
Chocolatey — like yum or apt-get, but for Windows
You can just call me choco.
- Build Status
- Chat Room
- Support Chocolatey!
- See Chocolatey In Action
- Etiquette Regarding Communication
- Information
- Documentation
- Requirements
- License / Credits
- Submitting Issues
- Contributing
- Committers
- Compiling / Building Source
- Windows
- Other Platforms
- Prerequisites:
- Before building:
- Build Process:
- Testing
- Installing on Other Platforms:
- Compiling / Building Source
- Credits
Build Status
| GitHub Action |
|---|
Chat Room
Come join in the conversation about Chocolatey in our Community Chat Room.
Please make sure you’ve read over and agree with the etiquette regarding communication.
Support Chocolatey!
- Purchase Chocolatey Pro / Chocolatey for Business
See Chocolatey In Action
Chocolatey FOSS install showing tab completion and refreshenv (a way to update environment variables without restarting your shell):

Chocolatey Pro showing private CDN download cache and virus scan protection:

Etiquette Regarding Communication
If you are an open source user requesting support, please remember that most folks in the Chocolatey community are volunteers that have lives outside of open source and are not paid to ensure things work for you, so please be considerate of others’ time when you are asking for things. Many of us have families that also need time as well and only have so much time to give on a daily basis. A little consideration and patience can go a long way. After all, you are using a pretty good tool without cost. It may not be perfect (yet), and we know that.
If you are using a commercial edition of Chocolatey, you have different terms! Please see support.
Information
- Chocolatey Website and Community Package Repository
- Mailing List / Release Announcements Only Mailing List / Build Status Mailing List
- Twitter / Facebook / GitHub
- Blog / Newsletter
- Documentation / Support
Documentation
Please see the docs
Give choco.exe -? a shot (or choco.exe -h). For specific commands, add the command and then the help switch e.g. choco.exe install -h.
Requirements
- .NET Framework 4.8+
- PowerShell 2.0+
- Windows Server 2008 R2+ / Windows 10+
- See our documentation on the support lifecycle and supported operating systems for additional information
License / Credits
Apache 2.0 — see LICENSE and NOTICE files.
Submitting Issues

- If you are having issue with a package, please see Request Package Fixes or Updates / Become a maintainer of an existing package.
- If you are looking for packages to be added to the community feed (aka https://community.chocolatey.org/packages), please see Package Requests.
- Start with Troubleshooting and the FAQ to see if your question or issue already has an answer.
- If not found or resolved, please follow one of the following avenues:
- If you are a licensed customer, please see support. You can also log an issue to Licensed Issues and we will submit issues to all other places on your behalf. Another avenue is to use email support to have us submit tickets and other avenues on your behalf (allowing you to maintain privacy).
- If it is an enhancement request or issue with the website (the community package repository aka https://community.chocolatey.org), please submit the issue to the Chocolatey.org repo.
- If you have found an issue with the GUI (Chocolatey GUI) or you want to submit an enhancement, please see the ChocolateyGUI repository.
- If you have found an issue with the client (choco.exe), you are in the right place. Keep reading below.
Observe the following help for submitting an issue:
Prerequisites:
- The issue has to do with choco itself and is not a package or website issue.
- Please check to see if your issue already exists with a quick search of the issues. Start with one relevant term and then add if you get too many results.
- You are not submitting an «Enhancement». Enhancements should observe CONTRIBUTING guidelines.
- You are not submitting a question — questions are better served as emails or Community Chat questions.
- Please make sure you’ve read over and agree with the etiquette regarding communication.
Submitting a ticket:
- We’ll need debug and verbose output, so please run and capture the log with
-dvor--debug --verbose. You can submit that with the issue or create a gist and link it. - Please note that the debug/verbose output for some commands may have sensitive data (passwords or API keys) related to Chocolatey, so please remove those if they are there prior to submitting the issue.
- choco.exe logs to a file in
$env:ChocolateyInstall\log\. You can grab the specific log output from there so you don’t have to capture or redirect screen output. Please limit the amount included to just the command run (the log is appended to with every command). - Please save the log output in a gist (save the file as
log.sh) and link to the gist from the issue. Feel free to create it as secret so it doesn’t fill up against your public gists. Anyone with a direct link can still get to secret gists. If you accidentally include secret information in your gist, please delete it and create a new one (gist history can be seen by anyone) and update the link in the ticket (issue history is not retained except by email — deleting the gist ensures that no one can get to it). Using gists this way also keeps accidental secrets from being shared in the ticket in the first place as well. - We’ll need the entire log output from the run, so please don’t limit it down to areas you feel are relevant. You may miss some important details we’ll need to know. This will help expedite issue triage.
- It’s helpful to include the version of choco, the version of the OS, and the version of PowerShell (Posh) — the debug script should capture all of those pieces of information.
- Include screenshots and/or animated gifs whenever possible, they help show us exactly what the problem is.
Contributing
If you would like to contribute code or help squash a bug or two, that’s awesome. Please familiarize yourself with CONTRIBUTING.
This project uses an .editorconfig file in order to help maintain consistency of code.
Errors and warnings produced by not following these defined conventions will in future be enforced at build time, so ensure your contributions adhere to the rules defined in it and produce no warnings or errors in Visual Studio.
Committers
Committers, you should be very familiar with COMMITTERS.
Compiling / Building Source
There is a build.bat/build.sh file that creates a necessary generated file named SolutionVersion.cs. It must be run at least once before Visual Studio will build.
Windows
Prerequisites:
The following are a minimum set of requirements to successfully complete the build process:
- .NET Framework 4.8
- .NET Framework 4.8 Dev Pack
- Visual Studio 2019 or Visual Studio 2019 Build Tools
- .NET SDK (i.e. ability to install .NET Global tools using
dotnet tool install)
There is a setup.ps1 file at the root of this repository, which can be used to install all of the above.
Build Process:
- Run
build.bat.
Important
It is assumed that Chocolatey CLI is installed on the machine where you are running the build, as this is required to generate the final Chocolatey package.
If required, you can skip the creation of the Chocolatey packages using the --shouldRunChocolatey option, i.e. .\build.bat --shouldRunChocolatey=false
Running the build on Windows should produce an artifact that is tested and ready to be used.
Other Platforms
Prerequisites:
- Install and configure Mono. Mono 6.6 or newer should work, see
docker/Dockerfile.linuxfor the currently recommended version of Mono.- Linux systems; see Mono install instructions for Linux
- Mac systems; see Mono install instructions for Mac
- Install .NET 6.0 SDK or newer. This is used in the build scripts.
- Linux systems; see Install .NET on Linux
- Mac systems; see Install .NET on macOS
- This is required for some Dotnet Global Tools used during the Cake build. The .NET Frameworks equivalent builds do not work on Mono.
- If building from Git, then having Git 2.22+ installed is required.
- MonoDevelop is helpful for working on source.
Before building:
- Consider adding the following to your
~/.profile(or other relevant dot source file):
# Mono
# http://www.michaelruck.de/2010/03/solving-pkg-config-and-mono-35-profile.html
# https://cloudgen.wordpress.com/2013/03/06/configure-nant-to-run-under-mono-3-06-beta-for-mac-osx/
export PKG_CONFIG_PATH=/opt/local/lib/pkgconfig:/Library/Frameworks/Mono.framework/Versions/Current/lib/pkgconfig:$PKG_CONFIG_PATH
- Set your permissions correctly:
Build Process:
- Run
./build.sh.
Running the build on Mono produces an artifact similar to Windows but may have more rough edges. You may get a failure or two in the build script that can be safely ignored.
Testing
The Chocolatey CLI codebase contains a number of different tests, including unit, integration, and end-to-end tests.
These are all documented in the TESTING.md file.
The unit and integration tests are NUnit tests, which can be executed directly within Visual Studio, or as part of the build process.
The end-to-end tests use Pester as the test framework. Since these tests have the potential to actually make changes to your system, we recommend using the provided Vagrant file to run these tests in a dedicated virtual machine.
Installing on Other Platforms:
- Get a copy of the source code and build.
- Copy (or link) the contents of
./code_drop/temp/_PublishedApps/chocoto your preferred install directory. On Linux, the preferred directory is/opt/chocolatey - Export the
ChocolateyInstallenvironment variable, pointing to the install directory the build output was copied too. - Copy
./docker/choco_wrapperto a directory on the$PATH, rename tochoco, and if the install directory is something else than/opt/chocolatey, then edit it to point to the correct path.
Credits
Chocolatey is brought to you by quite a few people and frameworks. See CREDITS (just LEGAL/Credits.md in the zip folder).
Сегодня я расскажу Вам о волшебстве. И это волшебство способно изменить жизнь системного администратора Windows раз и навсегда.
В наше время становится все меньше и меньше людей, которые хоть раз не устанавливали софт в среде Linux. Это невероятно просто: для установки midnight commander (mc), в среде RH (RedHat Enterprise, CentOS, Fedora, и т.д) нам всего лишь нужна пара «волшебных» команд:
# yum install mc
Менеджер пакетов yum позаботится о том, чтобы установилась самая свежая версия mc, а также о зависимостях пакета, если таковые имеются. Но что же делать, если в нашем распоряжении находится Windows, а мы хотим что-то подобное? Правильно, перейти на Linux или читать дальше!
Под моей «опекой» находится гетерогенная сеть из Windows и Linux машин (проще сказать — зоопарк), и вот уже около двух лет для установки софта под Win* я пользуюсь, где это возможно, Chocolatey. Chocolatey (chocolatey.org, github.com/chocolatey) — система управления пакетами, во многом схожая с apt-get или yum, но только для Windows.
На хабре уже касались темы Chocolatey в контексте разработчика, сегодня я хочу взглянуть на этот замечательный инструмент с точки зрения системного администратора. Chocolatey работает на основе технологии NuGet (активно используется разработчиками софта под Windows), и основная черта Chocolatey — пакеты чаще всего не содержат установочных файлов (setup.msi, setup.exe, и т.д…). Работает это следующим образом: в пакете находится скрипт-установщик на powershell, который скачивает и устанавливает нужную версию установочного файла из нужного места в интернете, а Вам остается только наслаждаться легкостью установки.
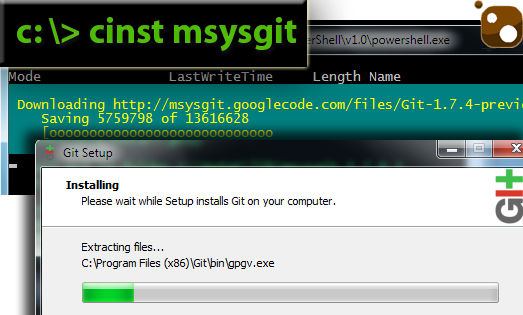
Установка Chocolatey
Прежде чем получить возможность использовать магию Chocolatey нам нужно установить ее ядро. Для этого запускаем в командной строке:
@powershell -NoProfile -ExecutionPolicy unrestricted -Command "iex ((new-object net.webclient).DownloadString('https://chocolatey.org/install.ps1'))" && SET PATH=%PATH%;%systemdrive%\chocolatey\bin
Эта команда скачает и запустит основной скрипт установки chocolatey.org/install.ps1, а также настроит требуемые переменные окружения. Теперь, когда у нас есть все необходимое давайте испытаем систему управления пакетами и установим Nodepad++. Достаточно выполнить следующую команду:
cinst notepadplusplus
Какие еще есть пакеты и откуда они берутся?
Как и NuGet, Chocolatey обладает внушительным списком пакетов, который располагается в репозитории, он же библиотека пакетов. Вот только некоторые из них:
Топ 10 самых популярных пакетов на chocolatey.org
- Git — 51191 скачиваний
- Notepad++ — 37533 скачиваний
- 7Zip — 37802 скачиваний
- Google Chrome — 25960 скачиваний
- Java Runtime — 25699 скачиваний
- NodeJS — 25542 скачиваний
- Mozilla Firefox — 20747 скачиваний
- Adobe Flash Player — 20660 скачиваний
- VLC Player — 20419 скачиваний
- Ruby 2.0 — 19587 скачиваний
Пакеты добавляются каждый день, ведь любой желающий может добавить свой пакет на chocolatey.org, главное чтобы он отвечал требованиям.
Требования к публикации пакетов
- Не публикуйте незаконные программы. Программы, которые незаконны в большинстве стран мира также запрещены к размещению на Chocolatey.org. Это также применимо к программам, которые нарушает авторские права, пиратские программы и «кряки». Помните, что это также касается программ которые используются для пиратства.
- Не пакуйте программы в chocolatey на которые у Вас нет прав на распространение. Пожалуйста, уточняйте правила распространения программного обеспечения и не нарушайте их.
- Не публикуйте вирусы либо любые другие программы наносящие вред.
- Публикуйте только те программы, которые будут полезны для других. Если Ваш пакет не относится к этой категории — не публикуйте его.
- Не публикуйте spyware или adware. Программы, которые поставляются с встроенными adware или spyware или любыми другими нерелевантными программами не разрешены для публикации. Обычно все нерелевантные программы можно исключить из установки используя ключи установщика. Примерами таких программ являются PDFCreator и CCleaner.
- Не публикуйте программы, которые уже опубликованы. Используйте поиск по Chocolatey.org. Если Вы хотите улучшить уже существующий пакет — свяжитесь с человеком, который поддерживает пакет или отправьте pull-request в его репозиторий.
- Не включайте другие программы в Ваш пакет, если для них уже есть свой пакет. Если Вашему пакету требуется те или иные программы, существующий пакет должен быть включен Вами в качестве зависимости.
- Разделяйте зависимости на несколько пакетов. Старайтесь разделить пакет на как можно больше пакетов. Например программа поставляется с опциональными модулями. Создайте дополнительные пакеты для модулей, вместо того, чтобы включать их в общий пакет. Эта идея уже давно применяется в пакетах под Linux по той причине, что это позволяет создавать легковесные пакеты и минимизирует шанс конфликта.
Как это работает?
Я хотел бы подробнее разобрать содержание пакетов Chocolatey на примере logstash, который я создавал специально для развертывания агента logstash на сервере Windows:
\logstash
  \tools
    chocolateyInstall.ps1
  logstash.nuspec
Здесь видно, что в пакете всего 2 файла: logstash.nuspec и chocolateyInstall.ps1.
logstash.nuspec — файл, в котором описывается мета-информация пакета
<?xml version="1.0"?>
<package xmlns="http://schemas.microsoft.com/packaging/2010/07/nuspec.xsd">
  <metadata>
    <id>logstash</id>
    <version>1.2.1.2013101701</version>
    <title>logstash</title>
    <authors>kireevco</authors>
    <owners>http://chocolatey.org/profiles/kireevco</owners>
    <projectUrl>https://github.com/kireevco/chocolatey-packages</projectUrl>
  <copyright>http://logstash.net</copyright>
    <iconUrl>http://logstash.net/images/logstash.png</iconUrl>
    <requireLicenseAcceptance>false</requireLicenseAcceptance>
    <description>Logstash is a tool for managing events and logs. You can use it to collect logs, parse them, and store them for later use (like, for searching). Speaking of searching, logstash comes with a web interface for searching and drilling into all of your logs. This package installs logstash flat jar as an agent service via nssm. All you need to do - is to configure your logstash.conf and start logstash service. Service is installed with these parameters: "java.exe -Xmx512M -jar logstash.jar agent --config logstash.conf --log logstash.log
"</description>
    <summary>Logstash Agent package</summary>
    <tags>logstash, logging</tags>
    <dependencies>
      <dependency id="javaruntime" version="7.0.0" />
      <dependency id="NSSM" version="2.16.0" />
      <dependency id="Chocolatey" version="0.9.8.20" />
    </dependencies>
  </metadata>
</package>
В этом файле будет интересно разобрать секцию dependencies, в которой мы указываем что нашему пакету необходимо наличие 3х других пакетов определенных версий, а именно javaruntime, NSSM (позволяет установить наш .jar файл в качестве службы Windows), а также Chocolatey определенной версии. Если какой-либо из необходимых пакетов отсутствует, либо его версия не соответствует требуемой — система зависимостей разрешит ситуацию и приведет все к требуемому виду. Стоит отметить, что для указания версий используется нотация nuget.
Powershell скрипт chocolateyInstall.ps1
#Указываем откуда скачивать jar файл
$url='https://download.elasticsearch.org/logstash/logstash/logstash-1.2.1-flatjar.jar'

#Указываем путь где будет раполагаться управляющий cmd файл
$cmdfile='c:/logstash/logstash.cmd'

#Указываем куда копировать конфигурационный файл
$confile = 'c:/logstash/logstash.conf.sample'
$dir='c:/logstash'

if (!(Test-Path -path $dir)) {New-Item $dir -Type Directory}

Get-ChocolateyWebFile 'logstash' 'c:/logstash/logstash.jar' $url $url
$cmdcontent = @"
set HOME=c:/logstash/sincedb
cd /d c:\logstash
java.exe -Xmx512M -jar logstash.jar agent --config logstash.conf --log logstash.log
"@
Set-Content $cmdfile $cmdcontent -Encoding ASCII

#Создаем тестовый конфиг
$confcontent = @"
input {
  stdin {}
}

output {
   stdout {}
}
"@
Set-Content $confile $confcontent -Encoding ASCII


if ($serviceinfo = Get-Service "Logstash" -ErrorAction SilentlyContinue)
{
  if ($serviceinfo.status -ne 'Running')
  {
    if ($serviceinfo.status -eq 'Stopped')
    {
      echo "Service found and is stopped. Deleting."
      echo "Delete Service"

      sc.exe \\localhost delete "Logstash"
      nssm install "Logstash" C:\logstash\logstash.cmd
    }
  }
  else
  {
    echo "Stop Service"
    sc.exe \\localhost stop "Logstash"
    echo "Delete Service"
    sc.exe \\localhost delete "Logstash"
    echo "Installing Service"
    nssm install "Logstash" C:\logstash\logstash.cmd

  }
}
else
{
  #Устанавливаем службу через nssm
  echo "Installing Logstash Service"
  nssm install "Logstash" C:\logstash\logstash.cmd
}
Применение:
Многие админы, вероятно, побежали тестировать функционал — оно и правильно, ведь ничего сложного в использовании Chocolatey нет — в этом-то и есть сладость Chocolatey. Тем не менее, хотелось бы предложить несколько сценариев использования этого менеджера пакетов для Windows.
Cmd и Powershell скрипты
Все мы используем простейшие скрипты в нашей работе, и chocolatey как нельзя лучше интегрируется в этот процесс. Простейший скрипт для обычной клиентской машины может выглядеть так:
cinst flashplayerplugin
cinst flashplayeractivex
cinst notepadplusplus
cinst sublimetext2
cinst 7zip
cinst GoogleChrome
cinst javaruntime
cinst Firefox
cinst flashplayerplugin
cinst adobereader
cinst ccleaner
cinst sysinternals
cinst putty
cinst filezilla
cinst dropbox
cinst skype
cinst paint.net
cinst virtualbox
cinst DotNet4.5
cinst Wget
cinst ConEmu
cinst libreoffice
cinst PDFCreator
cinst teamviewer
cinst wuinstall.run
Представьте сколько времени это экономит Вам?
Puppet
Я использую Puppet для управления конфигурацией своей инфраструктуры, что экономит мне массу времени и нервов. В Puppet есть замечательная концепция ресурсов, а также декларативный стиль, которые в купе помогают мыслить абстрактно, на уровне «Какая программа должна стоять на том или ином сервере», а не на уровне «Какие комманды я должен запустить на Windows, а какие на Linux». Для Puppet существует провайдер Chocolatey, который позволяет нам сделать следующее:
package { "7zip" :
    ensure => installed,
}
или
package { "notepadplusplus" :
    ensure => 1.0,
}
Обо всем остальном позаботятся Puppet и Chocolatey. Поверьте, это намного удобнее чем производить установку из msi файла, который нужно еще где-то захостить, а также удостовериться что при обновлении версии (которое еще нужно сделать) старые версии тоже сохраняться и ничего при этом не сломается.
Chocolatey и Desktop
Предлагаю рассмотреть два способа использования Chocolatey для администрировании рабочих станций.
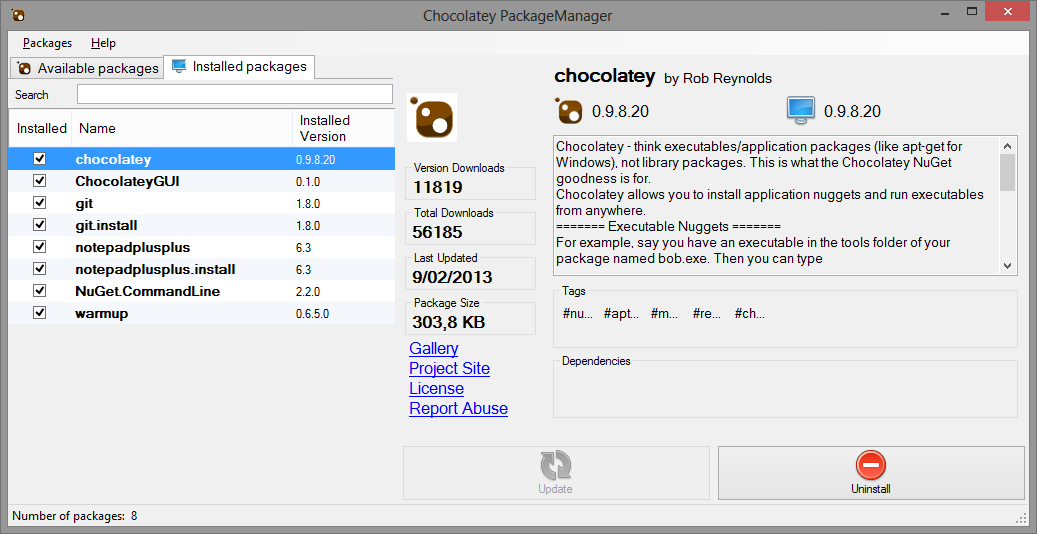
Chocolatey GUI
ChocolateyGUI — это графический интерфейс для системы управления пакетов Chocolatey. Удобный способ для обзора текущего состояния репозитория, а также состояния локально-установленных пакетов. Мне почему-то очень сильно напомнило раннюю версию synaptic или даже aptitude. Работает достаточно сносно. Установить его, кстати, можно из коммандной строки:
cinst ChocolateyGUI
Windows Post Install (WPI)
Можно пойти еще дальше, использовать интерфейс WPI для удобного выбора пакетов, в котором будут исполняться команды Chocolatey. При помощи WPI можно удобно группировать программы по категориям, а также создавать шаблоны и наборы установки.
Решение не всегда сможет стать абсолютной альтернативой использования USB-HDD в качестве источника, но заменив все возможные компоненты на аналогичные из репозитория Chocolatey Вы избавите себя от мучительного копирования образа (папки) с полным набором софта (Photoshop, Office, 3D Max с Архикадом, что там еще?) и оболочкой WPI (а все ради того, чтобы поставить «легкие» программы вроде Google Chrome, Notepad++, Avast и т.п.).
К примеру, для приходящих админов, поддерживающих разрозненный парк машин без централизованного хранилища удобно иметь что-то вроде такого списка шаблонов:
- Бизнес
- Бухгалтер
- Разработчк
- Домашний пользователь
- Медиа-Станция


Таким образом, WPI всего лишь является оболочкой для запуска команд Chocolatey, что позволяет уменьшить суммарный объем дистрибутива. Конечно, при таком подходе на клиентской машине уже должен быть рабочее интернет-подключение, что сегодня не является проблемой, за исключением отдельных случаев.
Возвращаясь к программам которые отсутствуют в репозитории Chocolatey.org, следует упомянуть, что Chocolatey поддерживает любые NuGet фиды, а не только предлагаемый по-умолчанию chocolatey.org. Заливаем важные файлы в DropBox и создаем свой пакет где-нибудь на www.myget.org — это очень просто!
Если кому интересно, могу рассказать в подробностях (в форме отдельного поста) как создать свой пакет и как загрузить его в репозиторий chocolatey.org, и о том, как я научил Windows устанавливать все обновления без моего участия (с перезагрузками и лицензиями), как я обновляю базу maxmind.dat в автоматическом режиме, как я использую logstash и многом другом, и все это не без помощи chocolatey и puppet!
В заключение скажу, что на мой взгляд, идея децентрализованной системы управления пакетам для Windows и ее реализация — очередной способ убедиться что в наши дни opensource и открытие технологии становится не менее качественными и применимыми к реалиям системного администрирования. Закрытый код все реже становится рыночным преимуществом того или иного сообщества / компании, в то время как реализация и поддержка играют огромную роль. Представить что десять лет назад открытый проект, созданный одним человеком сможет создать такой резонанс в широких кругах, да еще и Windows кругах — нереально, а сегодня Chocolatey — это еще один шанс окунуться в opensource сообщество и убедиться в открытой возможности внести свой вклад в общую идею.
На любые ошибки и неточности прошу указывать в комментариях, с удовольствием поправлю и дополню материал.
И под конец, небольшой опрос:
Только зарегистрированные пользователи могут участвовать в опросе. Войдите, пожалуйста.
При установке софта на клиентскую машину в качестве источника Вы обычно используете:
55.17% Сайты разработчиков (Microsoft.com, Abby.com, Adobe.com)64
45.69% Частично сайты разработчиков, частично из локального репозитория (USB HDD/Network Storage)53
17.24% Локальный репозиторий (USB HDD/Network Storage)20
14.66% Предустановленный в образе (WIM/Acronis/Ghost)17
3.45% Что-то еще (отпишитесь)4
Проголосовали 116 пользователей. Воздержались 30 пользователей.
From Wikipedia, the free encyclopedia
Chocolatey
| Original author(s) | Chocolatey Software, Inc. |
|---|---|
| Developer(s) | Chocolatey Software, Inc. |
| Initial release | 23 March 2011; 14 years ago |
| Stable release |
2.4.3[1] |
| Preview release |
2.3.0-beta-20240528[2] |
| Repository | github |
| Written in | C#,[3] XML,[3] shell script,[3] Ruby[3] |
| Operating system | Windows 7 / Windows Server 2008R2 and later |
| Type | Package management system |
| License | Apache License 2.0[4] |
| Website | chocolatey |
Chocolatey[5] is a machine-level, command-line package manager and installer for software on Microsoft Windows. It uses the NuGet packaging infrastructure and Windows PowerShell to simplify the process of downloading and installing software.[6]
The name is an extension on a pun of NuGet (from «nougat») «because everyone loves Chocolatey nougat».[7]
Compatible package manager
[edit]
In April 2014, Microsoft debuted OneGet (renamed PackageManagement on March 20, 2015) alongside PowerShell 5. It is a free and open-source package-provider manager, which provides a way to integrate other package managers into PowerShell. OneGet was pre-configured to browse the Chocolatey repository.[8][9]
- Windows Package Manager
- ^ «Release 2.4.3». 27 February 2025. Retrieved 23 March 2025.
- ^ «Release 2.3.0-beta-20240528». GitHub. 29 May 2024. Retrieved 30 May 2024.
- ^ a b c d «The Chocolatey Choco Open Source Project on Open Hub: Languages Page». Open Hub. Retrieved 2 May 2024.
- ^ «Chocolatey license». Chocolatey.org. 14 December 2021.
- ^ «Chocolatey Gallery». Chocolatey.org. Retrieved 7 March 2015.
- ^ Hanselman, Scott, «Is the Windows user ready for apt-get?», Hanselman, Scott, 28 May 2013. Retrieved 4 June 2014.
- ^ «Where Chocolatey Comes From», GitHub.com, 25 July 2011. Retrieved 5 June 2014.
- ^ Snover, Jeffrey, «Windows Management Framework V5 Preview» Archived 2022-08-17 at the Wayback Machine, Microsoft TechNet Windows Server Blog, 3 April 2014. Retrieved 5 June 2014.
- ^ Hoffman, Chris (3 August 2015). «How to Use PackageManagement (aka OneGet) on Windows 10». How-To Geek. Retrieved 2020-11-12.
- Official website
- Chocolatey on GitHub
Categories:
- C Sharp software
- Command-line software
- Free software programmed in C Sharp
- Package management systems
- Software using the Apache license
- Windows-only free software
- Installation software stubs
Last Updated :
23 Feb, 2024
Chocolatey is a package manager for Windows that gives you a command-line approach to install, update, and remove software. It makes managing software on a Windows PC easy and saves you time and effort.
In this article, we will show you how to install the Chocolatey package manager on Windows 11.
Prerequisites to Install Chocolatey Package Manager
- Windows 7 or later / Windows Server 2003 or later
- PowerShell v2 or later
- .NET Framework 4 or later
What is Chocolatey?
Chocolatey is a free, open-source package manager for Windows that works similarly to Apt or DNF on Linux. It is a program that installs software via the Windows command line, downloads and installs programs, checks for updates and installs them automatically when necessary.
Choco is a one-of-a-kind software management solution that enables users to create a software deployment package using PowerShell and deploy it using a variety of Windows tools such as Puppet, SCCM, Altiris, and Connectwise Automate.
Method 1: Install Chocolatey Package Manager Using PowerShell
Step 1: Press Win +S then on the search bar type «Powershell» and click on «Run as administrator«
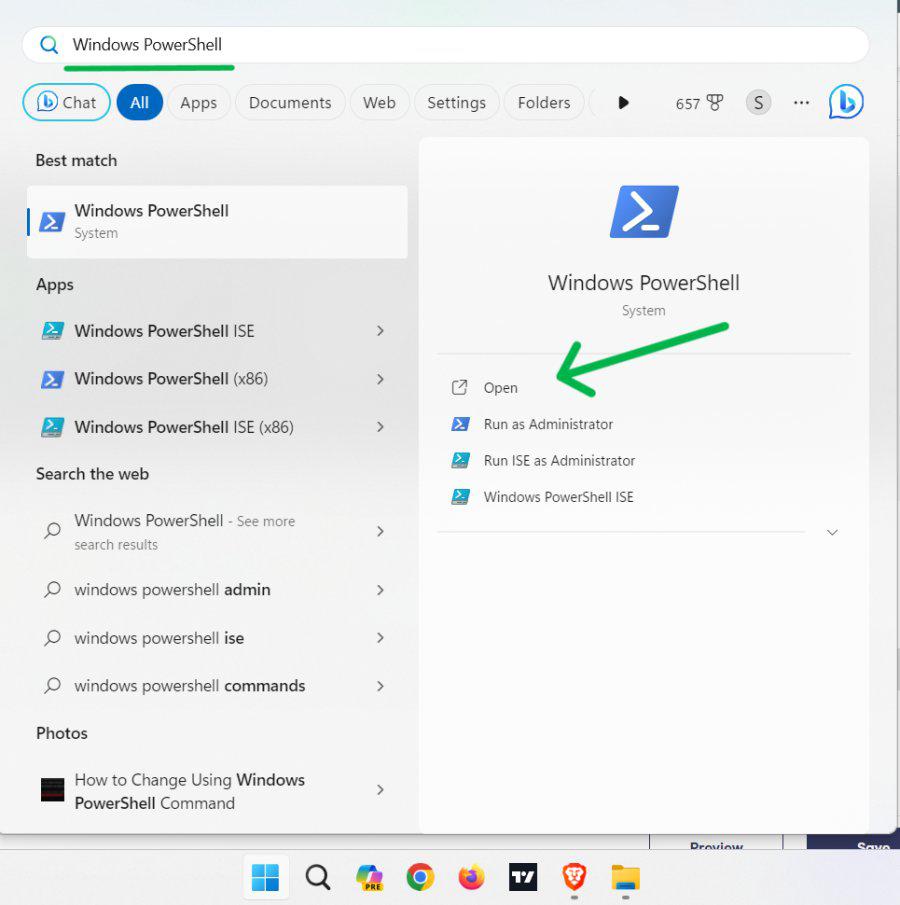
Step 2: Type each of these commands and press the Enter key after typing each one
Set-ExecutionPolicy AllSigned

Step 3: Wait for the script to finish running. you can confirm it by running the command in a new CMD or Powershell instance.
Step 4: After installing Chocolatey, you can confirm it by running the command in a new CMD or Powershell instance.
choco -v

Method 2: Install Chocolatey Package Manager Using Command Prompt
Step 1: Press Win +S then on the search bar type «CMD» and click on «Run as administrator«
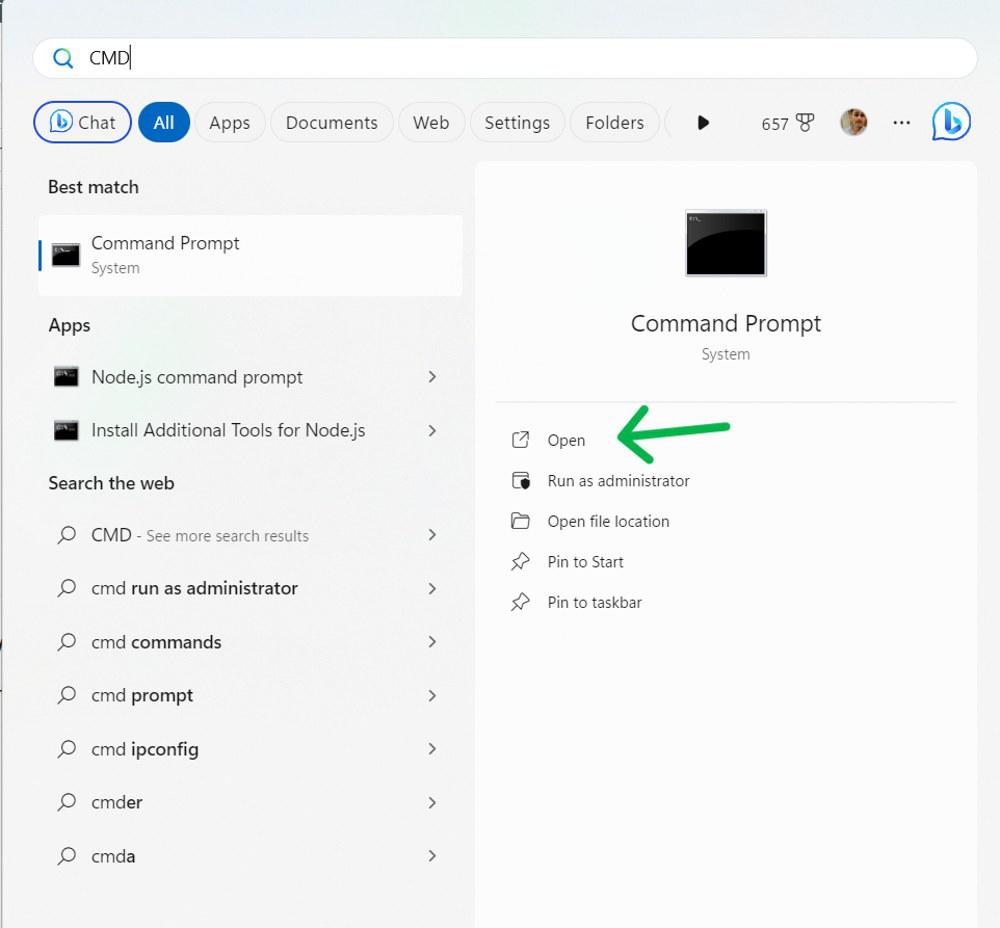
Step 2: Type the following command to install Chocolatey Package Manager
@"%SystemRoot%\System32\WindowsPowerShell\v1.0\powershell.exe" -NoProfile -InputFormat None -ExecutionPolicy Bypass -Command " [System.Net.ServicePointManager]::SecurityProtocol = 3072; iex ((New-Object System.Net.WebClient).DownloadString('https://chocolatey.org/install.ps1'))" && SET "PATH=%PATH%;%ALLUSERSPROFILE%\chocolatey\bin"

Step 3: Wait for the script to finish running. you can confirm it by running the command in a new CMD or Powershell instance.
Step 4: After installing chocolatey, you can confirm it by running the command in a new CMD or Powershell instance
choco -v
More Useful Software to Install with Chocolatey
- choco install vscode to install Visual Studio Code.
- choco install python to install Python.
- choco install nodejs to install Node.js.
- choco install Chrome to install Google Chrome
Conclusion
In Conclusion, We have demonstrated the process of installing Chocolatey, and the method of using it for the installation of some other valuable software on your Windows PC. Chocolatey is a useful package that can facilitate your software management and boost the speed of the process. You can see more packages at the Gallery and create your own packages if you want
Also Read
- How to use Chocolatey Choco to Install GIT on Windows?
- How to Install Git on Windows Using Chocolatey?
- How to Install Docker using Chocolatey on Windows
2021-01-18
·
2 мин. для прочтения
Наиболее популярным пакетным менеджером для Windows является Chocolatey.
Содержание
1 Ресурсы
- Домашняя страница: https://chocolatey.org/
- Репозиторий: https://github.com/chocolatey/choco
2 Установка Chocolatey
-
Порядок установки описан на странице https://chocolatey.org/install.
-
Установка проводится в PowerShell.
- PowerShell должен быть запущен с правами администратора.
- Проще всего запустить его комбинаций клавиш
Win+X.
-
Команда установки находится на странице https://chocolatey.org/install.
3 Дополнительные настройки
- Для того, чтобы установка происходила без запроса подтверждения, можно сделать следующую настройку:
choco feature enable -n=allowGlobalConfirmation - Обратно включить запрос подтверждения можно командой:
choco feature disable -n=allowGlobalConfirmation
4 Пакеты
- Список пакетов находится на странице https://chocolatey.org/packages.
- Список пакетов:
5 Работа с программным обеспечением
5.1 Сервисные функции
- Информация по ключам командной строки:
- Список пакетов в репозитории:
- Список установленных пакетов:
5.2 Установка пакета
- Для установки пакета нужно выполнить команду:
choco install package_name - Чтобы установить без запроса на подтверждение, следует добавить ключ
y:choco install package_name -y
5.3 Удаление пакета
- Для удаления пакета нужно выполнить команду:
choco uninstall package_name
5.4 Обновление пакетов
- Для обновления пакета нужно выполнить команду:
choco upgrade package_name - Для обновления всех установленных пакетов нужно выполнить команду:
5.5 Автоматическое обновление пакетов
- Для автоматического обновления пакетов используется пакет
choco-upgrade-all-at:choco install choco-upgrade-all-at - Обновление можно выполнить командой:
- Чтобы задать время обновления, нужно устанавливать с определёнными параметрами:
- если не указывать никаких параметров,
choco-upgrade-all-atпо умолчанию будет запускаться ежедневно в 2 часа ночи и прерываться в 4 часа ночи; - запуск
choco upgrade all -yежедневно (по умолчанию) в 23:00 и прерывание в 1:00 ( по умолчаниюABORTTIMEравно +2 часа):choco install choco-upgrade-all-at --params "'/TIME:23:00'" - запуск
choco upgrade all -yежедневно в 4:00 и прерывание в 8:00:choco install choco-upgrade-all-at --params "'/DAILY:yes /TIME:04:00 /ABORTTIME:08:00'" - запуск
choco upgrade all -yкаждое воскресенье в 1:00 и прерывание в 3:00:choco install choco-upgrade-all-at --params "'/WEEKLY:yes /DAY:SUN /TIME:01:00'"
- если не указывать никаких параметров,
- Параметры можно отредактировать, запустив команду:
choco-upgrade-all -EditConfig