
Встроенная утилита CHKDSK.exe (check disk) используется в Windows для проверки диска на ошибки. Сhkdsk проверяет файловую систему на физические и логические ошибки, находит поврежденные секторы (bad sectors) и исправляет найденные проблемы.
Содержание:
- Проверка и восстановление диска с помощью команды chkdsk
- Просмотр результатов проверки Chkdsk в Windows
Проверка и восстановление диска с помощью команды chkdsk
Чтобы проверить жесткий диск на ошибки, запустите командную строку с правами администратора и выполните:
chkdsk E: /F /R
Данная команда:
- Выполнит проверку диска E:\
- Исправит автоматически найденные ошиьки (/F)
- Попытаться восстановить данные при обнаружении поврежденных секторов, она попытается восстановить информации (/R).
Полная проверка диска может занять длительное время в зависимости от емкости носителя и количества файлов. После окончания проверки диска вы увидите подробную статистику диска, информацию о поврежденных секторах и файлах, предпринятых действиях по восстановлению.
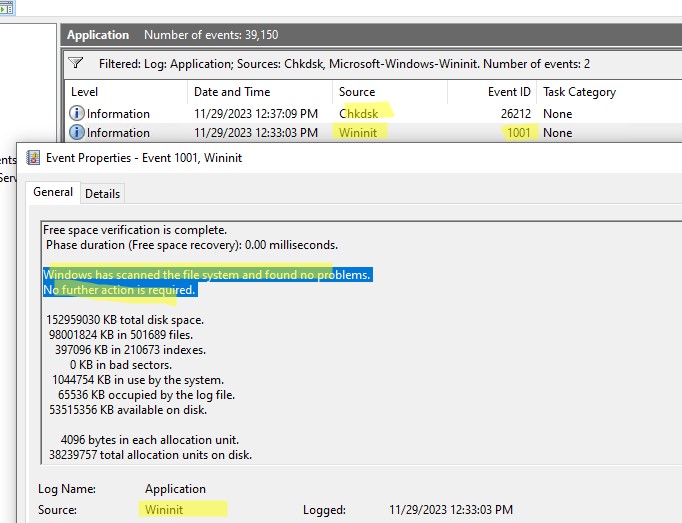
Если утилита chkdsk не обнаружила проблем на диске, появится сообщение:
Windows has scanned the file system and found no problems.
No further action is required.

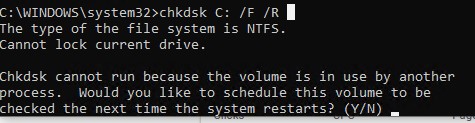
Утилита chkdsk не позволяет выполнить online проверку системного диска (C:\). При запуске команды chkdsk C: /F /R появится уведомление:
Cannot lock current drive. Chkdsk cannot run because the volume is in use by another process. Would you like to schedule this volume to be checked the next time the system restarts? (Y/N).
Невозможно выполнить команду Chkdsk, так как указанный том используется другим процессом. Следует ли выполнить проверку этого тома при следующей перезагрузке системы?
Чтобы запланировать проверку диска при следующей загрузке Windows, нажмите
Y
->
Enter
.
This volume will be checked the next time the system restarts
.
Чтобы отменить запланированную проверку диска, выполните:
chkntfs /x c:
Чтобы отключить топ перед проверкой, добавьте атрибут /X в команде chkdsk. В этом случае Windows принудительно закрое все открытые файловые дескрипторы, отмонтирует диск и выполнит проверку на ошибки.
Если вам нужно выполнить проверку большого NTFS тома, но вы не хотите блокировать диск, можно сначала просканировать диск на ошибки:
chkdsk E: /f /offlinescanandfix
Утилита найдет ошибки и сохранит их в файл $corrupt для дальнейшего исправления
Чтобы исправить найденные ошибки, не тратя время на полное сканирование тома, выполните:
chkdsk D: /spotfix
Это существенно сократит время недоступности тома для пользователя при исправлении ошибок.
В консоли PowerShell для проверки диска можно использовать командлет Repair-Volume как аналог команды chkdsk:
Repair-Volume -driveletter C -scan
Также рекомендуем перед проверкой проверить SMART состояние жестких дисков с помощью встроенных PowerShell командлетов из модуля управления дисками:
Get-PhysicalDisk | Sort Size | FT FriendlyName, Size, MediaType,SpindleSpeed, HealthStatus, OperationalStatus -AutoSize

Просмотр результатов проверки Chkdsk в Windows
Chkdsk при онлайн сканировании диска выводит результаты прямо в консоль. Если вы запланировали проверку диска при загрузке Windows, то результаты можно получить только из журнала событий Windows (Event Viewer).
- Откройте консоль Event Viewer (
Eventvwr.msc
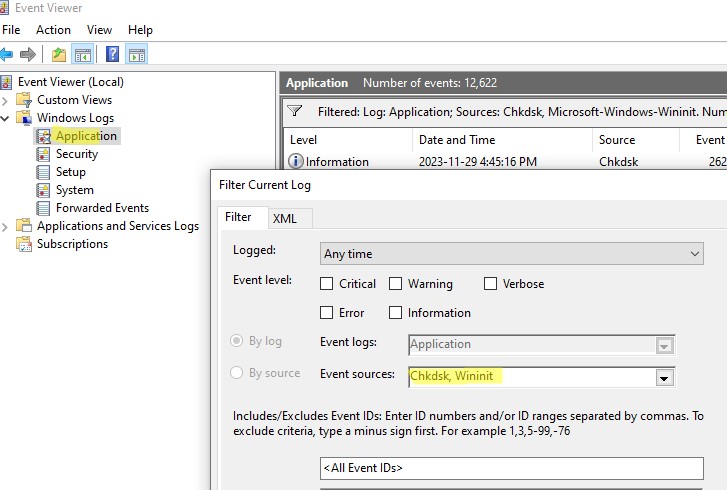
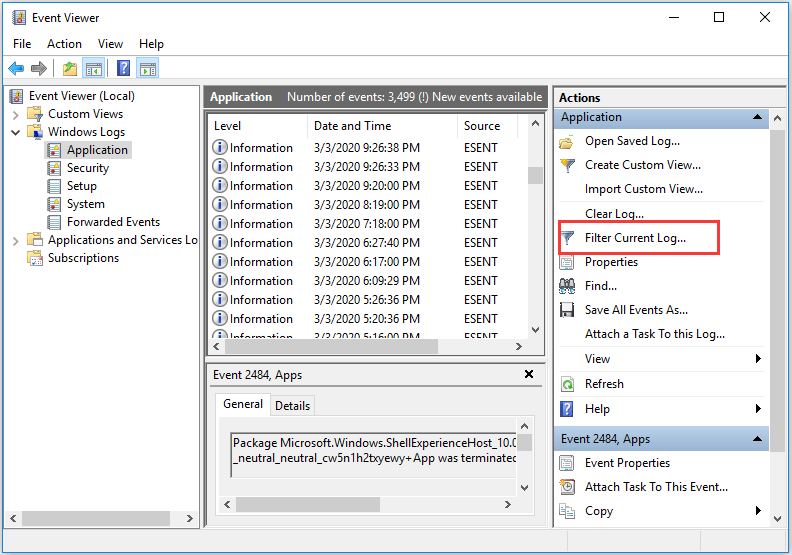
) и перейдите в раздел Windows Logs -> Application; - Щелкните правой клавишей по разделы Application и выберите Filter Current Log. В поле Event Source выберите Chkdsk и Wininit и нажмите ОК;

- Подробные результаты проверки диска содержатся в описании события. Обратите внимание, что у онлайн событий проверки диска будет указан источник Chkdsk. Если выполнялась офлайн проверка диска при загрузке Windows, у такого события будет источник Wininit и EventID 1001.

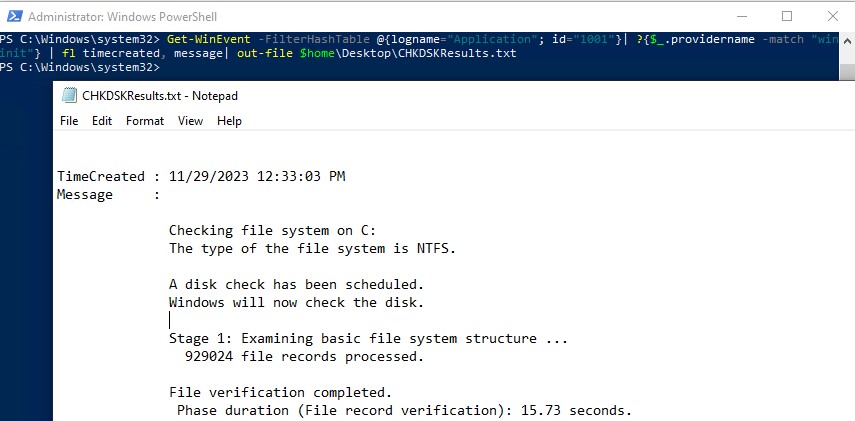
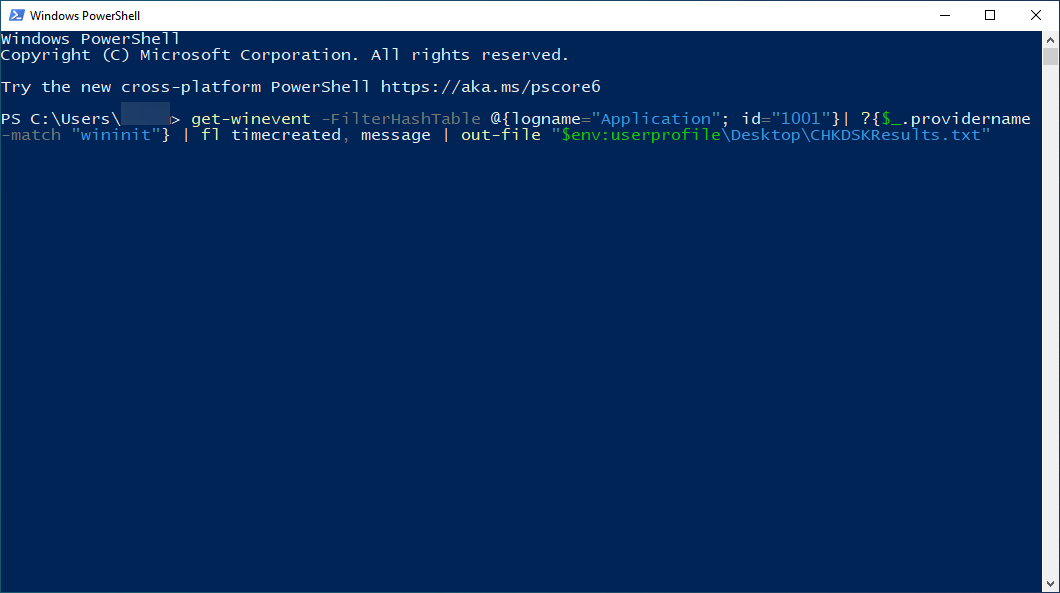
Можно получить лог проверки диска с помощью PowerShell командлета Get-WinEvent. Например, чтобы выгрузить результаты последних 5 проверок диска в текстовый файл CHKDSK_SCAN.txt на рабочем столе, выполните команду:
Get-WinEvent -FilterHashTable @{logname="Application"; id="1001"}| ?{$_.providername –match "wininit"} | fl timecreated, message| out-file $home\Desktop\CHKDSKResults.txt
Открыть полученный файл с логом chkdsk:
notepad.exe $home\Desktop\CHKDSKResults.txt
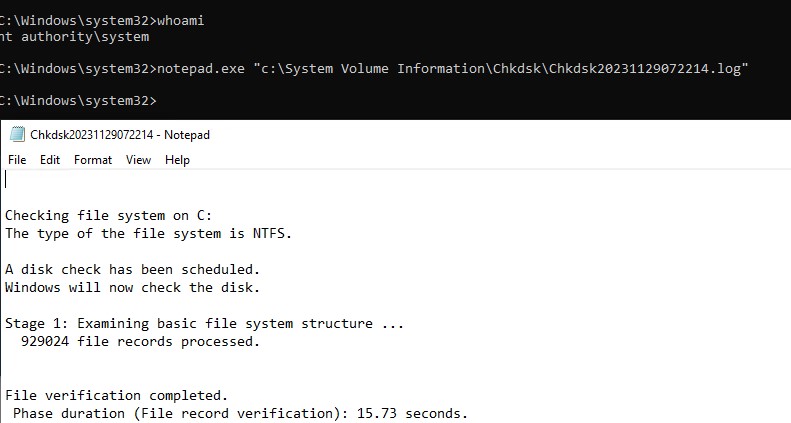
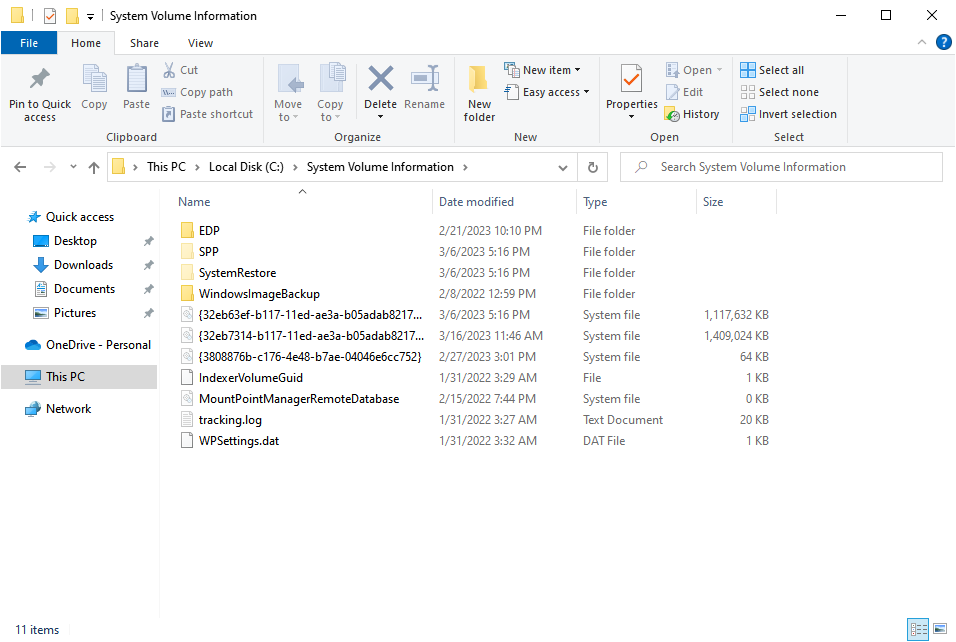
Если размер лога Chkdks очень большой, журнал событий может обрезать его. В этом случае можно открыть полный лог проверки диск в System Volume Information. Чтобы получить доступ к этой папке, нужно запустить командную строку от имени SYSTEM (проще всего с помощью утилиты psexec):
.\PsExec.exe -i -s cmd.exe
После этого можно открыть лог chkdsk:
notepad.exe "c:\System Volume Information\Chkdsk\Chkdsk20231129072214.log"
Readers help support Windows Report. We may get a commission if you buy through our links.
Read our disclosure page to find out how can you help Windows Report sustain the editorial team. Read more
Chkdsk or Check Disk is a built-in utility for disk repairs in Windows and is often the first used by users. After each scan, it creates a log file detailing the collected information. This concerns users and they have been asking where are Chkdsk logs stored in Windows 10.
The log files are critical for various reasons, whether to identify or eliminate the problem. And that cannot be done until you can access the log file in a readable format. That’s what we will be helping you with today. So, let’s find out the Chkdsk log file location in Windows 7 and later iterations.
What is the location of chkdsk logs?
If you have been trying to figure out where the Chkdsk logs are stored in Windows 10, it’s the System Volume Information folder on the system drive, usually the C: drive. The folder also contains other critical information and is the Chkdsk log location in Windows 11 as well.
But you can’t access the Chkdsk logs in File Explorer since the files here are protected and not accessible under default settings. Also, we don’t recommend changing these since you can have Chkdsk output to file or view them in the Event Viewer. Let’s find out how.
How do I view Chkdsk logs in Windows 10?
1. With Event Viewer
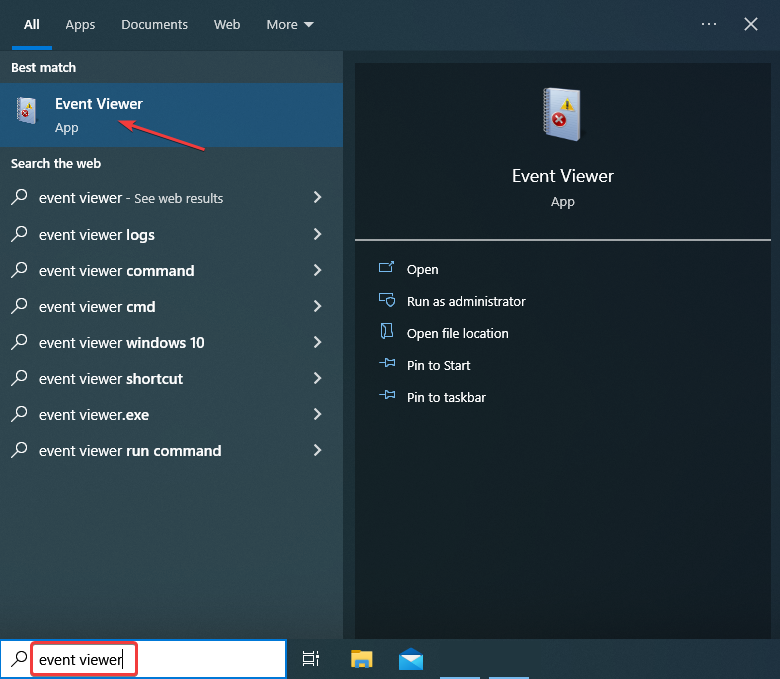
- Press Windows + S to open the Search menu, type Event Viewer in the text field, and click on the relevant result.

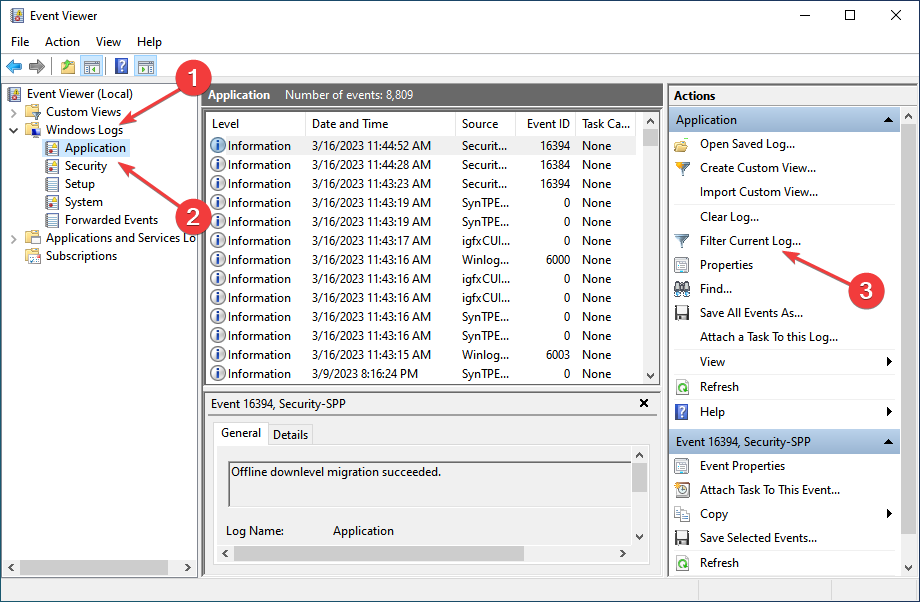
- Expand Windows Logs from the navigation pane, select Applications under it, and then click on Filter Current Log on the right.

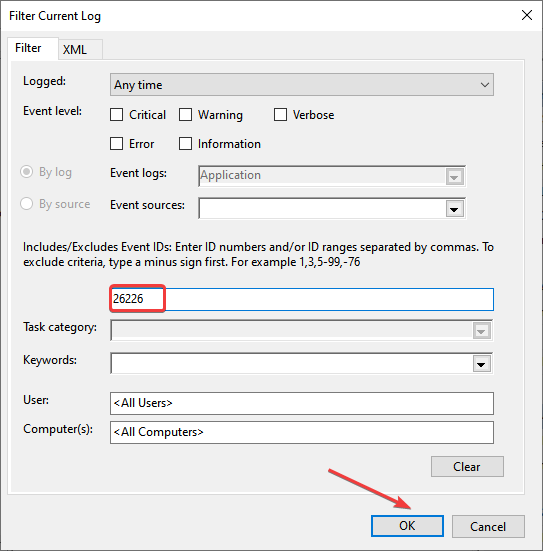
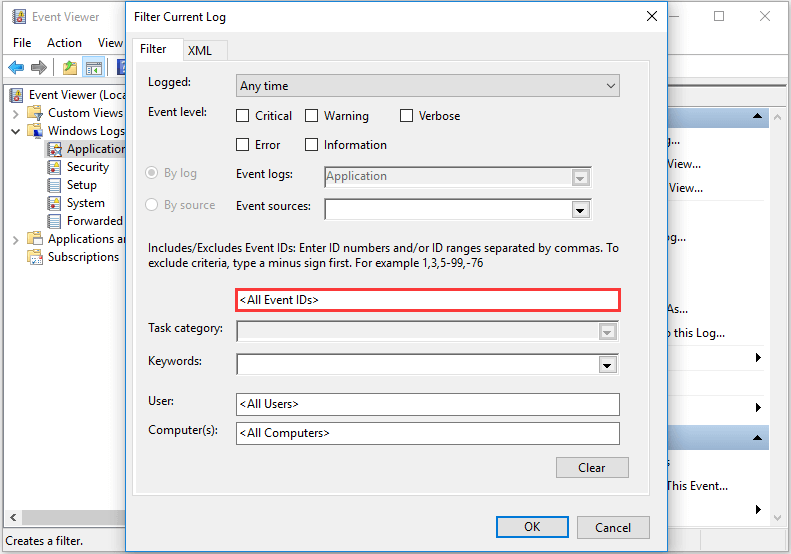
- Enter 26226, the event ID for Check Disk, in the All Event IDs text field, and click OK.

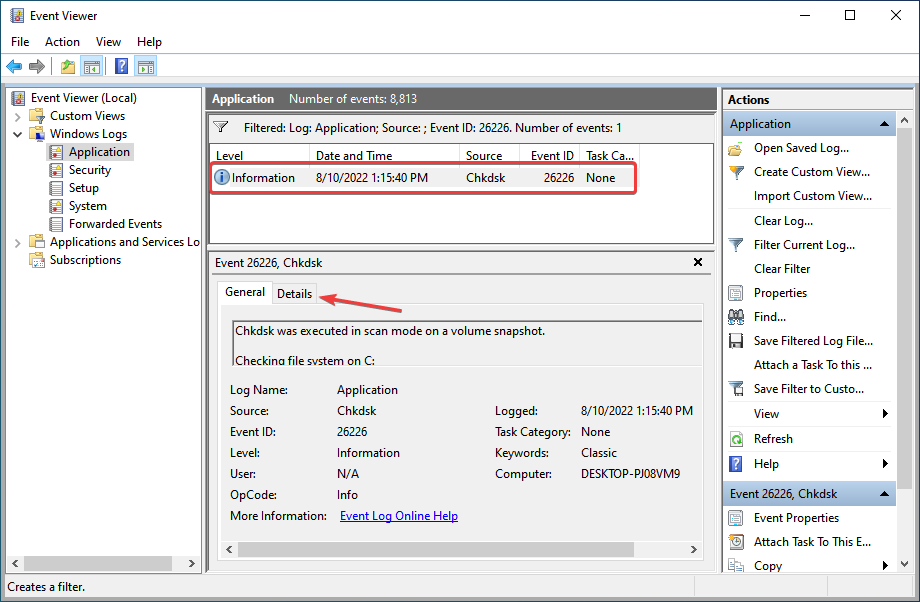
- All the Chkdsk logs will now be listed. You can click on one to see a brief overview in the General tab or head to the Details tab for a comprehensive result.
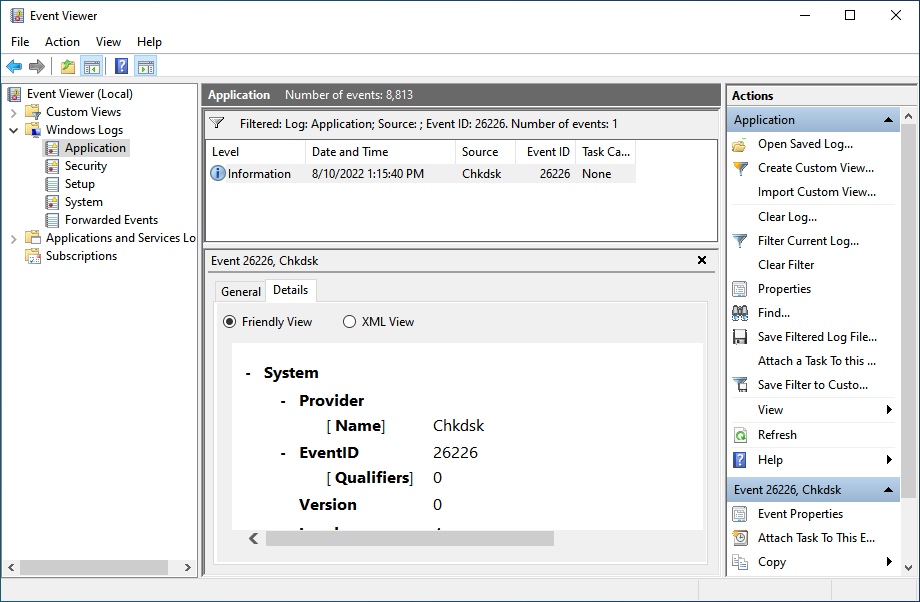
- You can now view the Chkdsk log in Friendly View and XML View.
Using the Event Viewer to view Chkdsk logs is probably the simplest way. But if you find that Chkdsk log is not in Event Viewer, there’s another method to export the file.
2. Via PowerShell
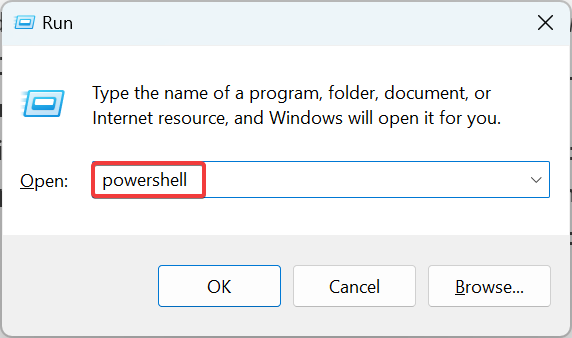
- Press Windows + R to open Run, type powershell in the text field, and then hit Enter.

- Click Yes in the UAC prompt.
- To export the Chkdsk log as a text file to the desktop, execute this command:
get-winevent -FilterHashTable @{logname="Application"; id="1001"}| ?{$_.providername -match "wininit"} | fl timecreated, message | out-file "$env:userprofile\Desktop\CHKDSKResults.txt"
- Go to the desktop, and open the CHKDSKResults.txt file to view the logs.


That’s it! You now know where are Chkdsk logs stored in Windows 10, how to access them, and view the detailed results. Also, the same information applies to the Chkdsk log file location on Windows Server 2012; you can access these from the Event Viewer.
And while you are here, do not forget to check some quick tips to improve your PC’s performance.
For any other questions and suggestions, don’t hesitate to reach for the comments section below.
Matthew Adams
Windows Hardware Expert
Matthew is a freelancer who has produced a variety of articles on various topics related to technology. His main focus is the Windows OS and all the things surrounding it.
He is passionate about the tech world, always staying up-to-date with the latest and greatest. With an analytical view, he likes problem-solving, focusing on errors and their causes.
In his free time, he likes to read and write about history and tries to always develop new skills.
-
Home
-
News
- How to Open Chkdsk Log Windows 10? – 2 Ways
By Tina |
Last Updated
Chkdsk is a very common tool to check disk when there are problems on the hard drive. However, after running the chkdsk command, do you know where the chkdsk log is located or do you know how to find the chkdsk log location? This post from MiniTool will show you 2 ways to find chkdsk log Windows 10.
Chkdsk, also known as the check disk, is a Windows built-in tool. You can run the chkdsk tool via the Command Line window or with the Scan Disk option in Windows. The chkdsk might also start scanning automatically during system boot-up from some users.
The chkdsk tool is used to scan the file system of the hard drive on your laptop or desktop computers. If it finds the file system errors, it will repair them. In addition, the chkdsk tool can also be used to scan and repair the bad sectors on hard drive. Therefore, the chkdsk tool is a system maintenance utility.
2 Ways to Open Chkdsk Log Windows 10
Chkdsk retains the logs that provide an overview of the scans and any fixes applied. In general, the chkdsk log location is in the System Volume Information folder on the C drive. However, the System Volume Information is a concealed folder and it will not be displayed on the File Explorer.
Meanwhile, if you want to see the chkdsk log Windows 10, what can you do? Hence, in the following section, we will show you how to view the chkdsk log.
Open Chkdsk Log via Event Viewer
1. Type Event Viewer in the search box of Windows and choose the best-matched one.
2. Then open it.
3. In the pop-up window, select Windows Logs > Application on the left panel to continue.
4. On the right panel, choose Filter Current Log.
5. In the pop-up window, enter 26226 in the All Event IDs text box.
6. Click OK to continue.
7. After that, click information to view chkdsk log details.
So, in order to view the chkdsk log Windows 10, you can try the above instructions.
Open Chkdsk Log via PowerShell
Besides viewing chkdsk log via Event Viewer, you can also choose to open chkdsk log via PowerShell.
Now, here is the tutorial.
- Open PowerShell as administrator.
- Then input this command to display the latest chkdsk log in PowerShell: get-winevent -FilterHashTable @{logname=”Application”; id=”1001″}| ?{$_.providername –match “wininit”} | fl timecreated, message and hit Enter to continue.
- In order to get a text file of that chkdsk log, type the following command: get-winevent -FilterHashTable @{logname=”Application”; id=”1001″}| ?{$_.providername –match “wininit”} | fl timecreated, message | out-file DesktopCHKDSKResults.txt and hit Enter to continue.
With this method, you can view the chkdsk log in the PowerShell window or choose to export the chkdsk log as a text file. So, you can choose either of them to view chkdsk log Windows 10. These chkdsk logs will show you the five stages of the check disk scans and any fixes applied to the file system.
Final Words
In conclusion, the chkdsk tool is a Windows built-in tool which can be used to scan and repair corrupted file systems or bad sectors on hard drive. If you want to know what fixes have been applied to the system, you can open chkdsk log. This post has shown two 2 ways to open chkdsk log Windows 10.
About The Author
Position: Columnist
Tina is a technology enthusiast and joined MiniTool in 2018. As an editor of MiniTool, she is keeping on sharing computer tips and providing reliable solutions, especially specializing in Windows and files backup and restore. Besides, she is expanding her knowledge and skills in data recovery, disk space optimizations, etc. On her spare time, Tina likes to watch movies, go shopping or chat with friends and enjoy her life.
Download Windows Speedup Tool to fix errors and make PC run faster
We run ChkDsk on our computer systems to find and fix the errors. After completing the scanning, the chkdsk results are saved in Event Viewer. You can read the chkdsk results in the Event Viewer with some clicks. In the case of corruption, sudden power failure, etc., Windows executes the chkdsk command automatically and checks the system for errors. Besides this, you can also schedule the chkdsk in Windows 11/10 for disk error checking. The chkdsk utility in Windows 11/10 fixes various performance issues and makes the system run smoothly.
Windows saves the chkdsk results in Event Viewer so that the user can read them and take additional troubleshooting steps. But many users do not know how to read the Event Viewer Log for Check Disk on a Windows machine. In this article, we will show you the steps that help you find the chkdsk results in Event Viewer logs.
Where is Chkdsk Log File location?
Chkdsk logs are stored in the System Volume Information folder on the system drive in Windows 11/10.
We will use the following two methods to view the Event Viewer logs for chkdsk:
- Using the Event Viewer app on Windows.
- Using the Windows PowerShell.
1] Reading ChkDsk results using the Event Viewer app
Follow the below-listed steps.
1] Type “Event Viewer” in the Windows search box and click on the app to launch it.
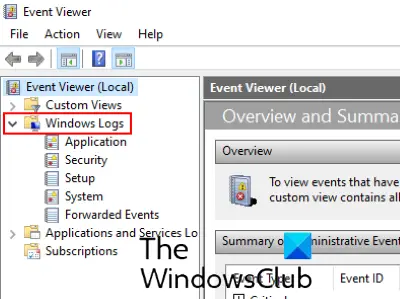
2] In the Event Viewer app, expand the “Windows Logs” section in the left panel.
3] Now, right-click on the “Application” option and click “Filter Current Log.”
3] In the Event Sources drop-down menu, select the checkboxes for “chkdsk” and “wininit.” When you are done, click OK.

After performing these steps, you will be able to view the chkdsk results in the Event Viewer center panel.
Select a particular log and its details will be available in the bottom center panel.
2] Viewing ChkDsk results using the PowerShell
Let’s see the steps to view chkdsk results using the Windows PowerShell.
1] Type PowerShell in the Windows search box and click on the Windows PowerShell app.
2] In the PowerShell window, type the following command and press the Enter key to execute it.
get-winevent -FilterHashTable @{logname="Application"; id="1001"}| ?{$_.providername –match "wininit"} | fl timecreated, message
This will show you the chkdsk logs.
3] You can also export the chkdsk logs in the text file. For this, type the following command in the PowerShell and hit Enter.
get-winevent -FilterHashTable @{logname="Application"; id="1001"}| ?{$_.providername –match "wininit"} | fl timecreated, message | out-file Desktop\chkdsklog.txt
The file will be saved on your Desktop with the name “chkdsklog.”
Do note that the PowerShell command provides you only with the most recent chkdsk logs. Hence, if you want a detailed chkdsk log, please follow the first method listed in this article.
This is how you can find and view the chkdsk results in Event Viewer logs.
Related post that you may like to read: ChkDsk stuck at a particular % or hangs at some stage.
Nishant is an Engineering graduate. He has worked as an automation engineer in the automation industry, where his work included PLC and SCADA programming. Helping his friends and relatives fix their PC problems is his favorite pastime.
Reader Interactions
To find the Chkdsk log in Windows 10, follow these steps:
1. Open the Event Viewer: Press the Windows key + R to open the Run dialog box. Type «eventvwr.msc» (without quotes) and press Enter.
2. In the Event Viewer window, on the left-hand side, expand the «Windows Logs» section.
3. Click on «Application» to view the application logs.
4. In the middle pane, locate and click on «Wininit» (Windows Initialization) under the «Source» column.
5. Look for an entry with the «Chkdsk» keyword in the «General» tab on the right-hand side. You can identify it by the «Checking file system on C:» information or similar details.
6. Double-click on the Chkdsk entry to open a detailed view of the log.
7. In the Event Properties window, you can view the Chkdsk log details, including the operation, duration, and any errors or issues encountered during the disk check.
This method allows you to access and review the Chkdsk logs on Windows 10. It helps you diagnose and troubleshoot disk related problems, providing valuable information about the health and integrity of your system’s hard drive.
Video Tutorial: Where are CHKDSK logs stored in Windows 10?
Where does CHKDSK recover files to?
When CHKDSK (Check Disk) is run on a Windows computer to repair file system errors, it might recover files that were previously inaccessible. CHKDSK typically recovers these files by moving them to a specific folder called «Found» or «Found.000» on the affected drive. The specific location of this folder depends on the drive that is being scanned.
Here are the steps to locate where CHKDSK recovers files to:
1. Open File Explorer by right-clicking on the Start button, and then select «File Explorer» or by using the Windows key + E shortcut.
2. On the left-hand side of the File Explorer, locate and select the drive on which you ran CHKDSK.
3. In the address bar, enter the path of the specific drive. For example, if CHKDSK was run on the C: drive, type «C:» and press Enter.
4. Look for a folder named «Found» or «Found.000.» This is where CHKDSK stores the recovered files. Note that these folders might be hidden, so make sure you have enabled the option to show hidden files and folders in File Explorer. You can do this by going to the «View» tab in the File Explorer and checking the «Hidden items» box.
5. Open the «Found» or «Found.000» folder, and you should find the recovered files stored in numbered folders or with names like «File0000.chk» or similar.
It’s important to note that the recovered files might not retain their original names or folder structure. They could be renamed and placed in a single directory, making it necessary to manually sort through them to identify and organize the files you need.
Remember to always back up your important files before running CHKDSK or making any changes to your system to avoid potential data loss.
How do I open a CHKDSK file?
To open a CHKDSK file, follow these steps:
1. Ensure you have the necessary software: CHKDSK is not a file that can be directly opened or accessed by users. It is a system utility for checking and repairing file system issues on Windows computers. Therefore, you don’t actually open a CHKDSK file itself.
2. Run CHKDSK utility: CHKDSK (short for Check Disk) is a command-line tool that scans and verifies the integrity of the file system and file metadata on a disk. To run CHKDSK:
a. On Windows 10, right-click on the Start button and select «Command Prompt (Admin)» or «Windows PowerShell (Admin)«. On older versions of Windows, you can open the Command Prompt by pressing the Windows key + R, typing «cmd,» and hitting Enter.
b. In the opened Command Prompt or Windows PowerShell window, type the command: `chkdsk [drive letter]` and press Enter. Replace `[drive letter]` with the specific drive letter or location for the CHKDSK scan. For example, if you want to check the C: drive, use the command: `chkdsk C:`
c. The CHKDSK utility will scan the selected drive for errors or bad sectors and attempt to fix them automatically.
3. Review the results: After the CHKDSK scan completes, you can review the results displayed on the Command Prompt or Windows PowerShell window. It will provide information about any issues found, repaired files, and other details about the disk’s health.
Remember, CHKDSK is primarily used for system maintenance and repair, so it’s not directly meant for opening a specific file. If you’re trying to open a file with a .CHK extension, it likely indicates a recovered file from a disk scan rather than an actual file meant for direct access. In such cases, you may need to use file recovery software or consult with a data recovery expert to retrieve any valuable data.
Does CHKDSK fix corrupt files?
Yes, CHKDSK (Check Disk) can potentially fix corrupt files on a storage device such as a hard drive or SSD. Here’s how it works:
1. Identification of File System Errors: CHKDSK scans the file system for any errors like bad sectors, cross-linked files, or other issues that might result in file corruption.
2. File System Repair: If CHKDSK detects any errors in the file system, it attempts to repair them. This repair process involves reallocating data from bad sectors and fixing cross-linked files, which can help in resolving the corruption.
3. Recovery of Lost File Fragments: In some cases, CHKDSK might be able to recover and restore fragments of files that were previously inaccessible due to corruption. This can be especially helpful if the corruption was caused by physical issues on the storage device.
4. Salvaging Partially Corrupted Files: Sometimes, CHKDSK can salvage partially corrupted files by removing the corrupt portions or by recovering and replacing them with earlier versions stored in backup sectors.
However, it’s important to note that while CHKDSK is a useful tool, it might not always be able to fix severe file corruption or recover all lost data. Therefore, it’s essential to have regular backups in place and consider using specialized file recovery software if the files are extremely important.
Additionally, running CHKDSK without proper knowledge or understanding of its commands and parameters can potentially cause data loss or further damage. Therefore, it’s recommended to consult with a professional or follow detailed guides when using CHKDSK, especially if you’re not familiar with its usage.
Is there a log file for CHKDSK?
Yes, there is a log file for CHKDSK (Check Disk) utility in Windows operating systems. CHKDSK is a command-line tool used to check and repair file system errors on the hard drive. When you run CHKDSK, it automatically generates a log file that provides details about the file system scan, errors found, and fixes made.
The log file is stored in the Windows Event Log, specifically in the «Application» event log. You can access the Event Viewer tool in Windows to view the CHKDSK log. Here are the steps to access the log file:
1. Press the Windows key + R on your keyboard to open the Run dialog box.
2. Type «eventvwr.msc» and hit Enter to open the Event Viewer.
3. In the Event Viewer window, expand the «Windows Logs» section on the left-hand side.
4. Click on the «Application» log to view the application-related events.
5. Look for events with the source «Wininit» and event ID «1001.» These events indicate the completion of CHKDSK scans and include information about the scan results.
6. Double-click on the event to view the details and information provided in the log file.
Note: It’s important to know that the CHKDSK log file might not always be available or may get overwritten if you’ve run CHKDSK multiple times. Therefore, it’s recommended to save or export the log file if you require it for future reference or troubleshooting purposes.
By reviewing the CHKDSK log, you can gain insights into any issues or errors found during the file system scan, helping you identify and resolve disk-related problems on your Windows system.
How do I recover files after CHKDSK?
Recovering files after running CHKDSK can be a crucial task, especially if you have encountered data loss or corruption. Here are the steps you can take:
1. Check the CHKDSK log: After running CHKDSK, it generates a log file that records the actions taken during the scan. You can access this log by opening the Event Viewer and navigating to the «Application» category. Look for events with the source as «Wininit» or «Chkdsk» and check for any error messages or file details mentioned.
2. Check the Found.000 folder: When CHKDSK detects file system errors, it may create a folder named Found.000 (or similar) in the root directory of the affected drive. This folder contains fragments of files that couldn’t be linked to their original location. Open this folder and inspect its contents. It’s possible that your lost files might be present there.
3. Utilize file recovery software: If you cannot find your files using the above methods, you can turn to third-party data recovery software. Numerous tools are available that specialize in recovering lost or deleted files. Some popular options include Recuva, EaseUS Data Recovery Wizard, and MiniTool Power Data Recovery. Install one of these tools on a different drive, follow the software instructions, and perform a scan on the drive that underwent CHKDSK. Hopefully, the software will find and recover your lost files.
4. Seek professional data recovery services: If the above steps prove unsuccessful or you’re dealing with irreplaceable data, it might be necessary to consult a professional data recovery service. These services employ advanced techniques and hardware to recover data from damaged or inaccessible drives. Keep in mind that professional services can be costly and might require physically shipping your drive to their facility.
Remember, it’s essential to act promptly after running CHKDSK and experiencing data loss. Avoid any further modifications to the affected drive to prevent potential overwriting of the lost files.