
DHKDSK is the most common tool to check hard drives on Windows, but lots of users are confused about whether it is safe to run CHKDSK on SSD. Don’t worry. This post of MiniTool will explain it in detail and provide an effective way to check SSD.
A great many people suspect that CHKDSK is not beneficial to SSD. When opening the related forums and communities, you may find that there are many questions about the subject such as “does CHKDSK work on SSD”, “how safe is it to run CHKDSK on SSD”, etc. Here is a true example from the superuser forum:
I recently saw Windows 10 pops up with a warning message that I should run CHKDSK on my laptop. My laptop came with an SSD and I’m not sure if there are any negative implications to running CHKDSK on such a drive. Are there any potential issues with reporting “bad sectors” on the drive? How safe is it to run CHKDSK on my SSD drive? The model of SSD that I have is reported as “Samsung SSD PB22-JS3 2.5”.https://superuser.com/questions/209606/how-safe-is-it-to-run-chkdsk-on-an-ssd
Overview of CHKDSK and SSD
CHKDSK is a Windows built-in disk scan and repair utility that can run in Command Prompt to check and repair disk errors. This tool can create and display the drive status based on the partition file system. Besides, you can even run the CHKDSK command from a Windows installation disc when your computer can’t function well. Here’s how to check a hard drive using CHKDSK:
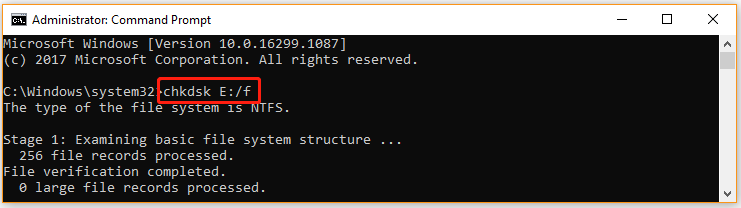
Step 1. Type cmd in the search box, and then right-click the Command Prompt app and select Run as administrator. Then click on Yes in the User Account Panel window to confirm it.
Step 2. In the elevated Command Prompt, type chkdsk E: /f and hit Enter. (Replace E with the drive letter that you want to check)
Tip: If you want to check and shield the bad sectors, type chkdsk /f /r command and hit Enter. Then type Y to continue this operation.
SSD is a storage device that uses integrated circuit assemblies as memory to store data. Compared with HDD, SSD doesn’t have any mechanical moving parts. Due to this feature, SSD owns more physical stability and faster data access speed. However, each memory bank of SSD has a finite lifespan, which limits the number of times that can be read and written from the system. So, SSD has a more limited lifespan.
With the time going by, the SSD may run into some errors that you have to check and repair. CHKDSK is commonly used to check hard drives, but a lot of people are skeptical about running CHKDSK on SSD. Is it safe to perform the CHKDSK SSD command? Let’s keep reading.
Is It Safe to Run CHKSDK on SSD
Does CHKDSK work on SSD? Of course, the answer is yes. However, many people reported that they encountered some issues after running the CHKDSK command on their C drive. For example, a user from Facebook Hub reported that his computer can’t start normally after running chkdsk c: /f from an elevated Command Prompt.
Thus, lots of people are confused if it is safe to run CHKDSK SSD Windows 10. In fact, the SSD CHKDSK command is not harmful. When running CHKDSK on SSD, the process does more reading than writing to the drive. Since the reading operation is so small and quick that it can be neglected completely, running the SSD CHKDSK command has little impact on the performance.
In addition, it is not necessary to run CHKDSK SSD Windows 10 regularly like performing it on a traditional HDD. This is because SSD owns advanced leveling and controlling technology, which can automatically detect and repair certain drive errors via the drive controller.
However, it is not recommended you run the SSD CHKDSK repair on your C drive because many people experience some problems after doing that. If you are also troubled by the issue after running the chkdsk c: /f command, you can try the following guide provided by Microsoft:
Step 1. Press the Win + I keys to open the Setting app, and then navigate to the Update & Security section.
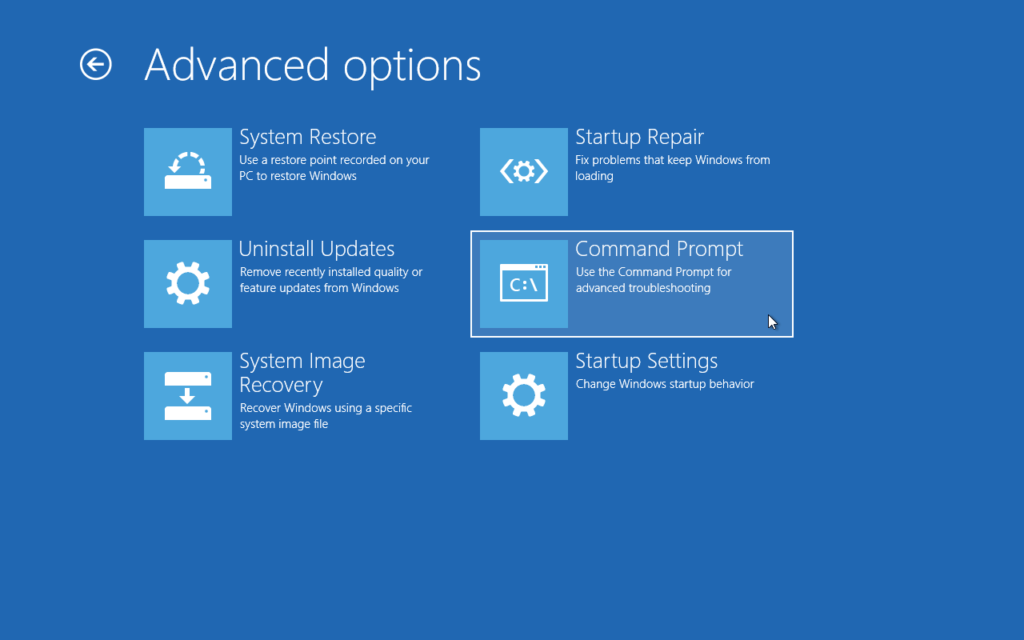
Note: If your computer can’t start normally, you need to use Windows 10 bootable media to start your computer. Once started, follow the on-screen prompts to operate until you arrive at the Install Now screen. Then click on Repair Your Computer, and click on Troubleshoot > Advanced Options > Command Prompt in order.
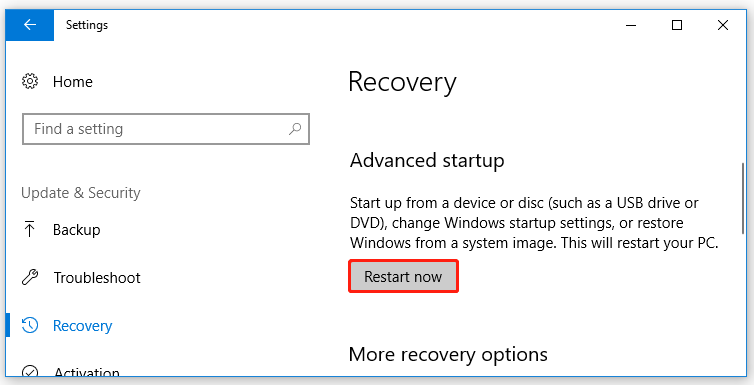
Step 2. Select Recovery from the left side, and go to the Advanced startup section and click on Restart now.
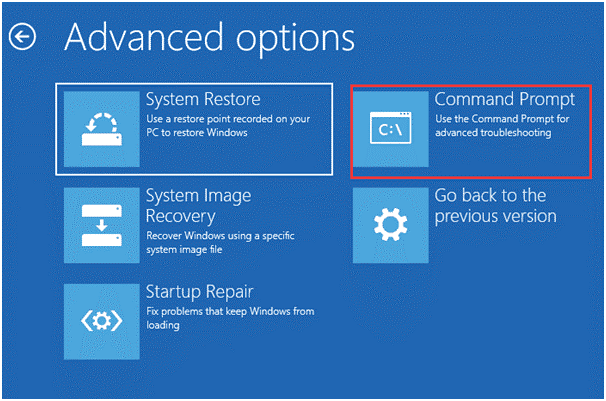
Step 3. In the pop-up window, select Troubleshoot > Advanced options > Command Prompt in order.
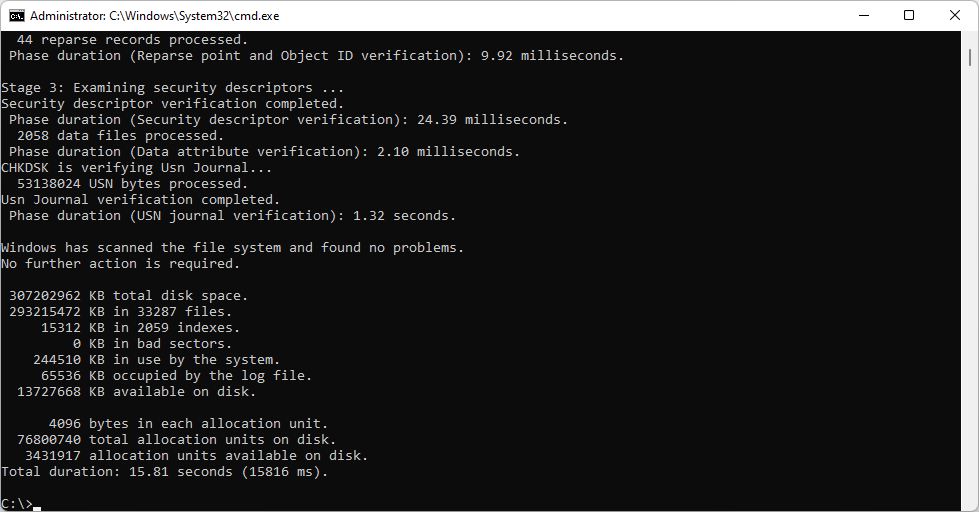
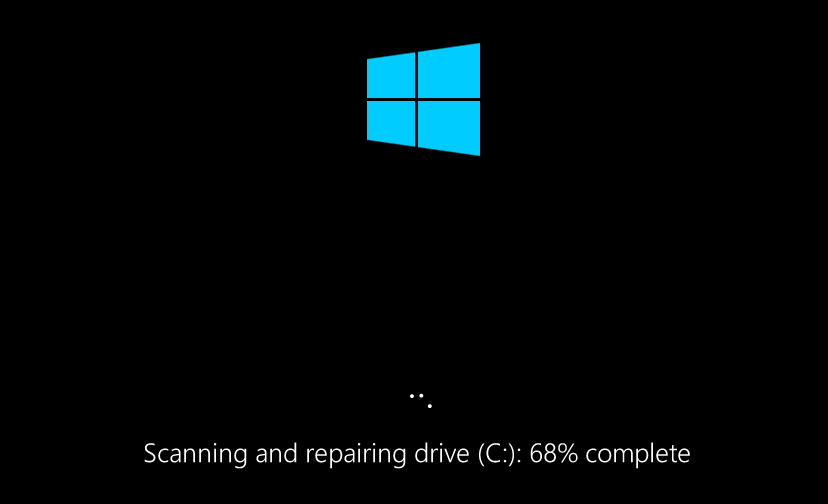
Step 4. Type chkdsk /f in the elevated command prompt and hit Enter.
Step 5. Wait for the CHKDSK utility to complete the scan. Once done, type Exit and hit Enter.
Step 6. Now, your computer should start up as expected. If it restarts into the Recovery Console, you can select Exit and start Windows 10.
CHKDSK can help you repair the logical hard drive errors, but it is not suitable for C drive on SSD and it can run into some issues like CHKDSK write-protected and CHKDSK not working. So, how to check SSD safely and effectively? Let’s keep reading.
How to Check SSD Windows 10 Effectively
Is there an effective way to check SSD? Yes, it is. Here we highly recommend you use MiniTool Partition Wizard. It is a powerful partition manager that can help you fix various errors such as Windows 10 Bootloader repair, WEI could not measure storage performance, HP stream low disk space, and so forth.
Here’s how to check SSD using MiniTool Partition Wizard.
MiniTool Partition Wizard FreeClick to Download100%Clean & Safe
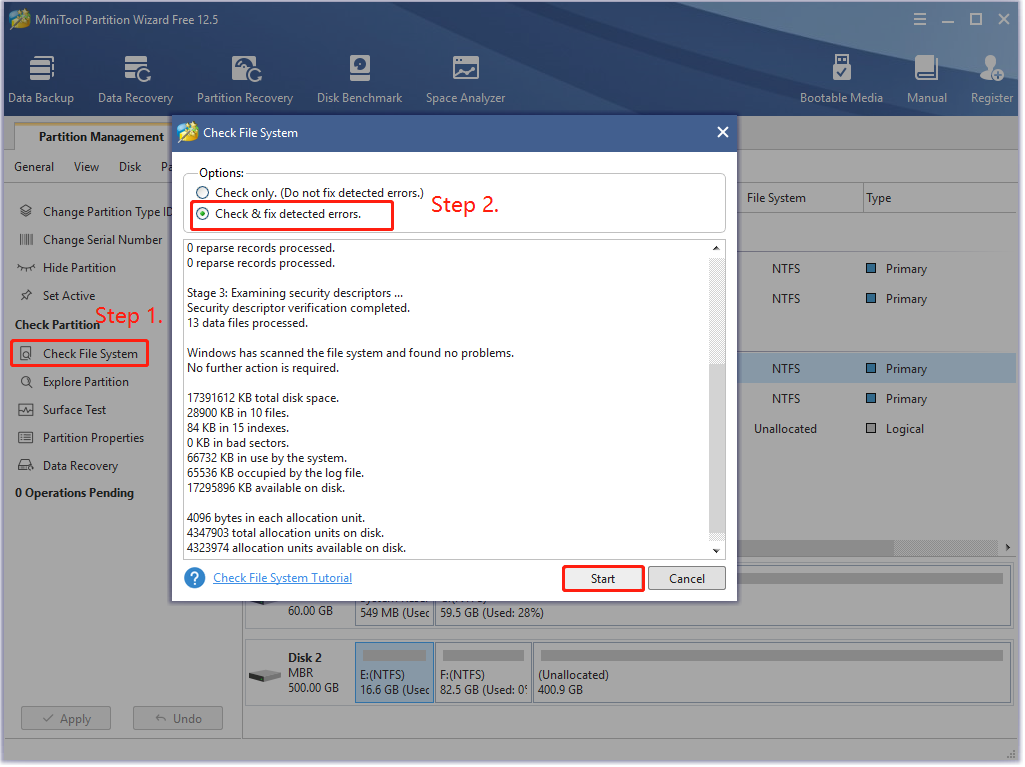
Step 1. Launch this program to enter the main interface after you installed it, and then select the partition that you want to check from the disk map and click on Check File System from the left pane. Also, you can right-click the partition directly and select Check File System.
Step 2. In the pop-up window, select the Check & fix detected errors option and click on the Start button. Then this program will automatically detect and fix the file systems errors on the drive like running the chkdsk /f command.
Tip: If you want to check the C drive, you need to click on Yes to confirm it. Then the drive will be checked the next time your system restarts.
Step 3. If you want to check bad sectors on the drive, you can select the partition and click on Surface Test from the left pane.
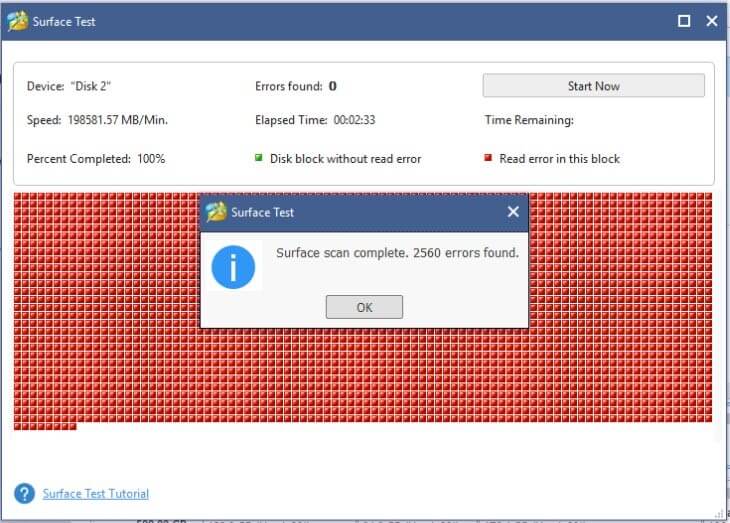
Step 4. Click on the Start now button in the pop-up window. After that, this tool will scan the whole drive immediately and show you the test result.
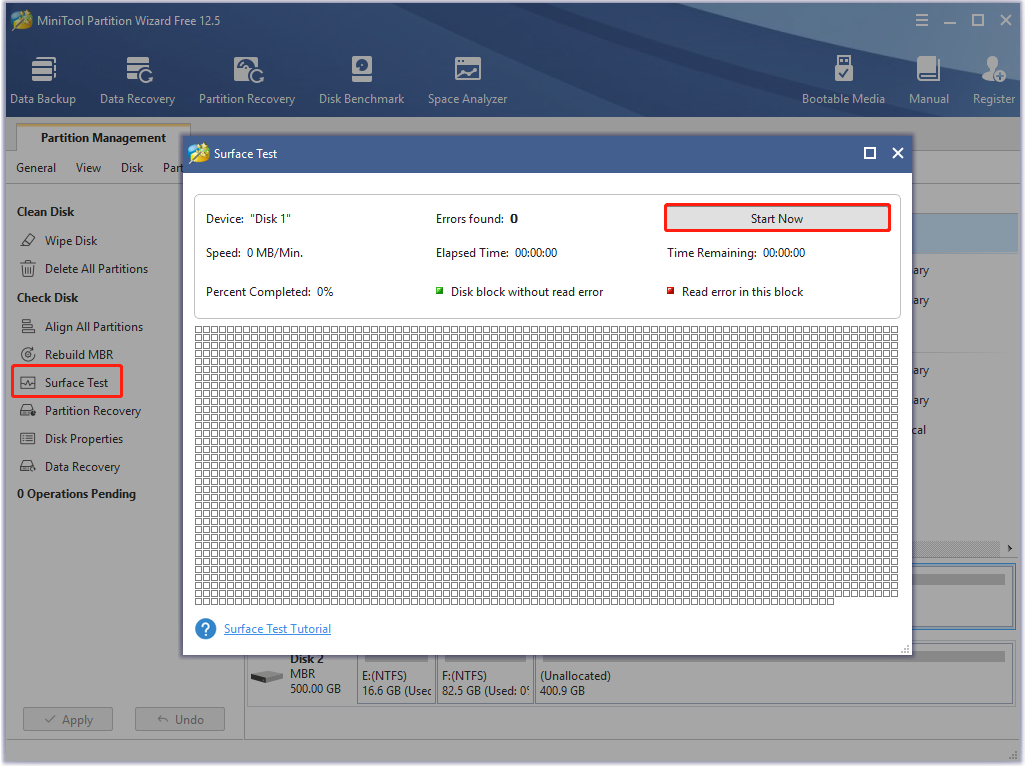
If there are any blocks marked with red color as the following picture shows, it indicates that your hard drive is getting failing. At this time, you may have to consider replacing it with a new one. How to upgrade to SSD without reinstalling OS? Don’t worry. We will walk you through a step-by-step guide.
Bonus Tip: How to Upgrade to HDD/SSD Without Reinstalling OS
As mentioned above, the SSD drive has a limited lifespan. If you have used an SSD for a long time, then the drive may get faulty, and running CHKDSK on SSD can’t help you fix the issue. So, the most effective way is to replace it with a new one.
Here comes a new question: how to update to HDD/SSD without reinstalling OS? You can use the Copy Disk feature of MiniTool Partition Wizard that can migrate OS to the HDD/SSD easily and even copy the entire disk to the new one. To do so, follow the step-by-step guide below:
MiniTool Partition Wizard DemoClick to Download100%Clean & Safe
Step 1. Connect your new HDD/SSD to your computer and launch the program to enter its main interface.
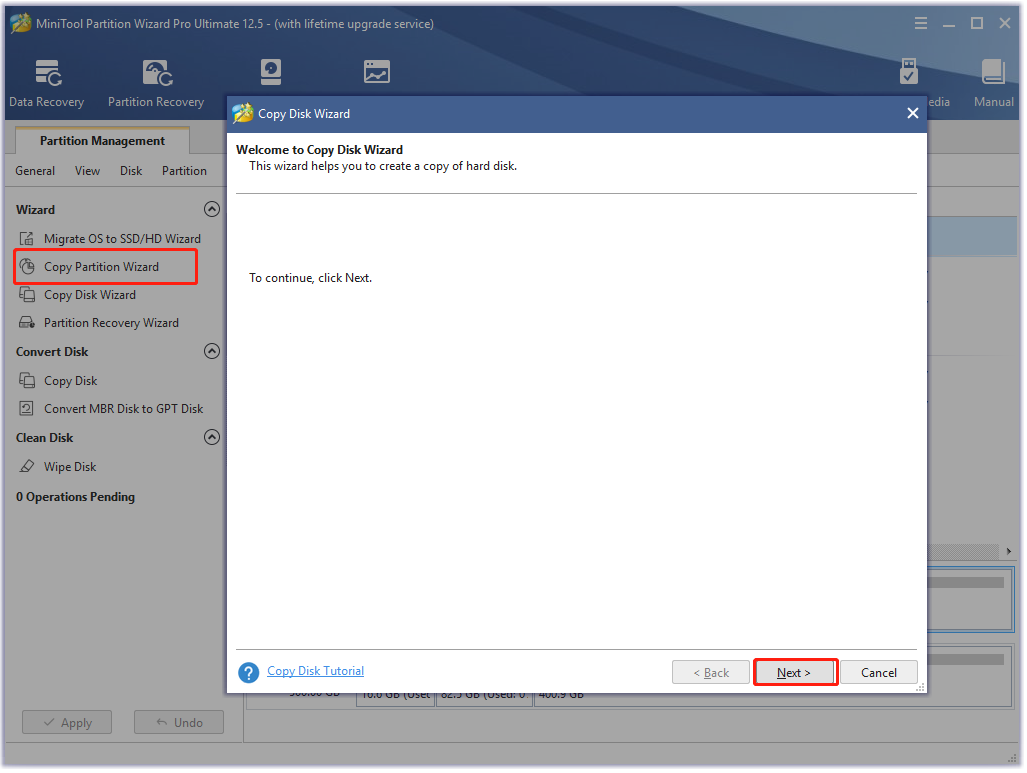
Step 2. Click on the Copy Disk wizard feature on the left pane and click on the Next button.
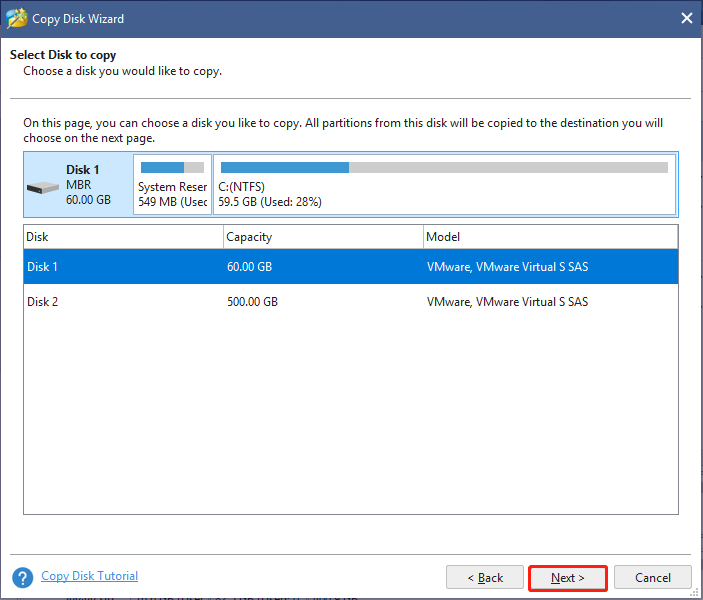
Step 3. Select the original disk that you want to copy and click on Next to go on.
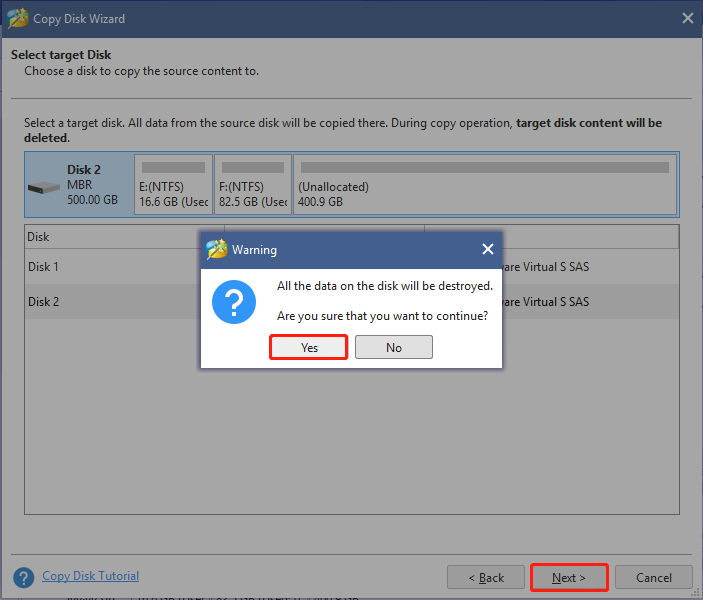
Step 4. Select the target disk that you’re ready to copy the source content to and click on Next. After that, you will be prompted to confirm this operation. Click on Yes to continue.
Note: All the data on the target drive will be overwritten. So, make sure you back up them in advance if there are any important data.
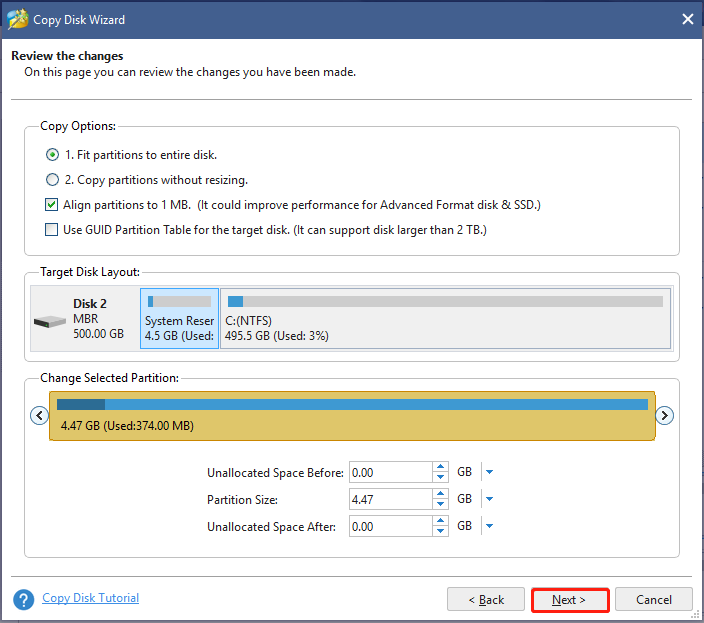
Step 5. Review the changes you have been made. Here you can select the default copy options if you haven’t special demands and click on Next.
Tip: If you want to copy the disk to a GPT disk, you can select the Use GUID Partition Table for the target disk option.
Step 6. Click Finish in the next window and click on Apply to execute the pending operation. Then wait for the process to complete.
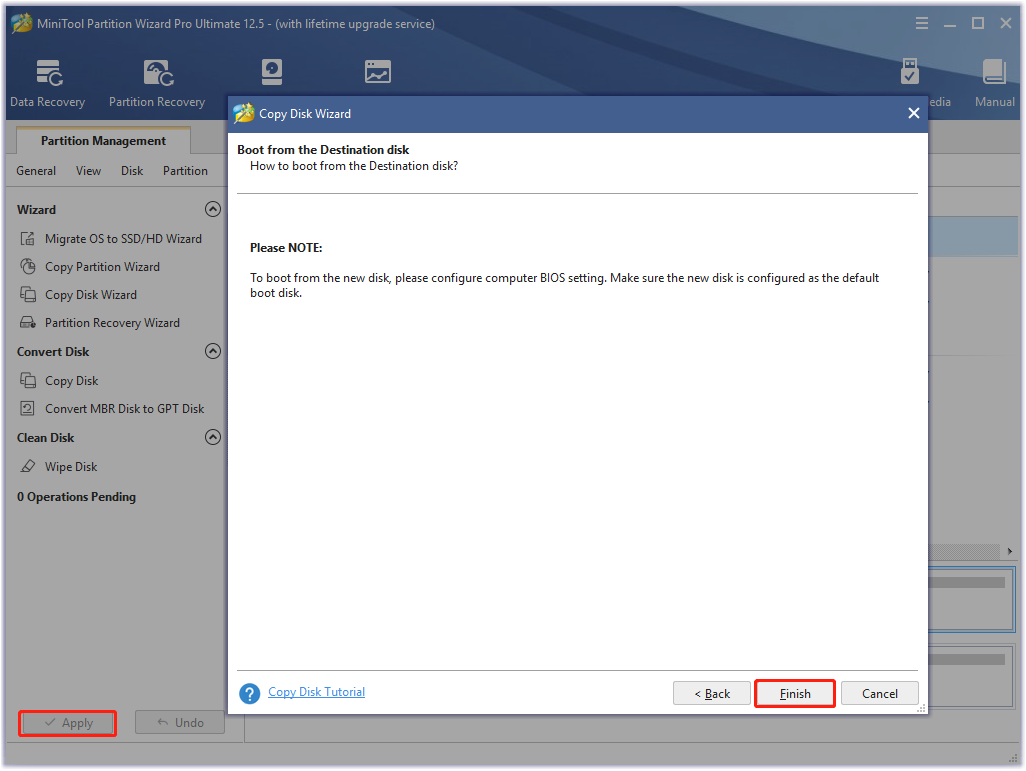
Now, you should complete the copying process successfully and you can set the new HDD/SSD as the boot drive.
My SSD drive always runs into errors. So, I want to check my drive using CHKDSK, but I’m confused if it’s safe to run CHKDSK on SSD. Fortunately, this post helped me a lot.Click to Tweet
What’s Your Opinion
Is it safe to run CHKDSK on SSD? Now, I believe that you already have known the answer. If you encounter any problems when using CHKDSK, you can use MiniTool Partition Wizard to check your SSD. Besides, the MiniTool program can help you upgrade to a new HDD/SSD without reinstalling OS.
Have you any other ideas on this topic? You can write them down in the comment zone. If you have difficulties in using MiniTool Partition Wizard, please send us an email to [email protected] and we will help you ASAP.
Updated on Apr 28, 2025
SSDs used to be very expensive. However, prices have been dropping for a while now as more advanced devices hit the market.
Although SSDs provide users with increased performance and many other benefits, these drives are fragile. Therefore, they are prone to error at any time. This is where things get more complicated. But don’t worry. EaseUS will provide you with two methods in this article.
Overview About How to Check SSD for Errors on Windows 10/11:
| ⚙️Complex Level | Low, Beginners |
| ⏱️Duration | 2-5 minutes |
| 🚩Applies to | Check SSD for errors on Windows 10/11/8/7 |
| ✏️Ways |
|
| ⛏️Tools | A Windows PC, Windows Properties, CMD, EaseUS Partition Master |
Windows allows you to check errors on an SSD via the «CHKDSK» command, but it is difficult for users without much computing experience. Hence, for beginners, choosing a simple third-party tool matters a lot. During our test, a third-party tool stood out because of its stability, compatibility, and clear interface.
Way 1. Check SSD for Errors via EaseUS Partition Master
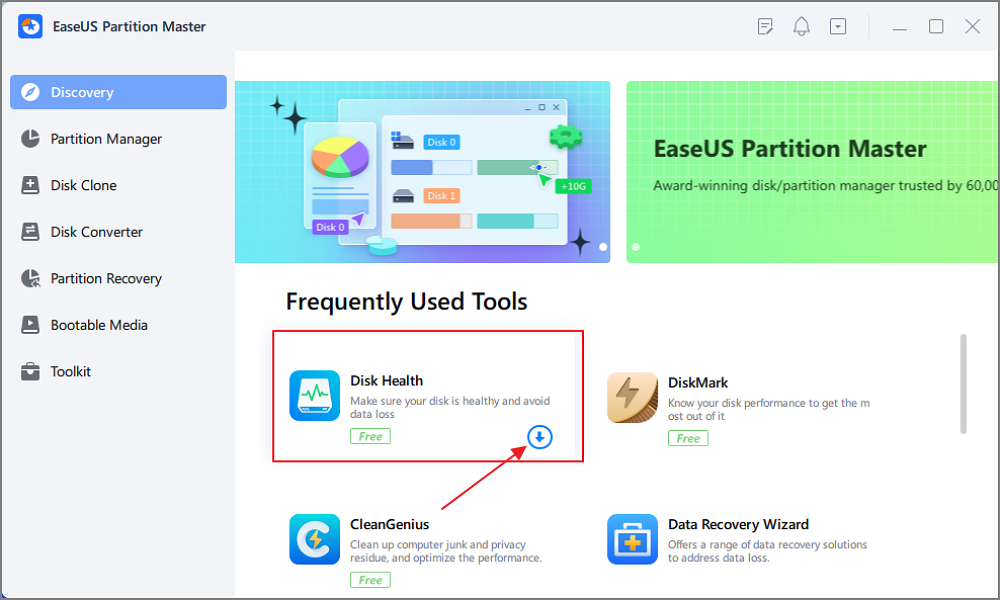
First, we recommend you use reliable software to check errors and locate bad sectors on your SSD, EaseUS Partition Master. It can check the SSD health status and show a score based on the test result. It will warn when the SSD status is unhealthy and has too many errors. Click the button to install it on your PC and start to check your SSD.
To help you check errors on an SSD, this tool can do the following tasks to help:
- Guide 1. Check SSD Health via SMART Status
- Guide 2. Check SSD for Bad Sectors
- Guide 3. Check SSD for File System Errors
EaseUS Partition Master can tell you if your SSD is healthy, how many bad sectors your SSD has, and if there is any file system error on your SSD. It can provide more details than the CHKDSD command. Let’s start.
Guide 1. Check SSD Health via SMART Status
Here is how to use EaseUS Partition Master to check SSD SMART status:
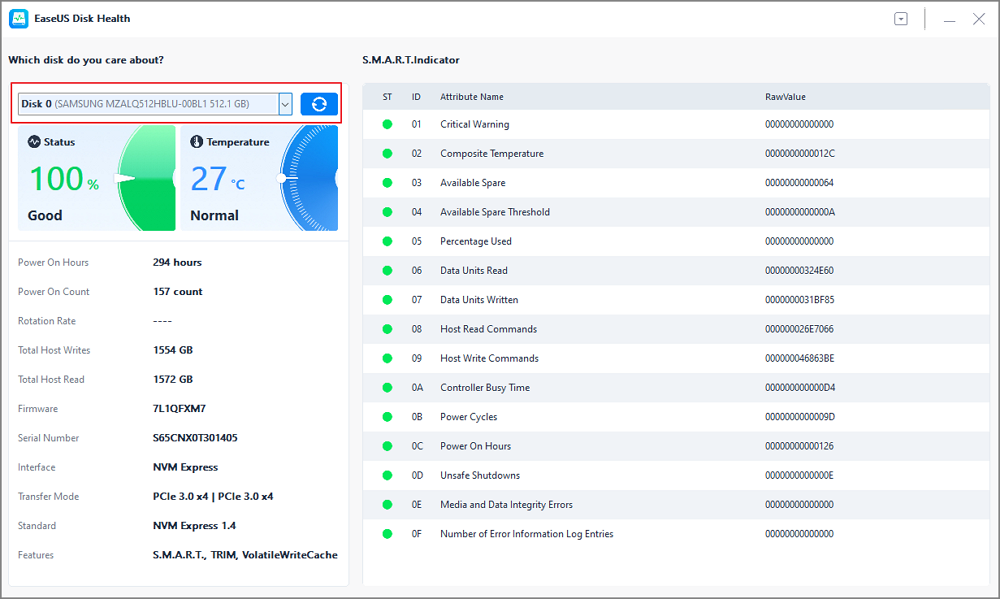
Step 1. Launch EaseUS Partition Master and click the blue arrow to activate the «Disk Health» feature under the «Discovery» section.
Step 2. Select the target disk and click the «Refresh» button. Then, you can see the health condition of your disk.
Guide 2. Check SSD for Bad Sectors
EaseUS Partition Master can help you run a disk surface test on your SSD or check hard drive for bad sectors to help you locate bad sectors:
Step 1. Open EaseUS Partition Master. Go to Toolkit and select «Bad Sector Scan.»
Step 2. Tick «Scan Disk» and choose the target disk from the drop-down menu.
Step 3. Click «Scan» to apply the bad sector scaning process.
Guide 3. Check SSD for File System Errors
Follow the steps to check file system errors on your SSD:
Step 1. Right-click the target partition that may have a problem.
Step 2. Choose «Check» > «Check File System».
Step 3. In the Check File System window, check the «Try to fix errors if found» option by clicking the «Start» button.
Step 4. Please wait patiently. After the process, you can click the «Finish» button to exit the window.
Besides, EaseUS can do a lot of tasks to help you manage your SSD well, such as:
- ✅Wipe/format an SSD
- ✅Initialize a new SSD
- ✅Run SSD SMART test
- ✅Test SSD read/write speed
- ✅Clone SSD to larger SSD
- ✅Merge/split partitions on SSD
Now, download this tool to manage your SSD well. To check SSD health or test SSD speed, you will need this tool.
Way 2. Check SSD for Errors by CHKDSK
It is easy to find out bad sectors and file system errors on your SSD by running CHKDSD (short for «check disk») in Windows. This command will report the total number of faulty sectors after inspecting the SSD; remember to run the CHKDSD command regularly. However, if you want to know other details about your SSD, turn to Way 1.
Here is how to run CHKDSK to check your SSD for errors:
Step 1. Type cmd in the Windows search box and select Run Command Prompt as administrator.
Step 2. In the command prompt window, type the command chkdsk C: /f /r /x

Using the chkdsk command [chkdsk C: /f /r /x], you can check and scan your SSD for errors and repair file system corruption and bad sectors if errors are found.
Way 3. Check SSD for Errors via Windows Properties
Besides the ways above, you can use Windows Properties to check SSDs for errors. Here is how:
Step 1. Click This PC in File Explorer > right-click the SSD you want to check > select Properties.
Step 2. Select the «Tools» section > select the Check option under the error checking section.
Step 3. Next, you can choose to Scan the target drive or repair the drive if errors are found.
Step 4. After the scanning finishes, click the » Show Details link» to see the CHKDSK logs in Event Viewer.
You may also like:
Conclusion
Your SSD will sometimes report errors. Regularly checking your SSDs or partitions for errors can help you find out what exactly the errors are on your SSD so you can fix them without any hassle. Since disk errors can have a variety of causes, including bad sectors, improper shutdown, malware, physical damage, etc., it’s important to know how to check for these errors. This article introduces three effective methods to help you check for errors on your SSD, but note that if your SSD suffers serious physical damage, what you have to do is not follow these methods and take it for repair or replace the SSD in time to avoid causing more losses.
Don’t forget to share this article on your social media if these ways do help you.
Check SSD for Errors FAQs
It is a common issue that an SSD reports an error. Here are some other questions and answers to help you solve issues related to errors on an SSD:
1. Should you scan SSD for errors?
Of course, you should. An SSD is a storage device using integrated circuit components. SSDs have higher stability and faster data access speed than HDDs. However, SSDs have a limited lifespan. Therefore, you will need to periodically check for and fix errors on your SSD over time.
2. How do I make sure my SSD is clean?
To clean your SSD, you need to follow the steps below:
- Ensure your SSD is connected to the PC and is not the boot drive.
- Right-click the Windows icon and select/launch Disk Management.
- In the lower right-hand pane, find the SSD you want to clean.
- Right-click on each partition and select Delete Volume.
3. How to check SSD for errors in Linux?
The easiest way to check the health of an SSD in Linux is to use the command line tool smartctl. This is a feature of the smartmontools package, which needs to be installed before checking SSD health in Linux.
- Install the smartmontools package using the command «sudo apt install smartmontools.»
- Run the command «sudo smartctl -t short -a /dev/sdX» (instead of sdX, use the name of your SSD).
- After the test is completed, run the command «sudo smartctl -a /dev/sdX» to display the results.
When it comes to diagnosing and fixing issues with your hard drive, CHKDSK is a well-known tool that has been around for decades. It was the tool people turned to when they saw signs of hard drive failure. While it can be useful in certain situations, CHKDSK on SSD can also have its limitations and may even cause harm if used improperly. In this article, we’ll explore the scenarios where CHKDSK may be necessary and those where it could be harmful, and ultimately suggest a better alternative for keeping your hard drive healthy and free from errors.
Overview of CHKDSK and SSD
CHKDSK is a disk repair utility that can be run in Command Prompt to diagnose and repair disk errors in Windows. It can be run even from a Windows installation disc when the computer is not functioning. To run CHKDSK on a hard drive, type “cmd” in the search box, right-click the Command Prompt app, select “Run as administrator”, and then type “CHKDSK E: /f” (replace the E with your drive letter) in the elevated Command Prompt.
SSDs are storage devices that use integrated circuits to store data, resulting in faster access speed and physical stability compared to HDDs. However, the lifespan of an SSD is limited by the number of times it can be read and written. People are skeptical about running CHKDSK on SSD, as it is commonly used to check hard drives, but it is safe to do so.
CHKDSK was one of the favorite tools people turned to for how to check hard drive health. But times change and the rise of SSDs and better third party tools have changed the game. Read on to learn more about how CHKDSK works with SSDs.
Is It Safe to Run CHKDSK on SSD
CHKDSK is a built-in disk scan and repair utility in Windows that can be run from Command Prompt to check and repair disk errors. Running CHKDSK on an SSD is safe and won’t impact its performance. CHKDSK on an SSD does more reading than writing to the drive, which is so small and quick that it can be neglected.
It is not necessary to run CHKDSK on SSDs regularly, as SSDs have advanced leveling and control technology that can automatically detect and repair certain drive errors via the drive controller. However, running CHKDSK on the C drive of an SSD is not recommended, as it can lead to some problems. If this happens, follow these steps to fix the issue:
- Press the Win + I keys to open the Settings app and navigate to the Update & Security section. If your computer can’t start normally, use Windows 10 bootable media.
- Go to Recovery, Advanced startup section and click on Restart now.
- Select Troubleshoot > Advanced options > Command Prompt.
- Type CHKDSK /f in the elevated command prompt and hit Enter.
- Wait for the CHKDSK utility to complete the scan, then type Exit and hit Enter.
- Your computer should start as expected. If it restarts into the Recovery Console, select Exit and start Windows 10.
CHKDSK is Safe for SSDs
Many users are aware that defragging can be harmful to SSDs as it accelerates the degradation of the drive. Another built-in disk related tool in Windows is CHKDSK, which may lead to concern that it could also damage an SSD.
However, CHKDSK is not harmful. The tool performs more reading than writing operations on the drive and any writing operations are so small and quick that they can be neglected. When running CHKDSK, the tool reads the drive data to confirm its health and sets aside any errors found. There is no need to worry about accidental CHKDSK runs on SSDs.
CHKDSK is Not Necessary for SSDs
Aside from safety concerns, some may wonder if CHKDSK is necessary to run on an SSD as it is regularly performed on traditional hard disk drives (HDDs). Want to know more about HDD vs SSD facts? Read our guide.
However, SSDs are more advanced than HDDs and their sophisticated leveling and controlling technology, such as the drive controller, automatically detects and repairs drive issues, negating the need for CHKDSK. Running CHKDSK periodically on an SSD may not be necessary, though it can still be performed for a double check.
Troubleshooting: Fixing CHKDSK-related Issues on Windows 10
According to reports from some Windows users, the Check Disk Utility in the operating system is causing blue screens and breaking their SSDs after running the command. The issue is reported to have appeared after updating to the December 2020 version of Windows 10 64-bit. If you have encountered this issue, don’t worry, Microsoft has acknowledged it and has posted a guide to fix your machine.
Follow these steps to resolve the issue:
- The device will automatically start up into the Recovery Console after failing to start up a few times.
- Select Advanced options from the list of actions.
- Select Command Prompt from the list of actions.
- Once Command Prompt opens, type: CHKDSK /f.
- Allow CHKDSK to complete the scan, which can take a while. Once it has completed, type: exit.
- The device should now start up as expected. If it restarts into the Recovery Console, select Exit and continue to Windows 10.
Note: After completing these steps, the device might automatically run CHKDSK again on restart. It should start up as expected once it has completed.
Hotfix for Errors with CHKDSK After Update KB4592438
Microsoft has released a hotfix for the issue with the Windows 10 Check Disk Utility (CHKDSK) that was causing disk corruption, particularly with SSDs, after running CHKDSK /f in the command prompt as an administrator. This issue was introduced with the KB4592438 update for Windows 10 20H2 in the previous Patch Tuesday. The hotfix has already been rolled out to non-managed devices, and may take up to 24 hours to propagate. For enterprise-managed devices, the issue can be resolved by installing a special Group Policy. If your system has already been affected by disk corruption, Microsoft has provided a workaround by booting the device into the Recovery Console and running CHKDSK /f.
Fix Windows 10 CHKDSK BSODs and SSD File System Corruption by Uninstalling a Problematic Update
Another solution to fix the CHKDSK BSOD and SSD file system corruption issue in Windows 10 is by uninstalling the problematic Windows 10 update. To do this, try booting into Safe Mode and following these steps:
- Open System Settings and go to Update & Security > Windows Update.
- In the Windows Update section, open View update history.
- On the View update history page, click Uninstall updates.
- Find the problematic Windows update, right-click on it and click Uninstall.
- Reboot your system and check if the error has been resolved.
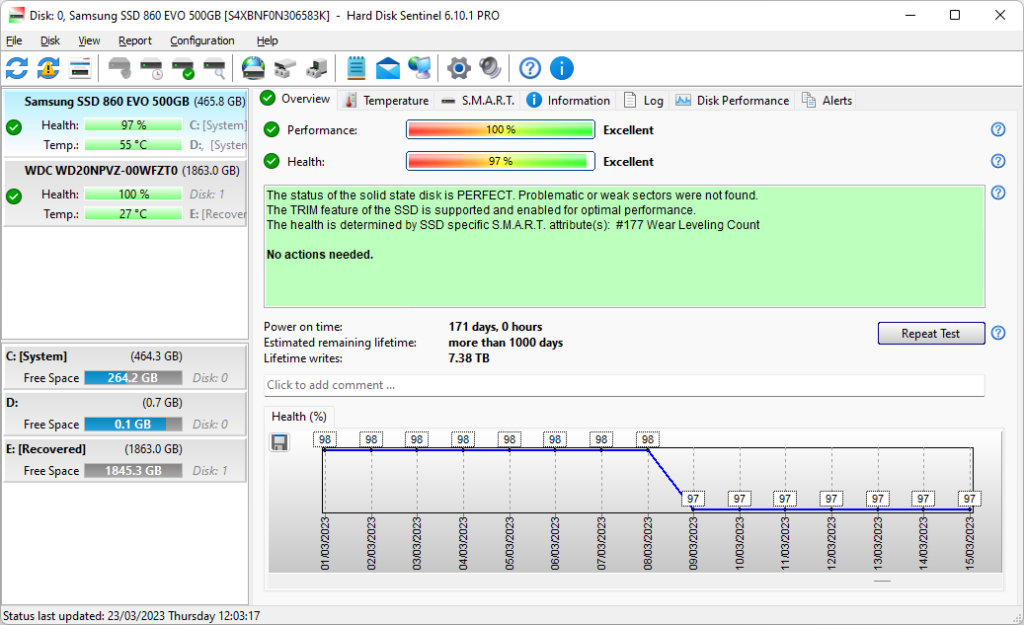
How to Monitor Your SSD Health?

Hard Disk Sentinel (HDSentinel) is a multi-OS SSD and HDD monitoring and analysis software. It aims to detect, diagnose, and repair hard disk drive problems and display information about the health and performance of both SSDs and HDDs. HDSentinel covers a wide range of devices, including internal and external hard disks, SSDs, hybrid drives, disks in RAID arrays, and Network Attached Storage (NAS) drives. The software runs in the background, monitoring the SMART status of the disk(s), and warns the user if any errors are detected or unexpected behavior occurs. It also offers various alert and report options to ensure maximum data protection.
HDSentinel is a highly sensitive disk health rating system, making it an effective solution for preventing HDD failure and data loss. The Professional version includes scheduled and automatic disk backup options to protect against data loss from failure, malware, or accidental deletion. The software also displays the current hard disk temperature and logs maximum and average temperatures. This information can be used to check the maximum temperature under high disk load and understand the importance of the hard disk operating temperature.
If you are using a computer with at least one hard disk or SSD and want to ensure that your data is always available, then Hard Disk Sentinel is the perfect solution. It is designed for use on multiple hard disks and SSDs, both in desktop and notebook computers and in mobile or removable racks or enclosures. It is also suitable for use in high disk load server environments. The software offers a range of features to maximize system stability, performance, and data protection, making it an ideal solution for anyone who values their sensitive and valuable data. You can download Hard Disk Sentinel and try it for yourself to determine if it is the right fit for your needs. To try Hard Disk Sentinel, click the link for a free trial.
If you continue to have problems, you should begin to think about how long an SSD lasts. Hard Disk Sentinel can help you know if your SSDs health is declining so you can be prepared.
FAQ
Should I overprovision my SSD?
Overprovisioning is when a portion of an SSD’s capacity is set aside and is not visible or accessible to users. It is used to improve the performance and lifespan of SSDs. This is because data on SSDs cannot be overwritten but must be erased to write new data, which can affect write performance. Overprovisioning provides extra space for the flash controller to manage the data traffic and storage and reduces write amplification. It also helps with garbage collection, reduces power consumption, and increases SSD lifespan.
Can you run CHKDSK on SSD?
Yes, you can run CHKDSK on an SSD. However, it is not as useful for SSDs as it is for an HDD. There are better options, too. Hard Disk Sentinel can give you more data and help you keep your SSD in good shape.
How do I know if my SSD is trim enabled?
While it’s true that the fsutil command can show whether the operating system in general uses the TRIM function or not, this only means that the OS is prepared to send the TRIM command to the SSD device via the controller driver where the SSD is connected. However, this doesn’t guarantee that the SSD will actually receive the TRIM command. Some hard disk controllers and their drivers may block the TRIM command and not pass it to the SSD even if TRIM is supported by the SSD. This is why Hard Disk Sentinel checks the real usage of TRIM for each device and displays “disabled” if there is a problem with the driver of the hard disk controller.
To check if your SSD is TRIM enabled, follow these steps:
- Check whether the SSD supports TRIM.
- Update the driver of the hard disk controller or use a different one if necessary.
- After the change and system restart, TRIM will be really working and reported by Hard Disk Sentinel.
Note that you can use the “Send test report to developer” option if you need further assistance in checking the disk controller and proper driver to use.
Conclusion
In conclusion, Hard Disk Sentinel provides a more robust solution for monitoring and maintaining the health of your SSD compared to CHKDSK. With its advanced features, detailed reporting, and real-time monitoring, Hard Disk Sentinel offers a comprehensive approach to SSD health management that minimizes the risks associated with using CHKDSK. Whether you’re an experienced computer user or just someone looking for a reliable way to keep your SSD healthy, Hard Disk Sentinel is an excellent option to consider. So, if you want to ensure the longevity of your SSD and avoid potential issues caused by CHKDSK, give Hard Disk Sentinel a try today.
Проверка SSD на ошибки — не то же самое, что аналогичные тесты обычных жестких дисков и многие привычные вам средства здесь по большей части не подойдут в связи с особенностями работы твердотельных накопителей.
В этой инструкции подробно о том, как проверить SSD на ошибки, узнать его состояние с помощью технологии самодиагностики S.M.A.R.T., а также о некоторых нюансах выхода диска из строя, которые могут быть полезны. Также может быть интересным: Как проверить скорость SSD, Программы для SSD дисков.
- Встроенные средства проверки дисков Windows, применимые к SSD
- Программы проверки SSD и анализа их состояния
- Использование CrystalDiskInfo
Встроенные средства проверки дисков Windows 10, 8.1 и Windows 7
Для начала о тех средствах проверки и диагностики дисков Windows, которые применимы к SSD. В первую очередь речь пойдет о CHKDSK. Многие используют эту утилиту для проверки обычных жестких дисков, но насколько она применима к SSD?
В некоторых случаях, когда речь идет о возможных проблемах с работой файловой системы: странное поведение при действиях с папками и файлами, «файловая система» RAW вместо ранее рабочего раздела SSD, вполне можно использовать chkdsk и это может быть эффективным. Путь, для тех, кто не знаком с утилитой, будет следующим:
- Запустите командную строку от имени администратора.
- Введите команду chkdsk C: /f и нажмите Enter.
- В команде выше букву диска (в примере — C) можно заменить на другую.
- После проверки вы получите отчет о найденных и исправленных ошибках файловой системы.
В чем особенность проверки SSD по сравнению с HDD? В том, что поиск поврежденных секторов с помощью дополнительного параметра, как в команде chkdsk C: /f /r производить не нужно и бессмысленно: этим занимается контроллер SSD, он же переназначает сектора. Аналогично, не следует «искать и исправлять бэд-блоки на SSD» с помощью утилит наподобие Victoria HDD.
Также в Windows предусмотрен простой инструмент для проверки состояния диска (в том числе SSD) на основании данных самодиагностики SMART: запустите командную строку и введите команду wmic diskdrive get status

В результате её выполнения вы получите сообщение о статусе всех подключенных дисков. Если по мнению Windows (которое она формирует на основании данных SMART) всё в порядке, для каждого диска будет указано «Ок».
Программы проверки SSD дисков на ошибки и анализа их состояния
Проверка ошибок и состояния SSD накопителей производится на основании данных самодиагностики S.M.A.R.T. (Self-Monitoring, Analysis, and Reporting Technology, изначально технология появилась для HDD, где применяется и сейчас). Суть в том, что контроллер диска сам записывает данные о состоянии, произошедших ошибках и другую служебную информацию, которая может служить для проверки SSD.
Есть множество бесплатных программ для чтения атрибутов SMART, однако начинающий пользователь может столкнуться с некоторыми проблемами при попытке разобраться, что значит каждый из атрибутов, а также с некоторыми другими:
- Разные производители могут использовать разные атрибуты SMART. Часть из которых попросту не определена для SSD других производителей.
- Несмотря на то, что вы можете ознакомиться со списком и объяснениями «основных» атрибутов S.M.A.R.T. в различных источниках, например на Википедии: https://ru.wikipedia.org/wiki/S.M.A.R.T, однако и эти атрибуты по-разному записываются и по-разному интерпретируются различными производителями: для одного большое число ошибок в определенном разделе может означать проблемы с SSD, для другого — это просто особенность того, какие именно данные туда записываются.
- Следствием предыдущего пункта является то, что некоторые «универсальные» программы для анализа состояния дисков, особенно давно не обновлявшиеся или предназначенные в первую очередь для HDD, могут неверно уведомлять вас о состоянии SSD. Например, очень легко получить предупреждения о несуществующих проблемах в таких программах как Acronis Drive Monitor или HDDScan.
Самостоятельное чтение атрибутов S.M.A.R.T. без знания спецификаций производителя редко может позволить обычному пользователю составить правильную картину о состоянии его SSD, а потому здесь используются сторонние программы, которые можно разделить на две простые категории:
- CrystalDiskInfo — самая популярная универсальная утилита, постоянно обновляющаяся и адекватно интерпретирующая атрибуты SMART большинства популярных SSD с учетом информации производителей.
- Программы для SSD от производителей — по определению знают все нюансы содержимого атрибутов SMART твердотельного накопителя конкретного производителя и умеют правильно сообщить о состоянии диска.
Если вы — рядовой пользователь, которому требуется просто получить сведения о том, какой ресурс SSD остался, в хорошем ли он состоянии, а при необходимости и автоматически произвести оптимизацию его работы — я рекомендую обратить внимание именно на утилиты производителей, которые всегда можно скачать бесплатно с их официальных сайтов (обычно — первый результат в поиске по запросу с названием утилиты).
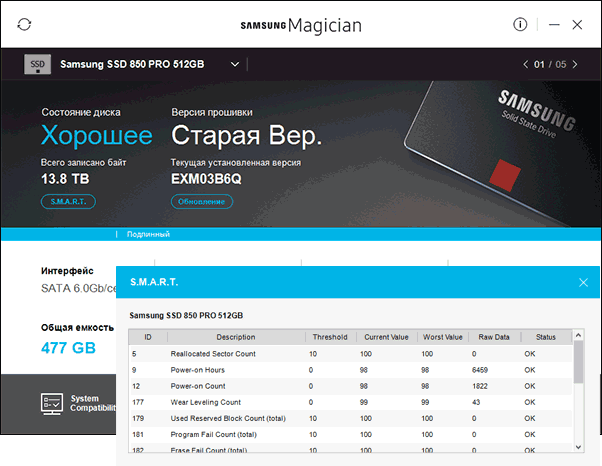
- Samsung Magician — для SSD Samsung, показывает состояние диска на основании данных SMART, количество записанных данных TBW, позволяет просмотреть атрибуты напрямую, выполнить настройки диска и системы, обновить его прошивку.

- Intel SSD Toolbox — позволяет произвести диагностику SSD от Intel, просмотреть данные о состоянии и произвести оптимизацию. Отображение атрибутов SMART доступно и для дисков других производителей.

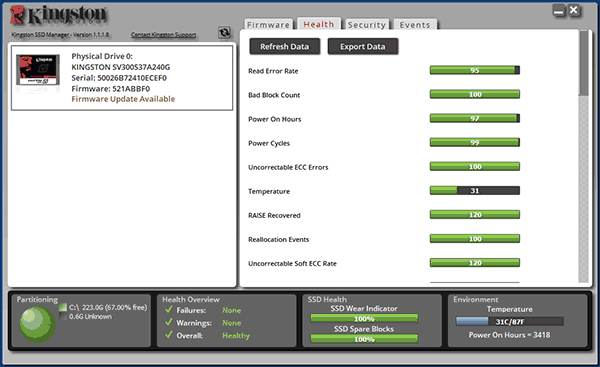
- Kingston SSD Manager — сведения о техническом состоянии SSD, оставшийся ресурс по разным параметрам в процентах.

- Crucial Storage Executive — оценивает состояние как для SSD Crucial, так и других производителей. Дополнительные возможности доступны только для фирменных накопителей.

- Toshiba / OCZ SSD Utility — проверка состояния, настройка и обслуживание. Отображает только фирменные накопители.
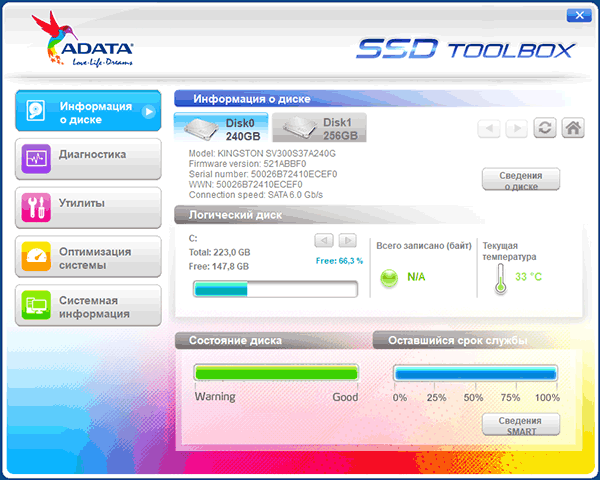
- ADATA SSD Toolbox — отображает все диски, но точные данные о состоянии, в том числе оставшемся сроке службы, количестве записанных данных, проверить диск, выполнить оптимизацию системы для работы с SSD.

- WD SSD Dashboard — для дисков Western Digital.
- SanDisk SSD Dashboard — аналогичная утилита для дисков


В большинстве случаев указанных утилит оказывается достаточно, однако, если ваш производитель не позаботился о создании утилиты проверки SSD или есть желание вручную разобраться с атрибутами SMART, ваш выбор — CrystalDiskInfo. Однако существуют и более простые утилиты, позволяющие, к примеру, получить информацию об ожидаемом сроке службы SSD диска, например, SSDLife.
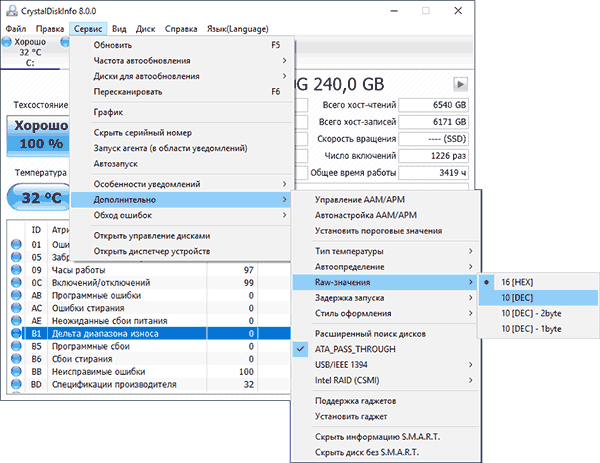
Как пользоваться CrystalDiskInfo
Скачать CrystalDiskInfo можно с официального сайта разработчика https://crystalmark.info/en/software/crystaldiskinfo/ — несмотря на то, что установщик на английском (доступна и portable версия в ZIP-архиве), сама программа будет на русском языке (если он не включится сам, измените язык на русский в пункте меню Language). В этом же меню вы можете включить отображение названий атрибутов SMART на английском (как они указаны в большинстве источников), оставив интерфейс программы русскоязычным.

Что дальше? Дальше вы можете ознакомиться с тем, как программа оценивает состояние вашего SSD (если их несколько — переключение в верхней панели CrystalDiskInfo) и заняться чтением атрибутов SMART, каждый из которых, помимо названия, имеет три столбца с данными:
- Текущее (Current) — текущее значение атрибута SMART на SSD, обычно указывается в процентах оставшегося ресурса, но не для всех параметров (например, температура указывается иначе, с атрибутами ошибок ECC та же ситуация — кстати, не паникуйте, если какой-то программе не понравится что-то связанное с ECC, часто дело в неверной интерпретации данных).
- Наихудшее (Worst) — худшее зарегистрированное для выбранного SSD значение по текущему параметру. Обычно совпадает с текущим.
- Порог (Threshold) — порог в десятичной системе счисления, при достижении которого состояние диска должно начать вызывать сомнения. Значение 0 обычно говорит об отсутствии такого порога.
- RAW-значения (RAW values) — данные, накопившиеся по выбранному атрибуту, по умолчанию отображаются в шестнадцатеричной системе счисления, но можно включить десятичную в меню «Сервис» — «Дополнительно» — «RAW-значения». По ним и спецификациям производителя (каждый может по-разному записывать эти данные) вычисляются значения для столбцов «Текущее» и «Наихудшее».

А вот интерпретация каждого из параметров может быть разной для разных SSD, среди основных, которые доступны на разных накопителях и легко читаются в процентах (но в RAW-значениях могут иметь разные данные) можно выделить:
- Reallocated Sector Count — количество переназначенных блоков, тех самых «бэд-блоков», о которых шла речь в начале статьи.
- Power-on Hours — время наработки SSD в часах (в RAW-значениях, приведенных к десятичному формату, обычно указываются именно часы, но не обязательно).
- Used Reserved Block Count — количество использованных резервных блоков для переназначения.
- Wear Leveling Count — процент износа ячеек памяти, обычно считается на основании количества циклов записи, но не у всех марок SSD.
- Total LBAs Written, Lifetime Writes — количество записанных данных (в RAW значениях могут блоки LBA, байты, гигабайты).
- CRC Error Count — выделю этот пункт среди прочих, потому как при нулях в других атрибутах подсчета разных типов ошибок, этот может содержать какие-либо значения. Обычно, всё в порядке: эти ошибки могут накапливаться при внезапных отключениях питания и сбоях ОС. Однако, если число растет само по себе, проверьте, чтобы ваш SSD был хорошо подключен (не окисленные контакты, плотное подключение, исправный кабель).
Если какой-то атрибут не ясен, отсутствует в Википедии (ссылку приводил выше), попробуйте просто выполнить поиск по его названию в Интернете: вероятнее всего, его описание будет найдено.
В заключение одна рекомендация: при использовании SSD для хранения важных данных, всегда имейте их резервную копию где-либо ещё — в облаке, на обычном жестком диске, оптических дисках. К сожалению, с твердотельными накопителями актуальна проблема внезапного полного выхода из строя без каких-либо предварительных симптомов, это нужно учитывать.
Рекомендуем: Как исправить в Windows 10 загрузку жесткого диска 100%
Используя систему Windows 10, рано или поздно, вы начнете испытывать проблемы связанные с ошибками жесткого диска, независимо от того, установлен на вашем устройстве — обычный жесткий диск или твердотельный накопитель (SSD). И проблемы всегда будут меняться, например, Windows 10 может перестать распознавать диск. Вы можете заметить странное поведение, когда конкретное приложение, блокируется. У вас могут возникнуть проблемы с обновлением до новой версии Windows и ряд других проблем.
Если вы заметили, что система плохо работает, даже если вы не уверены, что это связанно с жестким диском, вы можете использовать встроенный инструмент Check Disk для решения многих распространенных проблем.
Check Disk (chkdsk) — это инструмент, который существует уже много лет, и его основная цель — проверить целостность файловой системы и исправить любые логические ошибки. Кроме того, если данные неправильно записываются на диск или есть, подозрения на физические проблемы с диском инструмент способен сканировать и восстанавливать поврежденные сектора.
В этом руководстве мы рассмотрим шаги по проверке и исправлению ошибок жесткого диска с помощью инструмента Check Disk (chkdsk), встроенного в Windows 10.
Если у вас возникли проблемы с жестким диском, вы можете использовать средство проверки диска в Windows 10 для устранения большинства ошибок:
- Откройте «Проводник».
- Кликните на «Этот Компьютер» в левой панели.
- В разделе «Устройства и диски» нажмите правой кнопкой мыши жесткий диск, который вы хотите проверить, восстановить, и выберите «Свойства».
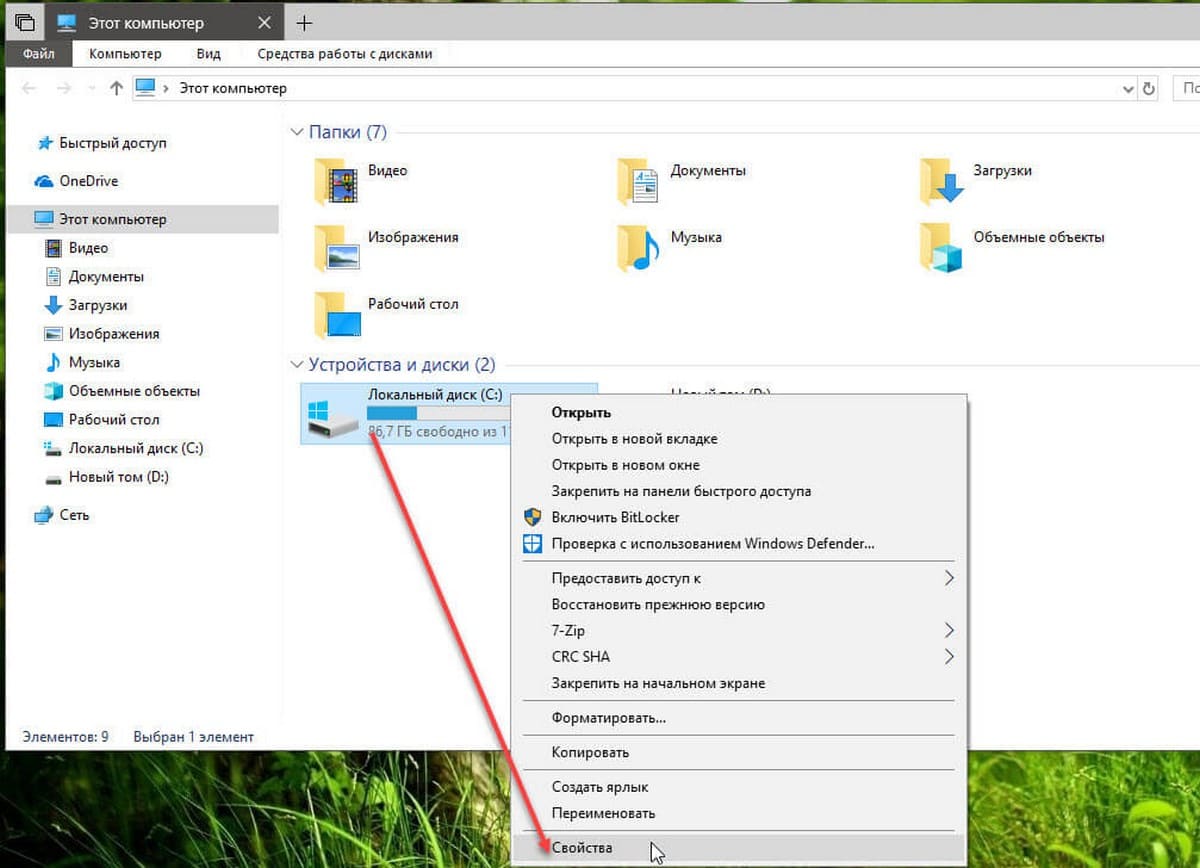
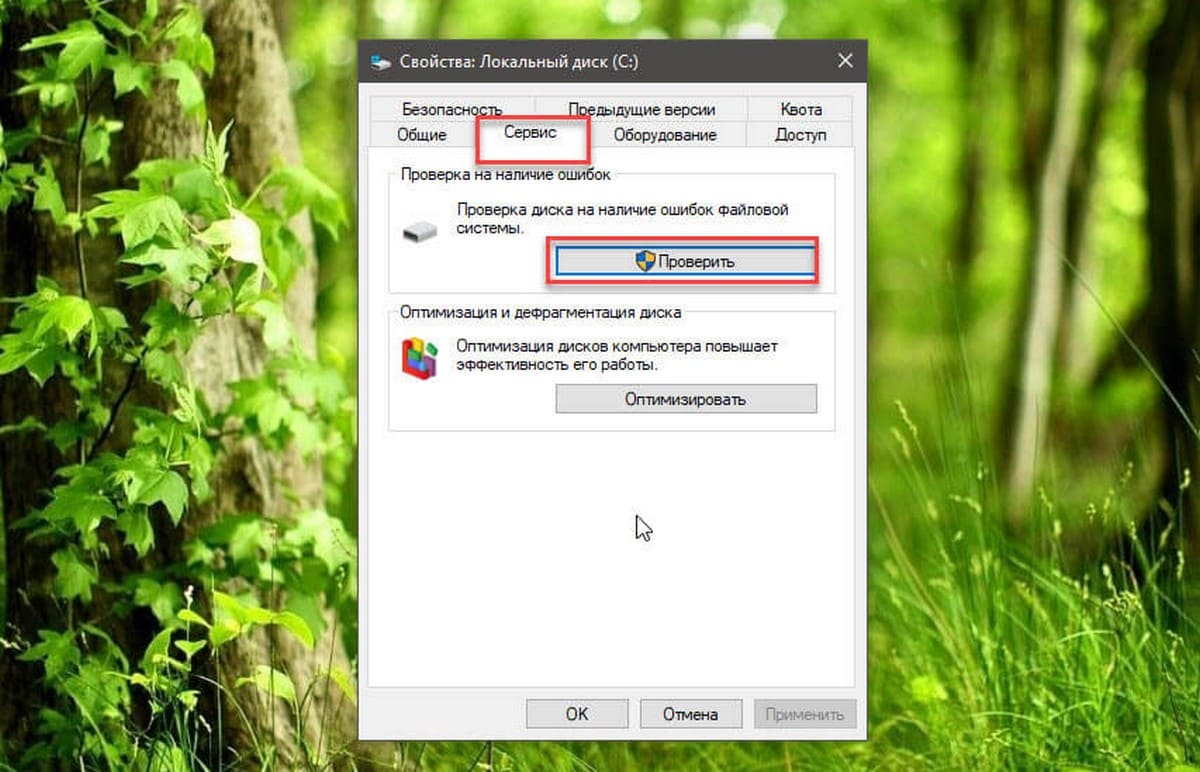
- Перейдите на вкладку «Сервис».
- В разделе «Проверка на наличие ошибок» нажмите кнопку «Проверить».
- Нажмите кнопку «Проверить Диск».
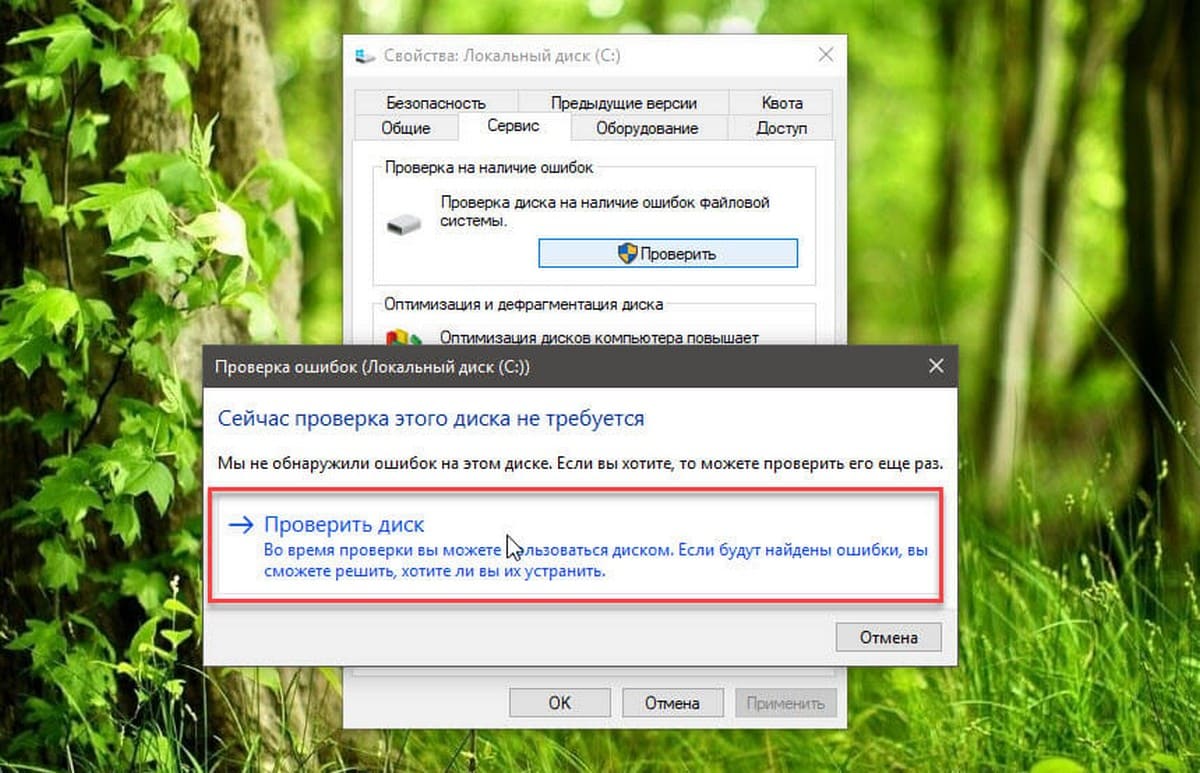
Если утилита не обнаружила никаких ошибок, нажмите кнопку «Закрыть», но если есть ошибки, которые не могут быть устранены, вам будет предложено запланировать другое сканирование во время следующего перезапуска.
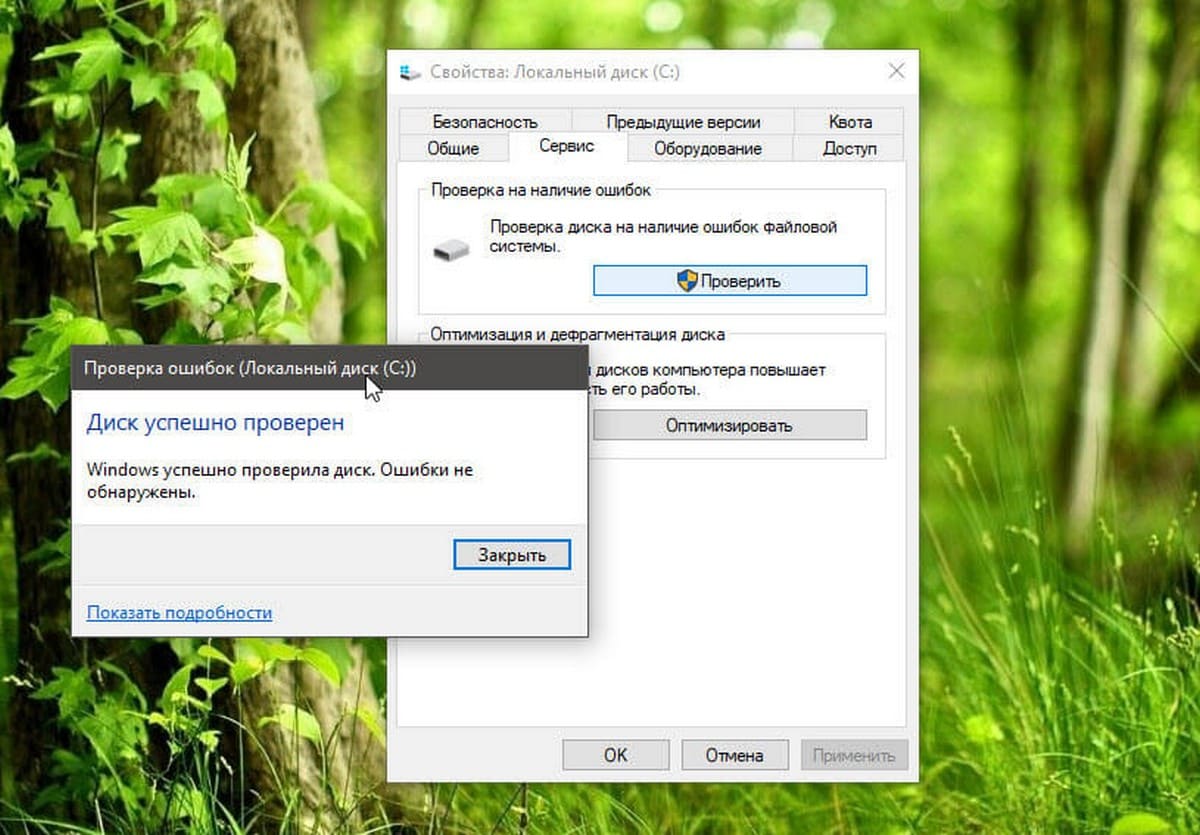
После того, как вы выполните шаги выше, ваш жесткий диск должен продолжать работать без проблем.
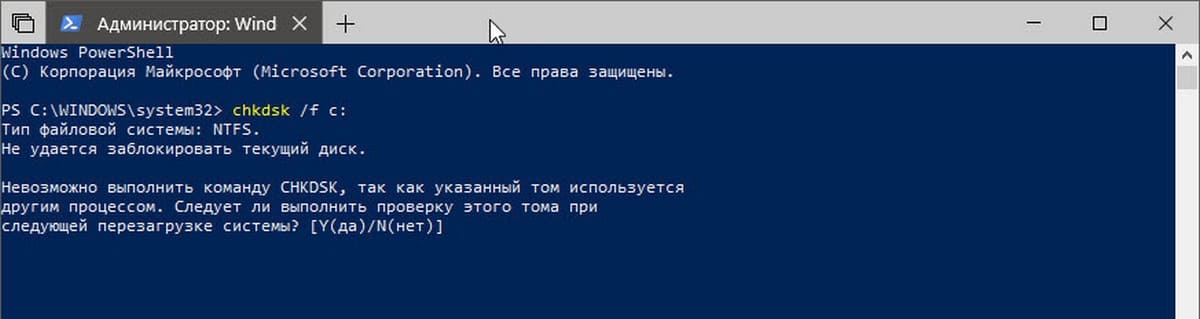
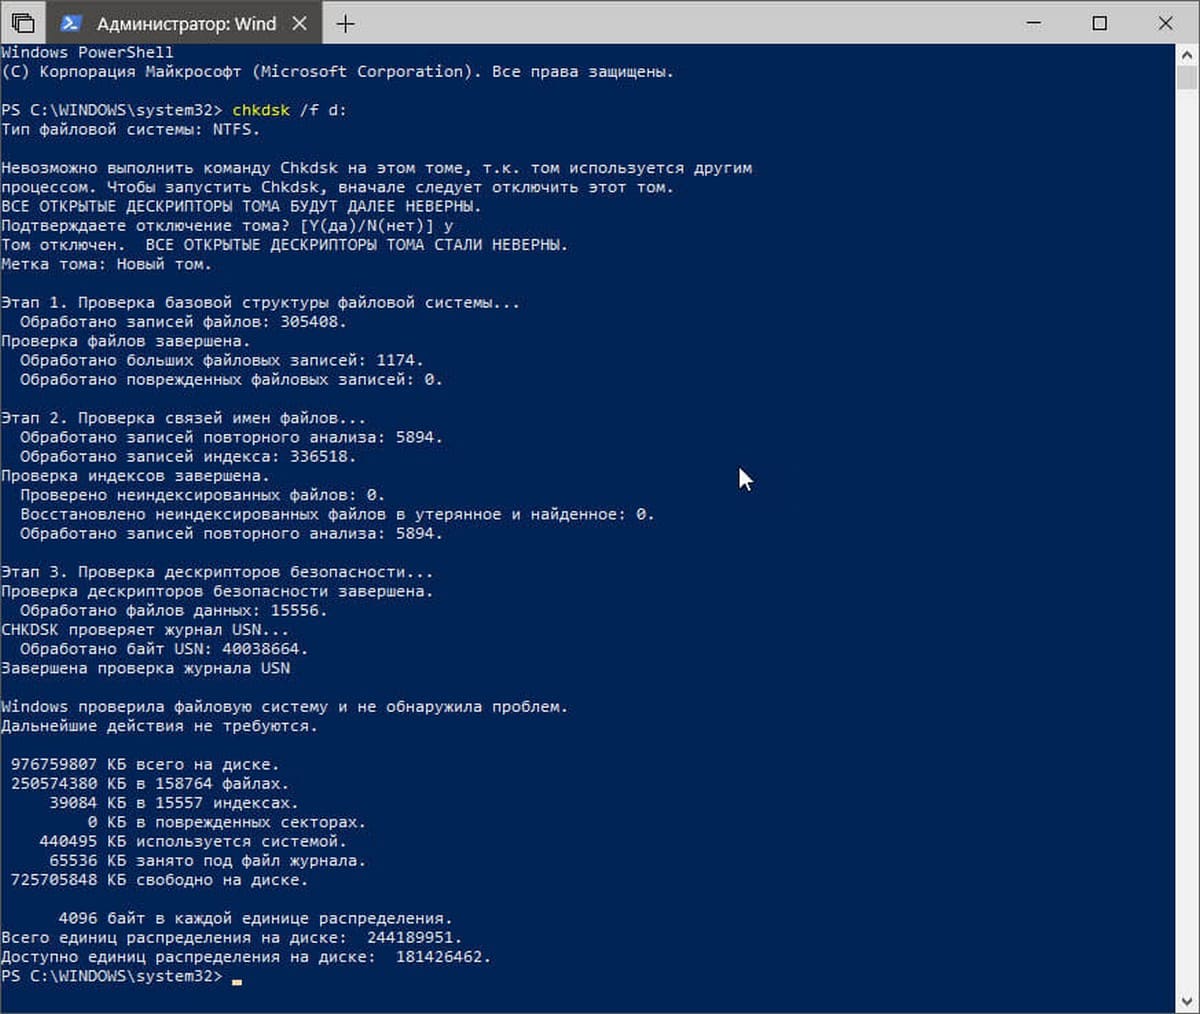
Как исправить ошибки жесткого диска с помощью PowerShell.
Кроме того, вы можете проверить и исправить ошибки жесткого диска с помощью инструмента Check Disk (chkdsk) непосредственно PowerShell:
- Откройте PowerShell от имени администратора.
- Введите или скопируйте и вставьте следующую команду, для запуска инструмента chckdsk и нажмите Enter :
chkdsk /f c:
Примечание: где с: -буква диска который нужно проверить.
Или, если вы хотите исправить поврежденные сектора на жестком диске, используйте эту команду и нажмите Enter :
chkdsk /r c:
Вы всегда должны начинать с команды /F, чтобы исправить ошибки, но если у вас все еще есть проблемы, тогда вы использовать инструмент с помощью команды /R.
После сканирования, если обнаружены ошибки, но есть файлы, которые используются, вам будет предложено запланировать сканирование во время следующего запуска системы.
После того, как вы завершили проверку, на жестком диске исправлены ошибки и плохие сектора, он должен снова начать работать правильно.
Если вы хотите узнать больше о доступных параметрах с помощью chkdsk, используйте команду chkdsk /?.
Данное руководство предназначено для устройств под управлением Windows 10, описанные здесь шаги также должны работать в Windows 8.1 и Windows 7.
Вам может быть интересно: Как отключить автоматическую оптимизацию диска в Windows 10.