
Quick Tips
- The IOBit uninstaller tracks the registry changes made when you install any software.
- Geek Uninstaller scans for leftover entries after uninstalling the software.
- Nirsoft RegistryChangesView displays changes side by side.
1. Nirsoft RegistryChangesView – Simple and Straightforward
Nirsoft RegistryChangesView is a freeware that allows you to capture and compare snapshots of Windows Registry before and after making changes at a particular time. This allows you to safely clean your Windows registry by exporting the Registry state from a time and replacing it with the current one.
How to use Nirsoft RegistryChangesView:
Step 1: Open the software and select Saved Registry Snapshot under Registry Data source 1 in the dialogue box.

Step 2: Then, click on Create Registry Snapshot. This step should be completed before making registry changes so you can revert them later.

Step 3: Once done, install software, GUI changes, settings, or the registry itself.
Step 4: Once the changes are made, in the Registry Data source 2, select Current Registry and select all options in Hives to compare; click OK.

Step 5: You will see changes comparing the snapshot and the current registry. Here, you can manage the changes and revert.
Pros
- Completely free to use.
- Simple interface.
- Compatible with all versions of Windows
Cons
- It can be difficult to use.
- The interface can seem outdated.
Price: Free for personal use and untampered distribution
Download Nirsoft RegistryChangesView
2. Windows System Restore – Built-in Feature
Windows System Restore is an inbuilt utility that allows you to restore the system after any substantial change is made to it. This can help you clean the registry after uninstalling.

How to Use Windows System Restore:
Step 1: Search for system restore in the Windows start menu and open the Create a restore point option.
Step 2: Click on Create and name the system restore point.
Step 3: Once you wish to revert the changes, open the same window again.
Step 4: Click on System Restore and select the Restore point created in the second step.

Step 5: Click on Finish to start the system restore.
Pros
- Pre-installed utility on Windows PCs.
- Easy to use.
- Non-technical interface.
Cons
- There is no registry-specific cleaning, only a system rollback.
- Limited customization of the restore point.
Price: Pre-installed utility/free to use
3. IObit Uninstaller – Modern and Advanced Interface
IObit Uninstaller is free software that lets you completely uninstall software from Windows. When you uninstall any particular software in Windows, some residuals are left in the system. Many of these are stored in the Windows registry. IOBit helps clean all of these.
What I liked about this software is that it is pretty straightforward, has a modern interface, and works well.

How to Use IOBit uninstaller:
Step 1: Launch the software, go to the Software health tab, and click Scan Now.
Step 2: You can view the logos for uninstallation leftovers, which show unrequired registry entries you can clean up. Click on Fix All to remove them.
Pros
- Easy-to-use interface.
- Many free features.
- All-rounder uninstaller tool.
Cons
- Comes with bundleware.
- Spammy notifications.
Price: Free; Subscription $15-$17/year
Download IObit Uninstaller
4. Using Geek Uninstaller – Advanced and Feature-Pack
Geek Uninstaller is a free-to-use powerful software uninstaller that allows you to uninstall and clear uninstallation leftovers. It lets you view the registry entries, installation folder, and other granular details.
What I like about this software is that it is easy to use. There are no unnecessary notifications and no restrictions unless you want more features. The basic version is free, genuinely helpful, and feature-packed.

How to Use Geek Uninstaller:
Step 1: Launch Geek Uninstaller, which will show all the non-Microsoft store software on your PC.
Step 2: Find the software you wish to uninstall and double-click it.
Step 3: Once the software is uninstalled, Geek uninstaller will automatically check for any residuals and allow you to clean them.
Pros
- Feature-packed free version.
- Simple interface.
- Allows uninstallation of Microsoft Store apps as well.
Cons
- It doesn’t let you clean the registry alone, as uninstaller is baked into the process.
- No way to restore the changes.
Price: Free; Subscription: $24.95 for a lifetime.
Download Geek Uninstaller
Was this helpful?
Thanks for your feedback!
The article above may contain affiliate links which help support Guiding Tech. The content remains unbiased and authentic and will never affect our editorial integrity.
Ходят слухи, что в реестре Windows сидит маленький фиксик, который записывает вручную всю информацию о программах и их процессах, и если очень сильно попросить, то он сам все починит и наведет порядок. На самом же деле, никакого фиксика не существует и данные приложений имеют свойство накапливаться. И чем их больше — тем медленнее работает ваша система.
Так что регулярную очистку от лишних процессов стоит взять в свои руки. А о том, что такое реестр, как его чистить и чем это сделать — читайте дальше.
Что такое реестр
Это база данных в системе Windows, которая хранит информацию о работе и настройках каждого установленного приложения. Также туда сохраняются выставленные на ПК настройки и информация о подключенных к нему внешних устройствах (наушники, колонки, клавиатура, мышь и так далее). Благодаря этим данным, система обрабатывает запросы быстрее, а в приложениях реже случается сбой.
Все компоненты работают, пока включен ПК, и каждое действие, которое совершаете вы или Windows, сохраняется в базе данных и дополняет ее. Так что со временем могут скопиться записи, которые уже не нужны:
- действия и настройки удаленных программ;
- записи о вирусах, которые убрал антивирус;
- удаленные расширения браузера;
- данные об исправленных системных ошибках.
Нужно ли чистить реестр
Удалять полностью данные ни в коем случае нельзя, так как они обеспечивают стабильную работу вашего ПК. Однако можно их немного проредить, чтобы убрать ненужные данные и ускорить работу системы. Одинаково вредно для стабильной работы и отсутствие сохраненных данных, и слишком большое их обилие. Оба пункта провоцируют ошибки, так что стоит убирать только ненужные файлы.

Очистка реестра Windows 10 проста, но перед этим мы все-таки рекомендуем создать резервную копию. Особенно важно это сделать, если вы собираетесь делать все вручную. Своевременно убирать мусор из системы, конечно, полезно, но главное не навредить и иметь возможность вернуть все как было.
Как создать резервную копию
Резервные копии позволяют вам восстановить системные файлы, если в процессе выполнения определенных операций что-то пошло не так. В нашем случае ее нужно создать, перед тем как почистить реестр.
Для этого нужно выполнить следующие действия:
- Открыть поисковую строку в меню «Пуск» и ввести в нее слово «Выполнить», либо нажать комбинацию клавиш Win+R для запуска системной утилиты;
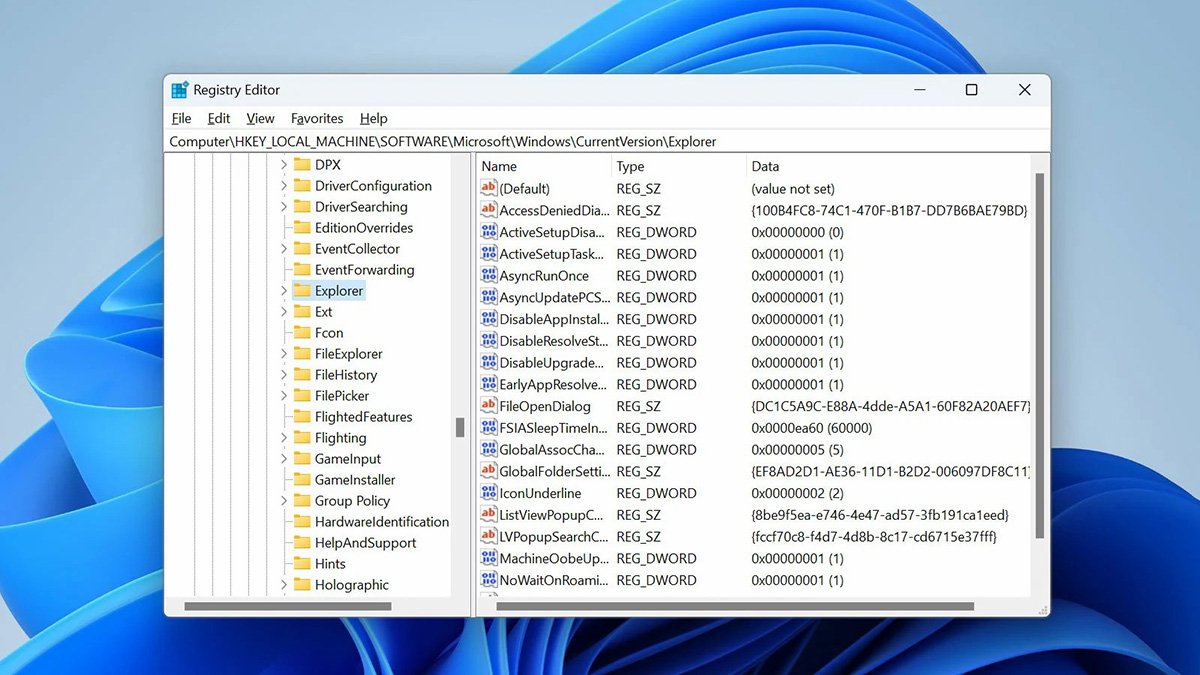
- В открывшемся окне ввести regedit и нажать ОК;
- В редакторе реестра открыть раздел «Файл» (File);

- Кликнуть на пункт «Экспорт» (Export);
- Выбрать путь для сохранения файла и дать ему имя, чтобы не потерять среди других компонентов ПК.
Рекомендуем сохранять резервную копию на флешке или внешнем жестком диске. Это нужно на случай, если в процессе очистки что-то пойдет не так и вы потеряете доступ к файловому хранилищу ПК.
Как почистить
Итак, что такое реестр вы знаете, резервную копию сделали, теперь пора приступать к очистке. Есть два стула: программы и ручная работа. Каждый из методов имеет свои плюсы и минусы, и мы рассмотрим их чуть подробнее.
Программы
Программы — самый простой способ очистить реестр в Windows 10. Они автоматизируют процесс и сами убирают лишние файлы. Если вы используете их для удаления устаревших данных, то скорее всего никаких проблем с работой системы после чистки не будет. Но также есть и минус — программы могут удалить не все, и подтормаживания сохранятся.

Поэтому важно найти хорошую утилиту. И пару таких примеров мы рассмотрим ниже. Расскажем о плюсах и минусах, чтобы вы знали, что качаете. А еще все описанные ниже программы работают на русском языке, так что вам не придется разбираться с новым интерфейсом на английском языке.
CCleaner
Пожалуй, это одна из самых популярных программ для ПК в принципе. Ею часто пользуются, когда нужно освободить место на системном диске и удалить лишние файлы. При этом вам даже необязательно покупать полную версию, достаточно будет и пробного варианта утилиты с урезанным функционалом.

Единственный минус — версия с официального сайта может не работать в России, но вы можете скачать ее со стороннего сайта, в том числе — один из прошлых выпусков.
А вот как почистить реестр с помощью CCleaner:
- Установите и запустите программу;
- Зайдите в меню «Реестр»;
- Проверьте наличие галочек в пункте блока «Целостность реестра»;
- Запустите поиск проблем в системе с помощью одноименной кнопки;
- Когда программа обнаружит проблемы, нажмите «Исправить» (на этом этапе можно создать резервную копию, если вы не сделали этого раньше);
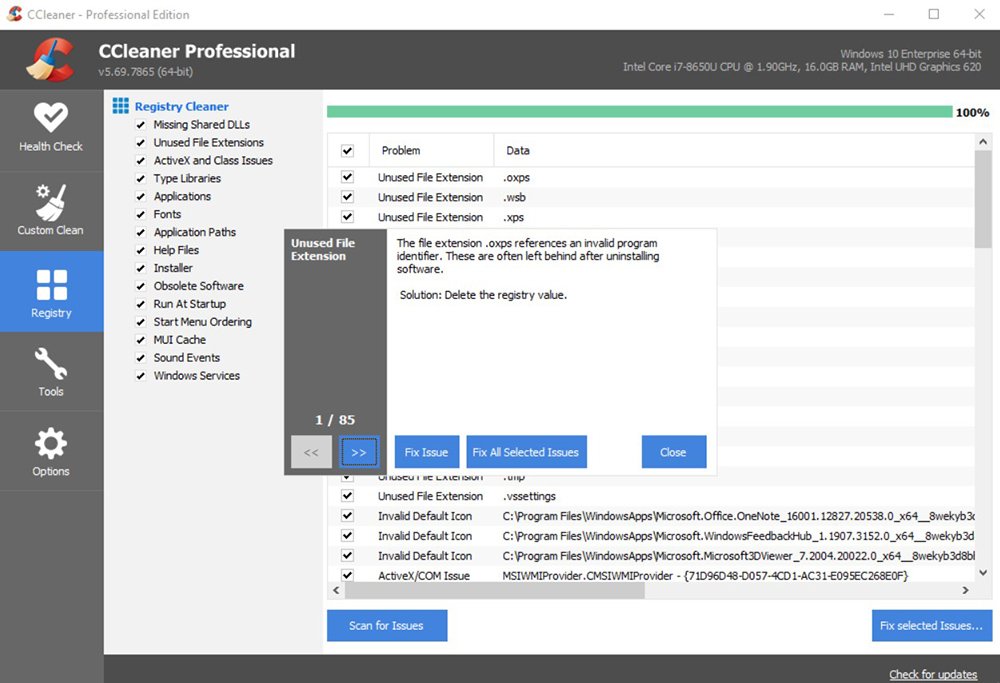
- Запустите очистку и подождите немного, пока CCleaner закончит работу;
- При необходимости повторите действия.
С помощью программы можно убрать ошибки в работе системы и ПК начнет работать быстрее. Из минусов только то, что некоторые компоненты все-таки придется убирать вручную.
Auslogic Registry Cleaner
Еще одна полезная утилита для очистки реестра — Auslogic Registry Cleaner. Она также, как и CCleaner, делает полное сканирование данных на вашем ПК и удаляет мусорные файлы, которые хранят информацию об удаленных программах и другие ненужные вещи.
Из минусов — долгая работа программы. Анализ и сама очистка займут не меньше 10 минут точно, но и вычищает она все тщательно. А еще ее можно скачать бесплатно с официального сайта разработчика.
Процесс работы похож на CCleaner, вам нужно запустить анализ системы, выставить настройки файлов, которые нужно будет удалить (ошибки, устаревшие файлы и так далее), а потом просто вычистить все ненужное. Рекомендуем после этого перезагрузить ПК.
Advanced System Care
Третий вариант утилиты для работы с реестром — Advanced System Care. Она работает в автоматическом режиме. Достаточно будет запустить сканирование и можно вертеться на стуле, пока программа работает сама. А скачать ее тоже можно бесплатно с официального сайта.
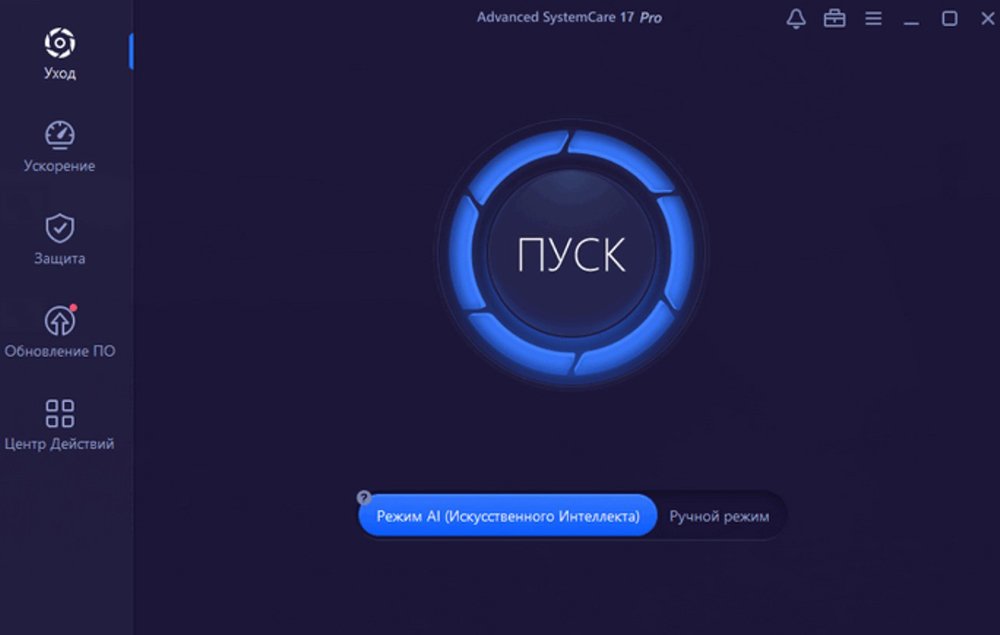
Работа утилиты, опять же, похожа на описанные выше варианты. Запустили сканирование — нашли проблемы — автоматически избавились от них с помощью одной кнопки. После этого перепроверили все еще раз при необходимости и перезагрузили ПК. Все готово.
Вручную
Этот вариант подходит пользователям, которые уверенно владеют ПК и знают, файлы каких программ могли остаться в реестре Windows 10. Все потому, что вам нужно действовать очень осторожно, чтобы случайно не удалить системные компоненты, и крайне внимательно проверять названия файлов. Но если вы уверены в своих силах — читайте нашу инструкцию.
А вот как почистить реестр на Windows 10 вручную:
- Откройте окно командной строки с помощью поиска в меню «Пуск» или диалогового окна «Выполнить» (Win +R). Чтобы вызвать командную строку введите в поиске cmd.
- В окне командной строки впишите regedit и нажмите Enter, чтобы запустить редактор реестра от имени администратора.
- Разрешите программе вносить изменения в Windows.
- Сделайте резервную копию, если не сохранили ее ранее.
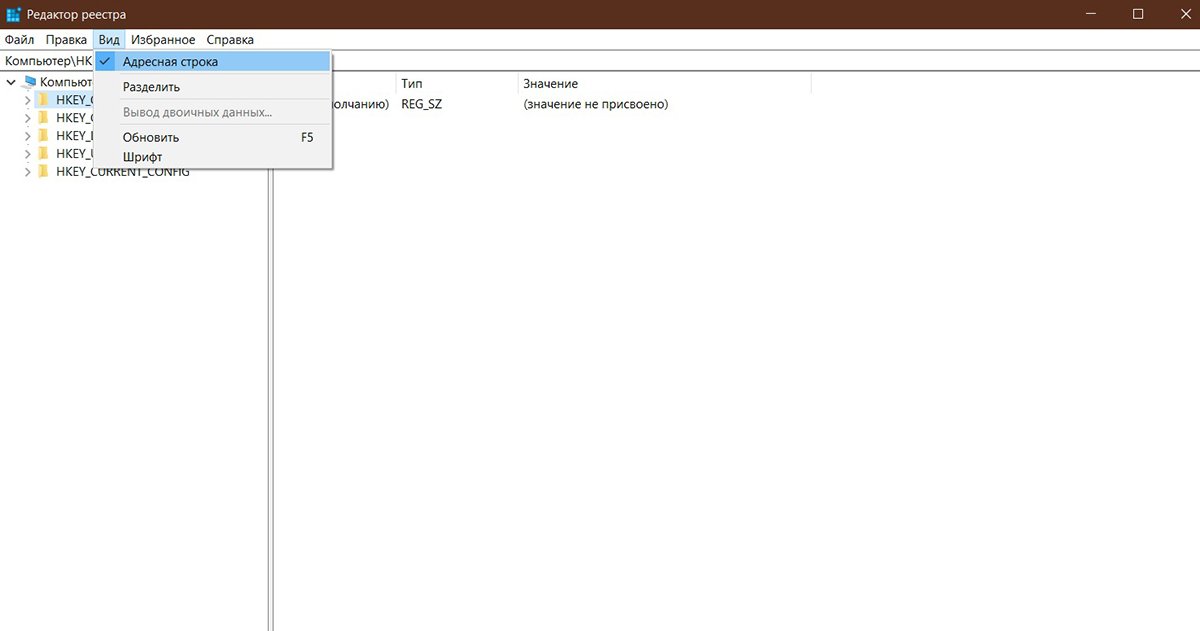
- Во вкладке «Вид» установите галочку возле пункта «Адресная строка».
- В адресной строке введите HKEY_CURRENT_USER и нажмите Enter.
- Откройте папку SOFTWARE в меню слева и вы увидите список всех когда-либо установленных на ваш ПК приложений, чьи файлы все еще хранятся в реестре.
- Удалите ненужные файлы.

Опять же повторим, что делать все нужно осторожно и внимательно следить, чтобы вы случайно не зацепили файлы установленной на ПК программы. Если папок слишком много, но вы помните, какие приложения удалены и больше не понадобятся — можно воспользоваться поиском по названиям через комбинацию клавиш CTRL + F.
Исправление ошибок
Если после чистки все равно остались какие-то ошибки в системе и программы работают с лагами, хотя вы не трогали их папки — проверьте ошибки реестра. Сделать это можно самостоятельно, без установки дополнительных программ и приложений.
Следуйте нашей инструкции:
- Запустите командную строку от имени администратора.
- Введите в ней команду sfc /scannow (пробел обязательно нужен) и нажмите Enter.
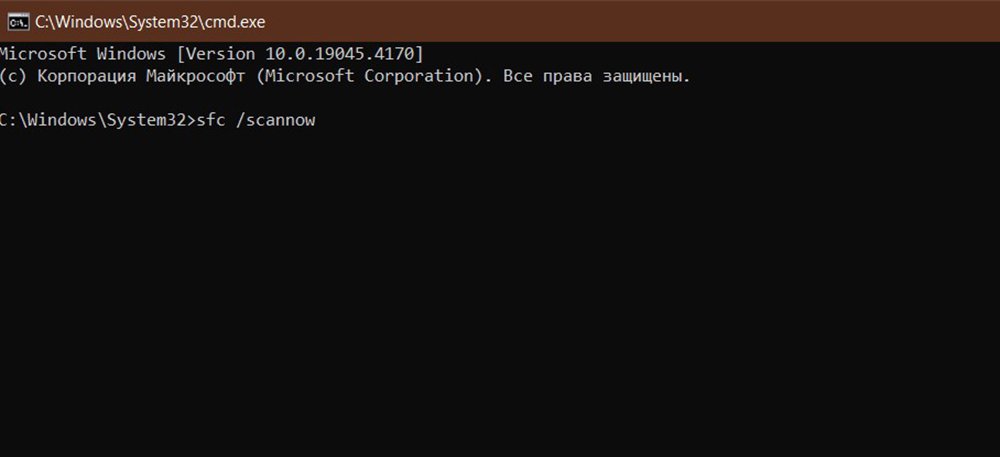
После этого команда запустит автоматическое сканирование системы. Выключать ПК в это время нельзя, дождитесь окончания процесса. После этого вы увидите, какие системные ошибки остались на вашем ПК и сможете убрать их вручную или с помощью одной из программ, что мы описали выше. Конечно, если ошибок слишком много, стоит рассмотреть тяжелую артиллерию в виде переустановки Windows полностью.
Теперь вы знаете способы очистки реестра на вашем ПК и сможете пользоваться им когда понадобится убрать ошибки и лаги приложений. Не забывайте регулярно проверять компьютер и своевременно его чистить от лишних файлов.
Заглавное фото: CQ.ru
Windows Registry is a complex database that contains entries about your computer’s hardware and software. Usually, you don’t need to make any changes to the registry files. However, sometimes, they can cause some problems like error messages, computer running slow, and more. In this case, cleaning registry might be helpful. Follow this guide to get 4 ways to clean registry files on your PC.
Every time you install apps or hardware on your Windows device, new registry entries are created. Even if you uninstall them, the corresponding registry entries are not always removed completely. Over time, you will get thousands of useless registry entries.
Although they only occupy a little disk space, your operating system has to run all of them, which will slow down your computer in the long run. Things will get worse if your device is attacked by malware. Malware will mess up the registry and make your computer vulnerable.
Therefore, you need to clean your registry every few weeks to prevent some possible issues and boost your system performance. Since most of you are not familiar with Registry Editor, you might have no idea about how to clean registry Windows 10/11. In this guide, we highlight 4 ways to clean Windows registry for you.
Preparation: Back up Registry Files
Before cleaning your registry, it is advised to back it up because deleting certain entries from the registry might cause some severe problems. To do so:
Step 1. Press Win + R to open the Run dialog.
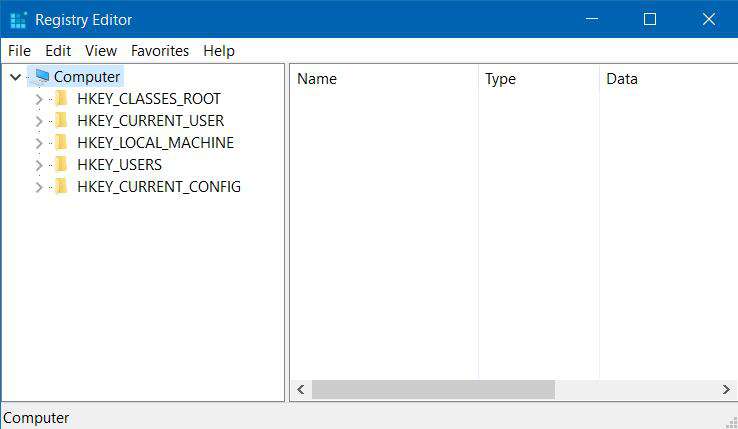
Step 2. Type regedit and hit Enter.
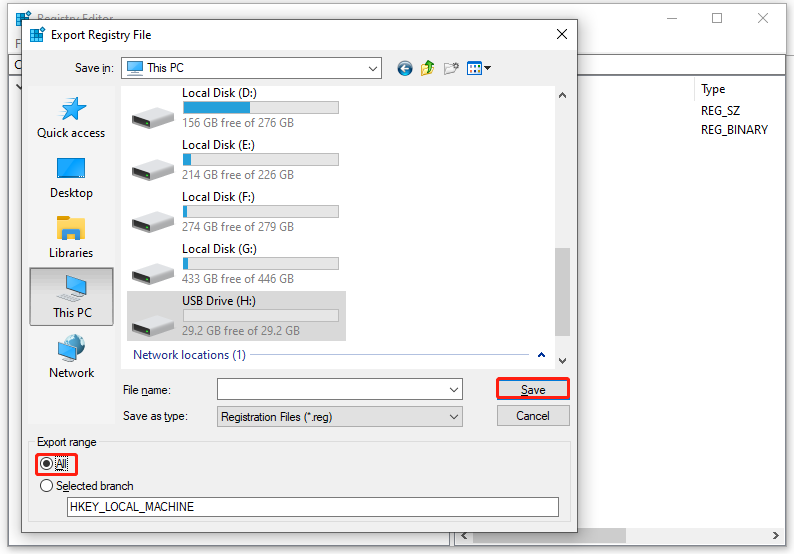
Step 3. In Registry Editor, click on File in the upper left corner and select Export from the context menu.
Step 4. Select All as Export range > enter the name of the file > choose a safe location > hit Save.
Tips:
If you only want to back up a specific branch, tick Selected branch and type its path.
It is advisable to save the registry backup to a USB flash drive or external hard drive in case that you need to restore it after a system crash.
Also see: How to Backup and Restore Registry in Windows 10
How to Clean Windows Registry via MiniTool System Booster
Speaking of cleaning registry and improving system performance, MiniTool System Booster is an optimal choice for you. It is one of the most reliable free registry cleaners that help you to clean Windows registry safely with simple steps.
In addition, this tool can speed up your PC by deleting junk files, erasing browsing history, removing deceptive & unwanted programs, and more. Now, let’s see how to clean registry files via this tool:
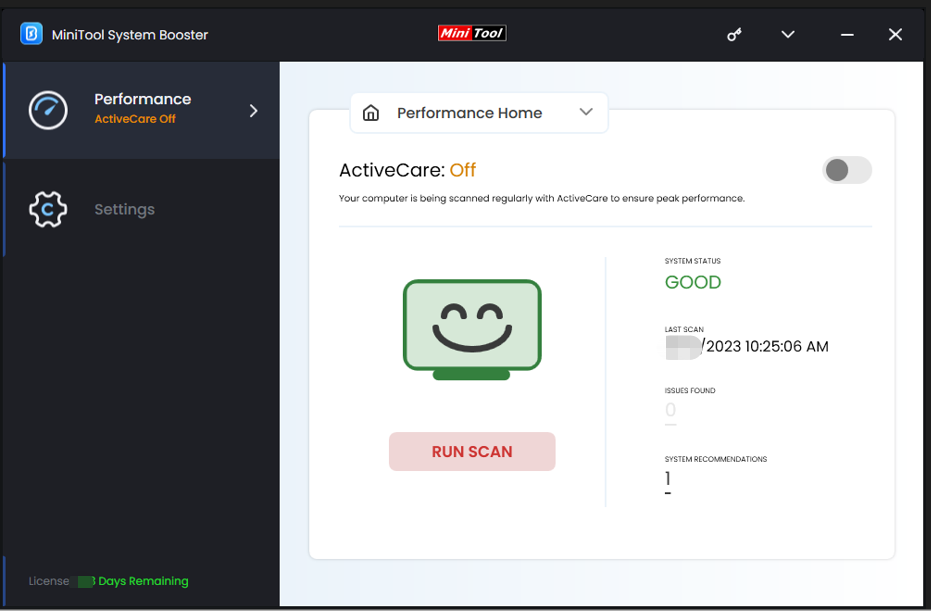
Step 1. Launch MiniTool System Booster.
MiniTool System Booster TrialClick to Download100%Clean & Safe
Step 2. In the main page, toggle on ActiveCare and hit RUN SCAN to start scanning your computer for issues.
Step 3. After scanning, hit FIX ISSUES to solve all the found problems.
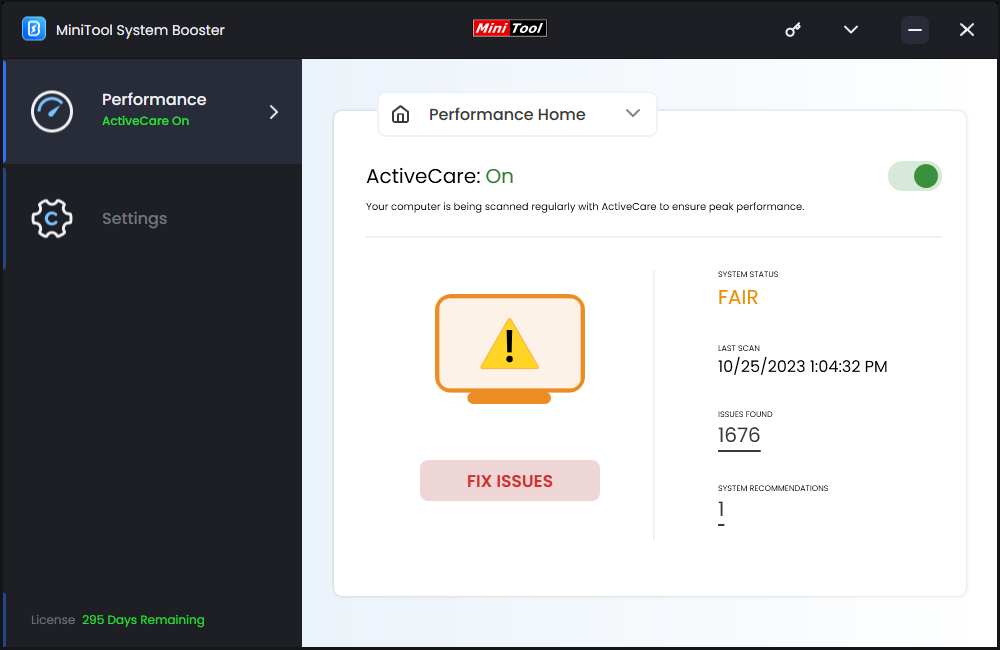
In addition, you can hit the number under ISSUES FOUND to view the details and choose what to clean up. As you can see, MiniTool System Booster will detect Internet junk files, Windows junk files, registry issues, and available memory for you.
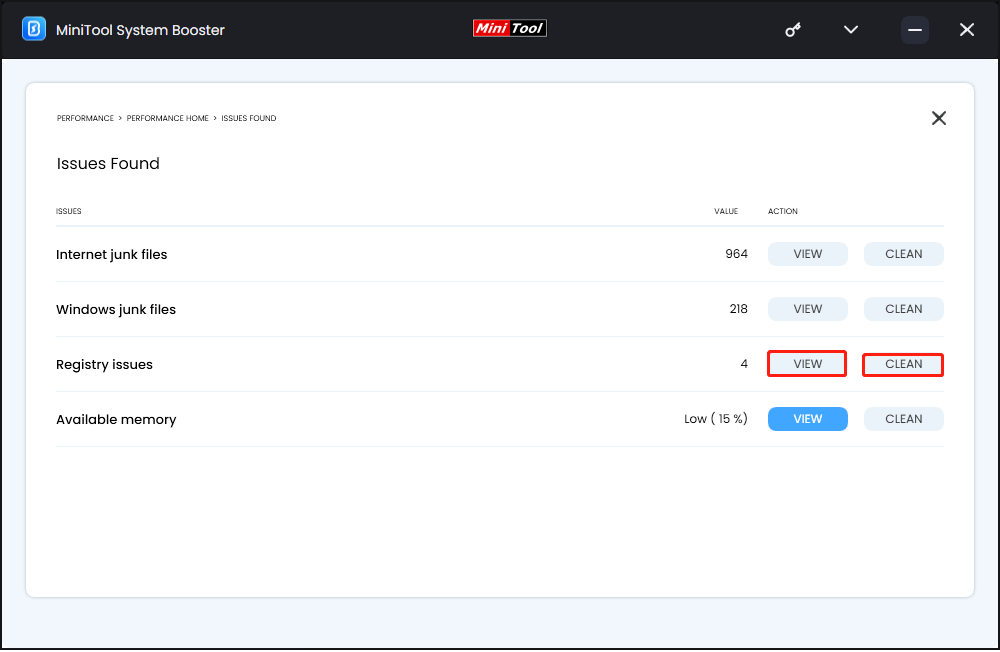
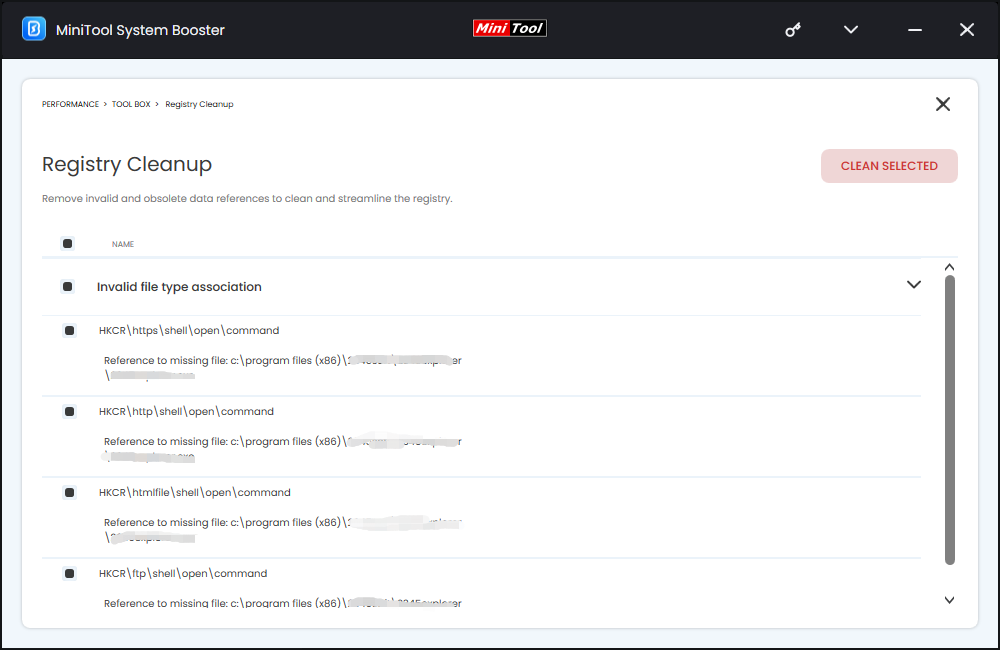
If you hit VIEW, you can view all the problematic registry entries. Tick the items you want to clean and hit CLEAN SELECTED to delete them.
How to Clean Windows Registry via Disk Cleanup
Disk Cleanup is one of the most effective inbuilt tools that manage disk space on your PC. Although it doesn’t clean the Windows registry directly, it will cleanup and remove files that contain data in the registry. Once these data is deleted, the corresponding registry entries will also be deleted. Follow these guidelines:
Step 1. Press Win + S to evoke the search bar.
Step 2. Type disk cleanup and hit Enter.
Step 3. Select the system drive and hit OK.
Step 4. Click on Clean up system files and select the files you want to delete.
How to Clean Windows Registry via Command Prompt
Deployment Imaging Serving and Management, also known as DISM, is another core Windows tool that can scan system files and images for corruption or any other changes. At the same time, you can also use it to clean registry to some extent. Here’s how to clean registry Windows 10 via CMD:
Step 1. Run Command Prompt with administrative rights.
Step 2. In the command window, type DISM /Online /Cleanup-Image /CheckHealth and hit Enter to scan the system image for corruption.
Step 3. Run DISM /Online /Cleanup-Image /ScanHealth to perform a more advanced scan to determine whether the image has any problem.
Step 4. Run DISM /Online /Cleanup-Image /RestoreHealth to repair any issues that DISM detects.
Also see: Best Fixes: DISM /online /cleanup-image /restorehealth Is Stuck
How to Clean Windows Registry via Registry Editor
If you know the exact paths of the registry entries you need to remove, you can choose to remove them manually in Registry Editor. In this process, you can’t be too careful as you are likely to delete something crucial by mistake. Here’s how to clean registry Windows 10 manually:
Step 1. Press Win + R to open the Run box.
Step 2. Type regedit and hit Enter to open Registry Editor.
Step 3. Navigate to the key you want to remove or press Ctrl + F to find it. If you want to find keys about apps and programs, you can expand the HKEY_LOCAL_MACHINE, HKEY_CURRENT_USER, and HKEY_USERS folders.
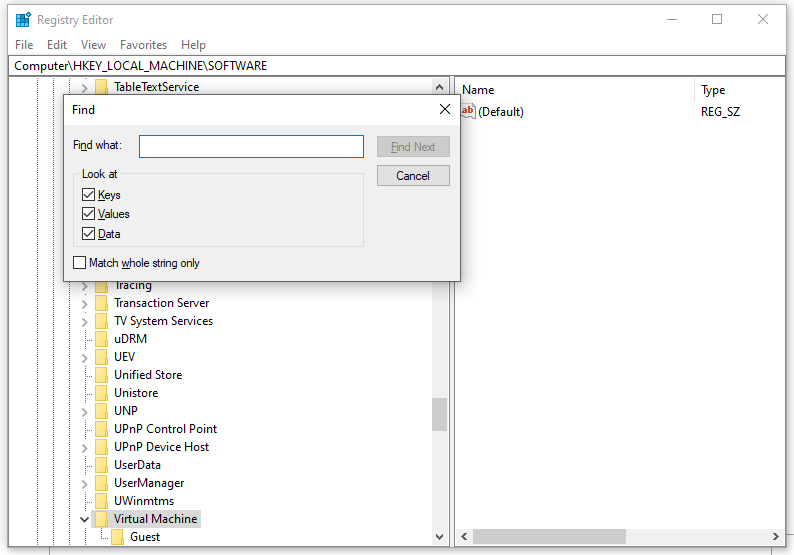
Step 4. Right-click on any key or folder you want to get rid of and select Delete from the context menu.
Also see: How to Fix: Error While Deleting Key on Windows 10/11/8/7
Final Words
By following the steps outlined in this guide, you can clean Windows registry safely and easily. Also, don’t forget to create a backup of your registry files before proceeding. Once you delete some essential entries mistakenly, you can import the backup and restore your registry data. Hope you can keep running your PC smoothly via regular registry cleaning tasks.
Before we proceed with how to clean with Registry in windows 10, the first and the foremost thing to do is to know what exactly a REGISTRY is! Ok, so just reel back for a moment to the point when you first started using your computer or laptop, and try to process or recall all that you have done so far in your system, taking into account that the system has never been formatted or cleaned before.
So basically all that you have done to the minute level so far till this date are all recorded in your Registry. So practically when you open your registry its is literally a complete mess because the registry does not clean up when its done with a particular business. So it constantly creates entries but seldom removes them when they are not needed any more. This way it create a lot of unused and garbage registry entries which affect the overall performance of the system, sometimes even slowing down the booting speed also. Thus it is very important to clean your registry from time to time to maintain an efficient performance of the system.
The article here would depict few of those effective methods to carry out the cleaning of Registry in Windows 10 computers and laptops.
Method #1: Clean Registry in Windows 10 Manually
Here in this section, instead of using third-party tools we would enter the registry and clean the unused entries or keys commonly called, manually to clean the directory. The steps are very easy which are laid out below as follows:
Step 1. Turn on your Computer and press “Windows + R” to launch the Run command.
Step 2. In the empty search box, enter “regedit” and hit “Enter” to open the Windows Registry Editor.

Step 3. Once the registry editor is opened, navigate to the right side of the panel and click on “HKEY_CURRENT-USER” > “Software key”.
Step 4. Look out for the sub keys of “Specific User Account”.
Step 5. Select any entry which relates to any software or application which is longer used. Right-click on it and select “Delete” from the context menu.
Step 6. Again go to the following location:
HKEY_LOCAL_MACHINE > Software key > software sub keys for the specific user
Step 7. Select all the non-existing tools applications, right-click on it and choose “Delete” to get rid of them all.
Step 8. Now go to the following location:
HKEY_LOCAL_MACHINESOFTWAREMicrosoftWindowsCurrentVersionSharedDLLs
Step 9. Check for the DWORD values with broken path. Right-click on the entries and select “Delete”.
Step 10. Navigate now to the location:
HKEY_CURRENT_USERSoftwareMicrosoftWindowsCurrentVersionRun
Step 11. Check out for the incorrect path and right-click to delete the span startup entries.
Once you are done with all these, a lot of garbage entries which are no longer needed get removed from your windows 10 registry.
Don’t miss: How to burn ISO file to DVD on Windows 10
Method #2: Clean Registry on Windows 10 using Registry Cleaner
Registry Cleaner is a wonderful registry cleaning tool which not cleans the registry but prompts you to create a backup before cleaning in case you need the deleted entries sometime later in the future. Besides it provides many other tools to facilitate the process of cleaning. The steps to use the tool are given below:
Step 1. Download the program file from the official website and install it with all terms and conditions. Launch the program and from the right side of the panel click the “Registry” icon.
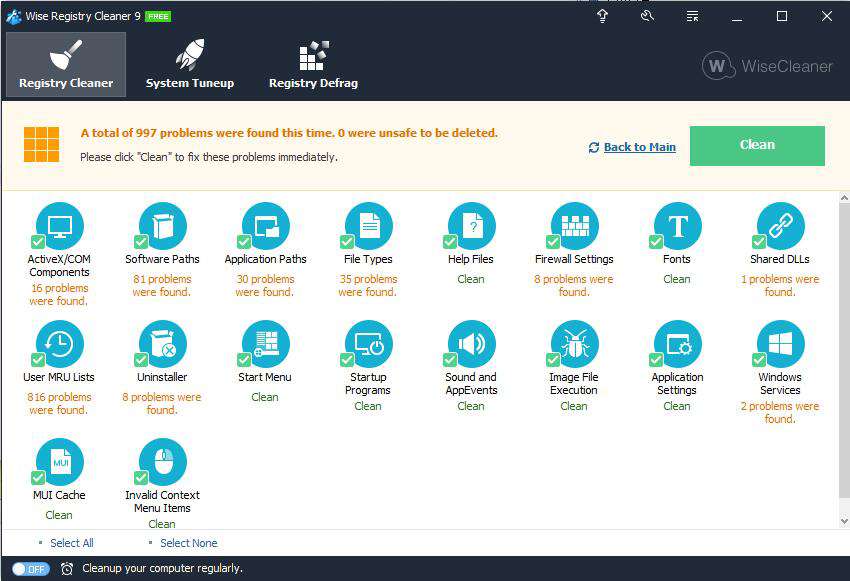
Step 3. Select the items that you need to “Scan” under the Registry Clean.
Step 4. Click “Scan for issues” and you will get to see a progress bar and number of potential threats or issues as outcome. Once the issues are listed, right-click anywhere on the screen and select “Save to text file…” to save the list as a text file.
Step 5. Select the issues that you want to delete after analysis, and click “Fix Selected issues…”
Step 6. When you are prompted to create a back up the selected entries, click “Yes” to continue the backup process. Choose the location where you want to save the backup. The file extension used is .REG.
Conclusion:
Since registry keys are solely responsible for controlling almost every function and operation of your system it is very risky to delete the entries without having proper expertise and knowledge of the system files. Mostly people don’t have that knowledge thus it is safer to create a backup in case you have deleted some essential files which can be retrieved later on as per the need.
Related Articles:
- How to Encrypt A USB Flash Drive on Windows 10
- If Ophcrack doesn’t Work on My Windows, What’s the alternative?
- How to Burn ISO Image to Bootable USB Drive on Windows
Most of us know a thing or two about computers, even if it’s just a basic understanding of using them. However, even with everyday use, there are still aspects or components of your PC that you may not understand, and one of those things is the Windows Registry. Perhaps you’ve heard of the registry but unless you’ve had to go in there before, you might be intimidated by it. Generally speaking, computer users shouldn’t have to regularly access the registry, however, if your PC is running slower than usual or if you have registry errors, it may be time for you to learn how to perform a thorough registry clean for Windows 10 and 11.
The Windows Registry is a section of your computer that contains and records pretty much everything on your computer. Often called “the heart” of a computer, the registry stores information and settings for operating system configurations, user preferences, software programs, and hardware devices.
The longer we have our PC, the more frequently we add new downloads, installations, and updates to our machine. There is nothing wrong with downloading new programs or installing new updates, but it may eventually slow down your computer.
This is where your registry comes into play. Every program, application, driver, utility, game, and download has data that will be stored in your operating system’s registry. When it begins to overflow with unwanted information, it can actually cause your computer to crash. Doing registry cleanups for Windows 10 and 11 can help improve performance and prevent crashes if done correctly.
How To Clean Registry in Windows 10 and 11
One of the most critical things to remember is that the registry is a very fragile component of your computer. If you mess with it too much or incorrectly, it can essentially destroy Windows. With that being said, it is essential to exercise caution while cleaning the registry in Windows 10 and 11, especially if you are doing it manually.
There are a few different methods that you can use to do a thorough registry cleaning for Windows 10 and 11, including Windows tools and third-party registry cleaners, so let’s discuss so you can choose what option works best for you. It’s essential to backup your data and your registry before attempting to clean it.
Preparation: Back up Registry Files
Backing up your registry is essential in case you accidentally delete a critical file that affects your computer’s functionality. The Windows Registry contains crucial system settings, and making changes to it can lead to stability and boot problems. To ensure you can revert changes if needed, follow these steps to create a backup:
- Open Registry Editor:
- Press Win + R, type regedit, and hit Enter.
- If prompted for confirmation, provide the necessary credentials.
- Locate the Registry Key or Subkey:
- Navigate to the specific registry key or subkey that you want to back up.
- Export the Registry:
- Click on File > Export.
- Choose a location to save the backup file (e.g., your desktop).
- Provide a descriptive name (e.g., “Registry Backup 11-16-18”).
- Click Save.
How to Clean Windows Registry via Disk Cleanup
One of the easiest ways to clean your Windows 10 or Windows 11 registry is to launch Disk Cleanup. The utility tool comes pre-installed with your operating system and can help to uninstall and clean old and unnecessary files. Keep in mind that Disk Cleanup does not actually clean your registry directly, but it can clean up and remove files that may still have data in the registry. When Disk Cleanup is performed, registry data entries are often removed and deleted as well. To keep your PC running smoothly and to maintain performance, it’s a good idea to regularly perform Disk Cleanups.
- Press Start and type Disk Cleanup in search bar
- Click on app
- Once the app opens, a window will appear, select the Windows C: drive and then click OK
- After the tool completes its scan, click on Clean up system files
- Click OK again (this prompts a second scan with additional options)
- After the scan is complete, you can browse through more files that you can delete
- Click OK
How to Clean Windows Registry with Windows DISM
Another method that can contribute to a healthier registry is the DISM from Windows. According to Microsoft, Deployment Image Servicing and Management (DISM.exe) is a command-line tool that can be used to service and prepare Windows images and system errors. DISM helps to repair any issues that may be associated with broken registry entries and can significantly reduce registry issues on your PC.
Third-Party Software Applications for cleaning Registry
If you are not comfortable learning how to clean the registry in Windows 10 or 11, you should consider third-party computer cleaning softwaresoftware applications. Cleaning the registry manually requires caution and sometimes it’s best to leave the cleaning to the professionals. In this case, a registry cleaning program that can safely tidy up your Windows registry for improved PC performance.(We encourage everyone to run a Windows Registry cleaner as their computer begins to age, but it is vital when there are noticeable slowdowns or other issues).
It’s essential to keep up with computer updates, maintenance, and prevention methods to keep your PC in tip-top shape. Performing a registry cleanup using third-party software can make all the difference regarding registry-related issues.
By following these tips, you can keep your Windows registry clean and your PC running at its best.