
-
Home
-
News
- How to Create macOS Bootable USB on Windows 10/11? See the Guide!
How to Create macOS Bootable USB on Windows 10/11? See the Guide!
By Vera | Follow |
Last Updated
It is a good way to create macOS bootable USB on Windows 10/11 when your Mac fails to boot. Don’t know how to make a bootable USB drive for Mac on Windows? Thankfully, MiniTool gives you detailed guidance in this post. Let’s get started.
Some of you choose a Mac to use since it is reliable and secure. However, you may run into bootable issues and the Mac fails to run to the desktop. No matter you are running Windows 11/10 or macOS, it’s a matter of time before the device cannot start up.
If your Mac refuses to boot up due to file corruption, update issue, and other software issues, you can make a bootable medium to repair the Mac. So, how to create macOS bootable USB drive? You can choose to do this thing on a Windows PC by following the guide below.
How to Create Mac Bootable USB from Windows
Note that the operations below apply to many macOS versions, including macOS Ventura, Monterey, Big Sur, Catalina, and Mojave.
Part 1: What to Do Before Creating Bootable USB for Mac on Windows
Before you do, some things should be prepared.
#1. Prepare a USB Drive
Prepare a USB flash drive that has at least 16GB of storage space. Besides, make sure there is no important data saved to this drive. If yes, back up the crucial files to another safe place. You can do this thing via copy & paste or use a piece of free backup software like MiniTool ShadowMaker.
MiniTool ShadowMaker TrialClick to Download100%Clean & Safe
#2. Download Mac DMG File
A DMG file is a type of disk image in macOS that is used to store compressed software installers, just like an ISO file in Windows. To create macOS bootable USB, a .dmg file is required. So, how to download a copy of Mac (.dmg)? Follow the help document from Apple – How to download macOS, then you can get a .dmg file of macOS.
#3. Download TransMac or UUByte
When searching for “make bootable USB Mac Windows 10” or “create a macOS bootable USB on Windows” online via Google Chrome, you may see the related searches – UUByte create macOS bootable USB and TransMac bootable USB.
UUByte and TransMac are third-party tools that can be used to make a macOS bootable USB drive. Just download one of them and install it on your PC. Here, we take TransMac as an example. Note that it is a paid software but you can free try it for 15 days. Just get it via https://www.acutesystems.com/scrtm.htm.
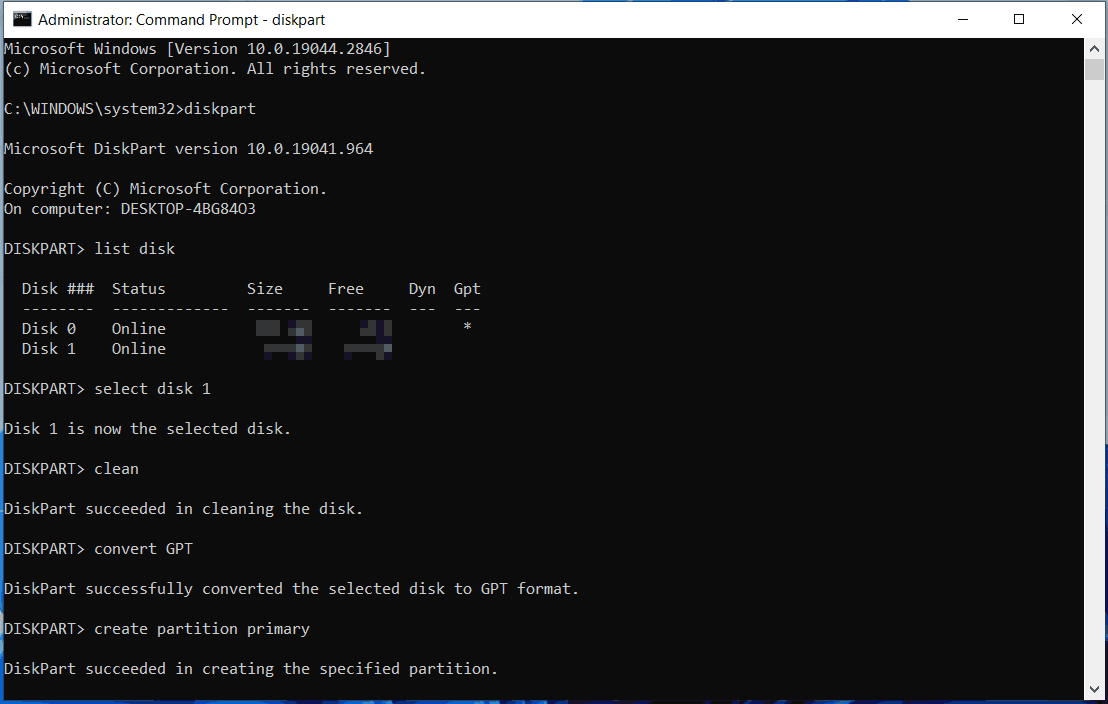
Part 2: Create a GPT Partition on USB
Sometimes the USB drive is not bootable due to the partition issue. So, you first need to convert the USB drive to GPT and then run TransMac for a bootable USB drive.
To create a GPT partition on USB, run Command Prompt as an administrator. Then, type diskpart and press Enter. Next, execute the following commands:
list disk
select disk n: n means the drive letter of your USB drive.
clean
convert GPT
create partition primary
Tips:
In addition to Diskpart, you can run MiniTool Partition Wizard to convert disk to GPT.
After everything is ready, let’s see how to create macOS bootable USB now.
Part 3: Make Bootable USB Mac Windows 10/11
How to make a bootable Mac USB on Windows via TransMac? Accomplish it in these steps:
Step 1: Connect your USB flash drive to your Windows PC and launch TransMac as an administrator.
Step 2: Click Run to start a free trial.
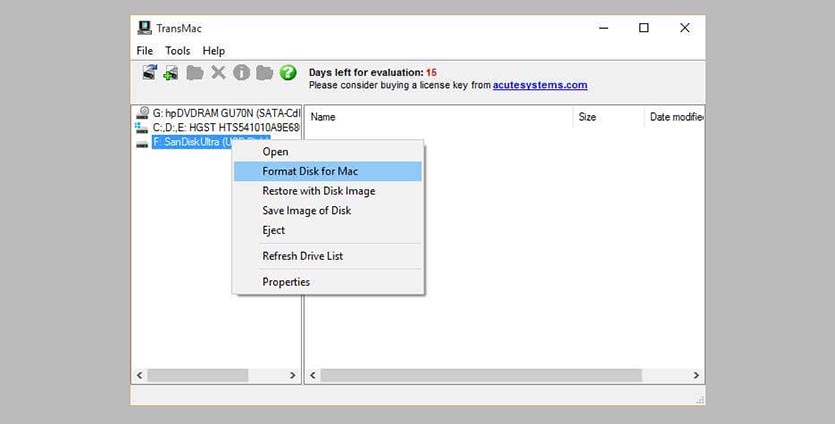
Step 3: Right-click on the USB drive and choose Format Disk for Mac. Then, click Yes to confirm. You are asked to name the USB drive and we type macOS.
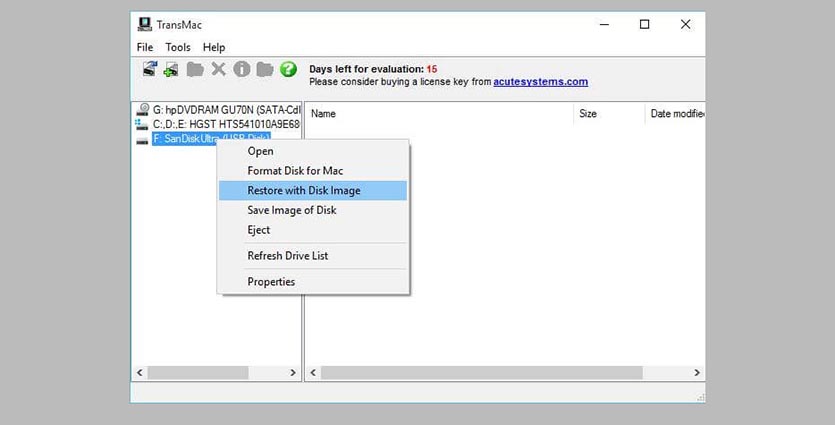
Step 4: Right-click on the drive and choose Restore with Disk Image.
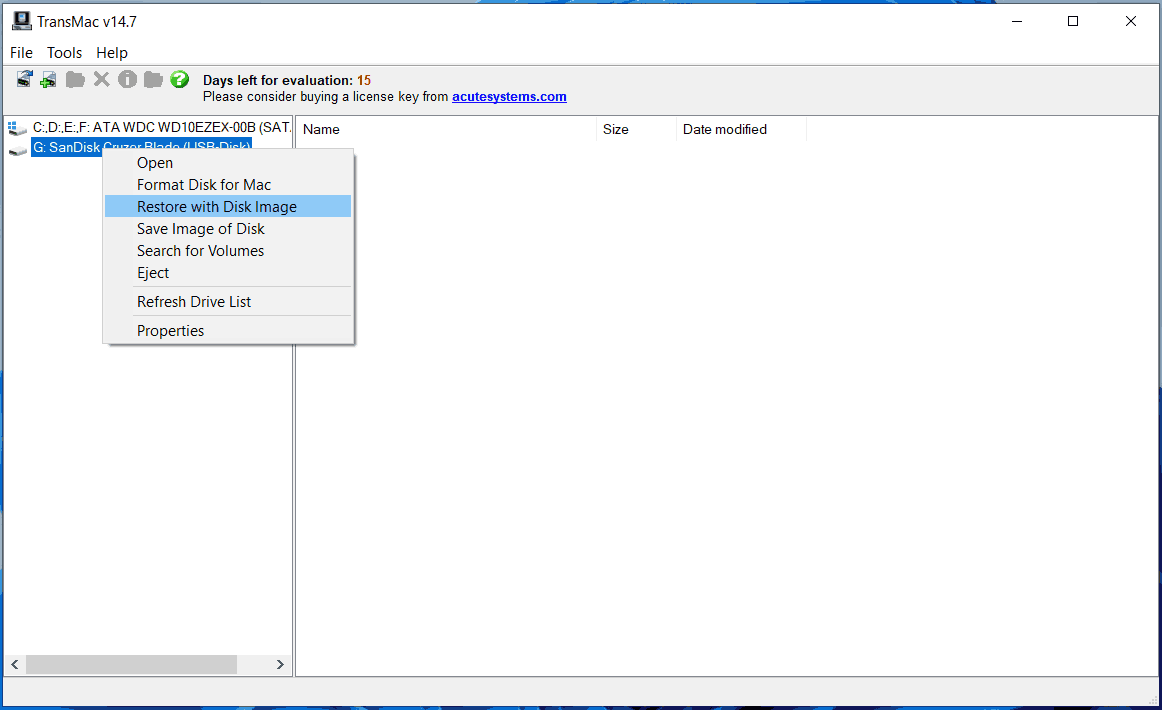
Step 5: Click Yes, choose the .dmg file you have downloaded, and click OK > Yes. Then, this tool is creating a bootable USB drive.
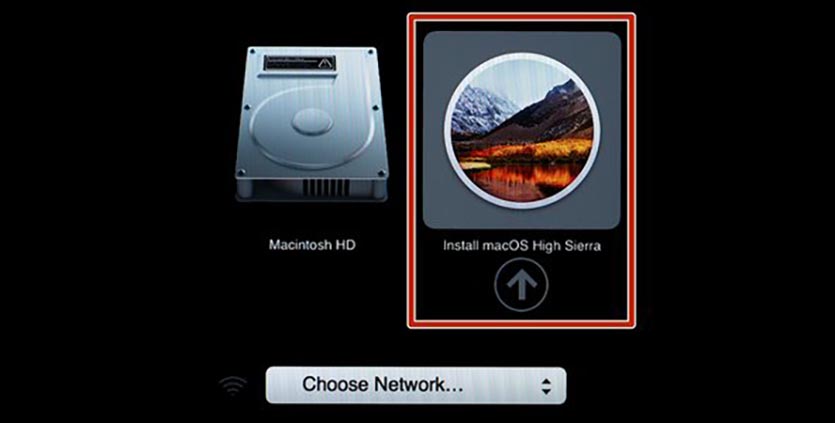
Now you get the bootable USB drive for Mac on Windows. Eject the drive from the PC and connect it to your Mac. Then, run the macOS from this drive to perform a repair.
Verdict
It is a simple way to create macOS bootable USB on Windows 11/10. If you need it to fix your Mac, this guide is helpful to you and just follow the given instructions for a Mac bootable USB from Windows.
About The Author
Position: Columnist
Vera is an editor of the MiniTool Team since 2016 who has more than 7 years’ writing experiences in the field of technical articles. Her articles mainly focus on disk & partition management, PC data recovery, video conversion, as well as PC backup & restore, helping users to solve some errors and issues when using their computers. In her spare times, she likes shopping, playing games and reading some articles.
DMG is a disk image format for Mac just like an ISO file in Windows. Therefore, it is possible to mount a DMG file on a virtual disk or write it to a DVD and access its contents. A macOS installation package with DMG extension enables creating bootable installer DVDs. My first experience with burning a DMG file to DVD was actually on Windows, back in 2013, when Mountain Lion was the operating system. I accidentally formatted the hard disk of my iMac and lost the recovery partition in the process. The only option left for me was buying an OS X Lion Installer disc as the Internet Recovery required a lot of bandwidth and time. Later, I found a way to burn macOS DMG file to a bootable DVD on my Windows laptop. Eventually, I restored my iMac to OS X 10.8 using the same DVD as macOS installation disc.
Let’s start with the process of burning a Mac OS X installer in DMG format (InstallESD.DMG) to a DVD in a Windows environment. Here we use an old version of Mac OS, Mountain Lion, to make a bootable macOS DVD.
Since Apple has changed the file architecture of the macOS installer, this tutorial may be outdated if you plan it for the latest macOS versions. In that case, you need to download a special custom-made version of macOS DMG (bootable) from the Internet or get it converted from a macOS installer. However, from Step 4, the procedure is standard across all macOS variants from OS X Lion.
- Get macOS Installer in bootable DMG format.
- In the video we use OS X 10.8 Mountain Lion downloaded from the Mac app store. You could also find a copy from the Internet.
- Install the free Windows application 7-ZIP (download) to extract and locate InstallESD.DMG, which includes all files to form a bootable macOS DVD.
- Now, download and install TransMac version 12 (15-day trial) for Windows 10 from official website.
- Run Transmac app as administrator, by right-clicking on its icon.
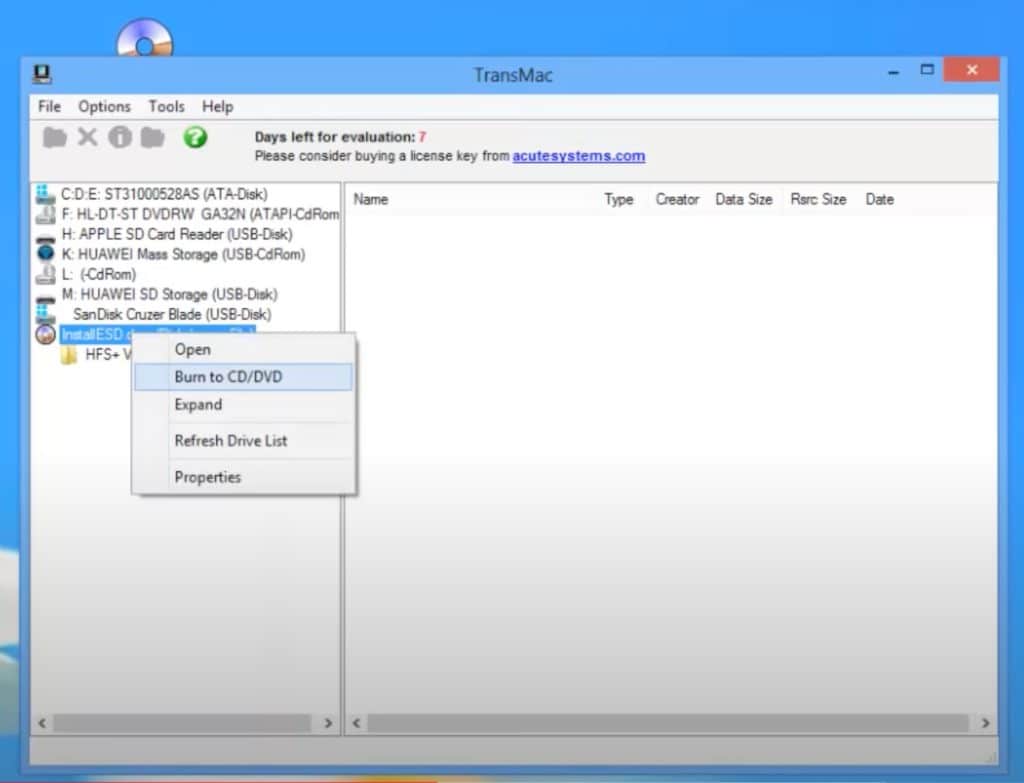
- Click on the File tab at the top, and select the option “Open Disk Image” to load macOS installer DMG file to the software.
- Find the DMG file loaded on the left side, right-click on it and choose to burn it to DVD.
- Once you write InstallESD.DMG file to DVD on Windows, load it to a Mac and start it.
- Press the Option key and select the listed DVD as your installation source.
The DMG files for new macOS versions are around 5.8 and 8 GB. You need a dual-layer (8.5 GB) DVD for a file of that size. Alternatively, if your Mac doesn’t have a DVD drive, you may consider buying a portable DVD writer or making a macOS USB in Windows using the same software.
Make a macOS install DVD in Windows PC from DMG/ISO image
As we mentioned earlier, Apple has changed the file architecture of the macOS installer from OS X Mavericks 10.9. Hence, you cannot follow the above-given technique to directly extract InstallESD.DMG in Windows and make it a bootable DVD in newer macOS variants like High Sierra and above. It may be possible to locate an InstallESD.DMG or Basesystem.DMG from the ‘Shared Support’ folder inside macOS installation package ending with .APP extension, but still, you cannot make it bootable for a USB or DVD. That simply means, the macOS DMG file you would get from Apple.com are not supported.
However, most people searching for methods to burn macOS DVD on Windows don’t have a Mac in a working state. A workaround for this problem is to create macOS bootable DMG file on Mac itself from the official macOS installer [Download macOS offline installer [DMG and APP ]. You could also get it done from your friend’s Mac or at a service centre and mail it to your Windows PC.
Watch the following video from 2.20 to create a macOS bootable DMG file. Then Transfer it a a Windows PC online or with the help of a USB disk.
Alternative options to burn DMG in Windows 10 without DVD drive.
If you have an old iMac or MacBook Pro with a DVD slot, you may use the above method to restore macOS through a bootable DVD installer created from a DMG source. However, as you know, none of the new Macs has an optical drive. Let’s check out a few alternatives.
- Format a USB Drive to GPT partition scheme in Windows. Next, restore the macOS Mojave or High Sierra DMG using Transmac.
- Get a portable DVD writer to boot into macOS installer.
External hard disks also work well for this requirement provided the file system is in the HFS+ format with GUID partition scheme.
Burn DMG to USB for new macOS versions
Looking for a way to burn the DMG files and create new MacOS Installer on your Windows computer? Here is the simplest and universal method to write macOS files with DMG extension to USB disc on Windows.
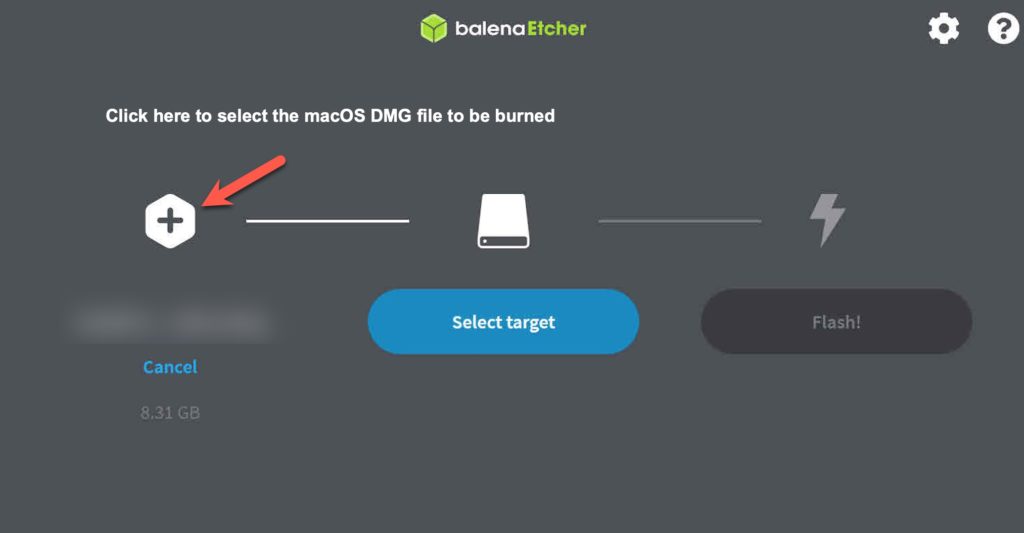
First of all, download the macOS DMG file as discussed above. Now get BalenaEtcher app for Windows. Click on the + icon to add the downloaded DMG image and choose a target USB disk, then press the Flash button to burn the disk following the on-screen instructions.
Ever transferred data from your macOS computer to your Windows and seen unique file formats?
One of the formats that come from the macOS is DMG. To explain in the simplest manner, a DMG file is a disk image file used for macOS software. DMG is the newer version of the past file format IMG, which was used for Mac Classic.
Now, if you have a DMG file on your Windows computer and are unsure how to open and save it, this post is for you.
Why Do You Want to Open a DMG File on Windows OS?
There can be a variety of reasons behind you wanting to open a DMG file on your Windows, but I’d imagine the common reasons would be:
- You just migrated your data from macOS to Windows OS with a backup file.
- Your client sent you these files to unpack.
- You downloaded a DMG file from the internet.
In all the above cases, if you cannot open the file, it can be quite frustrating.
Also read: Zip, Unzip, Protect, and Share Files on Mac with WinZip
How to Open DMG Files on Windows OS?
It can seem confusing how to extract DMG files. While your smart brain might tell you to convert them to .ZIP, there’s an easier way to access it.
The answer is to use DMG extractor tools. Let’s check the best options out there that you can use to open your DMG files right away.
A tool by Reincubate, DMG Extractor, is the perfect solution to your problem. It instantly opens DMG files on your Windows computer by extracting the package. All it takes is a few clicks to open encrypted and non-encrypted files.

You’re allowed to extract DMG files that are even over 4 GB in size. During the entire process, you don’t need any sort of technical knowledge or high-level skills. This solution is super easy to use and free to download.
Not to mention, it’s lightweight, so it doesn’t burden your computer at all. It works rapidly.
You can download and use DMG File Extractor on several Windows versions, including 10, 8, 7, and below.

It’s rated highly among users because it does what it promises and does it very well. In fact, it also comes with an impressive set of features, such as:
- Success and fail count report after extraction
- Ability to extract multiple DMG files simultaneously
- Ability to extract Read Only and Compressed DMG files
- Various search options to mine out data within the package
- Unpack DMG emails that include attachments
Despite providing so many powerful features, DMG File Extractor remains an easy-to-use tool for the masses.
Seamlessly open macOS files on your Windows computer with DMG File Extractor, a state-of-the-art tool that solves your problem.

It has helped over 100K people extract DMG files on their Windows computers, and I believe those are pretty good numbers to testify to their brilliance.
It opens all types of DMG files, including password-protected ones. It has no spyware or adware, so you can totally rely on it. In fact, companies like Microsoft, Intel, and IBM trust this tool.
You can try out their demo before paying for the paid version of the software.
All it takes is three simple steps to get the ball rolling with FreeViewer DMG File Extractor. It’s lightweight software that does the job well, even for the free version. You can try out the free one before committing to the paid version, which I think is pretty generous of the makers.
Here are some of the many features of this tool:
- Extract multiple files at once
- Convert hidden image files into a read-write format
- Search effectively within the pack with the help of filters
- Instantly save selected data into the Windows device
FreeViewer DMG File Extractor can be used in all versions of Windows.
7-Zip
I believe this tool needs no introduction because we’ve all used 7-Zip for various purposes. It’s a free solution that’s been in the “extraction” space for many years, and it’s yet to disappoint.
It carries a high compression ratio and works with all versions of Windows. The fact that it’s open source gives you full freedom over what you can do with it.
Apart from the huge number of file formats it supports, you can easily extract DMG files and view or save them on your Windows computer in a jiffy.
Zipware
Simple, fast, and free are the words that best describe Zipware, a free archive tool for Windows. It supports all major formats, including the new RAR5 format and, of course, the DMG file that we’re after.
It’s designed to be simple yet powerful because it can handle small as well as large compression without breaking a sweat. It’s highly versatile, and you can do almost anything with it without worrying about pushing it beyond its potential.
Drag and drop support, extracting password-protected files, and scanning for viruses are some of the many features of Zipware.
Unzipper
As the name suggests, Unzipper can extract any kind of file out there. Unzipping DMG files is just one of the many possibilities of this lightweight solution. It comes with a simple user interface that’s easy to understand.

You can also set automatic extractions, in the sense when you double-click on the compressed file; it’ll automatically extract it for you.
It’s a highly impressive tool, but what’s shocking is that you can use it for completely no cost at all.
TransMac
TransMac by Acute Systems is a premium solution to extract and save DMG files on your Windows computer. Besides extracting them, you can create, compress, expand, and even split DMG files.

The tool carries a very simple layout that eliminates any kind of confusion, unlike a lot of fancy software. Just because of how effective TransMac is, it’s rated 5/5 by ZDNet, Tucows, and Softpedia.
Final Words
Irrespective of why you wish to extract DMG files on your Windows computer, the above tools will allow you to do it most seamlessly. Most of them allow you to use the tool for free, to begin with.
Next, learn how to open an EPS file on Windows and Mac.
MACOS
If you are a Mac user, then you must be familiar with DMG. In fact, this is one of the most popular macOS file formats that can be used to distribute and install software applications. However, when you need to access or burn a DMG file on a Windows 10 system, it can be a bit tricky since DMG is primarily designed for macOS environments. Fortunately, there are several methods you can utilize to successfully burn DMG files to USB drives on Windows 10. This article will guide you through these methods step by step, ensuring you can handle DMG files without the need for a Mac.
Understanding DMG Files
Before delving into the various methods of burning DMG files to USB drives, it’s essential to understand what DMG files are.
-
What is a DMG File?
-
DMG (Disk Image File) is a commonly used format for disk images in macOS.
-
It contains a compressed file system that can hold applications, images, and other file types.
-
DMG files offer features such as encryption and compression, making them ideal for software distribution.
-
Why You Might Need to Burn a DMG to USB
Burning a DMG file to a USB might be necessary for several reasons:
-
To create a bootable USB drive for macOS installations.
-
To backup software or files contained within the DMG.
-
To facilitate software transfer between different operating systems.
Methods to Burn DMG to USB on Windows 10
Method 1: Using Third-party Software
Several third-party tools can help you burn DMG files to USB drives. Some of the most popular options include TransMac, PowerISO, and Rufus. Here is a breakdown of how to use these tools.
Option A: TransMac
TransMac is a versatile tool that allows Windows users to read and write DMG files. To burn a DMG file using TransMac:
-
Download and Install TransMac
-
Visit the official website and download the software.
-
Install it by following the installation wizard.
-
-
Insert Your USB Drive
-
Connect the USB drive to your Windows 10 computer.
-
-
Open TransMac
-
Run the application as an Administrator (right-click the icon).
-
-
Format the USB Drive (if necessary)
-
Right-click on your USB drive in the left pane.
-
Select “Format Disk for Mac” (Note: This will erase all contents).
-
-
Burn DMG to USB
-
Right-click on the USB drive again.
-
Choose “Restore with Disk Image”.
-
Select your DMG file and click “OK”.
-
Confirm any prompts and wait for the process to complete.
-
-
Eject the USB Drive
-
After the burning process, safely eject your USB drive.
-
Option B: PowerISO
PowerISO is another effective solution for burning DMG files. To use PowerISO:
-
Download and Install PowerISO
-
Download PowerISO from the official site.
-
Install the software on your Windows system.
-
-
Insert the USB Drive
-
Connect the USB drive to the computer.
-
-
Launch PowerISO
-
Open the application and navigate to “Tools > Create Bootable USB Drive”.
-
-
Select the DMG File
-
Under “Source”, click the “Browse” button to select your DMG file.
-
-
Choose the USB Drive
-
From the “Destination” dropdown, select your USB drive.
-
-
Start the Burning Process
-
Click “Start” to begin burning the DMG file to the USB drive.
-
-
Complete the Process
-
Wait for the confirmation message and safely eject the USB drive.
-
Method 2: Using Command Line (DD for Windows)
For advanced users, the DD command-line tool can be used to convert and write DMG files to USB on Windows. Here’s how to do it:
-
Install DD for Windows
-
Download the DD for Windows executable from its GitHub page.
-
-
Open Command Prompt as Administrator
-
Search for “cmd” in the Windows search bar.
-
Right-click and select “Run as Administrator”.
-
-
Identify the USB Drive
-
Type
diskpartand hit Enter. -
Type
list diskto see a list of disks connected to your computer. -
Note the disk number corresponding to your USB drive.
-
-
Unmount and Write the DMG File
-
e.g., if your USB drive is Disk 1, run the following commands:
select disk 1
clean
create partition primary
format fs=exfat
assign
exit
-
-
Burn the DMG File
-
Use the DD command:
dd if=Path\to\your\file.dmg of=\\.\PhysicalDrive1 bs=4M -
Make sure to replace
Path\to\your\file.dmgwith the actual path and adjustPhysicalDrive1to match your USB drive’s designation.
-
Note: Be very cautious using the DD command, as it can overwrite any drive without confirmation.
Method 3: Online Converters
If you prefer a hassle-free option, online converters can sometimes be helpful. The downside is the limitation on file sizes and potential security risks. Here’s how it works:
-
Visit an Online DMG to ISO Converter
-
Websites like Zamzar or CloudConvert allow you to upload DMG files.
-
-
Upload Your DMG File
-
Follow the prompts to upload your DMG file.
-
-
Convert to ISO
-
Convert the DMG to an ISO file.
-
-
Burn ISO to USB
-
Use tools like Rufus to create a bootable USB from the ISO.
-
Conclusion
Burning DMG files to USB drives on Windows 10 is entirely possible through several methods, whether you choose third-party software like TransMac or PowerISO, utilize the command line with DD for Windows, or rely on online converters. Regardless of the chosen method, the ability to manage DMG files on a Windows system expands your software installation and data transfer options, making it easier to work across different operating systems.
Key Takeaways
-
Choose the Right Tool: Depending on your technical skill level, select a suitable tool for burning DMG files.
-
Understand File Formats: Knowing the difference between DMG and ISO can clarify the burning process.
-
Backup Data: Always ensure critical data is backed up before formatting any USB drive.
By following this comprehensive guide, you can confidently burn DMG files to USB drives on Windows 10, making your software management tasks a breeze.
Suggested Articles
MACOS
MACOS
MACOS
MACOS
MACOS
MACOS
Когда компьютер Mac внезапно перестал запускаться, а резервной копии macOS под рукой нет, поможет чистая переустановка системы.
Если рядом есть другой Mac, то проблем с созданием загрузочной флешки не возникнет. Сейчас расскажем, как выкрутиться из ситуации с Windows-ПК.
? Спасибо re:Store за полезную информацию. ?
Как создать загрузочную флешку в Windows
1. Для создания флешки скачиваем приложение TransMac.
Утилита распространяете на сайте разработчика по цене $59. К счастью, есть бесплатный 15-дневный триал.
2. Теперь потребуется найти образ для установки macOS.
Официального способа скачать операционную систему из Windows нет. Придется либо искать друга с компьютером Mac, либо пользоваться известными всем сайтами.
Обратите внимание, что для работы утилиты TransMac нужен образ macOS в формате *.dmg
Если удастся найти друга с яблочным компьютером и скачать macOS из Mac App Store, будет проще у него же и сделать нагрузочную флешку по инструкции.
3. Когда образ скачан, а утилита установлена, запускаем TransMac от имени Администратора и соглашаемся на триальный период использования программы.
4. Подключаем к компьютеру флешку (понадобится накопитель емкостью 8ГБ и более)
5. В боковом меню находим подключенный накопитель и через контекстное меню форматируем командой Format Disk for Mac.
Внимание! Данный процесс является необратимым, все данные с флешки будут удалены.
6. После окончания форматирования снова вызываем контекстное меню диска и выбираем пункт Restore with Disk Image.
7. В открывшемся окне проводника указываем скачанный образ для установки macOS.
8. Подтверждаем запись образа на флешку и ждем 20-30 минут, пока процесс не завершится.
Все! Флешка для установки macOS готова.
Как запустить Mac с флешки
Подключаем наш накопитель к компьютеру Mac и включаем его с зажатой клавишей Alt (Option).
Обратите внимание, что для загрузки со внешних накопителей на Mac с чипом T2 нужно произвести некоторые манипуляции.
В меню выбора диска указываем флешку и производим установку macOS.
Следуйте подсказкам мастера установки и через несколько минут получите работоспособный Mac.
(159 голосов, общий рейтинг: 4.41 из 5)
iPhones.ru
Это может пригодиться каждому, когда нет второго Mac под рукой.
Артём Суровцев
@artyomsurovtsev
Люблю технологии и все, что с ними связано. Верю, что величайшие открытия человечества еще впереди!