
Здравствуйте админ! Понадобилось достать несколько файлов из дистрибутива Windows 7, 8.1, 10 и соответственно встал вопрос — Как открыть установочные образы install.wim и install.esd дистрибутива Windows? Буду очень благодарен, если ещё подскажете, как редактировать данные файлы (wim и esd).
Как редактировать файл образ install.wim
Привет друзья! Файл образ install.wim содержит в себе в сжатом состоянии все системные файлы операционной системы и в наших статьях мы уже много раз с ним работали. Находится файл install.wim в ISO-дистрибутиве Windows или на установочном диске системы. Если в вашей операционке повредился или отсутствует какой-либо системный файл, то кроме запуска средства проверки целостности системных файлов вы можете просто заменить отсутствующий системный файл вручную, конечно если вы знаете, какой именно файл в системе повреждён или вовсе отсутствует, для этого файл образ install.wim нужно просто подключить (смонтировать) в какую-либо папку, затем скопировать из этой папки необходимые системные файлы и после этого отмонтировать образ. При желании вы также можете изменить содержимое файла install.wim, для этого при отключении образа нужно указать в командной строке ключ /Commit и все произведённые вами изменения в файле install.wim будут сохранены, подробности далее в статье.
Для того, чтобы смонтировать файл образ install.wim будем использовать утилиту Dism, входящую в состав операционной системы: Windows 7, 8.1, 10.
Во-первых, скачаем ISO-образ с нужной нам операционной системой, например Windows 7.
Во-вторых, щёлкнем на скачанном ISO-образе двойным щелчком левой мыши и подключим его к виртуальному дисководу, после подключения скопируем из папки source подключенного дистрибутива файл install.wim, в моём случае на диск (H:).

Также в корне диска (H:) создаём папку с произвольным названием, например 1.

Открываем командную строку от имени администратора и вводим команду:
Dism /Get-WimInfo /WimFile:H:\install.wim (где H: буква диска с файлом install.wim),
данной командой мы уточняем содержимое образа install.wim, ведь он может иметь несколько образов Windows. Видим, что в образе содержится четыре редакции операционной системы, выбираем для монтирования любой образ, к примеру образ с индексом 4 — Windows 7 Ultimate.
вводим команду:
Dism /Mount-Wim /index:4 /WimFile:H:\install.wim /MountDir:H:\1
где H: буква диска с файлом install.wim, а 1, это папка, в которую мы смонтируем содержимое образа файла install.wim


Вот и всё, образ install.wim подключен и его содержимое можно увидеть в папке 1, мы можем копировать из данной папки любые файлы, если вам нужно отредактировать файл install.wim, то вносите в папку 1 необходимые изменения.

После редактирования производим отключение образа install.wim командой:
Dism /Unmount-Wim /MountDir:H:\1 /Commit
но это, если мы редактировали файл install.wim и хотим сохранить изменения (если внесено много изменений, то отключение образа будет происходить минуты 2-3),
в случае, если мы не хотим сохранять изменения в файле install.wim, то команда будет такой.
Dism /Unmount-Wim /MountDir:H:\1 /Discard


Как редактировать файл install.esd
Друзья, в дистрибутиве Windows 8.1 и Windows 10 вместо файла install.wim часто используется файл образ Windows с новым типом сжатия install.esd, в этом случае вам придётся конвертировать его в файл install.wim, редактировать, затем опять конвертировать в install.esd.
You can easily open WIM files in Windows 10 by using WinMount which allows you to mount this image file and manage the data in the file. The program comes with tools which give access to editing, modifying and converting WIM files format.
- What program opens a WIM file?
- How do I extract a WIM file?
- How do I restore a WIM file in Windows 10?
- What is a WIM file extension?
- Is a WIM file bootable?
- How do I install a WIM file in Windows 10?
- Where is the WIM file in Windows 10?
- How do I install a WIM file?
- Can I delete install WIM file?
- What is a WIM file Windows 10?
- What is DISM tool?
- How do I copy pictures from Windows 10 to USB?
What program opens a WIM file?
With PowerISO, you can open an WIM file, and extract files from the WIM file. Click the «Open» button on toolbar or choose «File > Open» menu to Open WIM file. If there are more than one image in the WIM file, PowerISO will show a dialog prompt you to select an image to open.
How do I extract a WIM file?
Method 1: Using 7-Zip to extract files from Install. wim
- Insert your Windows 10 DVD and browse to the Sources folder inside the DVD. …
- In the Sources folder, right-click install. …
- Each index you inside the install. …
- Double-click the appropriate index number folder in 7-Zip. …
- Browse to the «Sources\install. …
- Close 7-Zip.
How do I restore a WIM file in Windows 10?
wim, don’t close the command prompt yet, but go back to Windows Explorer and open drive C and go to the Test folder. Right-click on the file winre. wim and press on Copy. Go in now C: Windows System32 Recovery, press with the right mouse button on an empty space and select Paste.
What is a WIM file extension?
Disk image. The Windows Imaging Format (WIM) is a file-based disk image format. It was developed by Microsoft to help deploy Windows Vista and subsequent versions of the Windows operating system family, as well as Windows Fundamentals for Legacy PCs.
Is a WIM file bootable?
WIM is a multi “image” file format that supports having one of those images declared as “bootable” i.e the typical case of booting a PE environment (boot.
How do I install a WIM file in Windows 10?
wim image on the USB bootable media using these steps:
- Open File Explorer (Windows key + E).
- Navigate to the USB location with the Windows 10 installation files.
- Double-click the sources folder.
- Right-click the install. …
- Open File Explorer again (Windows key + E).
- Navigate to the modified Windows 10 image (install.
Where is the WIM file in Windows 10?
WIM files. The install. wim file (Windows Image File) is a compressed file which contains a set of many files and associated file system metadata and is included in any Windows installation Media under the «sources» folder (sources\install. wim).
How do I install a WIM file?
Option 2 can be easily done as follows:
- Extract the required install.wim out of the ISO file or mount the ISO file.
- Open an elevated command prompt to use DISM commands.
- Run the following DISM command with the correct path to the install.wim and the desired file size in MB: …
- Now just replace the original install.
Can I delete install WIM file?
It is not suggested to delete the Install. wim file. … Move your IE temp file folder to another drive to check the result.
What is a WIM file Windows 10?
WIM is an acronym for Windows Imaging format file; this is an imaging format that allows for a single disk image to be used on multiple computer platforms. WIM is usually used to manage files like updates, drivers, and system component files without having to reboot the operating system image.
What is DISM tool?
The deployment image servicing and management tool (DISM) is manipulated to scan and restore potential issues within the windows that may impact an operating system.
How do I copy pictures from Windows 10 to USB?
Capture your device image
- Insert a USB drive into the Technician PC. …
- On the technician PC, open the Deployment and Imaging Tools Environment as administrator. …
- Copy the WinPE files to a working folder: …
- Copy the WinPE files to your USB key. …
- Move the USB flash drive from the Technician PC to the reference IoT device.
,
The install.wim file (Windows Image File) is a compressed file which contains a set of many files and associated file system metadata and is included in any Windows installation Media under the «sources» folder (sources\install.wim). Sometimes when Windows 10 or 8 crashes, due to corrupted system files or for any other reason, there is a need to repair the Windows file system, by using the install.wim file, as the repair source.
- DISM /Online /Cleanup-Image /RestoreHealth /Source:WIM:X:\Sources\install.wim
But, an install.wim file may contain several install.wim files (each one for different Windows 10 Edition e.g. Pro, Home, etc.), which are referenced either by their numerical index or by their unique name. For that reason there is the need to extract the install.wim and get a valid (according to the installed Windows Edition), install.wim file, in order to repair Windows 10 or Windows 8. (e.g. by using DISM).
In this tutorial you ‘ll find detailed instructions on how to extract an install.wim file, that contains install.wim files for different Windows 10 (or Windows  Editions (e.g. Windows 10 Pro, Windows 10 Home, Windows 10 Education, etc.).
- Related article: How to Extract Install.ESD to Install.WIM
How to extract an install.wim file that contains more than one install.wim files.
1. Attach or mount* the Windows installation media on your system.
* Note: If you are using Windows 8/8.1, then read this article on: How to mount ISO files.
2. Right click at Start menu and select Command Prompt (Admin).
3. Then type the following command and press Enter, in order to find which images are in the «install.esd» file: *
- dism /Get-WimInfo /WimFile:X:\sources\install.wim
* Note: Replace the «X» drive letter according to your case. At this example the Windows installation media is located at drive H:, so the command will be:
-
dism /Get-WimInfo /WimFile:H:\sources\install.wim
4. According to your Windows installed Edition take note of the index number. *
* e.g.: If you have installed the Windows 10 Home edition on your system, then the Index number is «2».

5. Then give the command below to extract the corresponding to your Windows version «install.wim» file (Index number): *
- dism /export-image /SourceImageFile:H:\sources\install.wim /SourceIndex:IndexNumber /DestinationImageFile:C:\install.wim /Compress:max /CheckIntegrity
* Note: Replace the IndexNumber according to your Windows 10 installed version or the Windows version that your want to extract from the source INSTALL.WIM file.
e.g. For this example (for a Windows 10 Home based computer) we want to extract the install.wim file with Index number=2. So, the command will be:
- dism /export-image /SourceImageFile:H:\sources\install.wim /SourceIndex:2 /DestinationImageFile:C:\install.wim /Compress:max /CheckIntegrity

7. When the process is completed you should have a valid Windows 10 Home install.wim on the drive C: (C:\install.wim).

That’s it! Let me know if this guide has helped you by leaving your comment about your experience. Please like and share this guide to help others.
If this article was useful for you, please consider supporting us by making a donation. Even $1 can a make a huge difference for us in our effort to continue to help others while keeping this site free:
- Author
- Recent Posts
Konstantinos is the founder and administrator of Wintips.org. Since 1995 he works and provides IT support as a computer and network expert to individuals and large companies. He is specialized in solving problems related to Windows or other Microsoft products (Windows Server, Office, Microsoft 365, etc.).
Windows Imaging Format or WIM is a disk image format. Microsoft developed the WIM file format and allows people to run the same Windows file system on multiple machines.
The WIM file format was introduced with the Windows Vista operating system and exists even today.
Using WIM files, people can choose to update Windows, installed drivers, and other components of an operating system without having to restart the system.
Once you create a WIM file to be deployed on other systems, it is best to verify the contents of the file to ensure that all the file systems have been saved correctly in the file.
Moreover, opening the WIM file before deploying on other systems ensures that the files aren’t faulty or corrupted, which otherwise may cause the system on which the file is executed to become damaged or corrupted beyond repair.
If you wish to open WIM files on a desktop or laptop running the Windows 10 operating system, below we have listed out the various ways you can do the same.
Method 1: Open WIM Files using 7-ZIP on Windows 10
7-Zip is a well-known open-source software that lets you compress, decompress files and folders on Windows. The 7-Zip software can also be used to open WIM files on Windows 10 computers.
- To begin, download and install the 7-Zip software for Windows 10 from here.
- After the installation of 7-Zip finishes on your PC, you can open the WIM file using 7-Zip by either double-clicking on the file.

- Alternatively, you can right-mouse-click on the file and select “7-Zip” within the “Open With” option in the drop-down menu.

Method 2: Use FileViewer Plus Software on Windows 10 to Open WIM Files
The FileViewer Plus is a universal file viewer software for the Windows operating system. The software supports over 300 varieties of file types, thus allowing you to open almost every type of file that you wish.
You can download the FileViewer Plus software on your Windows computer and then try to open the WIM file on your computer to view the WIM file contents.
Method 3: Use PeaZip to Open WIM Files on Windows 10 Computers
PeaZip is free software that, like 7Zip mentioned above, allows users to compress, decompress, encrypt/decrypt files and folders on their Windows computer.
One of the highlight features of PeaZip is that it allows opening files that have the WIM file extension.
Below is how to open WIM files using PeaZip:
- Download and install the PeaZip free Windows utility software from here on to your computer.
- Navigate to the WIM file on your computer.
- Using the mouse/trackpad of your computer, right-click on the WIM file and then click on the “Open With” option.
- Within the Open With window, select the PeaZip software to open the WIM file using the PeaZip software on your computer.
Final Words
The three methods mentioned in this article to open files with WIM file extension are the easiest ones you can follow.
All the tools to open WIM files mentioned in this article are trusted ones and are commonly used by Windows OS users to open WIM files on Windows 10 desktops and laptops.
If you’ve ever tried to setup an unattended install for Windows 10, you might have noticed during the install that you’re given options of which version you would like to choose. Today we’re going to the solve that issue and show you how to extract Windows 10 Enterprise WIM from ISO.

Some use cases for this would be to use an unattended install for Windows 10, you can also use this for SCCM or even MDT if you like. It can lower the footprint of your setup by removing unnecessary files that you know you won’t use. In my case I know I would use Windows 10 Enterprise 100% of the time because it’s the more appropriate version of my work environment.
Once you’ve downloaded your WIM file, let’s go ahead and mount it to your system so we can see exactly what we’re working with. In my case, I’m going to mount ‘Windows 10 20H2.iso’ to my D drive and open Powershell as an administrator.
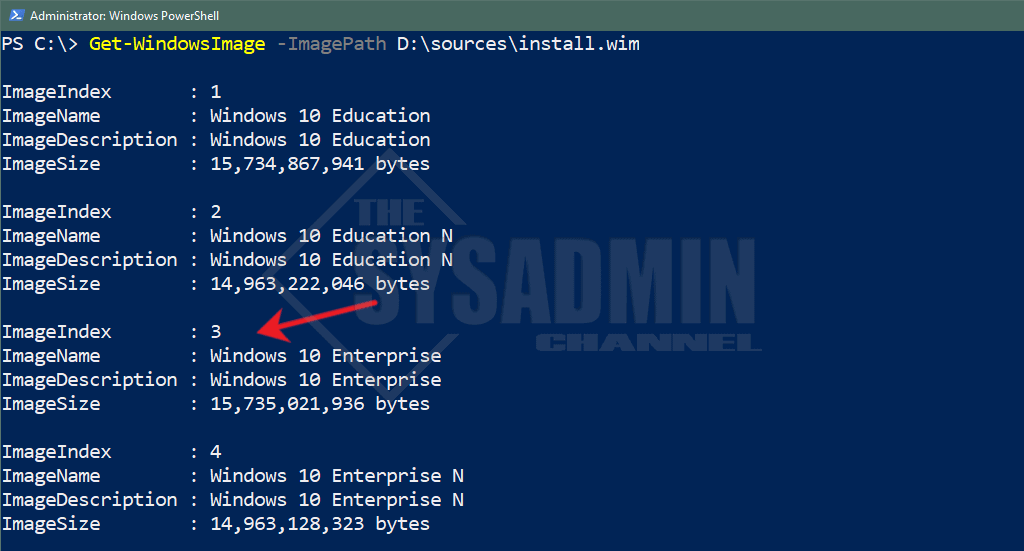
By default, any newer Windows 10 machine will have the DISM module loaded with the machine so make sure you’re using that to extract this. Next we’ll run the command Get-WindowsImage -ImagePath D:\sources\install.wim to spit all the WIM files that are associated with it. Once that happens, let’s take notice of the index that Windows 10 Enterprise is associated with. In our example, it is sitting at Index #3.
Click to view full image
PS C:\> Get-WindowsImage -ImagePath D:\sources\install.wim
ImageIndex : 1
ImageName : Windows 10 Education
ImageDescription : Windows 10 Education
ImageSize : 15,734,867,941 bytes
ImageIndex : 2
ImageName : Windows 10 Education N
ImageDescription : Windows 10 Education N
ImageSize : 14,963,222,046 bytes
ImageIndex : 3
ImageName : Windows 10 Enterprise
ImageDescription : Windows 10 Enterprise
ImageSize : 15,735,021,936 bytes
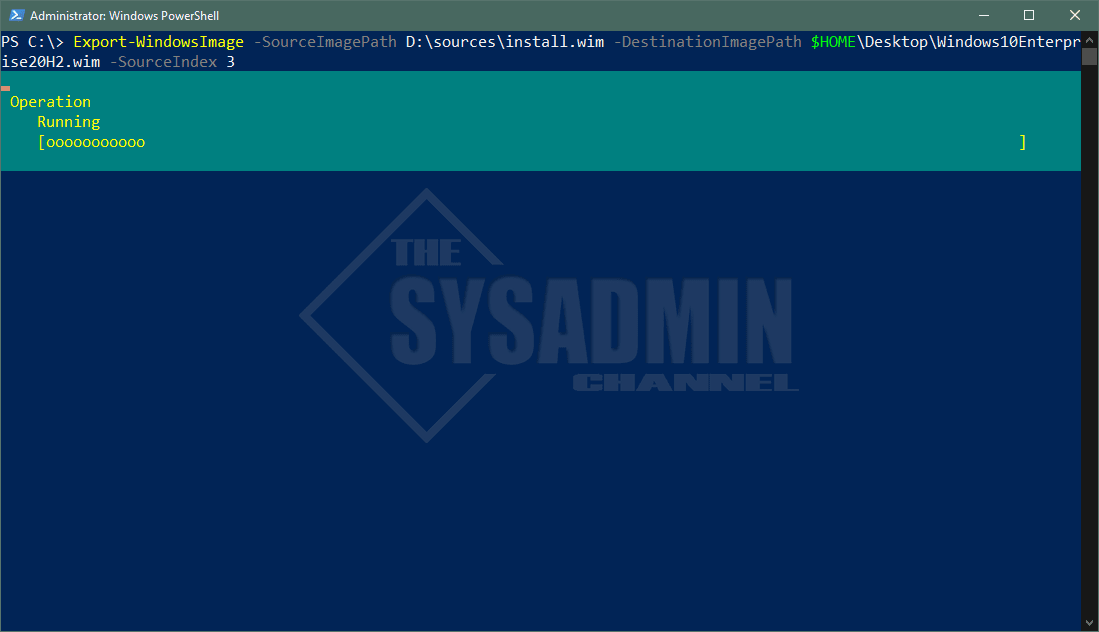
Next up we’ll run Export-WindowsImage -SourceImagePath D:\sources\install.wim -DestinationImagePath $HOME\Desktop\Windows10Enterprise20H2.wim -SourceIndex 3
This is telling Powershell to extract Index 3 from the info above as well as set the destination to my desktop.
Finally, you’ll need to replace install.wim that’s currently in the sources folder with the new wim you just created. You must rename it to install.wim because that’s what unattended installs are looking for by default so it must be set to that filename in order for it to work correctly.
Next thing to do is to confirm that we’ve extracted the Windows 10 Enterprise WIM properly from the general ISO that was available to us. To do that we’ll run the same command that we did earlier, however, this time the difference would be that we only see Windows 10 Enterprise as our only option.
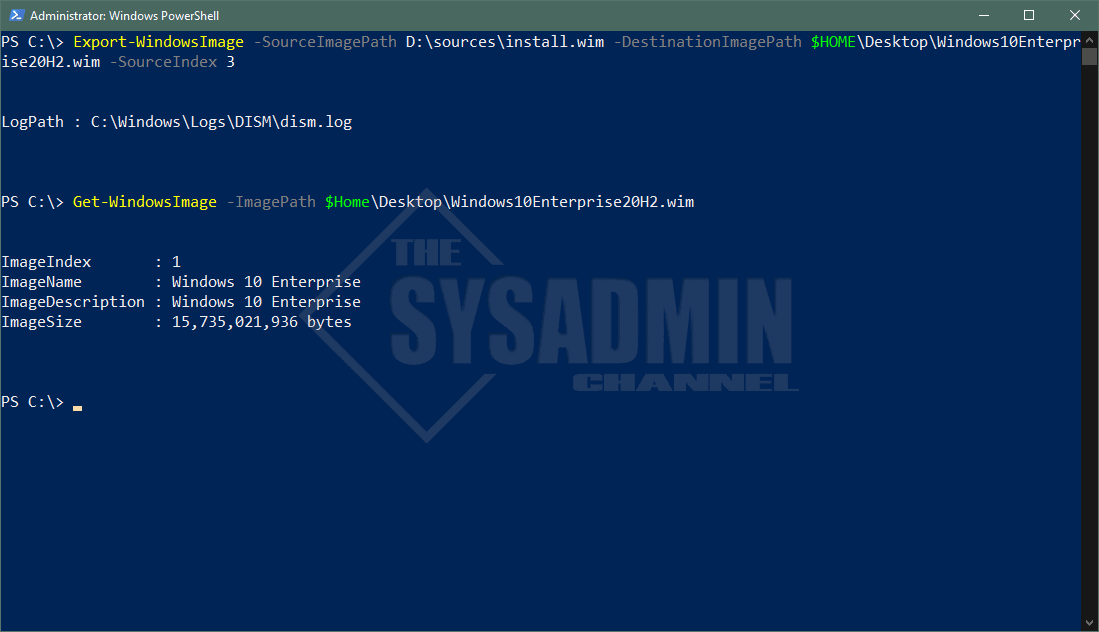
Now when you run the unattended install, you won’t be prompted for a Windows 10 version 🙂
Conclusion
Hopefully this article was able to help figure out how to extract Windows 10 Enterprise WIM from your ISO file. If you liked this article be sure to check out the others in our Server Administration.