
Чем открыть OXPS-файл — гайд по установке XPS Viewer
OXPS — это стандартизованная версия оригинального XPS-формата. Многим пользователям не удается открыть файлы в расширении OXPS, а все потому, что в их системе не установлена программа XPS Viewer.
Решение: Установка XPS Viewer
XPS Viewer может открывать OXPS-файлы, но она не предустановлена вместе с другим программным обеспечением Windows. Проще говоря, чтобы открывать файлы подобного расширения, необходимо установить на свой компьютер программу XPS Viewer. Прежде чем этим заняться, убедитесь, что с вашим Интернет-подключением все в порядке.
Запуск XPS Viewer из стандартных инструментов Windows

Перед установкой XPS Viewer было бы неплохо проверить, не установлена ли эта программа на вашем компьютере. Бывает и такое, что она установлена, а файлы OXPS все равно не открываются. Итак, сделайте следующее:
- нажмите на кнопку Win для открытия меню Пуск;
- опуститесь в самый низ и раскройте раздел «Стандартные — Windows»;
- найдите в списке XPS Viewer и кликните на него ЛКМ;
- попробуйте открыть нужный вам файл непосредственно через XPS Viewer.
Если XPS Viewer не может справиться с поставленной задачей, т.е. открыть OXSP-файл на вашем ПК, то сделайте Microsoft Edge браузером по умолчанию и попробуйте снова. Некоторые пользователи утверждают, что такие действия решили для них проблему с открытием OXSP-файлов.
Установка XPS Viewer через дополнительные компоненты
- Нажмите Win+I для открытия Параметров системы;
- перейдите в раздел «Приложения» и кликните ЛКМ на пункт «Дополнительные компоненты»;
- кликните на опцию «Добавить компонент» (значок плюса);
- выберите «Средство просмотра XPS» и нажмите «Установить»;
- подождите окончания установки и перезагрузите компьютер.
Если все прошло нормально, то теперь вы должны без проблем открывать файлы OXPS. Если же установить читалку XPS вышеуказанными действиями не удалось, то попробуйте методы ниже.
Установка XPS Viewer через команду DISM
- Нажмите Win+R для вызова окошка «Выполнить»;
- пропишите cmd и нажмите Ctrl+Shift+Enter;
- выполните команду dism /Online /Add-Capability /CapabilityName:XPS.Viewer~~~~0.0.1.0;
- подождите завершения процесса и перезагрузите компьютер.
Установка XPS Viewer через PowerShell
- Нажмите Win+R;
- пропишите powershell и нажмите Ctrl+Shift+Enter;
- выполните команду Get-WindowsCapability -Online |? {$_.Name -like «*XPS*» -and $_.State -eq «NotPresent»} | Add-WindowsCapability -Online;
- дождитесь завершения процесса установки и перезагрузите ПК;
- запустите XPS Viewer через меню Пуск и откройте нужный OXPS-файл.
Как альтернатива, вы можете попробовать открыть OXPS-файл через Microsoft Word или Excel. Если же и это не сработает, то мы рекомендуем вам обратиться за помощью к сторонним читалкам. Также можно прибегнуть к конвертации OXPS-файлов в другие расширения. Удачи!
Readers help support Windows Report. We may get a commission if you buy through our links.
Read our disclosure page to find out how can you help Windows Report sustain the editorial team. Read more
OXPS (Open XML Paper Specification) files are a popular format for storing electronic documents that preserve their formatting and layout, regardless of the software or device used to view them.
However, opening OXPS files in Windows 10 and 11 can be challenging, as these operating systems do not natively support this format.
We will explore both built-in solutions provided by Microsoft that can help you access and work with OXPS files seamlessly.
How can I open OXPS files in Windows 11?
Before engaging in advanced troubleshooting steps, you should consider performing the following checks:
- Ensure you have an active internet connection.
- Make sure your Windows is up to date.
NOTE
To open OXPS files, you need an XPS viewer, which is not installed by default on your Windows computer. Follow any methods to install the XPS viewer on your Windows 10 or 11 computer.
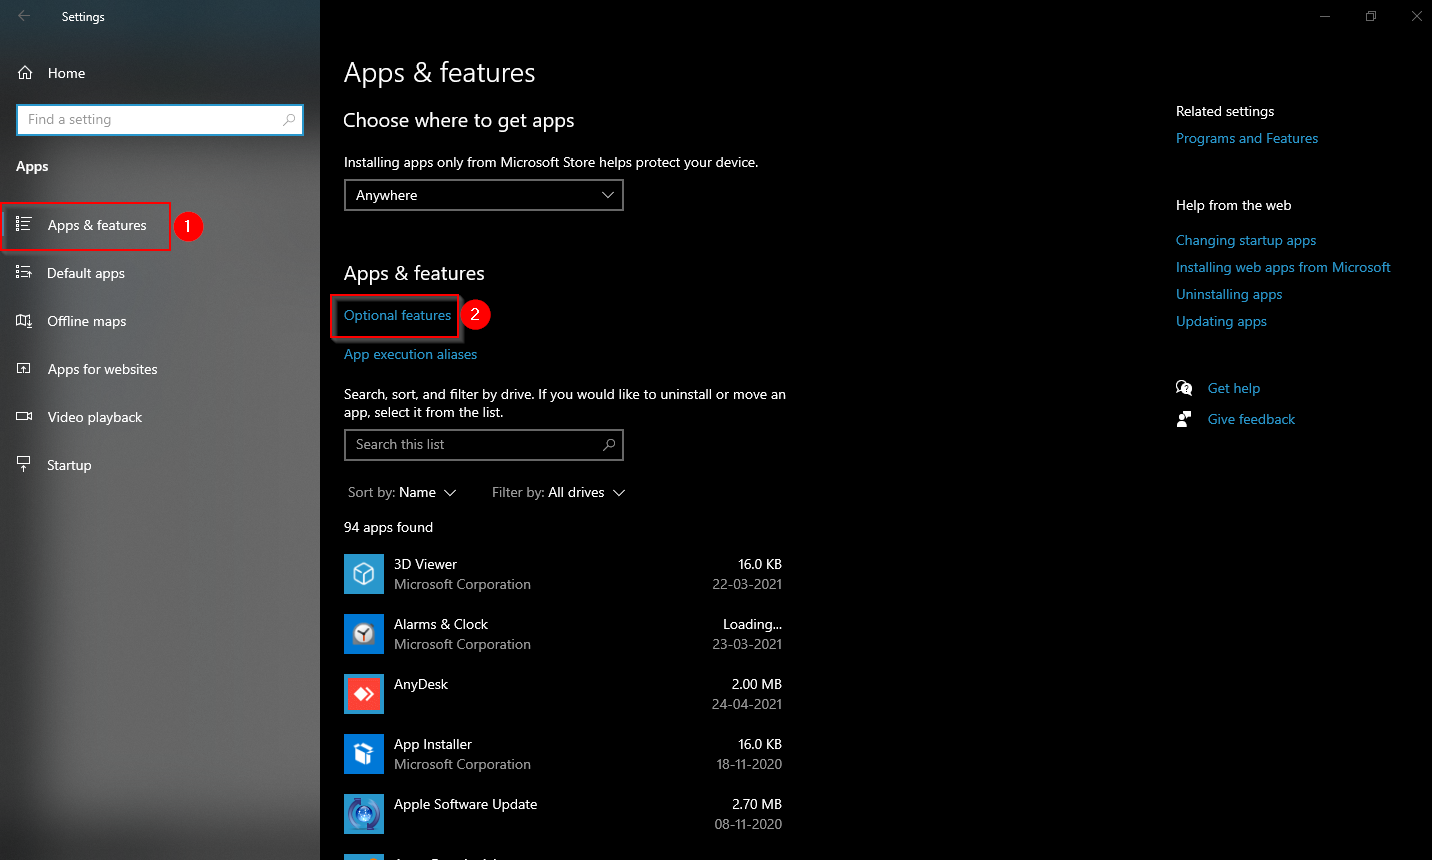
1. Use the Settings app
- Press Windows + I to open the Settings app.
- Go to Apps.

- Click Optional features from the right pane.
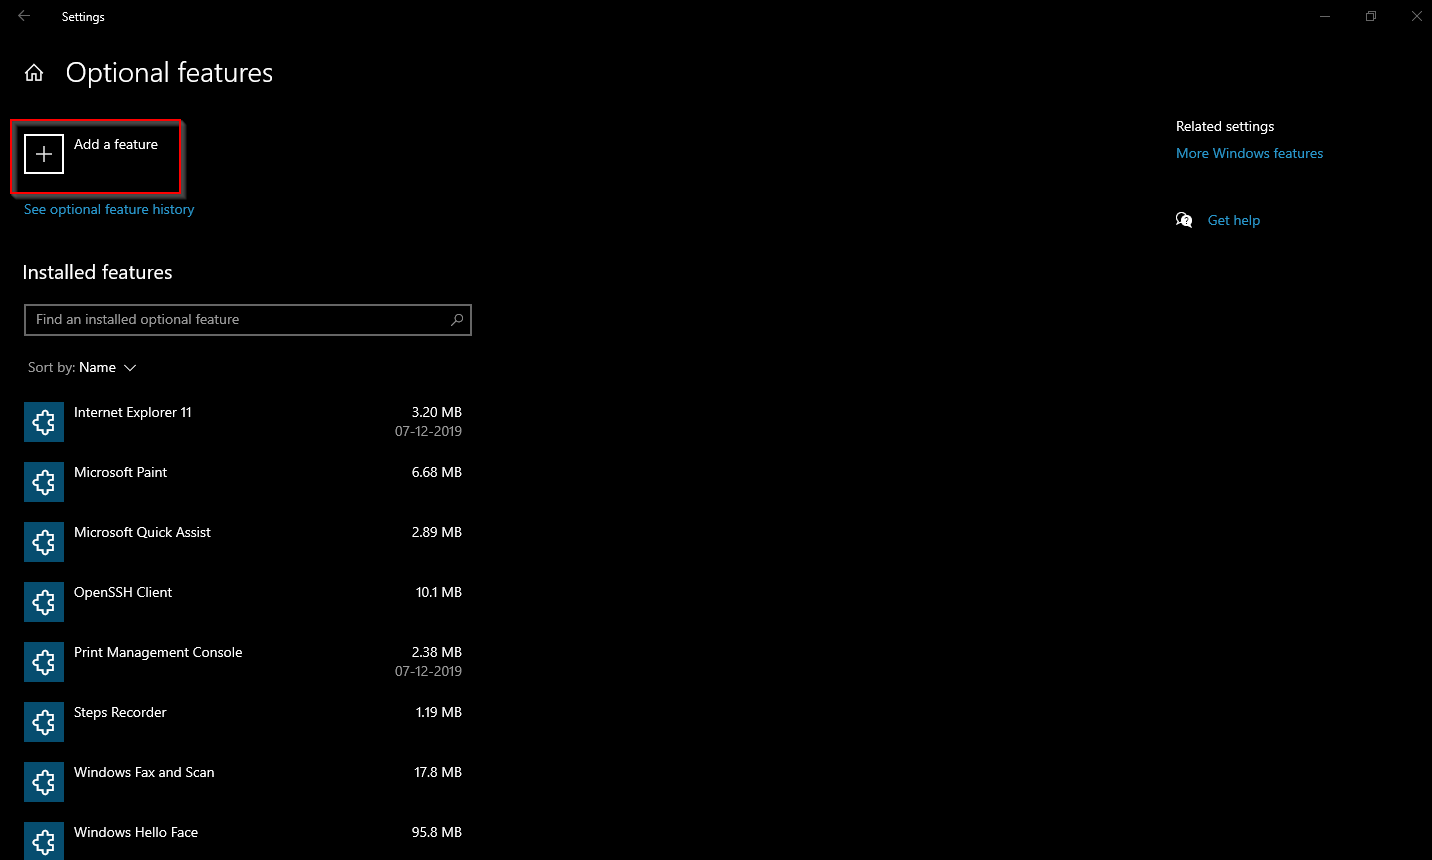
- Now click Add an optional feature.
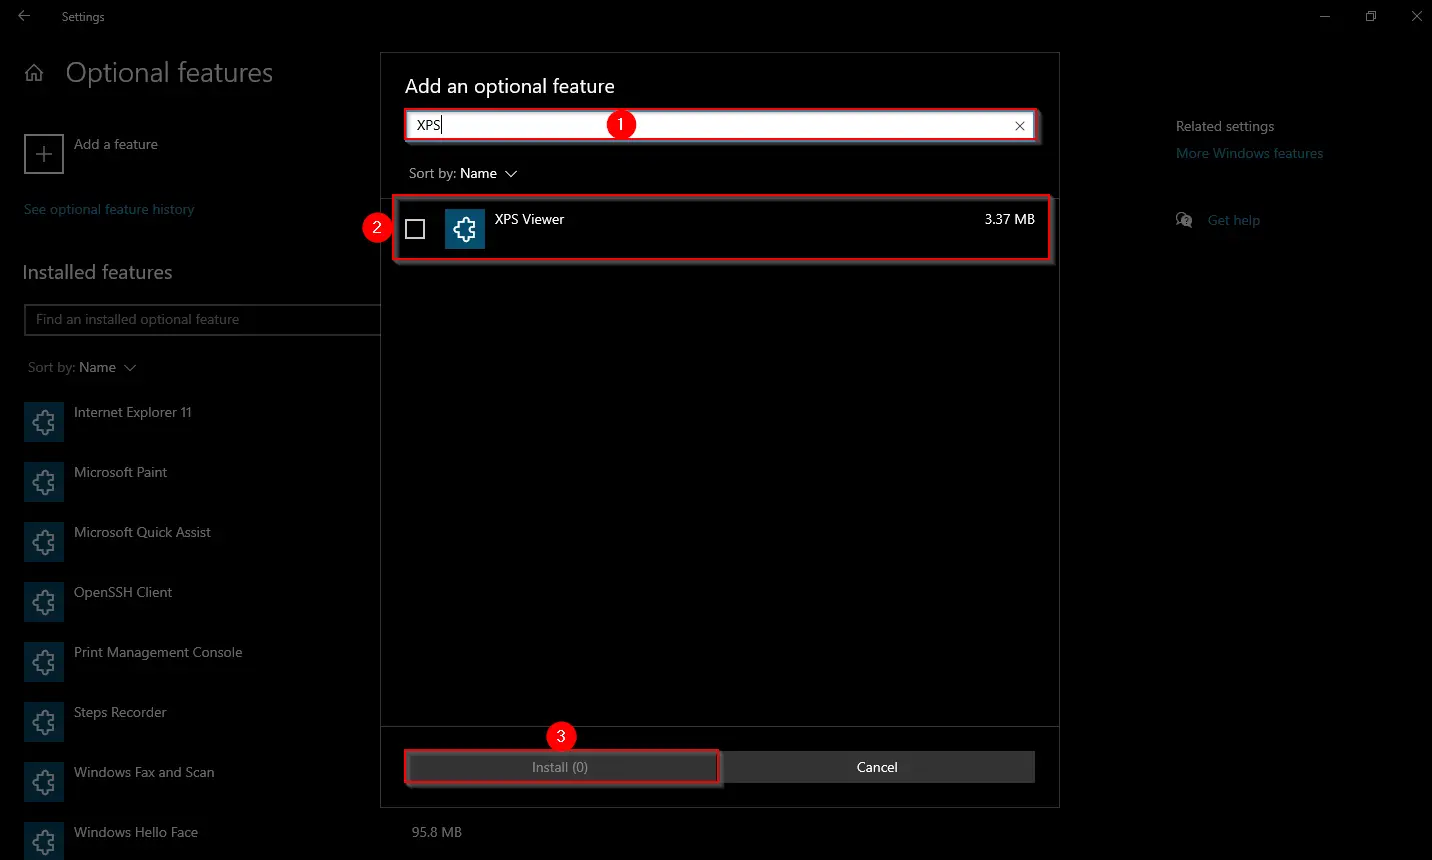
- Search XPS viewer, select it, and click Next.
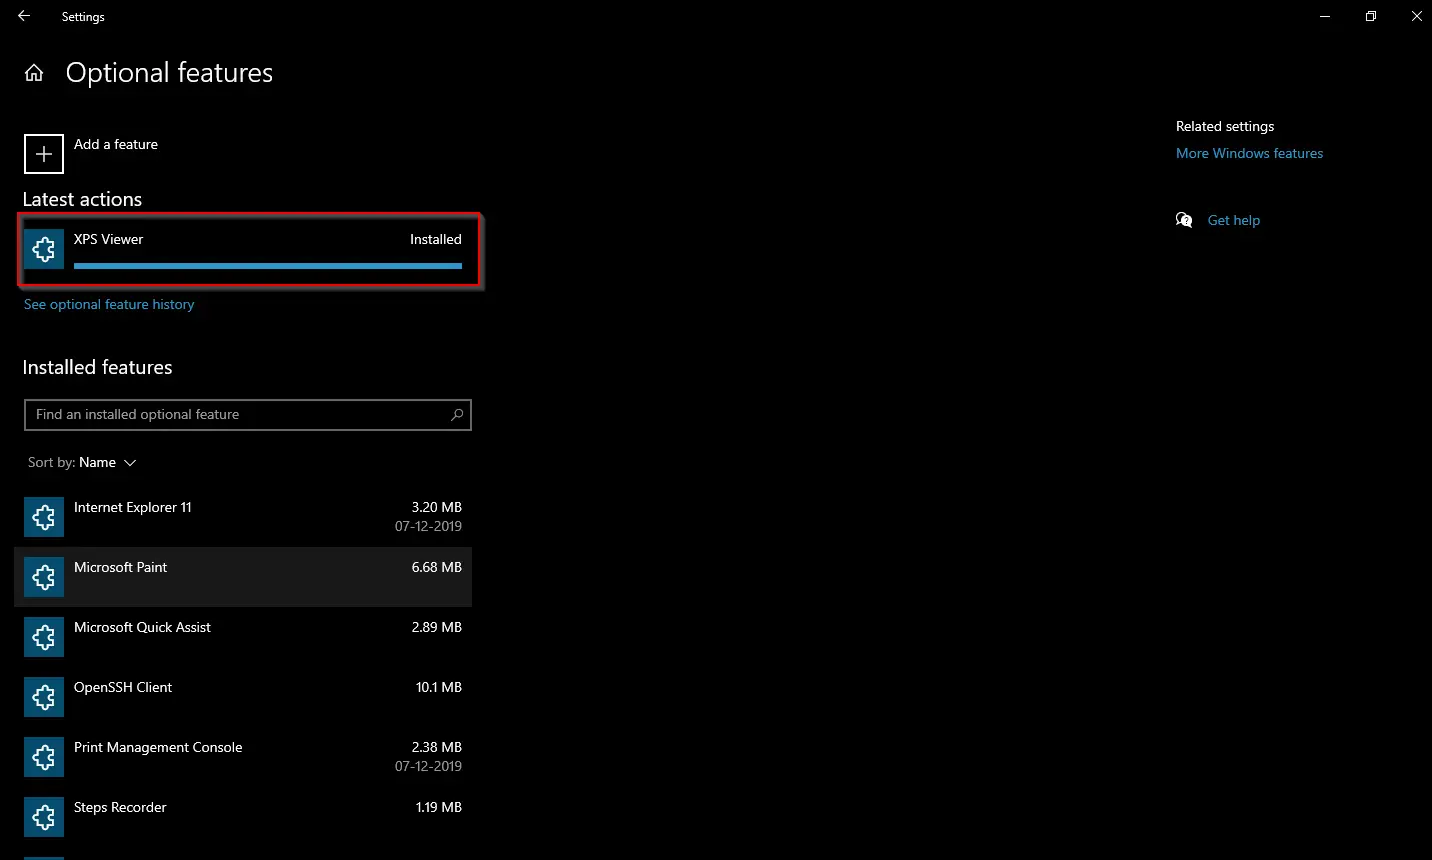
- Click Install. Wait for the installation to complete, then restart your PC.


Now use XPS Viewer to open the OXPS files
2. Use the DISM command
- Press the Windows key, type command prompt, and click Run as administrator.

- Type the following command and press Enter:
dism /Online /Add-Capability /CapabilityName:XPS.Viewer~~~~0.0.1.0
- Let the installation be complete, then reboot your PC. Once your PC starts, launch XPS Viewer to open the OXPS files.


In case you are looking for a way to open and view the XML file, read this guide for step-by-step instructions.
- Recent Windows 11 update lets you disable profanity filter in voice typing
- Microsoft wants Windows 10 users to upgrade to Windows 11 or Copilot + PCs
- Windows 11 KB5055627 update makes File Explorer more fluid
3. Use the Windows PowerShell
- Press the Windows key, type powershell, and click Run as administrator.

- Copy & paste the following command and hit Enter:
Get-WindowsCapability -Online |? {$_.Name -like "XPS" -and $_.State -eq "NotPresent"} | Add-WindowsCapability -Online
- Wait for the process to complete, then reboot your computer. Once the PC boots up, launch the XPS Viewer to open the OXPS files.


So, these are methods to install XPS Viewer to view OXPS files on your Windows 11 computer.
Microsoft no longer supports these files; once you can access them, convert them into PDFs for future use.
How can I open OXPS files in Windows 10?
To open the OXPS files, you need to have a user account with admin rights on your Windows 10 computer, then follow the methods mentioned above for Windows 11.
If you face issues while opening XPS files on a Windows 10/11 computer, we suggest you check out this informative guide to get the solutions.
Please feel free to give us any information, tips, and your experience with the subject in the comments section below.
Srishti Sisodia
Windows Software Expert
Srishti Sisodia is an electronics engineer and writer with a passion for technology. She has extensive experience exploring the latest technological advancements and sharing her insights through informative blogs.
Her diverse interests bring a unique perspective to her work, and she approaches everything with commitment, enthusiasm, and a willingness to learn. That’s why she’s part of Windows Report’s Reviewers team, always willing to share the real-life experience with any software or hardware product. She’s also specialized in Azure, cloud computing, and AI.
The OXPS (Open XML Paper Specification) file is the standardized version of the original XPS format. Many users fail to open the files with the OXPS extension if their system does not have the XPS Viewer installed.
Solution: Install the XPS Viewer
The XPS Viewer of Windows OS can open the OXPS files but this applet is not installed by default (although, its counterpart, i.e., the XPS Writer is installed by default). In this context, installing the Windows 10 XPS Viewer and then using it to open the OXPS file in Window 10 may solve the problem. But before proceeding, make sure your system has an active internet connection.
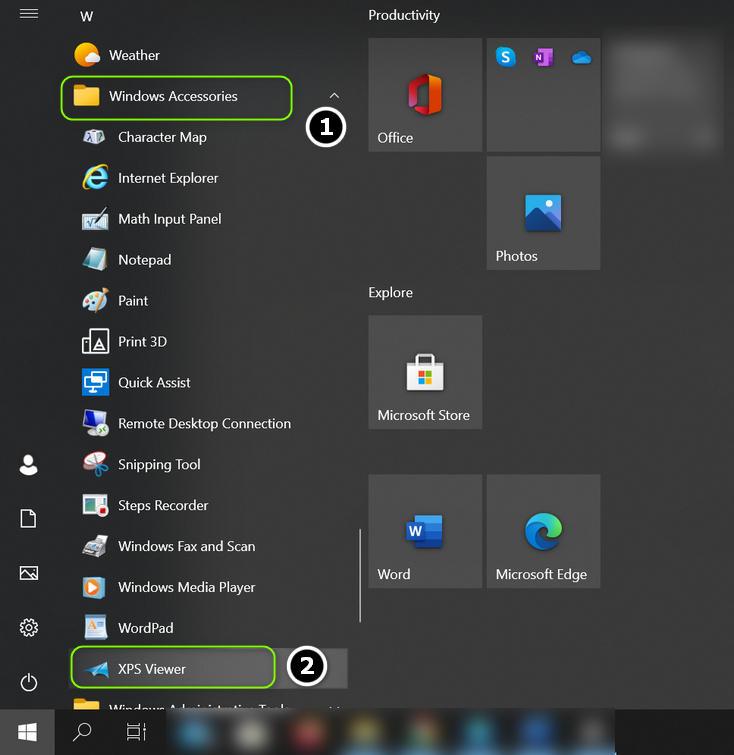
Launch the XPS Viewer from the Windows Accessories
Before installing, it will be a good idea to check if the said feature is already not installed on your system.
- Press the Windows key and scroll down till you find the Windows Accessories option.
- Now, expand the Windows Accessories and open XPS Viewer (if present).

Open XPS Viewer from the Windows Accessories - Then check if you can open the OXPS file in the Viewer.
If the XPS Viewer is not opening the file, then check if reverting the default system browser to Edge or Internet Explorer resolves the issue.
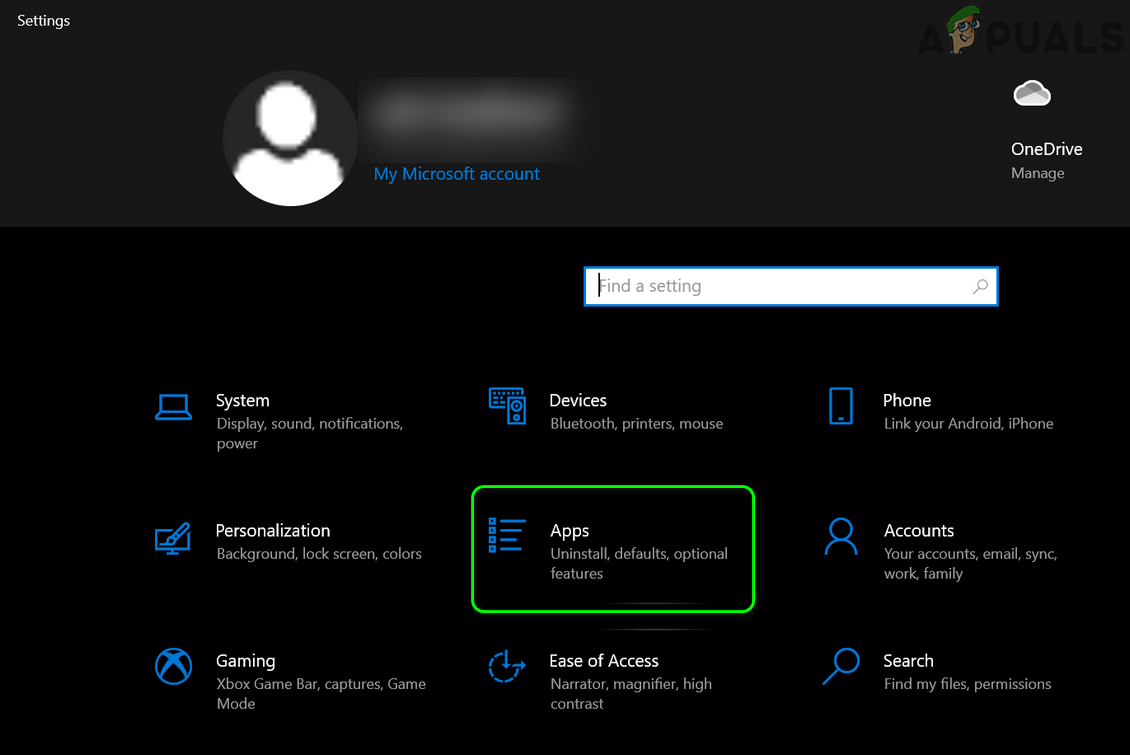
Install Through the Optional Features of Apps
- Press the Windows key and open Settings.
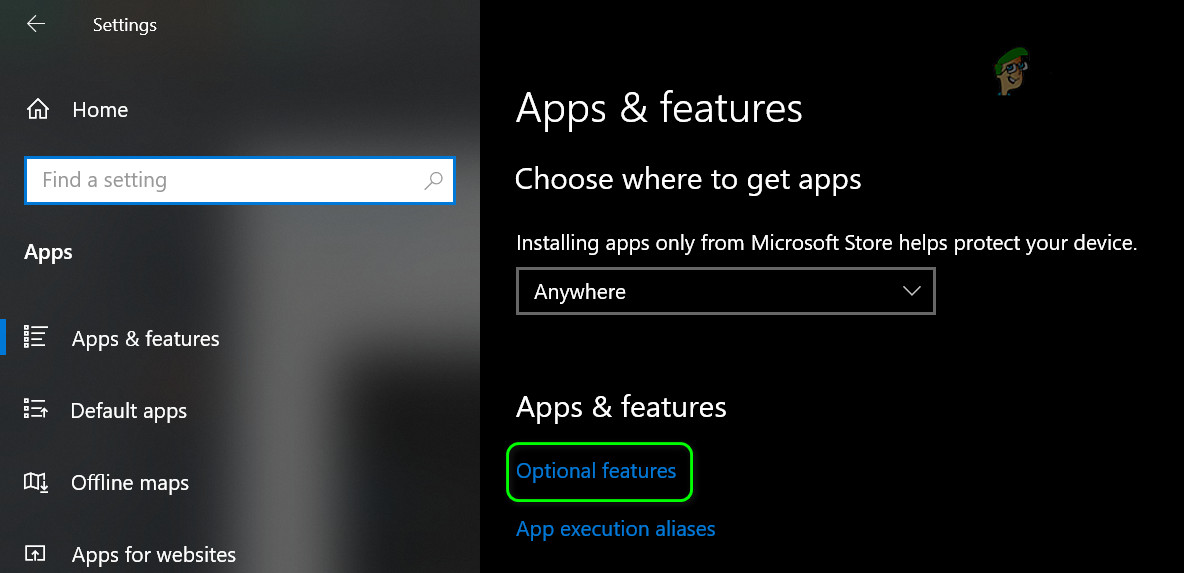
- Now select Apps and open Optional Features.

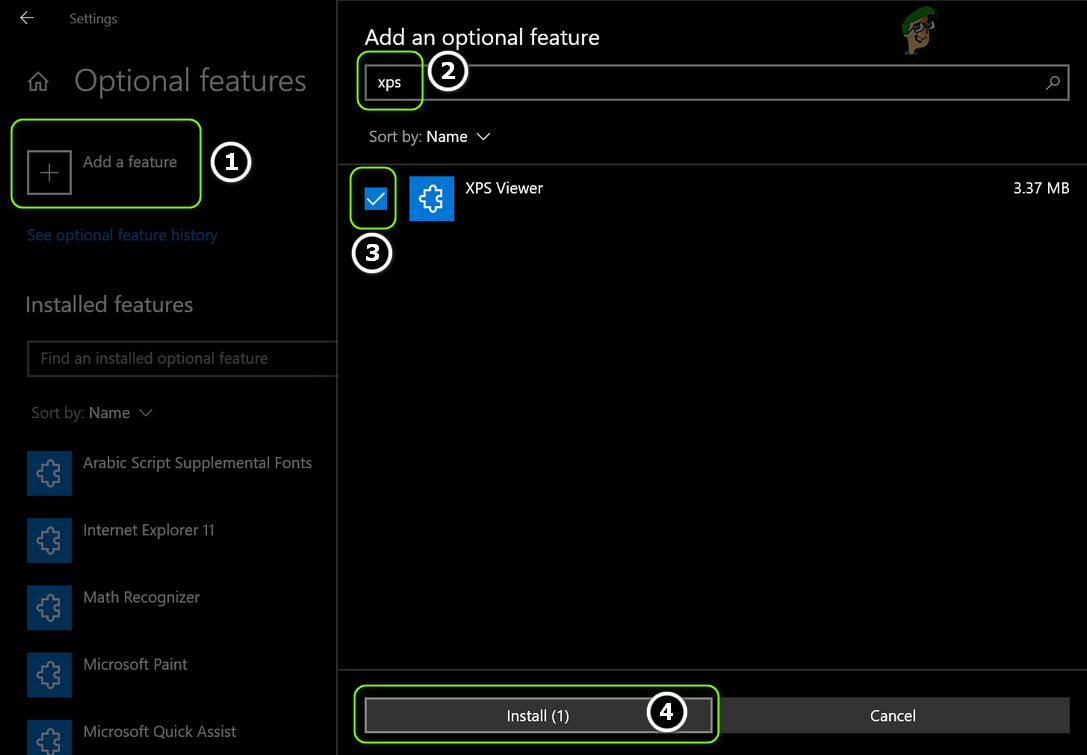
Open Apps in the Windows Settings - Then click on Add a Feature and in the search bar of the new window shown, type XPS Viewer.

Open Optional Features in Apps - Now, checkmark XPS Viewer and click on Install.

Install the XPS Viewer Feature - Then let the installation complete and reboot your PC.
- Upon reboot, check if the OXPS file can be opened with the Viewer application.
Use the PowerShell (Admin) to Install the XPS Viewer
- Launch the Power User menu (by right-clicking the Windows button) and select PowerShell (Admin).
Open Windows PowerShell Admin - Now execute the following:
Get-WindowsCapability -Online |? {$_.Name -like "*XPS*" -and $_.State -eq "NotPresent"} | Add-WindowsCapability -Online - Now let the process complete and reboot your PC.
- Upon reboot, launch the XPS Viewer (from Start menu>> Windows Accessories) to check if it can open the OXPS file.
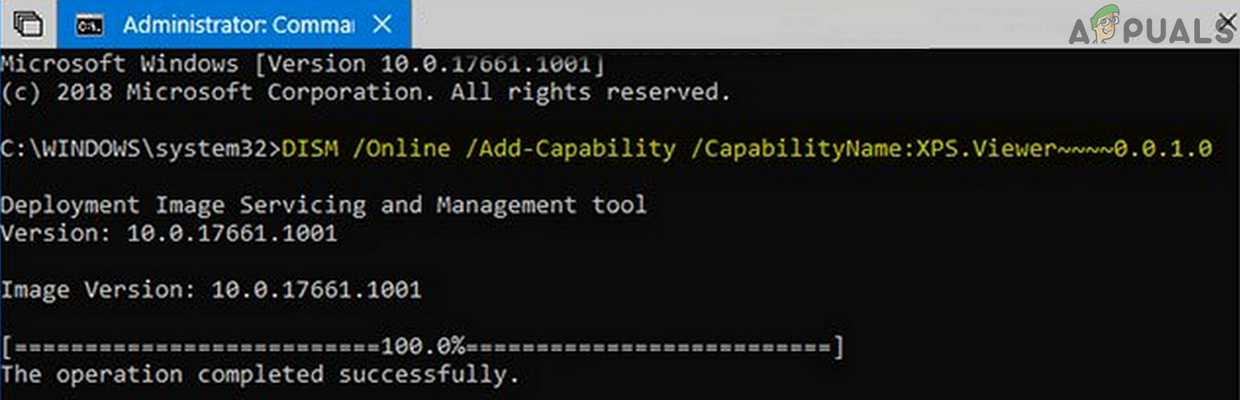
Use the DISM Command to Install the XPS Viewer
- Press the Windows key and type (in the Windows Search) Command Prompt. Then, right-click on the result of the Command Prompt and choose Run as Administrator.
Open Command Prompt as Administrator - Now execute the following DISM command:
dism /Online /Add-Capability /CapabilityName:XPS.Viewer~~~~0.0.1.0

Install the XPS Viewer by Using the DISM Command - Then let the process complete and reboot your PC.
- Upon reboot, check if the OXPS file can be opened by the XPS Viewer.
If the XPS Viewer fails to open the OXPS file, then check if opening the file with MS Word or Excel resolves the issue. If the issue persists, then you may try a 3rd party PDF reader or convert the OXPS files by using Microsoft XpsConverter or any of the other online tools.
Kevin Arrows
Kevin Arrows is a highly experienced and knowledgeable technology specialist with over a decade of industry experience. He holds a Microsoft Certified Technology Specialist (MCTS) certification and has a deep passion for staying up-to-date on the latest tech developments. Kevin has written extensively on a wide range of tech-related topics, showcasing his expertise and knowledge in areas such as software development, cybersecurity, and cloud computing. His contributions to the tech field have been widely recognized and respected by his peers, and he is highly regarded for his ability to explain complex technical concepts in a clear and concise manner.
Recently we took a screenshot of the Windows 10 Login Screen and saved it in the OXPS file. While I tried to open this document, we found that the XPS document viewer application is missing on Windows 10. Either someone has removed the XPS document viewer from my PC or was not available from the beginning of the Windows 10 installation.
Fortunately, Microsoft provides an easy way to install UWP (Universal Windows Platform) apps on Windows 10. After installing the XPS Viewer application on my PC, I was able to open the document.
How can I open an OXPS or XPS file in Windows 10?
To open the OXPS or XPS document on Windows 10, perform the following steps:-
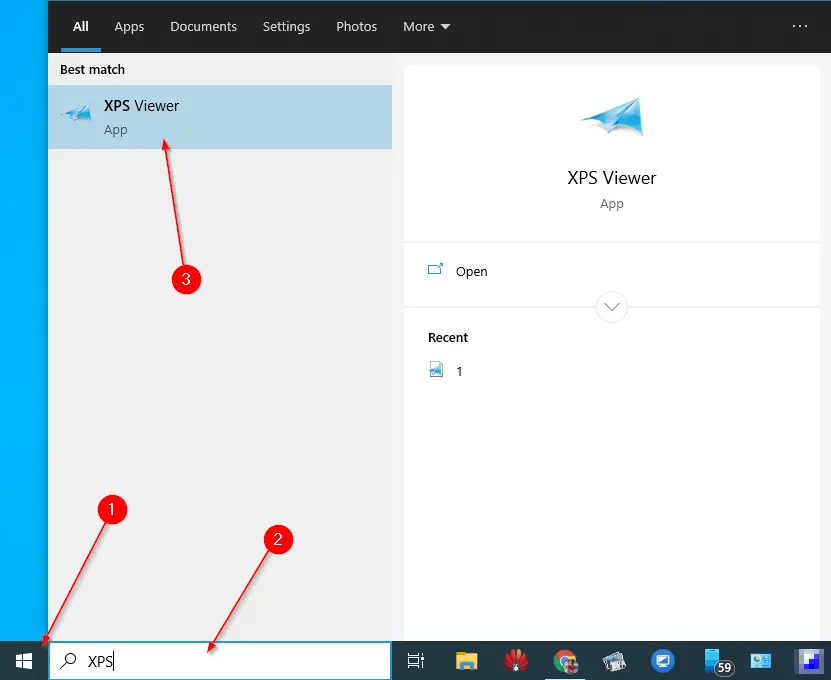
Step 1. Click on the Start button and type XPS. From the available results, click on the top entry “XPS Viewer” to open it.
Step 2. Once the XPS Viewer program is opened, drag your XPS or OXPS document in this program to open it.
Alternately, click on the File menu, select the Open option, and select the document from your PC.

Once you complete the above steps, you should open the XPS or OXPS document on your Windows 10 PC.
How to Install XPS Viewer in Windows 10?
If your Windows 10 XPS Viewer application is missing, and you want to install it, perform the following steps:-
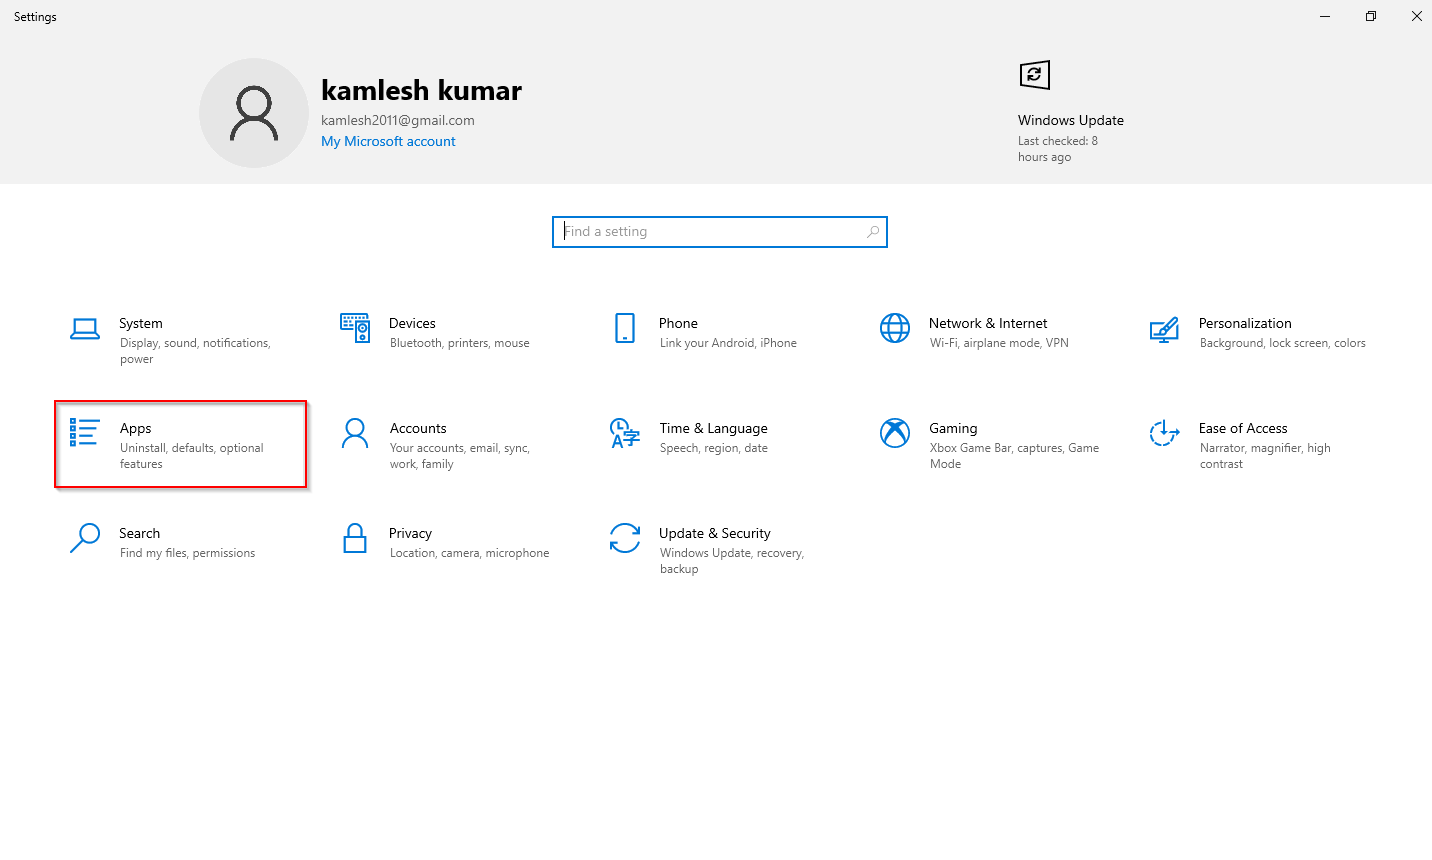
Step1. Click on the Start button and then the Settings gear icon to open the Settings app.
Step2. In the Settings window that appears, click on the Apps category.
Step3. Under the Apps, click on the “Apps & features” tab from the left side pane.
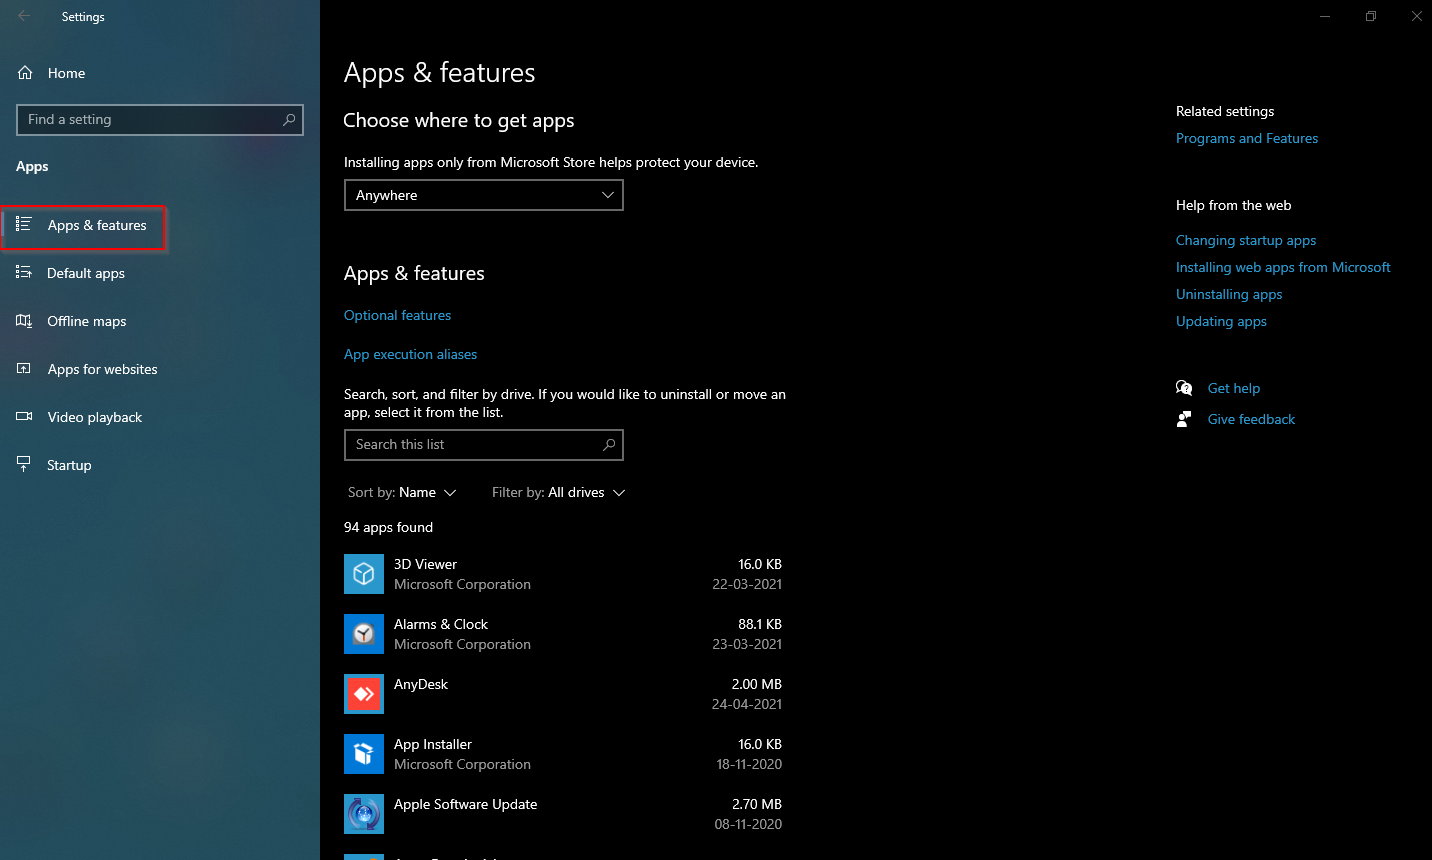
Step4. On the right side pane of “Apps & features,” click on the link labeled with “Optional features.”
Step 5. Click on the “Add a feature” button.
Step 6. On the pop-up window search box, type XPS.
Step 7. Check the checkbox “XPS Viewer.”
Step 8. Click the Install button.
Once you complete the above steps, the XPS Viewer application will be downloaded and installed automatically on your PC.
Now, you can open any.XPS or.OXPS document on your Windows 10 PC.
You might also be interested in Filestar and some free online tools to convert OXPS/XPS documents into PDF files.
Are you curious to know how to open XPS and OXPS files on Windows 10/11 PC or Mac computer? While XPS and OXPS files never gained much traction unlike their PDF counterpart, some people continue to use them.
However, opening these files isn’t as straightforward. This article will give you an idea of how you can open these files on your Mac computer or Windows PC.

flaticon/Freepik
The Windows operating system has an XPS viewer that can be used for XPS and OXPS files.
The only issue here is that the applet doesn’t get installed by default. It leaves you with no choice but to install the XPS viewer first before you can start opening OXPS files.
Here are the steps for installing on your Windows PC the XPS Viewer:
- Click on the Start button.
- Launch the Settings menu by clicking the Settings gear icon.
- Go to Apps and then look for App & Features.
- On the right panel, click the link that states Optional Features.
- Select Add a Feature on the next page for Optional Features.
- Scroll down to look for and select XPS Viewer in the next window.
- Click the Install button.
The XPS Viewer application will then be downloaded and installed automatically on your Windows PC once you have finished these steps above. It also means that you can now proceed to open any XPS or OXPS file on your Windows PC.
Simply follow the steps before doing so:
- Go to the Windows Search box and type XPS.
- Click to open the top entry XPS viewer from the available search results that show up.
- Open the XPS Viewer program and drag the OXPS file into it to open it. You can also try clicking the File menu, choosing the Open option, and clicking the specific file from the PC.
Steps to View and Open XPS and OXPS Files on Mac Computer

If you’re using your Mac computer to open XPS and OXPS files, here are the steps you should follow:
- Use the Mac OS Finder to look for the OXPS file you want to open. Double-click on it to open the corresponding app.
- If you can’t open the OXPS file in a Mac OS app and the error message “There is no application set to open the file” shows up instead, you can just click the “Search App Store” in the error dialog. Mac OS will list all OXPS file-compatible apps that you can try to use.
- You can select the option “Choose Application…” from the error box if you are familiar with the Mac OS app that can help open OXPS files. The file extension will be associated, allowing you to use it to open the OXPS file it contains.
- You can also install a third-party app that can read and open OXPS files.
Opening XPS and OXPS files don’t have to be complex. It only takes a few steps and you will be good to go.
Windows Dispatch is a website supported by its readers & community. Some pages may contain affiliate links which may allow us to earn a little money when you buy through them.
Aileen G. M.
A technology writer with a degree in Business Administration majoring in Marketing. Aileen loves creating helpful but simple guides for troubleshooting and fixing complex issues on today’s gadgets and services.