
При анонсе Windows 11 Майкрософт пообещала возможность запуска Android приложений в новой операционной системе. На момент релиза функция была недоступна, затем появилась в предварительных версиях системы, теперь же доступна всем пользователям.
В этой инструкции пошагово о том, как включить Windows Subsystem for Android в Windows 11, установить Android приложения и дополнительная информация, которая может оказаться полезной в контексте рассматриваемой темы. Также может быть полезным: Лучшие эмуляторы Android для Windows.
Установка Windows Subsystem for Android (WSA, Подсистема Windows для Android)
Все описанные действия по установке Подсистемы Windows для Android актуальны на момент написания статьи: вероятнее всего в скором времени процесс будет проще.
Необходимые шаги для установки Windows Subsystem for Android или WSA в Windows 11:
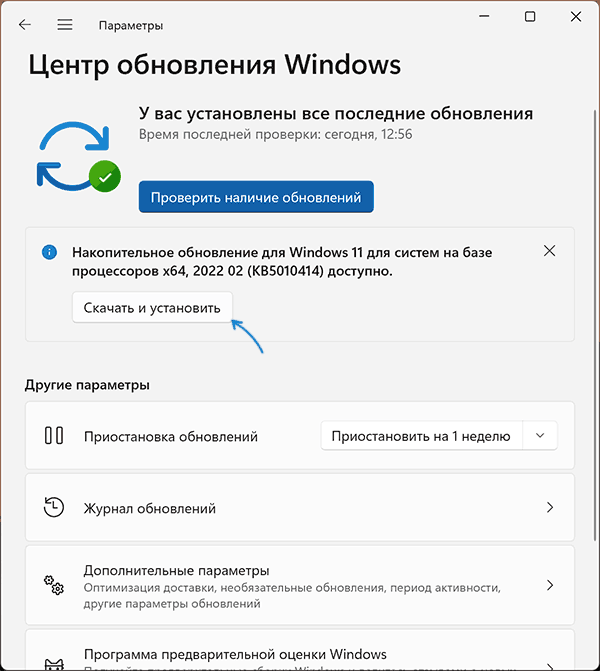
- Установите накопительное обновление KB5010414 через Центр обновления Windows, если вы этого еще не сделали.

- Для того, чтобы WSA могла работать, необходимо, чтобы на компьютере была включена виртуализация. Среди прочих требований — наличие SSD. Мне неизвестно, насколько критичен последний пункт при ручной установке Windows Subsystem for Android, к которой мы прибегнем далее.
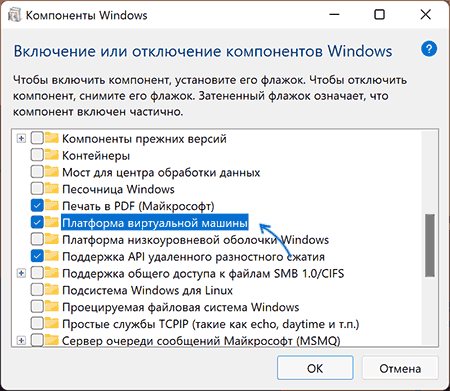
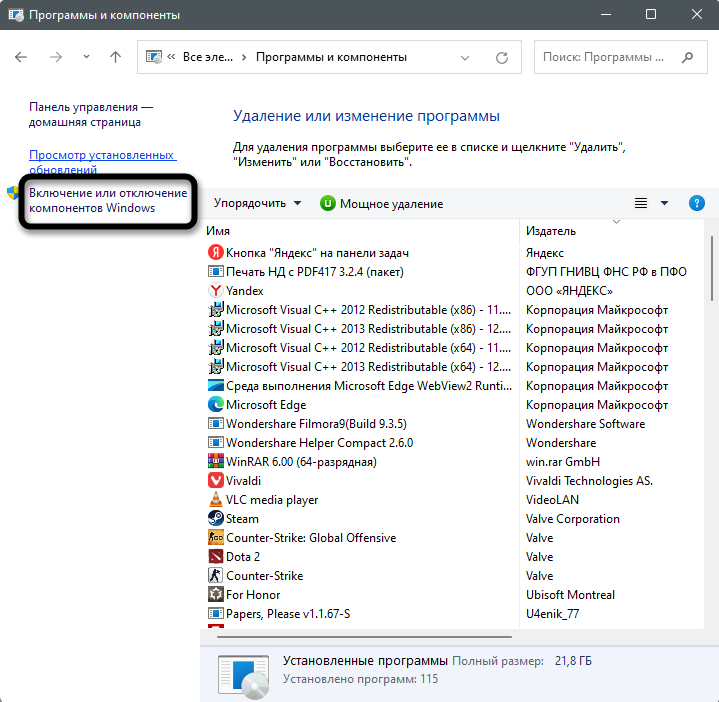
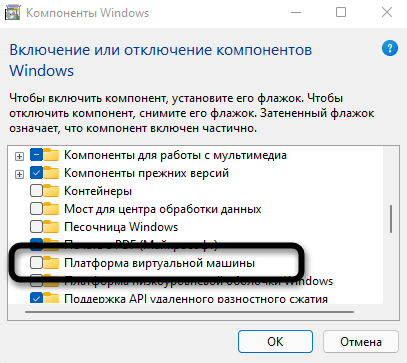
- Зайдите в Панель управления (для её открытия можно использовать поиск в панели задач) — Программы и компоненты, откройте пункт «Включение или отключение компонентов Windows», включите компонент «Платформа виртуальной машины», установите его и перезагрузите компьютер. Подробнее: Как установить дополнительные компоненты Windows 11 и Windows 10.

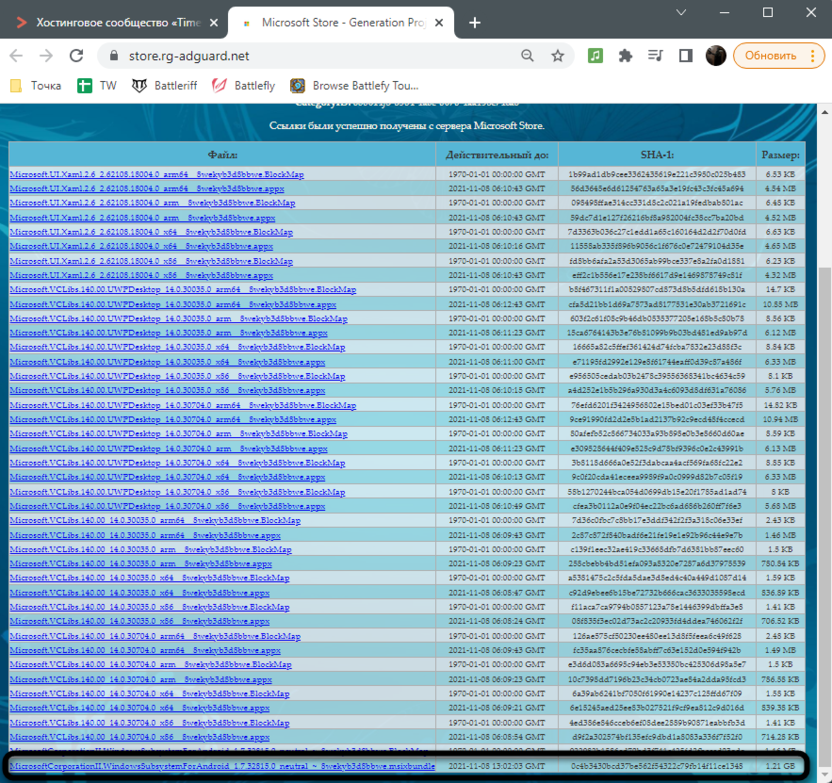
- Следующий шаг — установка приложения Windows Subsystem for Android, которое устанавливается при установке Amazon Appstore из магазина Microsoft Store. Сейчас приложение доступно лишь пользователям из США (но проверьте, возможно, к моменту, когда вы читаете этот материал, это уже не так), поэтому придется использовать обходной путь: зайдите на сайт https://store.rg-adguard.net/
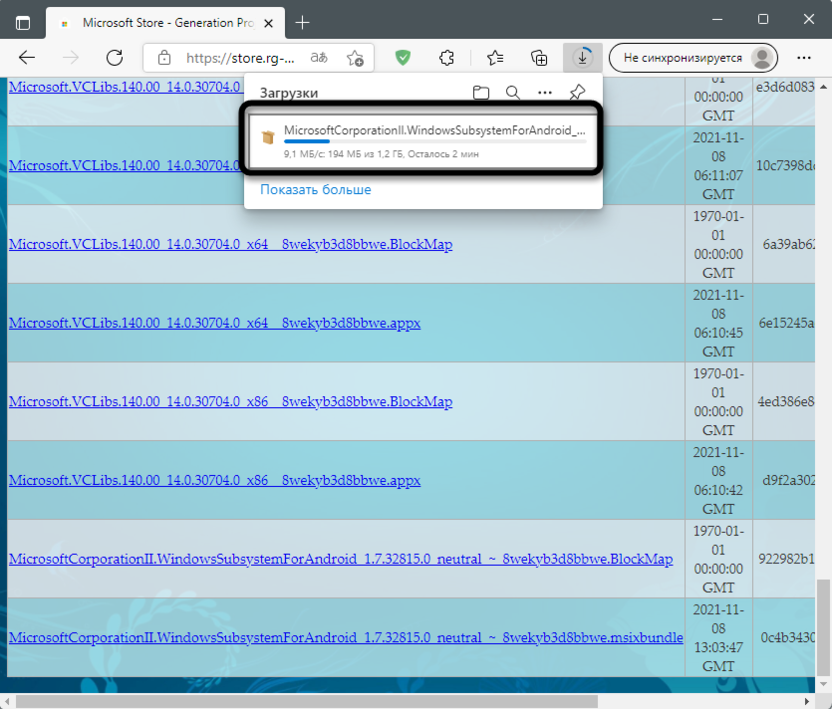
- В пункте слева выберите «ProductId», в поле ввода данных введите 9p3395vx91nr и нажмите кнопку с изображением «галочки» справа. Внизу отобразится список доступных файлов для загрузки, требуется скачать файл размером более одного гигабайта в конце списка с именем
MicrosoftCorporationII.WindowsSubsystemForAndroid_НОМЕР_ВЕРСИИ_neutral_~_8wekyb3d8bbwe.msixbundle

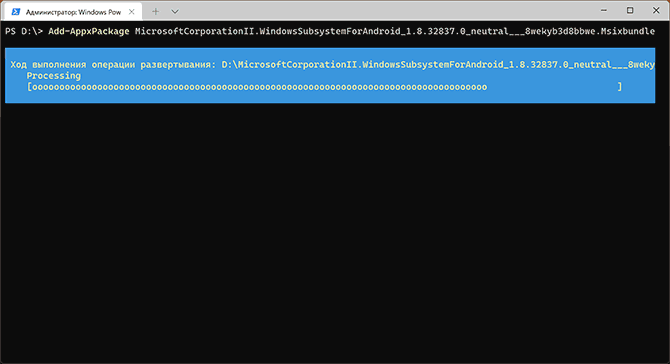
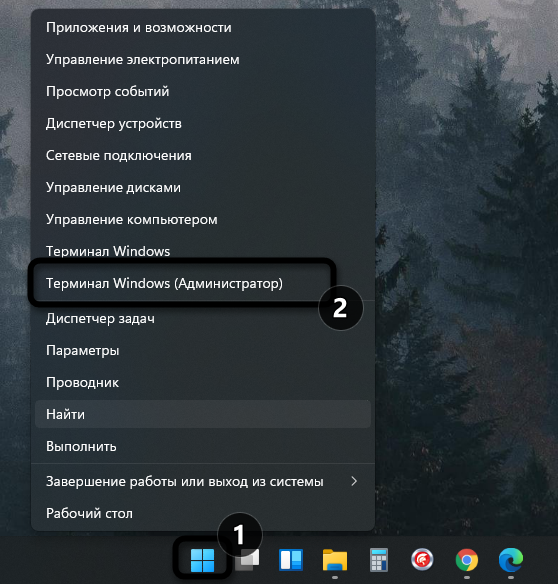
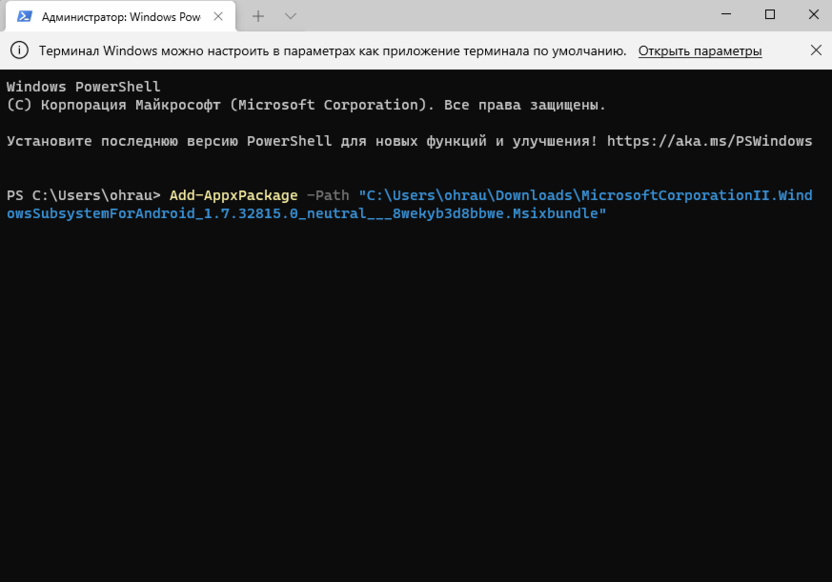
- Загруженный файл не получится установить просто запустив его. Для установки откройте Терминал Windows от имени администратора (правый клик по кнопке Пуск и выбрать нужный пункт в контекстном меню), а затем используйте команду
Add-AppxPackage полный_путь_к_скачанному_файлу
Путь можно скопировать, нажав правой кнопкой по файлу и выбрав соответствующий пункт в контекстном меню. Если путь содержит пробелы, возьмите его в кавычки.


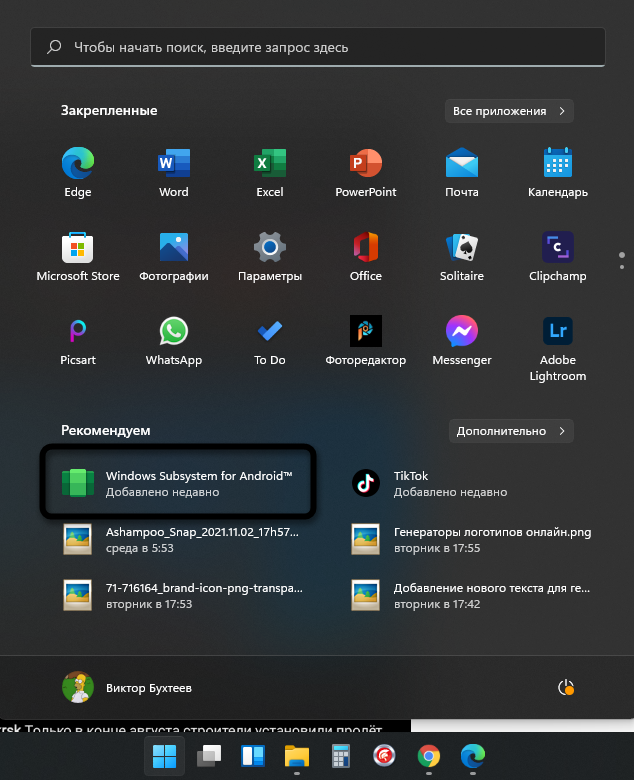
В результате выполнения указанных действий WSA или Подсистема Windows для Android будет установлена на компьютере, а в списке доступных приложений появится приложение «Параметры подсистемы Windows для Android».
После запуска подсистемы Windows для Android (первый раз можно быстро запустить, открыв пункт «Файлы» в параметрах подсистемы Windows для Android), на компьютере также будет установлено приложение Amazon AppStore — стандартный метод установки Android-приложений в Windows 11.
Установка Android приложений в Windows 11
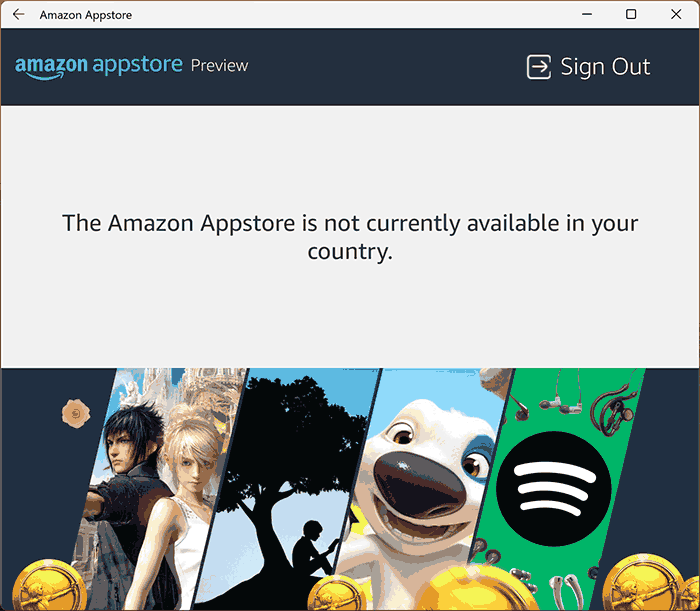
Стандартный метод установки Android приложений в Windows 11 — Amazon AppStore, однако на текущий момент (если ситуация изменится, и вы заметите это раньше меня, пожалуйста, напишите в комментариях), после входа в приложение вы увидите уведомление о том, что оно недоступно в нашей стране:
Поэтому придется использовать один из следующих методов.
Ручная установка Android-приложений в WSA с помощью adb.exe
Первый метод — использовать команды adb.exe для установки приложений из файлов APK вручную. Порядок действий:
- Скачайте инструменты командной строки platform-tools, включая adb.exe и распакуйте в удобную папку на вашем компьютере, рекомендую брать отсюда: https://adbinstaller.com/ — в этом варианте будет загружено только самое необходимое.
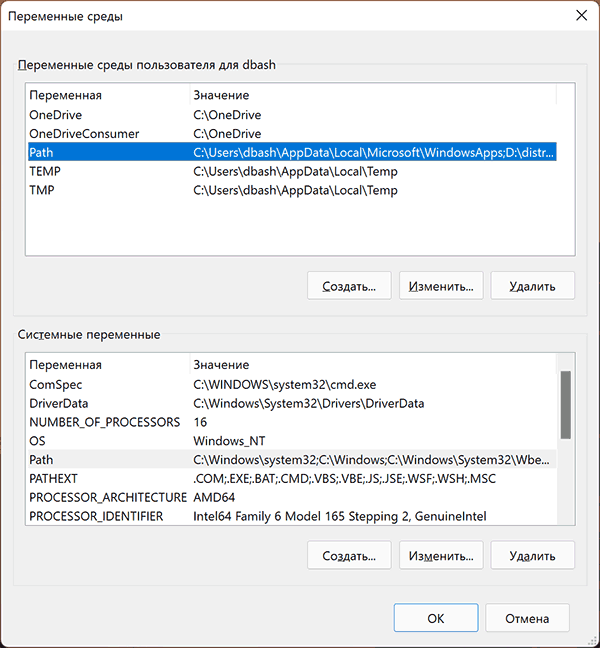
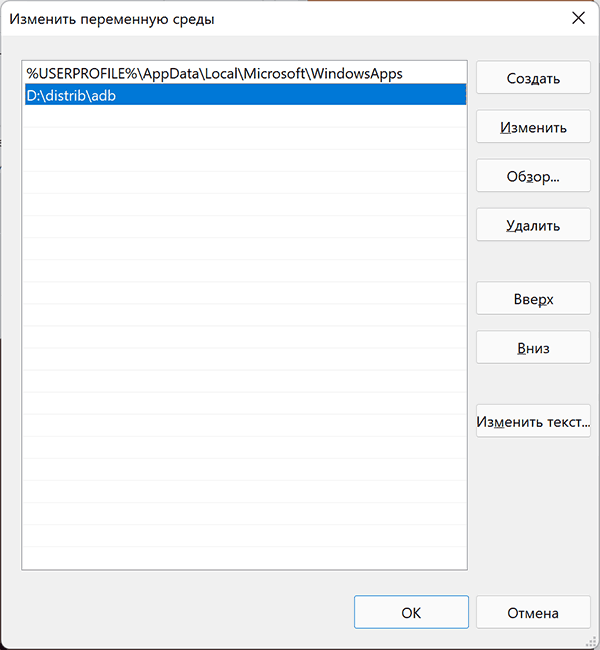
- Шаги 2-4 можно не выполнять, если вы готовы указывать полный путь к adb.exe в командной строке. Нажмите клавиши Win+R на клавиатуре, введите sysdm.cpl и нажмите Enter. Перейдите на вкладку «Дополнительно» и нажмите кнопку «Переменные среды».
- Выберите переменную Path (для пользователя, если требуется использование только текущим пользователем или в разделе «Системные переменные» для всей системы» и нажмите «Изменить».

- Нажмите «Создать» и добавьте путь к папке с файлом adb.exe в системную переменную Path.

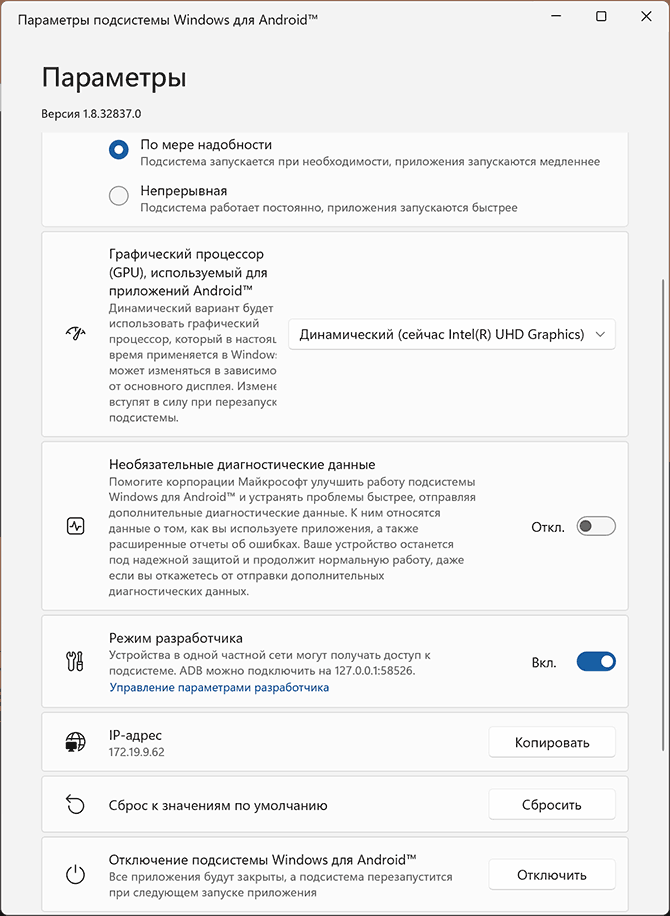
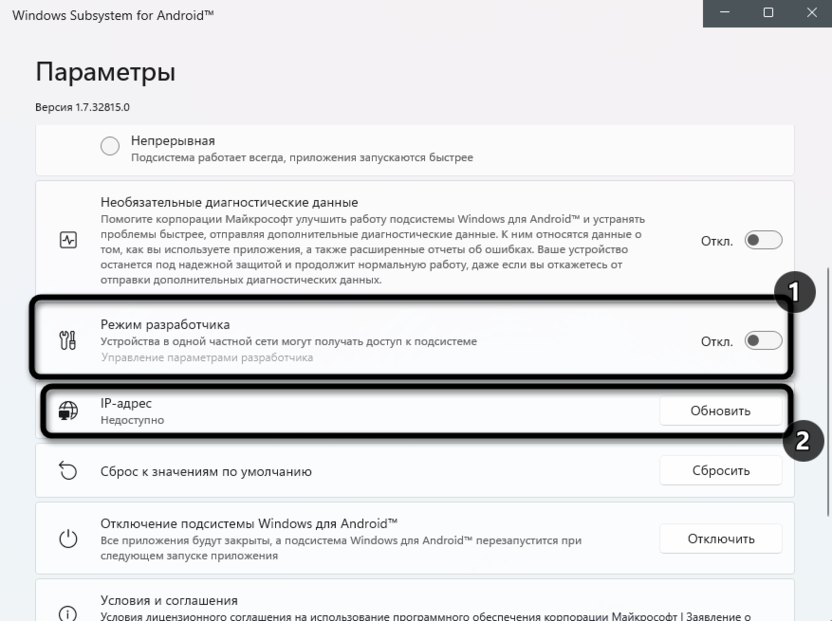
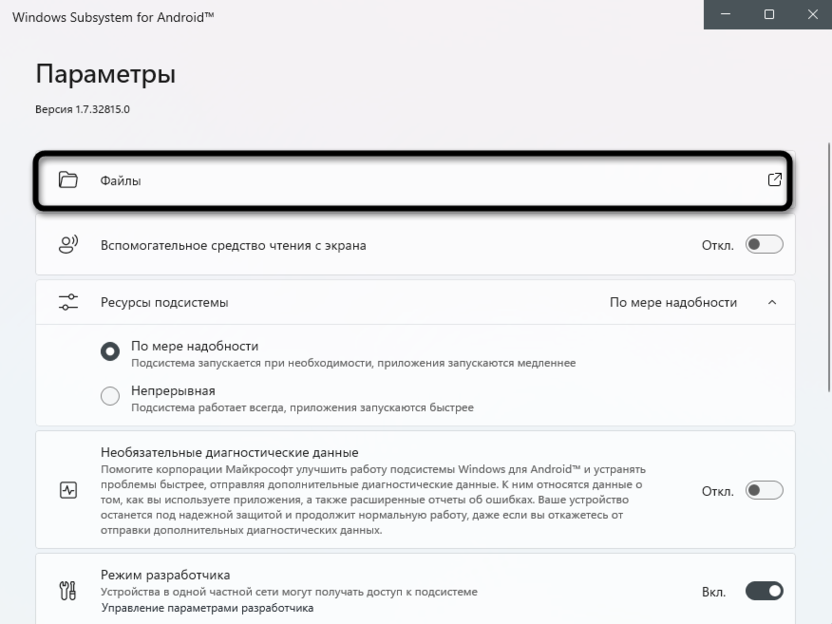
- Откройте приложение «Параметры подсистемы Windows для Android», включите пункт «Режим разработчика». Если сама WSA не запущена, запустите её (например, откройте пункт «Файлы» вверху окна, после открытия можно закрыть). Обратите внимание на пункт «IP-адрес» в параметрах, скопируйте его (если адрес не отображается, нажмите кнопку «Обновить» после запуска подсистемы Windows для Android).
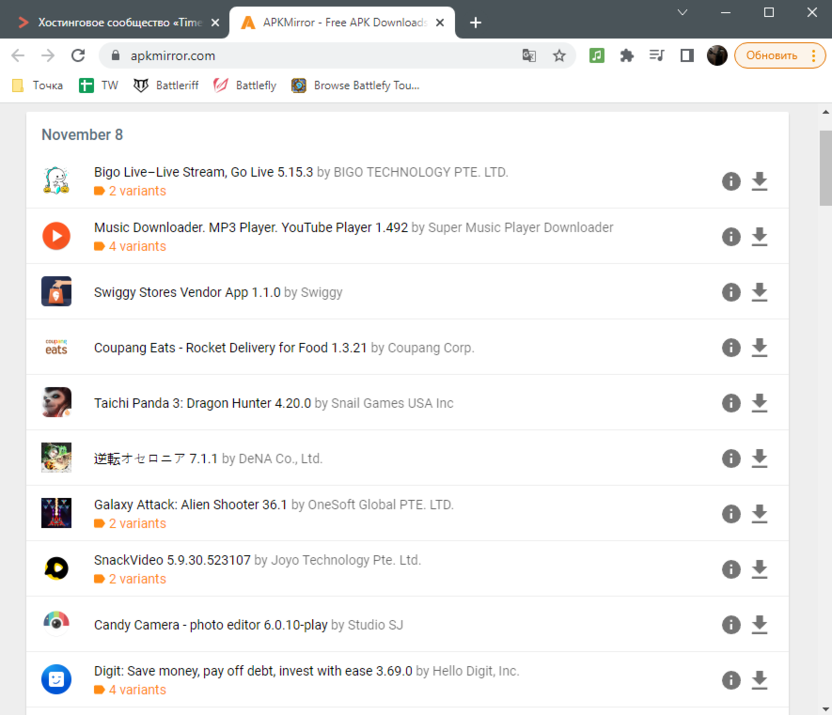
- Скачайте нужные вам приложения Android в виде файлов APK, например вот так: Как скачать APK приложений Android.
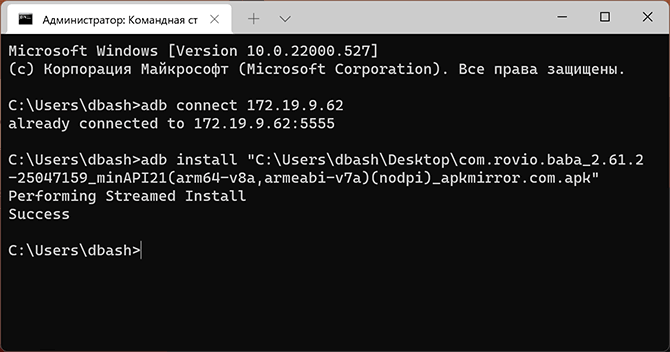
- Запустите командную строку от имени Администратора (как запустить командную строку от администратора в Windows 11).
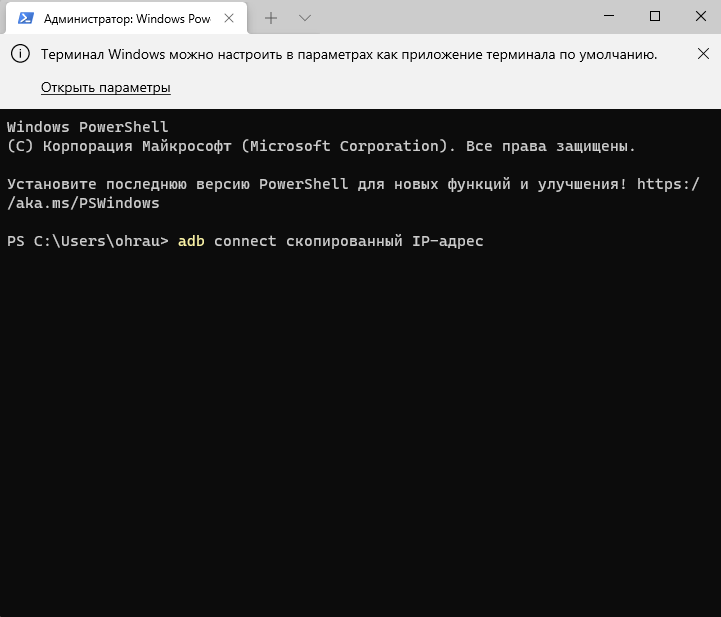
- Введите команду adb connect IP-адрес (где IP-адрес — адрес WSA из 5-го шага).
- Используйте команды adb install путь_к_файлу_apk для установки приложений Android. Успешно установленные приложения будут добавляться в меню Пуск Windows 11.

Не все приложения исправно работают: некоторые будут сообщать об ошибках или необходимости установки из Google Play (по всей видимости, из-за отсутствия Google Play Services). Но некоторые работают очень хорошо:
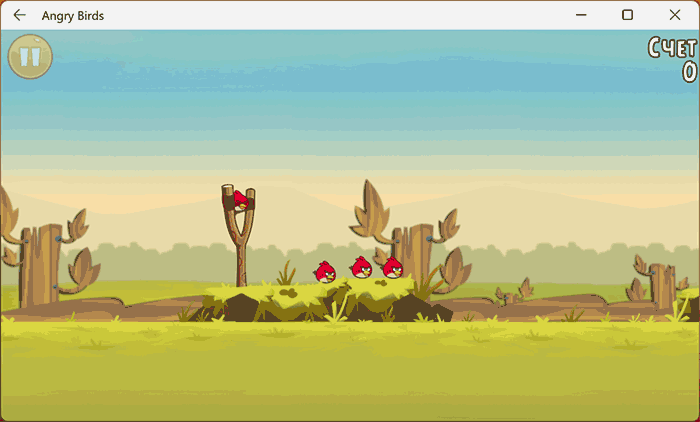
Даже работающие приложения не всегда делают это вполне исправно, среди замеченных проблем — неправильная отрисовка текстового контента в браузерах.
WSATools
В магазине Microsoft Store вы можете найти приложение WSATools, которое призвано облегчить установку приложений Android в Windows 11. Всё что требуется — указать файл APK устанавливаемого Android приложения, а всё остальное программа должна выполнить автоматически, в том числе — скачать и установить adb.exe при необходимости.

Однако в моем тесте установка в актуальной не Preview версии Windows 11 не удалась: экземпляр adb.exe, скачиваемый WSATools отказывается запускаться, а при ручной установке adb.exe, приложение либо зависает, либо «не видит» установленного adb.
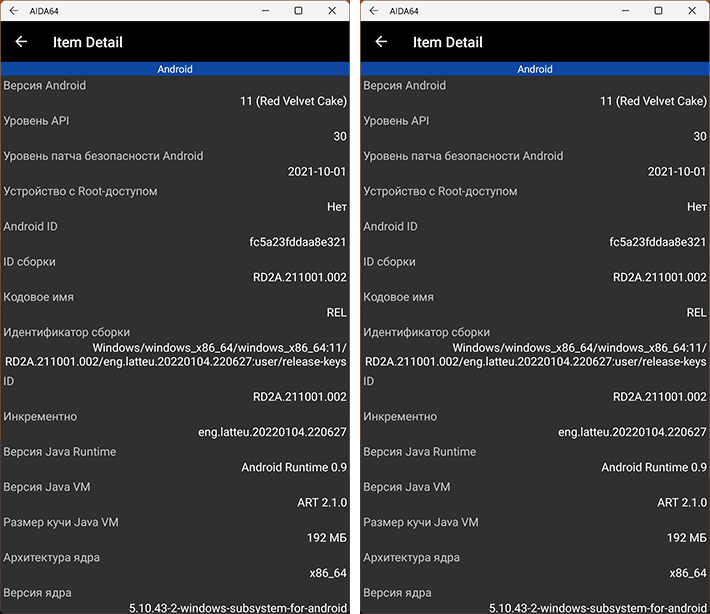
Если кому-то интересны характеристики виртуального устройства, запущенного в рамках Подсистемы Windows для Android, ниже — скриншоты с этой информацией.
Также, думаю, может заинтересовать проект MagiskOnWSA https://github.com/LSPosed/MagiskOnWSA для установки OpenGApps и получения Root в Windows Subsystem for Android.
Сейчас у пользователей Windows 11 Insider Preview есть возможность установить Android-приложения на свой компьютер и корректно взаимодействовать с ними. Однако в будущем эта функция интегрируется и в стабильные версии. Если вы не хотите ждать и желаете прямо сейчас начать использование мобильных программ в стабильной версии ОС, обратитесь к одному из следующих методов, чтобы достичь желаемого результата.
Способ 1: Установка приложений из Microsoft Store
У этого варианта есть свои недостатки, связанные с ограниченным набором приложений и изменениями в их внешнем виде. Однако это единственный официальный вариант, предназначенный для получения мобильных программ на ПК под управлением Windows 11.
Посмотрите на следующую инструкцию и решите, подойдет ли вам такой метод и найдутся ли нужные приложения в Microsoft Store.
-
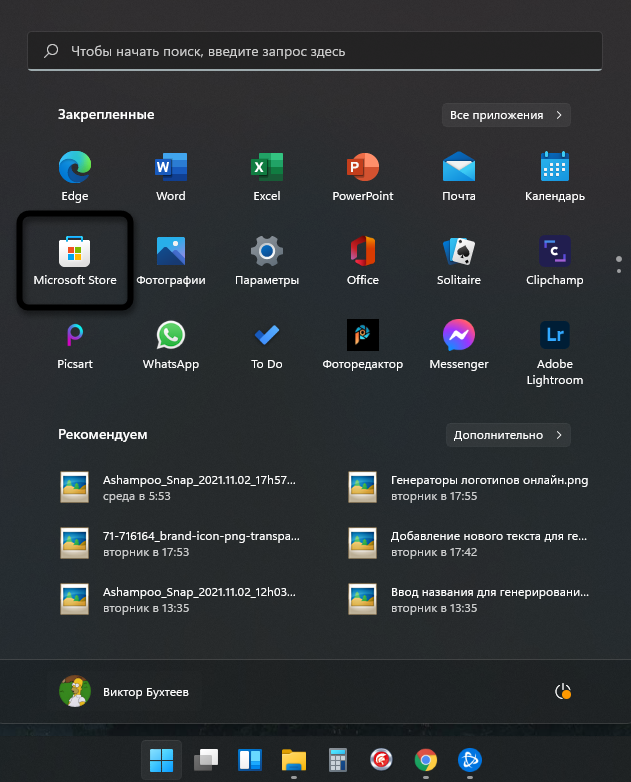
Откройте меню «Пуск» и запустите «Microsoft Store». Значок этой программы находится в списке закрепленных, но вы можете найти его и через поисковую строку Пуска.

-
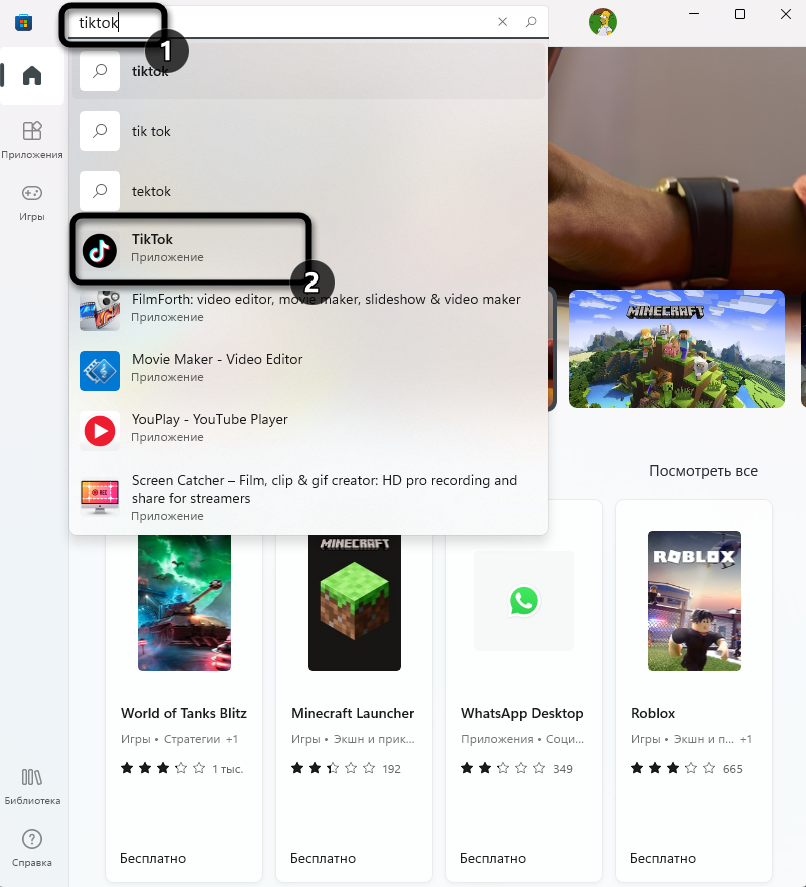
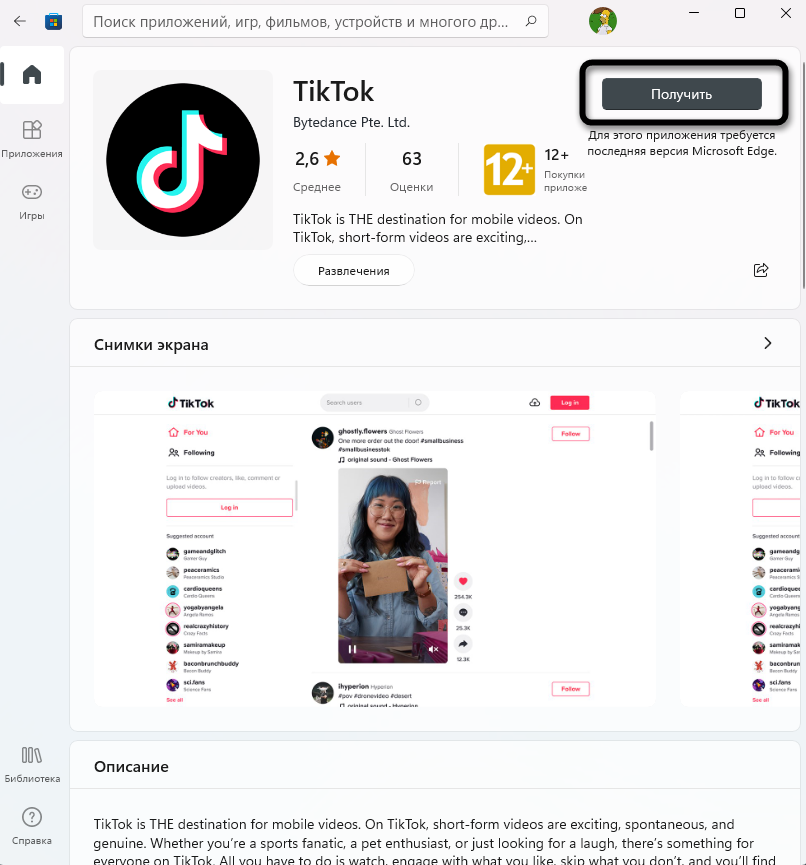
В самом магазине приложений используйте поиск, чтобы найти требуемое решение. Я за пример взял популярный сервис для создания и просмотра видео – TikTok.
-
На странице приложения нажмите кнопку «Получить».
-
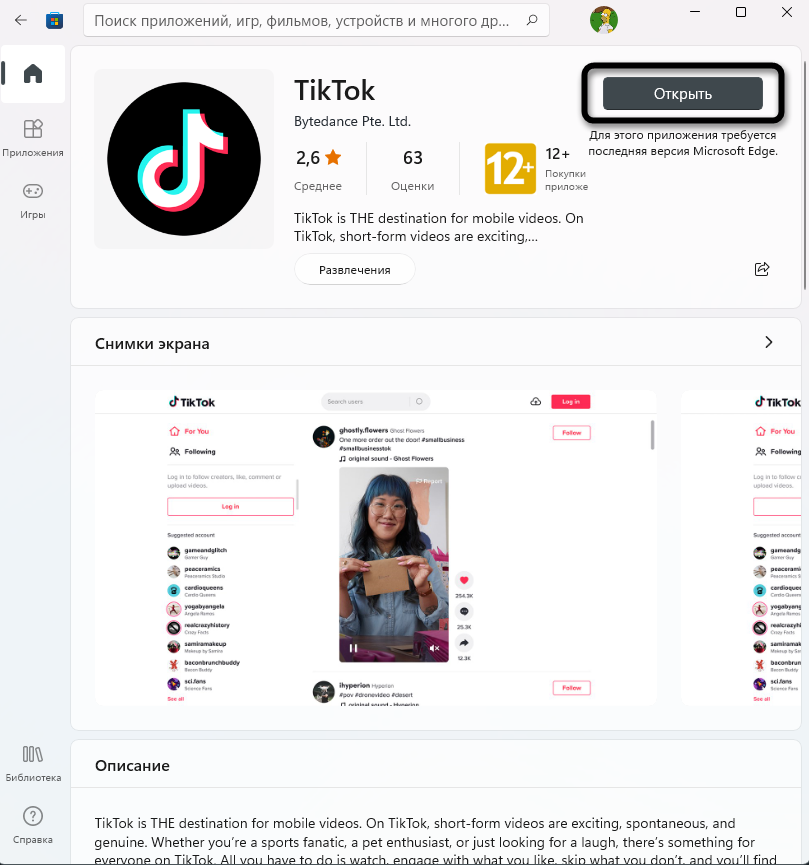
Автоматически начнется процесс скачивания и установки, после чего можно щелкнуть по «Открыть».
-
Запустится новое окно с интерфейсом приложения, и вы можете начать взаимодействие с ним. Как видно, сейчас некоторые функции ТикТок недоступны и интерфейс немного отличается.
-
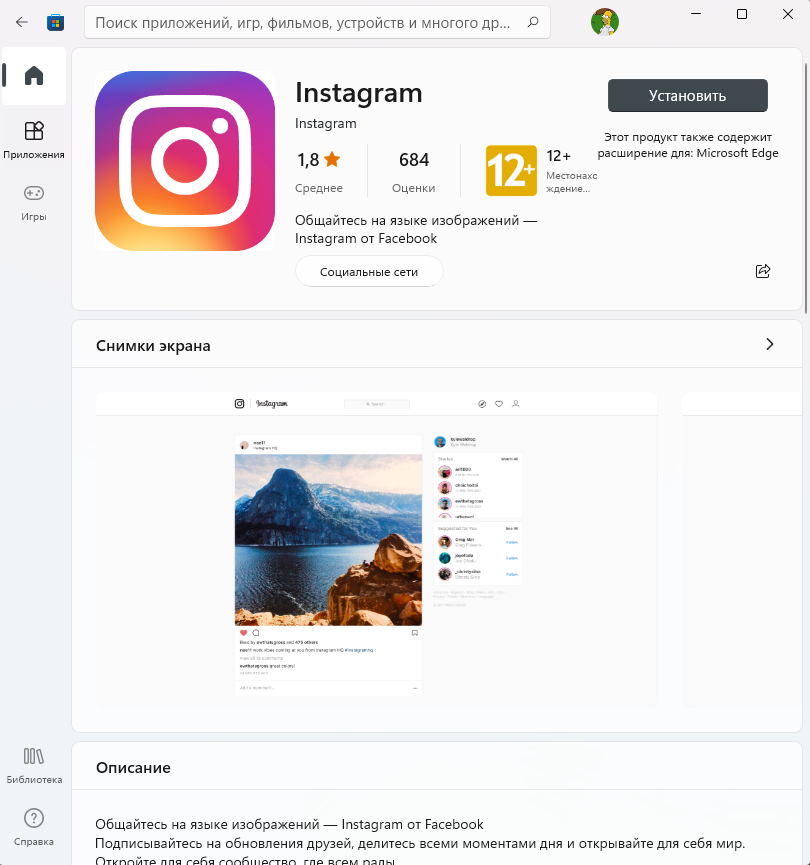
Ищите другие интересующие вас приложения и устанавливайте их на свой компьютер для дальнейшего использования.

Комьюнити теперь в Телеграм
Подпишитесь и будьте в курсе последних IT-новостей
Подписаться
Способ 2: Установка Windows Subsystem for Android
Windows Subsystem for Android – тот самый инструмент, позволяющий запускать андроид-приложения на компьютере под управлением Windows 11. В стабильных версиях операционной системы он отсутствует, поэтому далее я покажу метод его неофициальной инсталляции и загрузку APK-файлов для открытия полноценных мобильных приложений.
Обратите внимание на то, что нет точной информации о том, как поведет себя ОС после установки будущих обновлений. Возможно появление сбоев из-за наличия неофициальной версии Windows Subsystem for Android. Учитывайте это и выполняйте следующую инструкцию только на свой страх и риск.
-
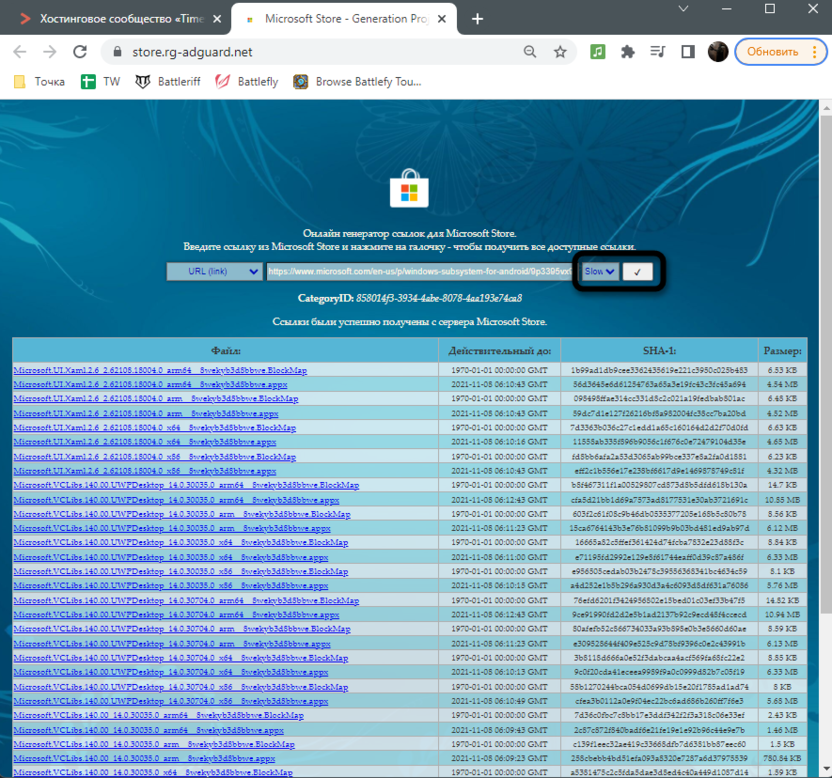
Откройте сайт https://store.rg-adguard.net/, который в нашем случае пригодится для получения файлов из Microsoft Store без использования этого приложения. Вставьте в строке ссылку https://www.microsoft.com/en-us/p/windows-subsystem-for-android/9p3395vx91nr, из списка справа выберите режим «Slow» и запустите процесс генерирации ссылки.
-
Вас интересует файл размером более 1 Гб, расположенный в конце списка. Он имеет расширение .msixbundle, поэтому спутать его с другими файлами не получится.
-
Если после нажатия по ссылке скачивание не запустилось, значит, ваш браузер блокирует небезопасные загрузки. Откройте Microsoft Edge или другой веб-обозреватель и скачайте упомянутый выше файл, щелкнув по его ссылке на странице.
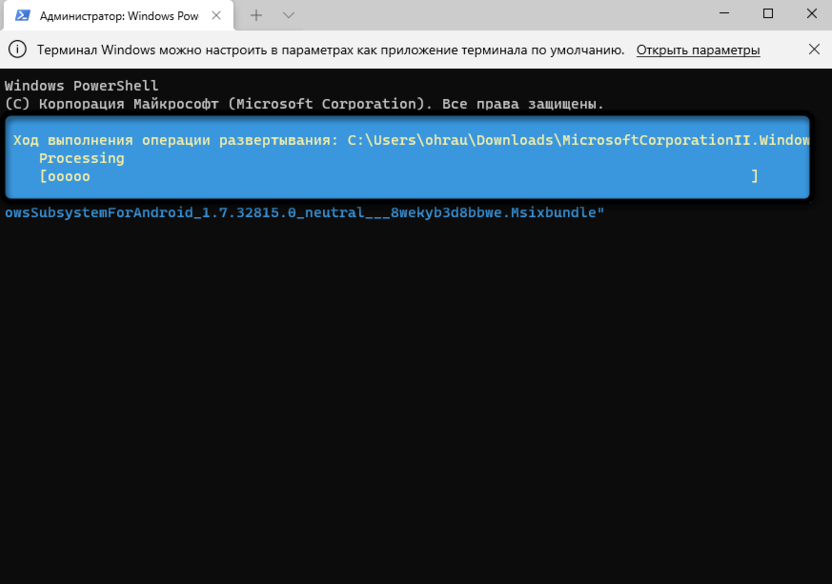
Пакет с файлами получен, значит, пришло время установить его в операционную систему. Просто так открыть пакет не получится, поэтому используйте терминал так, как это показано ниже.
-
Нажмите по кнопке «Пуск» ПКМ и запустите «Терминал Windows» от имени администратора.
-
Введите там команду Add-AppxPackage -Path » «, вставив в кавычках путь к скачанному файлу (включая его название и формат). Это показано на следующем скриншоте.
-
Нажмите Enter для запуска распаковки и ожидайте завершения процесса, следя за прогрессом выполнения операции.
-
Если все прошло успешно, можете открыть меню «Пуск» и убедиться в том, что приложение Windows Subsystem for Android имеет свой значок.
Если запустить данное приложение, можно увидеть стандартное окно с параметрами и кнопку, отвечающую за запуск виртуальной машины. В ней количество приложений ограничено, но все же некоторые полезные варианты есть. Дополнительно рассмотрим, как установить любой APK-файл, чтобы открыть полноценное Android-приложение в Windows.
-
Используйте любой проверенный источник, чтобы скачать APK-файл. Обычно это англоязычные хранилища, но если вам известен какой-то конкретный сайт, которому вы доверяете, загружайте файлы оттуда.
-
Откройте Windows Subsystem for Android, активируйте режим разработчика и скопируйте IP-адрес.
-
Если он недоступен, запустите виртуальную машину через «Файлы», дождитесь ее открытия, обновите IP-адрес и скопируйте полученный.
-
Сам IP-адрес необходимо ввести в терминале вместе с командой adb connect. Это добавит новое подключение.
-
После активации введите adb install + полный путь к APK-файлу вместе с его названием и форматом.

Успешная установка гарантирует появление ярлыка для запуска приложения в списке со всеми программами. Точно таким же образом установите все Android-программы или игры, которые вы хотите запустить в Windows 11.
Решение некоторых проблем
В завершение разберу две популярные проблемы, с которыми сталкиваются пользователи при попытке реализовать второй способ. Первая заключается в невозможности запуска виртуальной машины, что и мешает получить IP-адрес. Для решения этой ситуации необходимо активировать виртуализацию в Windows 11, что осуществляется так:
-
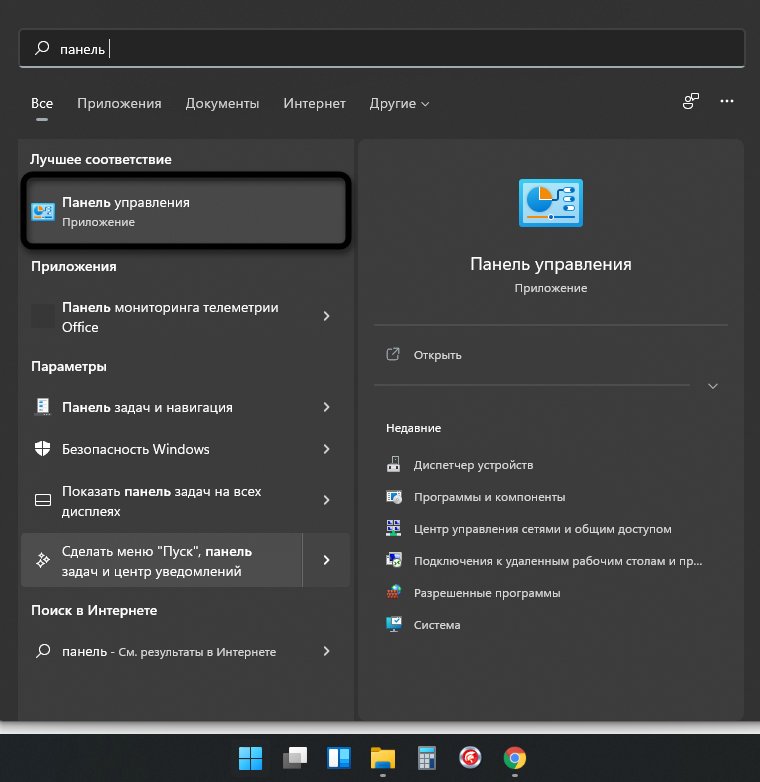
Откройте меню «Пуск» и через поиск отыщите «Панель управления».
-
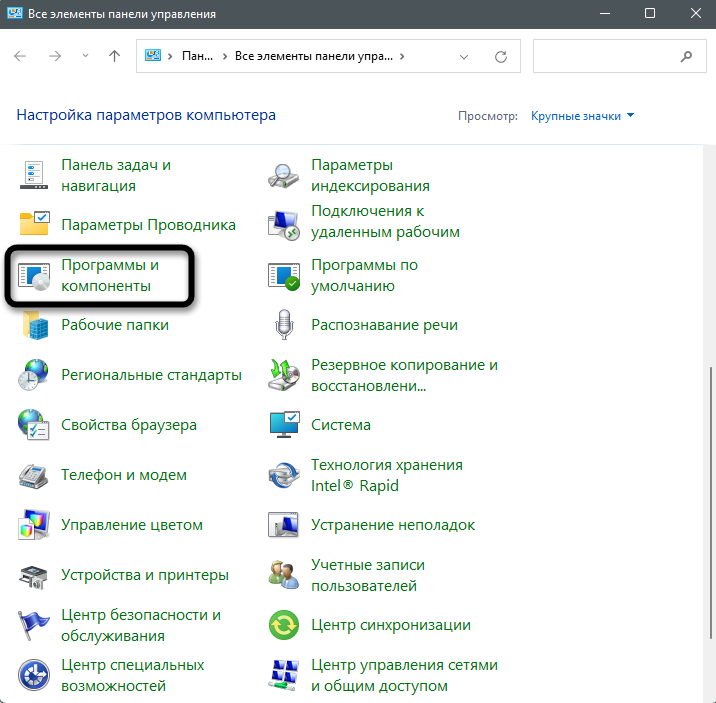
В новом окне вас интересует раздел «Программы и компоненты».
-
На панели слева кликните по ссылке «Включение или отключение компонентов Windows».
-
Отыщите компонент «Платформа виртуальной машины» и поставьте галочку возле данной строки. Перезапустите компьютер и снова запустите подсистему Android.
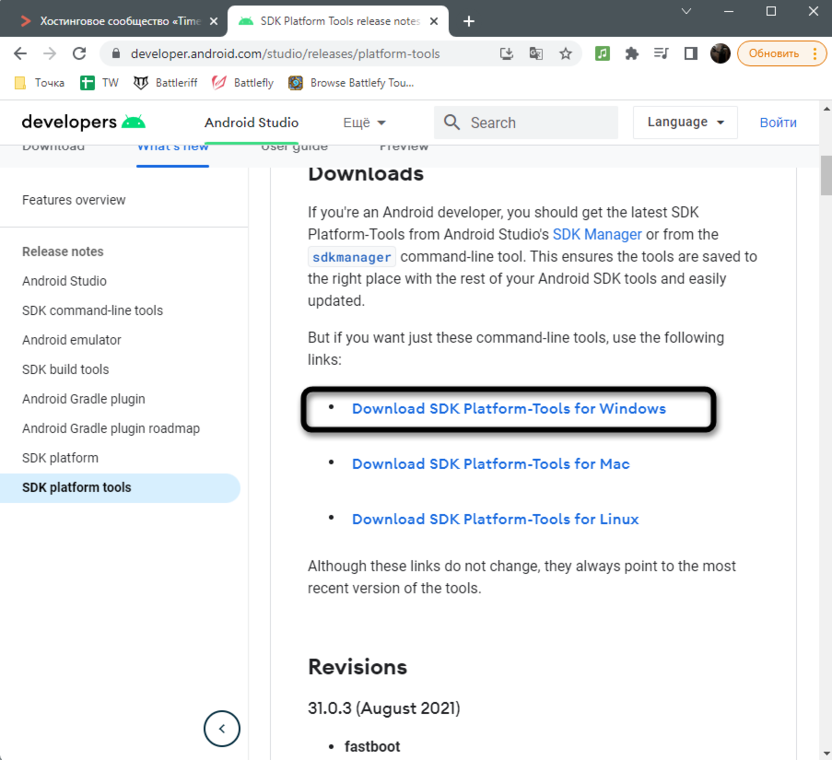
Вторая ситуация – возникновение неполадки на этапе ввода команды adb connect, когда данное имя не удается распознать. Это может быть связано с отсутствием в операционной системе SDK Platform Tools, поэтому займемся исправлением ситуации.
-
Перейдите на сайт Android Studio для разработчиков и скачайте набор инструментов для Windows.
-
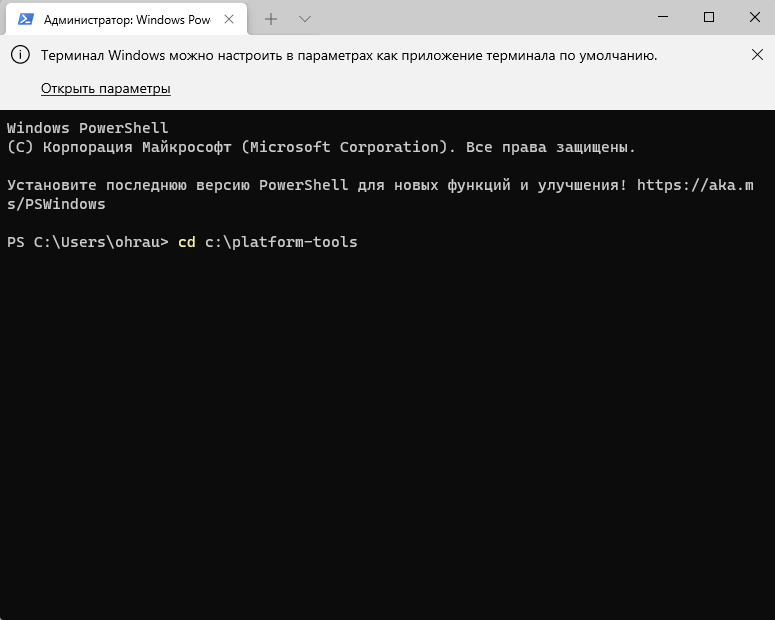
Установите программу в любую удобную для вас папку, после чего запустите терминал от имени администратора.
-
Используйте команду cd для перехода по пути расположения файлов SDK Platform Tools, введя после команды путь к каталогу.
-
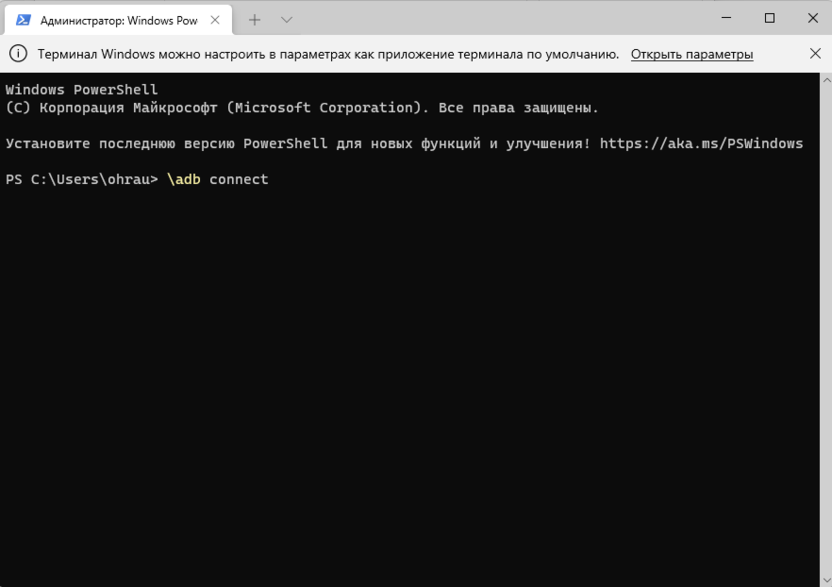
Пропишите новое соединение, но измените команду на \adb connect.
Теперь вы знаете, как запустить практически любое Android-приложение в Windows 11, если вы установили на компьютер стабильную версию, а не бету. Используйте удобный метод и не забывайте о том, что нужно четко следовать представленным инструкциям.
This Guide will show you how to install and run apk files or Android apps in any Edition of Windows 11 using Windows Subsystem for Android. WSA or Windows Subsystem for Android is a Tool that allows Windows to run Android Apps directly without using any emulator.
Install Android apps or apk files in Windows using Windows Subsystem for Android
WSA or Windows Subsystem for Android is a Tool that allows Windows to run Android Apps directly without using any emulator. The problem is Windows Subsystem for Android is currently only available through preview via the Beta Channel of the Windows Insider Program. But if you follow my guide, you don’t have to be in Windows Insider Program to try it out. The only thing you need is Windows 11 installed and some patience.
Prerequisites:
- Windows Subsystem for Android or WSA must be Installed.
Click here to view the guide that shows how to install Windows Subsystem for Android in any Edition of Windows 11 (including Windows 11 Home) non Inider or stable release.
How to Install Android Apps or apk files in Windows Subsystem for Android:
Thats it! Thanks for using this Guide. I hope it helped.
Opening APK files on Windows 11 is a straightforward process that allows you to access and install Android applications on your computer. With the growing popularity of Android apps and games, having the ability to open APK files on your Windows 11 device provides a convenient way to enjoy your favorite mobile apps on a larger screen. Whether you’re looking to use productivity apps, entertainment apps, or games, knowing how to open APK files gives you access to a vast array of software options.
To open APK files on Windows 11, you can use an Android emulator like Bluestacks or NoxPlayer, which simulate the Android environment on your computer. These emulators allow you to run APK files, giving you the ability to enjoy mobile apps and games on a Windows device. By using an Android emulator, you can access the Google Play Store, download and install APK files, and experience Android apps and games as if you were using an Android device. With the continued growth of the Android ecosystem, knowing how to open APK files on Windows 11 opens up a world of possibilities for productivity, entertainment, and gaming.
Opening APK files on Windows 11 is a straightforward process. Here’s how:
- Step 1: Download and install a reliable Android emulator such as BlueStacks or NoxPlayer.
- Step 2: Open the emulator and sign in with your Google account.
- Step 3: Locate the APK file on your computer.
- Step 4: Drag and drop the APK file onto the emulator to install it.
- Step 5: Once the installation is complete, you can open the APK file within the emulator.

Introduction
Windows 11 is the latest operating system introduced by Microsoft. It comes with various new features and enhancements, including improved compatibility with Android apps. This means you can now open and run Android apps on your Windows 11 PC. However, Android apps are typically distributed in APK (Android Package) file format. If you want to open APK files on Windows 11, you’ll need to take some additional steps. In this article, we will guide you on how to open APK files on Windows 11.
Using an Android Emulator
An Android emulator is software that allows you to run Android apps on your Windows PC. By using an Android emulator, you can open and run APK files on Windows 11. There are several popular Android emulators available, such as Bluestacks, Nox Player, and LDPlayer. Follow these steps to open APK files using an Android emulator:
- Choose an Android emulator of your choice (Bluestacks, Nox Player, LDPlayer, etc.).
- Download and install the Android emulator on your Windows 11 PC.
- Launch the Android emulator and set it up.
- Open the APK file that you want to run using the Android emulator. You can usually do this by double-clicking on the APK file or using the emulator’s file browsing interface.
- The Android emulator will automatically install the APK file and run the app.
Using an Android emulator is a convenient way to open APK files on Windows 11, especially if you want to test Android apps or access specific Android-exclusive features.
Bluestacks
Bluestacks is one of the most popular Android emulators available. It allows you to run Android apps on your Windows 11 PC seamlessly. Follow these steps to open APK files using Bluestacks:
- Download and install Bluestacks from the official website (https://www.bluestacks.com).
- Launch Bluestacks and set it up by following the on-screen instructions.
- Once Bluestacks is set up, locate the APK file you want to open on your Windows 11 PC.
- Right-click on the APK file and select «Open with Bluestacks» from the context menu.
- Bluestacks will automatically install the APK file and launch the app.
Bluestacks provides a user-friendly interface and smooth performance, making it a popular choice for running Android apps on Windows 11.
Nox Player
Nox Player is another excellent Android emulator that allows you to open and run APK files on Windows 11. Follow these steps to use Nox Player:
- Download and install Nox Player from the official website (https://www.bignox.com).
- Launch Nox Player and set it up.
- Locate and open the APK file you want to run with Nox Player.
- Nox Player will automatically install the APK file and start the app.
Nox Player offers advanced customization options and supports high-performance gaming, making it an ideal choice for both developers and gamers.
Using a File Extractor
If you don’t want to use an Android emulator, you can also open APK files on Windows 11 using a file extractor. Here’s how:
- Download and install a file extractor program on your Windows 11 PC. WinRAR and 7-Zip are popular choices.
- Right-click on the APK file you want to open and select «Extract» or «Open with» from the context menu.
- If you choose to extract the APK file, select a destination folder where you want to extract the contents of the APK.
- Once the extraction is complete, navigate to the extracted folder and look for the app’s executable file or other installation files.
- Double-click on the executable file to run the app.
Using a file extractor allows you to access the files within the APK and run the app without the need for an Android emulator. However, this method may not work for all APK files, especially if they require specific dependencies or settings.
WinRAR
WinRAR is a popular file extractor that supports various file formats, including APK files. Follow these steps to open APK files using WinRAR:
- Download and install WinRAR from the official website (https://www.win-rar.com).
- Right-click on the APK file you want to open and select «Open with WinRAR» from the context menu.
- WinRAR will open the APK file, displaying its contents.
- Extract the contents of the APK to a desired folder by clicking on the «Extract» button in the WinRAR toolbar.
- Navigate to the extracted folder and look for the app’s executable file or other installation files.
- Double-click on the executable file to run the app.
WinRAR offers a comprehensive set of features and is widely used for opening and extracting various types of files, including APKs.
7-Zip
7-Zip is a free and open-source file archiver that can extract files from APKs. Follow these steps to use 7-Zip:
- Download and install 7-Zip from the official website (https://www.7-zip.org).
- Right-click on the APK file you want to open and select «Open archive» or «Open with 7-Zip» from the context menu.
- 7-Zip will open the APK file, displaying its contents.
- Extract the contents of the APK to a desired folder by clicking on the «Extract» button in the 7-Zip toolbar.
- Navigate to the extracted folder and look for the app’s executable file or other installation files.
- Double-click on the executable file to run the app.
7-Zip is a lightweight and efficient file archiver that can handle APK files easily, making it a suitable choice for opening and extracting APKs on Windows 11.
Using Windows Subsystem for Linux (WSL)
Another method to open APK files on Windows 11 is by using Windows Subsystem for Linux (WSL). WSL allows you to run a Linux environment within Windows, enabling you to execute Linux commands and run Linux-compatible software. Follow these steps to use WSL:
- Enable Windows Subsystem for Linux on your Windows 11 PC by following the official documentation provided by Microsoft.
- Once WSL is set up, open the Linux terminal.
- Navigate to the directory where the APK file is located using the «cd» command.
- Run the following command to install an Android emulator, such as Genymotion: «sudo apt-get install genymotion».
- Once the Android emulator is installed, run the following command to open the APK file: «genymotion /path/to/apkfile.apk».
- The Android emulator will automatically install the APK file and launch the app.
Using WSL allows you to leverage the power of Linux to open and run APK files on Windows 11. However, setting up WSL and executing Linux commands may require some technical expertise.
Conclusion
Opening APK files on Windows 11 is now possible with the help of various methods and tools mentioned in this article. Whether you choose to use an Android emulator like Bluestacks or Nox Player, a file extractor like WinRAR or 7-Zip, or even Windows Subsystem for Linux (WSL), you have multiple options to run Android apps on your Windows 11 PC. Choose the method that suits your needs and technical expertise to enjoy the benefits of Android apps on your Windows 11 device.

Opening Apk Files on Windows 11
Windows 11, the latest version of the Microsoft operating system, allows users to open APK files, which are primarily used in Android devices. APK files contain the installation files for Android applications.
To open APK files on Windows 11, follow these steps:
- First, download an Android emulator such as BlueStacks or NoxPlayer on your Windows 11 PC.
- Install the Android emulator by following the on-screen instructions.
- Once the emulator is installed, open it and sign in with your Google account.
- Now, download the APK file you want to open on Windows 11.
- Go to the emulator’s home screen and click on the «Install APK» button.
- Select the APK file you downloaded and wait for the installation process to complete.
- Once the installation is done, you can find the app in the emulator’s app drawer and open it just like you would on an Android device.
By following these steps, you can easily open and use APK files on your Windows 11 PC using an Android emulator. This allows you to run Android apps and games on your computer.
Key Takeaways:
- Windows 11 does not natively support opening APK files.
- You can use an Android emulator like Bluestacks or NoxPlayer to open APK files on Windows 11.
- Another option is to use a file extraction tool like WinRAR to extract the contents of the APK file.
- Once extracted, you can access the files and folders within the APK file on Windows 11.
- It’s important to be cautious when opening APK files from unknown sources to avoid potential security risks.
Frequently Asked Questions
Are you having trouble opening APK files on Windows 11? Look no further. We provide answers to your most pressing questions below.
1. What is an APK file?
An APK file is an installation package for Android applications. It contains all the necessary files and resources needed to install and run an app on an Android device.
However, Windows 11 does not natively support APK files, so you’ll need to take a few extra steps to open them on your PC.
2. How can I open an APK file on Windows 11?
To open an APK file on Windows 11, you’ll need to use an Android emulator. These emulators simulate an Android environment on your PC and allow you to run Android apps.
There are several Android emulators available, such as BlueStacks, NoxPlayer, and MEmu. Download and install one of these emulators, then open the emulator and locate the APK file you want to open. You can usually do this by going to the emulator’s file manager or using the «Install APK» option.
3. Can I convert an APK file to an executable file on Windows 11?
Yes, it is possible to convert an APK file to an executable file, but it requires additional software and technical knowledge. One popular tool for converting APK files to EXE format is Bat to Exe Converter.
However, please note that converting an APK file to an EXE file may not always guarantee compatibility or functionality, as APK files are designed for Android devices and EXE files are native to Windows.
4. Is it safe to open APK files on Windows 11?
Opening APK files on Windows 11 can potentially pose security risks. Since APK files are meant for Android devices, they may contain malware or other harmful components that could infect your PC.
It is essential to download APK files from trusted sources and scan them with an antivirus program before opening. Additionally, using an Android emulator can provide an added layer of security by isolating the APK file from your system.
5. Are there any alternative methods to open APK files on Windows 11?
Yes, besides using an Android emulator, you can also use online services that convert APK files to other formats like ZIP or JAR. These converted files can then be opened on Windows 11 using appropriate software.
However, be cautious when using online conversion services, as they may also pose a security risk. Make sure to only use trusted and reputable websites.
To open APK files on Windows 11, you can follow a few simple steps. First, make sure you have an Android emulator installed on your PC, such as BlueStacks or NoxPlayer. These emulators create a virtual Android environment on your Windows system, allowing you to run APK files.
Once you have the emulator installed, simply double-click on the APK file you want to open. The emulator will launch and automatically install the APK file for you. After installation, you can access the app within the virtual Android environment and use it just like you would on an Android device.