
Загрузить PDF
Загрузить PDF
Из этой статьи вы узнаете, как на компьютере под управлением Windows запустить BAT-файл (пакетный файл). Такие файлы используются для различных целей, например, для автоматизации процессов. BAT-файл можно запустить с помощью Проводника или командной строки.
-

Для этого нажмите на логотип Windows в нижнем левом углу экрана.
-

Вы найдете эту опцию в левой части меню «Пуск».
- Также можно щелкнуть правой кнопкой мыши по логотипу Windows, а затем нажать «Проводник».
СОВЕТ СПЕЦИАЛИСТА
A wikiHow Staff Editor reviewed this article to make sure it’s clear and accurate.
Если «Проводника» в меню «Пуск» нет, кликните по логотипу Windows правой кнопкой мыши и выберите «Свойства».
Выберите папки для отображения в меню «Пуск». В данном случае выберите «Проводник».
То же самое можно проделать с папками «Видео», «Музыка», «Загрузки» и так далее. -

Также можно найти этот файл: щелкните по «Этот компьютер» на левой панели окна, а затем введите имя файла в строке поиска в верхнем правом углу окна.
-

Он должен запуститься. Если нет, запустите файл как администратор.
-
Щелкните правой кнопкой мыши по BAT-файлу и в меню выберите Запуск от имени администратора. Возможно, вам придется запустить файл от имени администратора — это зависит от содержимого BAT-файла.
- В большинстве случаев работа BAT-файла на экране не отображается, потому что все происходит в фоновом режиме. Выясните, для чего предназначен пакетный файл, потому что даже если вы не видите результаты его работы, он, скорее всего, успешно справился со своими задачами.
Реклама


-
Для этого нажмите на логотип Windows в нижнем левом углу экрана.
-

По мере ввода поискового запроса под ним будут отображаться результаты поиска.
-
Этот значок имеет вид черного квадрата с белыми символами.
-

Возможно, вам придется запустить командную строку от имени администратора — это зависит от содержимого BAT-файла.
-
«cd» — эта команда для изменения каталога, а путь — это расположение папки с BAT-файлом. Например, если пакетный файл находится на рабочем столе пользователя «Иван», введите:
cd /Пользователи/Иван/Рабочий стол.- Обязательно вставьте пробел между командой «cd» и расположением файла.
-

Текущий каталог изменится на папку с BAT-файлом.
-
Не забудьте про расширение .bat. Например, если BAT-файл называется «install», в командной строке введите install.bat.
-
BAT-файл будет запущен. Как только на экране отобразится мигающий курсор, считайте, что пакетный файл завершил работу.
- Если в командной строке отобразилось сообщение об ошибке, внимательно прочитайте его, чтобы внести изменения в код BAT-файла.
Реклама


Об этой статье
Эту страницу просматривали 106 662 раза.
Была ли эта статья полезной?
If you use Windows and have ever tried working with batch files, you might have noticed sometimes they don’t do what you expect when you double-click them. They could open in a text editor, show errors, or not do anything at all.
This issue can happen for a few reasons, like changes to how Windows handles file extensions or simple mistakes on our part. In this guide, we’ll look at why this happens with .BAT files on Windows 11 or Windows 10 and show you how to fix it and get your scripts running smoothly again.
What are batch files?
First off, batch files are scripts filled with commands or programs that run one after the other automatically, without needing us to start each one manually.
They’re super useful for doing the same thing over and over, like opening a bunch of commands all at once or setting up your system in a specific way. You can write them in any simple text editor (like Notepad or Visual Studio Code) and save them with a .bat at the end. They work on all versions of Windows and you can start them from the command line or just by double-clicking their icon.
Handy tip: How to batch rename files in Windows 11
Why are your .BAT files not opening after double-clicking?
Several things could stop your batch files from opening or running right when you double-click them in Windows 11/10. Here’s what might be going on:
- Sometimes, the program that should open .bat files gets switched to something else like a text editor or another app that can’t run scripts.
- The settings for .bat files might be wrong or missing in Windows.
- There could be mistakes in the batch file itself that stop it from running.
- The command prompt might not be set up or available on your computer.
- Your security software might think the batch file is a risk and stop it from running.
- You might not have the right permissions to run batch files or get into certain folders.
How to fix Windows 11/10 .BAT file not running problem?
Depending on what’s causing the trouble, different fixes might work. Here are some ways to get your Windows batch (.BAT) files working again after double-clicking.
See also: How to run batch file without the CMD window
Use a registry fix to repair .BAT file association
Since you can’t change how .bat files are handled from the settings, fixing the registry is the way to go. You can either tweak the registry yourself with the steps below or use our quick fix.
But careful, messing with the registry can be tricky and might cause big problems if not done right. So, make sure to create a system restore point before you start, so you can undo changes if needed.
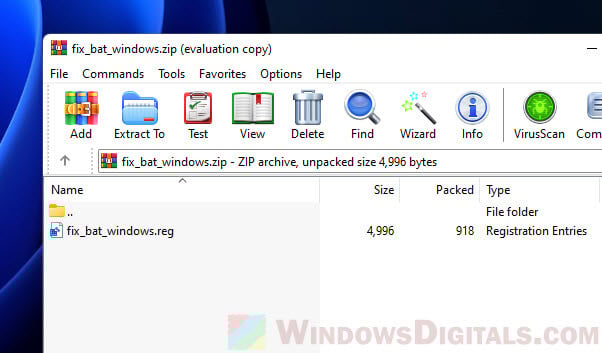
- Grab the .bat file association registry fix.
- Unzip the file you downloaded to a spot on your computer.

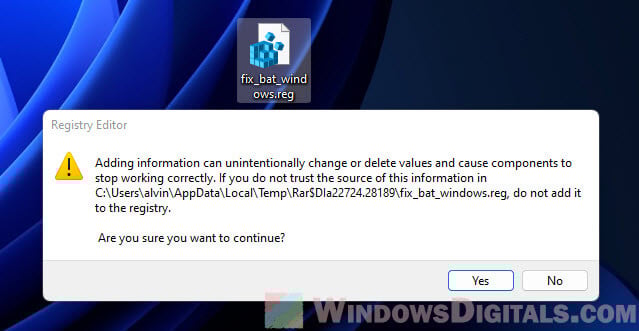
- Run the “fix_bat_windows.reg” file by double-clicking it.
- Hit “Yes” when it asks if you’re sure.

- Restart your computer.
After you do this, .bat files should work like they’re supposed to again.
Fix the .BAT file association manually using Registry Editor
If you want to handle it yourself in the Registry Editor, here’s how. Just remember, changing the registry can be risky, so please make a system restore point first, just in case.
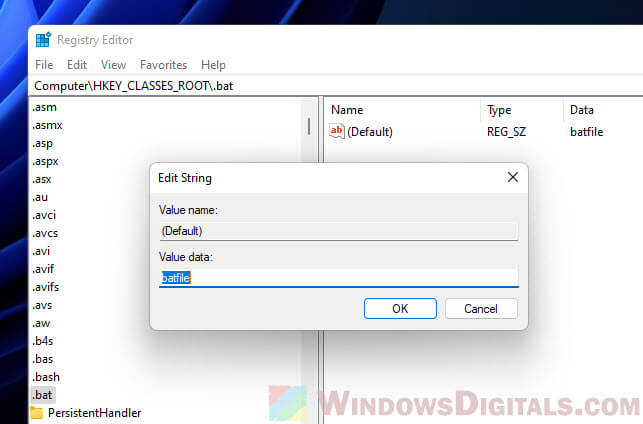
- Press Win + R, type “regedit”, and hit Enter to open the Registry Editor.

- Go to this part of the registry by clicking through the folders:
HKEY_CLASSES_ROOT\.bat
- Change the “(Default)” value to “batfile” to fix .bat file settings.

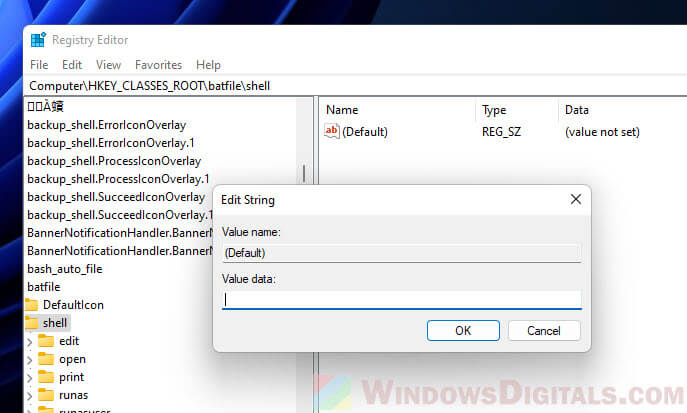
- Then, make sure the “(Default)” value under:
HKEY_CLASSES_ROOT\batfile\shell
is not set to anything. If it is, delete it.

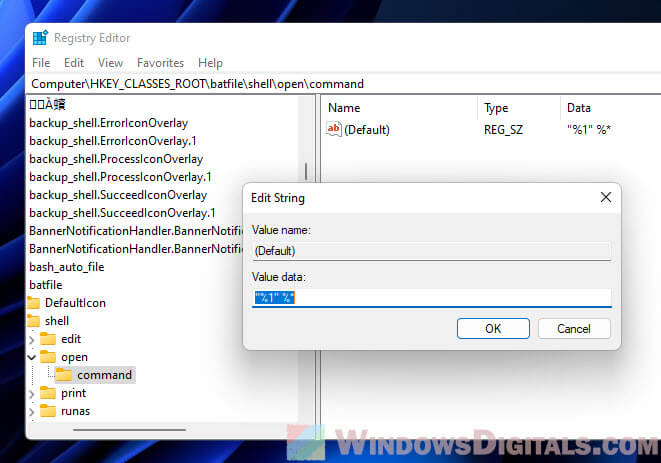
- Next, head to:
HKEY_CLASSES_ROOT\batfile\shell\open\command
- Change the “(Default)” value to
"%1" %*, including the quotes and space. This tells Windows to use the command prompt to open .bat files.
- Finally, go to:
HKEY_CURRENT_USER\Software\Microsoft\Windows\CurrentVersion\Explorer\FileExts\.bat
- Delete the “.bat” key and restart your computer.

Once you’ve done this, your batch files should be back to normal.
Check your batch file for mistakes
Ever run into trouble where your batch file just won’t do its thing? It might be because of mistakes in your code or using commands that don’t play nice. You can grab a text editor like Notepad++ that shows your code in different colors to spot errors easier. Also, giving it a go from the command prompt can help you see where things are going wrong.
Just pop open the Command Prompt, move it to where your batch file lives by typing in its home address, then type the file’s name with .bat at the end and hit Enter. If something’s not right, the command prompt will let you know by stopping the script and showing you what’s up.

Make sure you can use Command Prompt
If your batch files aren’t running on your Windows 11/10 computer, it could be because Command Prompt (CMD) isn’t ready for action. Here’s a quick way to check:
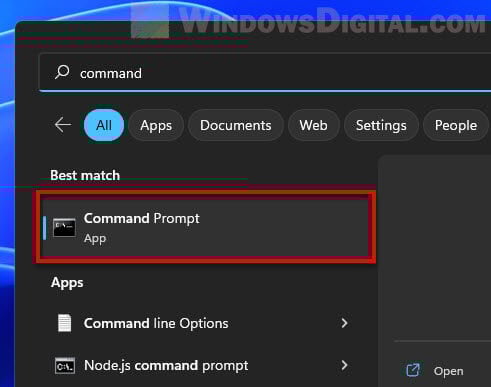
- Hit the Start menu and type “cmd” in the search bar.
- Click on “Command Prompt” from the search results to open it.

- If Command Prompt opens up, you’re good to go.
- If it doesn’t open or you get an error, then Command Prompt might be turned off.
How to get Command Prompt back on Windows 11/10
Found out Command Prompt is off-limits? No worries, you can switch it back on through the Local Group Policy Editor like this:
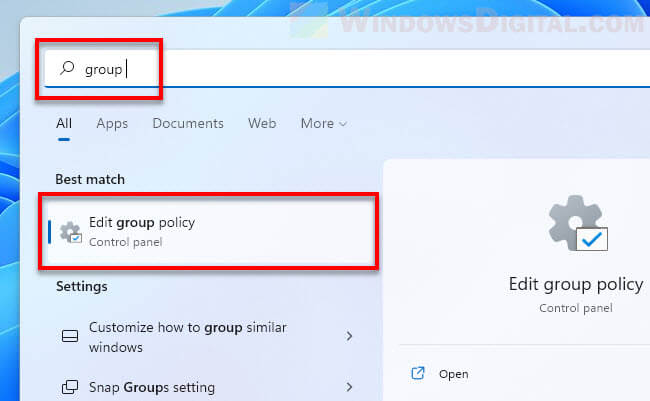
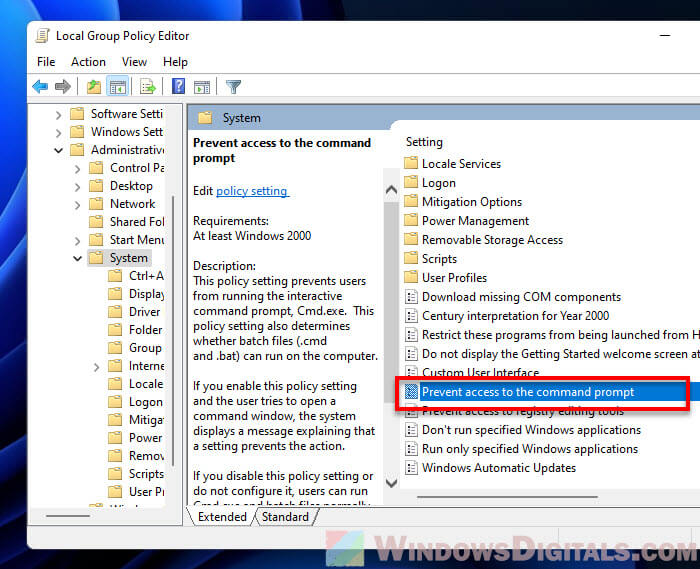
- Press Start and look up “gpedit.msc” or just “Local Group Policy Editor”.
- Click on it from the search results to jump in.

- Follow this path:
User Configuration > Administrative Templates > System
- Double-tap on “Prevent access to the command prompt” policy.

- Pick “Disabled” or “Not configured” and hit “OK”.

- Close the Local Group Policy Editor and give your .bat file another try.

If getting into the Local Group Policy Editor is a no-go, you can also flip the Command Prompt switch through the Windows Registry Editor:
- Hit Win + R, type “regedit”, and press Enter.
- Make your way here:
HKEY_CURRENT_USER\Software\Policies\Microsoft\Windows\System
- Look for “DisableCMD” or “DisableCMDAccess”.
- If you spot it, open it up and change the Value data to “0”.
- Close the Registry Editor and try running your .bat file once more.
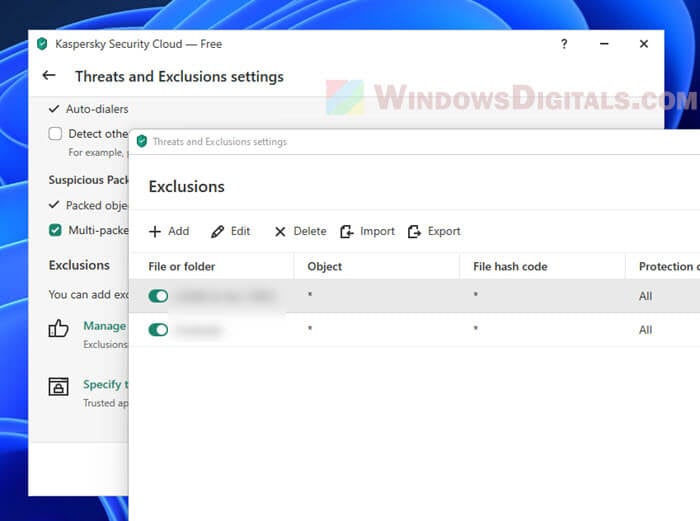
Check your security software
Sometimes, your antivirus might get a bit too protective and stop your batch file from running, thinking it’s up to no good. If you think your antivirus is getting in the way, you might want to turn it off for a bit or tell it to ignore your .bat file through an exception.
Just a heads-up, turning off your antivirus leaves your computer open to bad stuff, so don’t forget to turn it back on after you’re done checking your batch file.
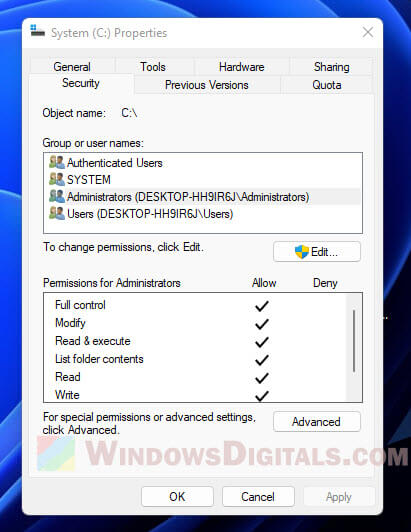
Make sure you have the right permissions
Running into roadblocks with your batch file might also mean you don’t have the permissions to do what you’re trying to do. You might need to let your user account know it’s okay to run batch files or access certain places on your computer.
Also, check this out: How to take ownership of a file, folder, or drive in Windows 11
- Right-click the folder where your batch file hangs out.
- Hit “Properties” then scoot over to the “Security” tab.
- See if you’ve got “Full control” or “Read & execute” rights.

- If not, hit “Edit” and add yourself to the VIP list.
- Tick “Full control” or “Read & execute” and click “OK”.
- Do the same for any other spots your batch file needs to touch.
One last piece of advice
We’ve covered several ways to fix .BAT files that won’t run in Windows 11 or 10, like using a registry fix, turning on Command Prompt access, and adjusting your antivirus settings. If these don’t work, there might be other issues with your batch file itself. Double-check it for any mistakes or missing commands. Hopefully, one of these solutions gets your batch files running properly again.
Bitberry File Opener, a best-in-class file handling tool for Windows, enables you to view, and print BAT files on your PC.
Supported .BAT file format
For Windows 7, 8, 10, and 11
Step 1: Download and install
Download Bitberry File Opener
The first step is to download the setup program. It contains everything you need to handle BAT files. There are no 3rd-party dependencies.
Run the setup program
Once downloaded, double-click the file (usually named BitberryFileOpenerSetup.exe) to start the installation process. This is a one-time thing.
Step 2: Select your BAT file
Use the File menu
Run Bitberry File Opener and select Open from the File menu to select your file.
Use drag and drop
You can also drag your file and drop it on the Bitberry File Opener window to open it.
Double-click the file
You can associate Bitberry File Opener with any supported file type so they open when you double-click them.
Open, search, and print text files
View BAT files
You can view your plain-text DOS Batch files with Bitberry File Opener.
Not a full-fledged text editor
The text file features are limited, but you can do the basics: View, search, and print.
Feature overview
You are welcome to use the software without a license for as long as you like, for personal tasks at home. Any other use requires a license. The free version has certain limitations — a license is needed to unlock them.
| Feature | Free | Licensed |
|---|---|---|
| Any kind of use that is not personal and at home | ||
| View 8 document formats including Adobe PDF, and edit Microsoft Word documents | ||
| View and edit 127 kinds of image formats, including many legacy formats | ||
| View dozens of digital camera RAW picture formats | ||
| Play any audio format imaginable, including many legacy formats — 72 in total | ||
| Watch videos in 115 formats ranging from HD videos to obscure legacy formats | ||
| Open and browse content in 55 types of archive and compressed files | ||
| Open and browse content in 2 types of encoded files | ||
| Open and edit 3 types of spreadsheet files, including from Microsoft Excel | ||
| Open email attachments in winmail.dat format | ||
| Preview the style of 6 different types of font files | ||
| View the content of 17 text based file formats | ||
| Save files, including attachments from winmail.dat files, and edited images, spreadsheets, and documents | ||
| Extract content from archives, compressed- and encoded files | ||
| Print documents, images, and spreadsheets | ||
| Convert images to other formats like JPEG, PNG, TIFF, PSD, etc. | ||
| Copy text from documents, data from spreadsheets, and images to the clipboard | ||
| File viewing without license reminders |
The free version of Bitberry File Opener lets you open all supported file formats with no time limits. Free to use forever for personal tasks at home. There are several limitations in the free version, but all supported file types can be opened so you can try it on your files.
On Windows 10, a batch file typically has a «.bat» extension, and it is a special text file that contains one or multiple commands that run in sequence to perform various actions with Command Prompt.
Although you can type commands manually to execute a particular task or change system settings on Windows 10, a batch file simplifies the work of having to re-type the commands, saving you time and avoiding mistakes.
You can also use other tools like PowerShell to write even more advanced scripts. However, running batch files in Command Prompt is still relevant for executing commands to change settings, automate routines, and launch apps or web pages on your computer.
This guide will walk you through the steps to create and run a batch file on Windows 10. Also, we will outline the steps to create advanced scripts and rum them automatically on schedule using the Task Scheduler.
How to create a batch file on Windows 10
The process of writing a batch file is not complicated. You only need Notepad or another text editor and some basic knowledge of typing commands in Command Prompt. These instructions will help you create a basic and advanced batch file to query system settings.
Create basic Windows 10 batch file
To create a basic batch file on Windows 10, use these steps:
All the latest news, reviews, and guides for Windows and Xbox diehards.
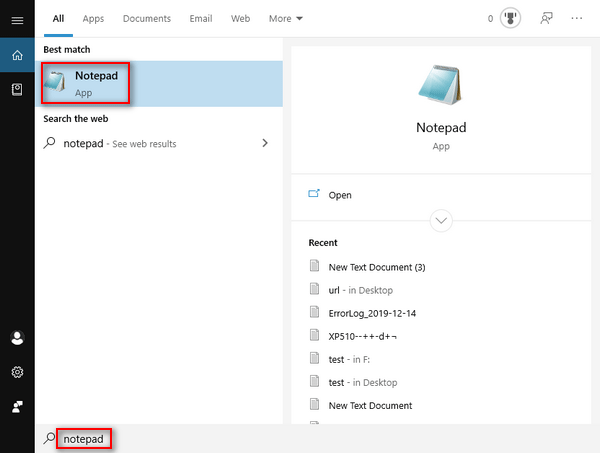
- Open Start.
- Search for Notepad and click the top result to open the text editor.
- Type the following lines in the text file to create a batch file:
@ECHO OFF
ECHO Hello World! Your first batch file was printed on the screen successfully.
PAUSE
The above script outputs the phrase, «Hello World! Your first batch file was printed on the screen successfully,» on the screen.
- @ECHO OFF — Shows the message on a clean line disabling the display prompt. Usually, this line goes at the beginning of the file. (You can use the command without the «@» symbol, but it’s recommended to include it to show a cleaner return.)
- ECHO — The command prints the text after the space on the screen.
- PAUSE — Allows the window to stay open after the command has been executed. Otherwise, the window will close automatically as soon as the script finishes executing. You can use this command at the end of the script or after a specific command when running multiple tasks and wanting to pause between each line.
- Click the File menu.
- Select the Save as option.
- Confirm a name for the script — for example, first_basic_batch.bat.
- Quick note: While batch files typically use the .bat file extensions, you can also find them using the .cmd or .btm file extensions.
Once you complete the steps, double-click the file to run it. Alternatively, you can use the steps below to learn how to run a batch file with Command Prompt, File Explorer, or Task Scheduler.
Create advanced Windows 10 batch file
To create an advanced Windows batch file with multiple commands, use these steps:
- Open Start.
- Search for Notepad and click the top result to open the text editor.
- Type the following lines in the text file to create a more advanced Windows 10 batch file:
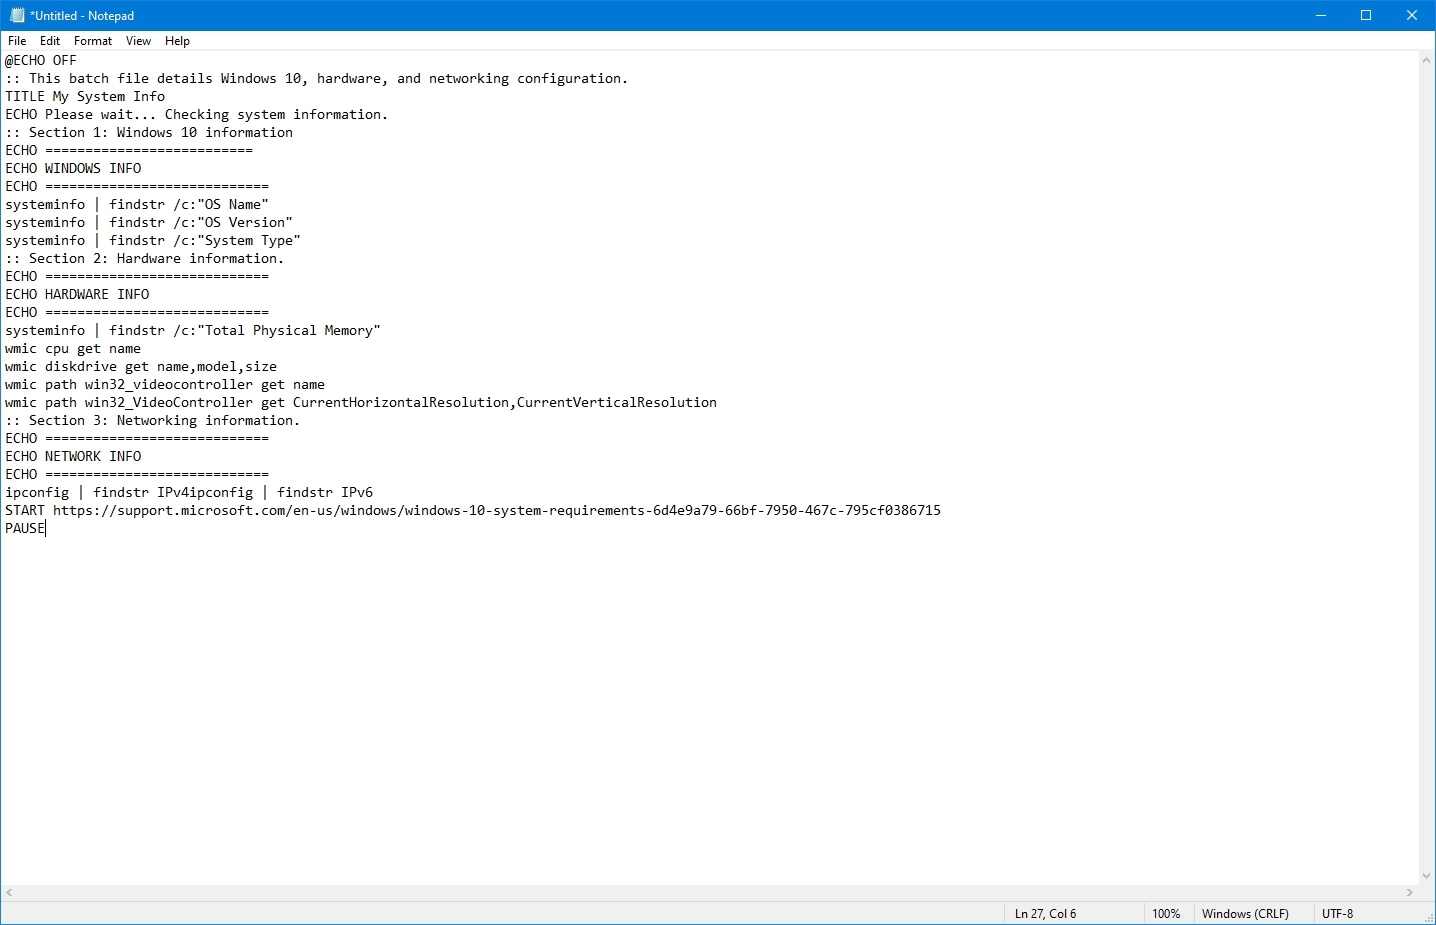
@ECHO OFF
:: This batch file details Windows 10, hardware, and networking configuration.
TITLE My System Info
ECHO Please wait… Checking system information.
:: Section 1: Windows 10 information
ECHO ==========================
ECHO WINDOWS INFO
ECHO ============================
systeminfo | findstr /c:»OS Name»
systeminfo | findstr /c:»OS Version»
systeminfo | findstr /c:»System Type»
:: Section 2: Hardware information.
ECHO ============================
ECHO HARDWARE INFO
ECHO ============================
systeminfo | findstr /c:»Total Physical Memory»
wmic cpu get name
wmic diskdrive get name,model,size
wmic path win32_videocontroller get name
wmic path win32_VideoController get CurrentHorizontalResolution,CurrentVerticalResolution
:: Section 3: Networking information.
ECHO ============================
ECHO NETWORK INFO
ECHO ============================
ipconfig | findstr IPv4ipconfig | findstr IPv6
START https://support.microsoft.com/en-us/windows/windows-10-system-requirements-6d4e9a79-66bf-7950-467c-795cf0386715
PAUSE
The above script runs each line to query a series of system details, and the result will be divided into three categories, including «WINDOWS INFO,» «HARDWARE INFO,» and «NETWORK INFO.» Also, the «START» command will open the web browser in the official support page outlining the Windows 10 system requirements, which you can check against your information.
- @ECHO OFF — Shows the message on a clean line disabling the display prompt. Usually, this line goes at the beginning of the file.
- TITLE — Prints a custom name in the title bar of the console window.
- :: — Allows writing comments and documentation information. These details are ignored when the system runs the batch file.
- ECHO — Prints the text after the space on the screen.
- START — Opens an app or website with the default web browser.
- PAUSE — Tells the console window to stay open after running the command. If you do not use this option, the window will close automatically as soon as the script finishes executing.
- Click the File menu.
- Select the Save as option.
- Type a name for the script — for example, first_advanced_batch.bat.
After you complete the steps, double-click the .bat file to run it or use the steps below to execute the script with Command Prompt, File Explorer, or Task Scheduler.
Create actionable Windows 10 batch file
You can also write batch scripts for any task that does not require user interaction. For instance, to map a network drive, install an application, change system settings, and more.
To create a non-interactive batch file on Windows 10, use these steps:
- Open Start.
- Search for Notepad and click the top result to open the text editor.
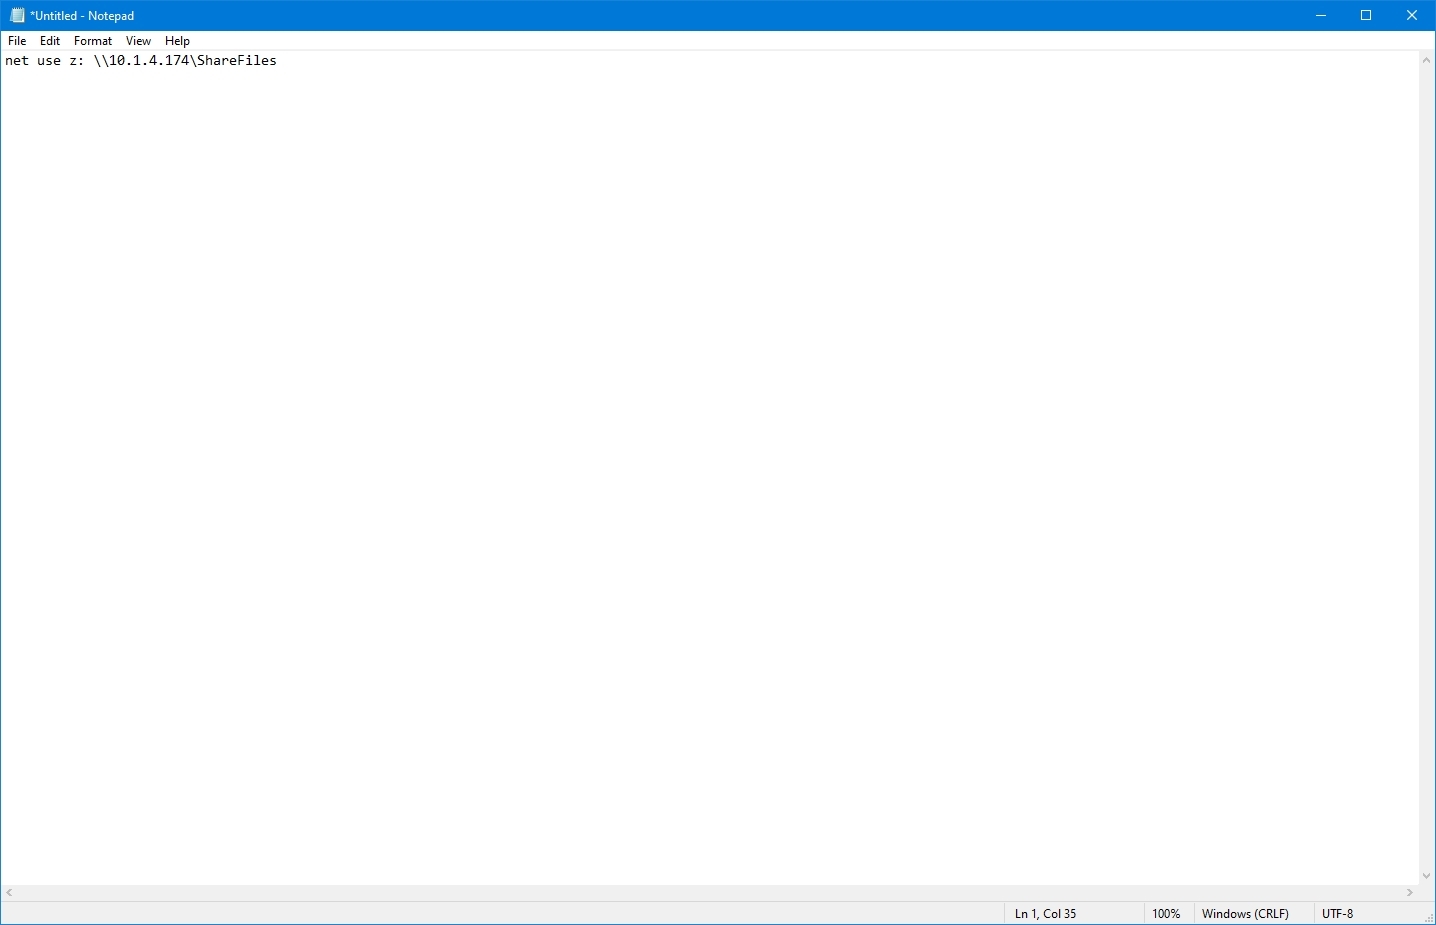
- Type the following command to map a network drive in the text file: net use z: \\PATH-NETWORK-SHARE\FOLDER-NAME /user:YOUR-USERNAME YOUR-PASSWORD
In the command, replace the «\\PATH-NETWORK-SHARE\FOLDER-NAME» for the folder network path to mount on the device and «YOUR-USERNAME YOUR-PASSWORD» with the username and password that authenticates access to the network share.
This example maps a network folder as a drive inside File Explorer using the «Z» drive letter: net use z: \\10.1.4.174\ShareFiles
- Quick note: If you are accessing the files from another computer that uses a specific username and password, do not forget to use the /user: option with the correct credentials.
- Click the File menu.
- Select the Save as option.
- Confirm a name for the script — for example, mount-z-network-drive.bat.
Once you complete the steps, the batch file will map the network folder without opening a Command Prompt window.
We only demonstrate a script with a single command, but you can include as many as you like, as long as you write them one per line.
How to run a batch file on Windows 10
Windows 10 has at least three ways to write batch files. You can run them on-demand using Command Prompt or File Explorer. You can configure the script using the Task Scheduler app to run it on schedule. Or you can save the batch files in the «Startup» folder to let the system run them as soon as you sign into the account.
Run batch file on-demand
If you want to run a script on-demand, you can use File Explorer or Command Prompt.
Command Prompt
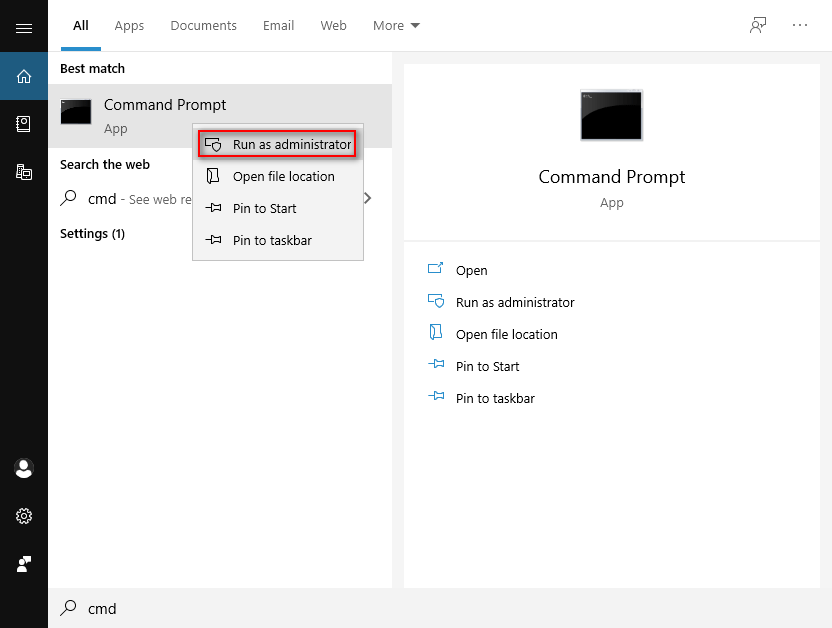
To run a script file with Command Prompt on Windows 10, use these steps:
- Open Start.
- Search for Command Prompt, right-click the top result, and select the Run as administrator option.
- Type the following command to run a Windows 10 batch file and press Enter: C:\PATH\TO\FOLDER\BATCH-NAME.bat
In the command, make sure to specify the path and name of the script.
This example runs the batch file located in the «scripts» folder inside the «Downloads» folder: C:\Users\UserAccount\Downloads\first_basic_batch.bat
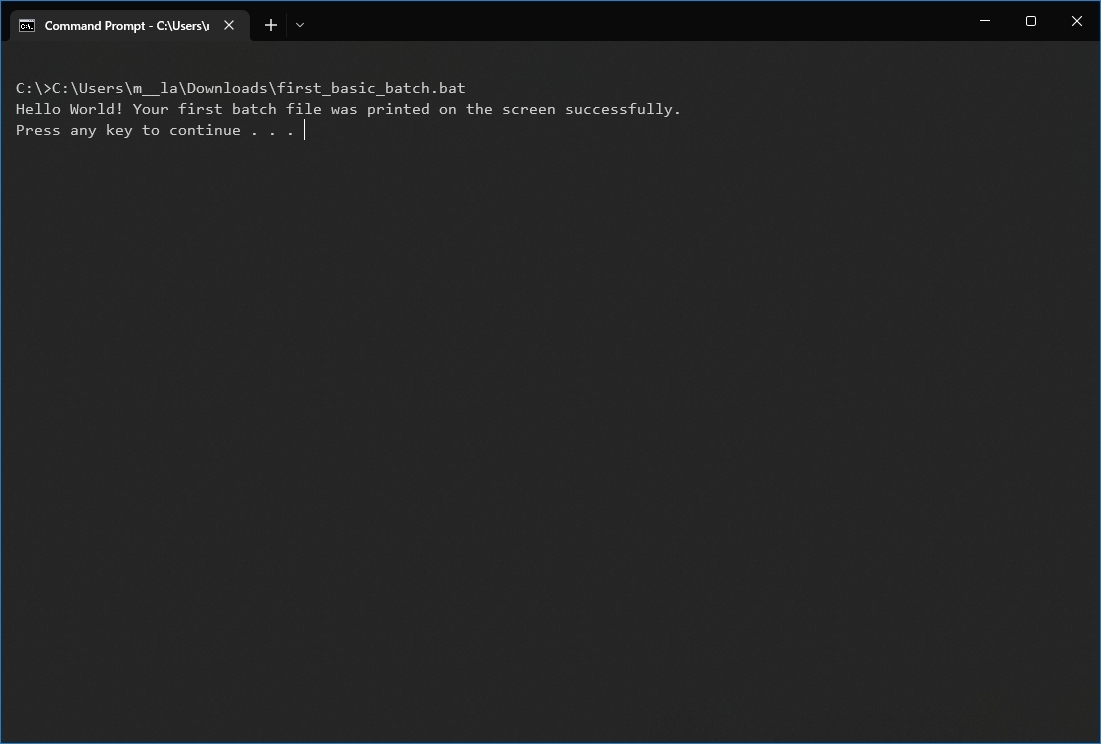
After you complete the steps, the console will return the results, and the window won’t close even if the script does not include the «PAUSE» command since you are invoking the script from within a console session that was already open.
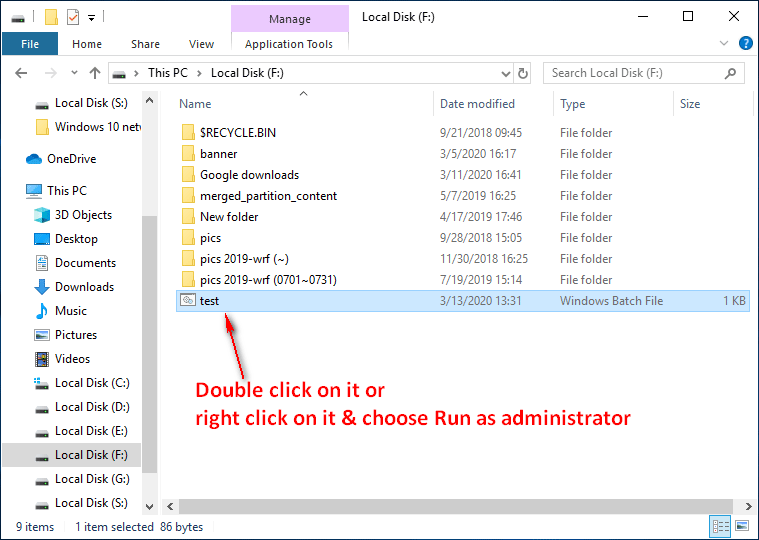
File Explorer
To run a batch file with File Explorer, use these steps:
- Open File Explorer.
- Browse to the folder with the batch file.
- Double-click the script file to run it.
- (Optional) If a command in the batch file requires administrator privileges, you will have to run the script as an admin by right-clicking the file and selecting the Run as administrator option.
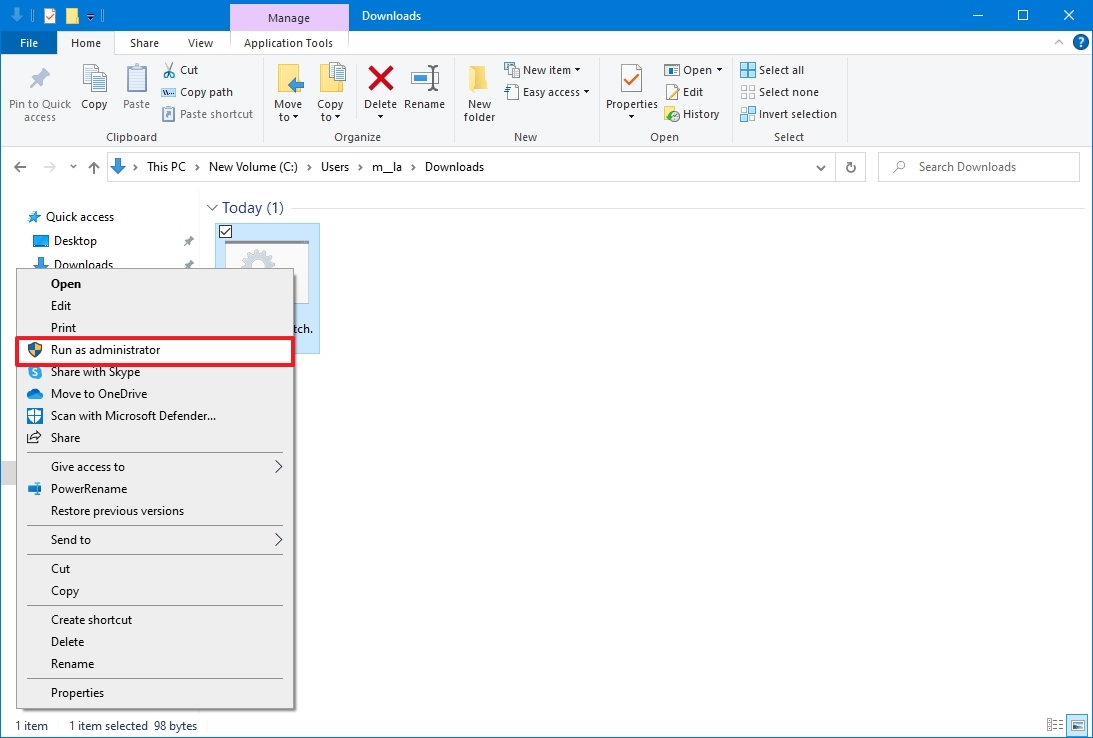
- Click the Yes button
Once you complete the steps, the script will run each command in sequence, displaying the results in the console window.
Run batch files on startup
Windows 10 also features a known folder called «Startup,» which the system checks every time it starts to run applications, shortcuts, and scripts automatically without the need for extra configuration.
To run a script on the Windows 10 startup, use these steps:
- Open File Explorer.
- Open the folder containing the batch file.
- Right-click the batch file and select the Copy option.
- Use the Windows key + R keyboard shortcut to open the Run command.
- Type the following command: shell:startup
- Click the OK button.
- Click the Paste option from the «Home» tab in the Startup folder. (Or click the Paste shortcut button to create a shortcut to the batch file.)
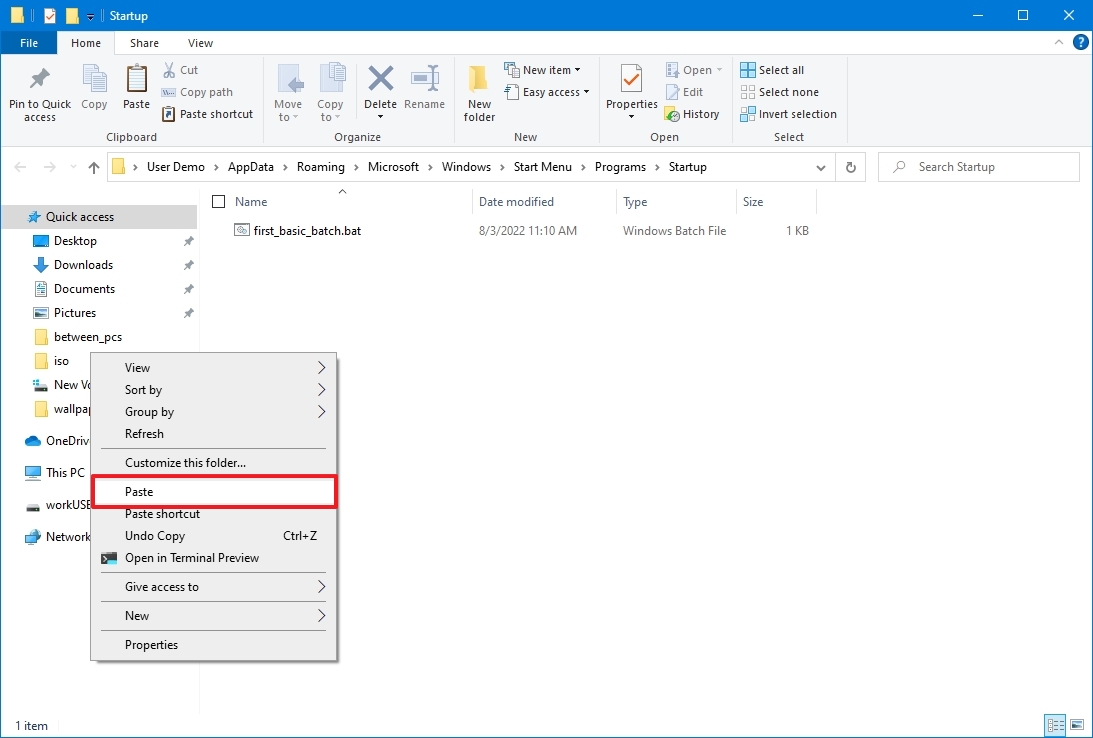
After you complete the steps, the batch file will execute automatically every time you log into your account.
Run batch file with Task Scheduler
To use Task Scheduler to run the batch file automatically at a specific time, use these steps:
- Open Start.
- Search for Task Scheduler and click the top result to open the app.
- Right-click the «Task Scheduler Library» branch and select the New Folder option.
- Confirm a name for the folder — for example, MyScripts.
- Quick note: You don’t need to create a folder, but keeping the system and your tasks separate is recommended.
- Click the OK button.
- Expand the «Task Scheduler Library» branch.
- Right-click the MyScripts folder.
- Select the Create Basic Task option.
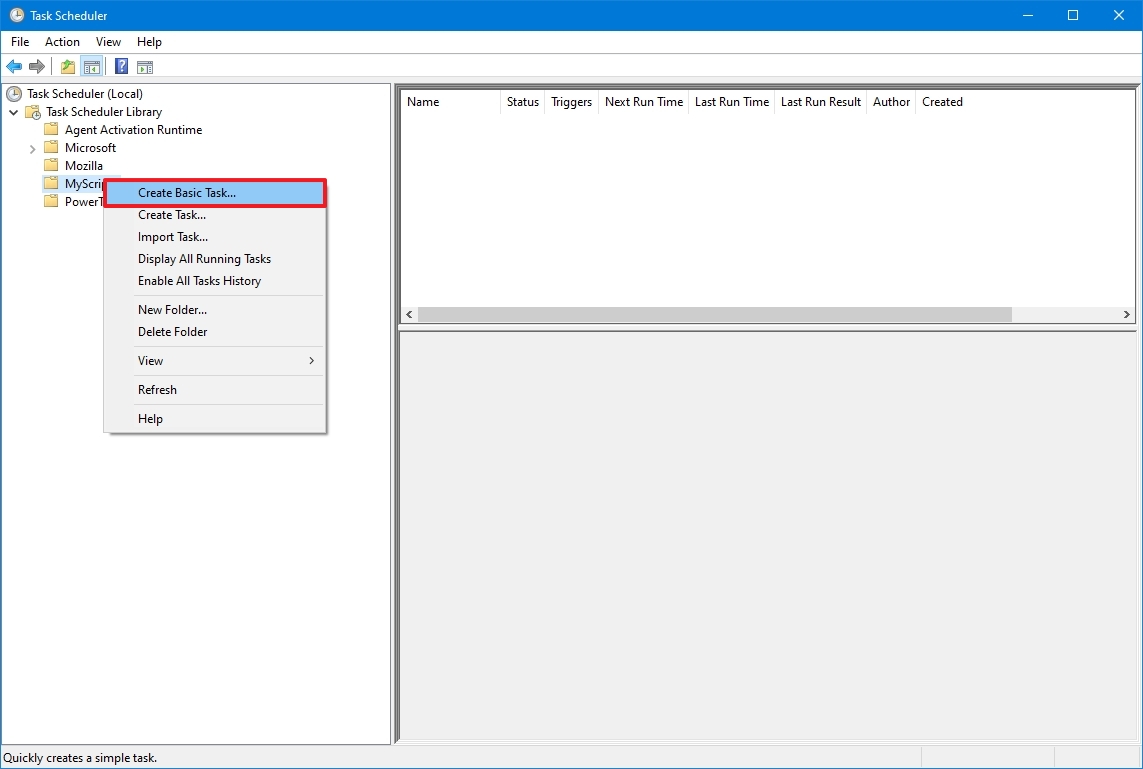
- In the «Name» field, confirm a name for the task — for example, SystemInfoBatch.
- (Optional) In the «Description» field, write a description for the task.
- Click the Next button.
- Select the Monthly option.
- Quick note: Task Scheduler lets you choose from different triggers, including a specific date, during startup, or when a user logs in to the computer. In this example, we will select the option to run a task every month, but you may need to configure additional parameters depending on your selection.
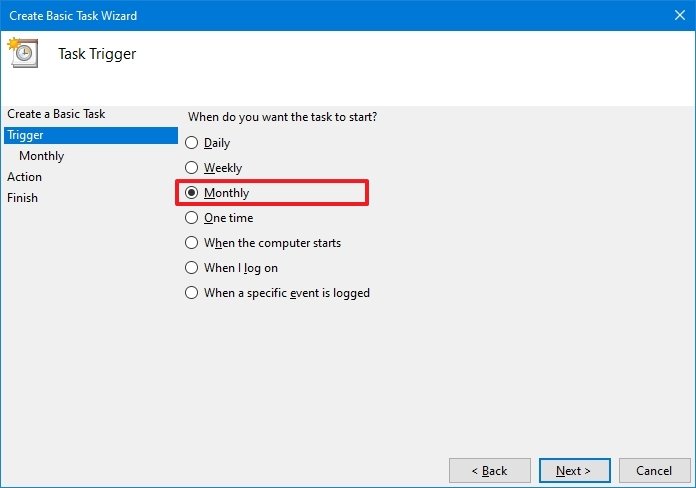
- Click the Next button.
- Use the «Start» settings to confirm the day and time to run the task.
- Use the «Monthly» drop-down menu to pick the months of the year to run the task.
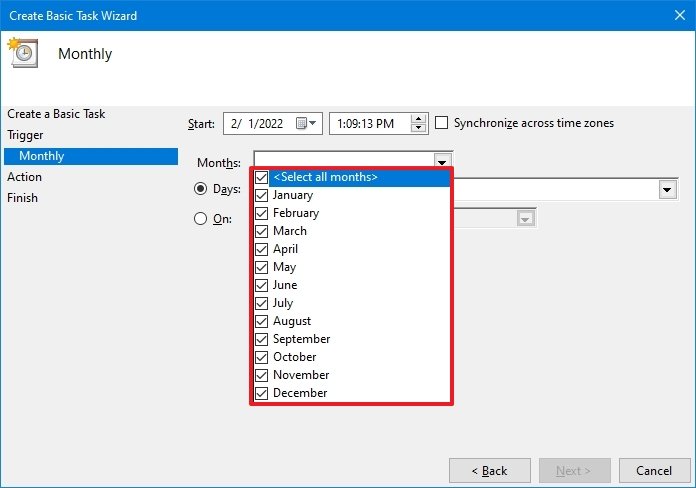
- Use the «Days» or «On» drop-down menu to confirm the days to run the task.
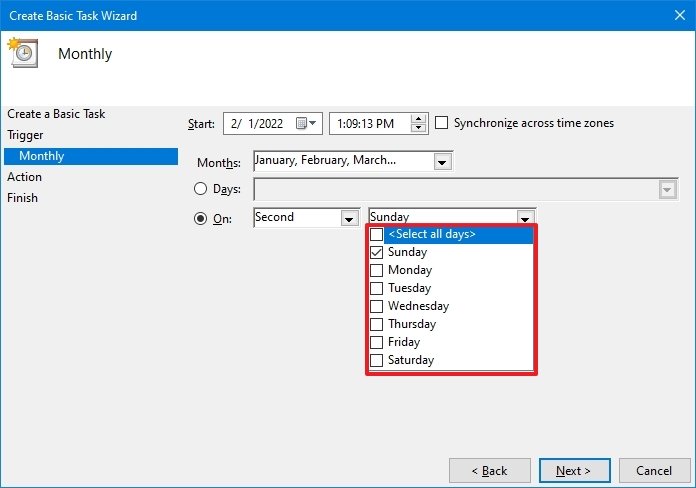
- Click the Next button.
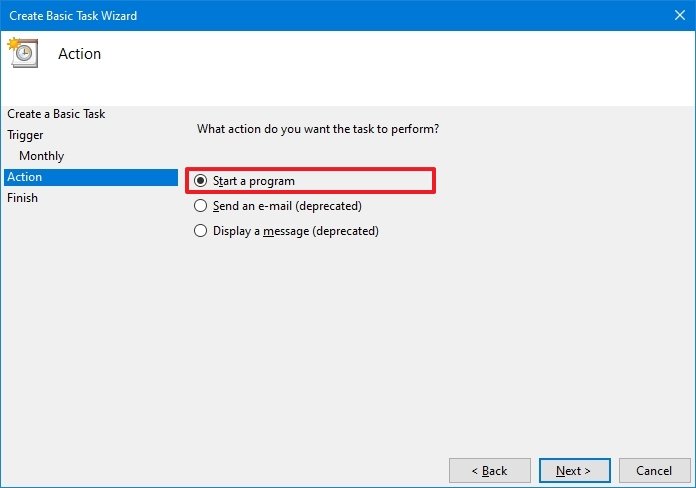
- Select the Start a program option to run the batch file.
- In the «Program/script» field, click the Browse button.
- Select the batch file you want to execute.
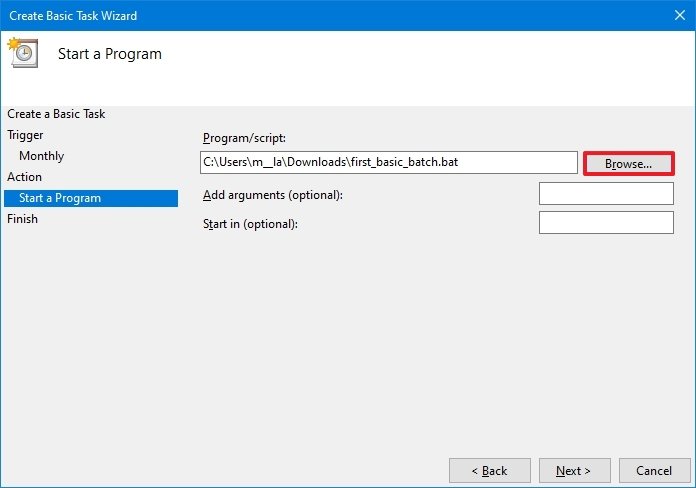
- Click the Finish button.
Once you complete the steps, the task will run the script during the configured time and date or action.
The above instructions are meant to schedule only a basic task. You can use these instructions to create a more customizable task with the Task Scheduler.
This guide focuses on Windows 10, but the same steps will also work for older versions, including Windows 8.1 and 7. Also, you can refer to these instructions if you have Windows 11 installed on your computer.
More Windows resources
For more helpful articles, coverage, and answers to common questions about Windows 10 and Windows 11, visit the following resources:
- Windows 11 on Windows Central — All you need to know
- Windows 10 on Windows Central — All you need to know
Mauro Huculak has been a Windows How-To Expert contributor for WindowsCentral.com for nearly a decade and has over 15 years of experience writing comprehensive guides. He also has an IT background and has achieved different professional certifications from Microsoft, Cisco, VMware, and CompTIA. He has been recognized as a Microsoft MVP for many years.
-
Home
-
News
- How To Create & Run A Batch File On Windows 10
By Sarah |
Last Updated
Batch files are used widely by computer handyman to simplify everyday tasks, to shorten the time and save unnecessary hassle. So what is a batch file? Can you create a batch file yourself? How to run the bat file on computer? These questions will be answered below.
You’d better turn to MiniTool Solution when you want to secure data or recover lost files from PC.
How to Create a Batch File Windows 10
What is batch file?
Batch file (also known as bat file) is actually a special kind of text file with a .bat extension. You can put some commands into the batch file to turn a complex process into a simple task. In this way, the commands can be run in sequence as soon as you click on the file. In short, the bat file is a script file in DOS, OS/2 and Microsoft Windows.
People are wondering how to create a batch file easily. Therefore, this part will focus on how to make a batch file in 2 ways.
How to Create a .bat File in Microsoft Windows 10
Firstly, you need to make sure you have a text editor (Notepad or WordPad is ok) and some basic using knowledge of Command Prompt. Then, follow the steps below.
How to make a bat file (simple bat file):
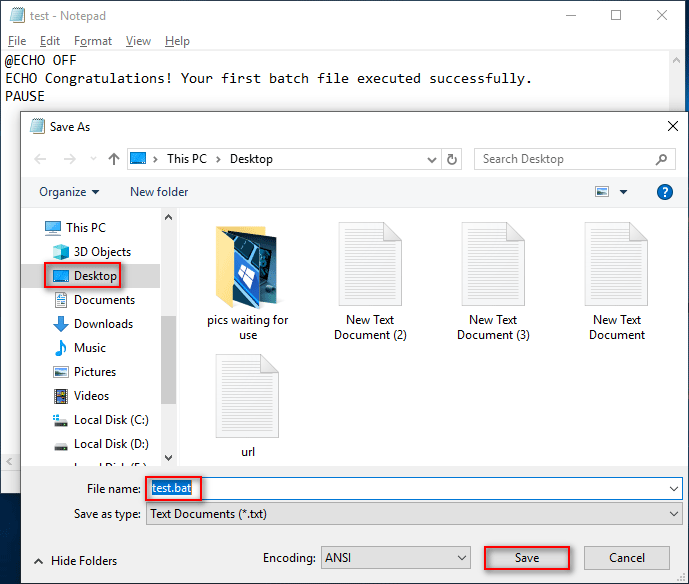
Step 1. Right click on the blank area on your PC screen.
Step 2. Choose New from the menu.
Step 3. Select Text Document from the submenu.
Step 4. Double click on the New Text Document file on desktop to open Notepad window.
Step 5. Type the following content into it:
@ECHO OFF
ECHO Congratulations! Your first batch file executed successfully.
PAUSE
Step 6. Select File from menu bar.
Step 7. Select the Save As… option.
Step 8. Type a name into the textbox after File name (add .bat extension to it) and choose a location to save the simple batch file.
Step 9. Click on the Save button to confirm.
There’s another way to open the Notepad window:
- Click on the Cortana search icon/box on taskbar.
- Type notepad and select Notepad from the result.
If you want to create an advanced Windows batch file or actionable batch file, you should also open the Notepad window -> type the corresponding content -> save it as a bat file.
4 Ways To Recover Notepad File On Win 10 Quickly!
How to Create a Bat File in MS-DOS
This way only works on the computers running a 32-bit version of Windows. If your system is 64 bit, please use the above steps.
Step 1. Open Windows search box and type cmd.
Step 2. Select Command Prompt from the result to open MS-DOS prompt.
Step 3. Type edit test.bat and hit Enter.
Step 4. A blue edit screen will appear. Type the following content into it:
@echo off
echo Hello this a test batch file
pause
dir c:\windows
pause
Step 5. Find and click File.
Step 6. Choose exit from the menu.
Step 7. Click on the Yes button to save it.
If you want to execute the test.bat file, just go back to the MS-DOS prompt -> type test -> hit Enter.
That’s all about how to create.bat files.
How to Run a Batch File
Run in file explorer:
- Open File Explorer on your Windows 10.
- Navigate to the drive and folder that include the Windows batch file.
- Just double click on the batch file to run it.
Note: Some commands require the administrator privileges, so you need to run the .bat file as administrator: right click on the file -> choose Run as administrator -> click Yes.
Click here if your File Explorer is not responding or has stopped working.
Run a batch file from Command Prompt:
- Open Windows search and type cmd.
- Right click on Command Prompt and choose Run as administrator.
- Type C:\Users\folder location\filename.bat and hit Enter.
In addition, you can run a bat file in Windows 10 on scheduled through Task Scheduler or run the batch file on startup via file explorer.
The Command Prompt tool can also be used to recover files on Windows 10.
About The Author
Position: Columnist
Sarah has been working as an editor at MiniTool since she graduated from university. Sarah aims at helping users with their computer problems such as disk errors and data loss. She feels a sense of accomplishment to see that users get their issues fixed relying on her articles. Besides, she likes to make friends and listen to music after work.