
Встроенная утилита CHKDSK.exe (check disk) используется в Windows для проверки диска на ошибки. Сhkdsk проверяет файловую систему на физические и логические ошибки, находит поврежденные секторы (bad sectors) и исправляет найденные проблемы.
Содержание:
- Проверка и восстановление диска с помощью команды chkdsk
- Просмотр результатов проверки Chkdsk в Windows
Проверка и восстановление диска с помощью команды chkdsk
Чтобы проверить жесткий диск на ошибки, запустите командную строку с правами администратора и выполните:
chkdsk E: /F /R
Данная команда:
- Выполнит проверку диска E:\
- Исправит автоматически найденные ошиьки (/F)
- Попытаться восстановить данные при обнаружении поврежденных секторов, она попытается восстановить информации (/R).
Полная проверка диска может занять длительное время в зависимости от емкости носителя и количества файлов. После окончания проверки диска вы увидите подробную статистику диска, информацию о поврежденных секторах и файлах, предпринятых действиях по восстановлению.
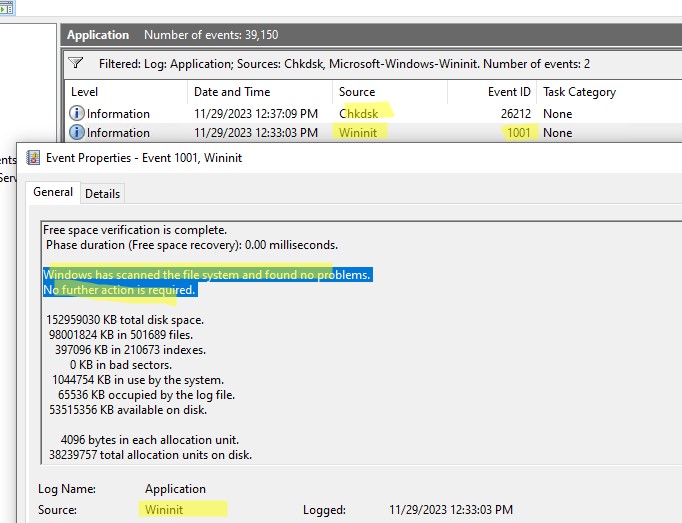
Если утилита chkdsk не обнаружила проблем на диске, появится сообщение:
Windows has scanned the file system and found no problems.
No further action is required.

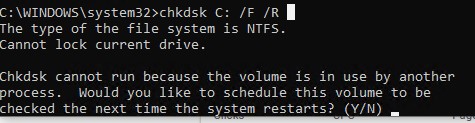
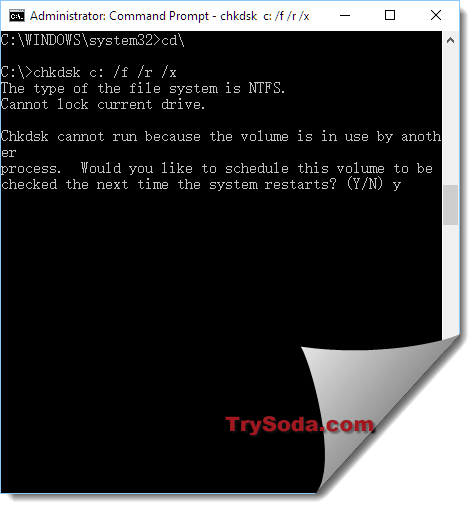
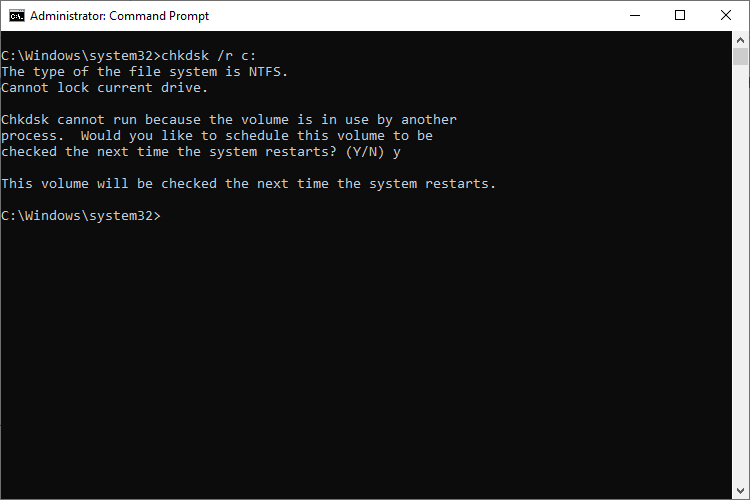
Утилита chkdsk не позволяет выполнить online проверку системного диска (C:\). При запуске команды chkdsk C: /F /R появится уведомление:
Cannot lock current drive. Chkdsk cannot run because the volume is in use by another process. Would you like to schedule this volume to be checked the next time the system restarts? (Y/N).
Невозможно выполнить команду Chkdsk, так как указанный том используется другим процессом. Следует ли выполнить проверку этого тома при следующей перезагрузке системы?
Чтобы запланировать проверку диска при следующей загрузке Windows, нажмите
Y
->
Enter
.
This volume will be checked the next time the system restarts
.
Чтобы отменить запланированную проверку диска, выполните:
chkntfs /x c:
Чтобы отключить топ перед проверкой, добавьте атрибут /X в команде chkdsk. В этом случае Windows принудительно закрое все открытые файловые дескрипторы, отмонтирует диск и выполнит проверку на ошибки.
Если вам нужно выполнить проверку большого NTFS тома, но вы не хотите блокировать диск, можно сначала просканировать диск на ошибки:
chkdsk E: /f /offlinescanandfix
Утилита найдет ошибки и сохранит их в файл $corrupt для дальнейшего исправления
Чтобы исправить найденные ошибки, не тратя время на полное сканирование тома, выполните:
chkdsk D: /spotfix
Это существенно сократит время недоступности тома для пользователя при исправлении ошибок.
В консоли PowerShell для проверки диска можно использовать командлет Repair-Volume как аналог команды chkdsk:
Repair-Volume -driveletter C -scan
Также рекомендуем перед проверкой проверить SMART состояние жестких дисков с помощью встроенных PowerShell командлетов из модуля управления дисками:
Get-PhysicalDisk | Sort Size | FT FriendlyName, Size, MediaType,SpindleSpeed, HealthStatus, OperationalStatus -AutoSize

Просмотр результатов проверки Chkdsk в Windows
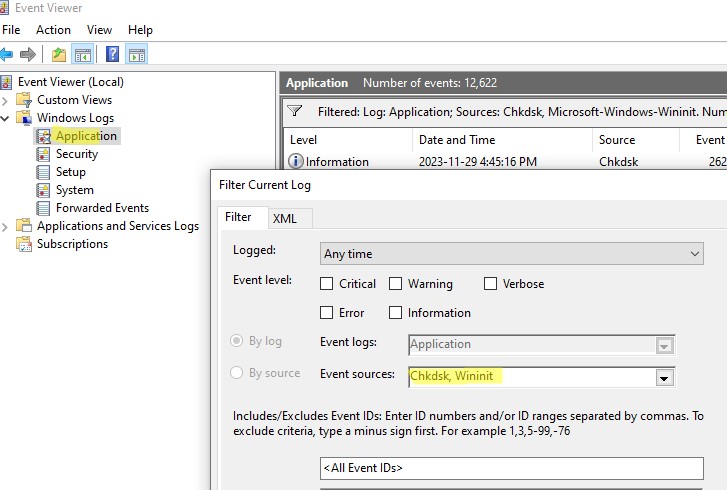
Chkdsk при онлайн сканировании диска выводит результаты прямо в консоль. Если вы запланировали проверку диска при загрузке Windows, то результаты можно получить только из журнала событий Windows (Event Viewer).
- Откройте консоль Event Viewer (
Eventvwr.msc
) и перейдите в раздел Windows Logs -> Application; - Щелкните правой клавишей по разделы Application и выберите Filter Current Log. В поле Event Source выберите Chkdsk и Wininit и нажмите ОК;

- Подробные результаты проверки диска содержатся в описании события. Обратите внимание, что у онлайн событий проверки диска будет указан источник Chkdsk. Если выполнялась офлайн проверка диска при загрузке Windows, у такого события будет источник Wininit и EventID 1001.

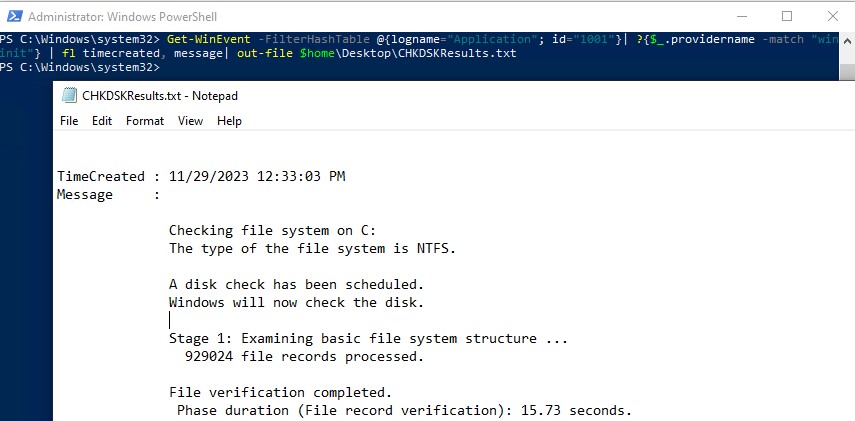
Можно получить лог проверки диска с помощью PowerShell командлета Get-WinEvent. Например, чтобы выгрузить результаты последних 5 проверок диска в текстовый файл CHKDSK_SCAN.txt на рабочем столе, выполните команду:
Get-WinEvent -FilterHashTable @{logname="Application"; id="1001"}| ?{$_.providername –match "wininit"} | fl timecreated, message| out-file $home\Desktop\CHKDSKResults.txt
Открыть полученный файл с логом chkdsk:
notepad.exe $home\Desktop\CHKDSKResults.txt
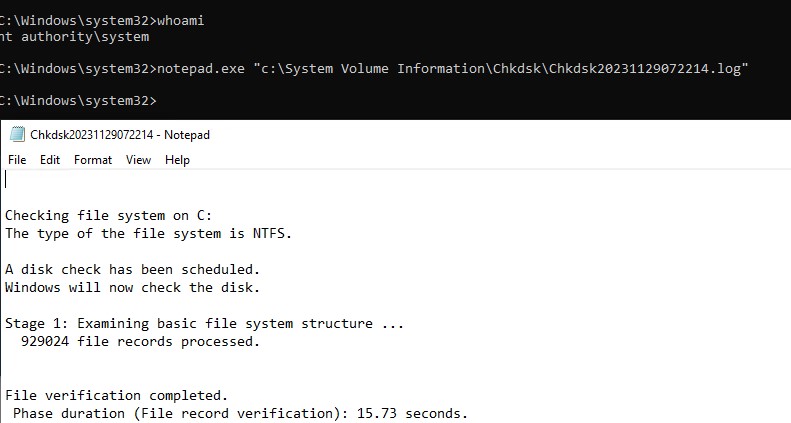
Если размер лога Chkdks очень большой, журнал событий может обрезать его. В этом случае можно открыть полный лог проверки диск в System Volume Information. Чтобы получить доступ к этой папке, нужно запустить командную строку от имени SYSTEM (проще всего с помощью утилиты psexec):
.\PsExec.exe -i -s cmd.exe
После этого можно открыть лог chkdsk:
notepad.exe "c:\System Volume Information\Chkdsk\Chkdsk20231129072214.log"
Hard drive errors caused by power outages, hardware failure, system crash, or human error can lead to drive inaccessible, data loss or subpar performance. How to free check and fix hard drive error Windows 10? This article tells how to scan and resolve hard drive problems to its utmost by running CHKDSK Windows 10 in 4 methods.
Many Windows users check their hard drives regularly as disk error will slow down or damage a hard drive in an accumulated way. The best way to check and fix hard drive errors or bad sectors to keep it healthy is to use Windows built-in CHKDSK utility – a useful hard disk scanning and repair utility which helps to examine hard drives for errors and repair them.
What Is CHKDSK Utility
Some users may don’t know what CHKDSK is and how to run it. Actually, CHKDSK is the abbreviation of Check Disk, which is a system tool provided in Windows, OS/2 and DOS to check file system integrity of a partition and fix logical file errors.
CHKDSK can help you fix hard drive errors caused by bad sectors, improper or sudden shutdowns, corrupted software and meta data corruption. Whenever you have hard drive errors like you need to format the partition before you can use it caused by improper shutdown of the machine or abnormal removal of USB drives, you can use CHKDSK to find out errors and fix them.
Then how to repair hard drive windows 10 with CHKDSK utility? Here I will illustrate you 4 ways to run Windows 10 Check Disk utility and fix hard drive errors.
Method 1. Run Check Disk Windows 10 from Partition Property
You can run Windows 10 CHKDSK from Windows desktop and the detailed steps are as below.
Step 1. Right-click Windows Start Menu and select Disk Management to open it.
Step 2. When you get the main interface of Disk Management, you can select the drive that you want to check and fix, then right-click it and choose Property.

Step 3. On the Tools tab, click Check.
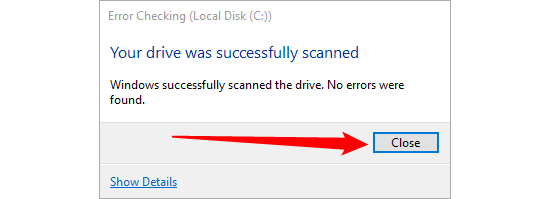
Step 4. If the system detects that there are errors, you will be asked to check the disk. If no errors are found, you will see a message as shown in the following picture. You can still choose to check the drive if you want to. Click on Scan drive.
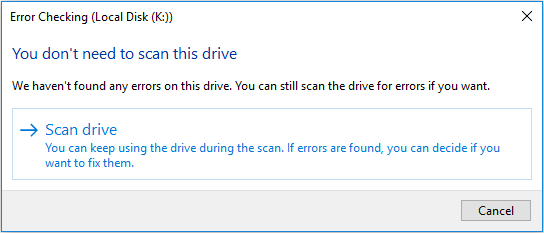
Step 5. Windows will display a message as below after completion. If no errors are found, it will say no error found. Then click Close to exit it. If there are some errors found on the drive, Windows will ask for a restart to fix the errors.
Method 2. CHKDSK Windows 10 with Elevated Command Prompt.
CHKDSK Windows 10 with elevated Command Prompt performs a couple of functions. Although running it may take some time, it does prevent hard disk from being damaged and loss of data in the long term. It is recommended to run it whenever Windows has shut down abnormally or hard disk performs abnormally.
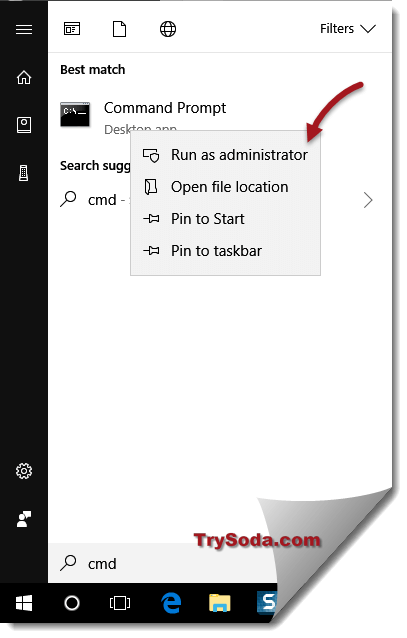
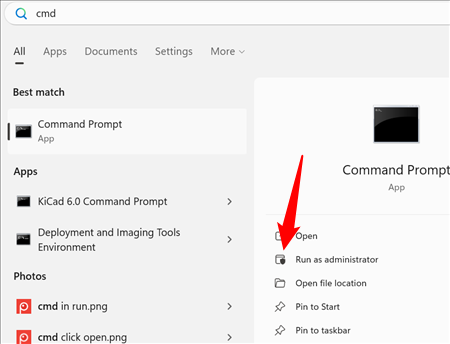
Step 1. Input cmd in the Windows 10 Cortana search box. Right-click the best match then select Run as administrator.
Step 2. In the elevated Command Prompt, type CHKDSK *: /f (* represents the drive letter of the specific drive that you want to scan and fix) and then press Enter. This CHKDSK Windows 10 command will scan your computer drive for errors and try to fix any that it finds.
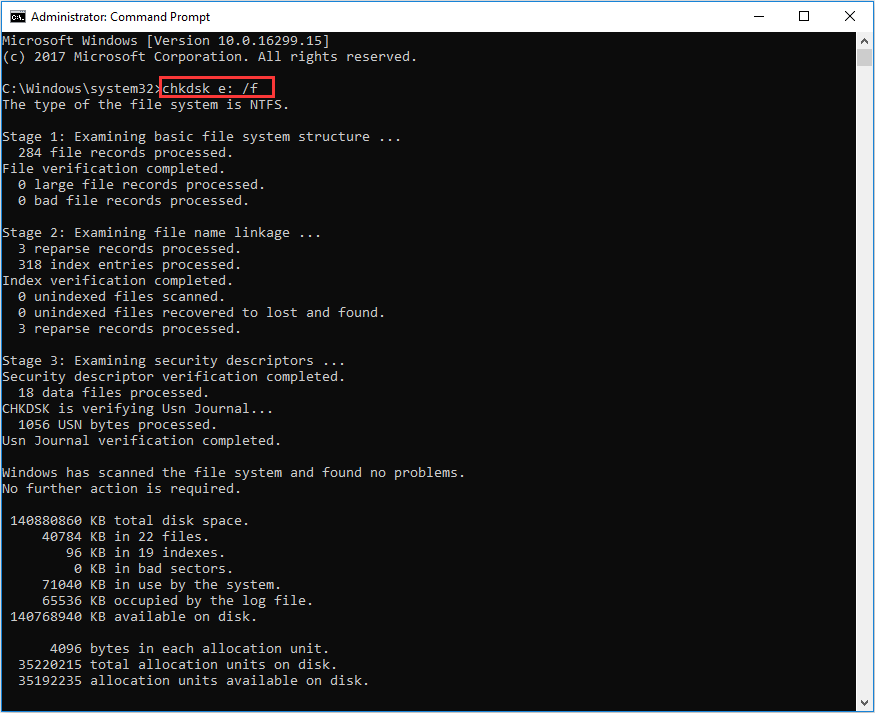
Here I take CHKDSK e: /f as an example (e represent the drive letter that I want to scan). The bellowing picture shows there is no file system error with the partition. If there is any hard drive errors detected, CHKDSK will help you fix it automatically.
Tip: If you want to check and fix the partition that being used, you may see “CHKDSK cannot run because the volume is in use by another process. Would you like to schedule this volume to be checked the next time the system restarts?” in the Command Prompt Windows.
Type Y and press Enter to comfirm, and then restart your computer to continue with the CHKDSK repair. C drive and system partition will always ask for a reboot.
Step 3. Input exit to exit the Command Prompt Window after performing all operations.
Note: The command supports a number of hard disk operations, but we mainly focus on two of them: /f and /r.
/f – fix any errors it detected
/r – Locate bad sectors on the drive and try to recover any and all readable information from them
Apart from commonly used /f and /r, you can choose the following parameters valid for both FAT32 / NTFS partition when running the CHKDSK utility from an elevated Command Prompt.
- /v – Display list of every file in every directory on FAT32 partition. On NTFS, it displays the cleanup messages.
- /x – force the volume to dismount. Also invalidates all open file handles. This should be avoided in Desktop Editions of Windows, because it may cause data loss/corruption.
The following are valid for NTFS volumes only.
- /c – skip checking of cycles within the folder structure.
- /I – perform a less vigorous check of index entries.
- /L[:size] – change the size of the log file to specified number of kilobytes. If size is not specified, it will display current size.
- /b – re-evaluates bad clusters on the volume (implies /R)
Besides, CHKDSK cannot repair hard bad sectors, in which case, data can get lost and become unusable. If you have very important files and data stored on the drive, you’d better backup the hard drive as this occasion could happen sometimes.
If you cannot boot up your computer, you can run the tool from Command Prompt either by booting your computer into the Recovery Mode or by using the original installation disc to run Command Prompt (For detailed steps, please see Method 4). If you can, you may also run CHKDSK repair with third-party software, but be sure to choose a reliable one.
Method 3. Windows 10 CHKDSK Repair with Third-party Software
If you are not familiar with commands or find that using commands is error-prone as it requires you to input every command correctly, in this way, you can use a free CHKDSK repair alternative to repair hard drive Windows 10. It is recommended to use MiniTool Partition Wizard Free Edition, which makes CHKDSK Windows 10 as a breeze.
MiniTool Partition Wizard Free Edition is an easy-to-use partition manager. Its Check File System function can scan through your hard drive and fix all errors detected. It is not as complicated and time-consuming as running CHKDSK in Command Prompt. And it is simpler to operate with its intuitive interface.
Apart from Check file system function, it can also perform other operations like format partition, resize partition, extend partition, copy partition/disk, convert MBR to GPT without data loss, wipe disk, convert FAT to NTFS.
Note: This function can only be used when the selected partition has a drive letter. For the partition without drive letter, you should appoint it a drive letter and then use this function.
Next, let’s see detailed steps about how to run CHKDSK Windows 10 to fix hard drive error with third-party software.
Step 1. Download MiniTool Partition Wizard Free Edition by clicking the following button. Install it on your computer and launch it to get the main interface.
MiniTool Partition Wizard FreeClick to Download100%Clean & Safe
Then select the target partition, and choose “Check File System” from the Check Partition group or from Partition menu.
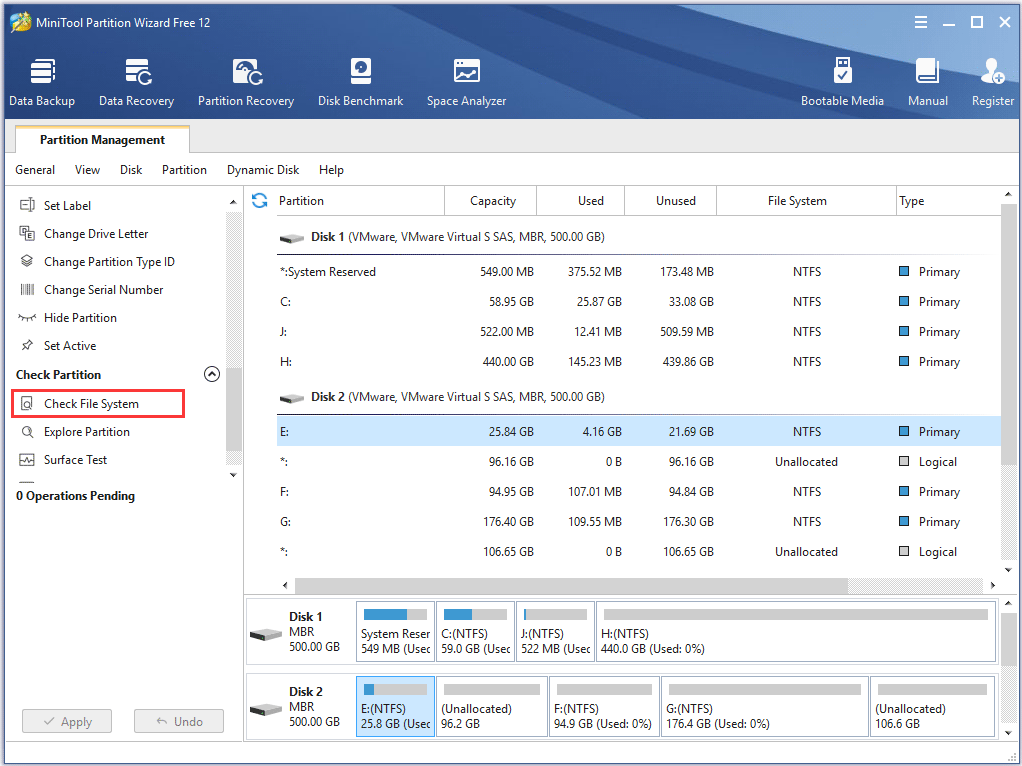
Step 2. You will see a new window with two options: Check only and Check & fix detected errors. If you only want to check, select Check only; if you want to recover mistakes during the checking process, select Check & fix detected errors. After that, click Start button. Once you click Start, MiniTool Partition Wizard will check/fix file system immediately.
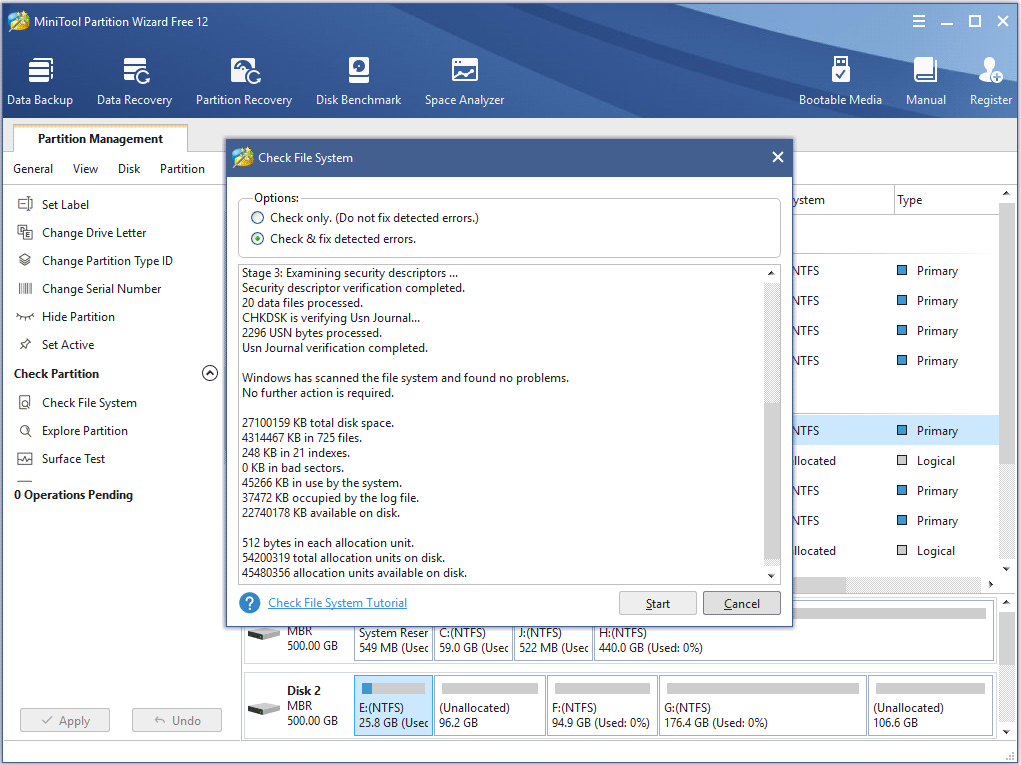
This page shows that MiniTool found no problems. If there is an error detected by MiniTool Partition Wizard, just let Partition Wizard fix it.
Method 4.Run Check Disk Windows 10 from Installation Disc/USB drive
The above three methods show you how to run CHKDSK when your computer can boot up successfully. However, if Windows won’t start, how can you check disk Windows 10?
Well, in this case, you can run CHKDSK on boot and check the hard drive for errors via Windows installation disc or USB drive. By following the steps as below, CHKDSK utility can be accessed easily.
Note: If you don’t have Windows 10 installation disc or USB flash drive to run CHKDSK, you can also run CHKDSK on MiniTool Partition Wizard Bootable Edition, which is very light and user-friendly.
Step 1. Insert Windows 10 installation disc or USB flash drive with Windows.
Step 2. Change the BIOS boot sequence to boot from the disc or USB drive.
Step 3. Select your language performance and click Next.
Step 4. Click Repair your computer.
Step 5. Then choose Troubleshoot on this page.
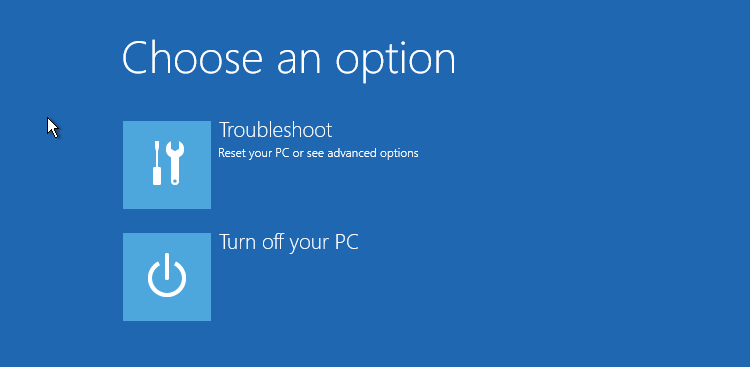
Step 6. On the Advanced options page, click Command Prompt to open it.
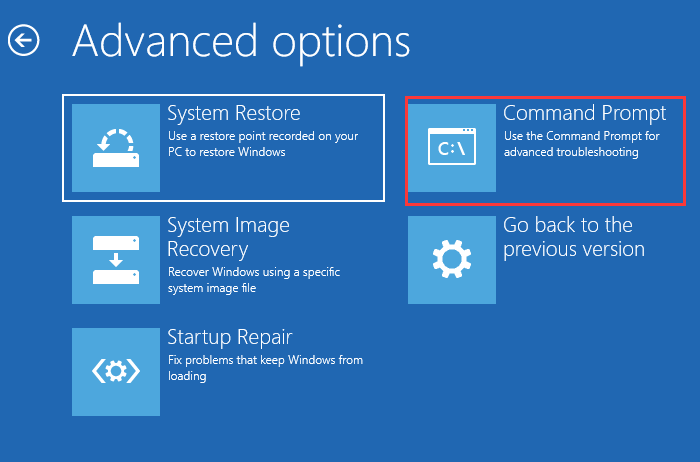
Step 6. When you successfully open the Command Prompt, you can follow the steps in Method 2 to execute CHKDSK commands.
After reading the 4 free methods in this post, I’m sure that you have learned how to use Windows 10 CHKDSK utility to repair hard drive errors. Now try one of them to complete hard drive repair by yourself.
“After reading this post, I learned how to repair hard drive Windows 10 with CHKDSK utility. People who don’t know how to run CHKDSK utility to fix hard drive error may check this post.”Click to Tweet
Wrapping Things Up
Have you fixed your hard drive with CHKDSK utility? Hope CHKDSK will help you fix all kinds of hard drive problems, and you can go back using your computer normally.
If you have any question about how to repair hard drive error with Window 10 Check Disk utility or if you have other better solutions, you can leave a message in the following comment zone and we will reply as soon as possible. If you need any help when using MiniTool software, you may contact us via [email protected].
CHKDSK Windows 10 FAQ
How do I run chkdsk in Windows 10?
To run chkdsk, please type cmd in the Windows 10 Cortana search box. Right-click the best match Command Prompt and select Run as administrator. In the command prompt window, type chkdsk e: /f (e represents the drive letter of the specific drive you want to scan and fix). Then CHKDSK will scan your drive and fix detected errors automatically.
Which is better chkdsk R or F?
Chkdsk /f will scan your drive and fix any errors it detected. Chkdsk /r will locate bad sectors on the drive and try to recover any and all readable information from them. Chkdsk /f will only check and fix disk errors, not bad sectors. So, chkdsk /r is better.
What is chkdsk f command?
Chkdsk /f is a Command Prompt command that is used to check a target drive on your computer and fix any hard drive errors it detects. Apart from chkdsk f, chkdsk /r is also commonly used to detect sectors on the hard drive and recovers any information still intact.
How do I repair my hard drive Windows 10?
Open Disk Management, select the drive that you want to check and fix, then right-click it and choose Property. On the Tools tab, click Check. Then it will scan your drive for hard drive errors and repair hard drive Windows 10 automatically.
Windows Check disk Utility A useful Command line tool, that checks the state of the hard drive and corrects any errors it finds, if possible. Mostly this utility is useful for troubleshooting Disk read errors, Bad sectors and other storage-related problems. Whenever you Notice 100 Disk Usage, System Became unresponsive, Unable to locate any files and folders, and Different Blue Screen errors Even Windows won’t Boot at Startup These are Disk Drive Errors and you can fix them by Running Check Disk Utility(CHKDSK).
In Other Words, Whenever you get Error Windows detected a hard disk problem. Or need to detect and fix file system or disk corruption Errors, we run the built-in Windows Check Disk Utility, Which checks file system errors, bad sectors, lost clusters, and so on.
Contents
- 1 Run Check Disk Utility on Windows 10
- 1.1 CHKDSK Help command
- 1.2 Check And Fix Drive Errors with CHKDSK
Run Check Disk Utility on Windows 10
- To Run Check disk Utility Open Command prompt as administrator.
- Then Type Command CHKDSK And hit the enter key to execute the command.
- Or you can Type The Command With Specific Drive letter. For Ex: CHKDSK C:
- But running the CHKDSK command will only display the disk’s status,
- This will run Chkdsk in a Read-Only mode and display the status of the current drive means won’t fix any errors present on the volume.
- You Can Add Some Extra parameters with CHKDSK command to tell CHKDSK utility to fix the Errors.
CHKDSK Help command
Typing chkdsk /? and hitting Enter will give you its parameters or switches.
/f Fixes errors detected.
/r Identifies Bad Sectors and attempts recovery of information.
/v Displays a list of every file in every directory, on FAT32. On NTFS, is displays the cleanup messages.
The following are valid on NTFS volumes only.
/c Skips the checking of cycles within the folder structure.
/I Perform a simpler check of index entries.
/x Forces the volume to dismount. Also invalidates all open file handles. This should be avoided in Desktop Editions of Windows, because of the possibility of data loss/corruption.
/l[:size] It changes the size of the file that logs NTFS transactions. This option too, like the above one, is intended for server administrators ONLY.
Do note that, when you boot to the Windows Recovery Environment, Only two switches may be available.
/p It performs an exhaustive check of the current disk
/r It repairs possible damage on the current disk.
The following switches work in Windows 10, Windows 8 on NTFS volumes only:
/scan Run the online scan
/forceofflinefix Bypass online repair and queue defects for offline repair. Needs to be used along with /scan.
/perf Perform the scan as fast as possible.
/spotfix Perform spot repair in offline mode.
/offlinescanandfix Run the offline scan and perform fixes.
/sdcclean Garbage collection.
These switches are supported by Windows 10 on FAT/FAT32/exFAT volumes only:
/freeorphanedchains Free up any orphaned cluster chains
/markclean Mark the volume clean if no corruption is detected.
Check And Fix Drive Errors with CHKDSK
Now To Scan And Fix Disk Drive Errors Again Open the command prompt As an administrator, Type Command Bellow and hit the enter key to execute the command.
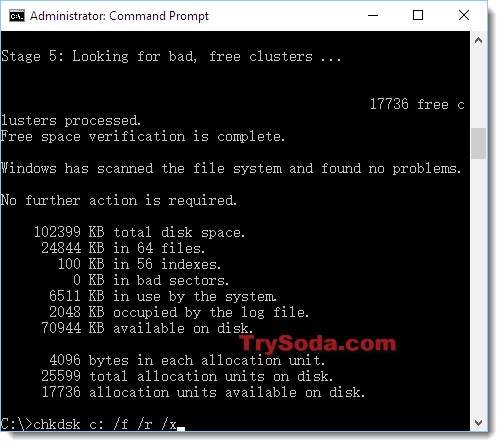
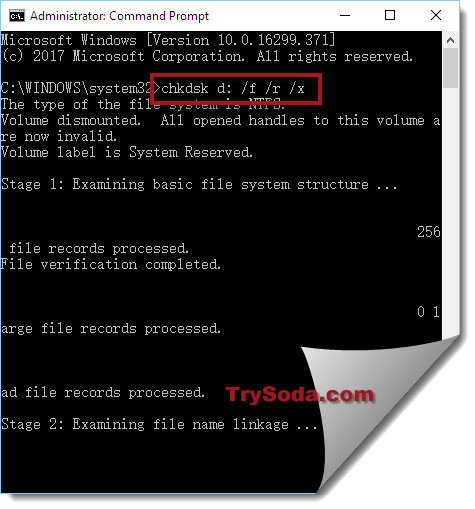
CHKDSK C: /f /r /x
- The Command CHKDSK is for Check The Disk Drive Errors.
- C: Is the Drive letter which you want to check for errors.
- /f Fixes errors if detected,
- /r Identifies Bad Sectors and attempts recovery of information.
- /x Forces the volume to dismount. Also invalidates all open file handles.
Note that CHKDSK needs to be able to lock the drive, meaning that it cannot be used to examine the system’s boot drive if the computer is in use. If your target drive is an external or non-boot internal disk, the CHKDSK process will begin as soon as we enter the command above. If, however, the target drive is a boot disk, the system will ask you if you’d like to run the command before the next boot. Type “yes” (or “y”), and restart the computer.
Now close the Command prompt And Restart windows, The CHKDSK Utility Will load and check disk Drive errors, Bad Sectors before the operating system loads. If found any disk Errors, the utility will fix them itself if possible.
This scanning and repair process can take a long time, especially when performed on larger drives. Wait until 100% complete the Scanning and repairing process. After That windows Restart and Start normally. That’s all you have successfully Repaired your Disk Drive Errors.
Conclusion
In Short words, you can use Command CHKDSK /F /R /X to Scan And Fix Disk Drive Errors in Windows 10. I hope after reading this post you can easily check and fix disk drive errors using Check Disk Utility. Also, read:
- Solved: Microsoft edge not working after windows 10 21H2 update
- Fix your pc needs to be repaired error 0xc0000225 on windows 10
- Solved: An operating system wasn’t found on Windows 10/8.1/7
- Windows 10 running slow after update 21H2? Here how to fix it!
CHKDSK is a command used in Command Prompt to scan, check, and repair hard drives in our computers. In Windows 11 or Windows 10, using chkdsk is no different from using it in any previous version of Windows. However, you will need to give the Command Prompt (CMD) administrative privileges to use the chkdsk command.
Run CHKDSK in Windows 11/10 from Command Prompt
If your target hard drive is not a boot drive, meaning that the drive isn’t where your Windows is located, using CHKDSK in Command Prompt will scan and repair the target drive immediately.
- Go to Start Menu. Type CMD.
- From the search result, right click Command Prompt, then click Run as administrator.

- If “User Account Control” ask for permission, click Yes to proceed.
- In the command prompt, type:
chkdsk [driveletter] /f /r /x
- For example:
chkdsk C: /f /r /x

- Chkdsk will then run to scan the selected disk for errors and repair them automatically. It may take hours if you have a huge and messy drive.
Why do we need the parameters “/f /r /x” when doing chkdsk?
- If you enter CHKDSK without the parameters, the command itself will only scan the disk and show you the disk’s status. It won’t repair anything. To allow it to fix errors it finds, “/f” is needed.
- If you want it to also locate bad sectors on the drive and recover readable information, “/r” is needed.
- To force it to dismount the drive before checking the disk, “/x” is needed. This is recommended to make sure there is no running application in that particular drive that may interfere with the CHKDSK process.
- If you need more info on other parameters you can use, go to this chkdsk docs from microsoft.
Run CHKDSK in Windows 10/11 Before Boot
If you want to CHKDSK your primary drive where you store and boot your Windows, usually C: drive, CHKDSK will need to run before booting into Windows. This is because CHKDSK cannot be run if the drive is in use, especially if there are any system core files on the drive that Windows relies on to work.
Note: If you cannot even boot into Windows, skip this method and go to the next one.
Here’s how you can set CHKDSK to run before boot in Windows 11/10:
- Follow step 1-4 in the instruction above.
- In the command prompt, enter chkdsk commands with the parameters. For example:
chkdsk C: /f /r /x
- If chkdsk detects that the drive you want to scan is a boot drive, it will shows “Cannot lock current drive. Chkdsk cannot run because the volume is in used by another process“, and ask if you would like to schedule the drive to be checked the next time you reboot/restart your computer.
- Type and enter Y.
- Restart your computer.
- Chkdsk will run automatically during your next boot before booting into Windows.
If you cannot even boot into Windows
If you are facing a serious issue where you can’t even boot into Windows, you can force your PC to boot into recovery mode and open Command Prompt from the recovery mode.
For more info about how to launch CMD on boot, read: How to Startup Repair Windows 11/10 using Command Prompt.
When do you need to run chkdsk for your drives?
You can run CHKDSK gradually and as frequently as you like. Unlike defragmenting, CHKDSK won’t harm your drive in any way no matter how frequently you run it. If you have not run it for a while, it’s recommended that you run CHKDSK for each of your hard drives once a month.
If you encounter freezes, hangs, drives, or CPU running at 100% all the time in Windows, run CHKDSK. There may be errors on the disk that cause all the problems.
Why is chkdsk stuck at a certain percentage for a long time?
CHKDSK may take some time to finish. We are talking about several hours here depending on the size of the disk and how much space it was used. Try to wait it out. We usually let our system run CHKDSK overnight.
If CHKDSK is still stuck at a certain percentage even after 10 hours of running, try to restart the run. It may indicate that your drive is starting to fail. Backup immediately and replace the drive as soon as possible before it completely breaks down.
Quick Links
-
What Is CHKDSK, and What Does It Do?
-
How to Check Up On or Cancel a Scheduled Disk Check
-
How to Use the ChkDsk Command
-
Important Chkdsk Commands
Summary
- Chkdsk is a utility that scans and fixes problems with your hard drive, including file system errors and bad sectors.
- It is recommended to run chkdsk regularly as part of routine maintenance and after abnormal shutdowns to prevent data loss and bigger problems.
- Running «chkdsk /f /r» can repair logical file system errors and scan for bad sectors, providing a thorough check of your hard drive.
Any time you have hard drive errors — or even strange behavior you might not at first associate with a hard drive — Check Disk can be a lifesaver. Here’s how to use the Chkdsk tool that comes with Windows 10, Windows 11, and other versions of Windows
What Is CHKDSK, and What Does It Do?
The Check Disk utility, also known as chkdsk (since that’s the command you use to run it) scans through your entire hard drive to find and fix problems. It’s not a terribly exciting tool — and running it can take some time — but it can really help prevent bigger problems and loss of data in the long run. Chkdsk performs a couple of functions, depending on how it’s run:
- Chkdsk’s basic function is to scan the integrity of the file system and file system metadata on a disk volume and fix any logical file system errors that it finds. Such errors might include corrupt entries in a volume’s master file table (MFT), bad security descriptors associated with files, or even misaligned time stamp or file size information about individual files.
- Chkdsk can also optionally scan every sector on a disk volume looking for bad sectors. Bad sectors come in two forms: soft bad sectors, which can occur when data is written badly, and hard bad sectors, which can occur because of physical damage to the disk. Chkdsk attempts to fix these problems by repairing soft bad sectors and marking hard bad sectors so they won’t be used again.
That may all sound very technical, but don’t worry: you don’t need to understand the ins and outs of how it works to know when you should run it.
You may want to run chkdsk every few months as part of routine maintenance along with using a S.M.A.R.T. tool for drives that support it. You should also consider running it any time Windows has shut down abnormally — such as after a power loss or system crash. Sometimes Windows will automatically run a scan during startup, but most often you’ll have to do it yourself. Even if you’re just having strange problems with apps not loading or crashing that you haven’t been able to resolve another way, you might consider checking the disk.
For example: I once had a problem where Outlook suddenly started crashing on me shortly after loading. After a lot of troubleshooting, a chkdsk scan revealed I had bad sectors where my Outlook data file was stored. Fortunately, chkdsk was able to recover the sectors in my case, and everything went back to normal afterward.
If chkdsk does encounter problems — especially hard bad sectors — that it can’t repair, data can become unusable. It’s not very likely, but it can happen. For that reason, you should always make sure you have a good backup routine in place and back up your PC before running chkdsk.
The chkdsk tool works pretty much the same in all versions of Windows. We’ll be working with Windows 10 in this article, so the screenshots may look slightly different if you’re using Windows 11, but chkdsk performs the same, and we’ll point out where any procedures differ. We’ll also talk about running it from the Command Prompt, in cases where you can’t even boot into Windows.
How to Run Chkdsk
Running the Check Disk tool from the Windows desktop is easy. In File Explorer, right-click the drive you want to check, and then choose «Properties.»

In the properties window, switch to the «Tools» tab and then click the «Check» button. In Windows 7, the button is named «Check Now.»
In Windows 10 and Windows 11, Windows may inform you that it hasn’t found any errors on the drive. You can still perform a manual scan by clicking «Scan drive.» This will first perform a scan without attempting any repairs, so it will not restart your PC at this point. If the quick disk scan reveals any problems, Windows will present that option to you. If you want to force it, though, you’ll have to use the command prompt to run chkdsk — something we’ll be covering a bit later in the article.
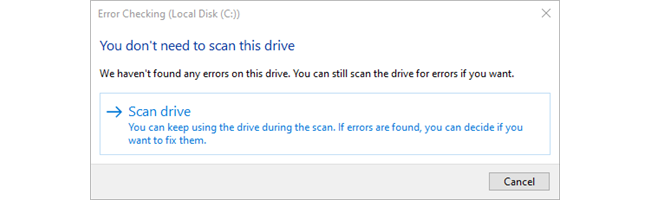
After Windows scans your drive, if no errors were found, you can just click «Close.»
How to Check Up On or Cancel a Scheduled Disk Check
If you’re not sure whether a disk check is scheduled for your next restart, it’s easy enough to check at the Command Prompt. You’ll need to run Command Prompt with administrative privileges. Open the Start Menu and then type «cmd.» Right-click the result and then choose «Run as administrator.»
This works identically in Command Prompt, PowerShell, or Windows Terminal as long as it is launched as administrator.
At the prompt, type the following command — substituting the drive letter if necessary.
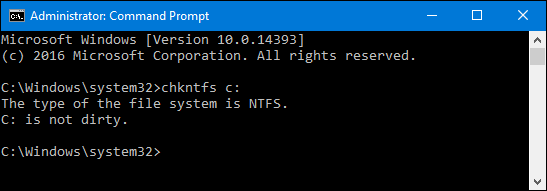
chkntfs c:
If you have scheduled a manual check of the drive, you’ll see a message to that effect.
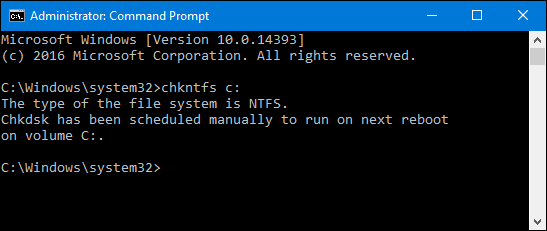
If Windows has scheduled an automatic check of the drive, you’ll see a message letting you know that the volume is dirty, which just means it’s been flagged with potential errors. This serves as indication that Windows will run a check the next time it starts. If no automatic scan is scheduled, you’ll just see a message letting you know that the volume is not dirty.
If a disk check is scheduled for the next time you start Windows, but have decided you don’t want the check to happen, you can cancel the check by typing the following command:
chkntfs /x c:

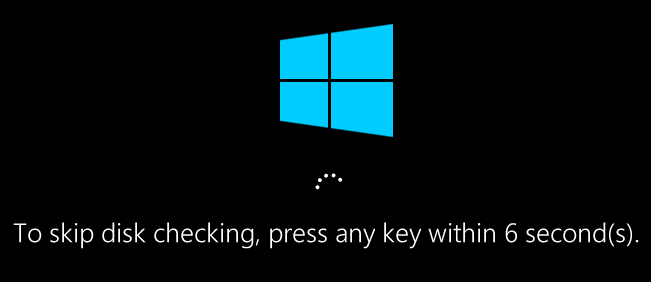
You won’t get any kind of feedback that the scan has been canceled, but it will have been. This command actually excludes the drive from the chkdsk command for the next start. If you do restart to find that a scan has been scheduled, Windows is also kind enough to provide you with about ten seconds to skip the scan if you want to.
How to Use the ChkDsk Command
If you’re willing to use the Command Prompt (or you have to because Windows won’t boot properly), you can exert a little more control over the disk-checking process. Plus, if you’re using Windows 10 or Windows 11 , it’s the only way to force automatic fixing or bad sector scanning into the mix. Open up the Command Prompt with administrative privileges by hitting Windows+X and selecting «Command Prompt (Admin).» You’ll be using the chkdsk command. The command supports a number of optional switches, but we’re mostly concerned with two of them: /f and /r.
You can also use PowerShell or Windows Terminal if you want. The process is identical. Just make sure that you launch them as administrator.
If you just use the chkdsk command by itself, it will scan your drive in read-only mode, reporting errors but not attempting to repair them. For this reason, it can usually run without having to restart your PC.

If you want chkdsk to attempt to repair logical file system errors during the scan, add the /f switch. Note that if the drive has files that are in use (and it probably will), you’ll be asked to schedule a scan for the next restart.
chkdsk /f c:

If you want chkdsk to scan for bad sectors as well, you’ll use the /r switch. When you use the /r switch, the /f switch is implied, meaning that chkdsk will scan for both logical errors and bad sectors. But while it’s not really necessary to explicitly write chkdsk /f /r, it also won’t hurt anything if you throw both the /r and /f switches on the command at the same time.
chkdsk /r c:
Running chkdsk /r gives you the most thorough scan you can perform on a volume, and if you have some time to spare for the sector check, we highly recommend running it at least periodically.
Important Chkdsk Commands
There are, of course, other parameters you can use with chkdsk . So, for the sake of completeness — and your geeky enjoyment — here they are:
- C:\>chkdsk /? Checks a disk and displays a status report.
-
CHKDSK [volume[[path]filename]]] [/F] [/V] [/R] [/X] [/I] [/C] [/L[:size]] [/B]
- volume Specifies the drive letter (followed by a colon), mount point, or volume name.
- filename FAT/FAT32 only: Specifies the files to check for fragmentation.
- /F Fixes errors on the disk.
- /V On FAT/FAT32: Displays the full path and name of every file on the disk. On NTFS: Displays cleanup messages if any.
- /R Locates bad sectors and recovers readable information (implies /F).
- /L:size NTFS only: Changes the log file size to the specified number of kilobytes. If size is not specified, displays current size.
- /X Forces the volume to dismount first if necessary. All opened handles to the volume would then be invalid (implies /F).
- /I NTFS only: Performs a less vigorous check of index entries. /C NTFS only: Skips checking of cycles within the folder structure.
- /B NTFS only: Re-evaluates bad clusters on the volume (implies /R) /scan NTFS only: Runs an online scan on the volume
- /forceofflinefix NTFS only: (Must be used with «/scan») Bypass all online repair; all defects found are queued for offline repair (i.e. «chkdsk /spotfix»).
- /perf NTFS only: (Must be used with «/scan») Uses more system resources to complete a scan as fast as possible. This may have a negative performance impact on other tasks running on the system.
- /spotfix NTFS only: Runs spot fixing on the volume /sdcleanup NTFS only: Garbage collect unneeded security descriptor data (implies /F).
- /offlinescanandfix Runs an offline scan and fix on the volume.
- /freeorphanedchains FAT/FAT32/exFAT only: Frees any orphaned cluster chains instead of recovering their contents.
- /markclean FAT/FAT32/exFAT only: Marks the volume clean if no corruption was detected, even if /F was not specified.
The /I or /C switch reduces the amount of time required to run Chkdsk byskipping certain checks of the volume
Hopefully, Chkdsk will fix whatever hard drive problems you may have, and you can go back to using your computer normally.