
How to check graphics card? This post provides 5 ways to help you check the graphics card on Windows 10/8/7 PC or laptop. Detailed step-by-step guides are included.
Wonder what graphics card does the computer have, and how to check graphics card on Windows 10/8/7 PC/laptop? This post provides 5 ways to help you check Windows 10/8/7 computer graphics card easily and quickly. Find out the detailed step-by-step guide.
Tip: MiniTool Power Data Recovery – Professional free data recovery program enables you to easily recover deleted/lost files from Windows 10 computer, memory/SD card, USB flash drive, external hard drive, SSD, etc. 100% clean program.
MiniTool Power Data Recovery FreeClick to Download100%Clean & Safe
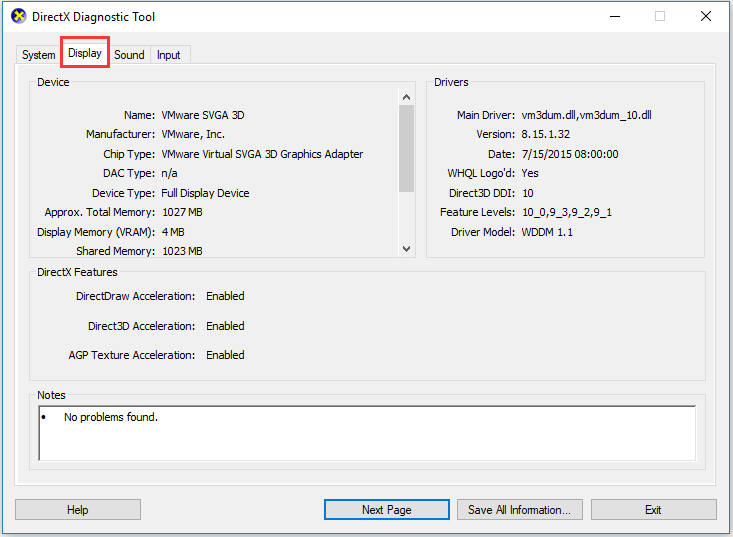
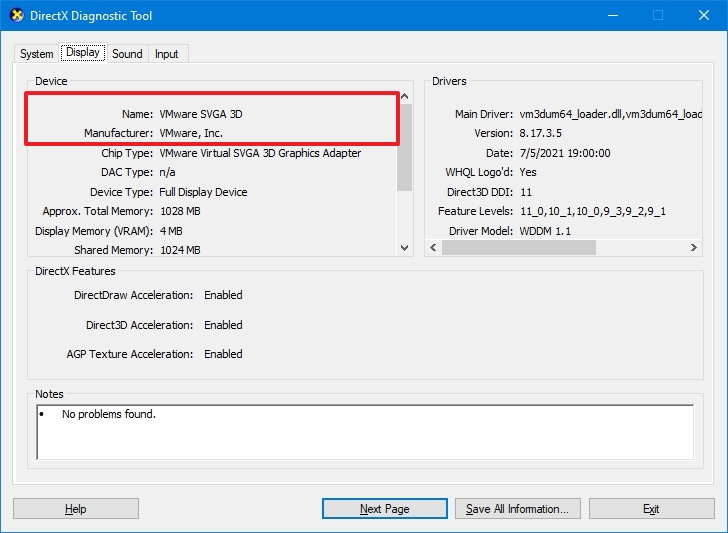
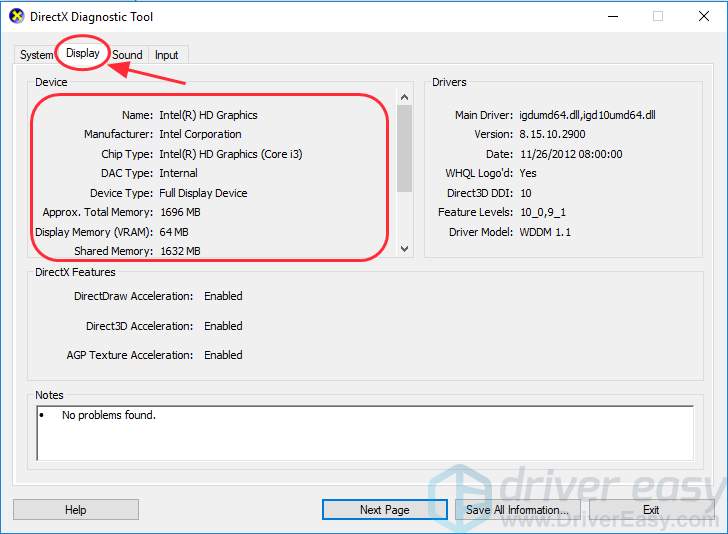
You can run Microsoft DirectX Diagnostic Tool to easily check the graphics card on Windows 10/8/7. Check the detailed guide below.
Step 1. You can press Windows + R key on computer keyboard to open Run window. Then type dxdiag and hit Enter to open DirectX Diagnostic Tool.
Step 2. Next you can tap Display tab, then you can check the detailed information of the graphics card on your Windows 10/8/7 PC/laptop, including graphics card name, manufacturer, its driver model/version/date, and more.
Recommended reading: 5 Best Free Photo Recovery Software to Recover Deleted Photos
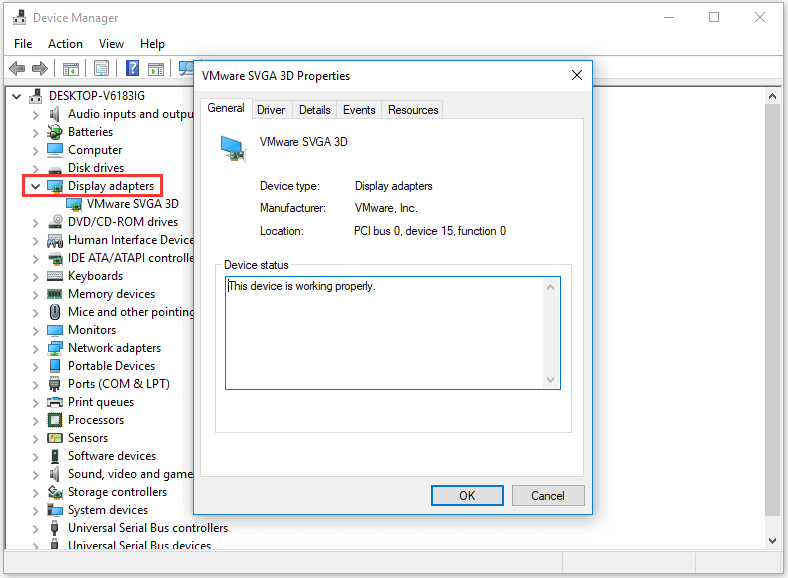
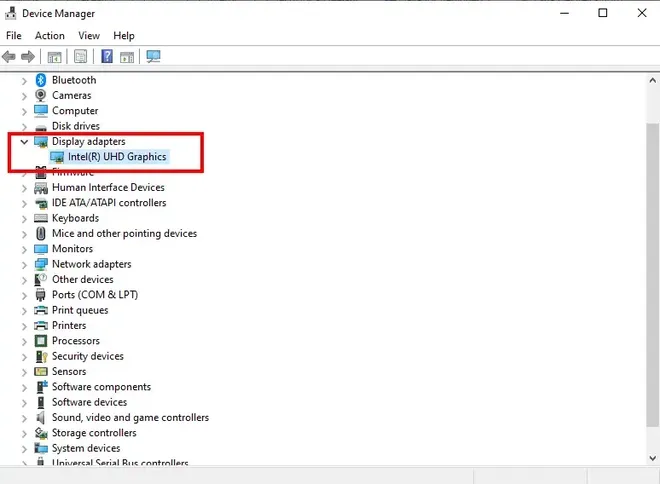
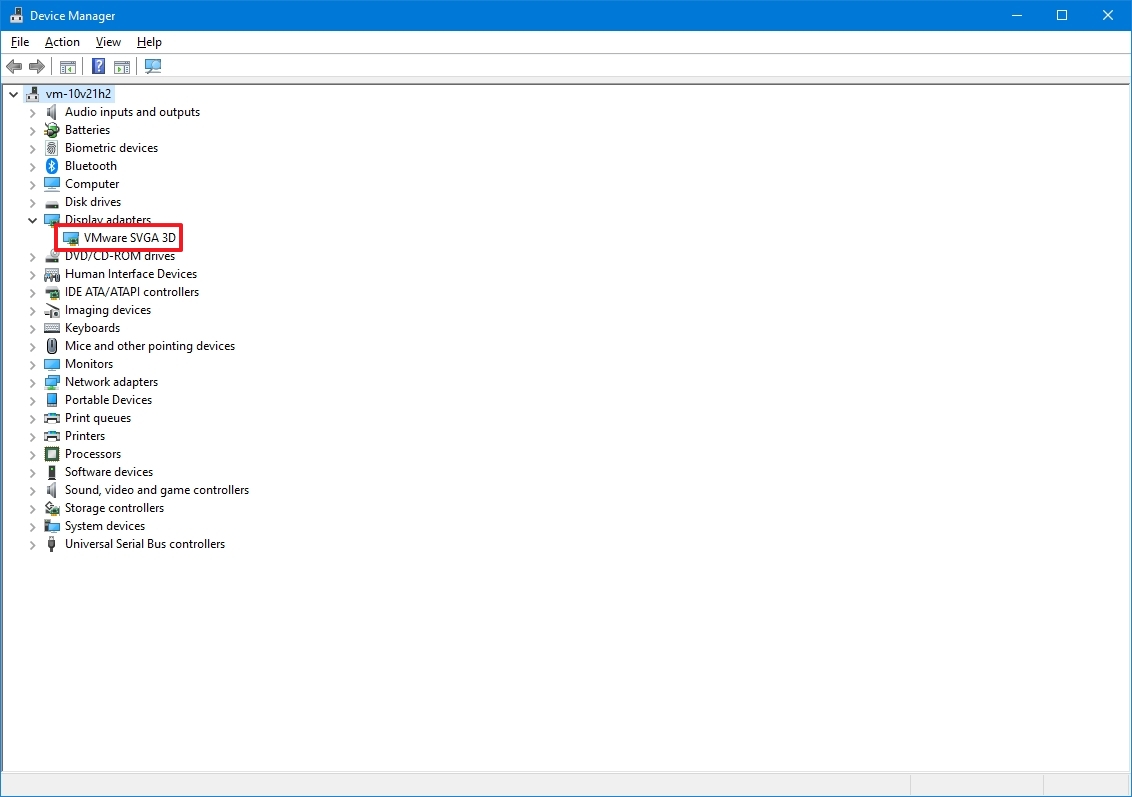
How to Check Graphics Card on Windows 10/8/7 in Device Manager
You can also easily check graphics card in laptop or PC through Device Manager.
Step 1 – Open Windows Device Manager
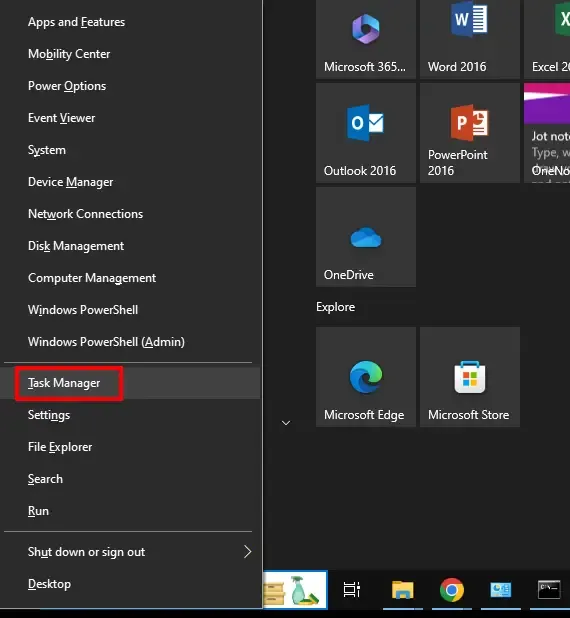
You can click Start and type Device Manager. Then click Device Manager under best match result to open Windows Device Manager.
You can also press Windows + X key on the keyboard simultaneously, and click Device Manager to open it.
Step 2 – Check Graphics Card Detailed Info
Then you can find Display adapters, click and expand it. Then you will see the installed graphics card (s) on your Windows 10/8/7 PC/laptop.
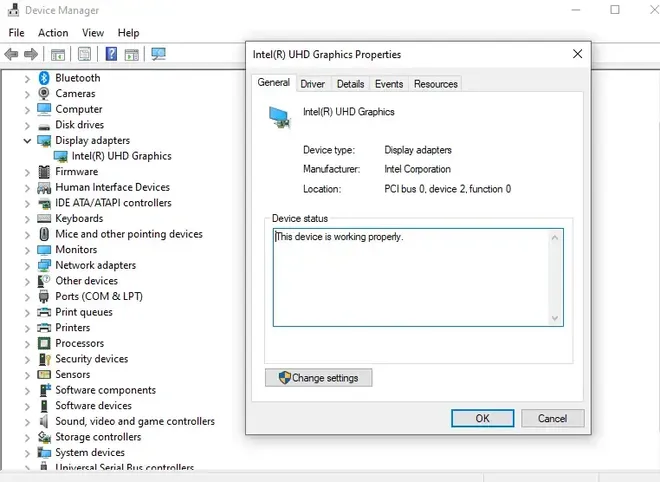
Right-click on one graphics card and select Properties. Then it will pop-up a window which includes all the detailed computer graphics card information.
You can then check the general information, the driver information, device status and more of the computer graphics card.
Recommended reading: Top 5 Free Video Recovery Software to Recover Deleted Videos
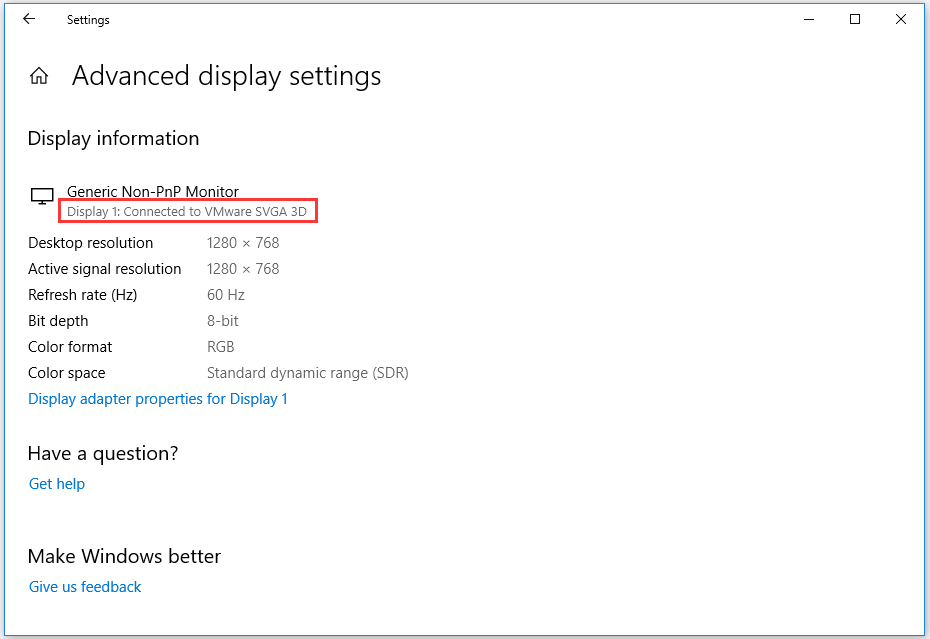
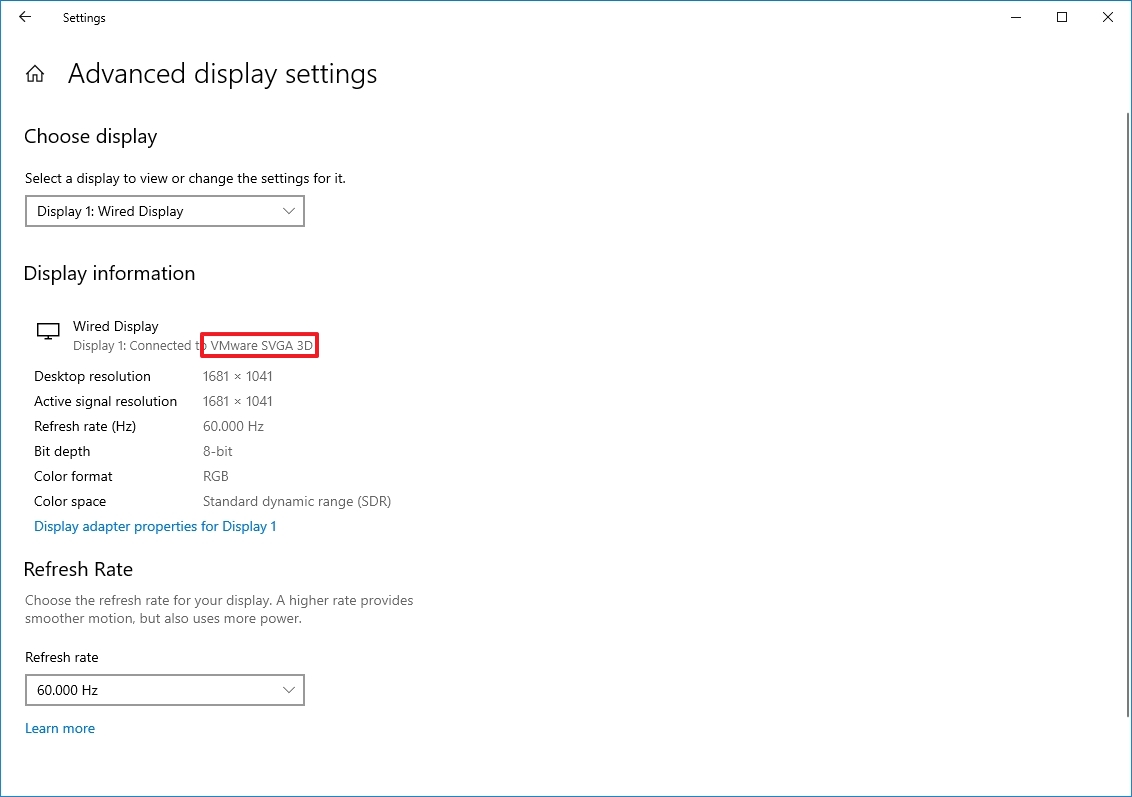
How to Check Graphics Card on Windows 10/8/7 from Display Settings
Another easy and quick to check graphics card on Windows 10/8/7 laptop or PC is to view display settings. Check the operation below.
Step 1. You can right-click the blank space on the computer screen and choose Display Settings.
Step 2. Then you can scroll down and click Advanced Display Settings to find out what graphics card your computer has and view its detailed parameters.
Recommended reading: How to Use Windows 10 Photos App to Edit Photos and Videos
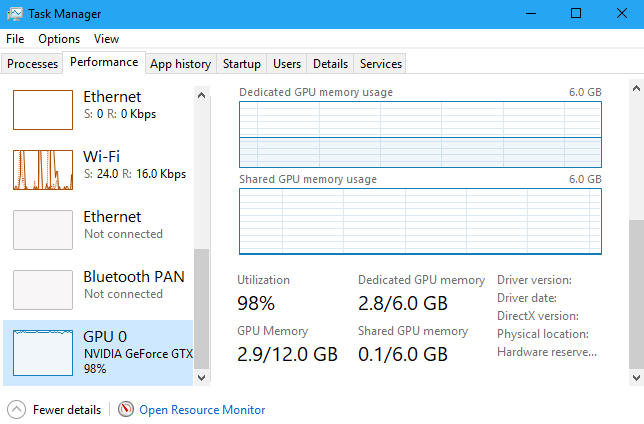
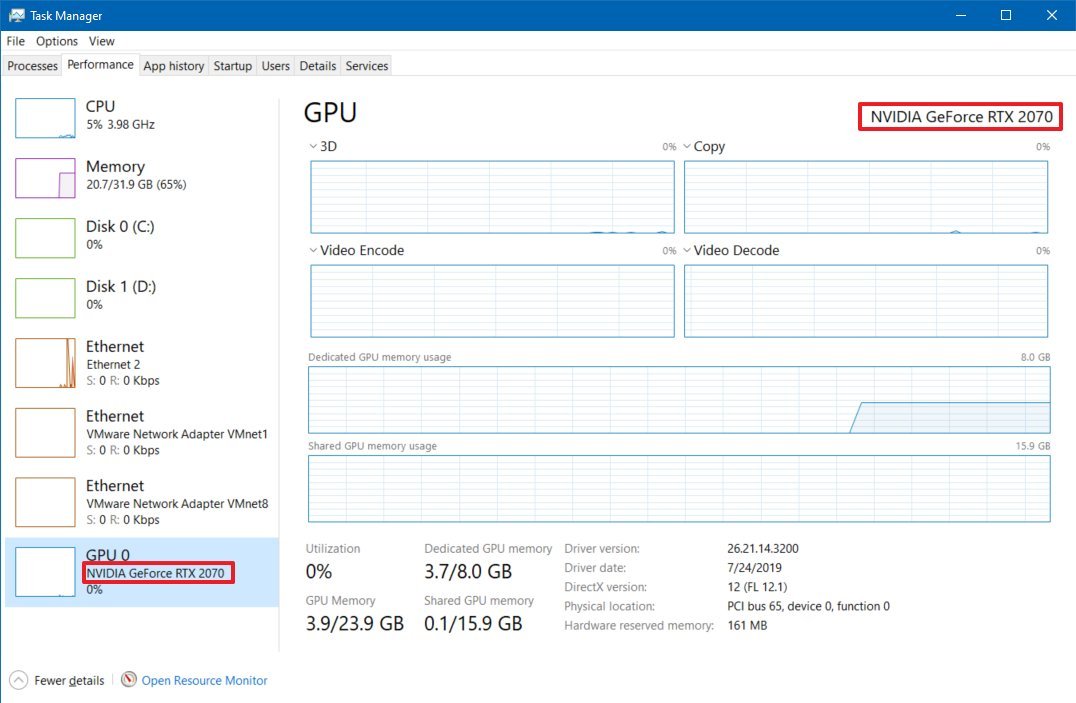
How to Check Graphics Card on Windows 10/8/7 from Task Manager
You can also find out the computer graphics card info by using Task Manager on Windows 10/8/7 PC.
Step 1. Open Windows Task Manager
You can press Windows + X keys on the keyboard at the same time, and choose Task Manager.
Or you can click Start and type Task Manager. Select Task Manager to open it.
You can also press the shortcut key Ctrl + Shift + Esc at the same time to open Task Manager quickly.
Then click More details to check the detailed information of running tasks in Windows 10/8/7 PC.
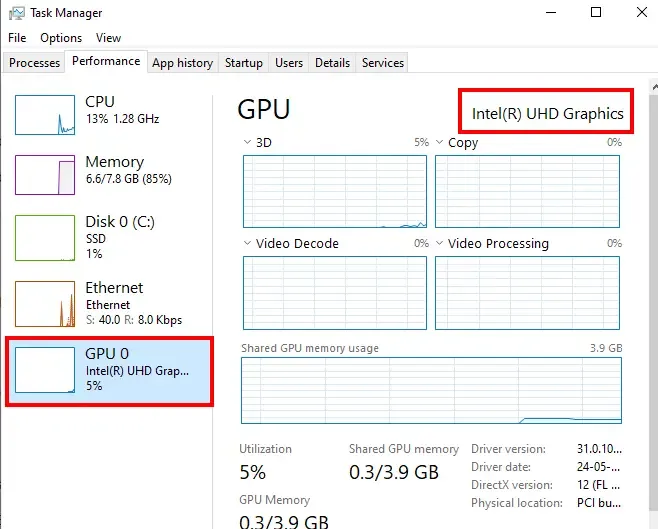
Step 2. Find Out Computer Graphics Card Information
Next you can tap Performance tab, and click GPU option to check computer GPU information. You can check the GPU model, current usage rate, the graphics card driver, the version and its performance, etc.
Recommended: How to Open & Use Windows 10 Camera App to Capture Video/Photo
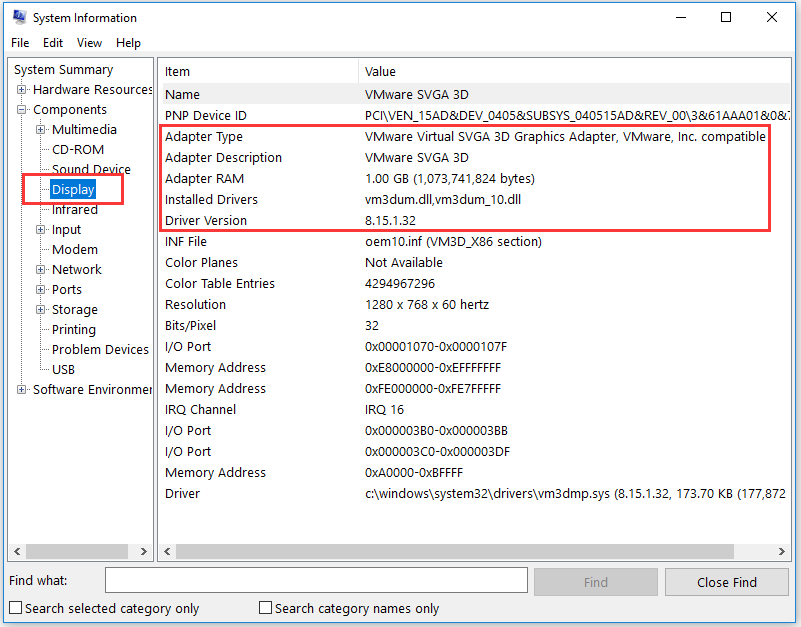
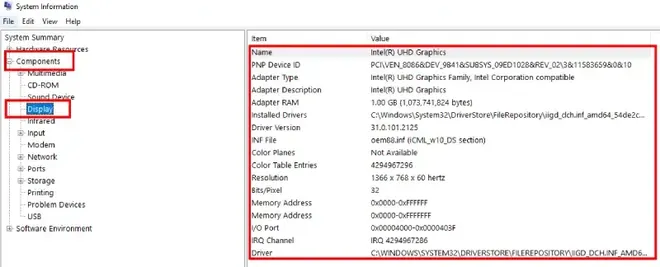
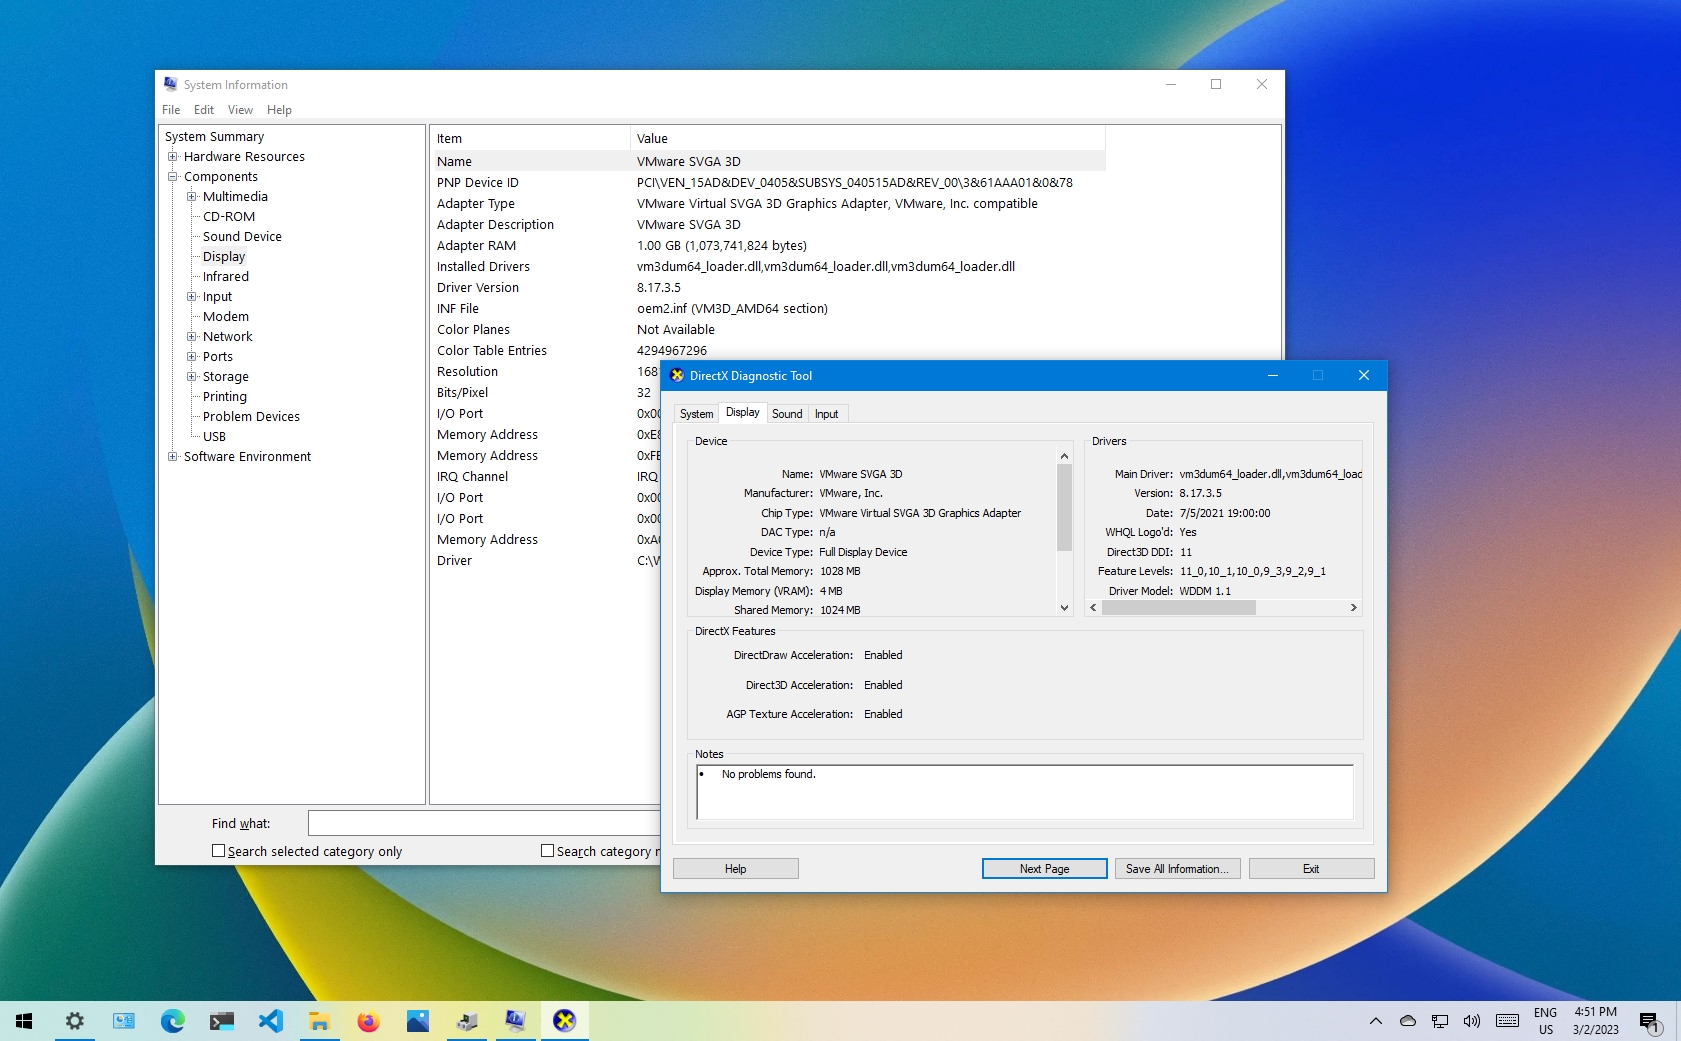
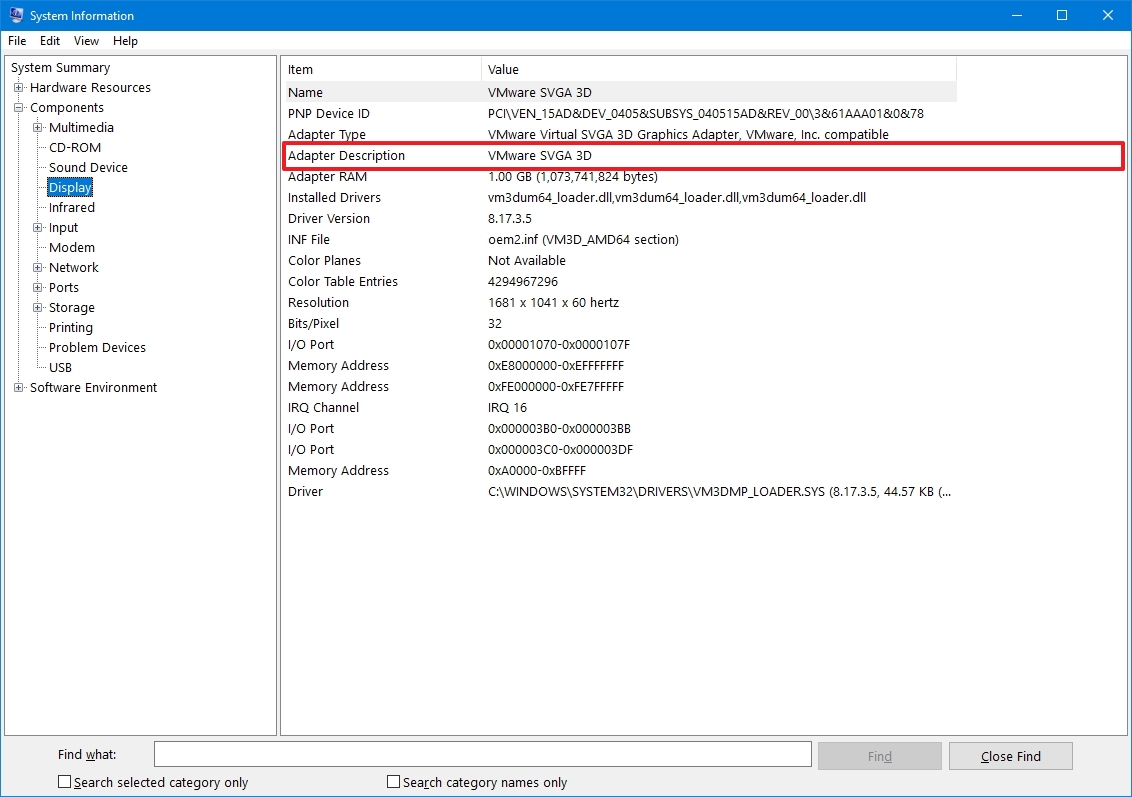
How to Check Graphics Card on Windows 10/8/7 through System Information
The last easy and quick way to allow you to check out the graphics card (GPU) or Windows 10/8/7 laptop or PC is to use System Information.
Step 1. Open Windows System Information
You can also press Windows + R key on the keyboard to open RUN window, then input msinfo32 and hit Enter.
Step 2. Check Windows 10/8/7 Laptop/PC GPU
Next you can expand System Summary -> Components -> Display, to check the detailed computer graphics adapter information incl. adapter model, adapter description, adapter RAM, installed drivers, and more. You can also check full specs of Windows 10/8/7 in this System Information window.
Bottom Line
If you want to find out what the graphics card your computer has, these 5 ways offered in this post can help you easily check graphics card in Windows 10/8/7 laptop or PC.
Video Guide:
Understanding your computer’s Graphics Card (GPU) is essential to performing certain tasks like gaming, running software or editing videos. Whether you’re a Windows 10 or Windows 11 user, checking your Graphics Card’s specification is not tricky. In this guide, we’re going to discuss some of the most easiest and hassle-free methods to understand how you can check what graphics card is installed in your Windows PC.
Table of Content
- Why does it Matter?
- What is a GPU
- Method 1: Check GPU Using Task Manager (Windows 10 and Windows 11)
- Method 2: Check GPU Using System Information (Windows 10 and Windows 11)
- Method 3: Using PowerShell to Check GPU
- Method 4: Check GPU Using DxDiag (Windows 10 and Windows 11)
- Method 5: Check GPU Using Device Manager (Windows 10 and Windows 11)
- Method 6: Check GPU Info Using Third-Party Tools (Windows 10 and Windows 11)
- What are the GPU Specifications
- Best GPU At a Glance (Industry-wise)
- Troubleshooting Tips
Before we jump in, let’s understand some of the basics first:
Why does it Matter?
Your GPU is responsible for rendering images, videos and animations. It’s an essential component for everything — from gaming to performing any productive task.
What is a GPU
A graphic card is responsible for real-time images, animations and video rendering. These cards are intended to help the PC run quicker and more proficiently than it would without them.
Method 1: Check GPU Using Task Manager (Windows 10 and Windows 11)
The Windows Task Manager is a tool included in the operating system that allows you to conveniently access information, about your GPU and monitor its usage. To check your GPU using the Task Manager follow these steps:
Step 1: Open the Task Manager
Press Ctrl + Shift + Esc to open the task manager or alternatively you can Press Win + X and select «Task Manager»
Step 2: Navigate to the Performance Tab and click on GPU
On the top menu bar, you’ll find a tab «Performance», click on it and navigate to the CPU from the left hand panel.
Here, you can check temperature, current usage, etc. and in case of multiple GPU’s you will find multiple entries such as GPU 1, GPU 2, and so on and this method is suitable for both Windows 10 and Windows 11.
Method 2: Check GPU Using System Information (Windows 10 and Windows 11)
You can also view your Graphic card details of your Windows PC by navigating through the System Information. This section will provide you detailed overview of your Windows System. Here’s how you can do it:
Step 1: Open System Information
Use Windows Shortcut key i.e. Win + R and type msconfig and hit the enter button. Alternatively, you go to the Start Menu and type «System Information» and hit the enter button.
Step 2: Navigate to Display
On the left hand menu, click on the Components and navigate to Display.
You will be able to see GPU name, VRAM (video memory), Driver additional details, etc. and this method is suitbale for both Windows 10 and Windows 11.
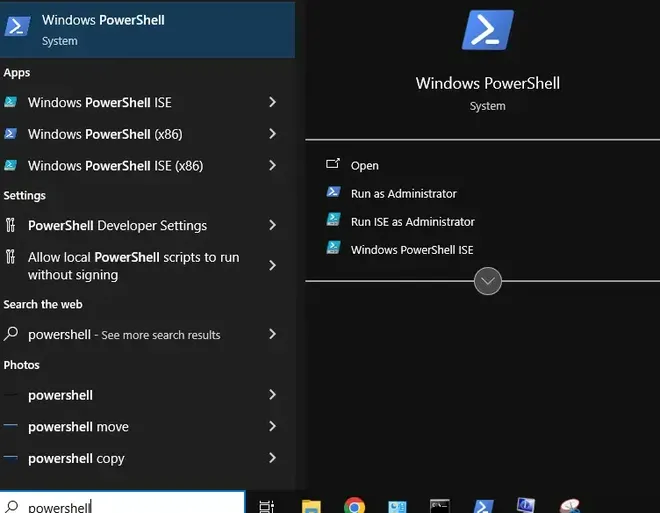
Method 3: Using PowerShell to Check GPU
This method is suitable for those who are comfortable in exploring tech-savvy methods for such methods. Here’s how you can use this option to check GPU in Windows 10 and 11.
Step 1: Access Windows PowerShell
Press Win + S and type «PowerShell» in the search box and hit the enter button or you can press Win + X and select «PowerShell» and click to open it.
Step 2: Run the Program to Display GPU details
Now, type the following command:
Get-CimInstance Win32_VideoController
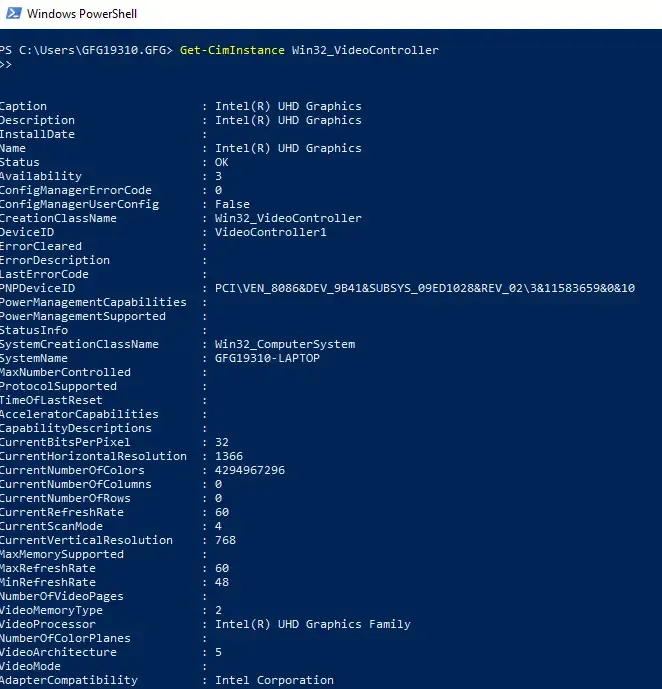
Note: Once you hit the enter button, all the system details will appear here, including GPU name.
Method 4: Check GPU Using DxDiag (Windows 10 and Windows 11)
DxDiag or DirectX Diagnostic Tool is an in-built tool that can be used to identify GPU and other system details. Here’s how to perform this action.
Step 1: Open Run Dialog & Open DirectX Diagnostic Tool
Press Win + R and type «dxdiag» in the run dialog and hit the enter button or Press Win + S and type «CMD» and type «dxdiag» and hit the enter button.
Step 2: Navigate to the Display Option
Navigate to the «Display» Tab. Under the Device section, you can see graphics cards and their info
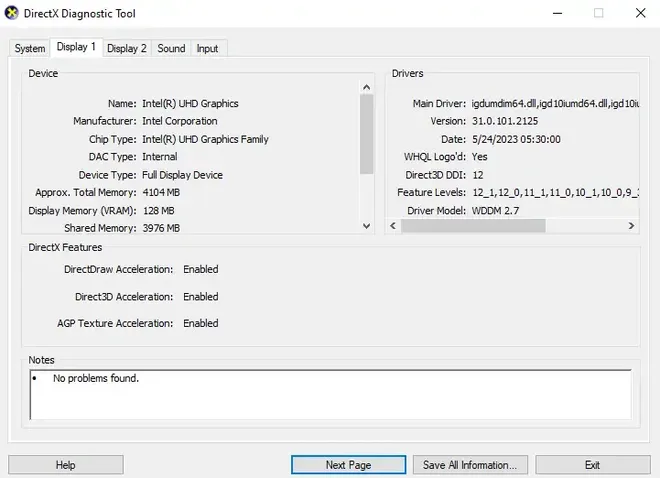
Note: If you’re looking to troubleshoot graphics related issues, this can be a useful method.
Method 5: Check GPU Using Device Manager (Windows 10 and Windows 11)
If you’re looking for any alternate method to check you Graphics Card for Windows 10 or Windows 11, then you can also use the Windows Device Manager. Here’s how and what needs to be done to perform this action:
Step 1: Open the Device Manager
Press Win + X and select the Device Manager or make a right-click on the Start Menu and select the Device Manager.
Step 2: Expand the Display Adapters
Click the arrow next to Display Adapters to view the GPU info.
Step 3: View GPU info
Make a right-click on your GPU and select Properties to view additional details (such as Manufacturer details, model, etc.)
You can also get any trusted third-party tool to get detailed insight and and if you’re a gamer, it becomes easy for you to pick the best GPU for gaming for rich experience.
- HWiNFO64
- GPU-Z
- Speccy
What are the GPU Specifications
Once you’ve identified your GPU, you can look up for its specifications to understand it’s capabilities. Below are three major aspects to look into:
- GPU Model
- Video RAM or VRAM
- Driver Version
Best GPU At a Glance (Industry-wise)
Below, is now the table featuring some of the best GPUs in different segments, considering factors of performance, prices and requirement.
| Category | Best GPU | Manufacturer | Why to Pick? |
|---|---|---|---|
| Best GPU for Gaming | NVIDIA GeForce RTX 4090 | NVIDIA | Exceptional performance with high frame rates, 4K gaming, and Ray Tracing. Ideal for AAA titles. |
| Best Budget GPU | AMD Radeon RX 6600 XT | AMD | Offers great 1080p gaming performance at a budget-friendly price. |
| Best GPU for Content Creation | NVIDIA GeForce RTX 3080 | NVIDIA | Excellent for video editing, 3D rendering, and AI workloads with CUDA support. |
| Best GPU for Professionals | NVIDIA Quadro RTX 8000 | NVIDIA | Top-tier GPU for professional workloads in CAD, 3D rendering, and scientific applications. |
| Best GPU for Streaming | AMD Radeon RX 6800 XT | AMD | Great for streaming with powerful performance and efficiency in gaming and multitasking. |
| Best GPU for VR | NVIDIA GeForce RTX 3080 | NVIDIA | Excellent performance in VR gaming with Ray Tracing and high frame rates. |
| Best GPU for Budget Gaming | NVIDIA GTX 1660 Super | NVIDIA | Great performance for 1080p gaming without breaking the bank. |
| Best GPU for 4K Gaming | NVIDIA GeForce RTX 4090 | NVIDIA | Leading GPU for 4K gaming with ultra-high settings and Ray Tracing. |
| Best GPU for Machine Learning | NVIDIA A100 Tensor Core GPU | NVIDIA | Superior GPU for AI/ML workloads with Tensor cores optimized for deep learning tasks. |
| Best GPU for Laptop Gaming | NVIDIA GeForce RTX 3080 Laptop GPU | NVIDIA | High performance in laptops for gaming and heavy tasks with a mobile form factor. |
Troubleshooting Tips
If you encounter any performance related or graphic related issue with your GPU, you can try out some of these troubleshooting steps:
- Try updating your GPU Drivers
- Check if it’s overheating
- Use Device Manager to Run Diagnostics
- If possible, try to reinstall your GPU Driver
- Make adjustments with your GPU settings.
Knowing how to check your graphics card is an essential skill for optimizing your PC’s performance while ensuring its compatibility. Whether you’re using Windows 10 or Windows 11, the above outlined methods are suitable for both Windows versions.
Once you identify you system’s GPU, you can make adjustments with your GPU, like if you’re a gamer then you might look for the best GPU for gaming, or if you’re a visual creator then you can look for the best GPU for editing.
Also Read
- AMD vs. Nvidia GPU in 2025: Who is the King of Graphic Cards?
The human brain is divided into two hemispheres. The right side of the brain is more creative and artsy, while the left side is more analytical and rational. Where a computer is concerned, the CPU, or central processing unit, is the analytical part, and the GPU, or graphics processing unit, is the creative part. Learn more about the beauty of your device’s GPU does and how to check for it on Windows 11.
What is a GPU?
Your computer’s GPU helps your PC or laptop handle visuals like graphics and videos. There are two different types of GPUs, and the type you have in your computer may vary due to the type of device and your specific computing needs.
Discrete GPU
These are standalone chips that are mounted on their own circuit board and are embedded alongside the CPU on a computer’s motherboard. They are larger and use more power than integrated GPUs, but they are an excellent choice for tasks that involve a lot of processing like video editing, design, and gaming. Due to their larger size, discrete GPUs can require a dedicated cooling apparatus, like a fan, to ensure that the chip won’t overheat and will continue to perform as it should.
Integrated GPU
These GPUs are built into your PCs motherboard. They’re smaller and lighter, but they also use less power. So while they’re great for portability and frequently appear in laptops, they aren’t always as powerful as discrete GPUs. They still do the job for gaming and video or photo editing, and they tend to be less expensive.
Why do I need to know my GPU?
Simply put, the more powerful your GPU, the better your graphics will be. This can affect your video and photo editing, content creation, gaming, and watching TV shows, and movies. Better graphics performance means that your video games can be played at a higher resolution and with faster frame rates, improving your overall experience.
How to check GPU in Windows
If you’re curious about what type of GPU you have in your device, Windows 11 makes it easy to find out. This information can come in handy if you use a lot of graphics-heavy applications like gaming and photo editing. Knowing what kind of GPU you’re working with can help you determine if you have enough power to make a program work as well as it could. These two simple ways will help you identify the GPU in your device:
Check GPU from Settings
- Select Settings > System.
- Select Display and scroll down to Related settings.
- Select Advanced display. Your GPU’s make and model should be shown under Display information.
Check GPU from Task Manager
- In Windows 11, right-click on the Start button.
- Select Task Manager from the menu.
- Select Performance.
- In the last pane of the tab, choose GPU. If this option is available, it will likely be at the bottom of the list.
- In the top right corner of the GPU selection, information about your computer’s GPU will be visible.
When you recognize the value of GPU, you can make smart choices about how much you need. If you need a better GPU, let us help you find the Windows device to meet your needs. If you’re using that powerful GPU for the best gaming experience possible, don’t forget that Windows 11 is designed with gaming in mind.
(Image credit: Future)
In computing, the graphics card is an essential component that makes it possible to render every pixel on the screen when navigating the Windows 10 desktop, running an app, and playing a game. Typically, devices can have graphics cards from one of the three leading manufacturers, including NVIDIA, AMD, or Intel.
Although for the most part, you don’t need to worry about the graphics specifications on your computer, it might be something important for users who work with graphics-intensive programs or play games. Usually, if you don’t have a card with a powerful graphics processing unit (GPU), it may not be possible for an application to perform as intended. Or, if you’re a gamer, you may not be able to play games, or you may need to determine the hardware to adjust the settings accordingly to prevent affecting performance.
Whatever your reasons might be, Windows 10 includes multiple ways to quickly find out the graphics card specifications using Settings, Device Manager, System Information, DirectX Diagnostic Tool, Task Manager, and, of course, using the card’s control panel software.
This how-to guide will walk you through the steps to check which graphics card is currently installed on your computer.
How to find out graphics card details using Settings
To find out the graphics card manufacturer and model using the Settings app on Windows 10, use these steps:
- Open Settings.
- Click on System.
- Click on Display.
- Under the «Multiple displays» section, click the «Advanced display settings» option.

- Under the «Display information» section, confirm the graphics card vendor and model.
Once you complete the steps, you will understand the video card installed on your device.
How to find out graphics card details using Device Manager
To determine the graphics card installed on the system with Device Manager, use these steps:
All the latest news, reviews, and guides for Windows and Xbox diehards.
- Open Start.
- Search for Device Manager and click the top result to open the tool.
- Expand the Display adapters branch.
- Confirm the manufacturer and model of the video card.
After you complete the steps, the graphics card information will be revealed.
How to find out graphics card details using System Information
To check the graphics card on Windows 10 with System Information, use these steps:
- Open Start.
- Search for System Information and click the top result to open the tool.
- Expand the Components branch.
- Click on Display.
- Under the «Adapter Description» field, determine the graphics card installed on your device.
Once you complete the steps, you’ll know the graphics card make and model, driver information, and more.
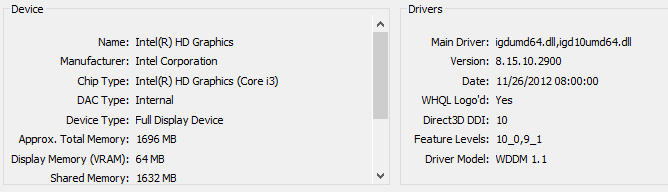
How to find out graphics card details using DirectX Diagnostic Tool
To find out the video card installed on your PC using DirectX Diagnostic Tool, use these steps:
- Open Start.
- Search for dxdiag and click the top result to open the tool.
- Click the Yes button (if applicable).
- Click the Display tab.
- Under the «Device» section, check the manufacturer and processor type of the graphics card.
After you complete the steps, you’ll be able to understand the basic information about the video card and other details. For example, the amount of memory built into the device and driver information.
How to find out graphics card details using Task Manager
To figure out the graphics card available on Windows 10 with Task Manager, use these steps:
- Open Start.
- Search for Task Manager and select the top result to open the tool.
- Quick tip: You can also use the «Ctrl + Shift + Esc» keyboard shortcut to open Task Manager.
- Click the Performance tab.
- Click on GPU.
- Confirm the brand and model of the graphics card on the top-right corner.
Once you complete the steps, the Task Manager will display the manufacturer name and model, the dedicated amount of memory, DirectX version, the physical location in the motherboard, and current utilization details.
How to find out graphics card details using Control Panel
Alternatively, if you have a GPU from Intel, NVIDIA, or AMD, you can also use their control panel software to check the graphics card specifications, including settings to adjust many preferences.
To check the specifications using the NVIDIA Control Panel, use these steps:
- Open Control Panel.
- Click on Hardware and Sound.
- Click on NVIDIA Control Panel.
- Click the System Information option from the bottom-left corner.
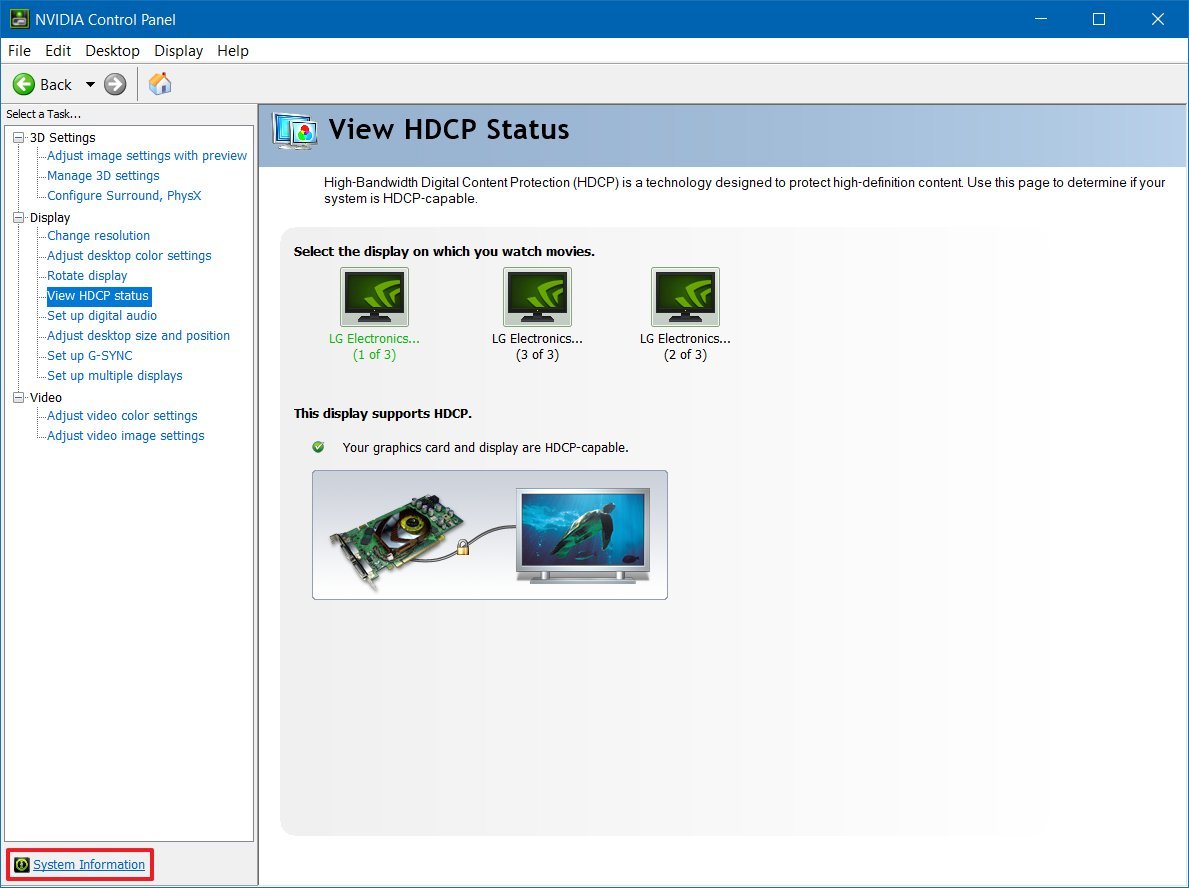
- Click the Display tab.
- Under the «Graphics card information» section, confirm the graphics model on the left side.
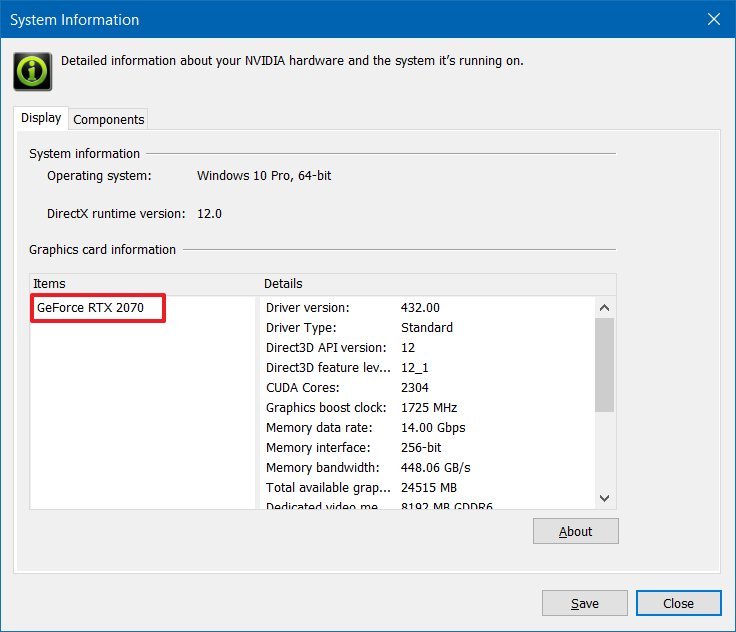
Once you complete the steps, you’ll know the exact graphics card model. On the right side, you’ll also find various other details, such as the number of CUDA cores, processor clock speed, memory data rate, bandwidth, type, amount, and the video BIOS version.
More resources
For more helpful articles, coverage, and answers to common questions about Windows 10 and Windows 11, visit the following resources:
- Windows 11 on Windows Central — All you need to know
- Windows 10 on Windows Central — All you need to know

Cutting-edge operating system
A refreshed design in Windows 11 enables you to do what you want effortlessly and safely, with biometric logins for encrypted authentication and advanced antivirus defenses.
Mauro Huculak has been a Windows How-To Expert contributor for WindowsCentral.com for nearly a decade and has over 15 years of experience writing comprehensive guides. He also has an IT background and has achieved different professional certifications from Microsoft, Cisco, VMware, and CompTIA. He has been recognized as a Microsoft MVP for many years.
Many of you may be wondering: what graphics card do I have in my Windows? Don’t worry. You’ve come to the right place! This article summarizes the easiest ways to find out the graphics card on Windows PC/laptop.
Graphics card is also called video card, video adapter, and display adapter. It connects to the motherboard of a computer system and generates output images to display.
How do I check the graphics card information?
- Check the graphics card automatically (Recommended)
- Check the graphics card in Device Manager
- Check the graphics card from Display Settings
- Check the graphics card by running DxDiag
Method 1: Check the graphics card automatically (Recommended)
You can check your graphics card information and fix any graphics card issue with Driver Easy! With Driver Easy, you can easily have a look at the graphics card information in your Windows, and also export the details of your graphics card into your computer and share the file with anyone you would like to, which only takes two clicks!
How to find out what graphics card in my computer
Follow the steps below to check the graphics card and export the information by Driver Easy:
1) Download and install Driver Easy.
2) Run Driver Easy and click Hardware Info on the left pane.

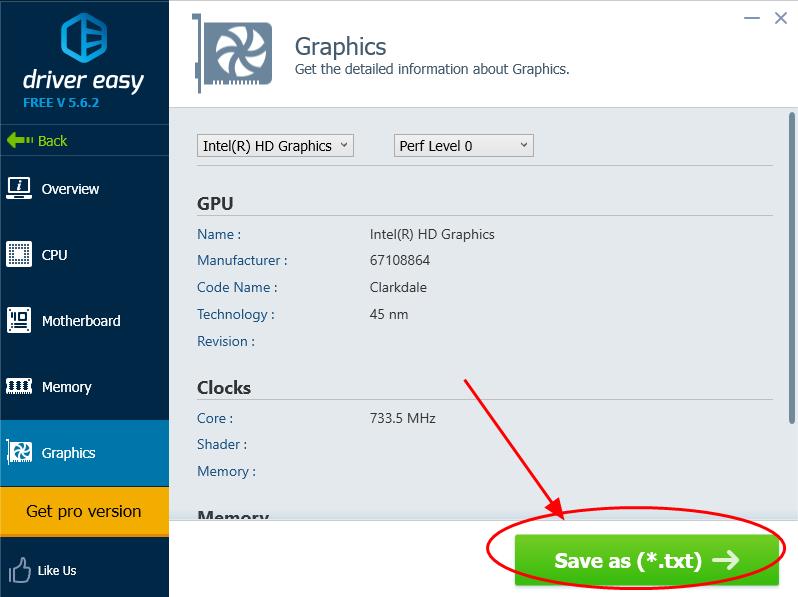
3) Click Graphics, then you’ll see the detailed information of the graphics card in your Windows. You can also have a overview on your computer hardware information, the CPU, the Motherboard, and the Memory information with Driver Easy.
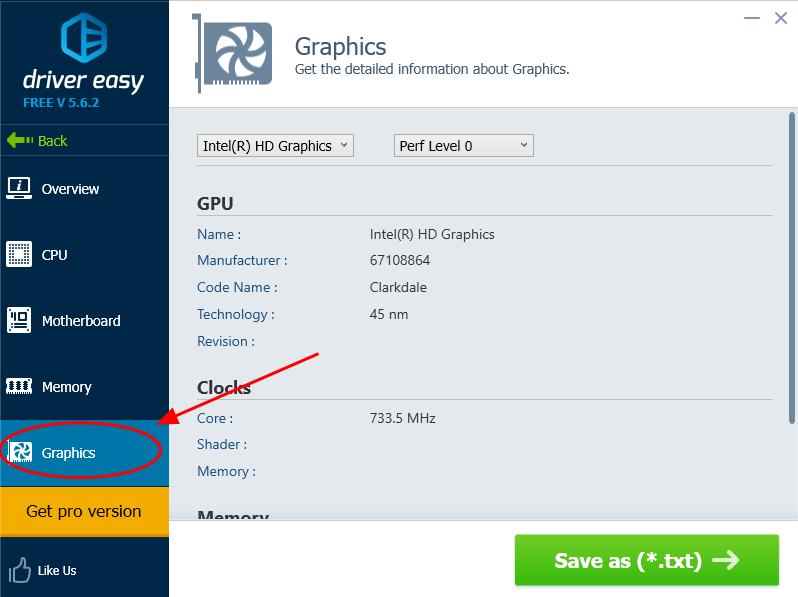
4) If you would like to export the information about the graphics card and save it in your computer, click the Save as (*.txt) button, then you can select a location to export and save the graphics card information as a .txt file in your computer! (This feature requires Pro version, and you will be prompted to upgrade to Pro version once you click the button.)
Automatically solve the driver issues with Driver Easy
Apart from checking the graphics card information, you can also automatically scan the device driver information in your Windows, and update the drivers to provide you with a better performance.
Driver Easy will automatically recognize your system, and solve the problems related with drivers in your computer. As a result, you don’t need to figure out your Windows version, and you don’t need to worry about making mistakes while installing drivers.
1) Run Driver Easy and click Scan Now. Driver Easy will then scan your computer and detect any problem drivers.

2) Click Update next to the flagged drivers to automatically install the correct drivers (you can do this with Free version).
Or click Update All to automatically install the correct drivers that are missing or outdated in your computer (you can do this with Pro version, and you will be prompted to Pro version when you click Update All).
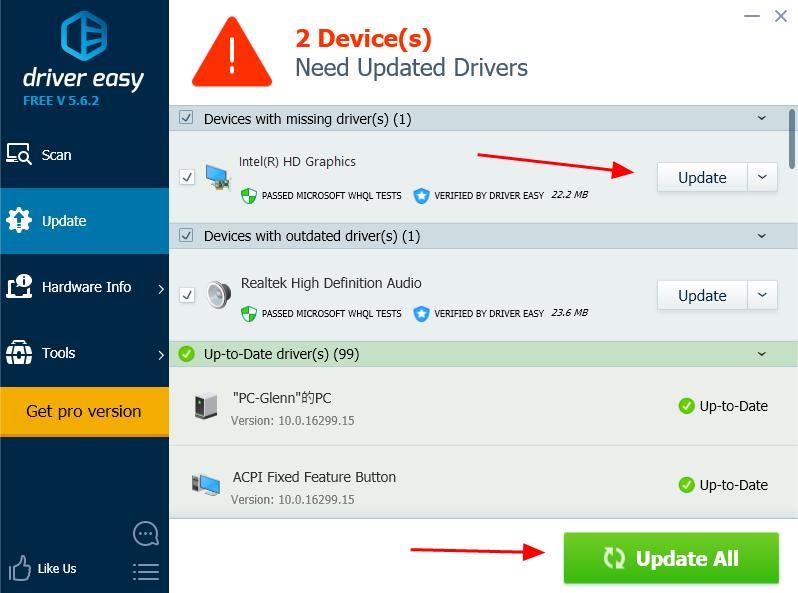
3) Restart your Windows to make it take effect.
Method 2: Check the graphics card in Device Manager
How to find the graphics card information in my Windows? The most direct way to check your graphics card in Windows 10 is in Device Manager. Device manager provides a detailed view of all the Windows recognized hardware in your computer, so you can check the hardware devices from Device Manager, such as the keyboards, sound cards and graphics cards. Follow these instructions:
1) On your keyboard, press the Windows logo key and X at the same time, then click Device Manager.
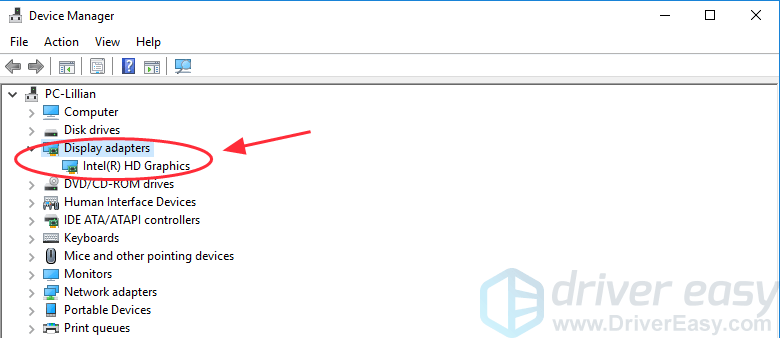
2) Double click Display adapters to expand it, and you will see what graphics card you have in your computer. In my case, I have Intel graphics card installed in my computer.
3) Right click the name of your graphics card, and click Properties. Some people may have more than one graphics card on your computer. In that case, you can select the one that you would like to know and check its details.
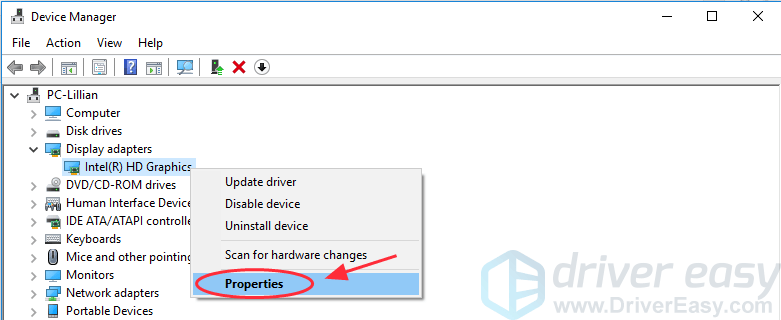
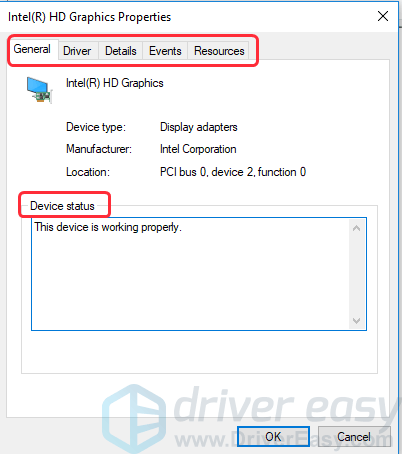
4) Then you should see a new pane about the detailed information of the specific graphics card. You can see its general information, the driver information and more. Further more, you can check the Device status to see if it works normally.
Method 3: Check the graphics card from Display Settings
Another quick access to check your video card is from the Display settings on your desktop. The Display settings allow you to customize your desktop and modify the related settings. Please follow these steps:
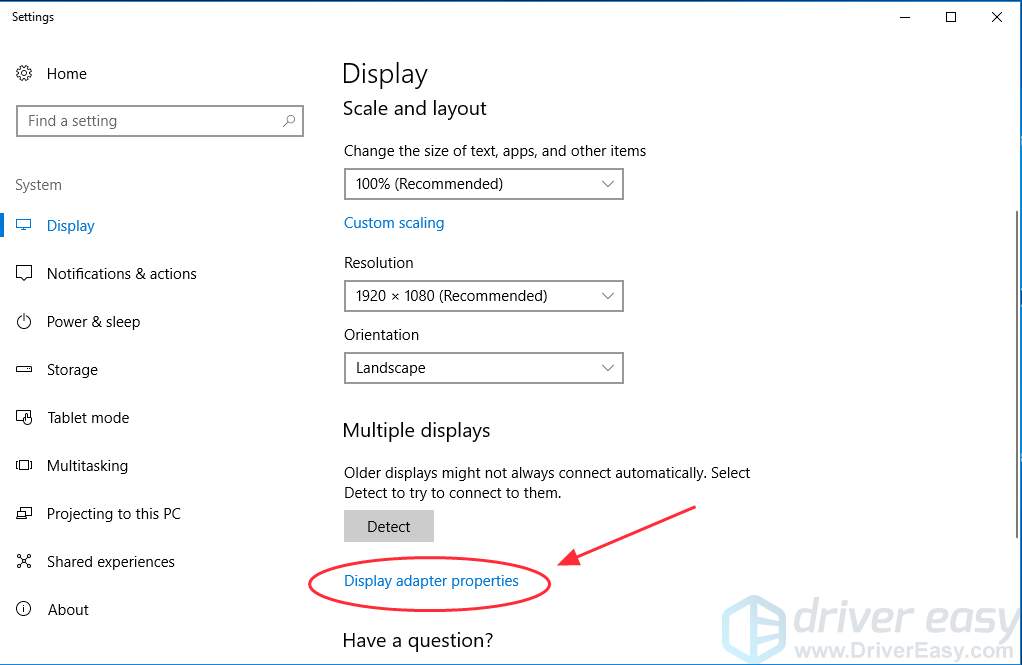
1) Right click the empty area on your desktop, and click Display settings.
2) Scroll down and click Display adapter properties.
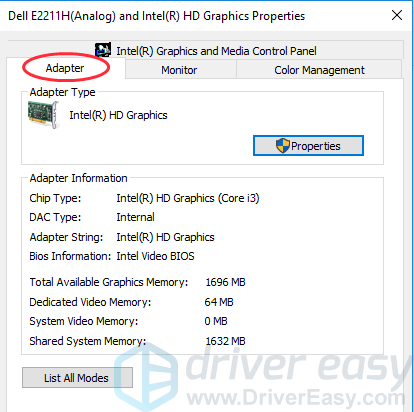
3) In the Adapter tab, you can see your video card information, including the graphics memory details.
Method 4: Check the graphics card by running DxDiag
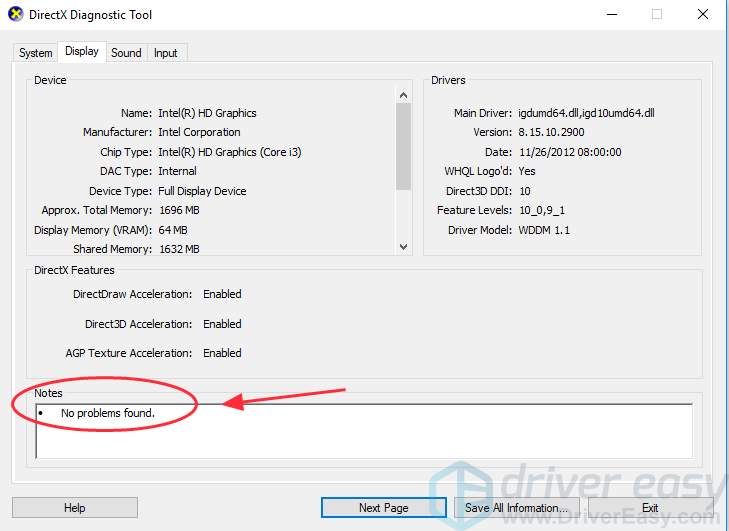
The third method to check your video adapter is to run DxDiag. DxDiag is the short term for DirectX Diagnostic. It’s a helpful tool for you to view the system information about your graphics card and sound card. Follow these steps:
1) On your keyboard, press the Windows logo key and R at the same time to invoke the Run box.
2) Type dxdiag and press Enter.
3) Wait for a few seconds for the app to load the information.
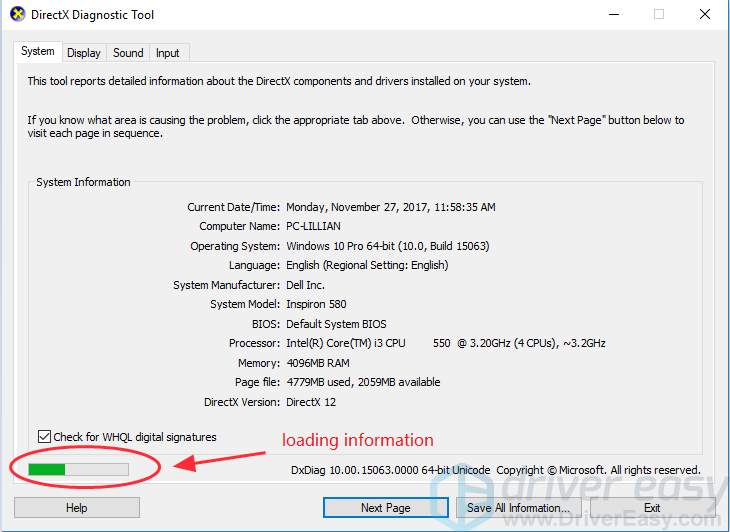
4) Click the Display tab, and you can see the display adapter information, including the driver type, date and version.
Tips: You can also check whether there is any problem with your device in the Notes section.
These are the effective ways about how to check your graphics card in Windows. Which method helps? If you have any question, feel free to let us know and we will see what more we can do to help.
65
65 people found this helpful
Available in other languages
Wenn Sie wissen möchten, mit welcher Grafikkarte ist Ihr PC ausgestattet? Keine Sorge. 4 nützliche Wege für Sie!