
In this walk-through, you will learn how to create a graph using the Windows Form App (WinForm) step by step.
By default, chart control is not available in the toolbox. You have to install first the chart option, then proceed towards CHART preparation.
Create Project using template “Windows Forms App”
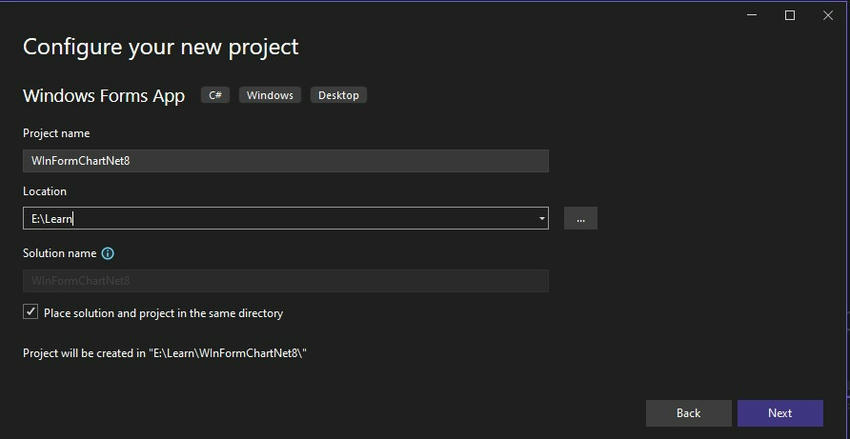
Set your project name and Location, which means the path of the project.

Select Your Framework .Net Version and create the project.
Search the Chart in the toolbox, you will come to know that there is no CHART control.
Install NugGet: System.Windows.Forms.DataVisualization
Right-click on Project and select Manage NuGet packages.
After installation, you can seethe Chart option is visible. Now, drag and drop the chart control on the Form1 canvas.
Double-click on the Form1 canvas area or press F7 on Form1 and enter the following code using the Inside Form1_Laod method.
private void Form1_Load(object sender, EventArgs e)
{
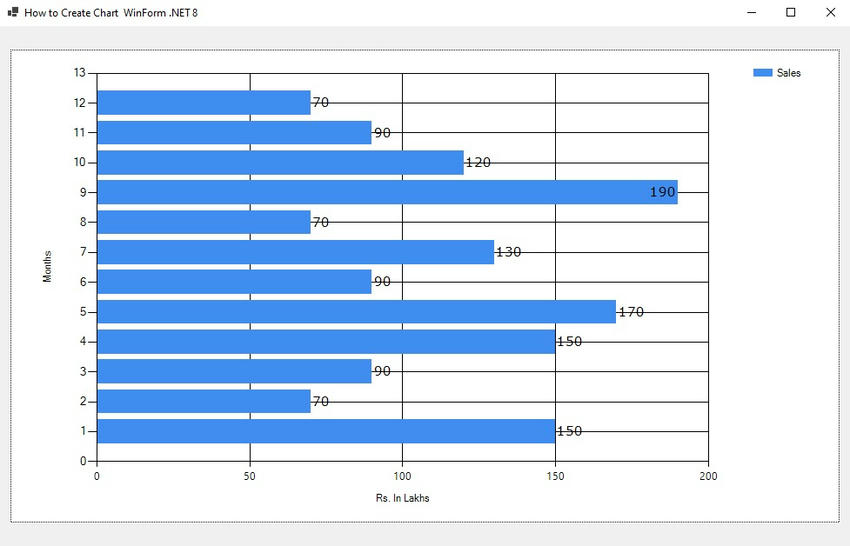
this.Text = "How to Create Chart WinForm .NET 8";
// Clear ChartAreas, Series
chart1.ChartAreas.Clear();
chart1.Series.Clear();
// Create Chart Area
ChartArea chartArea = new ChartArea("GraphArea");
chartArea.AxisX.Title = "Months";
chartArea.AxisY.Title = "Rs. In Lakhs";
// Add Chart Area
chart1.ChartAreas.Add(chartArea);
// Create a Series and set type to Bar
Series series = new Series("Sales")
{
ChartType = SeriesChartType.Bar,
IsValueShownAsLabel = true
};
// Add Data Points
series.Points.AddXY(1, 150);
series.Points.AddXY(2, 70);
series.Points.AddXY(3, 90);
series.Points.AddXY(4, 150);
series.Points.AddXY(5, 170);
series.Points.AddXY(6, 90);
series.Points.AddXY(7, 130);
series.Points.AddXY(8, 70);
series.Points.AddXY(9, 190);
series.Points.AddXY(10, 120);
series.Points.AddXY(11, 90);
series.Points.AddXY(12, 70);
// Add Series to Chart
chart1.Series.Add(series);
// Set Fonts
series.Font = new Font("Verdana", 11);
chart1.ChartAreas[0].AxisY.LabelStyle.Font = new Font("Segoe UI", 9);
}Output
To change the Chart Type, set the following property.
// Create a Series and set type to Bar
Series series = new Series("Sales")
{
    ChartType = SeriesChartType.Line,
    IsValueShownAsLabel = true
};

Happy Coding!
Доброго времени суток! В данной статье мы рассмотрим, как можно создавать графики в WinForms C#.
В качестве платформы примера нужно взять .Net Framework 4.8. Далее в ссылки проекта необходимо добавить
ссылку на сборку System.Windows.Forms.DataVisualization.
Для этого нужно в обозревателе решений нажать правой мыши на элемент меню Ссылки и далее Добавить ссылку.
В открывшемся окне необходимо найти сборку и выделить ее галочкой. В панели элементов должен появиться новый элемент — Chart.
Обратите внимание, что проект должен быть для версии .Net Framework 4.*.
Теперь рассмотрим пример кода:
using System.Windows.Forms;

using System.Windows.Forms.DataVisualization.Charting;
namespace ChartsWinForms
{
public partial class MainForm : Form
{
public MainForm()
{
InitializeComponent();
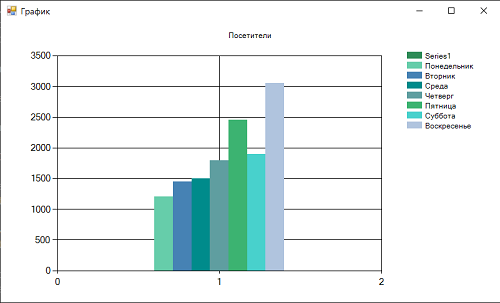
string[] daysOfWeek = { "Понедельник", "Вторник", "Среда", "Четверг", "Пятница", "Суббота", "Воскресенье" };
int[] numberOfVisitors = { 1200, 1450, 1504, 1790, 2450, 1900, 3050 };
// Установим палитру
chart.Palette = ChartColorPalette.SeaGreen;
// Заголовок графика
chart.Titles.Add("Посетители");
// Добавляем последовательность
for (int i = 0; i < daysOfWeek.Length; i++)
{
Series series = chart.Series.Add(daysOfWeek[i]);
// Добавляем точку
series.Points.Add(numberOfVisitors[i]);
}
}
}
}
Таким образом, вот так просто можно создавать графики в WinForms C#.
-
Создано 16.03.2023 13:36:01
-
Михаил Русаков
Копирование материалов разрешается только с указанием автора (Михаил Русаков) и индексируемой прямой ссылкой на сайт (http://myrusakov.ru)!
Добавляйтесь ко мне в друзья ВКонтакте: http://vk.com/myrusakov.
Если Вы хотите дать оценку мне и моей работе, то напишите её в моей группе: http://vk.com/rusakovmy.
Если Вы не хотите пропустить новые материалы на сайте,
то Вы можете подписаться на обновления: Подписаться на обновления
Если у Вас остались какие-либо вопросы, либо у Вас есть желание высказаться по поводу этой статьи, то Вы можете оставить свой комментарий внизу страницы.
Если Вам понравился сайт, то разместите ссылку на него (у себя на сайте, на форуме, в контакте):
-
Кнопка:
Она выглядит вот так:
-
Текстовая ссылка:
Она выглядит вот так: Как создать свой сайт
- BB-код ссылки для форумов (например, можете поставить её в подписи):
Example. Now we can use the Chart. In the next step, we will use the Form1_Load event handler to initialize the Chart we just added. To add Form1_Load, double-click on the Form window in Visual Studio.
Array: In Form1_Load, we assign an array of strings (Series) and an array of integers (Points).
For: In the for-loop, we add the strings to the Series collection and add the integers to the Points collections on those Series.
For
Tip: The loop results in two Series: a Cats series with a Point of 1, and a Dogs series with a Point of 2.
Info: These are reflected in a bar graph, which is shown in this page’s screenshot.
Example that sets Chart control up: C#
using System;
using System.Windows.Forms;
using System.Windows.Forms.DataVisualization.Charting;
namespace WindowsFormsApplication1
{
public partial class Form1 : Form
{
public Form1()
{
InitializeComponent();
}
private void Form1_Load(object sender, EventArgs e)
{
// Data arrays.
string[] seriesArray = { «Cats», «Dogs» };
int[] pointsArray = { 1, 2 };
// Set palette.
this.chart1.Palette = ChartColorPalette.SeaGreen;
// Set title.
this.chart1.Titles.Add(«Pets»);
// Add series.
for
(int i = 0; i < seriesArray.Length; i++)
{
// Add series.
Series series = this.chart1.Series.Add(seriesArray[i]);
// Add point.
series.Points.Add(pointsArray[i]);
}
}
}
}
27
Haz
This example shows how to display your data in your Windows Forms program as a bar graph or spline chart. To achieve this, you use Chart class in System.Windows.Forms.DataVisualization.Charting. Chart control can be found in Toolbox(.NET Framework 4.0 or newer). Older versions will not have the Chart control available.
To add a chart control to your application,
- In design view, open the Toolbox.
- From the Data category, drag a Chart control to the design area.
If you cannot see the Chart control in the Toolbox, right click in the Toolbox, select Choose Items, and then select the following namespaces in the .NET Framekwork Components tab:
- System.Web.UI.DataVisualization.Charting
- System.Windows.Forms.DataVisualization.Charting
Usage:
        void FrmChartExample_Load(object sender, EventArgs e)
        {
            BarExample(); //Show bar chart
            //SplineChartExample();
        }
This method shows how to add a bar chart.
        public void BarExample()
        {
            this.chartControl.Series.Clear();

            // Data arrays
            string[] seriesArray = { "Cat", "Dog", "Bird", "Monkey" };
            int[] pointsArray = { 2, 1, 7, 5 };

            // Set palette
            this.chartControl.Palette = ChartColorPalette.EarthTones;

            // Set title
            this.chartControl.Titles.Add("Animals");

            // Add series.
            for (int i = 0; i < seriesArray.Length; i++)
            {
                Series series = this.chartControl.Series.Add(seriesArray[i]);
                series.Points.Add(pointsArray[i]);
            }
        }
This method shows how to add a spline chart.
        private void SplineChartExample()
        {
            this.chartControl.Series.Clear();

            this.chartControl.Titles.Add("Total Income");

            Series series = this.chartControl.Series.Add("Total Income");
            series.ChartType = SeriesChartType.Spline;
            series.Points.AddXY("September", 100);
            series.Points.AddXY("Obtober", 300);
            series.Points.AddXY("November", 800);
            series.Points.AddXY("December", 200);
            series.Points.AddXY("January", 600);
            series.Points.AddXY("February", 400);
        }
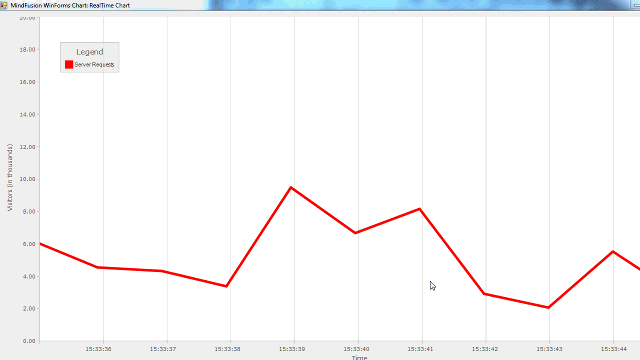
In this sample we will build a line chart that reads its data in real time and gets updated each second.
We start by creating an empty WinForms project. We assume you have installed the Charting for WinForms component and you can see a list with chart components in the VisualStudio toolbox.
Drag the LineChart control and drop it on the form. You should now see references to the three libraries that you need automatically added to your project:
- MindFusion.Charting;
- MindFusion.Charting.WinForms;
- MindFusion.Common;
1. Series and Data
Our chart will render time stamps at the X-axis. That’s why we choose the DateTimeSeries class to create the series for the chart. The constructor requires two lists – one with DateTime values and one with double values. They provide data for the X and Y axes respectively. We must also provide two more parameters: one for the start and one for the end of the time period.
List dates = new List();
List values = new List();
In order to mimic the real-time functionality we will use a timer. Our timer will generate a random number each second. At the beginning we will have a list with no values. Gradually, we will fill the values and once we reach the count of 100 we will start to delete the first value and add a new value at the end of the arrays.
That’s how we initialize the timer:
Random ran;
ran = new Random();

Timer dataTimer = new Timer();
dataTimer.Tick += new EventHandler(GenerateData);
dataTimer.Interval = 1000;
dataTimer.Start();
Let’s look at the GenerateData method:
private void GenerateData(object sender, EventArgs e)
    {
         dates.Add(DateTime.Now);
         values.Add(2 + ran.NextDouble() * 8.0);

         if (dates.Count > 100)
         {
             dates.RemoveAt(0);
             values.RemoveAt(0);
         }
...
}
There we always add the current DateTime. Since the timer ticks every second that’s exactly what we want. Once the values are 100, we start to remove values at the beginning of the list.
Now let’s create the DateTime series. It requires parameters for the start and end of the period. We always allocate the first and last DateTime values as the bounds of the DateTime data for this series:
DateTimeSeries series = new DateTimeSeries(dates, values, dates[0], dates[dates.Count-1]);
Then we see if we have already added a Series and if so – replace it. If no Series has been added – add the new one:
if (lineChart1.Series.Count > 0)
       lineChart1.Series[0] = series;
else
       lineChart1.Series.Add(series);
By default the DateTimeSeries renders its values from the X-axis – the DateTime instances as labels at the X-axis. We can customize how they look with the DateTimeFormat property. The predefined DateTimeFormat members don’t have an option where the values are rendered as “14:23:34” as a time stamp. So, we choose as DateTimeFormat “CustomDateTime” and use the CustomDateTime to specify the format:
series.DateTimeFormat = DateTimeFormat.CustomDateTime;
series.CustomDateTimeFormat = "H:mm:ss";
2. The X-Axis
We want at each moment only the last 10 values to be visible. The other 90 or however they are should be rendered but the user must scroll to see them. We achieve with the MinValue and MaxValue properties of the DateTimeSeries:
series.MinValue = 0;
series.MaxValue = 0.1 * dates.Count;
In order to render only the last 10 series, we use the XAxis properties – MaxValue and MinValue Once the MaxValue of the DateTimeSeries is more than 1, which means that at least 10 values have been added, we adjust the visible range of values at the X-axis so that only the last 10 are visible:
if (series.MaxValue > 1)
  {
      lineChart1.XAxis.MaxValue = series.MaxValue;
      lineChart1.XAxis.MinValue = series.MaxValue - 1.0;
  }
We also set the Title for this axis:
lineChart1.XAxis.Title = "Time";
Let’s hide the numeric values from rendering at the top of the DateTime stamps with the ShowXCoordinates property:
lineChart1.ShowXCoordinates = false;
3. The Y-Axis
By default the range of an axis is calculated based on the data. Let’s make our chart render the line graphics more to the beginning of the axis by increasing the MaxValue of the Y-axis while we fix the MinValue at 0:
lineChart1.YAxis.MinValue = 0;
lineChart1.YAxis.MaxValue = 20;
lineChart1.YAxis.Interval = 2;
We also change the axis Title and we use NumberFormat property to render the intervals with floating points:
lineChart1.YAxis.Title = "Visitors (in thousands)";
lineChart1.YAxis.NumberFormat = "N";
4. Grid
Let’s render vertical grid stripes. We want them to be dashed and light gray. We use GridType GridColor and GridLineStyle to customize the grid:
lineChart1.GridType = GridType.Vertical;
lineChart1.Theme.GridLineStyle = System.Drawing.Drawing2D.DashStyle.Dash;
lineChart1.Theme.GridLineColor = Color.FromArgb(192, 192, 192);
Note that GridColor and GridLineStyle are properties of the Theme property of LineChart add one extra – stop the grid stripes from moving around when the user scrolls the chart along the axis:
lineChart1.PinGrid = true;
5. Legend
The legend gets its labels from the Title property of a Series. In our case we set:
series.Title = "Server Requests";
We would like to change the legend background to make the legend easier to spot:
lineChart1.Theme.LegendBackground = new MindFusion.Drawing.SolidBrush(Color.FromArgb(120, 230, 230, 230));
We use a semi-transparent brush that let’s chart details be visible when the user moves the legend onto another chart element.
6. Line Colors
We want to render the line in red. We choose the MixedSeriesStyle class as the styling class for our application. You can use any other *SeriesStyle class that is appropriate in your case:
// assign a reb brush for the series
lineChart1.Plot.SeriesStyle = new MixedSeriesStyle()
    {
         UniformStrokeThickness = 5,
         UniformStroke = new MindFusion.Drawing.SolidBrush(Color.Red),
         UniformFill = new MindFusion.Drawing.SolidBrush(Color.Red)
     };
With that our sample is complete. You can download the full code with the necessary charting dll-s from this link:
Download the WinForms Real-TimeChart Sample
About MindFusion Charting for WinForms: A versatile dashboard component that provides your WinForms application with the ability to create fascinating charts, interactive dashboards and practical gauges. The component combines a flexible API that allows custom combination of chart components to build any type of chart you want. You can add as many axes of any type you want, combine various chart series into a single chart with different data providers each. The control also supports pan and zoom, scroll, unlimited number of legends, grid and a dashboard panel. Linear and oval gauges complete the tool set and guarantee every feature you might need to build the perfect gauge, chart of any type or dashboard in WinForms is right at your fingertips. Learn more at https://mindfusion.eu/winforms-chart.html