Altering the version name of your Windows operating system can serve multiple purposes such as personalizing your device or simply improving its visibility during presentations. The process may appear complex at first glance, but by following a set of clear steps, you can successfully change the Windows version name. This guide aims to provide detailed instructions on how to change the Windows version name effectively.
Accessing the System Properties
The first step involves accessing the system properties of your Windows operating system. Here’s how to do it:
-
Open ‘Run’ Dialog: Press the
Windows + Rkeys simultaneously to open the Run dialog. -
Open System Properties: Type
sysdm.cplin the Run dialog box and click ‘OK’. This action will open the System Properties window. - Check Current Information: Take a moment to review the current system information, including the version name. This will help you confirm the changes later.
Modifying the Registry
Changing the version name requires editing the Windows Registry, which stores various system configurations. Follow these steps with caution, as incorrect changes in the registry can lead to system instability.
-
Open Registry Editor: Press
Windows + Rto open the Run dialog again, typeregedit, and press ‘Enter’. This will open the Registry Editor. -
Navigate to the Correct Path: In Registry Editor, navigate to:
HKEY_LOCAL_MACHINE\SOFTWARE\Microsoft\Windows NT\CurrentVersionYou can do this by expanding the folders on the left side.
-
Locate ProductName: In the right pane, look for the entry named
ProductName. This entry holds the current version name of your Windows operating system. - Edit the ProductName: Right-click on
ProductNameand select ‘Modify’. A dialog box will appear where you can edit the text. Change the existing version name to your preferred name and click ‘OK’ to save the changes.
Updating the Edition ID (Optional)
If you want to change the edition identifier (for example, from Windows 10 Home to Windows 10 Professional), you can modify the EditionID entry as well.
-
Find EditionID: In the same key, locate the
EditionIDentry. - Modify the EditionID: Right-click
EditionIDand select ‘Modify’. Change the value to your desired edition name and confirm the action.
Restarting the System
After making the necessary changes in the Registry Editor, it is crucial to restart your computer so that the modifications take effect.
-
Close All Applications: Ensure that all open applications are closed to prevent any loss of data.
- Restart Your Computer: Click the Windows icon, select ‘Restart’, and wait for your computer to reboot.
Verifying the Changes
Once your computer has restarted, it’s important to verify that your changes have been implemented successfully.
-
Access System Properties Again: Repeat the process of opening the System Properties by typing
sysdm.cplin the Run dialog. - Check the Version Name: In the System Properties window, ensure that the version name reflects the modifications made earlier.
How Do You Change Windows Version Name
This section specifically addresses how do you change Windows version name through the Windows Registry. Following the steps outlined above provides the desired modifications. Remember to back up your registry before making any changes to prevent possible issues.
Frequently Asked Questions
1. Will changing the version name affect system performance?
Changing the version name itself does not affect system performance or functionality. However, incorrect changes to the registry can lead to issues if not handled properly.
2. How can I back up the registry before making changes?
To back up the registry, open the Registry Editor, click on ‘File’ in the top menu, and select ‘Export’. Choose a location to save the backup, ensuring to select ‘All’ under Export range in the dialog box.
3. Is it possible to revert the changes I made?
Yes, you can revert the changes by following the same steps outlined for modifying the registry and resetting the ProductName and EditionID to their original values. Alternatively, you can restore from the registry backup you created.
About the author
Raj Singh is an expert in operating systems such as Android, Ms Windows, Mac OS, Linux, and more. He simplifies complex system management tasks, offering guidance on optimizing and troubleshooting these platforms. With a focus on efficiency and customization, Raj helps individuals and businesses make the most of their operating environments. His technical expertise extends to creating tailored solutions for diverse needs, ensuring seamless operations and problem-solving across various platforms. Passionate about technology and innovation, Raj is dedicated to helping users unlock the full potential of their systems.
You may also like
В Windows 10 Pro последней версии из параметров исчезла возможность отложить обновление компонентов (обновление до новой версии Windows 10), в домашней версии этой возможности не было и раньше. Однако в случае, если на вашем компьютере установлена именно Pro версия системы, вы можете указать целевую версию ОС в реестре, и Windows 10 не будет обновляться до более новых версий.
В этой инструкции о том, как именно указать нужную версию Windows 10 Pro с помощью соответствующих параметров реестра, отключив тем самым обновление до более новых версий раз в полгода. Другие материалы об отключении различных обновлений: Отключение обновления Windows 10 и Windows 11 до новой версии в программе InControl, Как отключить обновления Windows 10.
Отключение обновлений Windows 10 Pro до новых версий
Все необходимые параметры вы можете задать с помощью редактора реестра:
- Запустите редактор реестра (Win+R, ввести regedit).
- Перейдите к разделу реестра
HKEY_LOCAL_MACHINE\SOFTWARE\Policies\Microsoft\Windows\WindowsUpdate
При отсутствии указанного подраздела, создайте его (правый клик по разделу «Windows» — создать раздел).
- В этом разделе создайте параметр DWORD (32-бит, даже для 64-бит Windows) с именем TargetReleaseVersion и укажите значение 1 для параметра.
- Создайте новый строковый параметр с именем TargetReleaseVersionInfo и укажите номер версии. Например, «2004» или «1909» (без кавычек), если вы не хотите получать следующих обновлений компонентов Windows 10.


Обратите внимание: функция поддерживается начиная с версии 1803, при этом в качестве целевой версии вы можете указать либо текущую, либо более новую версию системы, но не одну из предыдущих (например, если у вас установлена версия 2004, а в целевой указана 1909, эффекта не будет).
Готово, с этого момента система не будет получать обновлений до версии выше указанной. При необходимости отменить изменения, просто удалите созданные параметры реестра.
Если вы не хотите вручную менять параметры реестра, то просто создайте reg-файл со следующим содержимым и импортируйте его в реестр:
Windows Registry Editor Version 5.00

[HKEY_LOCAL_MACHINE\SOFTWARE\Policies\Microsoft\Windows\WindowsUpdate]
"TargetReleaseVersion"=dword:00000001
"TargetReleaseVersionInfo"="2004"
Этот файл устанавливает версию Windows 10 2004 в качестве целевой. Также может оказаться полезным: Программы для управления обновлениями Windows 10.
Recommended Posts
Posted
I recall discussions, a few years ago, somewhere, about using regedit to modify Windows version info that would trick *some* programs into installing. I have tried googling to no avail. I have already switch the info that IE pumps out (user strings).
I have a feeling that it this
HKEY_LOCAL_MACHINE\Software\Microsoft\Windows\CurrentVersion
that should be modified, but am uncertain.
Does anyone know what I am talking about? If so could you tell me how to do this, or point me to a link? I am using Win98 SE and want to put info in for WinXP sp2.
Thanks,
SW
Posted
I don’t know how or if you can do that, but if you are trying to install a program that uses an msi installer you can use the Orca msi editor to modify the installer. I did this with Doom 3 for example, worked fine after that. There are tutorials that tell how to use it and you can find out where to get it here if you want:
http://support.installshield.com/kb/view.a…ticleid=q107066
Posted
I did this trick with Win98 FE so Media Player 9 thought it was Win98 SE and it worked!
This will only work for programs that only check the registry to deterine if the program is allowed to install/run. It won’t allow all programs that require additional resources ffrom the NT/2000/XP kernell etc.
I’ll have a look to see if I can find what I did.
Posted
click on Windows Start button. Select Run. Type,
regedit
Double click on the following folders in the correct order;
HKEY_LOCAL_MACHINE
Software
Microsoft
Windows
CurrentVersion
In the right section in the Name column, double click on the following names and change their data value to:
ProductName Microsoft Windows 98 Second Edition
Version Windows 98SE
VersionNumber 4.10.2222
or
ProductName Microsoft Windows ME
Version Windows Millennium Edition
VersionNumber 4.90.3000
or
ProductName : Microsoft® Windows ® 2000 Operating System
VersionNumber : 5.00.2195.7035
Version Windows 2000 Professional
Hit OK after changing each value. Close Regedit.
Not sure if Changing them to Windows 2000/Xp values is a good idea?
- Author
Posted
(edited)
That’s the ticket, I’m looking for XPsp2 info though. Thanks for replying does anyone know what to put in for Xp? And should the go into Windows NT\CurrentVersion
Edited by Steven W
Posted
dont think orca works on 98se
Posted
dont think orca works on 98se
Maybe older versions if any exists.
Guest TM0d
Posted
dont think orca works on 98se
Maybe older versions if any exists.
I don’t think that there are older version cuz ORCA is the part of a kit (forgot the name) and Microsoft usually puts up a test (Beta) version of «independent» programs…
Posted
(edited)
Only Orca 1.x + 2.x work under 9x OSes, Orca 3.x does not.
- 7 years later…
Please help!
Link 2 «2. Install Orca 1.10.1124: download Installer SDK 1.1:» not work.
P.S. I’m sorry for my english
This works: IntelSDK 1.1 (but, then again, the second link already provided does so, too).
Please sign in to comment
You will be able to leave a comment after signing in
Sign In Now
· Hot!

Last month, we covered an unofficial utility that lets Windows users in-place upgrade from one Windows edition, say Home to Pro, without having to go through a clean installation. The utility is called «Helper-Tool für Windows 10/11 Inplace-Upgrades und Editionswechsel» which translates to «Helper tool for Windows 10/11 inplace upgrades and edition changes». You can read about it in full in our dedicated coverage.
However, those who don’t want to fiddle around with an unofficial app and would much rather prefer safely tweaking with the Registry instead are in for a treat. Windows enthusiast and X (formerly Twitter) user Bob Pony has shared the way to do this. The same user recently shared a one-click trick to bypass the Windows 11 system requirements check on LTSC.
Switching the Edition using the Registry Editor involves changing the value of the subkey EditionID to «Core.» On a system that is already running Windows 11/10 Pro, the value of EditionID is set to «Professional.»
The CurrentVersion Registry key address is given below:
HKEY_LOCAL_MACHINE\SOFTWARE\Microsoft\Windows NT\CurrentVersionDid you know that it’s possible to downgrade from Windows 10/11 Pro and higher to Windows 10/11 Home?
Simply change the EditionID value to Core, located in HKLM\SOFTWARE\Microsoft\Windows NT\CurrentVersion in Registry Editor (regedit) then run Windows 10/11 Home setup exe file. pic.twitter.com/xgB9cTMRaU
— Bob Pony (@TheBobPony) April 15, 2024
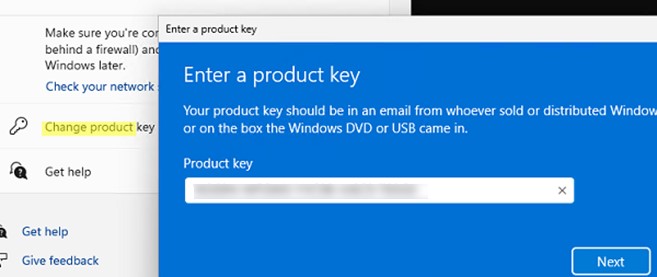
Upgrading from Windows 10/11 Home to Pro or higher edition is easy! Just simply change your Windows product key by going to the Settings app and go to activation page then click Change product key, now enter your Windows 10/11 Pro or higher edition product key there. pic.twitter.com/XB1iL6vwpI
— Bob Pony (@TheBobPony) April 15, 2024
Again, tweaking the Registry must be done safely and it’s best to create a backup before proceeding with the Registry Editor (regedit) in case something goes wrong.
While we are on the topic of Registry tweaks, Microsoft, last week, published its official mitigation enabler for Spectre variant 2 security vulnerability that is rearing its head up again. If you have an Intel 6th Gen (Skylake) and newer CPU, you can find those details here.
В этой статье мы покажем, как повысить младшую редакцию (издание) Windows 10 или 11 до более старшей версии без переустановки операционной системы с сохранением всех установленных программ, настроек и документов. Это позволит пользователю обновить редакцию Windows с Home до Pro или Enterprise.
Обновить домашнюю редакцию Windows 10/11 Home до Professional
Откройте командную строку и проверьте текущую версию и редакцию Windows:
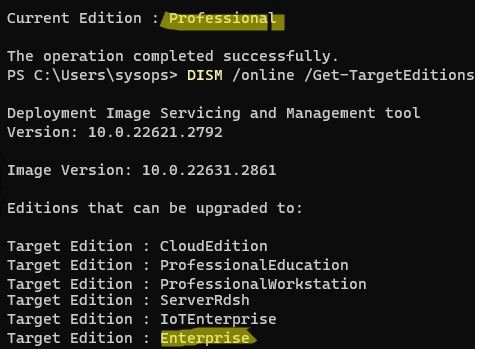
DISM /online /Get-CurrentEdition

В этом примере на компьютере установлена домашняя Home редакция Windows 10 ( в Windows 11 домашняя редакция называется Core).
Выведите список редакций, до которых можно обновить вашу версию Windows:
DISM /online /Get-TargetEditions
В списке есть редакция Professional, до которой мы хотим обновить ОС.
Чтобы выполнить обновление Home редакции до Pro, воспользуйтесь встроенной утилиты Changepk.exe. Запустите эту команду и выберите Change product key и укажите приобретённый вами ключ для Windows 10/11 Professional. Подтвердите апгрейд редакции.
Если у вас пока отсутствует приобретенный ключ для Windows Pro, укажите ключ
VK7JG-NPHTM-C97JM-9MPGT-3V66T
, который используется при установке Windows 10 и 11 Pro с пропуском ввода ключа (в ознакомительном режиме, без активации).
Вы можете очистить предыдущий ключ и задать новый из командной строки:slui.exe /upk
changepk.exe /ProductKey xxxxxxxxxxxxxxxx
После этого перезагрузите компьютер, чтобы начать обновление редакции.

После перезагрузки проверьте, что редакция Windows была обновления до Professional.
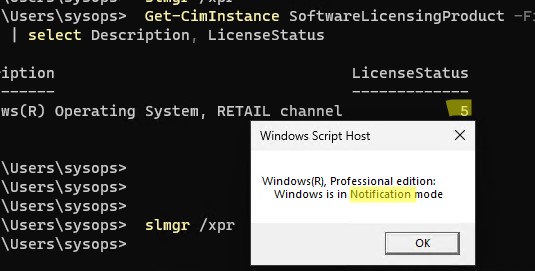
Если вы использовали временный ключ, указанный выше, ваша Windows не будет активирована до тех пор, пока вы не введете приобретенный ключ активации. Проверить статус активации Windows можно с помощью команды:
slmgr /xpr
Значение 5 (Notification mode), указывает что срок ознакомительного использования Windows окончен.
Вы можете только апгрейдить редакции Windows 10/11 (например, Home -> Pro или Home -> Education). Сценарий даунгрейда доступен для Education -> Pro и Enterprise -> Pro). LTSC редакцию Windows 10 можно обновить до Enterprise или более новой LTSC.
Изменить редакцию Windows 10 или 11 с Pro до Enterprise
Если вы хотите обновиться с Professional редакции Windows 10/11 до Enterprise:
- Проверьте текущую редакцию:
DISM /online /Get-CurrentEdition - До каких целевых редакций возможно обновление:
DISM /online /Get-TargetEditions
- Укажите ваш ключ для Enterprise редакции в следующей команде:
Changepk.exe /ProductKey NPPR9-FWDCX-D2C8J-H872K-2YT43 - Через одну-две минуты редакция вашей Windows 10 изменится на Enterprise (подтверждение и перезагрузка не требуется). Осталось только активировать вашу Windows онлайн (если у вас есть свой ключ) или на KMS сервере (если вы использовали GVLK ключ).