The following content dissertated by MiniTool Software explains what downgrading from Windows 10 Enterprise to Pro is, why users need to do that, and most significantly how to achieve that without reinstalling personal applications.
What Does “Downgrade Windows 10 Enterprise to Pro” Mean?
Downgrading Windows 10 Enterprise to Pro refers to replacing your current Windows 10 Enterprise edition operating system (OS) with a lower Windows 10 Professional edition. Since Win10 Pro is less advanced than Win10 Enterprise, we usually regard this change as downgrading. On the contrary, to change Windows Pro to Enterprise, people call it “upgrade”.
Why Need to Downgrade Windows 10 Enterprise to Pro?
Users usually upgrade Windows 10 Pro to Enterprise to enjoy more features and better services for advanced tasks or gaming. However, why do some people want to change from Windows 10 Enterprise to Pro? There are several reasons.
- Users encounter some problems while using Windows 10 Enterprise system.
- Users don’t need the special services of Windows 10 Enterprise OS anymore.
- Users mistook Win 10 Enterprise with Win 10 Pro and installed it.
- Dismissed employees are not allowed to use the Enterprise license belonging to the company.
How to Downgrade from Windows 10 Enterprise to Pro?
Next, we will talk about how to downgrade Windows 10 Enterprise to Windows 10 Pro step by step. Please do exactly as what is described below.
Before starting, you need to do some preparations. On the one hand, you need to get a Windows 10 Pro license to register the PRO version you are going to install. On the other hand, you have to back up important data, especially personal files/folders, that you don’t want to lose during the downgrading process, which requires a clean installation of the system that erases all apps and files.
To create a backup of crucial files and tools, you will need a professional and reliable data backup program like MiniTool ShadowMaker, which enables you to back up vital items quickly and freely.
MiniTool ShadowMaker TrialClick to Download100%Clean & Safe
The following solutions not only apply to Windows 10, but also Windows 11, 8.1, 8, 7.
#1 Downgrade Windows 10 Enterprise to Pro by Changing Product Key
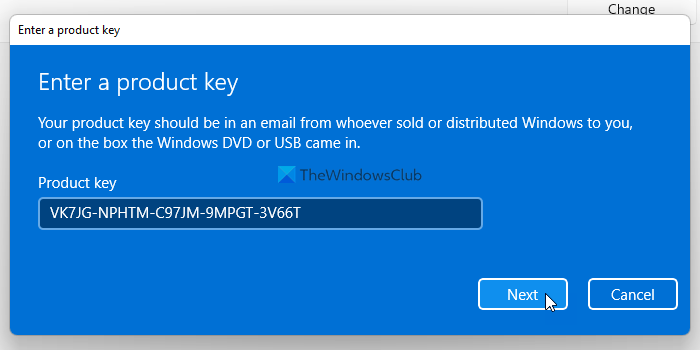
The easiest way to turn Win10 Enterprise into Win10 Pro is to alter the Windows Registration key. However, you need to rely on a generic product key below as transit.
- For Windows 10 Pro: VK7JG-NPHTM-C97JM-9MPGT-3V66T
- For Windows 10 Pro N: 2B87N-8KFHP-DKV6R-Y2C8J-PKCKT
Now, let’s see how to downgrade Windows 10 Enterprise to Pro:
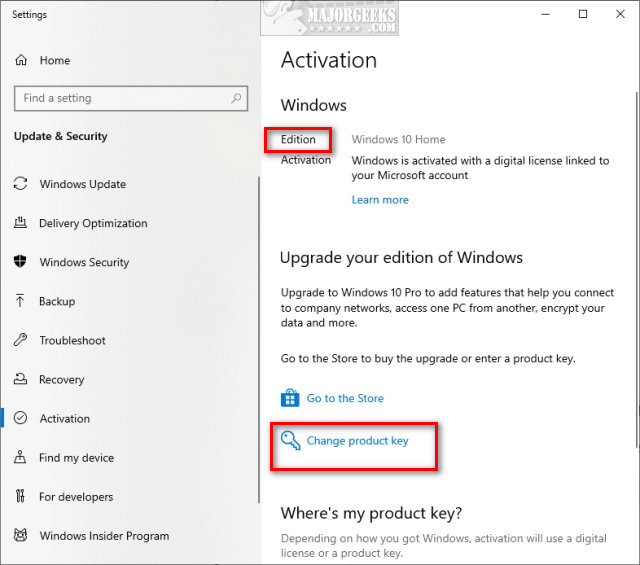
- Navigate to Windows 10 Enterprise Settings > Update & security > Activation.
- In the right section, click on the Change product key option.
- Next, input the Windows 10 Pro generic product key above into the column.
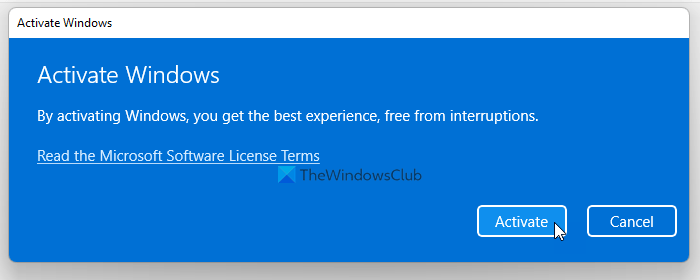
- Confirm the change with the Activate button.
If your Enterprise edition is upgraded from Pro before, you will be activated directly to the Pro edition after the above steps. If not, you have to further activate your system with a valid Windows 10 Pro license key that you should have got in the above preparation.
#2 Convert Windows 10 Enterprise to Pro Through Installation ISO
Secondly, you are able to replace Win10 Enterprise with the Pro edition using Windows 10 Pro installation ISO file.
- Get a Win10 Pro Installation ISO file.
- Click on the ISO file to open it.
- Double-click on exe to launch it.
- Then, it will notify you about system updates. You can choose either Download and install updates or Not right now.
- Accept applicable notices and license terms.
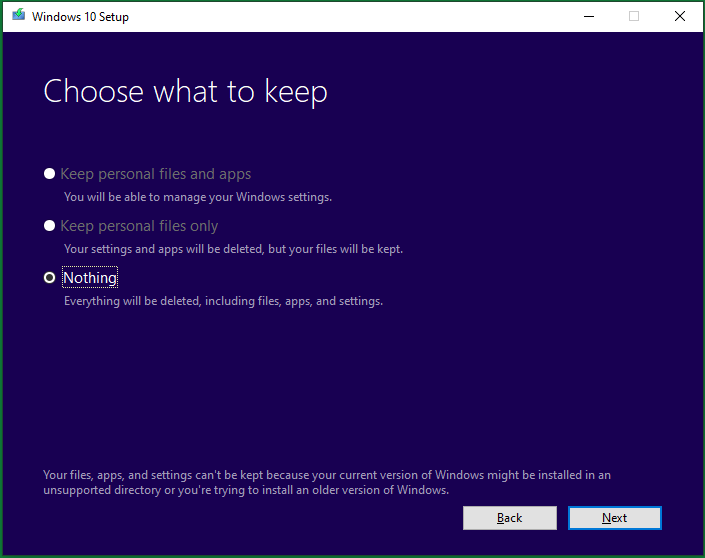
- Choose what to keep, keep personal files and apps, keep personal files only, or nothing.
Then, just follow the guidance to carry out the rest steps.
#3 Downgrade Windows 10 Enterprise to Pro in Media Creation Tool
Media Creation Tool is a Microsoft official program that can help you directly download all editions of Windows 10 automatically with its own downloader. With it, you do not need to manually find the official webpage and download the system you want.
For an important preparation, you have to change some settings in the registry. Go to Computer\HKEY_LOCAL_MACHINE\SOFTWARE\Microsoft\Windows NT\CurrentVersion in your Registry Editor, change ProductName string’s value from Windows 10 Enterprise to Windows 10 Pro and alter EditionID string’s value from Enterprise to Professional.
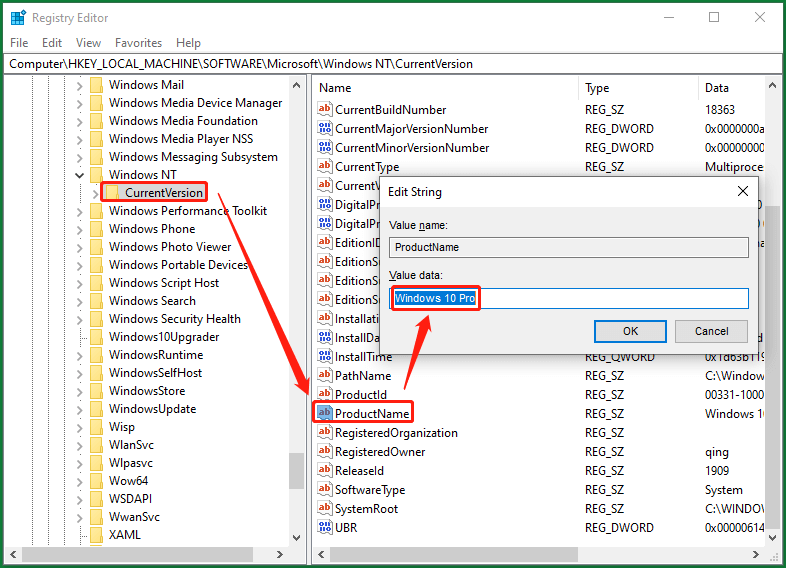
This preparation is to enable Media Creation Tool to automatically download Windows 10 Professional’s installation files in the below process.
- Download Media Creation Tool onto your PC.
- Then, double-click on the exe to start the process.
- Accept the applicable notices and license terms.
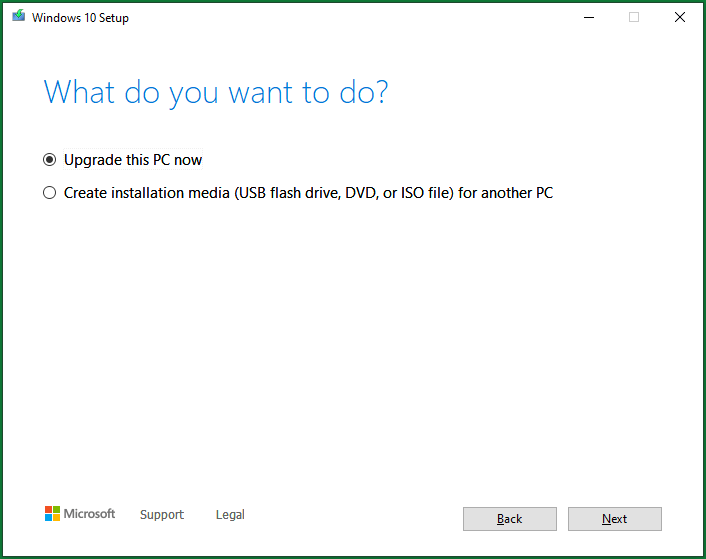
- Choose Upgrade this PC now and wait patiently to let it download Windows 10 necessary files and create Windows 10 media.
Then, just follow the on-screen instructions to finish the task.
#4 Change Windows 10 Enterprise to Pro with Installation Media
To downgrade from Win10 Enterprise to Pro with an installation device, you can carry out the operations on the target computer with the same preparations as described in the above Method 3. Or, you can perform the task on a Windows 10 Pro PC if you have one without those preparations.
No matter on which machine, just select Create installation media (USB flash drive, DVD, or ISO file) for another PC in the fourth step in the above method 3. Then, specify the language, edition, and architecture. Next, select which kind of installation media you’d like to create, USB flash drive or ISO file. Then, just follow the guide to finish.
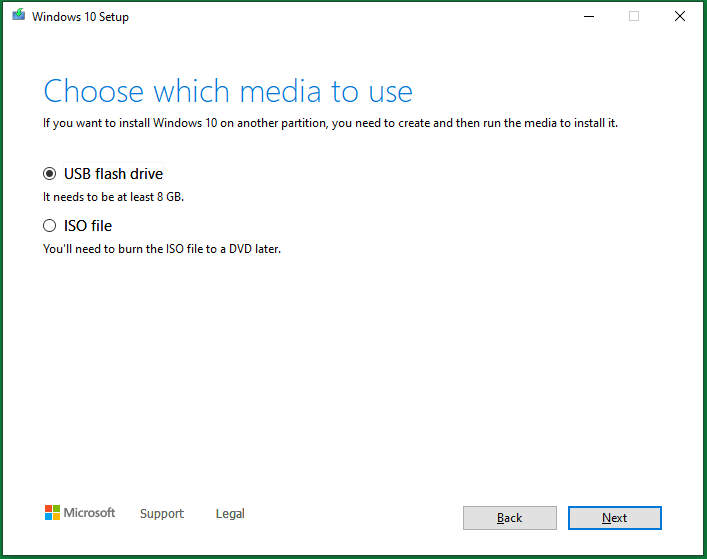
If you choose a USB flash drive, you need to prepare a blank USB with no less than 8 GB storage space and insert it into your computer. If there are important files within the USB, just move them out or back them up with MiniTool ShadowMaker.
MiniTool ShadowMaker TrialClick to Download100%Clean & Safe
If you select an ISO file, just pick up a location to save the ISO image and later burn it into a USB or CD/DVD for use with Windows Disc Image Burner.
Then, you can clean install Windows 10 Pro on your computer with the installation USB/CD/DVD.
#5 Downgrade Windows 10 Enterprise to Pro via Backup and Restore
Finally, if you have another computer running Windows 10 Pro edition, you can create a backup of the system and restore the backup to Windows 10 Enterprise PC. This will rely on MiniTool ShadowMaker mentioned above.
For preparation, you need to connect 2 USB disks to the Win10 Pro PC, one for storing the system image and one for creating bootable media.
- Download and install MiniTool ShadowMaker on the Win10 Pro machine.
- Launch the tool. If it asks for purchase, click the Keep Trial option to continue using it for free.
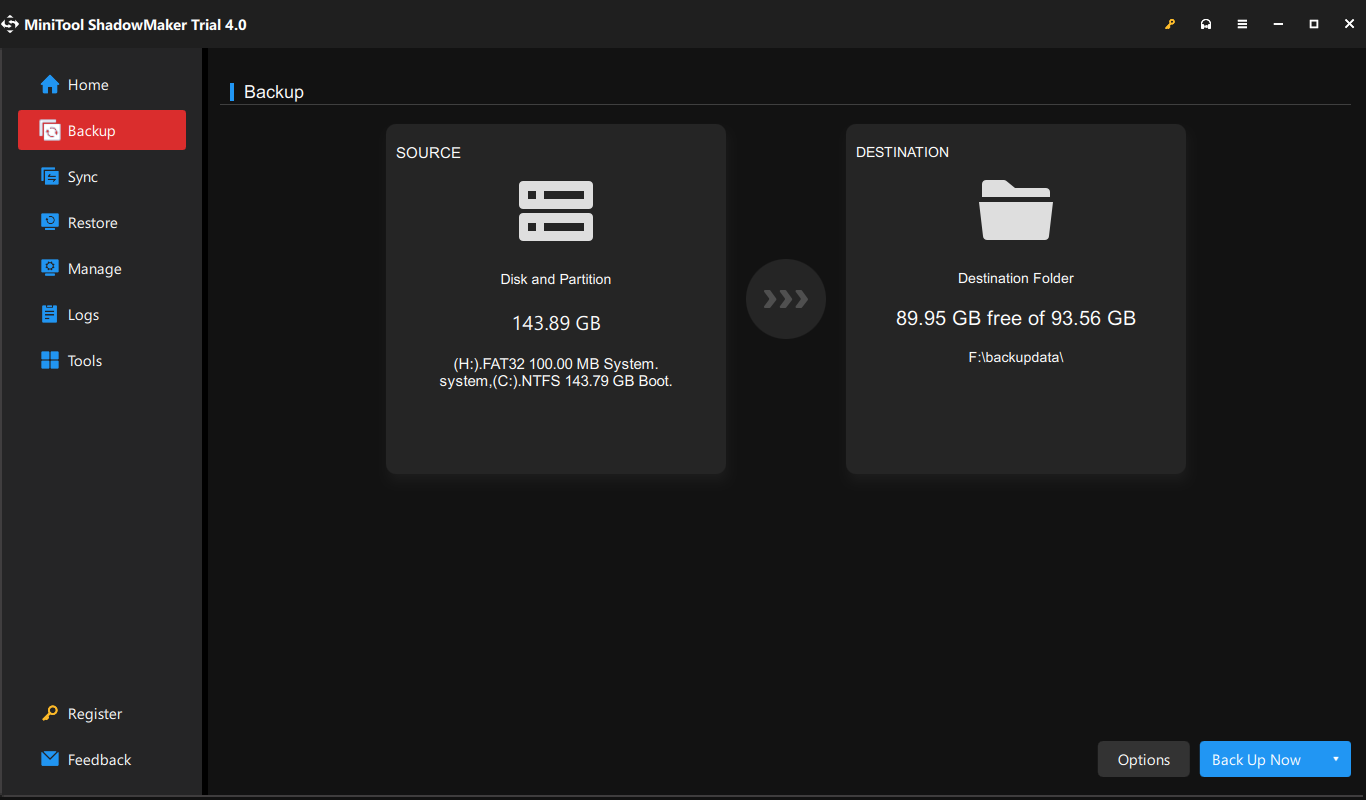
- In its main interface, move to the Backup tab.
- In the Backup tab, the source for system backup is selected by default.
- Click on the Destination module to select a USB hard drive to save the system image.
- Click Back up Now to start.
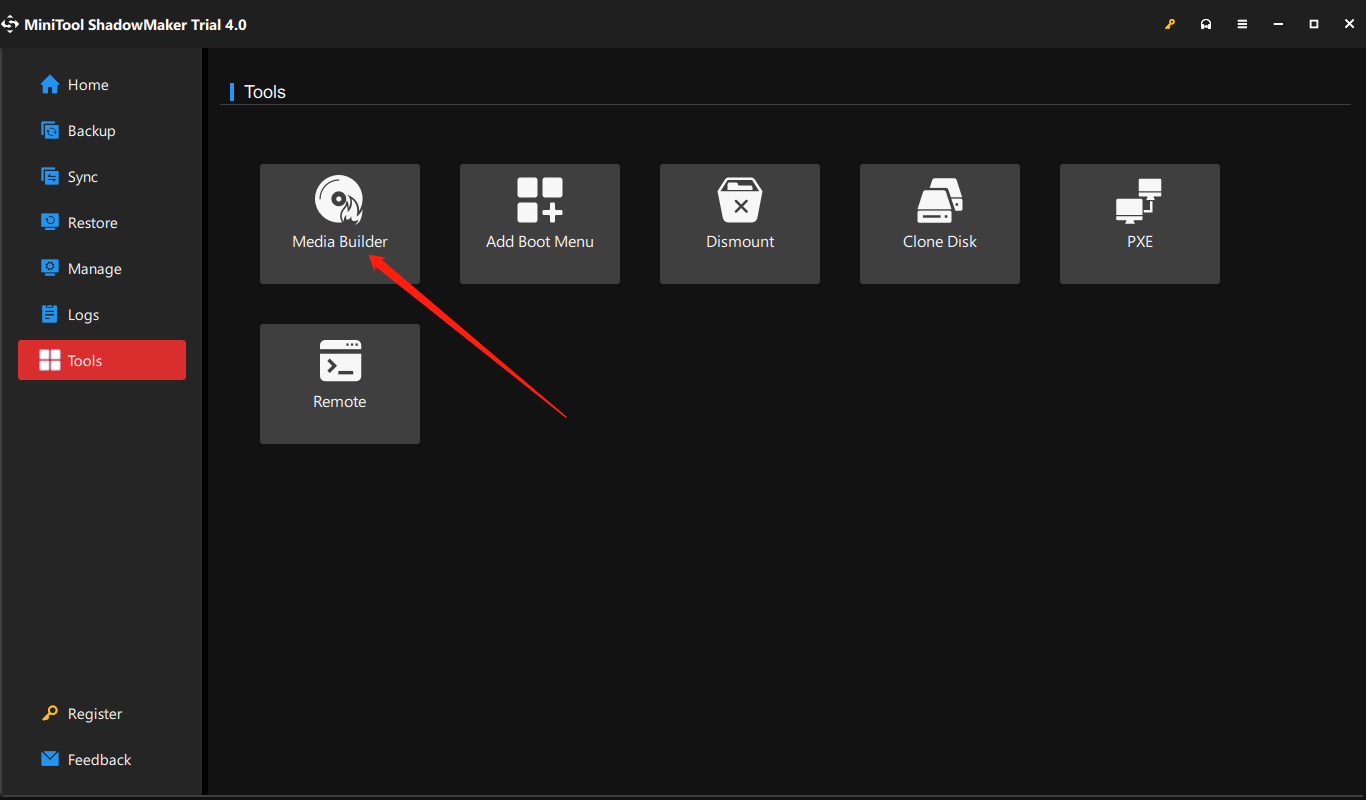
Wait until the process completes. Then, you need to create a bootable media with MiniTool ShadowMaker to boot Win10 Enterprise computer into Windows PE (Windows Preinstallation Environment) to conduct system restore. Just go to the Tools tab and select Media Builder to follow the instruction.
Next, connect the two USB disks to the Win10 Enterprise computer and set up the machine to boot from the bootable USB in its BIOS. When you successfully boot up from the bootable USB, you will enter WinPE and MiniTool ShadowMaker will open automatically.
- Switch to the Tools tab in MiniTool ShadowMaker.
- Click on the Universal Restore option, which improves the chance of system bootability after restoration compared to normal system restore.
- Then, follow the guide to finish the system restoration to a different computer.

Wait until the whole process completes. In this way, you have managed to alter OS from Enterprise to Pro.
Windows 10 Enterprise vs Pro
In general, Windows 10 Enterprise is almost identical to Windows 10 Pro and event to Windows 10 Home in terms of user interface (UI) except for the name in Windows Settings and the config screen. As for function, the advanced Win10 Enterprise system provides more features than the Win10 Pro system, which offers more utilities than Win10 Home.
The following are the features that are only available in Windows 10 Enterprise compared with Windows 10 Pro.
- DirectAccess: It is a VPN-type component that allows automatic VPN connections every time a user connects directly to the network while increasing security through an encrypted session.
- AppLocker: It enables you to create AppLocker rules in the Local Security Policy editor by setting up a whitelist and blacklist for programs as you preferred.
- App-V (Application Virtualization): It permits system administrators to create virtual instances of apps in a container. Then, Windows can run those programs in a self-contained virtual environment.
- UE-V (User Experience Virtualization): It enables users to save their system and app settings as they move from one computer to another so as to work in the same Windows environment.
- WTG (Windows To Go): It allows users to install Windows onto a USB flash drive or an external hard disk. So, you can plug the USB into any other computer and boot from it to work under a familiar system.
Knowing the above features that are embedded in Win10 Enterprise OS but not in Win10 Pro OS, you may have an impulse to upgrade from Windows 10 Pro to Enterprise to enjoy them. However, it’s somehow troublesome to upgrade a system that is similar to downgrade a system described above. If you really want some features above like Windows To Go, you can rely on third-party programs such as MiniTool ShadowMaker mentioned above to help you create bootable media.
MiniTool ShadowMaker TrialClick to Download100%Clean & Safe
As for Windows Enterprise or Pro, which is better or which to choose, it’s hard to say. They are just two editions of the Windows operating system for users with different needs. You need to select the one that suits you most.
Verdict
That is all about downgrading Windows 10 Enterprise to Pro. Hope you can understand the information and manage to degrade Windows 10 Enterprise to Pro. If you have any different ideas or want to share something about this topic, just leave a comment below. If you encounter any problem while using MiniTool ShadowMaker, just contact [email protected].
Also read:
- Can You Use Filter on Snapchat Video Calls? Yes or No?
- What’s the Best Frame Rate for 4k Video? 60 FPS or 50 FPS?
- How to Tag/Untag Photos on Facebook & Hide/See Tagged Photos?
- Windows 11 Video Editor Fade out/in: Movie Maker/Photos/Clipchamp
- [7 Fixes] Windows 11 Can’t Find Camera or Camera Doesn’t Work
Many users opt to downgrade from Windows 10 Enterprise to Pro, not because one is better, but because each serves different needs. Enterprise is built for large organizations with advanced security and management features, while Pro is ideal for small businesses and power users, offering essential tools. Moreover, Enterprise requires a volume licensing agreement, making it less suitable for personal or small business use. In contrast, Pro provides advanced features with more flexibility.
If you want to change from Windows 10 Enterprise to Pro, you can either enter a valid product key or perform a clean installation. This guide will walk you through both downgrade methods and everything you need to know when downgrading.
How to downgrade Windows 10 Enterprise to Windows 10 Pro
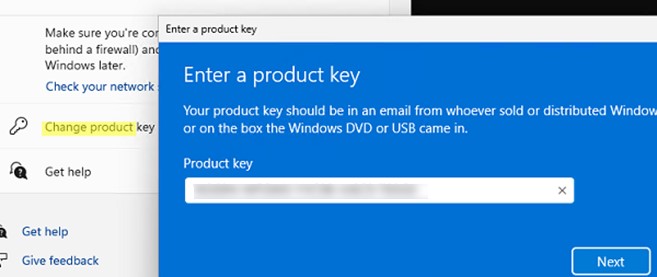
Option 1: Downgrade using a Windows 10 Pro product key (Without reinstalling Windows)
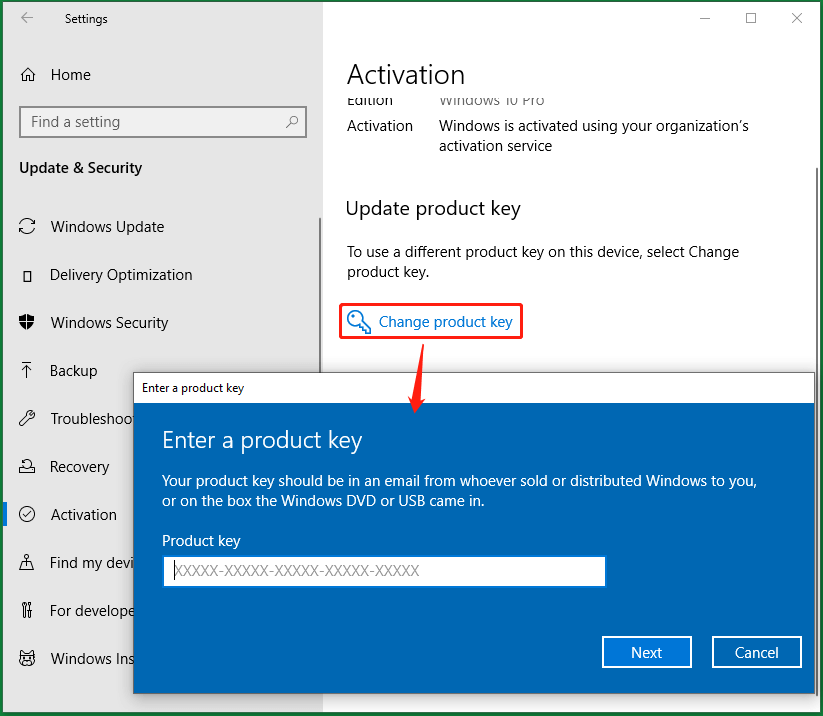
- Press Windows + I to open Settings.
- Go to Update & Security > Activation > Change product key.
- Enter a valid Windows 10 Pro product key.
- Tap Next and follow the on-screen instructions.
- Restart the system to complete the downgrade process.
Option 2: Perform a clean installation of Windows 10 Pro (Recommended if no product key is available)
Before performing a clean installation, backup all your essential data to an external drive or cloud storage to prevent data loss.
Download the Windows 10 Installation Media
- Go to the Download Windows 10 page on the official Microsoft website.
- Navigate to Create Windows 10 installation media and click Download Now > Save. Wait for the file to download, then run it.
Create a bootable USB drive using the Media Creation tool
- Read and select Agree to the license.
- Select Create installation media (USB flash drive, DVD, or ISO file) for another PC > Next.
- Click the USB flash drive. Ensure your USB drive has at least 8 GB of storage space before being plugged into your computer.
- Tap on the correct USB drive from the list and tap Next. The Media Creation Tool will then download the necessary files and create a bootable USB drive.
- Hit Finish once it says Your USB flash drive is ready.
Boot from the USB drive and select Install Windows 10 Pro
Now, you’re ready to boot from the USB drive. The boot order setting may vary based on your PC manufacturer’s BIOS/UEFI firmware version.
- Press the appropriate key (F2/F12/Del/Esc) until the screen pulls up a boot menu.
- Select the flash drive you just created, and press Enter. Your Windows will then start to boot.
Windows 10 Pro installation
- Once booted, set your language, time, and keyboard input method and hit Next > Install now.
- Enter a valid Windows 10 Pro product key. If you don’t have a product key, click the I don’t have a product key button.
- Select Windows 10 Pro > Next.
- Read and accept the license terms, then tap Next.
- Follow the on-screen instructions and wait for the Windows installation to complete.
- Complete the setup and restore your backed-up files.
Troubleshooting downgrade issues
Windows won’t accept the product key?
Windows may not accept the product key because of an invalid key type, so ensure you’re using a valid retail (We recommend reading the official Microsoft guide on how to validate the OEM activation key in Windows 10) or OEM key for Windows 10 Pro. It could also be a volume license activation issue, so check with your IT administrator for activation.
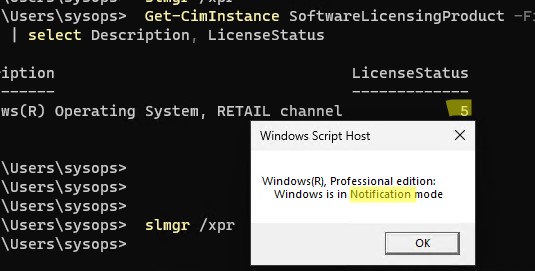
How do I check if my Windows 10 Enterprise license is volume-based?
The most common license types for Windows are Retail, OEM, and Volume Licensing. Let’s differentiate:
- Retail: Buying a Full Packaged Product (FPP) of Windows from an authorized retail merchant or Microsoft store. Product keys for Retail can be transferred to another PC.
- OEM (Original Equipment Manufacturer): Pre-installed by PC manufacturers and cannot be transferred to another computer as it is locked to the original hardware.
- Volume Licensing: Commonly used by organizations managing multiple devices. It is sold in bulk and requires special activation methods. Volume license keys, such as KMS (Key Management Service) and MAK (Multiple Activation Key), are intended for business use and are not for resale.
Here’s how to determine if your Windows license type is Retail, OEM, or Volume:
- Open Command Prompt via Windows search bar. You can also search cmd in the Run dialog box (Win + R).
- Input slmgr -dli and press Enter.
- A Windows Script Host dialog will pop up. Look at the Description to see what license type your Windows is using.
No option to downgrade in Activation settings?
If there’s no option to downgrade in Activation settings, it’s because Enterprise was installed as an upgrade. Remember that Enterprise licenses don’t support in-place downgrades via settings. The best action is to clean install Windows 10 Pro.
Device drivers missing after downgrade?
Windows downgrade may cause missing drivers, especially if they were pre-installed. Some pre-installed drivers are removed after a clean install. To reinstall them, use Windows Update by following these steps:
- Press Windows + I to open Settings.
- Go to Update & Security > Windows Update > Check for updates. Windows will scan the system, download any missing drivers, and install them.
- Restart your PC to complete the installation.
Another solution is to visit the PC manufacturer’s website and download the latest drivers for Windows 10 Pro.
Best practices when you change from Enterprise to Pro (Windows 10)
Back up all important files to prevent data loss
A clean install removes all existing programs and personal files from your Windows system. Make sure to back up your data to avoid losing important files. You can use an external hard drive, cloud storage (such as Google Drive), or Windows Backup. Likewise, consider using a Windows Backup tool like NinjaOne to simplify your backup management.
Check license and activation status
Downgrading from Windows 10 Enterprise to Pro requires a clean install since there is no built-in downgrade option. However, you may be able to switch by changing the product key. Moreover, if your device comes with Windows 10 Pro pre-installed, check if it has a digital license that activates automatically after installation.
Download essential drivers before downgrading
Some drivers may be lost after downgrading, which can cause display issues. Visit your PC manufacturer’s website, download the necessary Windows 10 Pro drivers, and save them on a USB flash drive before downgrading.
Frequently Asked Questions (FAQs)
Is Windows 10 Enterprise better than Pro?
Windows 10 Enterprise has advanced security, management, and deployment features, making it ideal for large enterprises. However, it requires more technical expertise to manage. For individual users, Windows 10 Pro is a better choice as it offers essential security and business features without the complexity of Enterprise.
Can I downgrade from Windows 10 Enterprise to Pro without a product key?
While there is no downgrade route from Windows 10 Enterprise to Pro, you can downgrade without a product key by downloading Windows 10 for free and performing a clean installation.
Will downgrading delete my files and apps?
Yes, since there is no downgrade route from Windows 10 Enterprise to Pro, you’ll need to perform a clean installation that will erase all files, apps, and settings. To prevent losing essential files, backup your data.
What if I don’t have a Windows 10 Pro product key?
Download Windows 10 for free from the official Microsoft page and perform a clean installation.
What happens if I use a generic product key for Windows 10 Pro?
You may use a generic product key to install Windows 10 Pro. However, it won’t activate your system. You’ll need your own unique 25-character key to continue using Windows without restriction.
Before you downgrade Windows 10 Enterprise to Pro
If you need Windows 10 Pro features without the complexity of Enterprise, downgrading may be a good option. You have two choices: if you have a valid Pro product key, you can switch versions easily; if not, a clean installation is required. Always remember to back up important data before making major system changes to prevent losing any of your important files.
By Timothy Tibbettson 06/30/2023 |
Downgrading from Windows 10 Enterprise to Windows 10 Pro can be as easy as changing your product key. Here’s how.
As mentioned, you need a product key, and not necessarily retail, purchased key. You might be able to try one of these generic product keys.
Otherwise, VK7JG-NPHTM-C97JM-9MPGT-3V66T (10 Pro) or 2B87N-8KFHP-DKV6R-Y2C8J-PKCKT (10 Pro N) work for most people.
Press the Windows Key + S, type in, and click on Activation settings.
Click on Change product key.
Copy and paste your product key and click Next.
To verify you successfully downgraded, close, and open Activation and confirm your Edition is Windows 10 Pro.
Similar:
comments powered by Disqus
Download Windows Speedup Tool to fix errors and make PC run faster
Although Windows 11 or Windows 10 Enterprise edition has a few more features than the Pro edition, if you do not want to use it, you can always downgrade to the desired version. Here is how you can downgrade Windows 11/10 Enterprise to Pro edition within moments.
The Enterprise edition of Windows 11 or Windows 11 is mainly for organizations like schools, colleges, offices, etc. Let’s assume that you opted for the Enterprise edition due to some reason. However, now you want to move back to the Pro edition because you have a valid product key for that edition. In such cases, this guide could help you to get the job done.
Before getting started, you must know a few things:
- A valid product key for the Pro edition is required.
- We have provided a generic key to change the edition. However, it doesn’t activate your copy of Windows 11/10. It just replaces the Enterprise edition with the Pro.
- If you have a digital license linked to your Microsoft account, you can sign in to your account to activate the copy of Windows 11/10.
To downgrade Windows 11/10 Enterprise to Pro edition, follow these steps:
- Press Win+I to open Windows Settings.
- Go to System > Activation.
- Click on the Change button.
- Enter the product key and click the Next button.
- Click on the Activate button.
- Restart your computer to get the change.
To learn more about these steps, continue reading.
At first, you need to press Win+I to open Windows Settings on your computer. Ensure that you are in the System tab. If so, click on the Activation menu visible on the right-hand side.
Here you can find two options – Activation state and Change product key. You need to click on the Change button associated with the Change product key. Now you need to enter the Windows 11/10 Pro edition’s product key. However, if you do not have a valid product key or have a digital license, you can enter the following generic key:
VK7JG-NPHTM-C97JM-9MPGT-3V66T
Then, click the Next button.
Once your computer detects the product key, it displays an Activate button. You need to click on it.
Once it displays the Windows is activated message, you need to reboot your computer. While rebooting, it might take a few minutes to change the edition.
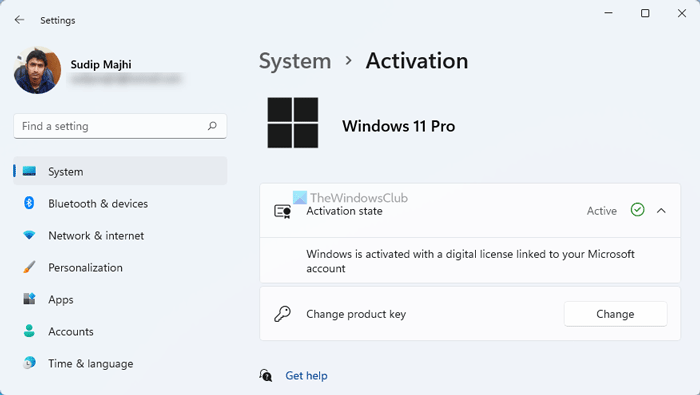
Once done, you can open the Windows Settings, go to System > Activation and find out the Activation state. As mentioned earlier, if you have a digital license, you need to sign in to your Microsoft account to activate the copy.
Can you change Windows from Enterprise to Pro?
Yes, you can change Windows 11/10 Enterprise to Pro. Whether you want to move from Enterprise to Pro or Pro to Enterprise, you can do that without any problem. All you need is a valid product key of the desired edition. On the other hand, you can also use a generic product as well.
Can you downgrade from Windows 11?
Yes, you can downgrade from Windows 11 to Windows 10 within moments. However, one important thing you must know is that you can roll back within ten days. Following that, you need to clean install Windows 10 on your computer in order to ditch Windows 11 and continue using Windows 10.
That’s all! Hope this guide helped.
Read Next: Download Windows 11/10 Enterprise ISO using Media Creation Tool.
When he is not writing about Microsoft Windows or Office, Sudip likes to work with Photoshop. He has managed the front end and back end of many websites over the years. He is currently pursuing his Bachelor’s degree.
В этой статье мы покажем, как повысить младшую редакцию (издание) Windows 10 или 11 до более старшей версии без переустановки операционной системы с сохранением всех установленных программ, настроек и документов. Это позволит пользователю обновить редакцию Windows с Home до Pro или Enterprise.
Обновить домашнюю редакцию Windows 10/11 Home до Professional
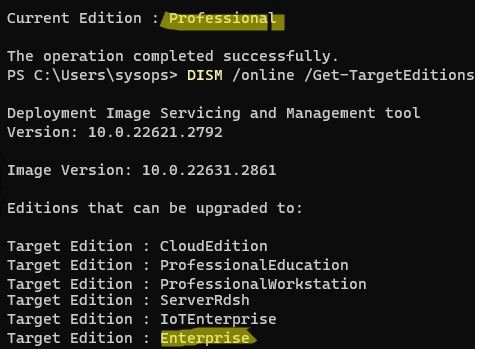
Откройте командную строку и проверьте текущую версию и редакцию Windows:
DISM /online /Get-CurrentEdition

В этом примере на компьютере установлена домашняя Home редакция Windows 10 ( в Windows 11 домашняя редакция называется Core).
Выведите список редакций, до которых можно обновить вашу версию Windows:
DISM /online /Get-TargetEditions
В списке есть редакция Professional, до которой мы хотим обновить ОС.
Чтобы выполнить обновление Home редакции до Pro, воспользуйтесь встроенной утилиты Changepk.exe. Запустите эту команду и выберите Change product key и укажите приобретённый вами ключ для Windows 10/11 Professional. Подтвердите апгрейд редакции.
Если у вас пока отсутствует приобретенный ключ для Windows Pro, укажите ключ
VK7JG-NPHTM-C97JM-9MPGT-3V66T
, который используется при установке Windows 10 и 11 Pro с пропуском ввода ключа (в ознакомительном режиме, без активации).
Вы можете очистить предыдущий ключ и задать новый из командной строки:slui.exe /upk
changepk.exe /ProductKey xxxxxxxxxxxxxxxx
После этого перезагрузите компьютер, чтобы начать обновление редакции.

После перезагрузки проверьте, что редакция Windows была обновления до Professional.
Если вы использовали временный ключ, указанный выше, ваша Windows не будет активирована до тех пор, пока вы не введете приобретенный ключ активации. Проверить статус активации Windows можно с помощью команды:
slmgr /xpr
Значение 5 (Notification mode), указывает что срок ознакомительного использования Windows окончен.
Вы можете только апгрейдить редакции Windows 10/11 (например, Home -> Pro или Home -> Education). Сценарий даунгрейда доступен для Education -> Pro и Enterprise -> Pro). LTSC редакцию Windows 10 можно обновить до Enterprise или более новой LTSC.
Изменить редакцию Windows 10 или 11 с Pro до Enterprise
Если вы хотите обновиться с Professional редакции Windows 10/11 до Enterprise:
- Проверьте текущую редакцию:
DISM /online /Get-CurrentEdition - До каких целевых редакций возможно обновление:
DISM /online /Get-TargetEditions
- Укажите ваш ключ для Enterprise редакции в следующей команде:
Changepk.exe /ProductKey NPPR9-FWDCX-D2C8J-H872K-2YT43 - Через одну-две минуты редакция вашей Windows 10 изменится на Enterprise (подтверждение и перезагрузка не требуется). Осталось только активировать вашу Windows онлайн (если у вас есть свой ключ) или на KMS сервере (если вы использовали GVLK ключ).