
When you have multiple monitors connected to your computer, Windows typically designates one as the primary monitor (usually the first-connected one) and the others as secondary. The primary monitor displays everything by default, so selecting which monitor serves as the primary one is crucial. Thankfully, Windows allows you to pick your primary monitor at any time through a simple process.
Follow the steps below to set your desired monitor as the primary display:
- Right-click anywhere on your Desktop and select Display Settings.

- In the Display Settings window, you will see all connected displays represented in graphical shapes. Click on the display you want to set as the primary display. Scroll down and check the box for Make this my main display.

- If the option Make this my main display is greyed out, it means that the chosen monitor is already set as the primary display.


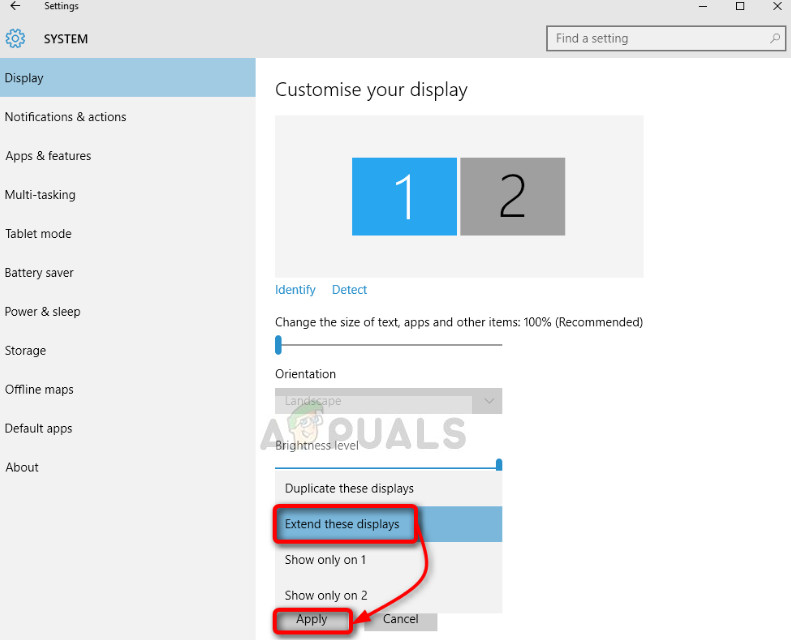
Ensure that the displays are extended. Without extending the displays, there will be no option to set a primary monitor. Change the setting to Extend these displays in display settings.
Note: Try connecting your HDMI cable to the monitor you want to use as the primary one. Some users reported that the monitor connected via HDMI is recognized as the primary monitor. This might not be the case for everyone but could help some users.
Kevin Arrows
Kevin Arrows is a highly experienced and knowledgeable technology specialist with over a decade of industry experience. He holds a Microsoft Certified Technology Specialist (MCTS) certification and has a deep passion for staying up-to-date on the latest tech developments. Kevin has written extensively on a wide range of tech-related topics, showcasing his expertise and knowledge in areas such as software development, cybersecurity, and cloud computing. His contributions to the tech field have been widely recognized and respected by his peers, and he is highly regarded for his ability to explain complex technical concepts in a clear and concise manner.
Having a dual monitor setup is always a productivity boost. Thankfully, the Windows operating system natively allows users to manage primary and secondary monitors without having to use third-party software.
When the first display device is connected to a Windows 11/10 PC, it automatically becomes the primary display monitor. This means it will host your desktop, as well as all other windows that you have open. When more monitors are connected, they are then detected as the secondary monitor, tertiary, etc.
This article guides you through multiple ways to change the primary monitor on your Windows PC, and also how to align them according to your actual setup. For example, if your dial-monitor setup is placed on top of each other, you can adjust them so. This will allow you to move your mouse cursor and windows up and down (instead of sideways) to move between the two displays.
Table of Contents
Changing your primary display will allow you to select which display device hosts your main content. If you have 3 displays connected and are aligned in a horizontal series, you can set your middle screen to be the primary display.
Change Primary Monitor in Windows 11
Follow these steps to change your primary monitor if you are using Windows 11:
-
Navigate to the following: This will open the Display Settings menu. (Press the Windows key + I buttons to open Settings directly).
Settings app >> System >> Display
-
Click the Identify button, which displays a number on each screen to identify which screen is primary, secondary, etc.

Identify screens -
Now click on the screen number you want to make primary.
Select screen -
Now expand “Multiple displays” and then check the box next to “Make this my main display.”
Make it the primary display


The selected monitor will now be your primary display. When the “Make this my main display” option is grayed out – this means the selected monitor is already your primary one.

If you have a dedicated NVidia graphics card, you can also change the primary monitor in Windows 11 or Windows 10 using the NVidia Control Panel.
Change Primary Monitor in Windows 10
If you are using Windows 10, then follow these steps to change your primary monitor:
-
Navigate to the following:
Settings app >> System >> Display
-
Now select the monitor that you want to make primary, then scroll down and check the box next to “Make this my main display” under Multiple displays.

Change primary display in Windows 10

Similar to Windows 11, the option will then be grayed out and the selected monitor will become your primary display.
The methods we have discussed up until now are the Windows native methods that allow you to change your primary monitor. However, if you are a fan of the Windows command line, then the following methods might be your cup of tea.
How to Change Primary Monitor from Command Prompt in Windows
To change your primary monitor using Command Prompt, you must use third-party command-line tools.
Using NirSoft NirCmd
NirCmd is a command-line tool that allows you to perform multiple tasks directly from the Command Prompt, which otherwise is not possible. Here are the steps to change your primary display using this tool:
-
To start with, download the NirCmd tool from the given link and then extract its contents into a separate folder.
-
Now open Command Prompt with administrative privileges and then navigate to the extracted folder directory using this cmdlet. Replace PathToFolder with the complete path to the extract NirCmd folder.
cd /d PathToFolder
Change directory -
Now use the following cmdlet to change your primary monitor while replacing Integer with the display identifier of the monitor you want to set as your primary display.
nircmd.exe setprimarydisplay IntegerNote: The Integer used in the command line will not be the same as the one you see on your displays when you identify the monitors. This is because while using the command line, the monitor indexes (identifiers) are changed.
In our case, the Integer “10” sets the secondary monitor as the primary, and the Integer “9” sets the first monitor as primary. You may have to adapt the hit-and-trial method to check which monitor is configured as primary.

Change primary monitor using NirCmd


When the correct identifier is used, you will notice that your display kind of zooms out and then zooms back in, signifying a change in the display settings. However, you must confirm which monitor has been configured as the primary display.
Using NirSoft MultiMonitorTool
MultiMonitorTool is another command-line tool used to manage your display settings. Follow these steps to use the MultiMonitorTool to change your primary monitor:
-
Start by downloading MultiMonitorTool and then extract its content into a separate folder.
-
Now open Command Prompt with administrative privileges and then navigate to the extracted folder directory using this cmdlet. Replace PathToFolder with the complete path to extract MultiMonitorTool folder.
cd /d PathToFolder
Change directory -
Now use the following cmdlet to change your primary monitor while replacing Integer with the display identifier of the monitor you want to set as your primary display.
MultiMonitorTool.exe /SetPrimary IntegerNote: Similar to NirCmd, you will have to perform the hit-and-trial method while changing the Integer value to identify the correct index for the monitor you wish to set as the primary display.
Change primary monitor using MultiMonitorTool


This will now change your primary display as you can see that the screen zooms out and then zooms back in, which signifies a change in your display settings. However, you will still need to confirm that the correct monitor has been configured as your primary display.
How to Change Display Orientation in Windows
Display orientation is the way your monitors are aligned. If you have only two monitors connected, they could be side-by-side, or in the top-and-bottom orientation. If more than two monitors are connected, they can be aligned in any way!
Furthermore, as it happens with many of us, it could be possible that you drag the mouse cursor from the left end of your screen onto the second monitor, which is placed on its right side.
You can manage your screen’s orientation with respect to one another so your computer knows in which direction the other displays are correctly configured.
-
To change the orientation of the displays, navigate to the following:
Settings app >> System >> Display
-
Here, hold down your screen and then drag it into a different position that is identical to your real monitor setup.
Drag and drop the screens to adjust the orientation -
Once the settings are done, click Apply to save the changes.
Apply settings


You can now move across your multiple displays in the direction in which they are aligned.
If you encounter any errors while setting up your primary monitor and have any tips for us, you can always ask us in the comments section below.
Frequently Asked Questions
How to shift a window from one monitor to the other?
If a window opens on the wrong monitor when you have multiple displays connected, you can simply switch it to the right one using the Windows Key + Shift + Left/Right Arrow Key shortcut keys to shift it to the previous or next display device.
How to fix the new window opens on the wrong monitor?
To open a window on the correct monitor, you must set it as the primary display device. To do so, go to Settings app >> System >> Display, select the monitor you want to set as the primary display, then check the box next to “Make this my main display.”
How do I check which monitors are primary and secondary?
You can display the number on the screen to identify which monitor is primary, secondary, and so on. For the primary monitor, it will display “1,” for the secondary, it will display “2,” and so on.
To identify your displays, navigate to Settings app >> System >> Display then click Identify. This will show the indexes on your screen for almost 2 seconds.
Is your PC showing the main desktop screen on a monitor that is not what you want as your primary monitor? Do you want to change your main display from your laptop screen to a connected secondary monitor? Is your PC showing duplicate or mirrored screens across all your monitors while you want to extend the displays instead?
If any of these questions is bothering you, don’t worry. This short tutorial will show you how to change the main display to any monitor of your choice on Windows 10, and how to set Windows to extend the displays to other monitors instead of mirroring them, if you have multiple monitors.
Also see: How to Switch Between Monitors on Windows 11
How to Change Main Display on Windows 10
By default, Windows 10 will usually select the monitor that is connected to the primary port of your graphics card (usually the first Display Port) as your primary display. Instead of trying to switch your monitors’ ports, you can easily change the main display by selecting the monitor of your choice to be your PC’s main display via Windows 10 display settings.
Assuming you’re trying to extend your displays onto multiple monitors, and select the monitor of your choice to be the primary display, here’s how to do it.
- On your Windows 10 PC, right-click anywhere on your desktop.
- Then, select Display settings from the list of options.
- In the display settings window, under Multiple displays, make sure “Extend these displays” is selected (instead of “Duplicate these displays” or “Show only on 1/2/etc”).
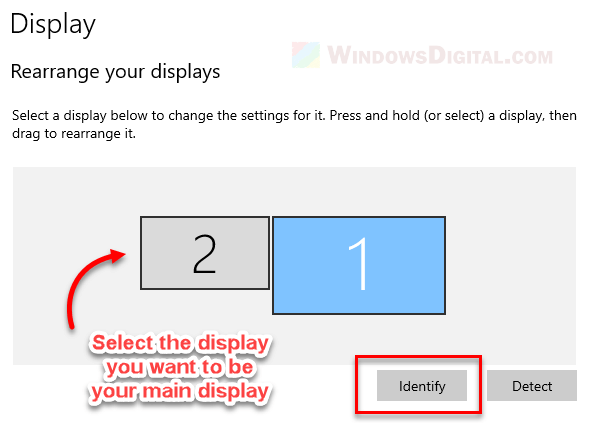
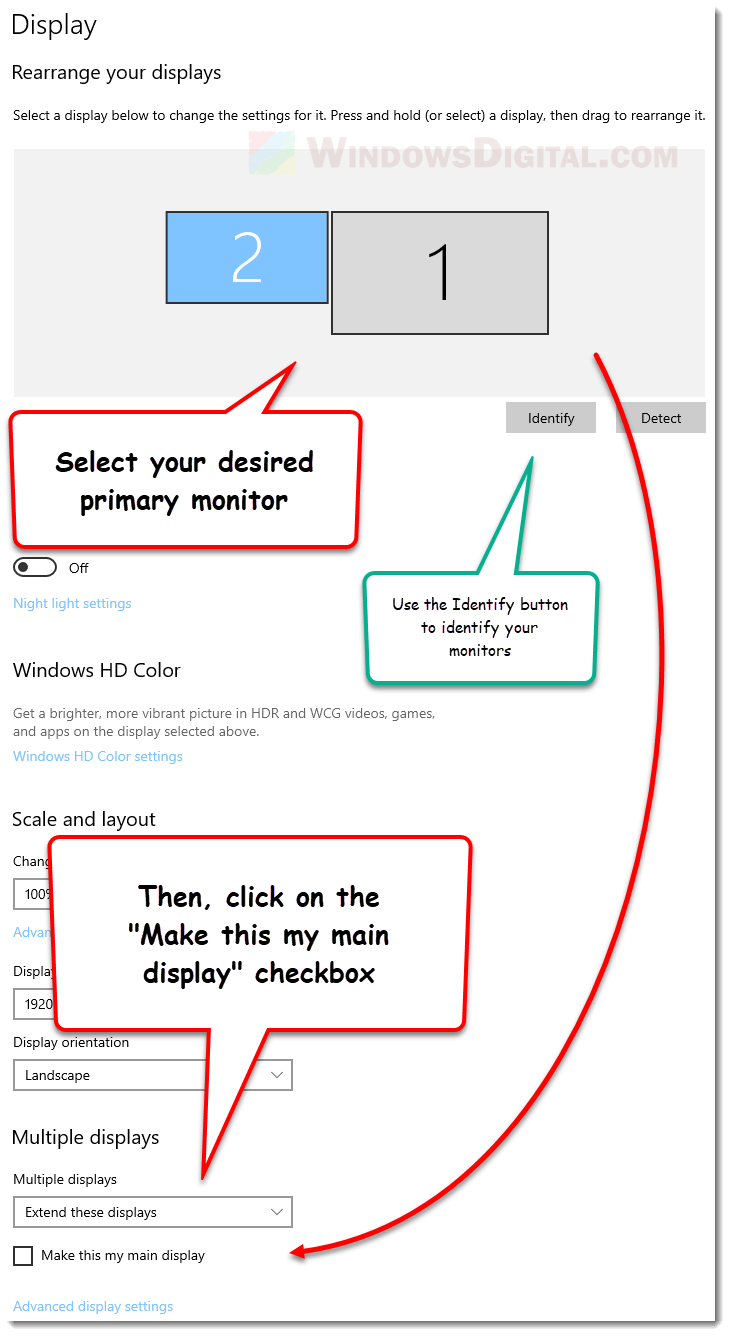
- At the top of the display settings window, under Rearrange your displays, click on the Identify button to find out which monitor each of these numbers is representing.
- To change the main display, click on the number that represent the monitor you want as your primary monitor to highlight it.

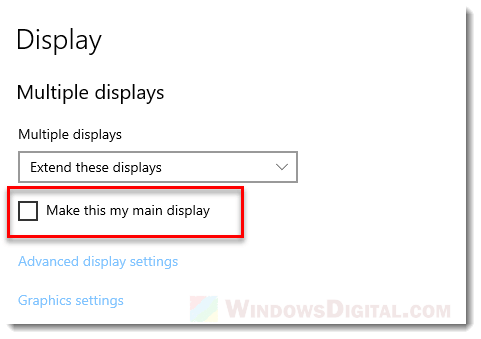
- Then, scroll down to the Multiple displays settings, and check the checkbox that says “Make this my main display“.

After completing the steps above, Windows 10 should then display the main desktop screen along with all your desktop icons and stuffs on the primary monitor you’ve just selected.
Tip: You can rearrange your displays by simply drag and drop the numbers that represents your monitors to any direction you want. For instance, if you move your secondary monitor to the top of your primary monitor in the “Rearrange your displays” settings, you will then have to move your cursor upward from your primary monitor to reach to your second monitor.
How to Change Primary Monitor on Windows 10 via NVIDIA Control Panel
Another alternative method to change primary monitor on Windows 10 is by setting it in the NVIDIA control panel, if you’re using a NVIDIA graphics card. Here’s how to do it.
- In the start menu, search and open NVIDIA control panel.
- In the left pane, expand Display, then select “Set up multiple displays“.
- Under “Drag the icons to match your display configuration”, right-click on the monitor you wish to set as primary monitor, then select “Make primary“.
- If you don’t know which number represents which monitor, you can right-click any of them and click Identify. The number will then pop up on the monitor screen it represents.
- Lastly, click Apply for the changes to take effect.
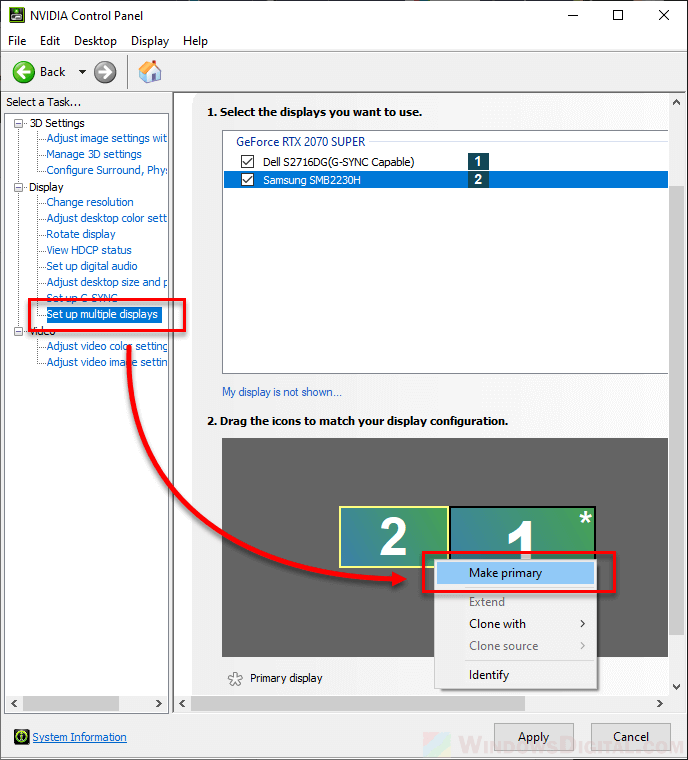
Additional tip: You can disable (or enable) any monitor that you don’t want to use in the “Select the displays you want to use” area. Simply uncheck the checkbox that corresponds to the monitor you want to disable, or check the checkbox if you want to enable it again.
Все способы:
- Способ 1: Штатные «Параметры»
- Способ 2: «Панель управления NVIDIA»
- Способ 3: Сторонний софт
- NirCmd
- Monitor Profile Switcher
- Вопросы и ответы: 0
Способ 1: Штатные «Параметры»
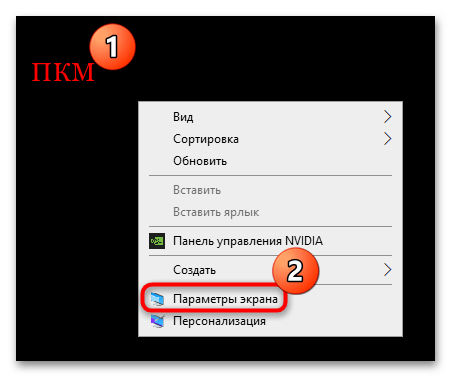
Выбрать основной монитор на компьютере с Windows 10 можно через раздел с настройками экрана штатных «Параметров», но для этого второе устройство уже должно быть подключено к ПК или ноутбуку, где будут производиться настройки:
- Кликните правой кнопкой мыши по свободной области на рабочем столе и из контекстного меню выберите пункт «Параметры экрана».

Или при помощи меню «Пуск» вызовите системное приложение «Параметры».
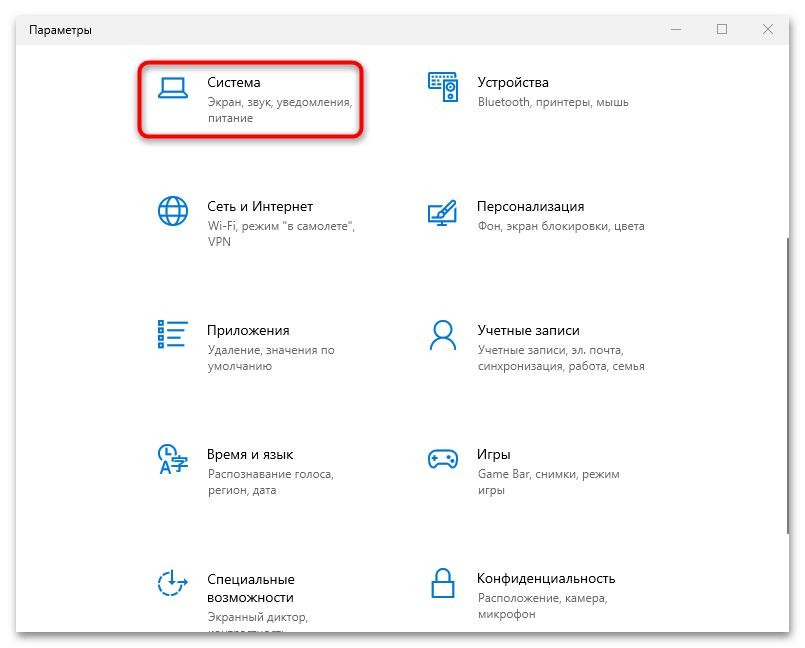
В появившемся окне вам нужен раздел «Система».
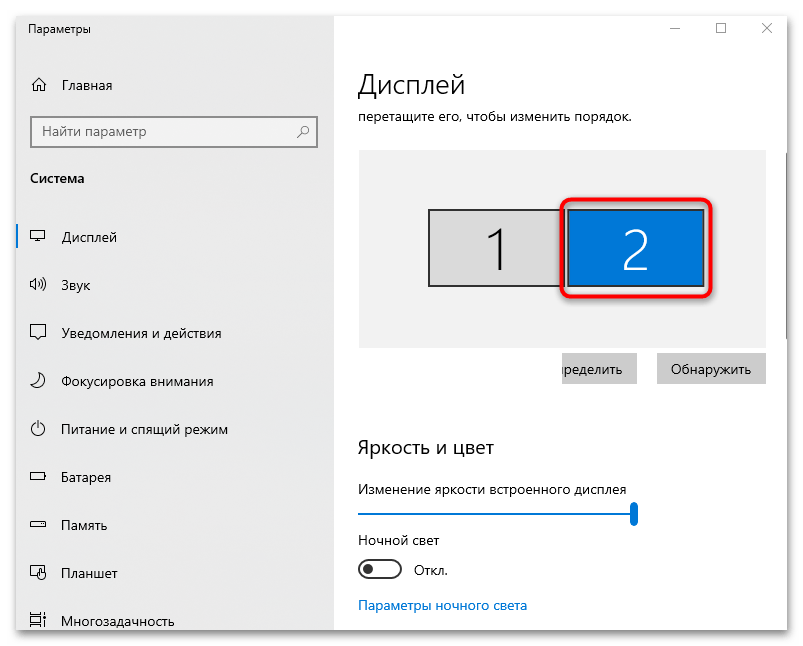
- Тут вы увидите экраны, подключенные к компьютеру. Выделите тот, который надо сделать основным.
- Затем пролистайте окно чуть ниже и отметьте опцию «Сделать основным дисплеем».
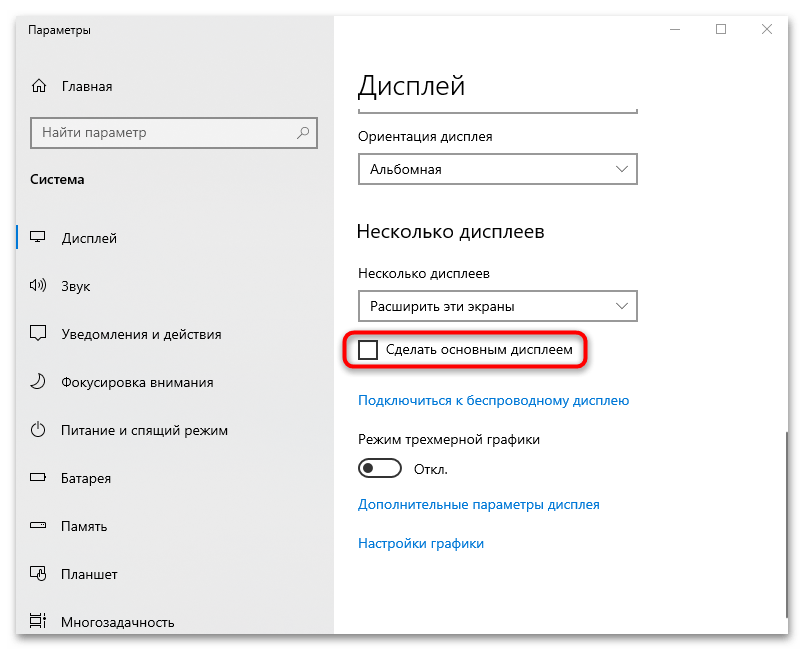
На этом настройки завершены – новые параметры применять мгновенно и автоматически, после чего выбранный дисплей станет основным.
Сделать экран основным можно и с помощью настроек проецирования. Этот вариант подойдет, если нужно использовать только один монитор, например подключенный к ноутбуку, и чтобы дисплей лэптопа при этом не работал. В этом случае достаточно одновременно нажать на клавиши «Win + P», после чего выбрать «Только второй экран».
Читайте также: Как переключаться между мониторами в Windows 10
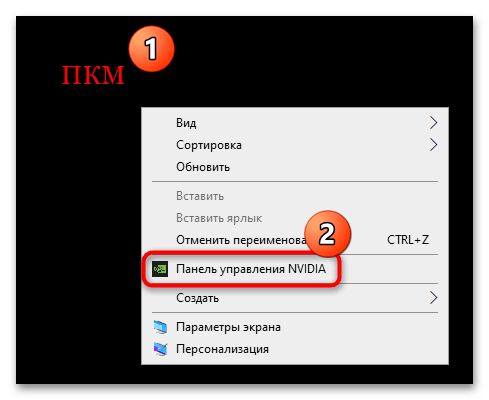
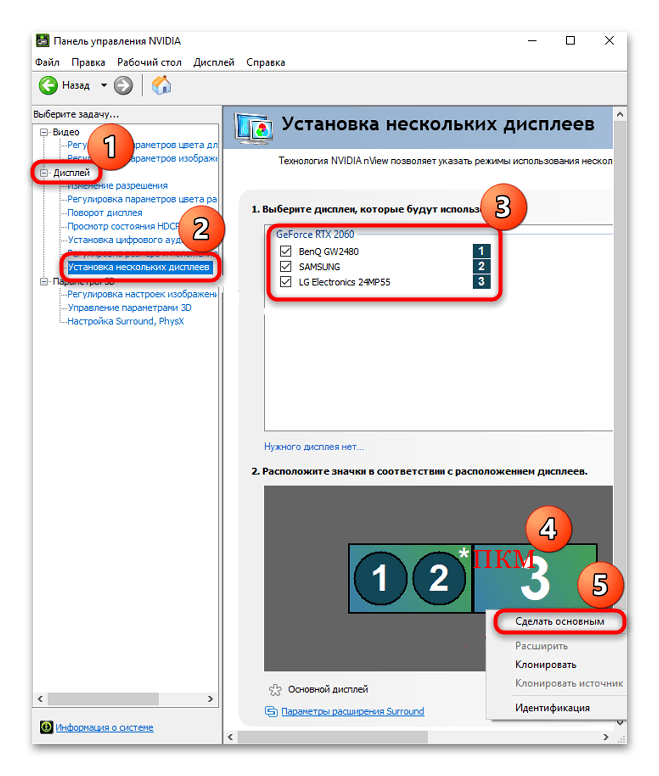
Способ 2: «Панель управления NVIDIA»
Если в компьютере или ноутбуке установлена видеокарта NVIDIA, можно выбрать основной монитор с помощью фирменного программного обеспечения производителя – «Панель управления NVIDIA».
- Запустите программу «Панель управления NVIDIA», используя строку системного поиска. Также ее можно открыть через контекстное меню рабочего стола, кликнув правой кнопкой по свободной области и выбрав соответствующий пункт.
- Разверните меню «Дисплей», расположенное на панели слева, затем нажмите на строку «Установка нескольких дисплеев». В центральной части окна можно выбрать, какие подключенные экраны будут использоваться, отметив их, а также расположить их в нужном порядке. Чтобы сделать один из дисплеев основным, кликните по нему правой кнопкой мыши и выберите пункт «Сделать основным» в появившемся меню. Нажмите на «Применить», чтобы новые настройки мгновенно вступили в силу.
Если в работе «Панели управления NVIDIA» есть проблемы, ознакомьтесь с нашими материалами на эти темы – в них рассмотрены наиболее распространенные ошибки и пути их исправления.
Подробнее:
Решение проблемы с отсутствием вкладки «Дисплей» в Панели управления NVIDIA
Возвращаем пропавшую панель управления NVIDIA в Windows 10
Неполадки в работе Панели управления Nvidia
Способ 3: Сторонний софт
Чтобы не менять каждый раз настройки вручную или в тех случаях, когда «Панели управления NVIDIA» нет, а возможности «Параметров» по каким-то причинам ограничены, можно воспользоваться сторонним программным обеспечением. Несколько примеров мы разберем более детально.
NirCmd
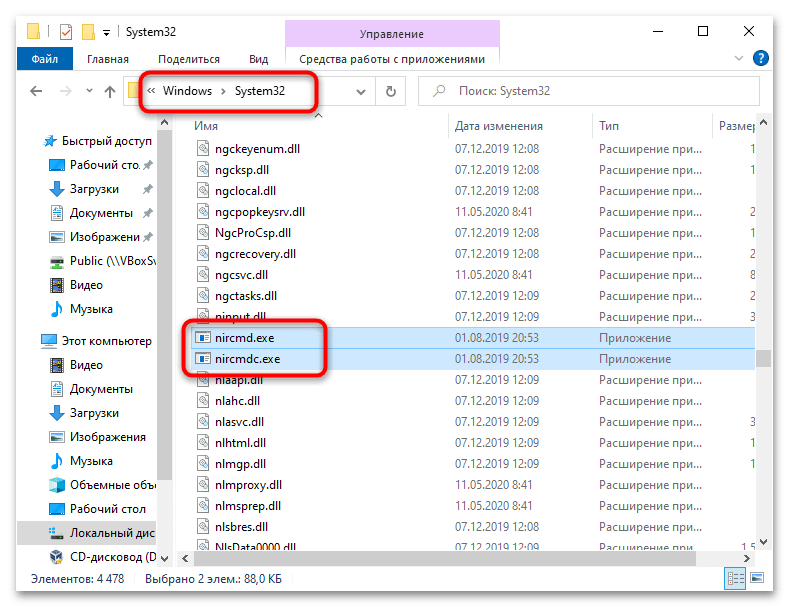
Утилита NirCmd – это небольшой инструмент, распространяющийся на бесплатной основе. С его помощью можно выполнять различные команды, которые предназначены для штатной консоли Windows, в том числе использовать запрос для смены основного монитора.
Скачать NirCmd с официального сайта
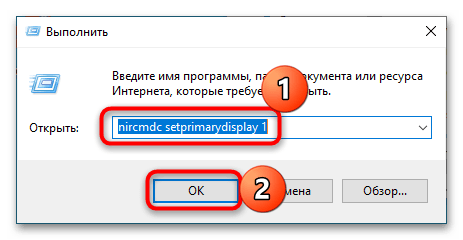
- Скачайте и распакуйте утилиту в директорию
C:\Windows\System32. - Запустите исполняемый файл утилиты либо вызовите диалоговое окно «Выполнить», одновременно нажав на клавиши «Win + R», затем введите команду
nircmdc setprimarydisplay 1, где под цифрой подразумевается номер экрана, который нужно сделать основным. Выполните запрос, нажав на клавишу «Enter» или кнопку «ОК».
После этого все настройки будут применены сразу – а необходимости запускать фирменный софт NVIDIA или «Параметры» не будет нужды.
Вы также можете создать ярлык, чтобы быстро менять настройки. Для этого кликните ПКМ по пустому месту рабочего стола, наведите курсор на «Создать» и щелкните по «Ярлык». В поле «Укажите расположение объекта» вставьте команду, указанную чуть выше, в следующем окне задайте любое имя и подтвердите создание кнопкой «Готово».
Monitor Profile Switcher
Еще один вариант – это программа Monitor Profile Switcher. Она также полностью бесплатная, но предназначена для управления мониторами, причем тут есть возможность создавать собственные профили с пользовательскими настройками для дисплеев и быстро переключаться между ними.
Следует отметить, что конфигурации основаны на системных настройках – в любом случае придется воспользоваться одним из вышеописанных способов, чтобы выбрать основной монитор, но сохранить его в программе для быстрого переключения.
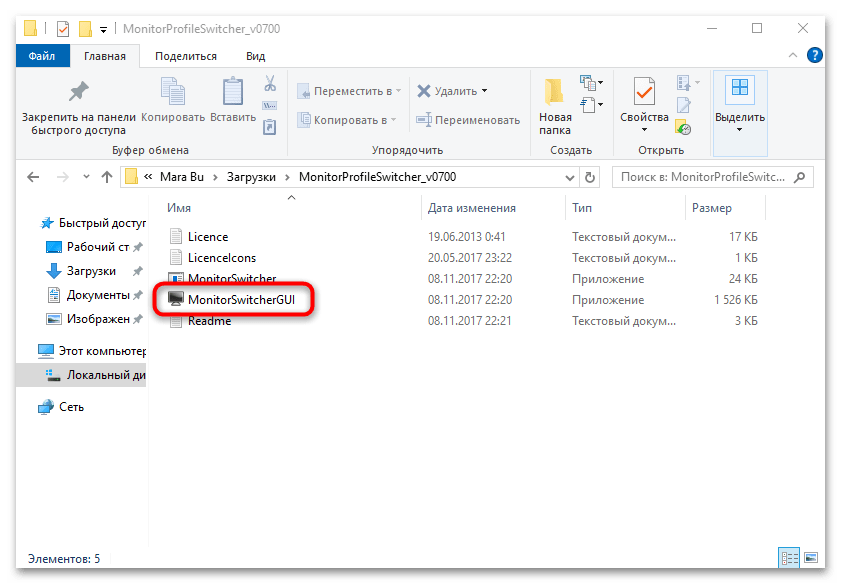
Скачать Monitor Profile Switcher с официального сайта
- Перейдите по ссылке выше и скачайте ZIP-файл с программой, после чего распакуйте его и запустите исполняемый файл «MonitorSwitcherGUI».
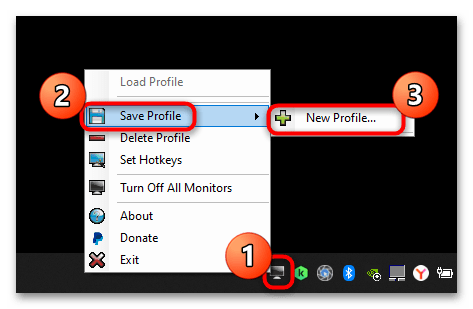
- В трее Windows 10 появится иконка программы. Кликните по ней левой кнопкой мыши, наведите курсор на пункт «Save Profile» и выберите «New Profile» — будущий профиль сохранит текущие системные настройки.
- В новом окне задайте ему имя.
- Далее останется вызвать меню софта, нажав на иконку в трее, и выбрать нужный профиль из меню.
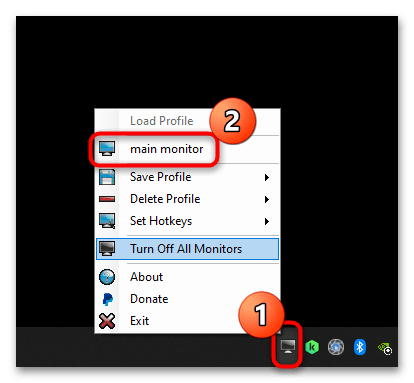
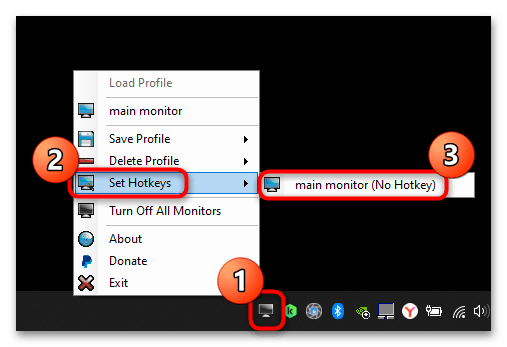
Помимо этого, через Monitor Profile Switcher можно настроить горячие клавиши для быстрого переключения между профилями – пункт «Set Hotkeys» в контекстном меню.
Если вы часто планируете переключаться между экранами, делая основным то один, то другой, можно добавить программу в автозагрузку, чтобы каждый раз не запускать софт вручную.
Подробнее: Добавление приложений в автозагрузку в Виндовс 10
Наша группа в TelegramПолезные советы и помощь
Changing the main display in Windows 10 is a straightforward process that lets you choose which monitor will be your primary screen. To change your main display, you need to access the Display Settings, select the monitor you want as your primary, and set it as the main display. It’s quick and easy, even if you’re not very tech-savvy.
Changing the main display in Windows 10 will let you decide which screen is your primary workspace. Follow these steps to do it easily.
Step 1: Open Display Settings
Right-click on the desktop and select «Display settings.»
When you right-click on your desktop, a menu will pop up. Look for and click on «Display settings.» This will open a window where you can manage your monitors and their settings.
Step 2: Select the Monitor You Want as Your Main Display
Click on the monitor you want to set as your main display.
In the Display settings window, you will see a diagram showing your connected monitors. Click on the monitor number that you want to use as your main display. This highlights the monitor, indicating that it’s selected.
Step 3: Set as Main Display
Check the box that says “Make this my main display.”
After selecting the monitor, scroll down a bit and find a checkbox that says “Make this my main display.” Click on it to assign the primary role to the selected monitor.
Step 4: Apply the Changes
Click «Apply» to save the changes.
Once you’ve checked the box, look for the “Apply” button at the bottom of the Display settings window. Clicking this button will save your changes and switch your main display.
Step 5: Confirm the Changes
Click «Keep changes» in the confirmation dialog.
A dialog box will appear asking you to confirm the changes. Click “Keep changes” to finalize your new main display settings. If you don’t confirm within 15 seconds, the settings will revert.
After completing these steps, the selected monitor will now serve as your primary display. Your main desktop and taskbar will shift to this screen, making it the default workspace for your computer activities.
Tips for Changing Main Display in Windows 10
- Ensure all monitors are turned on and connected before starting.
- Identify your monitors by clicking the “Identify” button in Display settings. Numbers will appear on each screen.
- Arrange your monitors in Display settings to match their physical layout for better navigation.
- Use higher resolution settings on your main display for sharper visuals.
- Restart your computer if changes don’t take effect immediately.
Frequently Asked Questions
Can I set any monitor as my main display?
Yes, as long as the monitor is connected and recognized by your Windows 10 system, you can set it as your main display.
What happens if I don’t confirm the changes?
If you don’t confirm the changes within 15 seconds, Windows will revert to the previous display settings, ensuring you don’t get stuck with unwanted changes.
Why can’t I see the «Make this my main display» option?
The option might be greyed out if the selected monitor is already set as the main display. Ensure you’ve selected the correct monitor.
Can I have multiple main displays?
No, Windows 10 allows only one main display. However, you can extend your desktop across multiple monitors.
What if my monitors are not displaying correctly?
Check your cable connections and ensure your graphics drivers are up to date. Restarting your computer can also resolve display issues.
Summary
- Right-click on the desktop and select «Display settings.»
- Click on the monitor you want to set as your main display.
- Check the box that says “Make this my main display.”
- Click «Apply» to save the changes.
- Click «Keep changes» in the confirmation dialog.
Conclusion
Changing the main display in Windows 10 is a simple task that can significantly enhance your computing experience. Whether you’re setting up a new monitor or just reorganizing your workspace, these steps will guide you through the process effortlessly.
Having a primary display tailored to your needs can make your work more productive and enjoyable. If you encounter any issues, don’t hesitate to revisit the steps or consult the FAQ section for additional help. For further reading, consider exploring more advanced display settings, such as resolution adjustments or multiple monitor setups. Now that you know how to change the main display in Windows 10, go ahead and make your workspace work for you.
Matt Jacobs has been working as an IT consultant for small businesses since receiving his Master’s degree in 2003. While he still does some consulting work, his primary focus now is on creating technology support content for SupportYourTech.com.
His work can be found on many websites and focuses on topics such as Microsoft Office, Apple devices, Android devices, Photoshop, and more.