
The boot menu shows up every time you turn on a PC where two or more Windows operating systems are installed. For instance, if you have installed Windows 10 and Windows 7 in a dual boot setup, you will get the boot menu where you can either select the non-default operating system or let the boot menu automatically boot into the default operating system.
By default settings, the most recently installed or most recently upgraded operating system is the default operating system in the boot menu.
")
However, at times, after installing or upgrading an operating system, you might want to change the boot order to set or change the default operating system.
In Windows 10, if you need to change the default boot order, you can do so without the help of third-party tools.
The following are the four ways out there to change the boot order in Windows 10.
Method 1 of 4
Change the boot order in Windows 10 via System Configuration
Step 1: Type msconfig in the Start/taskbar search field and then press the Enter key to open the System Configuration dialog.
Step 2: Switch to the Boot tab. Select the operating system that you want to set as the default and then click Set as default button. Click the Apply button.
")
Here, you can also change the default 30-second waiting period to the time of your choice.
Method 2 of 4
Change the boot order in Windows 10 via advanced options
Step 1: Close all running programs. Restart your PC.
Step 2: When you see the boot menu (Choose an operating system) screen, click the Change defaults or choose others.
")
Step 3: Next, you will get the Options screen. Here, click Choose a default operating system tile.
")
Step 4: On the Choose a default operating system screen, you can see the default operating system. The entry at the top of the list is usually the default operating system.
")
To change the default operating system, simply click on the tile that you want to set as the default operating system in the boot menu. For instance, I am clicking on Windows 10 entry to make it the default operating system.
That’s all! You will not see any confirmation message.
Instead, you will be taken back to the Options screen, where you can click Change the timer tile if you wish to change the default 30 seconds of the boot menu to 5, 10, or 15 seconds.
")
To exit, click the Back icon. You will now get the Choose an operating system screen. Here, the default operating system will appear at the top of the list. Click on an entry to boot into it.
Method 3 of 4
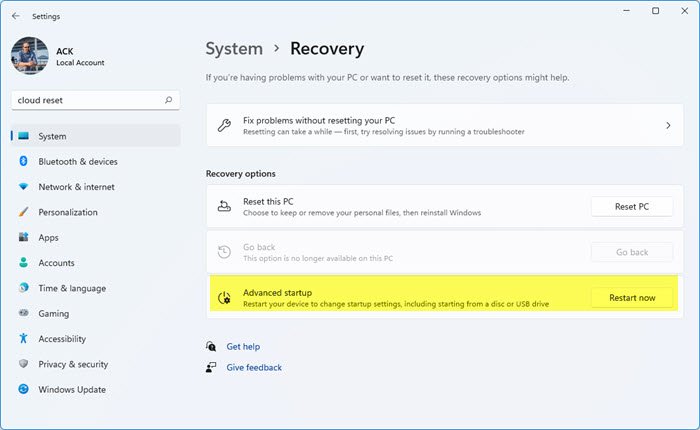
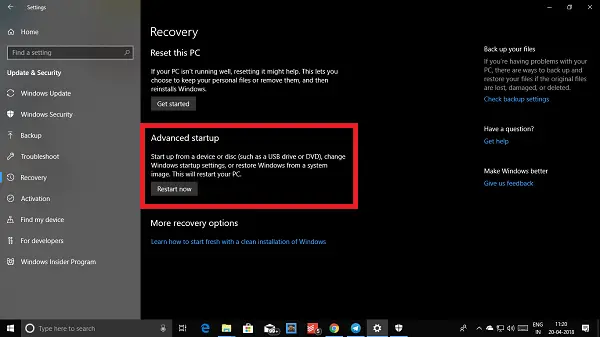
Step 1: Open the Settings app. Navigate to Update & security > Recovery.
Step 2: Click the Restart now button in the Advanced startup section.
")
Step 3: Your PC will restart, and you will get the Choose an option screen after the restart. Click Use another operating system tile.
")
Step 4: On the Choose an operating system screen, click Change defaults.
")
Step 5: Next, you will see the Options screen. Here, click Choose a default operating system tile.
")
Step 6: Finally, click on the OS entry that you want to set as default to make it the default.
")
You will now see the Options screen. Click the Back icon to go back to Choose an operating system screen. Here, you can see the default operating system. The default one appears at the top of the list.
Click on an entry to boot into it.
Method 4 of 4
Change the boot order in Windows 10 using EasyBCD
EasyBCD is one of the must-have tools for dual-boot PC users. With EasyBCD, you can easily change not just the default boot order but also add a new operating system to the boot menu.
Here is how to use the EasyBCD to change the boot order in Windows 10.
Step 1: Download EasyBCD and install the same. The free version is for personal and non-commercial use only.
Step 2: Run, EasyBCD. Click the Edit Boot Menu button on the left pane.
Step 3: In the Modify Menu Entries section, select an entry and then click the Up or Down icons to move it up or down.

To change the default operating system, simply click the checkbox next to it.
Here you can also change the countdown time from the default 30 seconds to something else, or you can make the boot menu wait until the user selects an entry.
Finally, click the Save settings button.
How to Change Boot Order in Windows 10
Changing the boot order in Windows 10 is an easy task that requires accessing the BIOS or UEFI settings of your computer. You’ll need to restart your computer, enter the BIOS or UEFI menu, and then navigate to the boot order settings. It’s a straightforward process, but you’ll need to pay attention to the steps to ensure you don’t accidentally change other settings.
In this section, you’ll find a detailed guide on how to change the boot order in your Windows 10 system. Follow these steps carefully to adjust the boot sequence.
Step 1: Restart Your Computer
Restart your computer by clicking on the Start menu, selecting Power, and then hitting Restart.
When your computer restarts, you’ll need to act quickly to enter the BIOS or UEFI settings. Pay attention to the prompt on your screen, which will tell you which key to press.
Step 2: Enter BIOS or UEFI Settings
Press the designated key (often F2, F12, Delete, or Esc) as soon as your computer starts to boot up.
The key varies by manufacturer, so check your computer’s manual if you’re unsure. This will take you into the BIOS or UEFI menu where you can manage various hardware settings.
Step 3: Navigate to Boot Order Settings
Use the arrow keys to find the Boot or Boot Order menu within the BIOS or UEFI settings.
Each BIOS or UEFI interface is different, so you might need to look around for the right menu. It’s usually labeled as Boot, Boot Options, or Boot Order.
Step 4: Change the Boot Order
Select the device you want to boot from first (such as a USB drive or DVD) and move it to the top of the list.
You can usually move devices up and down the list with the arrow keys or specific function keys indicated on the screen.
Step 5: Save and Exit
Press the key to save your changes and exit the BIOS or UEFI settings (often F10).
Your computer will then restart with the new boot order. Make sure to save your changes, or the boot order will not be updated.
Once you’ve completed these steps, your computer will reboot using the new boot order you’ve set. It will prioritize the device you placed at the top of the list whenever it starts up.
Tips for Changing Boot Order in Windows 10
- Always take note of the original boot order before making changes, in case you need to revert back.
- If you’re using a USB drive, make sure it’s plugged in before you access the BIOS or UEFI settings.
- Be careful not to change other settings unless you know what you’re doing.
- Consult your computer’s manual if you’re unsure about which key to press to enter the BIOS or UEFI menu.
- If you have trouble entering the BIOS or UEFI, try restarting and pressing the key repeatedly.
Frequently Asked Questions
How do I enter the BIOS or UEFI on my specific computer?
Refer to your computer’s manual or look up the manufacturer’s website for the specific key to press during startup.
Can I change the boot order without entering BIOS or UEFI?
No, you need to access the BIOS or UEFI settings to change the boot order.
Will changing the boot order affect my files?
No, changing the boot order only affects the sequence of devices your computer tries to boot from. It does not affect your files or operating system.
What happens if I make a mistake in the BIOS or UEFI?
If you make an unwanted change, you can usually reset to default settings within the BIOS or UEFI menu.
Can I change the boot order back to the original settings?
Yes, you can follow the same steps to revert to the original boot order.
Summary
- Restart Your Computer.
- Enter BIOS or UEFI Settings.
- Navigate to Boot Order Settings.
- Change the Boot Order.
- Save and Exit.
Conclusion
Changing the boot order in Windows 10 is a simple yet crucial task that can help you boot from different devices, such as a USB drive or DVD. Whether you’re troubleshooting, installing a new operating system, or just curious, knowing how to adjust the boot sequence can be incredibly useful.
Before diving in, make sure to familiarize yourself with the steps and tips provided. Take it slow and be cautious about other settings in the BIOS or UEFI menu. A little preparation goes a long way in ensuring a smooth process.
If you’re curious to learn more about other settings within the BIOS or UEFI, or how to optimize your Windows 10 experience further, there are plenty of resources and guides available online. Changing the boot order is just one small part of managing your computer’s settings, but it’s an excellent place to start.
Feel free to dive deeper, explore, and take control of your system. Happy computing!
Matt Jacobs has been working as an IT consultant for small businesses since receiving his Master’s degree in 2003. While he still does some consulting work, his primary focus now is on creating technology support content for SupportYourTech.com.
His work can be found on many websites and focuses on topics such as Microsoft Office, Apple devices, Android devices, Photoshop, and more.
-
Home
-
News
- How To Change Boot Order Safely On Windows Device
By Sarah |
Last Updated
A boot device is absolutely indispensable to a computer since it contains all the necessary files for booting an operating system (OS). Except for the device itself, the boor order is also very significant for users to boot into OS successfully. This post will show you how to change boot drive/boot order in detail.
In brief, the boot order refers to the order of the storage devices connected to a computer. It decides which device the computer will search first for program code to load the operating system. If the boot order is not set properly, users will definitely run into problems while booting. This happens frequently when users decide to change their boot device. (MiniTool Solution provides many useful methods for solving startup problemes.)
So, what should you do to avoid such situation? Certainly, the answer is change boot order .
How to Change Boot Order on A Windows Computer
When do you need to change boot sequence? The common cases include:
- Troubleshoot virus issues with bootable antivirus programs.
- Install a new operating system or reinstall your current system.
- Use bootable data destruction tools and other useful utilities.
- …
Every time when you start a computer, the BIOS (Basic Input/Output System) or UEFI Firmware will load up first; it tells the computer which drive it should use to boot the Windows. If you want to boot from a new drive, you should go to change the boot order in BIOS (please set the target drive as the first boot device). In the following part, I’ll take BIOS as an example to show you the steps to change boot sequence safely.
Tip: Please read this page carefully if your BIOS is corrupted.
How to Change Boot Drive in BIOS
Step 1: shut down your computer to which the target boot drive is connected. Then, restart it and look carefully for the message that tells you which button to press to enter SETUP/BIOS (the message will appear on your computer screen in the first few seconds).
- In common cases, you only need to press a single key (F1, F2, F10, Delete or Esc) during startup.
- However, there are still some cases in which you should press key combinations like Ctrl + Alt + Esc and Ctrl + Alt + Delete to access BIOS.
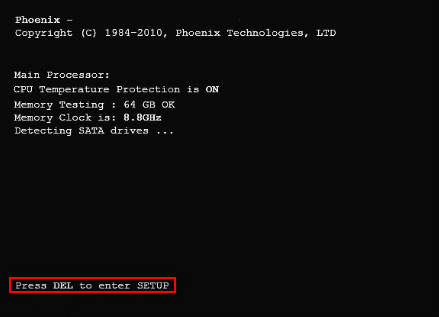
The message disappears very quickly so that many people complained they miss the key information during computer restart. In this case, my advice is to reboot again.
- Setup: [key]
- Press [key] to enter setup
- Press [key] to access BIOS
- Enter BIOS by pressing [key]
- Press [key] to enter BIOS setup
- Press [key] to access system configuration
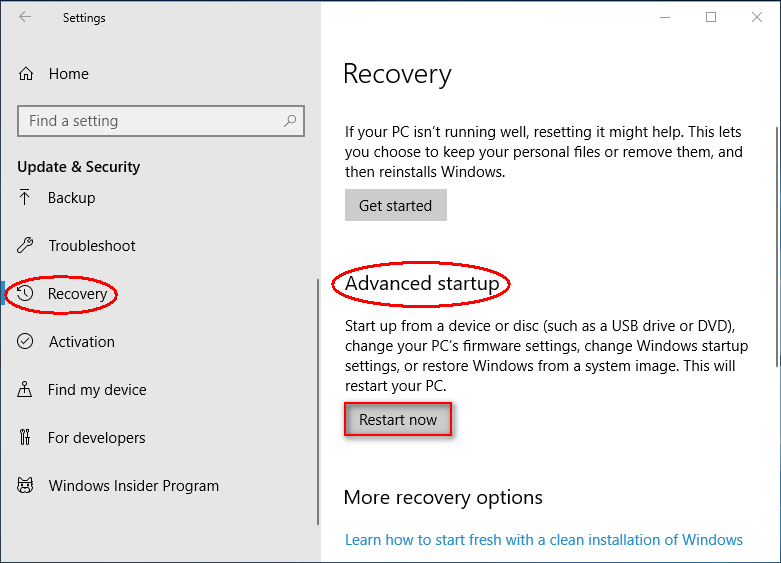
Luckily, users of Windows 10 have no such trouble; they can go to restart their PC to change boot order directly by following steps.
- Press Win + I key combination to open Windows Settings.>
- Click Update & Security at the bottom.
- Navigate to Recovery option from the left pane.
- Look for Advanced startup section from the right pane.
- Click on the Restart now button and wait.
Step 2: get familiar with the BIOS Setup Utility main window and then navigate to the boot order options.
Not all the BIOS utilities are the same; there are some differences between them. So please don’t be surprised to find that your BIOS interface is completely different from what I show you below. Please look through the options in BIOS Setup Utility so as to locate the option for changing boot order quickly.
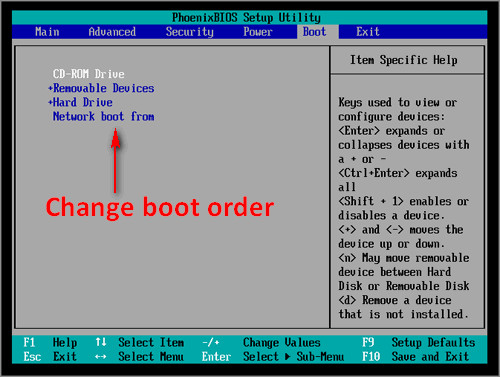
Now, you should select the option called Boot (or another name) that is responsible for changing the boot sequence. After that, all the devices (hard drives, USB drives, and optical drives) connected to the computer will be listed in order.
Actually, the list order is the order that tells your computer which drive to look first for operating system information. That is what well called the boot order.
Step 3: change boot order to meet your needs by following the instructions.
In this step, you should move the drive that you want to boot from to the top of the list (using the + and – keys). After that, please make sure the boot order is correct and the first boot drive contains valid & complete start-up files.
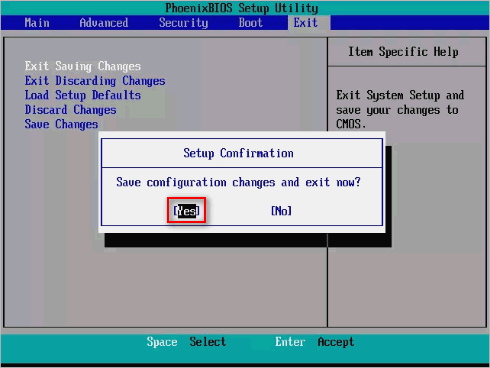
Step 4: exit BIOS and save changes.
When you’re sure everything’s right, you should navigate to Exit or Save and Exit option. Click Yes to exit and save changes.
Step 5: now, you can restart the computer with the new boot order. When you click to restart PC, your BIOS will start to boot from the first drive in the boot order you have modified. Then, you will enter Windows successfully. (If the first boot device is not bootable, the PC will try to boot from the second device.)
That’s how to change boot drive in BIOS.
[2020] Top Windows 10 Boot Repair Tools You Should Know!
About The Author
Position: Columnist
Sarah has been working as an editor at MiniTool since she graduated from university. Sarah aims at helping users with their computer problems such as disk errors and data loss. She feels a sense of accomplishment to see that users get their issues fixed relying on her articles. Besides, she likes to make friends and listen to music after work.
Download Windows Speedup Tool to fix errors and make PC run faster
When your PC boots up, the first thing that loads up is the UEFI Firmware or the BIOS. It does a lot of things which also includes the option to which hardware to use to boot the Windows. If you want to boot from a USB drive or an external drive, you need to change the boot order on Windows 11/10. The usual default is set to the first hard drive connected to the PC.
Prior to Windows 11/10, it was possible only by rebooting your PC and then press a unique key like F2 or DEL on your keyboard to get into BIOS. In Windows 10, Microsoft has inbuilt a recovery system that allows you to do many things. One of the options is to boot into BIOS making it a lot easier in case you always miss pressing the key.
In this guide, we will show how you can boot into Windows 11/10 firmware settings (UEFI/BIOS), and change the boot order easily.
Windows 11/10 Recovery System allows you to get into your UEFI/BIOS settings from the OS and change your boot order. You can choose to boot from a USB drive or DVD Drive. This comes in handy during fresh installation or upgrading using an ISO.
Windows 11 users need to press Win+I to open Settings > System Recovery and click on Restart now button against Advanced Startup.
Windows 10 users, open Settings > Update & Security > Recovery Advanced Startup and click on Restart now.
This feature lets you:
- Boot Windows from a device or disk (such as a USB drive or DVD).
- Change your PC’s Firmware Settings.
- Configure Windows Startup Settings.
- Restore Windows from a System Image.
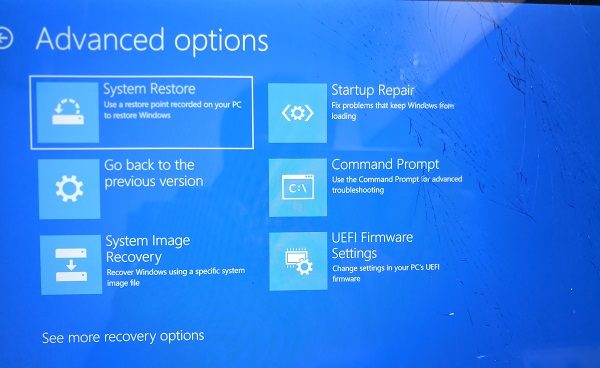
When you click on Restart Now, it will reboot your PC, and offer you all these Advanced Options. Click, and wait till you get these options. Select Troubleshoot > Advanced Options. This screen offers further options which include System Restore, Startup repair, Go back to the previous version, Command Prompt, System Image Recovery, and UEFI Firmware Settings.
Select UEFI Firmware Settings, and it will let you restart your PC. Once the computer boots up, it will take you to the Firmware settings.
- Switch to Boot Tab.
- Here you will see Boot Priority which will list connected hard drive, CD/DVD ROM and USB drive if any.
- You can use the arrow keys or + & – on your keyboard to change the order.
- Save and Exit.

Now when you boot it will follow the sequence which you have set in your BIOS or UEFI Firmware Settings.
See: How to change Boot Menu Timeout in Windows
This comes in very handy when you want to boot from a DVD drive that has Windows 11/10 Installation files or if you have another Windows installed on a secondary hard disk.
Read: How to change default operating system in Windows
Note: It seems if you have a Bluetooth keyboard, it will not work here. You will need a hard-wired keyboard to navigate and change the options. Also, the touch doesn’t work either.
Read: Change Time to display the list of operating systems & Recovery Options in Windows.
Anand Khanse is the Admin of TheWindowsClub.com, a 10-year Microsoft MVP (2006-16) & a Windows Insider MVP (2016-2022). Please read the entire post & the comments first, create a System Restore Point before making any changes to your system & be careful about any 3rd-party offers while installing freeware.
Reader Interactions
The process of changing the boot order in Windows 10 can be a critical step in troubleshooting and optimizing your computer’s performance. With the right boot order configuration, you can ensure that your computer starts up from the desired device, whether it’s an internal hard drive, external USB drive, or a bootable disk. This can be particularly useful when you need to boot from a recovery disk or install a new operating system.
Changing the boot order in Windows 10 is a straightforward process that can be done through the computer’s BIOS settings. The BIOS, which stands for Basic Input/Output System, is responsible for initializing and testing hardware components during the computer’s startup process. By accessing the BIOS settings, you can modify the boot order and prioritize the devices from which the computer should boot first. This flexibility allows you to tailor your computer’s startup sequence to meet your specific needs, enhancing the overall efficiency and functionality of your system.
To change the boot order in Windows 10, follow these steps:
- Restart your computer and enter the BIOS setup by pressing the appropriate key (usually F2 or Delete).
- Once inside the BIOS settings, navigate to the Boot menu.
- Locate the option that allows you to change the boot order sequence.
- Use the arrow keys to move the desired boot device to the top of the list.
- Save the changes and exit the BIOS settings.
By following these steps, you can change the boot order in Windows 10 and prioritize which device to boot from.

Understanding the Boot Order in Windows 10
The boot order refers to the sequence in which a computer’s operating system loads when the computer is turned on. By default, Windows 10 is set to boot from the hard drive or SSD where the operating system is installed. However, there may be situations where you need to change the boot order, such as when you want to boot from a different drive or device, like a USB drive or DVD.
In this article, we will guide you through the process of changing the boot order in Windows 10. Whether you’re a seasoned professional or a novice user, these step-by-step instructions will help you easily modify the boot order and ensure that your computer starts up from the desired device.
Note that changing the boot order requires accessing your computer’s BIOS or UEFI settings. The steps may vary slightly depending on your specific computer model and manufacturer. Make sure to follow the instructions carefully and consult your computer’s documentation if needed.
Changing the Boot Order in Windows 10
To change the boot order in Windows 10, follow these steps:
- Step 1: Shut down your computer completely.
- Step 2: Turn on your computer and quickly press the BIOS or UEFI key.
- Step 3: In the BIOS or UEFI settings, navigate to the Boot or Boot Options menu.
- Step 4: Use the arrow keys to select the desired boot device or drive.
- Step 5: Move the selected boot device to the top of the boot order list.
- Step 6: Save the changes and exit the BIOS or UEFI settings.
- Step 7: Restart your computer.
This process may slightly vary depending on your computer’s motherboard and firmware. The BIOS or UEFI key is typically displayed during the boot process. Common keys include F2, F8, F10, Del, or Esc. Refer to your computer’s documentation or the manufacturer’s website for the specific key.
Following these steps should successfully change the boot order in Windows 10, allowing you to boot from the desired device or drive.
Booting from a USB Drive
Booting from a USB drive can be useful when you need to install a new operating system or run diagnostics tools. Here’s how you can change the boot order to boot from a USB drive in Windows 10:
- Step 1: Connect the USB drive to your computer.
- Step 2: Follow the steps mentioned earlier to access the BIOS or UEFI settings.
- Step 3: Navigate to the Boot or Boot Options menu.
- Step 4: Use the arrow keys to select the USB drive as the boot device.
- Step 5: Move the USB drive to the top of the boot order list.
- Step 6: Save the changes and exit the BIOS or UEFI settings.
- Step 7: Restart your computer.
Your computer will now boot from the USB drive, allowing you to perform the desired actions, such as installing an operating system or running diagnostics.
Changing the Boot Order for a Specific Boot
If you have multiple operating systems installed on different drives, you can change the boot order to boot from a specific operating system when starting your computer. Here’s how:
- Step 1: Follow the steps mentioned earlier to access the BIOS or UEFI settings.
- Step 2: Navigate to the Boot or Boot Options menu.
- Step 3: Use the arrow keys to select the desired drive or operating system.
- Step 4: Move the selected drive or operating system to the top of the boot order list.
- Step 5: Save the changes and exit the BIOS or UEFI settings.
- Step 6: Restart your computer.
Your computer will now boot from the selected drive or operating system, allowing you to access the specific operating system you want to use.
Tips for Changing the Boot Order
Here are some additional tips to keep in mind when changing the boot order in Windows 10:
- Tip 1: Be cautious when modifying BIOS or UEFI settings. Incorrect settings can prevent your computer from starting up properly. Make sure to save any important data before making changes and proceed with caution.
- Tip 2: If you’re uncertain about changing the boot order, consult your computer’s documentation or seek assistance from a professional technician.
- Tip 3: Keep the boot order settings in mind if you plan to remove or add new drives or devices to your computer in the future. You may need to revisit the BIOS or UEFI settings to adjust the boot order accordingly.
- Tip 4: Regularly check for BIOS or UEFI firmware updates from your computer manufacturer’s website. These updates may include improvements or bug fixes related to boot order settings.
By following these tips, you can ensure a smooth and successful process when changing the boot order in Windows 10.
Exploring Boot Order Options in Windows 10
Aside from changing the primary boot device, Windows 10 offers additional boot options that can come in handy in specific situations. Let’s take a look at some of these boot order options:
Accessing the Boot Options Menu
The Boot Options menu allows you to temporarily change the boot order and choose a different device to boot from without permanently modifying the BIOS or UEFI settings. Here’s how you can access the Boot Options menu in Windows 10:
- Step 1: Restart your computer.
- Step 2: During the boot process, look for the key to access the Boot Options menu. This key is often F12 or Esc, but it can vary depending on your computer manufacturer.
- Step 3: Press the corresponding key to enter the Boot Options menu.
- Step 4: In the Boot Options menu, use the arrow keys to select the desired boot device.
- Step 5: Press Enter to boot from the selected device.
The Boot Options menu provides a convenient way to choose a different boot device on a temporary basis, without changing the permanent boot order settings.
Using Advanced Startup Options
Windows 10’s Advanced Startup Options provide additional boot options for troubleshooting and recovery purposes. Here’s how you can access the Advanced Startup Options:
- Step 1: Open the Start menu and click on the Power button.
- Step 2: Press and hold the Shift key on your keyboard, then click on Restart.
- Step 3: Your computer will restart and display the Advanced Startup Options menu.
- Step 4: In the Advanced Startup Options menu, select the desired option, such as Safe Mode, Command Prompt, or System Restore.
Advanced Startup Options provide various boot options that can help you troubleshoot and recover your computer in case of issues or errors.
Resetting Windows 10
If you are facing persistent software issues, you may consider resetting Windows 10 to its factory settings. Here’s how:
- Step 1: Open the Start menu and click on the Settings icon.
- Step 2: In the Settings menu, click on Update & Security.
- Step 3: Navigate to the Recovery tab in the Update & Security menu.
- Step 4: Click on the Get started button under the Reset this PC section.
- Step 5: Choose whether to keep your personal files or remove everything.
- Step 6: Follow the on-screen instructions to complete the reset process.
Resetting Windows 10 can help resolve persistent software issues and provide a fresh start for your computer.
Modifying Boot Options using the System Configuration Tool
The System Configuration tool, also known as msconfig, allows you to modify various system boot options, including the boot order. Here’s how you can use this tool:
- Step 1: Open the Start menu and search for «msconfig».
- Step 2: Click on the System Configuration app from the search results.
- Step 3: In the System Configuration window, navigate to the Boot tab.
- Step 4: Here, you can modify the boot options, such as the default operating system, timeout duration, and boot options for troubleshooting purposes.
- Step 5: Once you have made the desired changes, click on Apply and then OK.
- Step 6: Restart your computer for the changes to take effect.
The System Configuration tool provides a convenient way to modify various boot options without directly accessing the BIOS or UEFI settings.
Using Third-Party Software
There are several third-party software tools available that allow you to modify the boot order and manage boot options in Windows 10. These tools often provide a more user-friendly interface and additional features compared to the built-in options in the BIOS or UEFI settings. When using third-party software, make sure to choose a reputable and trusted tool.
By exploring these boot order options in Windows 10, you can customize your computer’s startup process and troubleshoot any issues or errors more effectively.
Changing the boot order in Windows 10 can be a crucial step when you need to boot from a different device or prioritize specific operating systems. Whether you’re installing a new operating system, running diagnostic tools, or troubleshooting software issues, understanding and modifying the boot order is essential. By following the instructions outlined in this article, you can confidently change the boot order in Windows 10 and optimize your computer’s startup process to suit your needs.
Changing Boot Order in Windows 10
In Windows 10, the boot order refers to the sequence in which the computer searches for the operating system to load during startup. By default, Windows 10 is configured to boot from the primary hard drive. However, there may be times when you need to change the boot order, such as when you want to boot from a USB drive or DVD.
- Start by accessing the «BIOS» or «UEFI» settings. This can usually be done by pressing the «Delete» or «F2» key during startup.
- Navigate to the «Boot» or «Boot Order» section in the BIOS/UEFI settings.
- Use the arrow keys to select the desired boot device, such as a USB drive or DVD, and move it to the top of the boot order list.
- Save the changes and exit the BIOS/UEFI settings.
After changing the boot order, your computer will prioritize the selected device and attempt to boot from it first. It is important to note that these settings may vary depending on the manufacturer and model of your computer. Refer to your computer’s user manual or contact the manufacturer’s support for specific instructions related to changing the boot order on your Windows 10 machine.
Key Takeaways — How to Change Boot Order in Windows 10
- Access the BIOS settings by restarting your computer and pressing the appropriate key.
- Navigate to the Boot section in the BIOS settings.
- Change the boot order by moving the desired device to the top of the list.
- Save the changes and exit the BIOS settings.
- Restart your computer to boot from the newly set boot order.
Frequently Asked Questions
In this section, we will provide answers to commonly asked questions about changing the boot order in Windows 10. Read on to find step-by-step instructions and helpful tips.
1. How do I change the boot order in Windows 10?
To change the boot order in Windows 10, follow these steps:
Step 1: Start your computer and access the BIOS menu by pressing the designated key during startup (usually F2, F10, or Del).
Step 2: In the BIOS menu, navigate to the «Boot» or «Boot Order» section using the arrow keys.
Step 3: Use the arrow keys to select the device you want to boot from first. You can prioritize different devices, such as hard drives, USB drives, or optical drives.
Step 4: Once you have selected the desired boot order, save the changes and exit the BIOS menu.
After following these steps, your computer will boot from the selected device according to the new boot order.
2. Can I change the boot order without accessing the BIOS?
No, changing the boot order typically requires accessing the BIOS menu. The BIOS (Basic Input/Output System) is a firmware interface that controls the computer’s hardware initialization process, including the boot order. Without accessing the BIOS, you won’t be able to change the boot order.
However, some computers may provide alternative methods to temporarily change the boot order without accessing the BIOS. For example, you might be able to select a boot device by pressing a specific key during startup.
If you are unable to access the BIOS or find an alternative method, consult your computer’s documentation or contact the manufacturer for further assistance.
3. Why would I need to change the boot order in Windows 10?
There are several reasons why you might need to change the boot order in Windows 10:
1. Booting from a different device: Changing the boot order allows you to prioritize booting from a specific device, such as a USB drive or DVD, instead of the default hard drive.
2. Installing a new operating system: When installing a new operating system, you may need to change the boot order to boot from the installation media.
3. Troubleshooting purposes: Changing the boot order can help troubleshoot issues with the current operating system by booting from a different device or performing a clean install.
By changing the boot order, you have more control over the startup process of your computer.
4. Will changing the boot order affect my data?
No, changing the boot order should not affect your data. The boot order determines the priority of boot devices and does not impact the data stored on those devices.
However, it’s always a good practice to back up your important data before making any changes to the boot order or any other system settings, as unexpected issues can arise during the process.
5. Can I revert back to the default boot order?
Yes, you can revert back to the default boot order by accessing the BIOS menu and selecting the «Restore Defaults» or similar option. This will reset the boot order to its original settings.
Additionally, some BIOS menus provide the option to select a «Load Setup Defaults» or «Optimized Defaults» option, which will restore not only the boot order but also other BIOS settings to their default values.
Remember to save the changes before exiting the BIOS menu to apply the default boot order.
In summary, changing the boot order in Windows 10 is a straightforward process that allows you to prioritize the devices your computer uses to boot up. By accessing the BIOS settings, you can easily rearrange the boot order to suit your needs. Remember to proceed with caution and make sure you are familiar with the different boot devices before making any changes.
Follow the steps outlined in this article and take note of any specific instructions provided by your computer’s manufacturer. By changing the boot order, you can ensure that your computer starts up from the desired device, whether it’s a USB drive, DVD, or another hard drive. Taking the time to adjust the boot order can save you troubleshooting time in the future and streamline your computer’s startup process.