
CIFS-utils (Common Internet File System utilities) — это набор утилит для монтирования и управления файловыми ресурсами, доступными через протокол CIFS (SMB). Протокол CIFS позволяет подключаться к файловым ресурсам, расположенным на других компьютерах, включая Windows-серверы.
Устанавливаем утилиту cifs-utils
1 |
$ sudo yum install cifs-utils |
Добавляем пользователей
1 2 3 4 5 |
$ sudo useradd -u 5000 UserPackages $ sudo useradd -u 5001 UserTraffic $ sudo groupadd -g 6000 share_library $ sudo usermod -G share_library -a UserPackages $ sudo usermod -G share_library -a UserTraffic |
Создаем каталоги, в которые будем монтировать расшаренные windows-ресурсы
1 2 |
$ sudo mkdir /mnt/Packages $ sudo mkdir /mnt/Traffic |
Создаем файл с настройками доступа к расшаренным windows-ресурсам и задаем права на этот файл
1 2 3 4 5 |
$ sudo nano /root/smb_user username=user domain=DOMAIN password=password $ sudo chmod 0600 /root/smb_user |
Монтируем
1 2 |
$ sudo mount.cifs \\192.168.0.15\Packages /mnt/Packages -o credentials=/root/smb_user,uid=5000,gid=6000 $ sudo mount.cifs \\192.168.0.15\Traffic /mnt/Traffic -o credentials=/root/smb_user,uid=5001,gid=6000 |
Команды для размонтирования:
1 2 |
$ sudo umount /mnt/Packages $ sudo umount /mnt/Traffic |
Автоматическое монтирование каталогов при последующей загрузке операционной системы
Открываем файл /etc/fstab в текстовом редакторе и добавляем в конце файла строки:
1 2 3 |
$ sudo nano /etc/fstab \\192.168.0.15\Packages /mnt/Packages cifs credentials=/root/smb_user,uid=5000,gid=6000 0 0 \\192.168.0.15\Traffic /mnt/Traffic cifs credentials=/root/smb_user,uid=5001,gid=6000 0 0 |
Авторский пост защищен лицензией CC BY 4.0 .
Overview
In this tutorial, you will learn how to mount SMB shares on CentOS 7. You will be guided through the process for both desktop and server installations of the operating system.
CentOS provides support for mounting Microsoft CIFS or SMB shares. Not just limited to shares hosted from Microsoft Windows, we can also mount shares from any network device that uses the SMB protocol. This includes just about any NAS device on the market.
If you understand how to mount SMB shares on earlier versions of Red Hat Enterprise Linux or CentOS, the instructions are identical.
Share Configuration
For this tutorial, I prepared a share named Core Library on a Windows Server 2012 R2 server that is a member of an Active Directory domain.
TABLE1 – Windows File Server
| Hostname | Operating System | Share Path | SMB Version |
|---|---|---|---|
| WS12FS01 | Windows Server 2012 R2 | \\WS12FS01\libraries\core | 2.0 |
For the share permission on WS12FS01, we grant Full Control to Everyone. Don’t be fooled into thinking this is insecure. Although everyone has access to the share, the NTFS permissions on the volume hosting the share overrule the share permissions. By leaving Everyone and granting full control, we save our selves work by only having to manage permissions on the file system itself.
For the NTFS permissions, we created an Active Directory account named _share_library_core and granted it Modify, Read & Execute, List folder contents, Read, and Write. The account will be used when we mount the share onto CentOS 7.
We use an Active Directory account in this tutorial as an example of how someone would accomplish this in an enterprise environment.
However, an Active Directory account is not required. As long as the CentOS server has an account that can authenticate successfully on the host publishing the share, it doesn’t matter where the account actually exists – in Active Directory or locally on the file server itself.
Preparing CentOS 7 for Mounting SMB Shares
A default CentOS 7 build will not be able to mount SMB\CIFS shares, unless you customized the install. We’ll need to install a package onto the server that allows it to understand the SMB protocol.
- Install the cifs-utils package from the default CentOS yum repository.
yum install cifs-utils
- Next, we need an account on the CentOS server that will map to the Windows account granted permission to the SMB share, _share_library_core. We’ll create a service account named svc_library_core with a user id (UID) of 5000.
useradd -u 5000 svc_library_core
- We also want a group on the CentOS server that will map to the share. This group will contain all of the Linux accounts that will need access to the share. Our account will be called share_library_core and it will have a group id (gid) of 6000.
groupadd -g 6000 share_library_core
- Finally, add any Linux accounts that require access to the SMB share to the newly created Linux group. I have an existing account named user1 that I will add to the share_library_core group.
usermod -G share_library_core -a user1
Mounting an SMB Share
We are now ready to mount our SMB share. In the example below, we temporarily mount the SMB share onto our CentOS server. The share will remain mounted until the server is rebooted.
- Create a directory to mount the SMB share into. We’ll mount the share in a directory called lib_core.
mkdir /lib_core
- Using the mount.cifs command, mount the SMB share into lib_core using the Active Directory user account _share_library_core. We need to map the UID of our svc_library_core account (5000) and the gid of our share_library_core group (6000) to the SMB share.
mount.cifs \\\\WS12FS01\\libraries\\core /lib_core -o user=_share_library_core,pass="secret",uid=5000,gid=6000
The extra backslashes (\) are not typos. Backslashes are used to escape certain characters. Because of this, we have to double up on them when accessing Microsoft shares.
- If no errors appeared, the share should successfully be mounted. The verify this, use the df command or the mount.
Hiding SMB USer Credentials
In the example above, we’re forced to enter the username and password into the command-line. This is a major security issue, as someone could browse your bash history to obtain the credentials, or they can see them while you type them in. Thankfully, there’s a way to address this problem by using a credentials file.
- If not Root, SU into the Root account.
su - root
- Create a credentials file in Root’s home directory. I typically create this file in a sub-directory in Root’s home, for organizational reasons. But for this example, I will place it in /root.
touch /root/creds_smb_library_core
- Modify the file’s permissions so that only the Root account is granted read permissions. No groups or other users should have access to the file.
chmod 0600 /root/creds_smb_library_core
- Open the file in a text editor. I like using VI, but you can use whichever you prefer.
vi /etc/root/creds_smb_library_core
- Add the following lines to the file. Remember to replace the username and password values so that they match your environment.
username=_share_library_core
password=secret
TABLE2 – Credential file options
username The Windows or Active Directory username granted permissions to the share on the Windows file server. password The password given to the username - Save your changes to the credential file and exit the text editor.
- Mount the SMB share. However, instead of using the user and pass options, we instead use the credentials option and point to our credentials file.
mount.cifs \\\\WS12FS01\\libraries\\core /lib_core -o credentials=/root/creds_smb_library_core,uid=5000,gid=6000
Persistent SMB Mounts using FSTAB
The downfall of the examples above is that the mounts are only temporary – the will not remount at system boot. The make the mount permanent we need to add it the fstab.
- Open /etc/fstab into a text editor.
vi /etc/fstab
- Add the following line to your fstab. Remember to replace the values with those that match your environment.
\\\\WS12FS01\libraries\\core /lib_core cifs credentials=/root/creds_smb_library_core,uid=5000,gid=6000 0 0
- Save your changes and exit the text editor.
- The SMB share will mount the next time the CentOS server is rebooted. To mount the share immediately, use the mount command.
mount -a
В этой статье мы рассмотрим, как в Linux смонтировать общую сетевую папку, расположенную на хосте Windows. В Windows для доступа к общим сетевым папкам используется протокол SMB (Server Message Block), который ранее назывался CIFS (Сommon Internet File System). В Linux для доступа к сетевым папкам Windows по протоколу SMB можно использовать клиент cifs-utils или Samba.
- Смонтировать сетевую папку в Linux с помощью cifs-util
- Автоматическое монтирование сетевой папки в Linux
- Linux: подключиться к сетевой папке с помощью клиента samba
Содержание:
Совет. Для доступа к сетевым папкам по SMB/CIFS используется порт TCP/445. Для разрешения имени используются порты UDP 137, 138 и TCP 139. Если эти порты закрыты, вы сможете подключиться к сетевой папке Windows только по IP адресу.
Смонтировать сетевую папку в Linux с помощью cifs-util
Вы можете смонтировать сетевую папку, находящуюся на Windows хосте, с помощью утилит из пакета cifs-util. Для установки пакета выполните команду:
- В Ubuntu/Debian:
$ sudo apt-get install cifs-utils - В CentOS/Oracle/RHEL:
$ sudo dnf install cifs-utils
Создайте точку монтирования:
$ sudo mkdir /mnt/share
Теперь вы можете смонтировать сетевую папку с компьютера Windows под пользователем User03с помощью команды:
$ sudo mount.cifs //192.168.31.33/backup /mnt/share -o user=User03
Укажите пароль пользователя Windows для подключения к сетевой папке.
При подключении сетевой SMB папки можно задать дополнительные параметры:
$ sudo mount -t cifs -o username=User03,password=PasswOrd1,uid=1000,iocharset=utf8 //192.168.31.33/backup /mnt/share
- //192.168.31.33/backup – сетевая папка Windows
- /mnt/share – точка монтирования
- -t cifs – указать файловую систему для монтирования
- -o опции монтирования (эту опцию можно использовать только с правами root, поэтому в команде используется sudo)
- username=User03,password=PasswOrd1 – имя и пароль пользователя Windows, у которого есть права доступа к сетевой папке. Можно указать имя пользователя guest, если разрешен анонимный доступ к сетевой папке
- iocharset=utf8 – включить поддержку кодировки UTF8 для отображения имен файлов
- uid=1000 – использовать этого пользователя Linux в качестве владельца файлов в папке

По умолчанию шары Windows монтируются в Linux с полными правами (0755). Если вы хотите изменить права по-умолчанию при монтировании, добавьте в команду опции:
dir_mode=0755,file_mode=0755
Если вы хотите использовать имя компьютера при подключении сетевого каталога Windows, добавьте в файл /etc/hosts строку:
IP_АДРЕС ИМЯ_КОМПЬЮТЕРА
Чтобы не указывать учетные данные пользователя Windows в команде монтирования сетевой папки, их можно сохранить в файле.
Например:
$ mcedit ~/.windowscredentials
Добавьте в файл:
username=User03
password=PasswOrd1
Для подключения к папке под анонимным пользователем:
username=guest
password=
Если нужно указать учетную запись пользователя из определенного домена Active Directory, добавьте в файл третью строку:
domain = vmblog.ru
Измените права на файл:
$ chmod 600 ~/.windowscredentials
Теперь при подключении сетевой папки вместо явного указания имени пользователя и пароля можно указать путь к файлу:
$ sudo mount -t cifs -o credentials=/home/sysops/.windowscredentials,uid=1000,iocharset=utf8 //192.168.31.33/backup /mnt/share
Отмонтировать сетевую SMB папку:
$ sudo umount /mnt/share
Автоматическое монтирование сетевой папки в Linux
Можно настроить автоматическое монтирование сетевой папки Windows через /etc/fstab.
$ sudo mcedit /etc/fstab
Добавьте в файл следующую строку подключения SMB каталога:
//192.168.31.33/backup /mnt/share cifs user,rw,credentials=/home/sysops/.windowscredentials,iocharset=utf8,nofail,_netdev 0 0
- rw – смонтировать SBM папку на чтение и запись
- nofail – продолжить загрузку ОС если не удается смонтировать файловую систему
- _netdev – указывает что подключается файловая система по сети. Linux не будет монтировать такие файловые системы пока на хосте не будет инициализирована сеть.
Вы можете указать версию протокола SMB, которую нужно использовать для подключения (версия SMB 1.0 считается небезопасной и отключена по-умолчанию в современных версиях Windows). Добавьте в конец строки с настройками подключения параметр vers=3.0.
//192.168.31.33/backup /mnt/share cifs user,rw,credentials=/home/sysops/.windowscredentials,iocharset=utf8,nofail,_netdev,vers=3.0 0 0
Если на стороне хоста Windows используется несовместимая (старая версия) SMB, при подключении появится ошибка:
mount error(112): Host is downилиmount error(95): Operation not supported
Чтобы сразу смонтировать сетевую папку, выполните:
$ mount -a
Linux: подключиться к сетевой папке с помощью клиента samba
Установите в Linux клиент samba:
- В Ubuntu/Debian:
$ sudo apt-get install smbclient - В CentOS/Oracle/RHEL:
# dnf install smbclient
Для вывода всех SMB ресурсов в локальной сети:
$ smbtree -N
Вывести список доступных SMB папок на удаленном хосте Windows:
smbclient -L //192.168.31.33 -N
Если в Windows запрещен анонимный доступ, появится ошибка:
session setup failed: NT_STATUS_ACCESS_DENIED
В этом случае нужно указать учетную запись пользователя Windows, которую нужно использовать для подключения:
smbclient -L //192.168.31.33 -U User03
Если нужно использовать учетную запись пользователя домена, добавьте опцию –W:
smbclient -L //192.168.31.33 -U User03 –W Domain

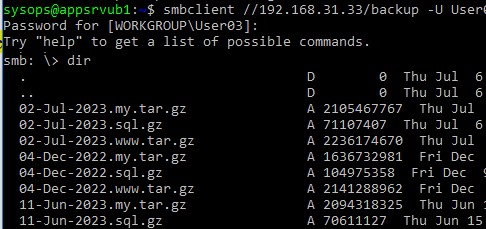
Для интерактивного подключения к сетевой папке Windows используется команда:
smbclient //192.168.31.33/backup -U User03 -W Domain
или
smbclient //192.168.31.33/backup -U User03
Для анонимного доступа:
smbclient //192.168.31.33/backup -U Everyone
После успешного входа появится приглашение:
smb: \>
Вывести список файлов в сетевой папке:
dir
Скачать файл из сетевой папки Windows:
get remotefile.txt /home/sysops/localfile.txt
Сохранить локальный файл из Linux в SMB каталог:
put /home/sysops/localfile.txt remotefile.txt
Можно последовательно выполнить несколько команд smbclient:
$ smbclient //192.168.31.33/backup -U User03 -c "cd MyFolder; get arcive.zip /mnt/backup/archive.zip"
Полный список команд в smbclient можно вывести с помощью команды help. Команды smbclient схожи с командами ftp клиента.
При использовании команды smbclient может появиться ошибка:
Unable to initialize messaging contextsmbclient: Can't load /etc/samba/smb.conf - run testparm to debug it.
Чтобы исправить ошибку, создайте файл /etc/samba/smb.conf.
Если на хосте Windows отключен протокол SMB 1.0, то при подключении с помощью smbclient появится ошибка:
Reconnecting with SMB1 for workgroup listing.
protocol negotiation failed: NT_STATUS_CONNECTION_RESET
Unable to connect with SMB1 -- no workgroup available.
CIFS
(Common Internet File System) is an implementation of SMB and network file
sharing protocol. It is used to provide shared access to files, folders and
printers etc. between windows to windows and windows to Linux machines over the
network.
This
article describes How to Mount Windows Share on CentOS7 using CIFS.
Step 1. Package installation: Run the
following command to install cifs-utils package:
[root@linuxcnf
~]# yum install cifs-utils -y
Loaded
plugins: fastestmirror
…………………………..
Installed:
cifs-utils.x86_64 0:6.2-10.el7
Dependency
Installed:
avahi-libs.x86_64 0:0.6.31-19.el7 cups-libs.x86_64 1:1.6.3-40.el7
…………………………..
samba-common.noarch 0:4.9.1-6.el7 samba-common-libs.x86_64 0:4.9.1-6.el7
Complete!
[root@linuxcnf
~]#
Step 2. Create Credential File: Create
a file with the following entries and change file permission:
[root@linuxcnf
~]# vi /root/.smb-credentials
username
= <user-name>
password
= <password>
domain
= <domain-name>
[root@linuxcnf
~]#
[root@linuxcnf
~]# chmod
600 /root/.smb-credentials
[root@linuxcnf
~]#
Step 3. Mount a Windows Share: Run
the following commands to create a directory to mount Windows Share and mount
Windows Share:
[root@linuxcnf
~]# mkdir -p /mnt/cifs-share
[root@linuxcnf
~]#
[root@linuxcnf
~]# ls -ld /mnt/cifs-share/
drwxr-xr-x.
2 root root 6 Nov 30 22:17 /mnt/cifs-share/
[root@linuxcnf
~]#
[root@linuxcnf
~]# mount
-t cifs -o credentials=/root/.smb-credentials //192.168.43.20/share /mnt/cifs-share/
[root@linuxcnf
~]#
Step 4. Configure for Auto Mount (Optional): Edit
/etc/fstab and put the below entries at the end of the file to mount the
Windows Share across reboot the machine:
[root@linuxcnf
~]# vi /etc/fstab
……………………………
//192.168.43.20/share /mnt/cifs-share/ cifs
credentials=/root/.smb-credentials
0 0
[root@linuxcnf
~]#
[root@linuxcnf
~]# mount -a
[root@linuxcnf
~]#
Step 5.
Verify the Mounting Status: Run the following command to verify mounting of the
Windows Share:
[root@linuxcnf
~]# df -hT
Filesystem Type
Size Used Avail Use% Mounted on
…………………………….
//192.168.43.20/share cifs
8.0G 3.9G 4.2G
49% /mnt/cifs-share
[root@linuxcnf
~]#
Done!!!
Windows Share is mounted successfully on CentOS 7 client.
Будем монтировать общую папку на запись в Centos 6 через cifs
yum install cifs-utils
Для Centos 5
yum install samba-client samba-common cifs-utils ntfs-3g
Ручками в версии Centos 6
mount.cifs //192.168.1.128/Zvonki_H_NS /mnt/win -o iocharset=utf8,codepage=cp866,uid=100,gi
Ручками в версии Centos 7
mount.cifs \\\\192.168.1.128\\Zvonki_H_NS /mnt/win -o user=admin,domain=DOMEN.LOCAL,pass=paSSword1
;
Разшифровка параметров для варианта Centos 6
192.168.1.128 — адрес машины с windows
Zvonki_H_NS — имя разшаренно папки на windows
/mnt/win — куда монтируем
rw — справа на запись и чтение
admin — имя пользователя в windows (под кем заходим для монтирования)
paSSword1 — пароль для windows пользователя
А вот теперь сложно: uid=100,gid=101 — над необходимо что бы права на файлы были от пределенного пользователя Linux
для примера пускай будет пользователь asterisk
Делаем раз:
id asterisk
uid=100(asterisk) gid=101(asterisk) groups=101(asterisk)
И вот наши заветные цифры uid и gid
;
скрипт
Время от времени компьютер с windows все равно перезагружают, нам необходимо проверять раз в 10 минут, на месте ли смонтированный каталог
в crontab добавили строчку — */10 * * * * root /etc/mont-share.sh
И сам скрипт
;
#!/bin/sh
if mountpoint -q /mnt/win
then
echo «mounted»
else
echo «no mounted»
umount /mnt/win
mount.cifs //192.168.1.128/Zvonki_H_NS /mnt/win -o iocharset=utf8,codepage=cp866,uid=100,gi
mountpoint -q /mnt/win && echo «mounted» || echo «not mounted»
fi
;
Так же необходимо иметь строку в fstab — что бы при старте Linux машины папка сразу монтировалась
добвлять в самый конец
;
//192.168.1.128/Zvonki_H_NS /mnt/win -o iocharset=utf8,codepage=cp866,uid=100,gi