
Все способы:
- Способ 1: Регулировка усиления и улучшения
- Вариант 1: «Панель управления звуком»
- Вариант 2: Realtek HD
- Способ 2: Встроенное средство устранения неполадок
- Способ 3: Обновление драйвера
- Способ 4: Проверка оборудования и разъемов
- Способ 5: Сторонние программы
- Вопросы и ответы: 1
Способ 1: Регулировка усиления и улучшения
Нередко микрофон фонит не из-за аппаратных проблем, а вследствие программных настроек или неполадок. Большое количество улучшений и высокий уровень усиления может вызвать фон, причем не только в недорогих встроенных устройствах, но и у внешнего качественного оборудования. Чтобы решить проблему, попробуйте отключить все улучшения через штатные приложения или фирменную утилиту звуковой карты.
Вариант 1: «Панель управления звуком»
Через приложение «Параметры» в Windows 10 можно перейти в классическую «Панель управления звуком», где доступны настройки для звукового оборудования, включая микрофоны.
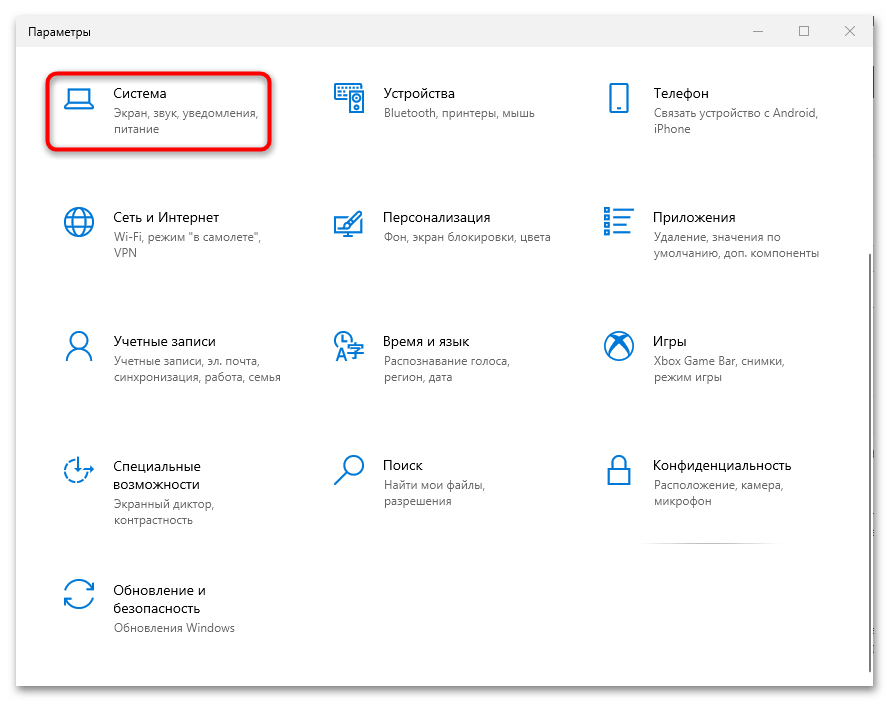
- Откройте главное меню, нажав на значок «Пуск». Выберите строку «Параметры», визуализированную под изображение шестеренки.
- Выберите раздел «Система».
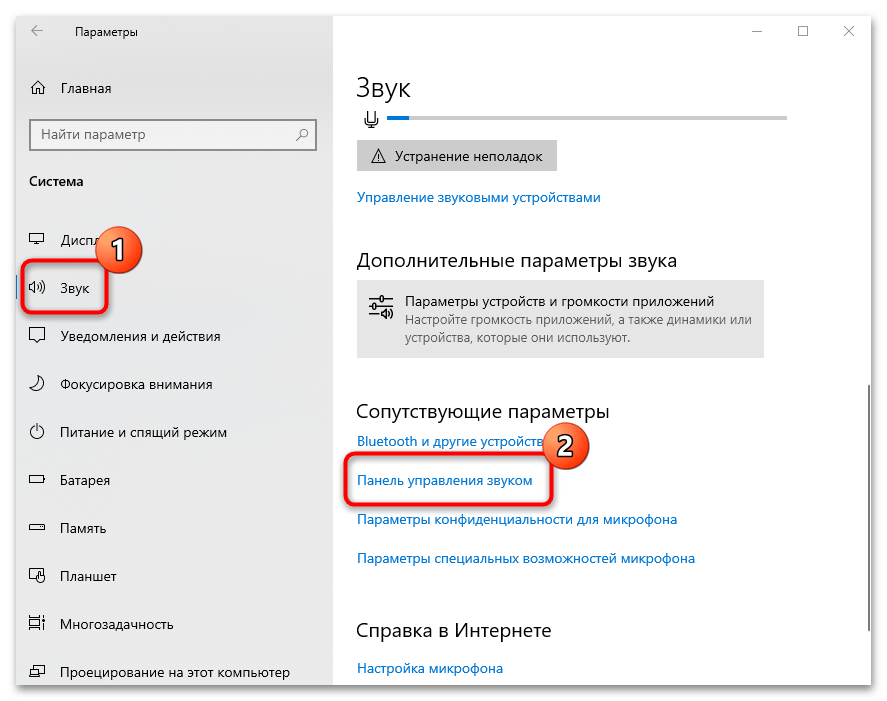
- В новом окне слева выберите вкладку «Звук». В блоке «Сопутствующие параметры» кликните по строке «Панель управления звуком».
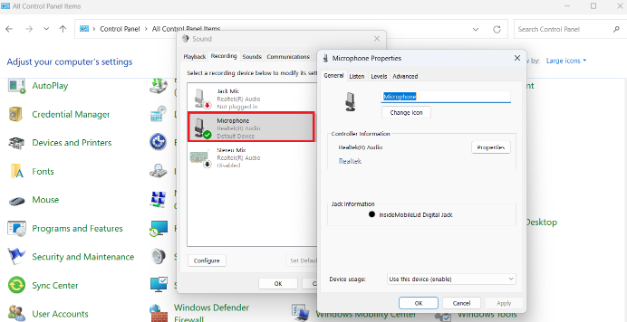
- Откроется панель, где нужно перейти на вкладку «Запись» — здесь есть звуковые устройства ввода. Выделите проблемное оборудование, кликнув по его названию левой кнопкой мыши, затем нажмите на кнопку «Свойства».
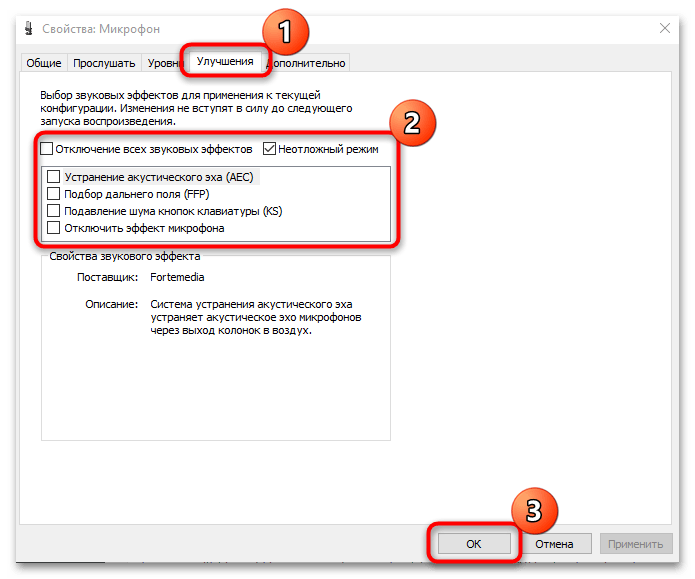
- Для начала перейдите на вкладку «Уровни». Посмотрите на положение ползунка у параметра «Усиление микрофона». Попробуйте уменьшить его значение до минимального, перетянув фиксатор влево.
- Затем нажмите на вкладку «Улучшения». Вручную снимите галочки с различных эффектов либо отметьте пункт «Отключение всех звуковых эффектов», и тогда список всех улучшений станет неактивным. Нажмите на кнопку «ОК», чтобы подтвердить настройку.


После этого проверьте, продолжает ли фонить микрофон в Windows 10. Если проблема никуда не делась, то переходите к следующим способам, где рассмотрены более серьезные системные и аппаратные проблемы.
Вариант 2: Realtek HD
Большинство звуковых карт взаимодействуют и настраиваются через фирменное приложение производителя компонента, и в большинстве случаев это Realtek HD Audio Manager. Через него можно управлять улучшениями микрофона. Если у вас другое приложение, то смысл использования сохранится, разница будет лишь в поиске рассматриваемых параметров.
Читайте также: Установка Realtek HD на компьютер с Windows 10
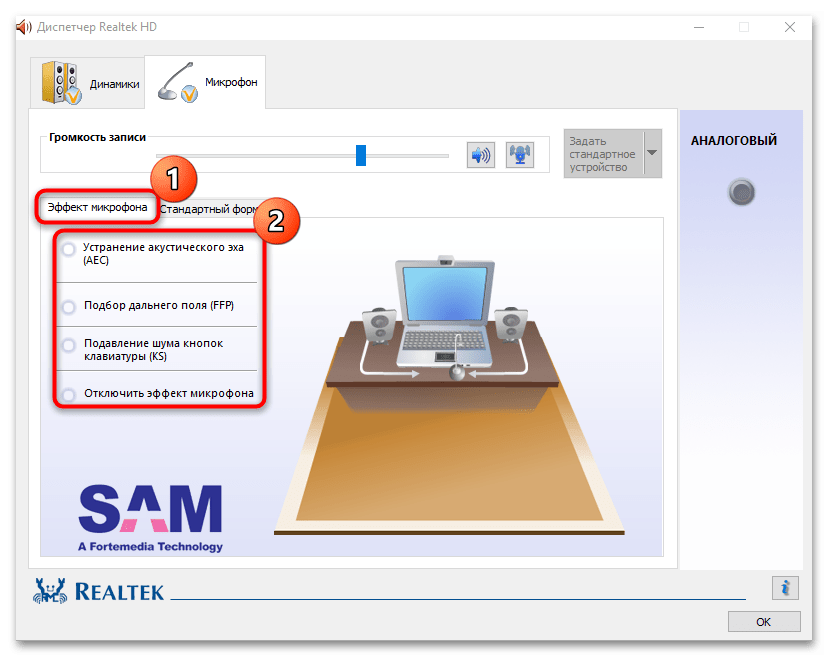
- Запустите аудиоменеджер и перейдите на вкладку «Микрофон» в интерфейсе программы. В строке с громкостью записи кликните по кнопке со значком в виде микрофона.
- Откроется панель с настройкой усиления – переведите значение параметра на минимум. Закройте дополнительное окошко.
- Ниже на вкладке «Эффект микрофона» отключите все улучшения, если они активны. Если ни одно из них не функционирует, можно попробовать активировать «Устранение акустического эха».
- На вкладке «Стандартный формат» попробуйте изменить частоту дискретизации, поскольку в некоторых случаях проблема с входным звуком связана именно с этим параметром. Подтвердите настройку.

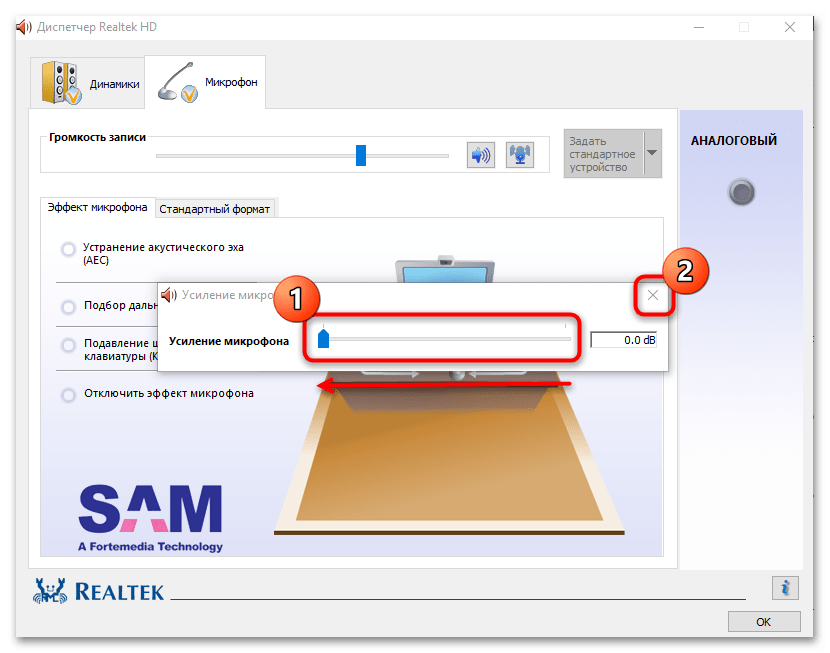
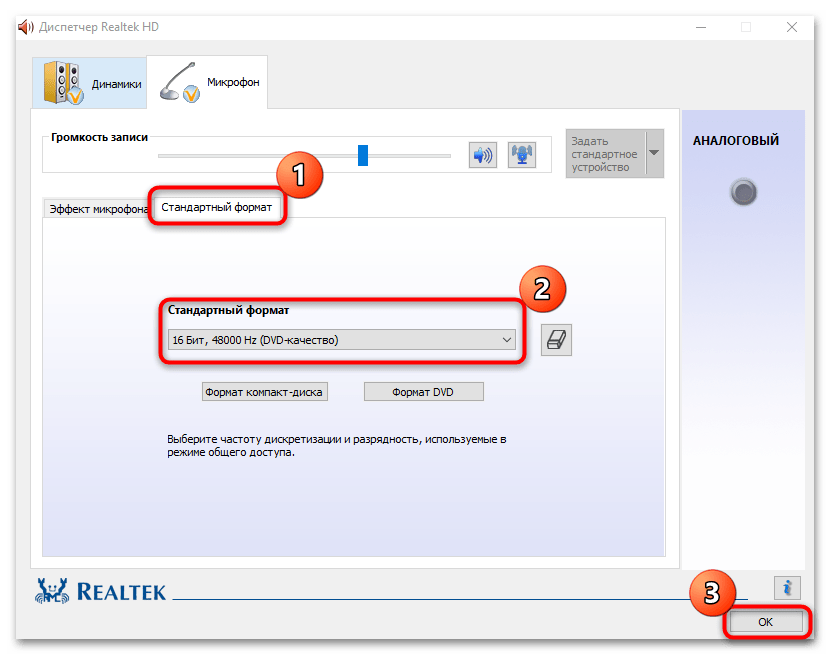
Настройки в менеджере Realtek HD могут отличаться, в зависимости от возможностей используемого звукового оборудования.
Читайте также:
Что делать, если не устанавливается Realtek HD в Windows 10
Что делать, если не запускается Realtek HD в Windows 10
Способ 2: Встроенное средство устранения неполадок
В «десятке» предусмотрено средство для диагностики и устранения неполадок, которое может также проверить микрофон на наличие неисправностей и дать рекомендации пользователю по их устранению:
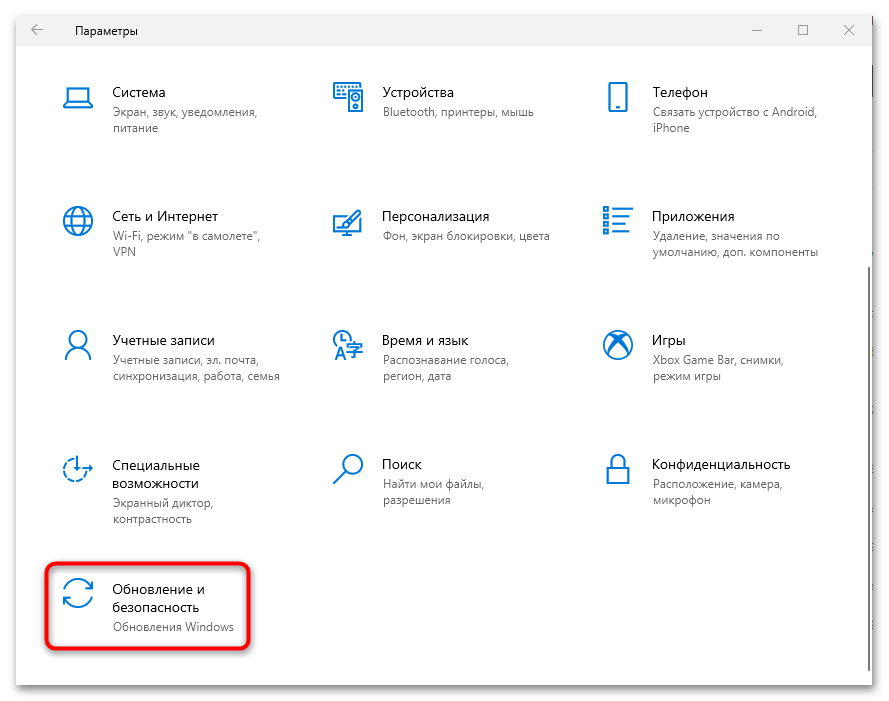
- Через системное приложение «Параметры» выберите раздел «Обновление и безопасность».
- На панели слева перейдите на вкладку «Устранение неполадок», затем нажмите по ссылке «Дополнительные средства устранения неполадок».
- Отыщите строку «Запись звука» и кликните по ней левой кнопкой мыши. Появится кнопка для запуска средства.

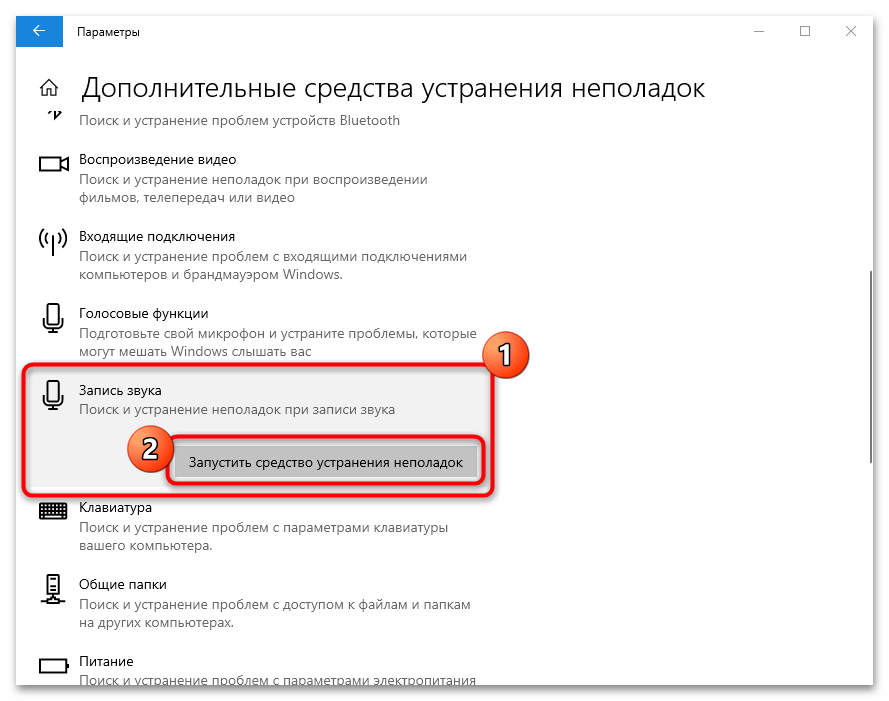
После этого штатное средство самостоятельно осуществит диагностику Windows и оборудования для записи звука на наличие проблем. Процесс проверки отображается на экране. Если неполадка будет обнаружена, инструмент даст рекомендации по ее устранению.
Способ 3: Обновление драйвера
Устаревшее программное обеспечение для звукового оборудования порой вызывает проблемы не только с воспроизведением, но и с микрофоном. Если используется встроенное устройство (в ноутбук, вебку), то обновить драйвер можно с помощью штатных средств или сторонних программ. В нашем руководстве можно узнать более подробную информацию по актуализации ПО для звуковых устройств в Windows 10.
Подробнее: Скачиваем и устанавливаем звуковые драйверы
Для внешних микрофонов отдельного ПО, как правило, нет, если речь не идет о дорогих моделях. Софт для них позволяет тонко настроить звучание, особенно если это профессиональное оборудование. Если в комплекте нет информации о программном обеспечении, попробуйте отыскать его самостоятельно на сайте компании, введя название модели в поисковую строку.
Способ 4: Проверка оборудования и разъемов
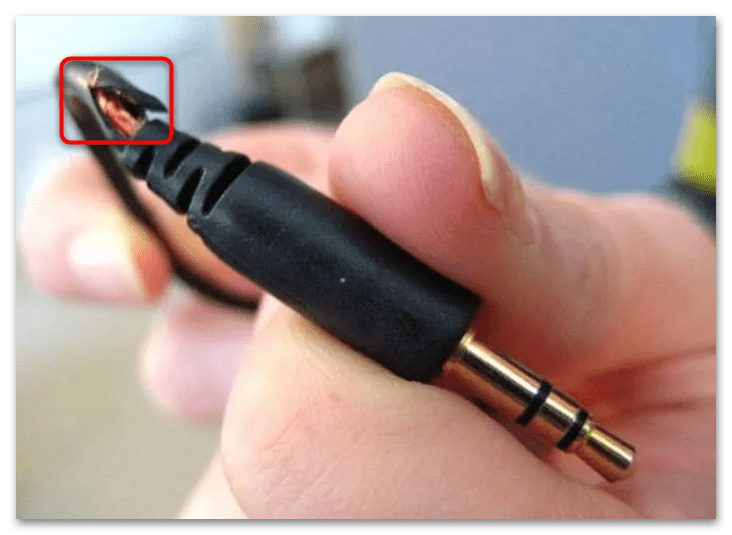
Загрязнения или повреждения внешнего оборудования, а также звуковых разъемов на компьютере или ноутбуке тоже вызывают проблемы с записью. Проверьте провод и штекер микрофона на наличие перегибов и других механических повреждений. Если они найдены, то устройство придется заменить или отнести в ремонт.
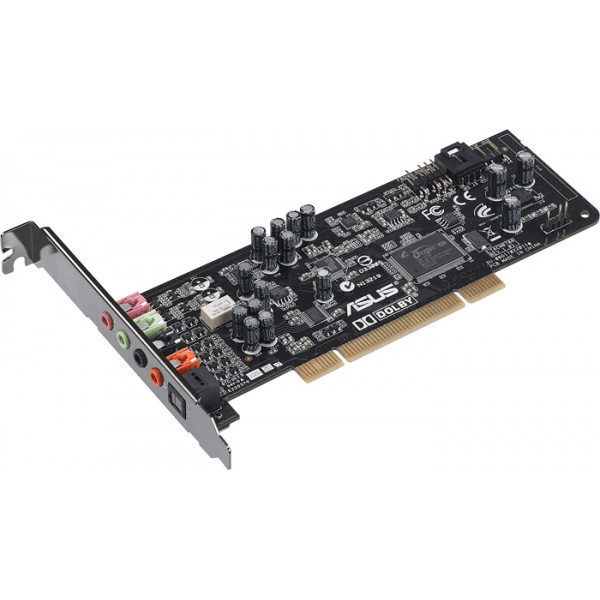
То же самое касается разъема 3.5 мм или USB-C на звуковой карте. Если компонент интегрирован в материнскую плату, без навыков поменять его не получится: придется отнести ее (если у вас ПК) или ноутбук в сервисный центр. В некоторых компьютерах звуковая карта может быть и отдельным внешним устройством — в такой ситуации достаточно извлечь лишь его и обратиться за квалифицированной помощью. Тем, кому пришлось заменить звуковую карту на новую внешнюю, может пригодиться наш отдельный материал по ее подключению к ПК.
Читайте также: Подключение звуковой карты к материнской плате
Способ 5: Сторонние программы
Существует специальный софт, с помощью которого можно тонко настроить работу микрофона. Это поможет, если проблема на программном уровне, а не на аппаратном. Некоторые из них представляют собой виртуальный микшер для обработки в реальном времени в играх или при общении, другие работают с уже записанными дорожками с микрофона, улучшая их. Можно попробовать убрать фон при записи в Windows 10 с помощью этих приложений. В нашем отдельном материале есть обзор на такое ПО с кратким описанием и ссылками на скачивание.
Подробнее: Программы для улучшения звука микрофона
Наша группа в TelegramПолезные советы и помощь
Download Windows Speedup Tool to fix errors and make PC run faster
If you attend a lot of virtual meetings, microphones that don’t work properly can degrade your experience. Therefore, in this article, we present some of the simplest solutions to fix Microphones that are distorted and making noise in Windows 11/10.
These are some of the things you can do if the audio from your Microphone sounds distorted or is making noises in Windows 11/10:
- Check Microphone Settings
- Disable Microphone Enhancements
- Run Recording Audio Troubleshooter
Let us talk about them in detail.
1] Check Microphone Settings

In this section, we are going to check if your computer’s microphone is set to the one you are using. T
o do that, launch Settings from the Start Menu and click System > Sound.
Now, check if “Choose your input device” is set to the microphone you are using, if not, click on the drop-down button and select it.
You can even check if the sound is working fine by checking the deflection in the “Test your microphone” option when you speak something in the microphone.
Read: Best Microphone settings for clear audio quality in Windows
2] Disable Microphone Enhancement

If you are facing a Microphone’s sound distortion problem then disabling Microphone Enhancement can solve the issue. To do that, you need to follow these steps:
- Launch Control Panel from the Start Menu.
- Make sure that “View by” is set to Large icons and click Sound.
- Go to the Recording tab, double-click on Microphone, go to Microphone Effects, and untick Disable Microphone Enhancements.
Hopefully, this will fix the Microphone distortion and noise issues in Windows 11/10.
Read: Microphone not working on Windows.
3] Run Recording Audio Troubleshooter
If you are facing any issue related to the microphone, running Recording Audio troubleshooting can fix the issue.
To do that, launch Settings from the Start Menu and click Update & Security > Troubleshoot > Additional troubleshooters > Recording Audio > Run the troubleshooter.
Follow the on-screen instructions to fix the issue.
Hopefully, you can fix Microphone distortion and noise problems in Windows 11/10 with the help of these solutions.
Related: No Sound or Audio is missing on Windows.
Why does my mic sound static on my PC?
High gain settings, faulty cables, ambient noise, or software interference can cause mic static on a PC. To resolve this, adjust your mic gain, check connections, reduce background noise, and update your recording software. Diagnosing the specific issue is essential for eliminating static and improving audio quality.
Why is my mic crackling on my PC?
Mic crackling on a PC is often caused by overloading the microphone with too much signal. To resolve this, use a PAD or attenuator to reduce the mic’s sensitivity or adjust the mic level control in your PC’s audio mixer. Ensuring appropriate input levels can help eliminate the crackling noise.
Yusuf is an Engineering graduate from Delhi. He has written over 1000 technical articles and has knowledge of programming languages including Java, and C++, and technologies such as Oracle 12C and MsSQL. Troubleshooting Windows is his favorite past-time.
Если у вас возникли проблемы с функциями микрофона или с микрофоном на гарнитуре или веб-камере, следующие сведения помогут вам устранить неполадки.
Убедитесь, что у приложений есть доступ к микрофону
Если после обновления Windows 11 микрофон не обнаружен, может потребоваться предоставить приложениям разрешение на его использование. Вот как это сделать.
-
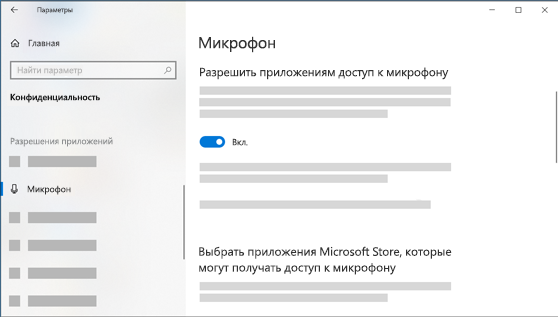
Выберите Пуск > Параметры > Конфиденциальность & безопасность > Микрофон и убедитесь, что доступ к микрофону включен.
-
Убедитесь, что включен параметр Разрешить приложениям доступ к микрофону , а затем выберите, какие приложения имеют доступ. Классические приложения не отображаются в этом списке.
Если вы хотите предоставить доступ к классическим приложениям, убедитесь, что включен параметр Разрешить классическим приложениям доступ к микрофону. Вы не можете отключить доступ к микрофону для отдельных приложений.
Если камера содержит микрофон, также может потребоваться предоставить приложениям разрешение на использование камеры. В этом случае выберите Пуск > Параметры > конфиденциальность & безопасность > камера и убедитесь, что камера включена.
Другие пользователи не слышат меня
Попробуйте следующие решения:
-
Если ваша гарнитура оснащена кнопкой выключения звука, убедитесь, что она не нажата.
-
Убедитесь, что микрофон или гарнитура правильно подключены к компьютеру. Если гарнитура является беспроводным устройством Bluetooth, убедитесь, что устройство Bluetooth связано и подключено, выполнив действия, описанные в разделе Связывание устройства Bluetooth в Windows.
-
Убедитесь, что в качестве системного устройства для записи звука по умолчанию используется микрофон или гарнитура. Вот как это сделать в Windows 11.
-
Выберите Пуск > Параметры > система > звук.
-
В разделе Входные данные выберите Выберите устройство для речи или записи и выберите нужное устройство.
-
Чтобы протестировать микрофон, проговорите в него. В разделе Громкость убедитесь, что синяя полоса перемещается, чтобы убедиться, что Windows вас услышит.
-
-
Запустите средство устранения неполадок со звуком записи. Выберите Параметры > Системный > Устранение неполадок > Другие средства устранения неполадок. Выберите средство устранения неполадок со звуком записи.
Windows не обнаруживает гарнитуру, камеру или микрофон
Если предыдущие действия по устранению неполадок не помогли устранить проблему, а Windows даже не обнаруживает микрофон, попробуйте переустановить аудиодрайверы:
-
Щелкните правой кнопкой мыши кнопку Пуск и выберите диспетчер устройств.
-
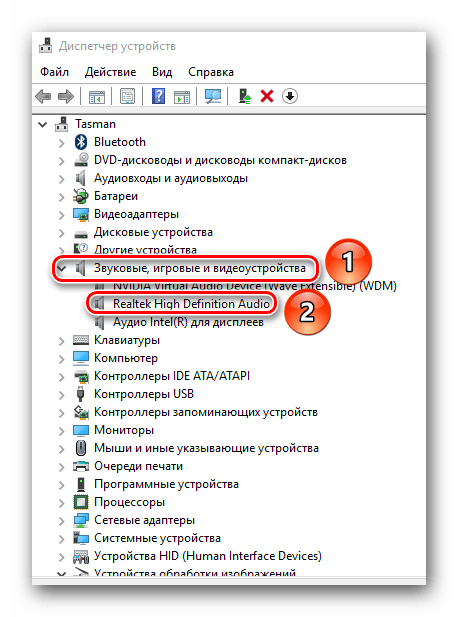
Разверните раздел Звуковые, видео- и игровые контроллеры .
-
Найдите любые звуковые устройства или драйверы. Щелкните правой кнопкой мыши звуковое устройство и выберите Удалить устройство. Убедитесь, что проверка поле Удалить программное обеспечение драйвера для этого устройства, а затем выберите Удалить. Повторите этот процесс для любых других звуковых устройств.
-
Перезагрузите компьютер. Windows попытается переустановить аудиоустройства и драйверы автоматически. Если это не так, щелкните правой кнопкой мыши кнопку Пуск и выберите диспетчер устройств. Щелкните правой кнопкой мыши раздел Звуковые, видео- и игровые контроллеры и выберите Пункт Проверить наличие изменений оборудования.
-
Обновите драйверы. После перезагрузки компьютера вернитесь к диспетчер устройств. Разверните раздел Звуковые, видео- и игровые контроллеры . Щелкните правой кнопкой мыши звуковой драйвер и выберите Обновить драйвер.
Громкость микрофона слишком низкая или, как представляется, вообще не работает
Попробуйте следующие решения:
-
Убедитесь, что микрофон или гарнитура правильно подключены к компьютеру.
-
Убедитесь, что микрофон правильно размещен.
-
Увеличьте громкость микрофона Вот как это сделать в Windows 11.
-
Выберите Пуск > Параметры > система > звук.
-
На вкладке Вход выберите микрофон, чтобы просмотреть его свойства.
-
В поле Громкость ввода убедитесь, что синяя полоса настраивается при разговоре с микрофоном.
-
Если это не так, перейдите к разделу Тестирование микрофона и Запуск теста. Это поможет устранить любые проблемы с микрофоном.
-
While working from home, the microphone & webcam have become the most significant components of every computer system. As a result, keeping its features in top shape should be your top priority. For an online meeting, you will need a working microphone so that others can hear you speak. However, you may have noted that the microphone level in Windows 10 is sometimes excessively low, requiring you to shout into the device to see any movement on the indicator. Most of the time, this problem of the microphone being too quiet Windows 10 appears out of nowhere and persists even after reinstalling USB device drivers. We bring to you a perfect guide that will teach you how to fix microphone too quiet Windows 10 issue by learning to increase microphone boost.

Table of Contents
Laptops have built-in microphones, while on Desktops, you can buy an inexpensive mic to plug into the audio socket.
- A pricey microphone or a sound-proof recording studio setup is not necessary for regular usage. It will suffice if you limit the quantity of noise around you. Earbuds can also be used as an alternative.
- Though you can usually get away with a quiet environment, chatting to someone on Discord, Microsoft Teams, Zoom, or other calling applications in a noisy area might cause problems. Although many of these apps can modify audio settings, it is significantly easier to adjust or boost the microphone volume in Windows 10.
Why Your Microphone is Too Quiet?
When you try to utilize your mic on your PC, you will discover that it is not loud enough for a variety of reasons, such as:
- Your hardware and software are incompatible with the microphone.
- The microphone was not made to be any louder.
- The mic quality is not very good.
- The microphone is made to work with sound amplifiers.
Regardless of whether the issue is hardware or software, there is a technique to raise the volume of your microphone. Adjusting the mic parameters to your specific needs is a simple method to solve your microphone too quiet Windows 10 problem. You may also use the communication sound as an advanced option. Remember that you may fix Realtek microphone too quiet Windows 10 problem by downloading drivers from the manufacturer website, which also provides long-term support. Keep in mind that changing your system sound settings will not cure all of your problems. It is conceivable that your microphone is not up to the task and has to be replaced.
Many customers complained that the volume on their microphone is too low, and as a result, too quiet during calls. Here are a few options for resolving this issue of Realtek microphone being too quiet in Windows 10.
Method 1: Remove Virtual Audio Devices
It is possible that your PC mic is too quiet because the operating system settings need to be adjusted and you may need to boost the master sound level in the app. It is possible that the mic is too quiet because you have a virtual audio device installed, such as an app that lets you reroute audio between applications.
1. If you need the virtual device, go at its options to see if you can amplify or raise the mic volume.
2. If the issue persists, then uninstall the virtual device if it is not required, and restart your PC afterward.
Method 2: Connect External Microphone Properly
Other possibilities for this issue include broken hardware being used to record. Microphone volumes in Windows 10 typically start below full capacity to spare other people discomfort while retaining quality. If you have low-powered audio input devices, then you may discover that your Windows 10 microphone is overly quiet resultantly. This is especially true with USB microphones and Realtek microphone drivers.
- If you are using an external microphone instead of a built-in one, check if your microphone is properly connected to your PC.
- This issue might also raise if your cable is loosely connected.

Also Read: Fix Windows 10 No Audio Devices are Installed
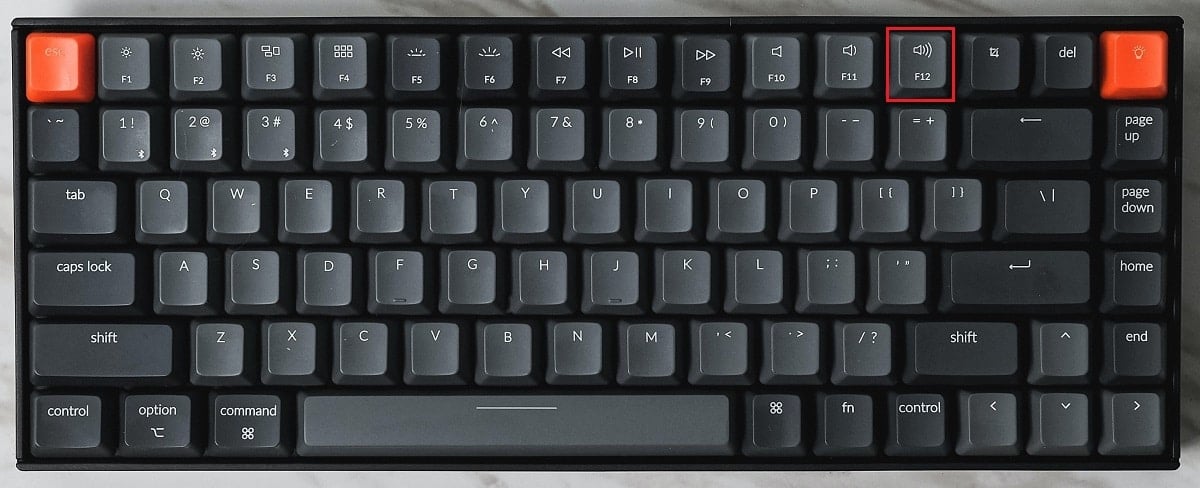
Method 3: Use Volume Hotkeys
This problem might be related to your volume controls, making it perceivable as a microphone-related issue. On your keyboard check your volume manually.
1A. You can press the Fn with arrow keys or press the increase or decrease volume button if it is given on your laptop accordingly.
1B. Alternately, press the Volume Up key on your keyboard according to the inbuilt volume hotkeys provided by the manufacturer.
Method 4: Increase Input Device Volume
When the intensity is not adjusted appropriately in the Sound settings, the volume on Windows 10 is too low. Thus, it must be synchronized at an appropriate level, as follows:
1. Press Windows key + I keys simultaneously to open Windows Settings.
2. Click on System Settings, as shown.

3. Go to the Sound tab from the left pane.

4. Click on the Device properties under the Input section.

5. As needed, adjust the Microphone Volume slider shown highlighted.

Also Read: How to Increase Volume on Windows 10
Method 5: Increase App Volume
You would not need any microphone boost software to increase your microphone volume, your system default drivers and Windows settings should suffice. Adjusting these will boost mic volume on Discord and other apps, but it may also increase noise. This is usually better than someone being unable to hear you.
The microphone volume may be controlled in several programs, as well as in Windows 10. Check to verify whether the app that is utilizing your microphone has an audio option for the microphone. If it does, then try to increase it from the Windows Settings, as follows:
1. Navigate to Windows Settings > System > Sound as shown in Method 4.

2. Under Advanced sound options, click on App volume and device preferences, as shown.

3. Now in the App Volume section, check if your app has required volume controls.
4. Slide the app volume (e.g. Mozilla Firefox) to the right to increase the volume, as depicted below.

Now check if you have enabled microphone boost in Windows 10 PC.
Method 6: Increase Microphone Volume
The microphone in Windows 10 may have been set too low. Here’s how to modify it:
1. Press the Windows key, type Control Panel and click on Open.

2. Set View by: > Large icons and click on Sound option.
3. Switch to the Recording tab.

4. Double-click on the microphone device (e.g. Microphone Array) to open the Properties window.

5. Switch to the Levels tab and use the Microphone slider to increase the volume.

6. Click on Apply > OK to save the changes.
Also Read: Fix Device Not Migrated Error on Windows 10
Method 7: Increase Microphone Boost
Mic boost is a type of audio enhancement that is applied to the microphone in addition to the present level of volume. If your mic is still quiet after altering the level, you can microphone boost Windows 10 by implementing the following steps:
1. Repeat Steps 1-4 of Method 6 to navigate to the Levels tab of Microphone Array Properties window.

2. Slide Microphone Boost to the right till the volume of your mic is loud enough.

3. Click on Apply > OK to save the changes.
Method 8: Run Recording Audio Troubleshooter
You can use the Recording Audio Troubleshooter if you have previously verified the volume of your mic under the Sound settings. This can help you discover any microphone troubleshooting in a well-organized list and provide suggestions to resolve the problem.
1. Launch Windows Settings by pressing Windows + I keys together.
2. Select the Updates & Security Settings.

3. Click on Troubleshoot tab in the left pane and scroll down to the Find and fix other problems section
4. Here, choose Recording Audio from the list and click on the Run the troubleshooter button as illustrated below.

5. Wait for the troubleshooter to detect and fix audio-related issues.

6. Once the process is completed, choose to Apply the recommended fix and restart your PC.
Also Read: How to Mute Microphone in Windows 10
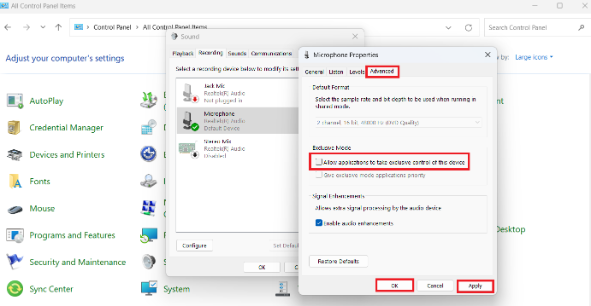
Method 9: Disallow Exclusive Control of Microphone
1. Navigate to Control Panel > Sound as shown.
2. Go to the Recording tab

3. Double-click your microphone device (e.g. Microphone Array) to open Properties.

4. Here, switch to the Advanced tab and uncheck the box marked Allow applications to take exclusive control of this device, as depicted below.

5. Click on Apply > OK to save the changes.
Method 10: Disallow Automatic Adjustment of Sound
Here are the steps to disallow automatic adjustment of sound to fix microphone too quiet Windows 10 issue:
1. Open Control Panel and select the Sound option as earlier.
2. Switch to the Communications tab.

3. Select the Do nothing option to disable the automatic adjustment of sound volume.

4. Click on Apply to save changes followed by OK and Exit.

5. To apply the modifications, restart your PC.
Also Read: Fix I/O Device Error in Windows 10
Frequently Asked Questions (FAQs)
Q1. How can I increase the volume of my microphone in Windows 10?
Ans. When people are having trouble hearing you via your PC, you may turn up the mic volume on Windows 10. To boost the level of your microphone, click the Sounds icon in the bottom bar of your screen and adjust different microphone and volume parameters.
Q2. What’s up with my microphone suddenly being so quiet?
Ans. If nothing else works, go to Settings > Update & Security > Windows Update. Look for Updates that were recently installed, and delete them.
Q3. How can I stop Windows from altering the volume of my microphone?
Ans. If you are using the Desktop version, go to Audio Settings and uncheck the option titled Automatically update microphone settings.
Recommended:
- How to Check if Modern Standby is Supported in Windows 11
- Fix Xbox One Headset Not Working
- Fix Low Microphone Volume in Windows 11
- Fix Sound Keeps Cutting Out in Windows 10
We hope this information helped you to resolve your microphone too quiet Windows 10 issue by using Microphone boost feature. Let us know which method you found to be the most successful in resolving this problem. Drop queries/suggestions in the comments section below.
Table of contents
- Why Is Microphone Resetting to 0 or 100 Volume on Windows 10?
- How to Resolve Microphone Resetting to 0 or 100 Volume on Windows 10
- How to Fix Microphone Keeps Resetting to 0 or 100 Volume on Windows 10
- Fix 1: Run the audio/speech troubleshooter
- Fix 2: Check for hardware issues
- Fix 3: Update or reinstall the audio/microphone driver from the manufacturer
- Fix 4: Stop other apps from controlling the microphone
- Fix 5: Change audio recording settings
- Fix 6: Uninstall audio control software
- Fix 7: Repair your system files through an SFC scan
- Final Word
Sometimes, Microsoft Volume keeps adjusting without the user’s authority. For example, users have reported microphone volume resetting to 0 or 100 on Windows 10 with no apparent trigger.
Users say that the microphone adjusting or resetting can affect multiple applications on the operating system, both built-in and third party.
This issue can be annoying because it can prevent you from conversing with fellow gamers, recording audio, communicating with your friends or colleagues online, etc.
Fortunately, you can fix it. So, if your microphone volume keeps resetting on Windows 10, this article will show you why the issue is occurring and what to do about it.
Why Is Microphone Resetting to 0 or 100 Volume on Windows 10?
If your Microphone resets to 0 or 100 volume, the problem can be one or more of the following situations:
- A problematic audio driver, such as outdated or corrupted audio drivers
- Incorrect microphone, audio, or PC settings
- The computer’s hardware failures
- Malware infection on your PC
- A background application is taking control of your microphone settings
- Corrupted, damaged, or missing system files
You wouldn’t automatically know what is causing your Microphone to auto-adjust or reset to 0 or 100 in Windows 10. However, you can diagnose the problem and find a solution.
How to Resolve Microphone Resetting to 0 or 100 Volume on Windows 10
If your computer’s microphone keeps resetting to 0 or 100 volume, you can start by restarting your PC. Computer errors can occur because of system or app conflicts, and rebooting the system can reset these apps and stop the conflicts.
If rebooting the system doesn’t work, you can scan it for malware using a quality anti-malware solution. Windows Defender is a good anti-virus, but some malware can bypass its security stops.
A quality third-party security tool like Auslogics Anti-Malware can help you find any malware residing in your PC.
You can also try plugging your microphone jack pinout on and off or plugging it into a different port to see if there are some hardware problems.
If the microphone keeps resetting after trying these solutions, you may need to conduct the technical troubleshooting solutions below.
How to Fix Microphone Keeps Resetting to 0 or 100 Volume on Windows 10
The following troubleshooting solutions will show you how to fix a microphone that keeps resetting to 0 or 100. You’ll also learn how to fix a microphone volume that won’t stay set on Windows 10.
Let’s dive in!
Fix 1: Run the audio/speech troubleshooter
When you experience the issue of the Microphone keeps resetting volume on Windows 10, the first thing to do is run the Speech and Recording Audio troubleshooters.
These are built-in Windows troubleshooters that will detect the problem and fix them automatically.
To run the speech troubleshooter, follow the steps below:
- Press the
Windows key + Ito open the Settings app directly. - Select the Update & Security tile and click on it.
- Now, on the left pane, click Troubleshoot.
- Next, click the Additional troubleshooters link on the right pane.
- From the list of apps and programs, search for Recording Audio under Find and fix problems.
- Click on the option, then click Run the Troubleshooter.
- Wait for the troubleshooter to run and follow the onscreen instructions to fix the problem if found.
If the problem persists, you can then proceed and run Audio Troubleshooter from the same window.
Here’s what to do:
- Press the
Windows key + Ito launch Settings directly. - Select the Update & Security tile and click on it.
- Now, on the left pane, click Troubleshoot.
- Next, click the Additional troubleshooters link on the right pane.
- Look for Playing Audio under Get up and Running from the list of apps and programs.
- Click on the option, then click Run the Troubleshooter.
- Wait for the troubleshooter to run and follow the onscreen instructions to fix the problem if found.
If the speech/audio troubleshooter fails to solve the problem, proceed to the next solution and see if you can find help.
Also Read: Quick & Easy: How to Increase Microphone Volume on Windows 10 and 11?
Fix 2: Check for hardware issues
Sometimes, the problem might be in your hardware devices. The microphone jack pinout port on your device might have been damaged.
You can try connecting the microphone to another jack port or to another computer to see if it works fine.
If the microphone fails to work on other ports or shows faulty features like adjusting the volume, it might be the problem.
In this case, you can dispose of it and find a new microphone that works fine.
If the microphone works fine on another jack port or computer, perhaps your device has technical issues that need to be addressed, such as driver issues.
Proceed to the next section to see how to update your drivers.
Fix 3: Update or reinstall the audio/microphone driver from the manufacturer
As we’ve previously mentioned, the microphone keeps resetting to volume 0 or 100 could be a driver issue. Updating this driver can help you fix the problem.
If the microphone you’re using is an external device, such as an NVIDIA microphone, you can download its latest drivers from the official manufacturer’s website.
If you are using a Windows built-in Microsoft microphone, you can install the latest audio drivers from Intel.com.
You will simply go to the website and find the latest audio drivers for your particular PC specs.
If you’re not sure about your PC specifications, find them out using the following steps.
- Press the Windows key and type msinfo32.
- Select the top result to open the System Information app.
- On the left pane, select Components and expand it.
- See the Sound Device and click on it.
- Next, check the specifications of the Sound device on the right-pane.
- Note down the Driver ID and version.
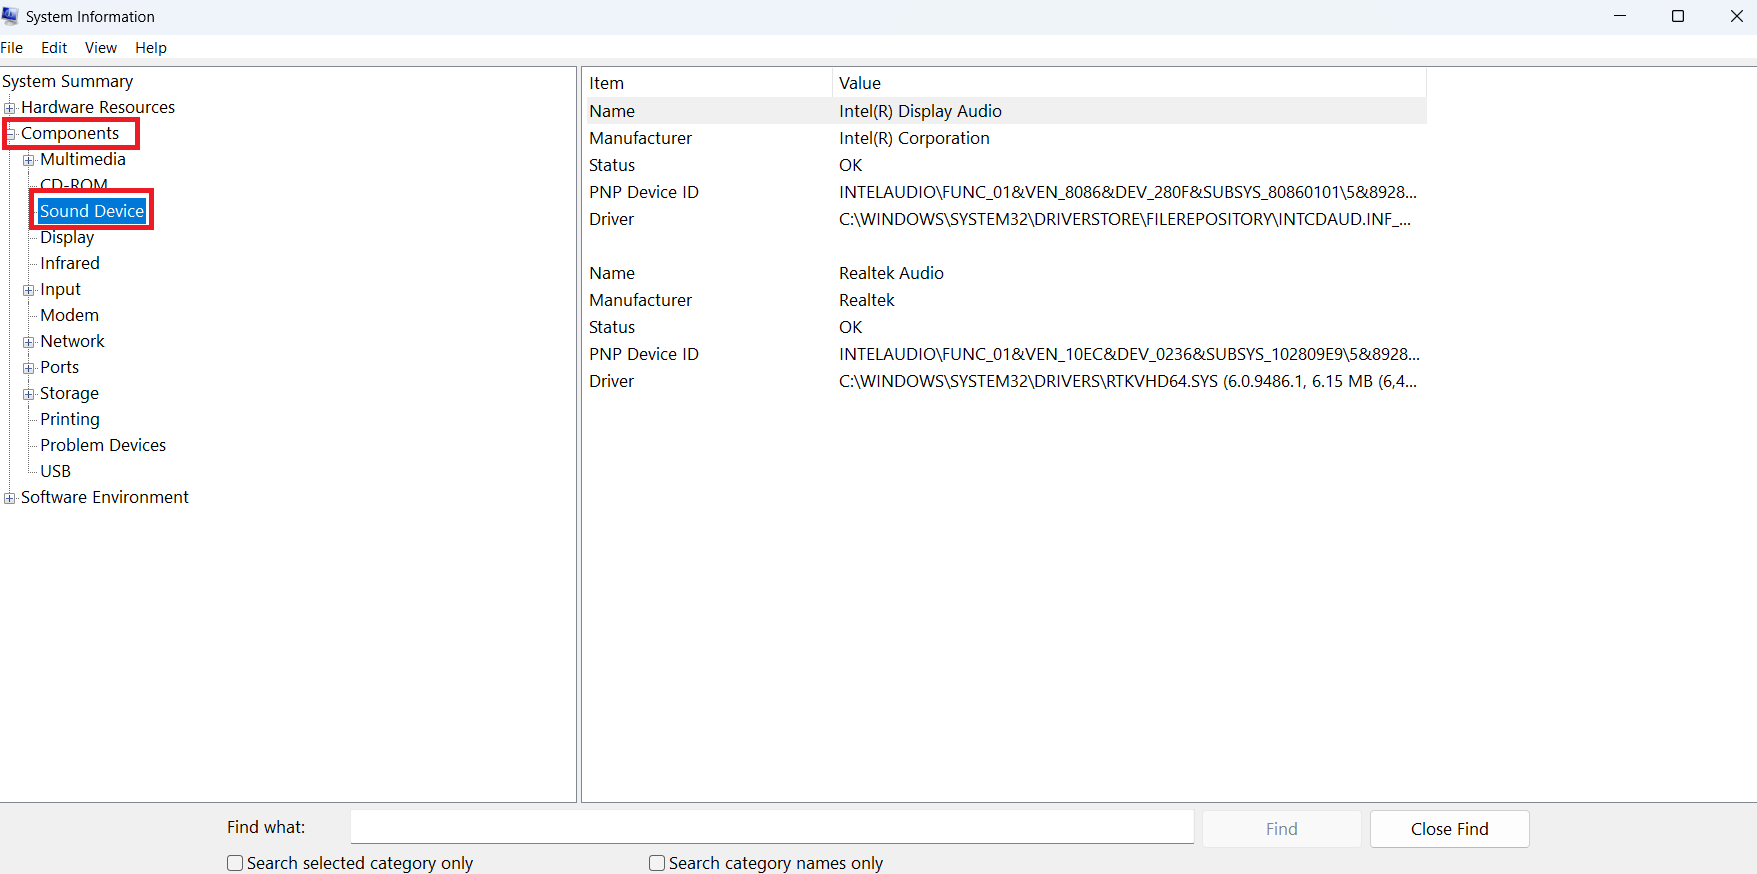
- Now, with this information, you can check the manufacturer’s site and find the update that matches your system’s driver specifications.
- Download and install it on your system and see if it solves the problem.
Alternatively, to update the drivers use the following steps.
- Press the Windows key and type dxdiag.
- Select the top result to open the DirectX Diagnostic Tool.
- Go to the Sound tab.
- Check the Sound Device and click on it.

- Under Drivers, note down the Driver name and version.
- Now, with this information, you can check the manufacturer’s site and find the update that matches your system’s driver specifications.
- Download and install it on your system and see if it solves the problem.
Download Auslogics Driver Updater
Prevent hardware errors and ensure problem-free device operation with this advanced tool that detects outdated drivers and safely gets them updated.
Related: Auslogics Driver Updater: Update Your Drivers in One Click!
Fix 4: Stop other apps from controlling the microphone
If you have third-party apps like Skype, Steam, and Discord, there is a chance that they’re causing problems to your microphone.
Windows gives you an option to allow or restrict apps from accessing your microphone, which can help you stop the problem you’re facing.
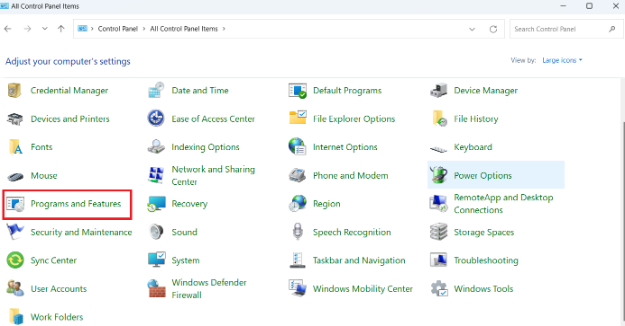
To stop other apps from controlling your microphone, use the following steps:
- Press the Windows key on your keyboard.
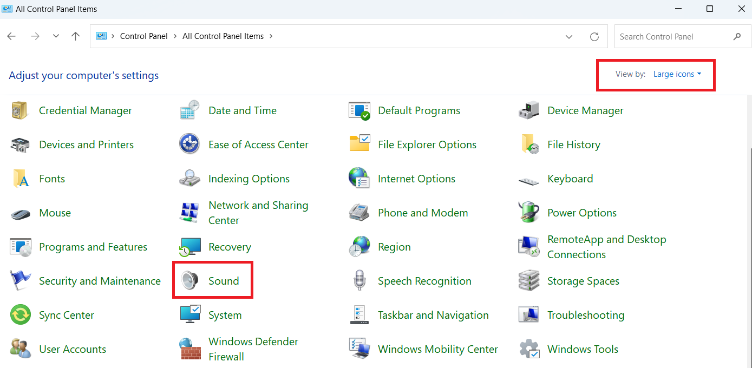
- Type control and select the Control Panel from the results.
- In the Control Panel window, locate Sound (if it opens in Large icons) and click on it.
- Now, go to the Recording tab.
- Double-click on the microphone option to open its properties.
- In the microphone properties windows, go to the Advanced tab.
- Uncheck the box next to Allow applications to take exclusive control of this device.
- Once done, click Apply, then click OK.
This will lock the microphone volume and prevent other apps from controlling it.
You can then exit the Control Panel and see if the microphone issue has been solved.
Related: Windows 10 Control Panel: Where to Find It and How to Use It
Fix 5: Change audio recording settings
If your PC’s Microphone is not set as the device’s default recording device, you may not be able to record audio using the Microphone.
If you’ve set this before and it won’t stay set, you can try again to set it using the following steps:
- Go to the Volume Control icon at the bottom-right corner of your screen.
- Right-click it, then select Open Sound Settings from the list.
- Next, click on the Manage Sound Devices link below Troubleshoot.
- Now under the Input device category, check if you have any other device enabled apart from your Microphone.
- If there are any other devices, select them, and click on the Disable option.
- This will leave only your device’s microphone as the only device to record Sound.
- You can now try to use the microphone and see if the problem persists.
If the problem persists, you can either update the device or conduct other diagnoses to know the exact problem and fix it using the methods we’ve provided below.
Fix 6: Uninstall audio control software
You may be experiencing the volume resetting problem because of audio control software on your PC. So, uninstalling it can help you fix the problem.
Follow the steps below to uninstall the audio control software:
- Press the Windows logo key and type control.
- Select Control Panel from the results.
- Next, select the Programs and Features option.
- Now, search for any audio control software from the list of your installed programs.
- If you find such software, click on it, then select Uninstall.
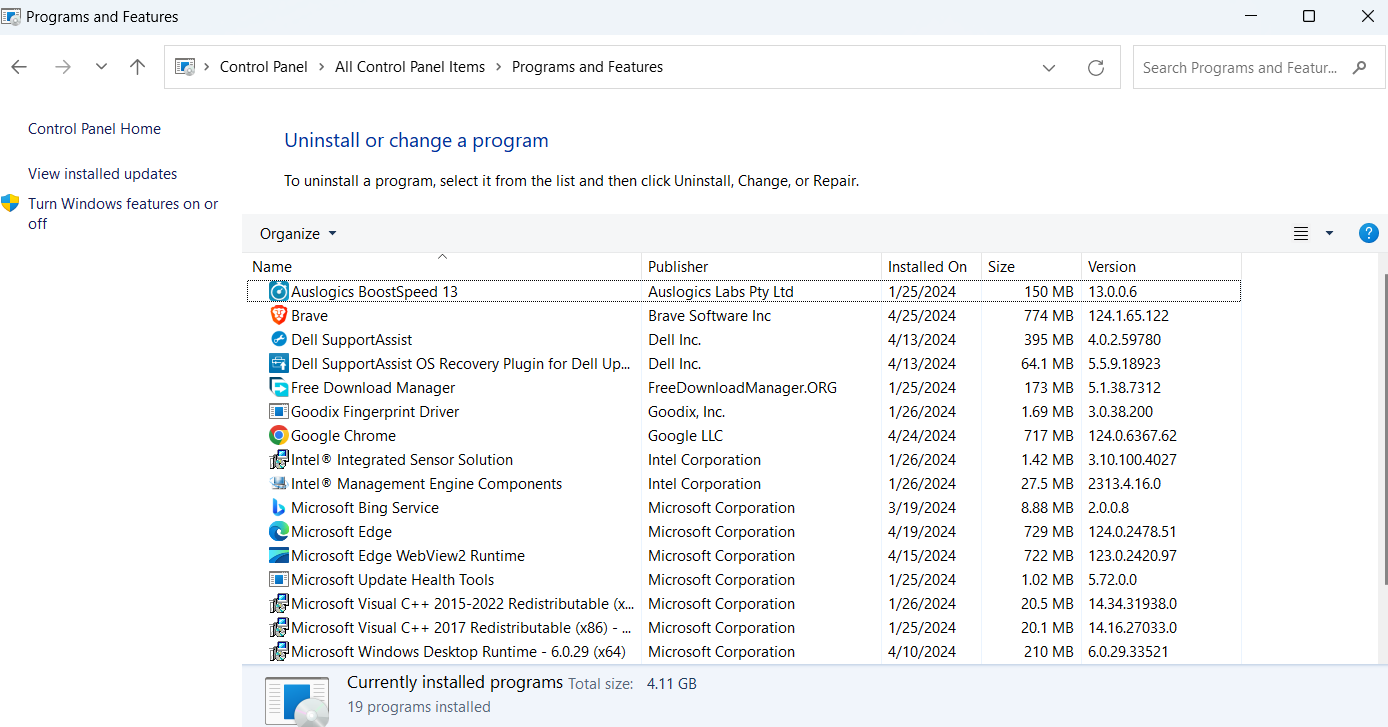
Wait for the uninstallation to be complete, then restart your computer. Check if the “Microphone volume keeps resetting to 100 on Windows 10” error has been solved.
Also Read: How to Fix an Auto Muting Microphone on Windows 10/11: Quick Solution Here
Fix 7: Repair your system files through an SFC scan
If your computer has corrupted, missing, outdated system files, you may experience some PC issues.
If this is the case, then the microphone volume may keep resetting to 0 or 100. An SFC scan can help you repair these system files.
To run an SFC scan follows these steps:
- Launch Command Prompt as an administrator:
- Press the Windows key and type cmd.
- Right-click Command Prompt, then select Run as Administrator from the list.
- Once the elevated Command Prompt opens, type the following command and press Enter:
sfc/ scannow
- Now, wait for the command to run and fix issues automatically.

Once done, restart your PC and see if the problem has been solved.
PRO TIP
Keep your devices running smoothly with Auslogics Driver Updater . This powerful tool scans your system for outdated drivers and updates them to the latest versions, ensuring optimal performance and preventing hardware errors.
Also Read: Windows Command Prompt: 28 Most Useful CMD Commands [with Examples]
Final Word
We believe these solutions will help you if your microphone volume keeps resetting to 0 or 100 on Windows 10. If we’ve left out other solutions that can help solve the error, please let us know in the comments section.