
cdi.exe is an executable file associated with the software CDI Base, developed by ZF Electronics, a company based in Auerbach, Germany. This software is often used in conjunction with Cherry products, a brand under ZF Electronics. The file is typically located in the directory C:\Program Files (x86)\Cherry\CDI on your computer.
The CDI Base software is primarily used to manage and control Cherry devices, such as keyboards and mice. It provides a user-friendly interface for configuring these devices, allowing users to customize their settings and preferences. This can include things like key assignments, mouse sensitivity, and other device-specific features.
cdi.exe is necessary for the proper functioning of the CDI Base software and, by extension, any Cherry devices that are being managed by that software. Without it, the software may not run correctly, and users may not be able to fully utilize their Cherry devices.
Under normal circumstances, there is no need to remove cdi.exe. If the file becomes corrupted or infected with malware, it may cause problems for your computer. In such cases, it may be necessary to remove or replace the file. If you no longer use any Cherry devices, or if you prefer to use different software to manage your devices, you may choose to remove cdi.exe and the associated CDI Base software.
Before removing any files, it’s always a good idea to make sure you have a recent backup of your system, and to consult with a computer professional if you’re unsure.
For more information, you can visit the official website of ZF Electronics at www.cherry.de.
Click to Run a Free Scan for cdi.exe related errors
Cdi.exe file information
The process known as CDI Base component belongs to software CDI Module by or Cherry, Auerbach Germany, www.cherry.de (www.cherry.de).
Description: Cdi.exe is not essential for the Windows OS and causes relatively few problems. Cdi.exe is located in a subfolder of «C:\Program Files (x86)»—primarily C:\Program Files (x86)\Cherry\CDI\.
Known file sizes on Windows 10/11/7 are 577,582 bytes (66% of all occurrences) or 581,678 bytes.
The program has no visible window. The cdi.exe file is not a Windows core file. The process can be uninstalled in the Control Panel.
Therefore the technical security rating is 26% dangerous.
Uninstalling this variant:
You can uninstall KeyMan, update it, or get help from the software vendor. Click on support.cherry.de to update it, click on support.cherry.de for support, or click on KeyMan in Windows Control Panel (Software or Programs category) to uninstall it.
Recommended: Identify cdi.exe related errors
External information from Paul Collins:
- «CDInterceptor» is not required to run at start up. CD indexer for measuring the speed of CD players
Important: Some malware camouflages itself as cdi.exe, particularly when located in the C:\Windows or C:\Windows\System32 folder. Therefore, you should check the cdi.exe process on your PC to see if it is a threat. We recommend Security Task Manager for verifying your computer’s security. This was one of the Top Download Picks of The Washington Post and PC World.
Best practices for resolving cdi issues
A clean and tidy computer is the key requirement for avoiding problems with cdi. This means running a scan for malware, cleaning your hard drive using 1cleanmgr and 2sfc /scannow, 3uninstalling programs that you no longer need, checking for Autostart programs (using 4msconfig) and enabling Windows’ 5Automatic Update. Always remember to perform periodic backups, or at least to set restore points.
Should you experience an actual problem, try to recall the last thing you did, or the last thing you installed before the problem appeared for the first time. Use the 6resmon command to identify the processes that are causing your problem. Even for serious problems, rather than reinstalling Windows, you are better off repairing of your installation or, for Windows 8 and later versions, executing the 7DISM.exe /Online /Cleanup-image /Restorehealth command. This allows you to repair the operating system without losing data.
To help you analyze the cdi.exe process on your computer, the following programs have proven to be helpful: ASecurity Task Manager displays all running Windows tasks, including embedded hidden processes, such as keyboard and browser monitoring or Autostart entries. A unique security risk rating indicates the likelihood of the process being potential spyware, malware or a Trojan. BMalwarebytes Anti-Malware detects and removes sleeping spyware, adware, Trojans, keyloggers, malware and trackers from your hard drive.
Other processes
tosnccore.exe aerofoil.exe audio32hd.exe cdi.exe samsungflowdesktop.exe wdappmanager.exe smrtsvc64.exe db22.exe truesuite.clientapplogonexe.exe vbcscompiler.exe 3cxdesktopapp.exe [all]
How can Uninstall CDI (Change Directory Interactive) Completely from Computer
CDI (Change Directory Interactive) removal has been a tough problem on your PC? Do you need an effective way to uninstall CDI (Change Directory Interactive) quickly with simple steps? Don’t worry, you will be able to solve the problem via the following removing instructions of the program.
Get Bloatware Uninstaller Now
CDI (Change Directory Interactive) may be great in providing its specific function for the users, but it also can turn out to be a problem when the program get some running issues or you don’t want to keep it on your computer any more. In this case, removing CDI (Change Directory Interactive) will be the common and also effective means to resolve the problem, and the real difficulty just come out when people try to uninstall CDI (Change Directory Interactive) from their PCs.
What usually make people to remove CDI (Change Directory Interactive)
- CDI (Change Directory Interactive) is not compatible with other installed applications
- Program gets a corrupted issue unexpectedly
- CDI (Change Directory Interactive) is not as good as the user expected, and need to be erased from the computer
- CDI (Change Directory Interactive) should be uninstalled first and reinstalled on the PC
- The application is regarded by the user and some websites as a suspect malware
Most common problems of removing the software
- CDI (Change Directory Interactive) program is not available on the Windows uninstall panel
- CDI (Change Directory Interactive) can’t be removed from the Windows and always receive a notification
- Nothing happen when click on the uninstall button on Windows
- CDI (Change Directory Interactive) or the related process still keep running on the computer after removing it
- Some files and traces of the program still can be found
- Removing process running for a long time and does not come to the end
If must be a headache if encountering such a problem on the computer, and there are still many other problems people might come across when perform the program removal on their own computers. Therefore, you should know the right way about how to uninstall CDI (Change Directory Interactive) from PC, or the way to fix/avoid the removing issue on the computer. Here are just several options that can support you to remove the application well.
How can uninstall CDI (Change Directory Interactive) well on PC? Check these guides
Option 1: Use the product’s uninstall tool
There are many applications in nowadays provides an uninstall process on the program’s installation folder, or the publisher gets an uninstaller which is specifically used to remove its own products. To remove CDI (Change Directory Interactive) in this way, please refer to the following uninstall instructions:
- 1. Right-click on CDI (Change Directory Interactive) icon on the desktop, and select «Open file location»
- 2. Scroll down the list of files and find the uninstall process, usually named «uninst000», «Uninstall», or «Uninstaller»
- 3. Double click on the uninstall process to start the removal
- 4. Follow the uninstall wizard to finish the removal, and restart your computer
- 5. Open the directory of the installation folder again, and make sure everything has been cleared well
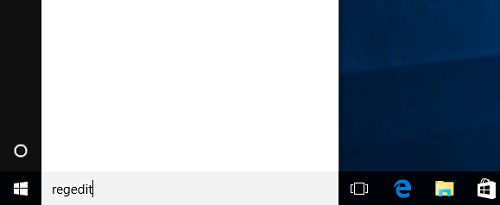
- 6. Click on the Windows button on the bottom-left-corner, and enter «regedit» on the search box
-

- 7. Click to open «regedit» or Registry Editor on the search result
-
- 8. Unfold the registry group inside, and find out those registry keys or entries which contains the program’s name
- 9. Back up these files, and then remove them from your computer system

Note: once problems occur after deleting the registry, please restore the back-up registry to Registry Editor.
When using the publisher’s uninstaller, you should download and install the uninstall application additionally, and choose to uninstall CDI (Change Directory Interactive) from its interface. Similar to the above removal, you should restart your computer after finish the uninstall process, and clear its remnants again which are still staying on the PC.
Things you need to know about Registry Editor
Registry Editor is a place that stores many important registry keys and entries which closely related to the system operation and program’s performance on the computer, removing a wrong file inside usually cause serious problem for the system, so you should be very careful when you have to manually delete some registries inside.
Get Bloatware Uninstaller Now
Option 2:Remove it with Windows uninstall feature
Windows system provide an uninstall feature in Control Panel that support the user to remove unwanted program on the PC, to access this applet in different operating system, you can follow these instructions:
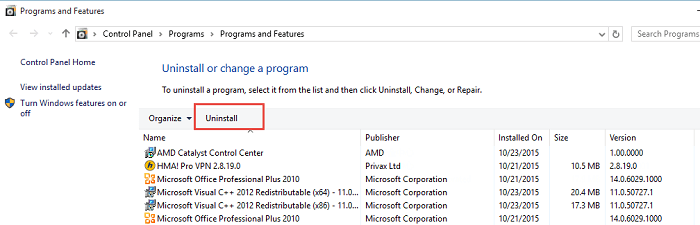
- 1. Open the uninstall panel on Windows system
- 2. Select CDI (Change Directory Interactive) on the programs list, click on Remove/Uninstall button
-
- 3. Confirm the program removal, and complete the removing steps with guides
- 4. When finish, reboot the computer
- 5. The same to the removing steps in Option 1, you should clear the leftovers in the installation folder as well as Registry Editor
Option 3:Uninstall CDI (Change Directory Interactive) with Bloatware Uninstaller
If you want to totally avoid the risky manual removal of registry, and handle CDI (Change Directory Interactive) uninstall more easily and quickly, taking a professional uninstall tool will be a great help for you, because it can count all of the files (including registry keys and temporary files) and provide a complete and automatic removal, thus, many risky and annoying manual steps could be skipped can you can totally remove CDI (Change Directory Interactive) on the PC more quickly.
Bloatware Uninstaller is an advanced uninstall utility that can give a good example about how uninstall CDI (Change Directory Interactive) well:
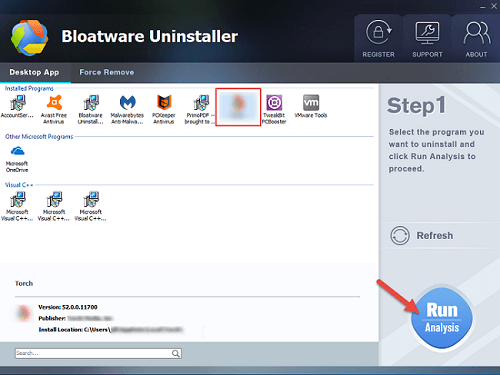
- 1. Install and launch the uninstaller on PC
- 2. Find and select CDI (Change Directory Interactive) from the programs list, and click on Scan button
-
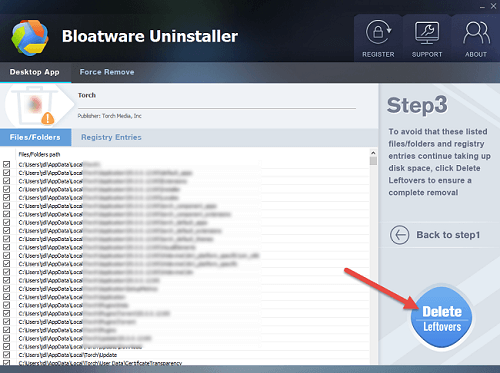
- 3. When all of files being detected, click on the uninstall or remove button
-
- 4. Follow the uninstall wizard to remove all of components from the computer
-
- 5. Exit the uninstaller when finish, and reboot the computer system

Get Bloatware Uninstaller Now
This is a very effective way to uninstall CDI (Change Directory Interactive) and other applications, while the manual removal usually resulted in an unsuccessful removal, and the most important point is it is much easier for the common user to take and get rid of the program they want. So it is currently the best way we found and would like to recommend you to remove unneeded programs with a good app uninstaller.
The Compact Diagnostic Interface component (also referred to as the «CDI») is installed and uninstalled along with the System Tray Icon component independently from the Application Console, and can be used when the Application Console is not installed on the protected device. The CDI is started from the System Tray Icon or by running kavfsmui.exe from the application folder on the protected device.
From the CDI window, you can do the following:
- Review information about general application status.
- Review security incidents that have occurred.
- Review current activity on the protected device.
- Start or stop writing dump and trace files.
- Open the Application Console.
- Open the About the application window with the list of installed updates and available patches.
The CDI is available even if access to Kaspersky Security for Windows Server functions is password-protected. No password is required.
The CDI component cannot be configured via Kaspersky Security Center.
Did you find this article helpful?
Thank you for your feedback! You’re helping us improve.
Thank you for your feedback! You’re helping us improve.
Большинство ошибок cdi.exe — результат отсутствия или повреждения версий исполняемого файла и, как правило, они наблюдаются при запуске программы Ultimate Boot CD. Основной способ решить эти проблемы вручную — заменить файл EXE новой копией. Кроме того, некоторые ошибки cdi.exe могут возникать по причине наличия неправильных ссылок на реестр. По этой причине для очистки недействительных записей рекомендуется выполнить сканирование реестра.
Исполнимые файлы с расширением файла EXE, также известны в качестве формата Windows Executable File. Загрузите новую версию cdi.exe для %%os%% в списке файлов ниже. Также доступны варианты для других версий Windows (при необходимости). В нашей базе представлены не все версии cdi.exe, поэтому нажмите на кнопку Request (Запрос), чтобы наши сотрудники её получили. В крайнем случае, если ниже отсутствует необходимая вам версия файла, вы всегда можете связаться с BrandTech.
Размещение вновь загруженного файла cdi.exe в правильном каталоге (в месте расположения исходного файла), скорее всего, решит проблему, однако, чтобы однозначно в этом убедиться, следует выполнить проверку. Повторно запустите Ultimate Boot CD, чтобы убедиться, что проблема успешно решена.
Продукт Solvusoft
Загрузка
WinThruster 2024 — Сканировать ваш компьютер на наличие ошибок реестра в cdi.exe
Windows
11/10/8/7/Vista/XP
Установить необязательные продукты — WinThruster (Solvusoft) | Лицензия | Политика защиты личных сведений | Условия | Удаление
| cdi.exe Описание файла | |
|---|---|
| Тип: | EXE |
| Функция: | Boot disk |
| App: | Ultimate Boot CD |
| Версия программного обеспечения: | none |
| Программист: | BrandTech |
| Имя: | cdi.exe |
| KB: | 196762 |
| SHA-1: | 3823b1dd741e2923080b4ae80ddcd7f02645f43c |
| MD5: | d5a5b5a7e3ee22d13cf12064e285325f |
| CRC32: | b1913617 |
EXE
cdi.exe
Идентификатор статьи: 413079
Cdi.exe
| Имя | ID | Размер (в байтах) | Загрузить | |||||||||||||||
|---|---|---|---|---|---|---|---|---|---|---|---|---|---|---|---|---|---|---|
| + cdi.exe | d5a5b5a7e3ee22d13cf12064e285325f | 192.15 KB | ||||||||||||||||
|
||||||||||||||||||
| + cdi.exe | d5a5b5a7e3ee22d13cf12064e285325f | 192.15 KB | ||||||||||||||||
|
||||||||||||||||||
| + cdi.exe | d5a5b5a7e3ee22d13cf12064e285325f | 192.15 KB | ||||||||||||||||
|
||||||||||||||||||
| + cdi.exe | d5a5b5a7e3ee22d13cf12064e285325f | 192.15 KB | ||||||||||||||||
|
||||||||||||||||||
| + cdi.exe | d5a5b5a7e3ee22d13cf12064e285325f | 192.15 KB | ||||||||||||||||
|
||||||||||||||||||
| + cdi.exe | d5a5b5a7e3ee22d13cf12064e285325f | 192.15 KB | ||||||||||||||||
|
Распространенные сообщения об ошибках в Cdi.exe
Типичные ошибки cdi.exe, возникающие в Ultimate Boot CD для Windows:
- «Ошибка программного обеспечения Cdi.exe. «
- «Недопустимый файл Cdi.exe. «
- «Cdi.exe столкнулся с проблемой и закроется. «
- «К сожалению, мы не можем найти cdi.exe. «
- «Cdi.exe не может быть найден. «
- «Ошибка запуска в приложении: cdi.exe. «
- «Cdi.exe не выполняется. «
- «Отказ Cdi.exe.»
- «Ошибка пути программного обеспечения: cdi.exe. «
Проблемы Ultimate Boot CD cdi.exe возникают при установке, во время работы программного обеспечения, связанного с cdi.exe, во время завершения работы или запуска или менее вероятно во время обновления операционной системы. Запись ошибок cdi.exe внутри Ultimate Boot CD имеет решающее значение для обнаружения неисправностей электронной Boot disk и ретрансляции обратно в BrandTech для параметров ремонта.
Причины проблем Cdi.exe
Большинство проблем cdi.exe связаны с отсутствующим или поврежденным cdi.exe, вирусной инфекцией или недействительными записями реестра Windows, связанными с Ultimate Boot CD.
В первую очередь, проблемы cdi.exe создаются:
- Недопустимые разделы реестра Cdi.exe/повреждены.
- Зазаражение вредоносными программами повредил файл cdi.exe.
- Cdi.exe злонамеренно или ошибочно удален другим программным обеспечением (кроме Ultimate Boot CD).
- Другое приложение, конфликтующее с cdi.exe или другими общими ссылками.
- Ultimate Boot CD (cdi.exe) поврежден во время загрузки или установки.
This file is a part of the Microsoft Windows system. EXE is short for executable and these types of files are used on Windows computers to install or run software.
Some programs may need cdi.exe to run properly, so if this file is missing you may encounter issues when trying to launch applications or games. Often, you will get an error message that says “cdi.exe missing” that tells you which specific file needs to be restored so that the application or game can continue functioning.
To resolve these issues caused by a missing cdi.exe, read the suggestions below.
Filesize(s):
573,486 bytes
How to fix cdi.exe missing error?
If the cdi.exe missing error appears on your PC, you can use the methods below. Some are automatic, which means you can start a process to let the system automatically restore the file. Others are manual, meaning you will have to manually download cdi.exe and move it to the correct program installation folder. If you are not very experienced with digging through system files and would prefer not to, you can simply go straight to an automatic method.
Here our list of solutions to try:
- Method 1: Download cdi.exe
- Method 2: Fix the missing cdi.exe error automatically
- Method 3: Update drivers to restore missing .exe files
- Method 4: Scan your PC for malware
- Method 5: Use System File Checker (SFC)
- Method 6: Fix corrupted cdi.exe file by performing System Restore
Method 1: Download cdi.exe
This is the most straightforward approach, but it is fully manual and will require you to download the right exe file and place it in the correct folder on your PC.
Look through the list of available versions of cdi.exe then select the correct file and click “Download”. If you are unsure which one to download, read the section below or choose an automatic method.
How to choose the correct version of cdi.exe?
When looking through the list of EXE files, pay attention to whether it’s a 64-, or 32-bit file, as well as the language it uses. For 64-bit programs, use 64-bit files if they are listed above.
It’s best to choose those EXE files whose language corresponds to the language of your program, if possible. It’s also recommended to choose the latest version to ensure up-to-date functionality.
As long as you get these two parameters right, you won’t have any issues downloading the right file.
Where to place the cdi.exe file?
After you’ve downloaded the correct EXE file, place it inside the program installation folder. Alternatively, you can put the cdi.exe file within the Windows system directory.
How to register cdi.exe?
If placing the missing cdi.exe file into the proper directory doesn’t seem to solve the problem, this means you need to register it. To do so, copy your EXE file to the C:\Windows\System32 folder, then open a command prompt with administrator privileges. There, type “regsvr32 cdi.exe” and press Enter.
Method 2: Fix the missing cdi.exe error automatically
Outbyte PC Repair allows you to automatically repair EXE errors, without you having to worry about choosing the right file or registering it. The utility will not only download the correct version of cdi.exe for free and suggest the right directory to install it to but will also resolve other issues related to the cdi.exe file.
- Download cdi.exe
- Fix the missing cdi.exe error automatically
- Update drivers to restore missing .exe files
Method 3: Update drivers to restore missing .exe files
Driver updates for the Windows operating system, as well as for network adapters, monitors, printers, etc., can be downloaded individually and installed from the Windows Update Center or by using specialized utilities.
Option 1 — Automatic Device Drivers Update
Outbyte Driver Updater automatically updates drivers on Windows. Routine manual driver updates are now a thing of the past. Just with a few clicks you can automatically search your system for outdated drivers and update all of them.
- Download the Outbyte Driver Updater
- Install the application
- Launch the app
- Driver Updater will scan your system for outdated and missing drivers
- Click Update to automatically update all drivers
Option 2 — Manually Update Device Drivers
Of course, you can also choose to update your drivers yourself one by one. First you will need to look through them to find the outdated ones, then search for the updates online. Here’s how to do that:
- Go to Taskbar’s search box and type Device Manager, then select Device Manager in the search results.
- Select a category to look at the devices’ names — right-click the one that needs to be updated
- Choose Search automatically for updated driver software
- Select Update Driver
- Windows might not be able to find the new driver automatically. In this case, you can find the driver on the manufacturer’s website, where all the necessary instructions are available. Just make sure to find the official website so that you only download the trusted driver and not some malicious software.
Method 4: Scan your PC for malware to fix the cdi.exe error
Since EXE files communicate directly with your system to give instructions, they are very common targets for malware, which can intentionally corrupt these files in order to substitute them with its own malicious files. If you suspect that this is what’s causing errors on your system, you should scan your computer for malware and eliminate it as soon as possible.
Option 1 — Windows Defender
The new version of Windows 10 has a built-in application called «Windows Defender», which allows you to check your computer for viruses and remove malware. In order to use the Windows Defender offline scan, follow these steps:
- Press the Win key or click Start and click on the gear icon to open Settings. Alternatively press Win + I key combination.
- Select the Update and Security option and go to the Windows Defender section.
- At the bottom of the Defender settings there is a checkbox labeled «Windows Defender Offline scan». To start it, click «Scan Now». Note that you will have to save all unsaved data before restarting your PC.
After you click the “Scan Now” button, the computer will reboot and automatically start searching for viruses and malware. Upon completion of the scan, the computer will restart, and in the notifications, you will see a report on the completed scan.
Option 2 — Outbyte AVarmor
Outbyte products are some of the most popular and effective programs for dealing with malware and unwanted programs, and they will come in handy even if you have a high-quality third-party antivirus installed. This software is specifically designed to complement your antivirus, not replace it. In the new version of Outbyte, scans can be performed in real time and manually. To initiate a manual scan please follow the steps below:
- Launch Outbyte AVarmor and click the Scan Now button. Also, you can select the Scan option on the left side of the program’s window and click Full Scan. The system will begin scanning and you will be able to see the scan results.
- Select items that you want to quarantine and press the “Quarantine Selected” button. After they’ve been quarantined, you may be prompted to reboot the computer.
- After the program has been restarted, you can delete all quarantined objects by going to the appropriate section of the program. However, if you found that your system started to encounter errors after something was quarantined, you should restore the file instead.
Check your system performance to eliminate file conflicts and junk accumulation. Resolve registry and missing file errors.
Compatible with Windows 7, 8, 10, 11
Method 5: Fix the cdi.exe missing error with System File Checker (SFC)
Many users are familiar with the sfc/scannow system file integrity check command, which automatically checks and fixes protected Windows system files. It is often one of the first things experienced Windows users do when they encounter errors.
To execute this command, you have to run Command Prompt as an administrator.
- Start the command line as an administrator in Windows by pressing the Win key on your keyboard and typing «Command Prompt» in the search field, then — right-click on the result and select “Run as administrator”. Alternatively, you can press the Win + X key combination which will open the menu where you can select Command Prompt (Admin).
- Type sfc / scannow while in Command Prompt and hit Enter. After entering the command, a system check will begin. It will take a while, so please be patient. Once the process is complete you will see this message: “Windows Resource Protection found corrupt files and successfully repaired them.” or “Windows Resource Protection found corrupt files but was unable to fix some of them”.
Keep in mind that System File Checker (SFC) cannot fix integrity errors for those system files that are currently being used by the operating system. To fix these files you have to run SFC command through the command prompt in the Windows recovery environment. You can get into Windows Recovery Environment from the login screen by clicking Shutdown, then holding down the Shift key while selecting Restart.
In Windows 10, you can press Win key, select Settings > Update & security > Recovery and under Advanced Startup, click Restart now. You can also boot from the installation disk or bootable USB flash drive with the Windows 10 distribution. On the installation screen select your preferred language and then select “System Restore”. After that, go to “Troubleshooting” > “Advanced Settings” > “Command Prompt”. Once in Command Prompt type the following command: sfc /scannow /offbootdir=C:\ /offwindir=C:\Windows, where C is the partition with the installed operating system and C:\Windows, is the path to the Windows 10 folder.
This operation will take a while and it is important to wait until it is complete. When finished, close the command prompt and restart the computer as usual. You should find that the cdi.exe missing error is gone.
Method 6: Fix the corrupted cdi.exe file by performing a System Restore
System Restore is very useful if you want to fix cdi.exe error, or almost any other error. Using the «System Restore» function, you can choose to restore Windows to a date when the cdi.exe file was not damaged. Restoring Windows to an earlier date cancels changes that were made to system files since that date. Please follow the steps below to roll back Windows using System Restore and get rid of the cdi.exe error.
- Press the Win + R keys combination to launch the Run dialog.
- Type sfc /scannow while in Command Prompt and hit Enter.
After entering the command, a system check will begin. It will take a while, so please be patient. Once the operation is complete you will see this message: “Windows Resource Protection found corrupt files and successfully repaired them.” or “Windows Resource Protection found corrupt files but was unable to fix some of them”.
- Type rstrui in the Run text box and click OK or hit Enter. This will open the system recovery utility.
- The “System Restore” window may include the “Choose a different restore point” option. If so, select this option and click Next. Check the “Show more restore points” checkbox to see a complete list of dates.
- Click the «Next» button and then click «Finish» to confirm your restore point. At this point, your computer will reboot normally and boot up with a restored version of Windows, and the cdi.exe error should be resolved.