
Список поддерживаемых операционных систем
- Microsoft Windows 10 (32/64-бит);
- Microsoft Windows 8.1 (32/64-бит);
- Microsoft Windows 8 (32/64-бит);
- Microsoft Windows 7 SP1 (32/64-бит);
- Microsoft Windows Vista SP2 (32/64-бит);
- Microsoft Windows XP SP3 (32-бит), SP2 (64-бит);
- Microsoft Windows Server 2012 R2;
- Microsoft Windows Server 2012;
- Microsoft Windows Server 2008 R2 SP1;
- Microsoft Windows Server 2008 SP2 (32/64-бит);
- Microsoft Windows Server 2003 R2 SP2 (32/64-бит);
- Microsoft Windows Server 2003 SP2 (32/64-бит).

Для возможности использования некоторых онлайн сервисов вам сможет понадобиться скачать Capicom для Windows (64-bit, 32-bit). Это компонент ActiveX, который отвечает за работу цифровых сертификатов.
Если у вас появляется ошибка: «Для подписи запроса электронно-цифровой подписью необходимо наличие установленного компонента Microsoft Capicom на вашей рабочей станции.», то вы зашли по адресу. Ниже представлена подробная информация о ее решении.
Для электронного документооборота требуется идентифицировать каждого участника в сети, чтобы точно быть уверенным, что определенные действия совершает именно он, а не кто-то другой. Опять же шепотом подтверждать компетентность оставлять электронную подпись. Все это осуществляется через библиотеки Капиком dll, который может отсутствовать в системе.
Эти файлы понадобятся в случае, если вы планируете использовать сервисы:
- Росреестр;
- Roseltorg;
- Сбербанк АСТ;
- Альфабанк
- zakupki.rk.gov.ru;
- Криптопро;
- Прочие электронные торговые площадки.
Видео инструкция по установке библиотеки Капиком
Скриншоты


Особенности
ОС: Windows 10 / 8 / 7 / Vista / XP
Тип: системная библиотека
Дата выхода: 2019
Разработчик: Microsoft
Платформа: PC
Тип издания: final
Версия: 6.0 (kb931906)
Язык интерфейса: русский (RUS) / английский (ENG)
Ключ: не требуется
Размер: 501 Кб
Установка Capicom на компьютер
Для 32-битных систем:
- Запустить CAPICOM-KB931906-v2102.exe
- Установить библиотеку согласно инструкции
- Обязательно поменять путь установки на C:\Windows\System32
- После этого надо ее зарегистрировать через «Пуск» -> «Выполнить»
- В строке ввести: cmd и нажать «Enter»
- В открывшемся окне ввести: regsvr32.exe capicom.dll
- Начать использование.
Для 64-битных систем:
- Скопировать содержимое папки Capicomx64 в C:\Windows\SysWOW64
- Зарегистрировать через «Пуск» -> «Выполнить»
- В строке ввести: cmd и нажать «Enter»
- В открывшемся окне ввести: C:\Windows\SysWOW64\regsvr32.exe capicom.dll
- Начать использование.
Скачать Capicom
Похожие файлы
Отзывы: 0
What is Capicom.dll? What Does It Do?
The size of this dynamic link library is 0.49 MB and its download links are healthy. It has been downloaded 67873 times already and it has received 3.9 out of 5 stars.
Table of Contents
- What is Capicom.dll? What Does It Do?
- Operating Systems Compatible with the Capicom.dll Library
- All Versions of the Capicom.dll Library
- Guide to Download Capicom.dll
- Methods to Fix the Capicom.dll Errors
- Method 1: Copying the Capicom.dll Library to the Windows System Directory
- Method 2: Copying the Capicom.dll Library to the Program Installation Directory
- Method 3: Uninstalling and Reinstalling the Program that Gives You the Capicom.dll Error
- Method 4: Fixing the Capicom.dll error with the Windows System File Checker
- Method 5: Getting Rid of Capicom.dll Errors by Updating the Windows Operating System
- Windows Update Guides
- Most Seen Capicom.dll Errors
- Dynamic Link Libraries Related to Capicom.dll
Operating Systems Compatible with the Capicom.dll Library
- Windows 10
- Windows 10 64 Bit
- Windows 8.1
- Windows 8.1 64 Bit
- Windows 8
- Windows 8 64 Bit
- Windows 7
- Windows 7 64 Bit
- Windows Vista
- Windows Vista 64 Bit
- Windows XP
- Windows XP 64 Bit
All Versions of the Capicom.dll Library
The last version of the Capicom.dll library is the 2.1.0.2 version released on 2010-12-31. Outside of this version, there is no other version released
- 2.1.0.2 — 64 Bit (x64) and 32 Bit (x86) (2010-12-31) Download directly this version
Guide to Download Capicom.dll
- Click on the green-colored «Download» button (The button marked in the picture below).

Step 1:Starting the download process for Capicom.dll - «After clicking the Download» button, wait for the download process to begin in the «Downloading» page that opens up. Depending on your Internet speed, the download process will begin in approximately 4 -5 seconds.

Methods to Fix the Capicom.dll Errors
ATTENTION! In order to install the Capicom.dll library, you must first download it. If you haven’t downloaded it, before continuing on with the installation, download the library. If you don’t know how to download it, all you need to do is look at the dll download guide found on the top line.
Method 1: Copying the Capicom.dll Library to the Windows System Directory
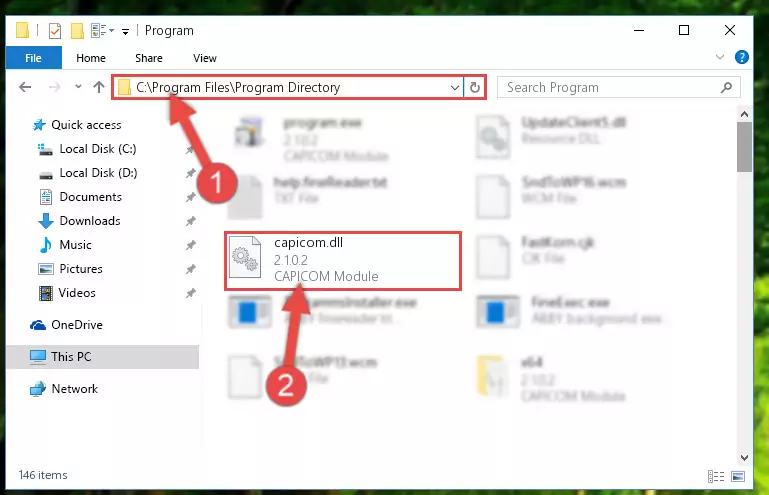
- The file you downloaded is a compressed file with the «.zip» extension. In order to install it, first, double-click the «.zip» file and open the file. You will see the library named «Capicom.dll» in the window that opens up. This is the library you need to install. Drag this library to the desktop with your mouse’s left button.
- Copy the «Capicom.dll» library file you extracted.
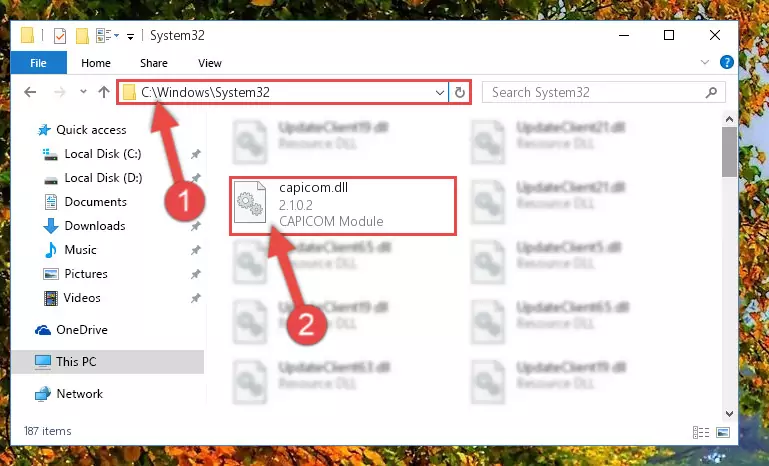
- Paste the dynamic link library you copied into the «C:\Windows\System32» directory.
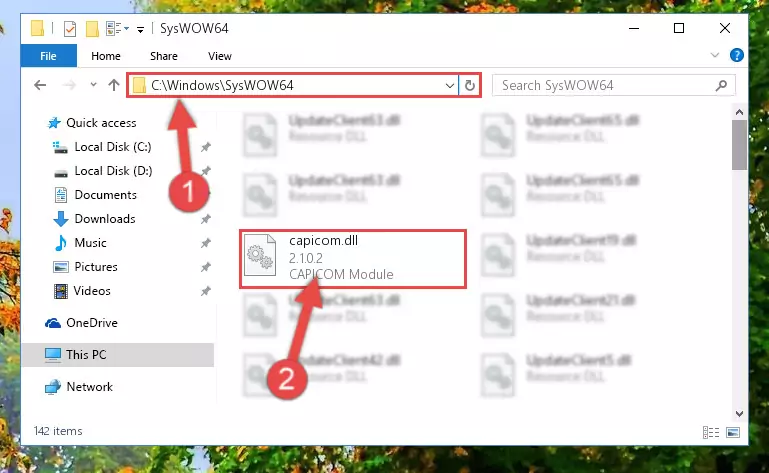
Step 3:Pasting the Capicom.dll library into the Windows/System32 directory - If your system is 64 Bit, copy the «Capicom.dll» library and paste it into «C:\Windows\sysWOW64» directory.
NOTE! On 64 Bit systems, you must copy the dynamic link library to both the «sysWOW64» and «System32» directories. In other words, both directories need the «Capicom.dll» library.
Step 4:Copying the Capicom.dll library to the Windows/sysWOW64 directory - In order to complete this step, you must run the Command Prompt as administrator. In order to do this, all you have to do is follow the steps below.
NOTE! We ran the Command Prompt using Windows 10. If you are using Windows 8.1, Windows 8, Windows 7, Windows Vista or Windows XP, you can use the same method to run the Command Prompt as administrator.
- Open the Start Menu and before clicking anywhere, type «cmd» on your keyboard. This process will enable you to run a search through the Start Menu. We also typed in «cmd» to bring up the Command Prompt.
- Right-click the «Command Prompt» search result that comes up and click the Run as administrator» option.
Step 5:Running the Command Prompt as administrator - Paste the command below into the Command Line that will open up and hit Enter. This command will delete the damaged registry of the Capicom.dll library (It will not delete the file we pasted into the System32 directory; it will delete the registry in Regedit. The file we pasted into the System32 directory will not be damaged).
%windir%\System32\regsvr32.exe /u Capicom.dll
Step 6:Deleting the damaged registry of the Capicom.dll - If you have a 64 Bit operating system, after running the command above, you must run the command below. This command will clean the Capicom.dll library’s damaged registry in 64 Bit as well (The cleaning process will be in the registries in the Registry Editor< only. In other words, the dll file you paste into the SysWoW64 folder will stay as it).
%windir%\SysWoW64\regsvr32.exe /u Capicom.dll
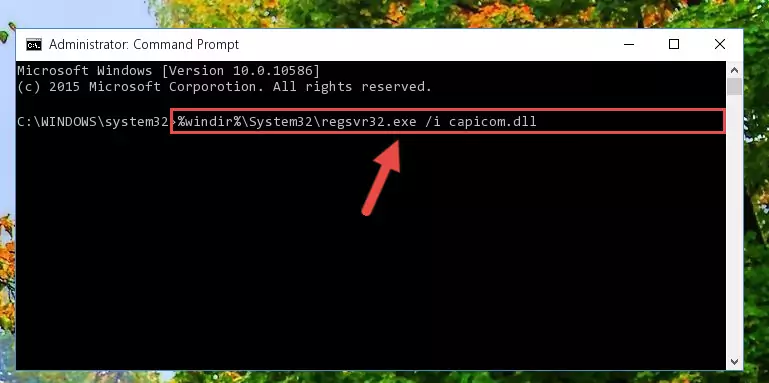
Step 7:Uninstalling the Capicom.dll library’s broken registry from the Registry Editor (for 64 Bit) - In order to cleanly recreate the dll library’s registry that we deleted, copy the command below and paste it into the Command Line and hit Enter.
%windir%\System32\regsvr32.exe /i Capicom.dll
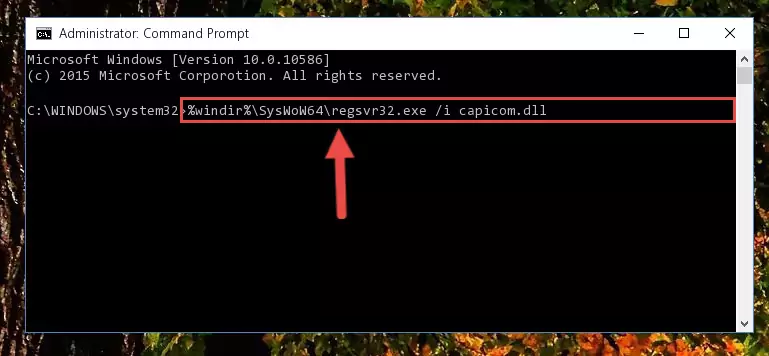
Step 8:Reregistering the Capicom.dll library in the system - If you are using a Windows with 64 Bit architecture, after running the previous command, you need to run the command below. By running this command, we will have created a clean registry for the Capicom.dll library (We deleted the damaged registry with the previous command).
%windir%\SysWoW64\regsvr32.exe /i Capicom.dll
Step 9:Creating a clean registry for the Capicom.dll library (for 64 Bit) - If you did all the processes correctly, the missing dll file will have been installed. You may have made some mistakes when running the Command Line processes. Generally, these errors will not prevent the Capicom.dll library from being installed. In other words, the installation will be completed, but it may give an error due to some incompatibility issues. You can try running the program that was giving you this dll file error after restarting your computer. If you are still getting the dll file error when running the program, please try the 2nd method.

Method 4: Fixing the Capicom.dll error with the Windows System File Checker
- In order to complete this step, you must run the Command Prompt as administrator. In order to do this, all you have to do is follow the steps below.
NOTE! We ran the Command Prompt using Windows 10. If you are using Windows 8.1, Windows 8, Windows 7, Windows Vista or Windows XP, you can use the same method to run the Command Prompt as administrator.
- Open the Start Menu and before clicking anywhere, type «cmd» on your keyboard. This process will enable you to run a search through the Start Menu. We also typed in «cmd» to bring up the Command Prompt.
- Right-click the «Command Prompt» search result that comes up and click the Run as administrator» option.
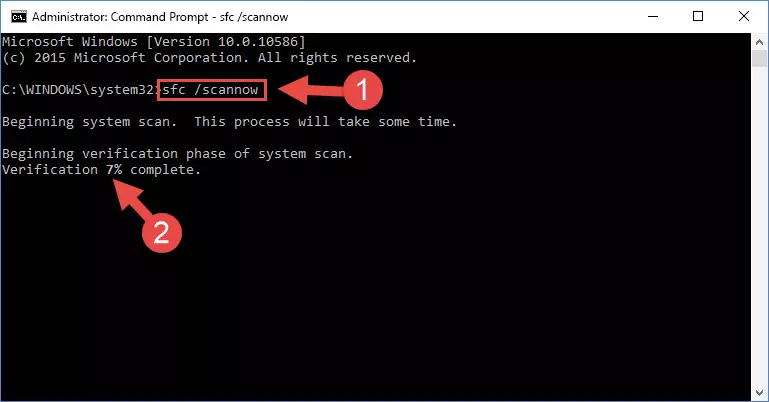
Step 1:Running the Command Prompt as administrator - After typing the command below into the Command Line, push Enter.
sfc /scannow
Step 2:Getting rid of dll errors using Windows’s sfc /scannow command - Depending on your computer’s performance and the amount of errors on your system, this process can take some time. You can see the progress on the Command Line. Wait for this process to end. After the scan and repair processes are finished, try running the program giving you errors again.
Method 5: Getting Rid of Capicom.dll Errors by Updating the Windows Operating System
Some programs need updated dynamic link libraries. When your operating system is not updated, it cannot fulfill this need. In some situations, updating your operating system can solve the dll errors you are experiencing.
In order to check the update status of your operating system and, if available, to install the latest update packs, we need to begin this process manually.
Depending on which Windows version you use, manual update processes are different. Because of this, we have prepared a special article for each Windows version. You can get our articles relating to the manual update of the Windows version you use from the links below.
Windows Update Guides
- Windows Update Guide
- Windows 8.1 and Windows 8 Update Guide
- Windows 7 and Windows Vista Update Guide
- Windows XP Update Guide
Most Seen Capicom.dll Errors
The Capicom.dll library being damaged or for any reason being deleted can cause programs or Windows system tools (Windows Media Player, Paint, etc.) that use this library to produce an error. Below you can find a list of errors that can be received when the Capicom.dll library is missing.
If you have come across one of these errors, you can download the Capicom.dll library by clicking on the «Download» button on the top-left of this page. We explained to you how to use the library you’ll download in the above sections of this writing. You can see the suggestions we gave on how to solve your problem by scrolling up on the page.
- «Capicom.dll not found.» error
- «The file Capicom.dll is missing.» error
- «Capicom.dll access violation.» error
- «Cannot register Capicom.dll.» error
- «Cannot find Capicom.dll.» error
- «This application failed to start because Capicom.dll was not found. Re-installing the application may fix this problem.» error
- Ccfgnt.dll
- Cpscan.dll
- Cvgs_nt.dll
- Chipesn.dll
- Mstsmmc.dll
Это приложение представляет собой один из плагинов управления ActiveX. Основной целью Capicom Plugin является обеспечение пользователей возможностью подписывать различные документы электронным ключом.
Как инсталлировать плагин на 64 бит ОС?
Перед установкой необходимо обязательно войти в систему под учеткой администратора. После этого можно начинать разархивирование файлов на ПК. Следующим шагом нужно выполнить копирование сapicom.inf и сapicom.dll в особый каталог syswоw64 системного раздела Windows. Затем необходимо выполнить регистрацию библиотеки: нужно зайти в системный каталог systеm32 и выполнить приложение сmd.exe как администратор. В открывшемся поле нужно набрать имя файла библиотеки. Это может выглядеть так:: «c:\ windоwssyswоw64rеgsvr32.exе сapiсom.dll» или другим подобным образом.
Процесс установки плагина на 32 бит ОС
Нужно извлечь содержимое загруженного архива, далее запустить установщик и начать установку файлов на ПК. Далее нужно поместить плагин в папку Systеm операционной системы. Основным функционалом плагина является проставление цифровой подписи в документе. С использованием этого компонента вы можете не только обрабатывать информацию для обеспечения ее защиты, но и хэшировать данные, а также шифровать/дешифровать данные.
Ключевые особенности
- Легкая инсталляция на компьютер;
- Поддержка большинства версий ОС Windows;
- Предусмотрено использования для цифровой подписи;
- Функциональный элемент управления ActiveX;
- Минималистичный интерфейс утилиты для удобства работы с ней.
Download the respective folder as per requirement of Operating System
Procedure to install capicom.dll for Windows 10-32 Bit
1. Extract the folder to your desktop and copy «capicom.dll» and «Interop.CAPICOM.dll» to your system folder i.e C:\Windows\System32.
2.Execute batch file «Windows7-32bit» as administrator (right click and select run as administrator) from the extracted folder to register «capicom.dll» with Operating System.
—————————————————————————————————————————
rocedure to install capicom.dll for Windows 10-64 Bit
1. Extract the folder to your desktop and copy «capicom.dll» and «Interop.CAPICOM.dll» to your system folder i.e C:\Windows\SysWOW64
2.Execute batch file «Windows7-64bit» as administrator (right click and select run as administrator) from the extracted folder to register «capicom.dll» with Operating System.
3.Download for Windows 10- 64 Bit
—————————————————————————————————————————
Please ensure in your internet explorer popup bloker is off(as shown in the attached jpg)