
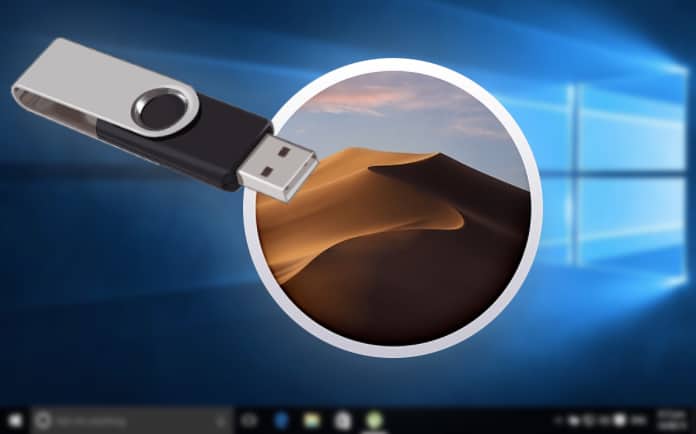
Каждый уважающий себя пользователь должен иметь под рукой как минимум диск с операционной системой, дабы загрузить с него компьютер и выполнить восстановление, если тот по какой-то причине не смог загрузиться самостоятельно. Касается это не только Windows, но и Mac OS. Правда, создавать такой образ нужно заранее, чтобы затем внезапно не оказаться обезоруженным. В ОС от Apple для этих целей можно воспользоваться такими программами как MacDaddy Install Disk Crеаtor и DiskMaker X, но что, если беда случилась, а вы так и не позаботились загодя создать загрузочный носитель с «яблочной» системой?
Неприятно, но не катастрофично, потому что создать его вы можете на другом маке, а если он недоступен, вполне сгодится ПК под управлением Windows, нужно только установить на него программу TransMac. Это простое приложение предназначается для просмотра содержимого оптических и жестких дисков, флеш-накопителей и томов Apple File System, а также файлов dmg, dmgpart, sparsebundle и sparseimage. Программа поддерживает работу с файловыми системами HFS, HFS+, создание, редактирование и разделение образов DMG, их запись на оптические и флеш-накопители.
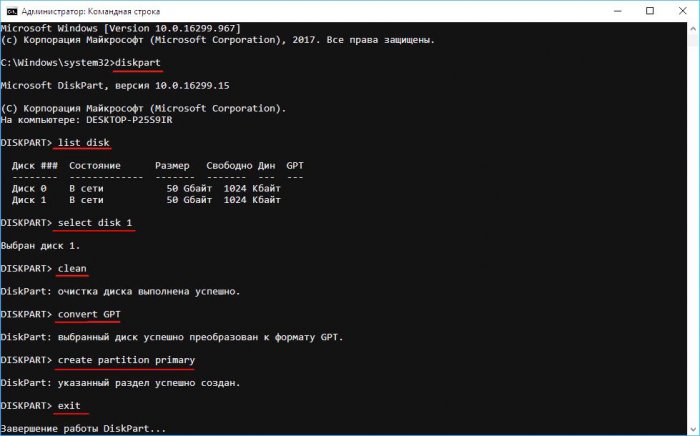
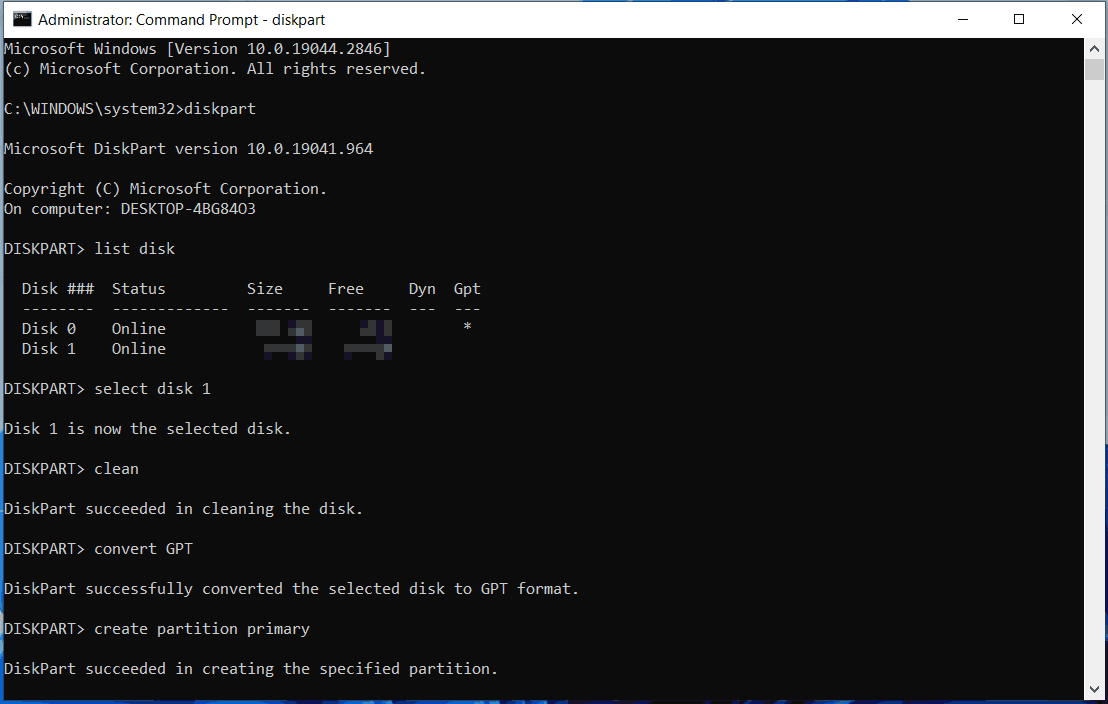
Для создания загрузочной флешки Mac OS вам понадобится установочный образ DMG с операционной системой от Apple, флеш-накопитель объёмом 16 Гб и установленная на компьютер с Windows программа TransMac. Перед тем как приступать к записи, флешку необходимо соответствующим образом подготовить, создав на ней раздел GPT. Для этого откройте от имени администратора командную строку и выполните в ней следующие команды:

Первой командой запускается утилита Diskpart, второй и третьей командами выводится список подключенных к компьютеру носителей и выбирается номер нужного диска, в данном случае флешки, четвертая и пятая команды очищают и преобразовывают диск в GPT, шестая команда создаёт на нём первичный раздел. Наконец, команда exit завершает работу утилиты Diskpart.
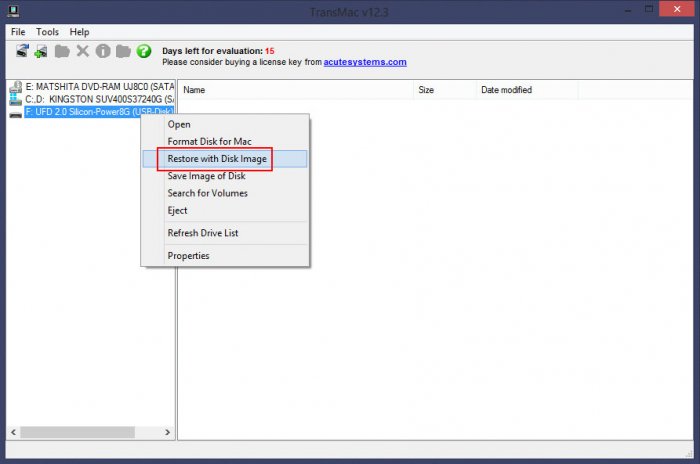
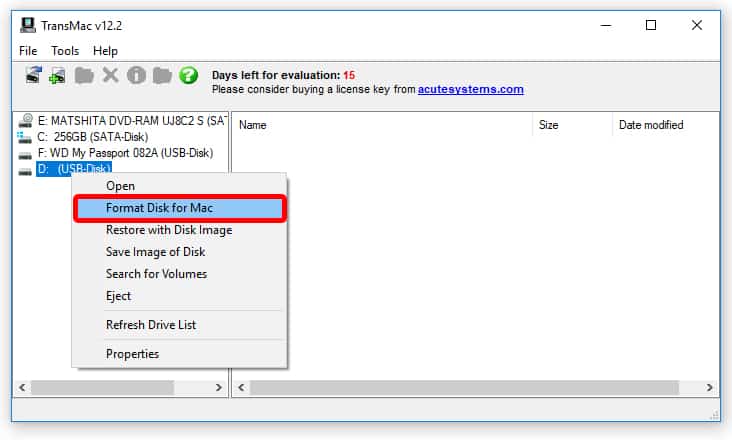
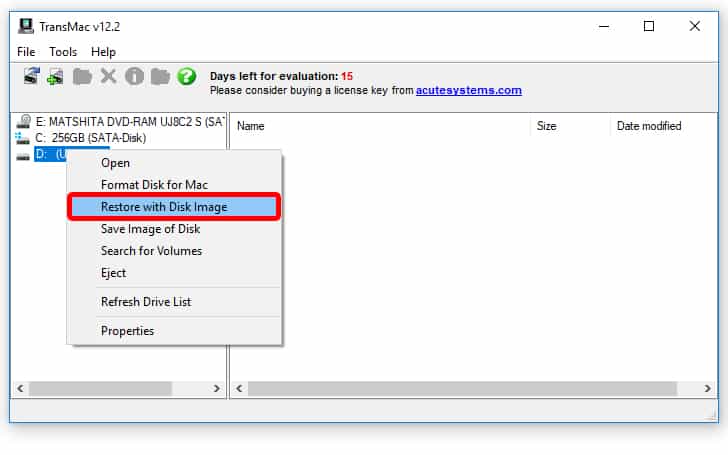
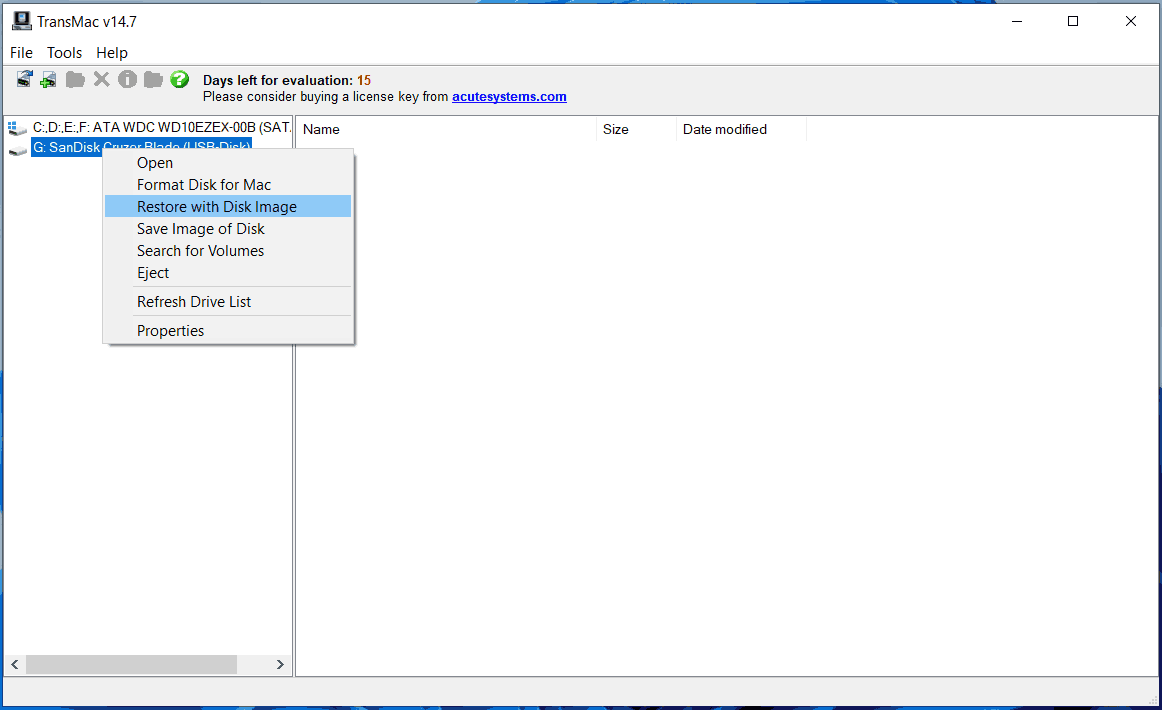
Подготовив носитель, запустите программу TransMac от имени администратора, слева на панели кликните по подключённой флешке ПКМ и выберите в меню опцию «Restore with Disk Image».
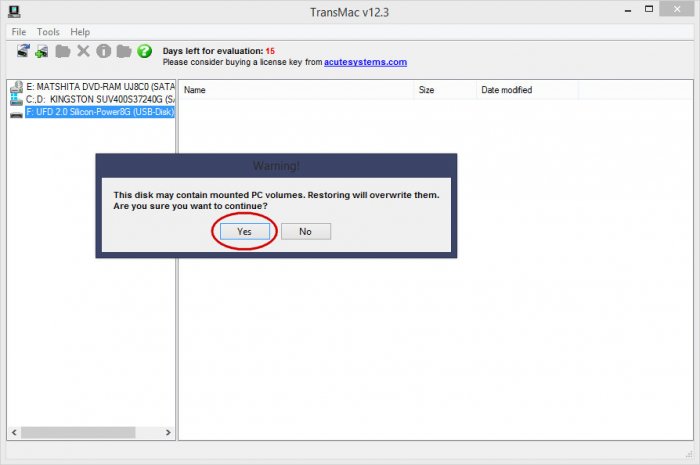
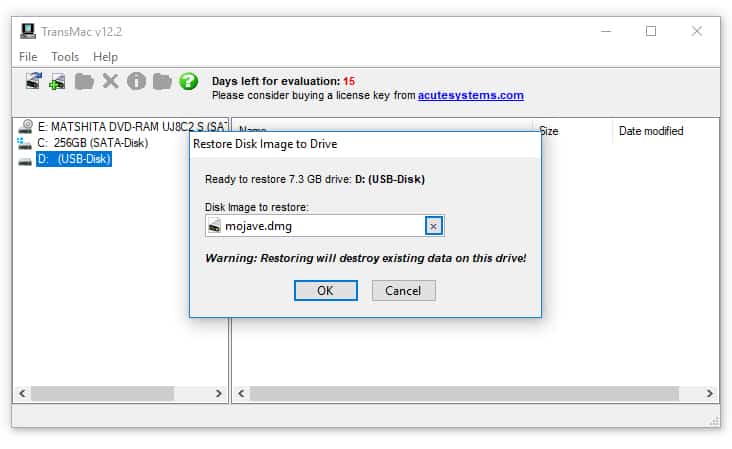
Подтвердите действие в открывшемся диалоговом окошке, затем в новом диалоговом окне
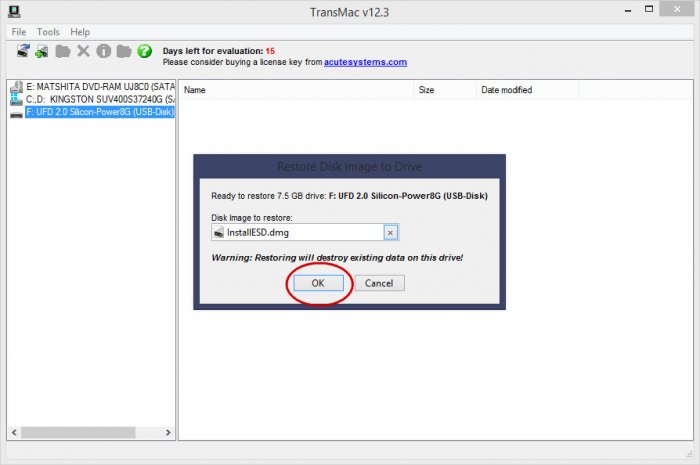
укажите путь к образу DMG и нажмите ОК.
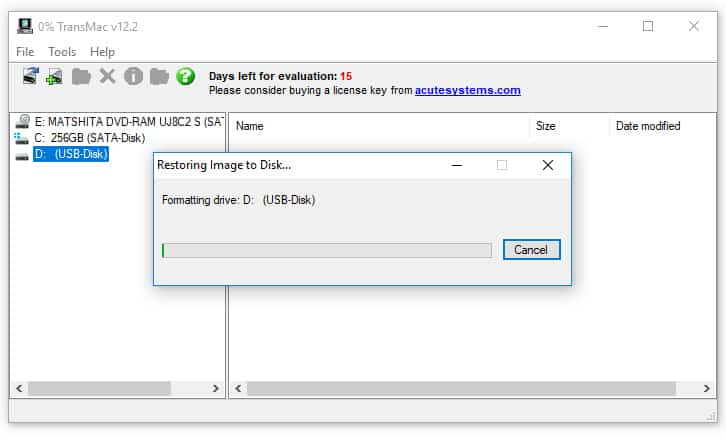
Начнётся процедура копирования файлов загрузочного образа на флешку. Она может занять достаточно длительное время, час или даже более, так что наберитесь терпения. По завершении процедуры вы станете обладателем загрузочной флешки, с помощью которой сможете попасть в среду восстановления операционных систем от Apple.
Статьи по этой теме:
1. Как установить Mac OS на Windows
2. Windows или Mac — какая из операционных систем лучше
Операционная система Windows более капризная и менее стабильная, чем macOS от Apple. Открытость ОС, отсутствие встроенной системы резервного копирования и большое количество вредоносного ПО часто приводят к необходимости перестанавливать Windows.
При наличии второго Windows-компьютера под рукой создать загрузочную флешку не составит никакого труда.
? Спасибо re:Store за полезную информацию. ?
Сейчас расскажем, как выйти из ситуации, когда есть только рабочий Mac.
В тему: как создать загрузочную флешку macOS в Windows
Еще несколько лет назад создать загрузочную флешку можно было при помощи стандартной утилиты Boot Camp, которая предназначена для быстрой установки Windows на Mac.
Приложение подготавливало загрузочную флешку, записывало на нее установщик Windows и заливало драйвера для корректной работы всех модулей Mac. Использовать такую флешку можно было не только на компьютерах Apple, с ее помощью можно было установить Windows на любой подходящий компьютер.
С недавнего времени разработчики macOS переработали утилиту и вместо создания загрузочной флешки она сразу же начинает установку системы на отдельный раздел Mac.
К счастью, есть и другой достаточно простой способ задать флешку для установки Windows.
Как создать загрузочную флешку Windows
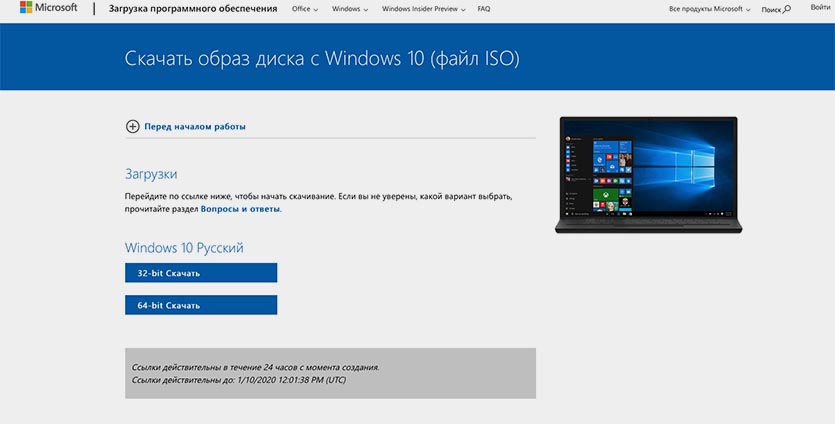
1. Для начала потребуется образ с операционной системой. Скачать его можно прямо с официального сайта Microsoft.
Образ Windows 10 занимает чуть более 5 Гб дискового пространства, на скачивание обычно уходит от 15 до 30 минут.
2. Далее понадобится флешка объемом 8 ГБ и более, которая будет отформатирована в формате Fat32.
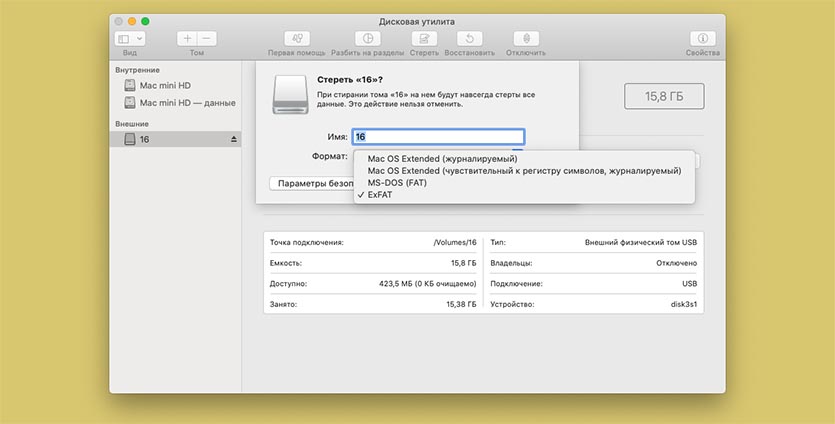
Можно воспользоваться приложением Дисковая утилита или сделать все в Терминале.
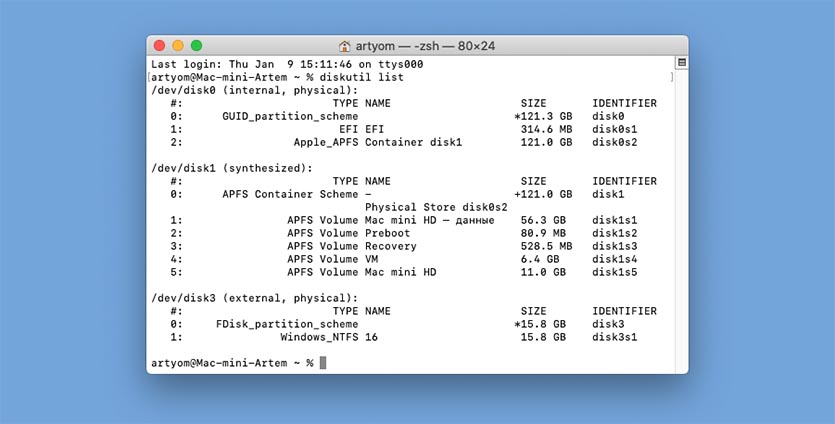
3. В Терминале выполняем следующую команду:
diskutil list
Видим перечень внутренних и внешних накопителей на Mac. Находим нужный по объему и запоминаем его номер. Далее вводим команду:
sudo diskutil eraseDisk FAT32 WININSTALL MBRFormat /dev/disk3
FAT32 — нужная нам файловая система;
WININSTALL — метка флешки после форматирования (можно указать любое имя);
disk3 — номер подключенного накопителя, который будем форматировать.
Вводим пароль администратора, ждем несколько секунд и получаем готовую чистую флешку.
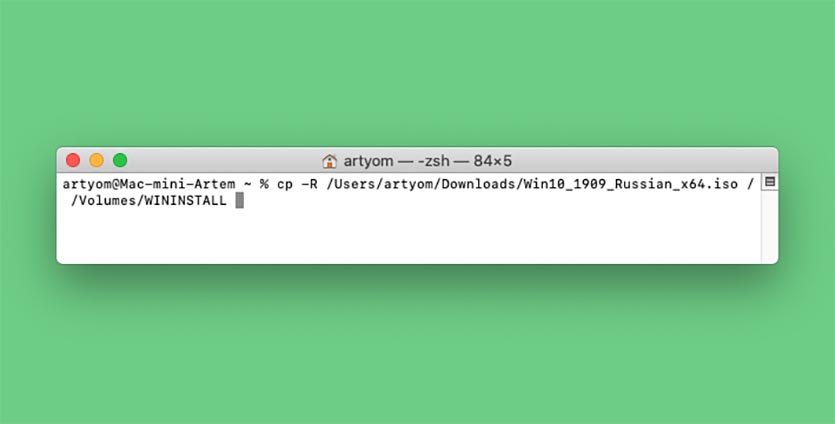
4. Остается лишь скопировать содержимое образа с Windows 10 на флешку.
Для этого монтируем образ и вводим в Терминале такую команду:
cp -R расположение_образа/ расположение_флешки
Чтобы вручную не прописывать длинные пути, нужно лишь ввести начало команды “cp -R “, а затем перетянуть образ на окно Терминала из Finder. Путь к нему пропишется автоматически.
Теперь пишем “/ ” (без кавычек с пробелом) и перетаскиваем в Терминал флешку из Finder.
5. Копирование займет определенное время. Никакого статуса при этом отображаться не будет. Об окончании процесса можно судить по светящемуся диоду на флешке (во время копирования он будет мигать).
Можно просто подождать около 20 минут.
Теперь флешку можно использовать для загрузки на компьютерах и ноутбуках с поддержкой UEFI. К сожалению, для старых Windows-ПК такой способ не подойдет.
(136 голосов, общий рейтинг: 4.39 из 5)
iPhones.ru
Сделать это проще, чем флешку macOS из Windows.
Артём Суровцев
@artyomsurovtsev
Люблю технологии и все, что с ними связано. Верю, что величайшие открытия человечества еще впереди!
Regardless of your OS – whether it’s Windows 10 or macOS Sierra – you could face the instance where your device refuses to reboot. This can happen for numerous reasons, including hardware failure, file corruption, malicious update, and the likes. If something similar happens with your Apple PC, you can repair it with macOS bootable USB that features installation media.
This is one of the core arguments for making a macOS bootable USB on a Windows PC when your Mac is working correctly. However, if none of your Apple computers [MacBook Air, iMac, Mac Pro, Mac Mini, MacBook Pro or MacBook] are working, then a Windows PC can be used to rescue the PC. You can use a Windows 10, or Windows 8.1/7 to create a bootable USB installation media for reinstalling macOS Sierra on your Apple PC.
Guide to Creating a macOS bootable USB on a Windows PC
In this tutorial, we’ll take you through the steps you need to take to create a macOS Sierra bootable USB installation on a PC featuring Windows 10, 8 or Windows 7. This can then be used to upgrade or reinstall Apple’s MacOS.
The pre-requisites
Before taking any step, you’d need the following:
- A problematic Mac PC with OS X or MacOS Sierra [10.12 or a later version].
- TransMac software [trial version would be sufficient].
- 16GB flash storage.
- A copy of macOS DMG file.
To use the latest macOS version to make a bootable USB drive, take these steps:
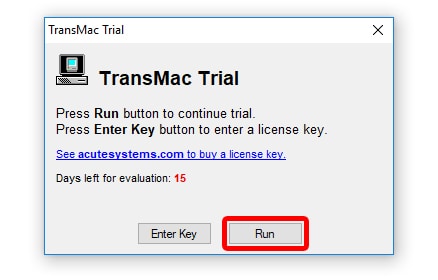
Step 1: Download, launch and install the TransMac software on Windows. The software comes at a cost, but you’ll get a 15-day trial free of cost, which is just enough. P.S. If you like TransMac, you can buy the paid version and show some love to the developer.
Step 2: Put in the USB flash drive you wish to use to resolve the problem of Mac. If you have a backup on the USB, remember to copy it somewhere, as the USB’s content will be erased.
Step 3: Right click on TransMac and choose “Run as administrator.”
Step 4: If you’re using TransMac’s free trial, click Run after waiting for a total of 15 seconds.
Step 5: On the late pane, right click the flash drive of USB, and choose “Format Disk for Mac.” You should do this before making bootable media because there is a probability that a Windows device was used to format the drive. If that’s the case, it’s likely that it is making use of the MBR partition. However, for it to work on Mac, it requires GPT partition.
Step 6: Click “Yes” on the warning message when prompted to continue formatting.
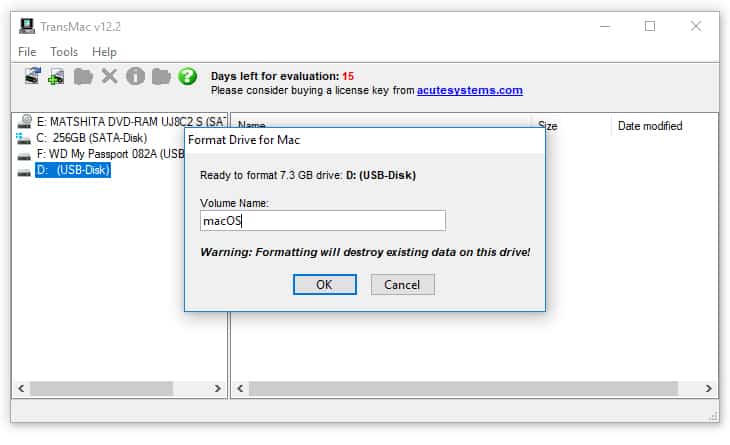
Step 7: Give some name to the drive and click “OK.” For example, you could name it “macOS bootable USB.”
Step 8: Now proceed further by clicking “Yes.”
Step 9: Click “OK” to continue when the formatting finishes.
Step 10: Next, right click on the flash drive of the USB, choose “Restore with Disk Image.”
Step 11: Click “yes” to erase the data on the flash drive when you get the warning message.
Step 12: Now on the right, click the button that says browse, and find the .dmg file with the installation files of macOS.
Step 13: Now click “Open” > “OK” > “Yes’ to make the macOS USB bootable media.
Once the process comes to an end, put the USB flash drive on your Mac PS to reinstall, install, or ugrade the OS to macOS’s newest version, which could be Sierra or above.
Steps to Create GPT Partition on a USB flash drive
If the USB flash drive doesn’t work with TransMac, you could still be facing an issue of partition. When that happens, you’ll want to repeat the whole process, but this time around, follow the steps listed below to utilize the Dispart command-line utility on the Windows PC for creating the relevant GPT partition.
- Launch Command Prompt in system administrator
- Type the command “diskpart” and press “Enter.”
- Enter the “list disk” command to each drive connected to your PC and press “Enter.”
- Now type the command “select disk” followed by the assigned number for the flash drive “select disk 4”, and press “Enter” again.
- Now enter “clean” command and press “Enter.”
- Enter the “convert GPT” command and hit “Enter.”
- Type the “create partition primary” command and tap “Enter” to finish the process.
After you’ve made a GPT partition for the USB flash drive, you can leverage the instructions above to leverage TransMac to make bootable media, but ignore the steps 5-9 this time around, and do what it says from the tenth step onward.
Once the process ends (note that it could take 30-60 minutes), connect the flash drive of USB and switch on the Mac PC while holding the “Option” key, and choose the USB flash drive to start the installation.
If you’re facing an issue producing bootable media, you can buy a flash drive that comes in the package of macOS Sierra.
That’s it. You’ve successfully created a macOS Bootable USB on a Windows PC. Feel free to use it at your will to fresh install macOS’s latest OS on Mac.
-
Home
-
News
- How to Create macOS Bootable USB on Windows 10/11? See the Guide!
How to Create macOS Bootable USB on Windows 10/11? See the Guide!
By Vera | Follow |
Last Updated
It is a good way to create macOS bootable USB on Windows 10/11 when your Mac fails to boot. Don’t know how to make a bootable USB drive for Mac on Windows? Thankfully, MiniTool gives you detailed guidance in this post. Let’s get started.
Some of you choose a Mac to use since it is reliable and secure. However, you may run into bootable issues and the Mac fails to run to the desktop. No matter you are running Windows 11/10 or macOS, it’s a matter of time before the device cannot start up.
If your Mac refuses to boot up due to file corruption, update issue, and other software issues, you can make a bootable medium to repair the Mac. So, how to create macOS bootable USB drive? You can choose to do this thing on a Windows PC by following the guide below.
How to Create Mac Bootable USB from Windows
Note that the operations below apply to many macOS versions, including macOS Ventura, Monterey, Big Sur, Catalina, and Mojave.
Part 1: What to Do Before Creating Bootable USB for Mac on Windows
Before you do, some things should be prepared.
#1. Prepare a USB Drive
Prepare a USB flash drive that has at least 16GB of storage space. Besides, make sure there is no important data saved to this drive. If yes, back up the crucial files to another safe place. You can do this thing via copy & paste or use a piece of free backup software like MiniTool ShadowMaker.
MiniTool ShadowMaker TrialClick to Download100%Clean & Safe
#2. Download Mac DMG File
A DMG file is a type of disk image in macOS that is used to store compressed software installers, just like an ISO file in Windows. To create macOS bootable USB, a .dmg file is required. So, how to download a copy of Mac (.dmg)? Follow the help document from Apple – How to download macOS, then you can get a .dmg file of macOS.
#3. Download TransMac or UUByte
When searching for “make bootable USB Mac Windows 10” or “create a macOS bootable USB on Windows” online via Google Chrome, you may see the related searches – UUByte create macOS bootable USB and TransMac bootable USB.
UUByte and TransMac are third-party tools that can be used to make a macOS bootable USB drive. Just download one of them and install it on your PC. Here, we take TransMac as an example. Note that it is a paid software but you can free try it for 15 days. Just get it via https://www.acutesystems.com/scrtm.htm.
Part 2: Create a GPT Partition on USB
Sometimes the USB drive is not bootable due to the partition issue. So, you first need to convert the USB drive to GPT and then run TransMac for a bootable USB drive.
To create a GPT partition on USB, run Command Prompt as an administrator. Then, type diskpart and press Enter. Next, execute the following commands:
list disk
select disk n: n means the drive letter of your USB drive.
clean
convert GPT
create partition primary
Tips:
In addition to Diskpart, you can run MiniTool Partition Wizard to convert disk to GPT.
After everything is ready, let’s see how to create macOS bootable USB now.
Part 3: Make Bootable USB Mac Windows 10/11
How to make a bootable Mac USB on Windows via TransMac? Accomplish it in these steps:
Step 1: Connect your USB flash drive to your Windows PC and launch TransMac as an administrator.
Step 2: Click Run to start a free trial.
Step 3: Right-click on the USB drive and choose Format Disk for Mac. Then, click Yes to confirm. You are asked to name the USB drive and we type macOS.
Step 4: Right-click on the drive and choose Restore with Disk Image.
Step 5: Click Yes, choose the .dmg file you have downloaded, and click OK > Yes. Then, this tool is creating a bootable USB drive.
Now you get the bootable USB drive for Mac on Windows. Eject the drive from the PC and connect it to your Mac. Then, run the macOS from this drive to perform a repair.
Verdict
It is a simple way to create macOS bootable USB on Windows 11/10. If you need it to fix your Mac, this guide is helpful to you and just follow the given instructions for a Mac bootable USB from Windows.
About The Author
Position: Columnist
Vera is an editor of the MiniTool Team since 2016 who has more than 7 years’ writing experiences in the field of technical articles. Her articles mainly focus on disk & partition management, PC data recovery, video conversion, as well as PC backup & restore, helping users to solve some errors and issues when using their computers. In her spare times, she likes shopping, playing games and reading some articles.
Apple updates its macOS designed to run on Mac computers every year. Every year, a new major version of the macOS is released. As of April 2022, macOS Monterey is the latest version of the macOS.
Prepare macOS bootable USB from Windows 10/8/7 PC
The macOS bootable USB can be prepared on a Mac without the help of third-party tools, just like how Windows bootable USB can be prepared from Command Prompt on a computer running Windows operating system. However, if your Mac device is not bootable, you can prepare macOS bootable USB right from Windows PC as well.
In this guide, we will see how to create macOS bootable USB drive on a PC running Windows 11, Windows 10 or Windows 7.
What you will need:
# macOS DMG file
# A USB flash drive with at least 16 GB of storage
# A PC running Windows 11, Windows 10 or Windows 7
# Trial copy of TransMac (trial copy is enough to create the bootable USB)
Once you have all items mentioned above, you can make macOS bootable USB on a Windows PC. In this guide, we’re creating macOS bootable USB on Windows 10, but you can use the same procedure on Windows 11 and Windows 7 as well.
Guide to prepare macOS bootable install USB on Windows 11/10/7
Step 1: Connect a USB drive with at least 16 GB of storage space to your Windows PC and move all data from USB drive to a safe place as the drive will be erased while preparing macOS bootable USB.
Step 2: Visit this page of TransMac and download the latest version of TransMac software on your PC. TransMac is a paid software but the 15-day trial copy can be used to prepare bootable USB without any issues. That said, if you often need to prepare macOS bootable USB from Windows, you should go ahead and buy the software.
Once the TransMac is downloaded, double-click on the setup file to run the installer and get it installed on your PC.

Step 3: Run TransMac software as administrator. To do so, type TransMac in Start menu search box, right-click on TransMac entry in search results, and then click Run as administrator option. When you see the TransMac Trial dialog box, Click Run button.


Alternatively, you can navigate to TransMac entry in Start menu, right-click on it, and then click Run as administrator option.
Step 4: Once TransMac is launched, in the left pane of the program, you will see the connected USB drive that you want to use to prepare macOS bootable USB. Right-click on the USB drive and then click Format Disk for Mac option.

Click Yes button when you see the warning dialog box.

This is because, if you have been using a USB flash drive with Windows operating system, the USB drive is likely using MBR partition type. So we need to partition the USB drive with GPT partition first before transferring the DMG file to the USB drive.
Step 5: Clicking Yes button will open Format Drive for Mac dialog box where you need to type a name for the drive. We are naming it as Seirra install drive.

When you see the warning message again, click Yes button to continue and format the drive for Mac.


Step 6: Once the format is done, right-click on the USB drive again, and then click Restore with disc image option.

Click Yes button when you see the following warning dialog box.

Step 7: Clicking the Yes button will open Restore Disk Image to Drive dialog box. Under Disk image to restore section, click the small button with drive icon on it (refer to the picture below) to browse to macOS DMG file. Select the macOS DMG file and then click Open.


Finally, click OK button.
Step 8: When you see the warning dialog box, click the Yes button to begin preparing your macOS bootable USB. The bootable USB should be ready in about 30 minutes. In our test, the tool took close to 45 minutes, though.
Once the bootable USB of macOS ready, you can connect it to your Mac device and begin installing macOS from it. Good luck!