
If your Windows 10 PC is running slow, facing system errors, or experiencing frequent crashes, reinstalling Windows 10 can help. But what if you don’t want to lose your files, apps, or settings? The good news is that you can reinstall Windows 10 without losing data using built-in options.
This guide will walk you through different methods to reinstall Windows 10 while keeping your personal files safe.
Over time, Windows 10 can develop issues that slow down performance. Some common reasons to reinstall include:
- Slow performance – Your system struggles due to junk files, software conflicts, or malware.
- Frequent crashes or errors – Blue Screen of Death (BSOD), driver failures, or software corruption may occur.
- Corrupted system files – Built-in repair tools like SFC and DISM might fail to resolve the problem.
- Failed Windows updates – Bugs or instability may arise after system updates.
- Removing unwanted software – A fresh reinstall eliminates unnecessary apps causing conflicts.
If you’re experiencing any of these problems, reinstalling Windows 10 can help restore stability and performance.
3 Ways to Reinstall Windows 10 Without Losing Data
There are three main methods to reinstall Windows 10 while keeping your files intact:
- Using the “Reset this PC” Option (Keeps files, removes apps)
- Using the Windows Installation Media (Reinstalls system files, keeps everything)
- Using an In-Place Upgrade via the Windows 10 ISO (Repairs system, keeps apps & files)
Let’s go through each method step by step.
Method 1: Reset This PC (Keeps Your Files, Removes Apps)
Windows 10 has a built-in Reset this PC feature that lets you reinstall the OS while keeping your personal files. However, installed apps and drivers will be removed.
Steps to Reset Windows 10 Without Losing Data:
1.Open Settings
- Press Win + I to open Settings.
- Click on Update & Security > Recovery.
2.Start the Reset Process
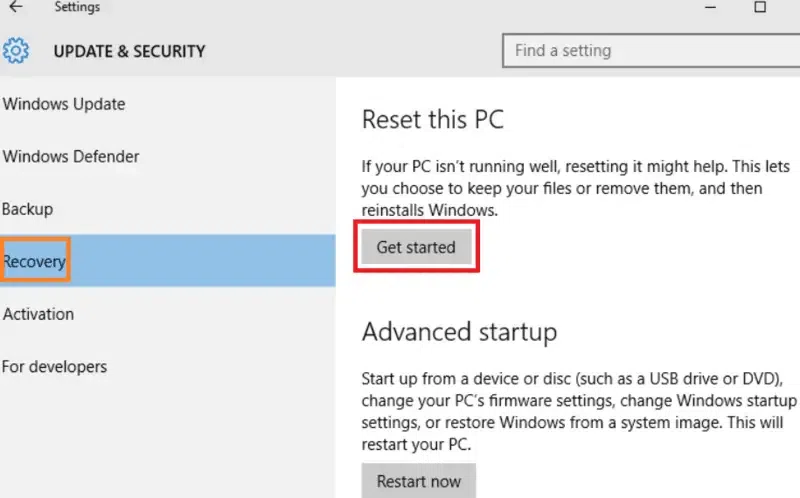
- Under Reset this PC, click Get started.
3.Choose “Keep My Files”
- Select “Keep my files” to ensure your personal data isn’t deleted.
- Windows will remove apps and reset settings but won’t touch personal files.
4.Follow the On-Screen Instructions
- Click Next and Reset to begin the process.
- Your PC will restart and reinstall Windows 10.
What Happens After the Reset?
Once the reset is complete, your personal files remain safe, but installed programs (except built-in Windows apps) will be removed. Additionally, Windows settings will return to default, which can help resolve configuration issues.
If you want to keep both files and apps, check out Method 3 below.
Method 2: Reinstall Windows 10 Using Installation Media
This method reinstalls Windows 10 while keeping your files, apps, and settings intact. It requires a bootable USB drive or an ISO file.
Requirements:
✔ A USB drive (8GB or more)
✔ Windows 10 installation media (Download from Microsoft’s official website)
Steps to Reinstall Windows 10 Without Losing Data:
1. Create Windows 10 Installation Media
- Download Media Creation Tool from Microsoft.
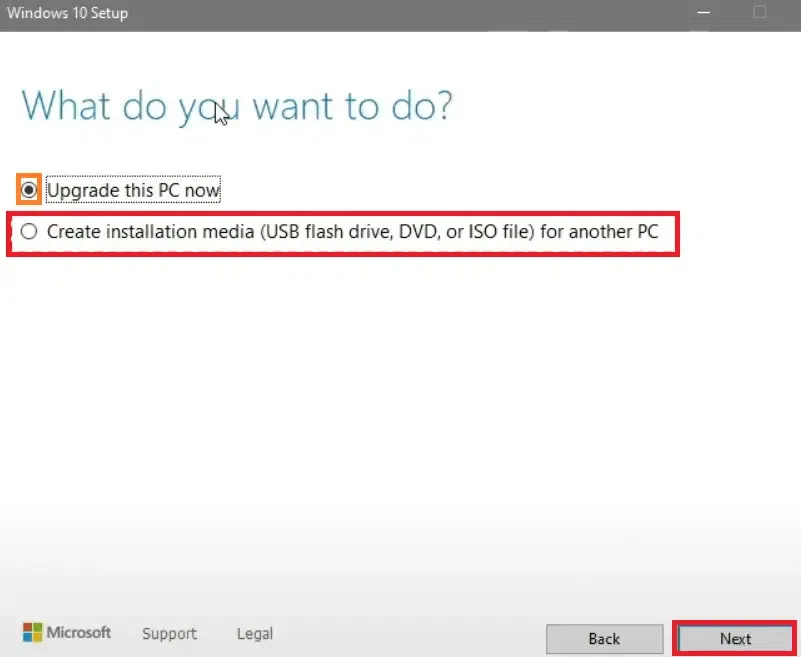
- Run the tool and select Create installation media (USB flash drive, DVD, or ISO file) for another PC.
- Follow the instructions to create a bootable USB.
2. Boot from the USB Drive
- Insert the USB drive and restart your PC.
- Press the boot key (F12, F2, DEL, or ESC, depending on your manufacturer).
- Select the USB drive as the boot device.
3.Start the Windows 10 Reinstallation
- Click Install Now.
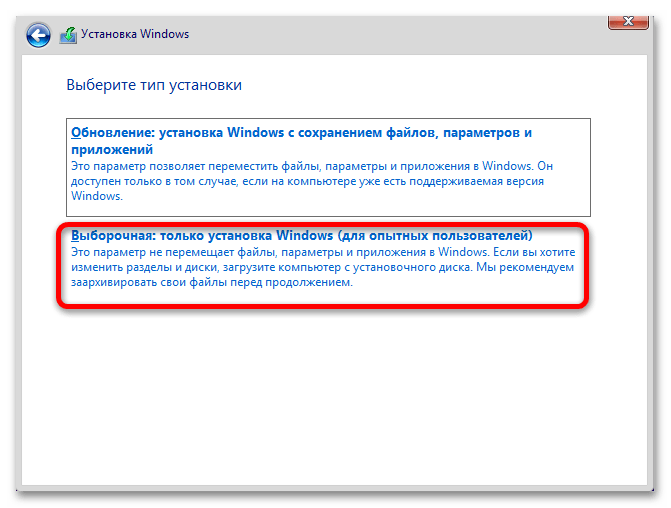
- Select Upgrade: Install Windows and keep files, settings, and applications.
4.Complete the Installation
- Follow on-screen instructions.
- After installation, your files, apps, and settings will remain intact.
This method is useful when your system is not booting properly but you still want to keep all your files and programs.
Method 3: Perform an In-Place Upgrade with Windows 10 ISO
An in-place upgrade reinstalls Windows 10 over your existing installation without deleting anything. It’s one of the safest ways to fix system issues while keeping everything intact.
Steps to Reinstall Windows 10 Without Losing Data:
1.Download Windows 10 ISO
- Go to Microsoft’s website.
- Download the Windows 10 ISO file.
2.Mount the ISO File
- Right-click the ISO file and select Mount.
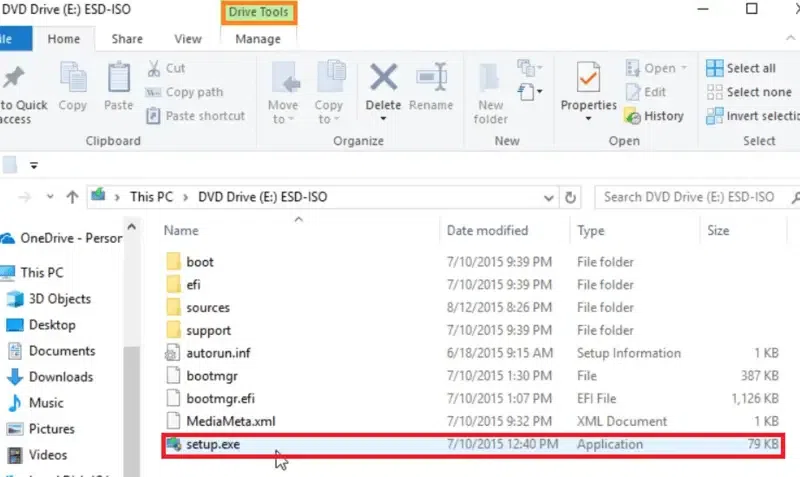
- Open the mounted drive and run setup.exe.
3.Choose to Keep Files and Apps
- Select “Upgrade this PC now”.
- Choose “Keep personal files and apps”.
4.Start the Installation
- Click Next, then Install.
- Windows 10 will reinstall while keeping all your files and programs.
This is the best method if your PC is running but facing software issues or corruption.
What to Do Before Reinstalling Windows 10?
To ensure a smooth reinstall process:
Backup important files – Even though these methods keep files, it’s best to back up data to an external drive or cloud storage.
Check your Windows version – Go to Settings > System > About to confirm your edition (Home/Pro) before reinstalling.
Note down license keys – If you have paid software, make sure to save license keys.
Unplug external devices – Remove unnecessary USB drives, printers, and accessories to avoid conflicts.
Final Thoughts
Reinstalling Windows 10 doesn’t mean losing data. Whether you use Reset This PC, Installation Media, or an In-Place Upgrade, you can restore your system while keeping important files intact. Each method has its advantages:
- For quick fixes: Use Reset This PC
- If Windows won’t boot: Choose Installation Media
- To keep everything (files, apps, and settings): Perform an In-Place Upgrade (ISO)
Have you tried any of these methods? Let us know in the comments! 🚀
FAQs
1.Will reinstalling Windows 10 delete my personal files?
No, if you choose the “Keep my files” option during reset or use an in-place upgrade.
2.Do I need a Windows 10 product key to reinstall?
No, if Windows 10 was previously activated on your PC, it will reactivate automatically.
3.Can I reinstall Windows 10 without a USB or DVD?
Yes! Use Reset This PC or mount the Windows ISO file for an in-place upgrade.
4.How long does it take to reinstall Windows 10?
It depends on your system, but typically 30 minutes to 2 hours.
Thank you for visiting our website! We hope this guide helps you achieve a smoother and faster Windows experience. Do check out our other tech tips and visit again Fyss.in for more solutions.
Post Views: 246
Discover more from Fyss | Find Your System Solutions
Subscribe to get the latest posts sent to your email.
If you’ve been struggling to access your computer and need to reinstall Windows without losing any of your important files, you’re in the right place. In this guide, I’ll walk you through the entire process of reinstalling Windows on a drive that already has Windows installed, even if you can’t access the system anymore. These steps are easy to follow, whether you have access to your PC or not.
Key Takeaways
- Reinstall Windows without deleting personal files.
- Determine if your drive is formatted as GPT or MBR before reinstalling.
- Use the correct boot mode (UEFI or Legacy) based on your drive’s format.
Requirements
- USB flash drive with Windows installation media (created with Ventoy or other tools).
- Basic understanding of accessing BIOS/boot menu.
- Internet connection (for downloading the latest Windows version, if needed).
Step 1: Open Command Prompt in Windows Recovery
If your computer won’t boot into Windows, the first step is to access the command prompt from the advanced options.
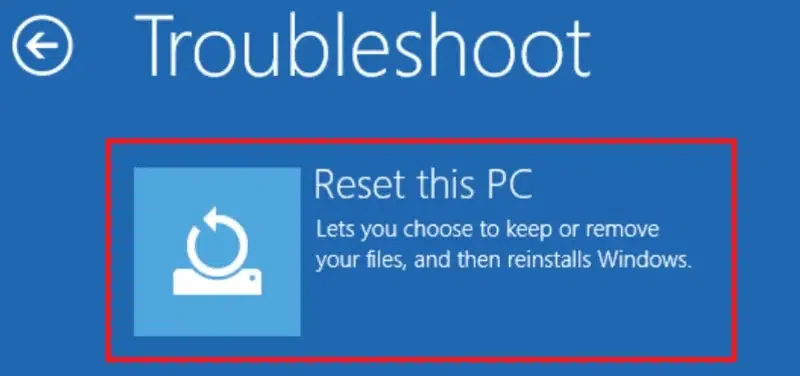
- Restart your computer and boot into Windows recovery by selecting Troubleshoot and then Advanced options.
- Select Command Prompt from the menu.

Step 2: Use DiskPart to Check Disk Format
Next, determine whether your drive is formatted as GPT or MBR, as this will influence the boot mode you’ll need to select.
- Type
diskpartand press Enter. - Type
list diskand press Enter. - Look at the GPT column. If there is an asterisk, the disk is GPT; if not, it’s MBR.

Step 3: Boot from Windows Installation Media
Now, create a bootable USB flash drive with the Windows installation ISO file if you haven’t already. I recommend using the Ventoy tool for this process, which allows you to easily boot from a variety of ISO files.
- Download and install Ventoy on your USB flash drive.
- Copy the Windows ISO file (Windows 10 or Windows 11 depending on the version you want to install) onto the USB drive.
- Restart your computer and boot from the USB flash drive.
For detailed instructions, check out my guide on How to Create a USB Rescue Disk with Ventoy: A Step-by-Step Guide.

Step 4: Select the Correct Boot Mode
This is a critical step, as choosing the wrong boot mode can prevent the reinstallation process from working properly. Depending on how your hard drive is formatted (GPT or MBR), you’ll need to select the appropriate boot mode in your computer’s BIOS settings. Let me walk you through how to access the BIOS and configure the boot mode for either Legacy or UEFI.
Restart Your Computer:
As soon as the system starts rebooting, press the BIOS access key for your machine. This key is typically one of the following: F2, Delete, Esc, or F12, but it can vary based on the manufacturer. You should see a prompt during the boot process that says something like “Press [Key] to enter Setup.”

Access the BIOS Settings:
Once inside the BIOS, use the arrow keys to navigate through the menus. Look for an option labeled Boot or Boot Menu, as this is where you will configure the boot options.

Enable Legacy/UEFI Boot Mode:
If your system is GPT-formatted, look for the UEFI boot option. Navigate to the Boot Mode or CSM (Compatibility Support Module) section in the BIOS.
If your system is MBR-formatted, you need to enable the Legacy BIOS boot mode or CSM support. In this section, change the Boot Mode Selection to Legacy or CSM (depending on your BIOS manufacturer).

Save Changes and Exit:
After selecting the appropriate boot mode, navigate to the Save and Exit option. The exact wording might differ depending on your BIOS version, but it is often labeled something like Save & Exit Setup or Exit Saving Changes. Select this option and press Enter. Your computer will then restart, and you should now see the correct boot options in the boot menu.

Select the Correct Boot Option:
During the reboot, press the Boot Menu key (often F12 or similar) to bring up the boot options menu. Here, you should see your USB flash drive listed twice—once under UEFI and once under Legacy BIOS. Select the boot mode that corresponds to your drive format (UEFI for GPT, Legacy for MBR).

By ensuring you choose the correct boot mode, you’ll avoid compatibility issues and ensure the Windows installation process goes smoothly.
Step 5: Install Windows Without Deleting Files
Once you’ve booted from the installation media, follow the Windows setup steps.
- Choose your region and language settings.
- Click Install Now and select I don’t have a product key (if necessary).
- Choose the version of Windows you want to install (Windows 10 Pro or similar).
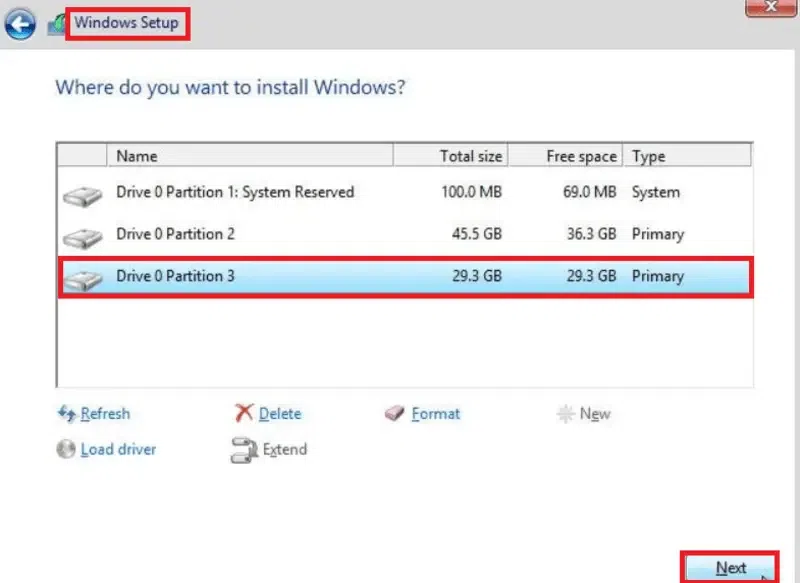
- Select Custom: Install Windows Only.
- Choose the partition where Windows is currently installed.

If you see a message indicating that the selected disk is of the GPT or MBR partition style, restart your computer and choose the correct boot mode.

For a detailed Windows installation guide, check out my guide on How to Install Windows 10 from a USB: Ultimate Step-by-Step Guide.
Step 6: Recover Your Data from Windows.old Folder
After completing the Windows reinstallation, your previous Windows files, settings, and personal data will be moved to a folder called Windows.old on your system’s C: drive. This folder contains everything from your old installation, including desktop files, documents, and downloads, and can be a lifesaver if you forgot to back up any important files beforehand. Follow these steps to recover your data:
Open File Explorer:
Start by opening File Explorer from the taskbar or by pressing Windows Key + E on your keyboard.

Navigate to C:\Windows.old:
In the left-hand sidebar of File Explorer, click on This PC, then double-click on the Local Disk (C:) drive. Once inside, you’ll see a folder named Windows.old. Double-click on it to access its contents.

Find Your Old User Account:
Inside the Windows.old folder, open the Users directory. This will contain folders representing all user accounts that were present on the old installation of Windows. Open the folder corresponding to your old user account.

Recover Your Files:
You’ll now see familiar folders like Desktop, Documents, Downloads, and more. To recover your files, simply navigate to each folder, select the files you want to restore, and copy them to the corresponding location in your new user profile. You can drag and drop the files or use Ctrl + C to copy and Ctrl + V to paste them into your new Windows installation folders.
Example:
- Navigate to Desktop if you want to recover files that were saved on your old desktop.
- Similarly, go to Documents or Downloads for personal files stored there.

Open Two Explorer Windows for Faster Copying:
To make it easier to copy your files, you can open a second File Explorer window by holding Shift and clicking on the File Explorer icon again. Position the two windows side by side—one showing the Windows.old folder and the other showing your new user profile in C:\Users. Then, drag the files from the old profile to the new one.

Ensure All Files are Recovered:
Go through all of the folders (Desktop, Documents, Downloads, etc.) to ensure you’ve recovered all the important files from the Windows.old folder. Once you’ve copied everything over to your new user profile, double-check that nothing essential has been left behind.

By following these steps, you can successfully restore your important files from your old Windows installation. Just be sure to check thoroughly so that no important data is missed before cleaning up your system.
Step 7: Clean Up Your System
After recovering your files, you can safely remove the Windows.old folder to free up space.
- Right-click on C: drive and select Properties.
- Click Disk Cleanup and select Clean up system files.
- Check the box for Previous Windows Installations and click OK.

Conclusion
Reinstalling Windows without losing your files may seem intimidating, but following these steps ensures that your data remains intact while you get a fresh installation of Windows. Be sure to check your disk format and use the correct boot mode to avoid issues.
Frequently Asked Questions (FAQ)
What is the difference between GPT and MBR?
GPT (GUID Partition Table) supports larger drives and more partitions, while MBR (Master Boot Record) is an older format with more limitations.
Can I keep my programs when reinstalling Windows?
No, reinstalling Windows will not keep your installed programs. You will need to reinstall them manually.
What happens if I choose the wrong boot mode?
If you choose the wrong boot mode, Windows will not install on your selected drive. You’ll need to restart and select the correct mode.
Can I use a local reinstall if I don’t have internet access?
Yes, you can perform a local reinstall using the existing Windows files on your computer, but it may not be the latest version.
How much space does the Windows.old folder take up?
The Windows.old folder can take up to 20-30GB of space, depending on the previous installation. Make sure you’ve copied your files before deleting it.
Все способы:
- Windows 11
- Windows 10
- Windows 7
- Переносим Windows на другой диск
- Windows 11
- Windows 10
- Различные программы
- Вопросы и ответы: 0
Windows 11
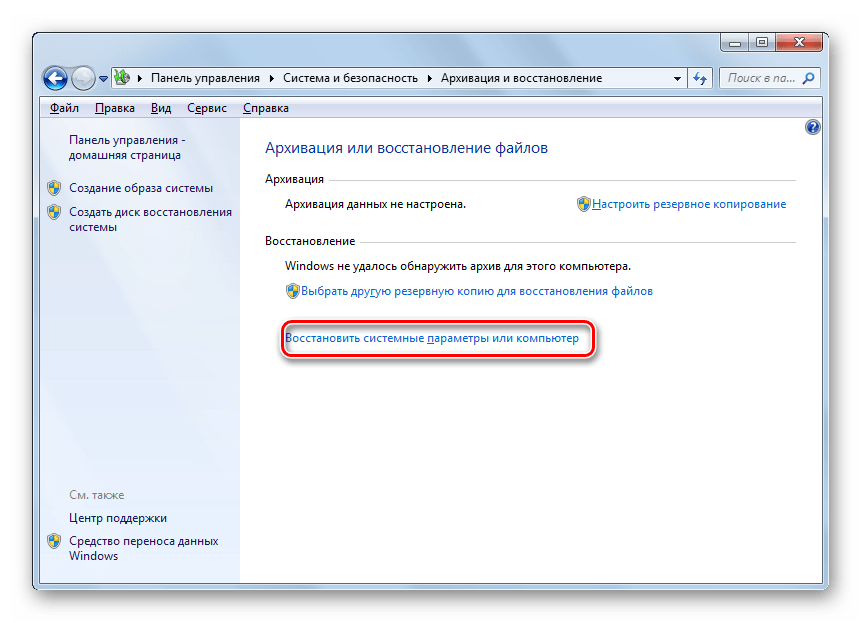
Переустановка Windows 11 без потери данных — это процесс, который позволяет обновить или восстановить систему, сохранив при этом все важные файлы и настройки. Для этого можно воспользоваться встроенной функцией «Восстановление системы» или создать резервную копию данных перед началом переустановки. Важно отметить, что при выборе опции «Сохранить мои файлы» в процессе установки, система удалит только системные файлы и программы, оставив личные данные нетронутыми. Однако перед началом процесса рекомендуется убедиться, что все важные файлы сохранены на внешнем носителе или в облаке, чтобы избежать случайной потери. Каждый доступный метод описан в материале по ссылке ниже.
Подробнее: Способы переустановки Windows 11 без потери данных
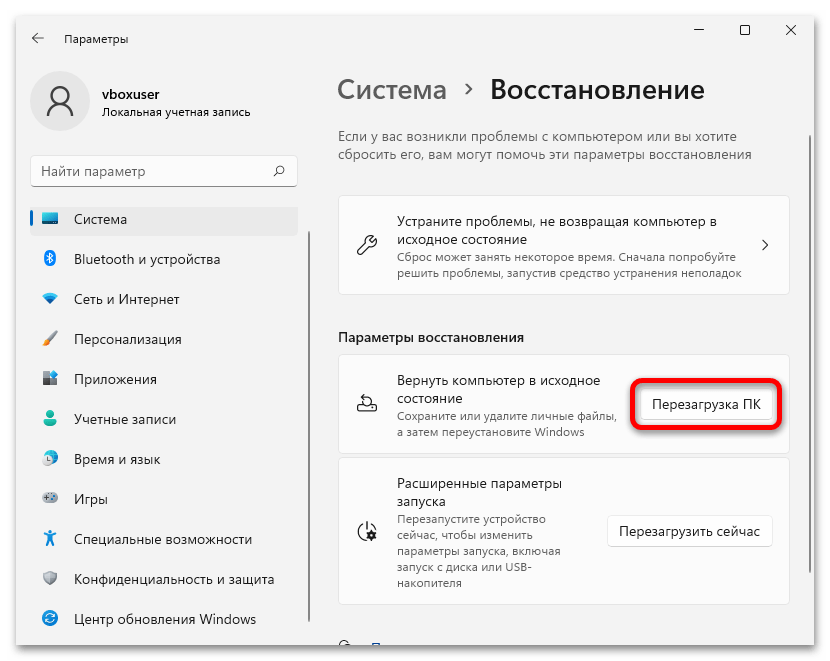
Если система работает нестабильно, но вы не хотите прибегать к полной переустановке, можно попробовать восстановить Windows 11 с сохранением данных. Это возможно с помощью функции «Вернуть компьютер в исходное состояние», которая позволяет сбросить настройки системы до заводских, не затрагивая личные файлы. Этот метод особенно полезен, если проблемы вызваны ошибками в системных файлах или некорректными обновлениями. Подробнее о восстановлении системы без удаления файлов можно узнать в соответствующей статье на нашем сайте.
Читайте также: Способы восстановления Windows 11 без удаления данных
Windows 10
Переустановка Windows 10 без потери данных также возможна благодаря встроенным инструментам. Для этого можно использовать функцию «Восстановление системы» или создать образ системы с помощью утилиты «Резервное копирование и восстановление». При выборе опции «Сохранить мои файлы» в процессе переустановки, система удалит только программы и настройки, оставив личные данные на месте. Однако перед началом процесса рекомендуется проверить, что все важные файлы сохранены на внешнем носителе, чтобы избежать случайной потери.
Подробнее: Методы переустановки Windows 10 без потери данных
Важно отметить, что при переустановке Windows 10 можно сохранить лицензию, если система была активирована ранее. Для этого достаточно войти в систему с учетной записью Microsoft, которая привязывает лицензию к вашему устройству. После переустановки система автоматически активируется, если используется та же версия Windows. Это особенно полезно для пользователей, которые хотят избежать повторной покупки лицензии. Детальнее о сохранении лицензии при переустановке можно узнать в нашей статье.
Читайте также: Переустанавливаем Windows 10 с сохранением лицензии
Windows 7
В случае с Windows 7 процесс переустановки системы без потери данных становится более сложным из-за устаревших инструментов. Однако можно воспользоваться функцией восстановления системы до заводских настроек, которая позволяет сохранить личные файлы. Для этого потребуется загрузочный диск или флешка с дистрибутивом Windows 7. Важно помнить, что при сбросе системы до заводских настроек будут удалены все установленные программы, поэтому рекомендуется заранее создать резервную копию важных данных.
Подробнее: Возвращение заводских настроек Windows 7
Если система работает нестабильно, но вы не хотите прибегать к полной переустановке, можно попробовать восстановить Windows 7 с помощью точки восстановления. Этот метод позволяет вернуть систему к состоянию, когда она работала корректно, не затрагивая личные файлы. Однако для этого необходимо, чтобы точки восстановления были созданы заранее.
Переносим Windows на другой диск
Перенос Windows на другой диск может быть необходим в различных ситуациях: при замене жесткого диска на SSD, увеличении объема памяти или переносе системы на другой компьютер. Этот процесс позволяет сохранить все данные, настройки и программы, что делает его отличной альтернативой полной переустановке системы. Однако важно учитывать, что перенос системы требует определенных знаний и подготовки, чтобы избежать потери данных.
Windows 11
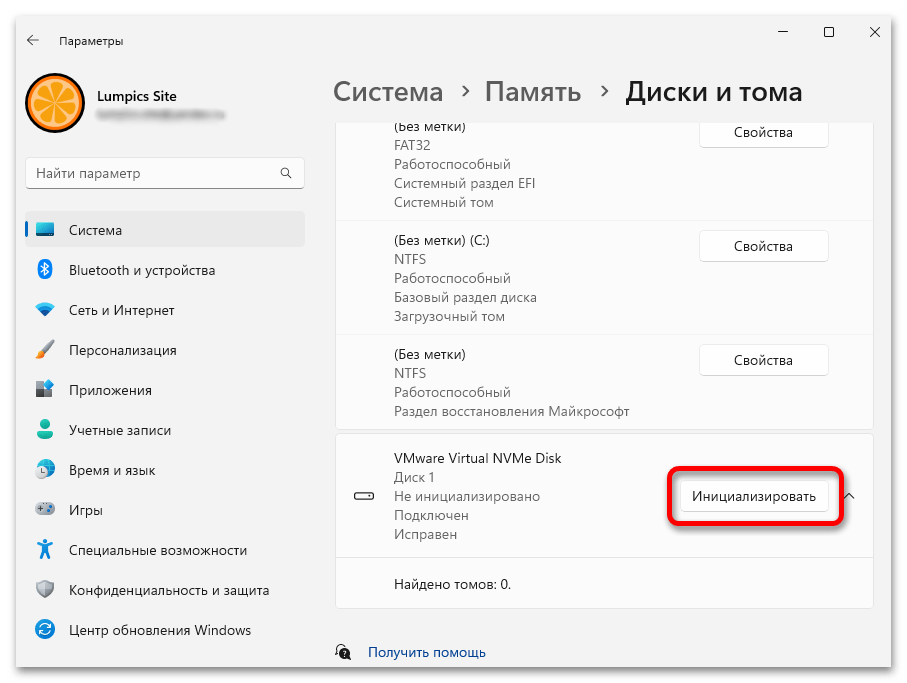
Для переноса Windows 11 на другой диск можно воспользоваться встроенными инструментами, такими как «Управление дисками» или сторонними программами для клонирования дисков. Это особенно полезно при переходе с HDD на SSD, так как позволяет сохранить все данные и настройки без необходимости переустановки системы. Также можно перенести Windows 11 на другой компьютер, но для этого потребуется дополнительная настройка драйверов и активации системы. Подробнее о переносе Windows 11 на другой диск или компьютер можно узнать в других статьях на нашем сайте, кликнув по подходящей ссылке.
Подробнее:
Перенос Windows 11 на другой диск
Переносим Windows 11 на другой компьютер
Windows 10
Перенос Windows 10 на другой диск, например, с HDD на SSD, также возможен с помощью встроенных инструментов или сторонних программ. Это позволяет сохранить все данные и настройки, что особенно полезно при обновлении оборудования. Кроме того, можно перенести систему на другой компьютер, как это происходит и в случае с Windows 11. Мы настоятельно рекомендуем прочитать все необходимые инструкции перед переносом, а также внимательно следовать всем шагам, чтобы избежать ситуации, когда какие-то важные данные будут утеряны.
Подробнее:
Перенос Windows 10 с HDD на SSD
Перенос Windows 10 на другой компьютер
Различные программы
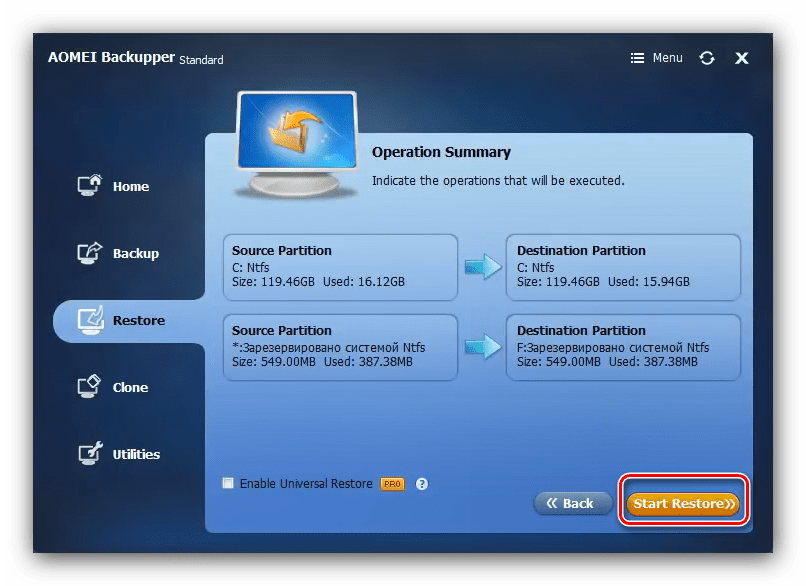
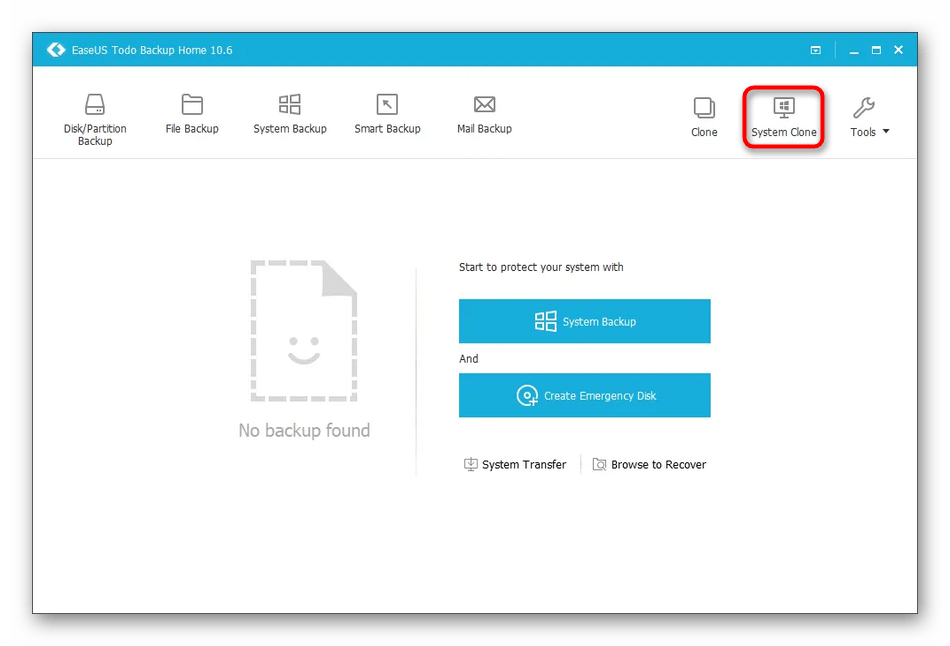
Для переноса Windows на другой диск или компьютер можно использовать специализированные программы, такие как Acronis True Image, Macrium Reflect или EaseUS Todo Backup. Эти программы позволяют клонировать диск, создавать образы системы и восстанавливать их на новом оборудовании. Они особенно полезны, если встроенные инструменты Windows не справляются с задачей или требуется более гибкое управление процессом. Больше сведений о программах для переноса Windows можно узнать в соответствующей статье на нашем сайте.
Подробнее: Программы для переноса Windows на SSD
Наша группа в TelegramПолезные советы и помощь
If you are facing performance issues with your PC or laptop and thinking about fixing them, then reinstalling your operating system is the best solution to fix any lagging and performance issues. But the question is, did you lose your data while performing the reinstallation of your Windows?
Well, the answer is no! You will reinstall your Windows 10 without losing a bit of data. And through this guide, you will learn various built-in methods to reinstall Windows 10 without losing data.
Table of Content
- How to Reinstall Windows 10 Without Losing Data — 3 Methods
- 1. Repair and Reinstall Windows 10 without losing Data
- 2. Reinstall Windows 10 without Losing Data
- 3. Clean & Reinstall Windows 10 without Losing Files
- Common Issues and Troubleshooting Tips During Windows Reinstallation
How to Reinstall Windows 10 Without Losing Data — 3 Methods
After applying multiple techniques to fix the system’s internal difficulties, and none of them have truly worked, it could be time to completely reinstall Windows 10 to resolve all the internal issues without losing the required data. Here, we’ll see 3 easy methods to reinstall Windows 10 without losing any internal data or files.
1. Repair and Reinstall Windows 10 without losing Data
Users can reinstall Windows 10 without losing internal data or programs if the system can boot up and they think everything that is installed is working. Now we’ll see some easy steps to repair and install Windows 10 without losing internal data.
Step 1: Initiate the Windows 10 Setup
Download the Windows Media Creation tool > Create an Installation ISO file.
Step 2: Run the EXE file
Double-click on mount the ISO File > Double-click on run the Setup.exe file.
Step 3: Check for Updates
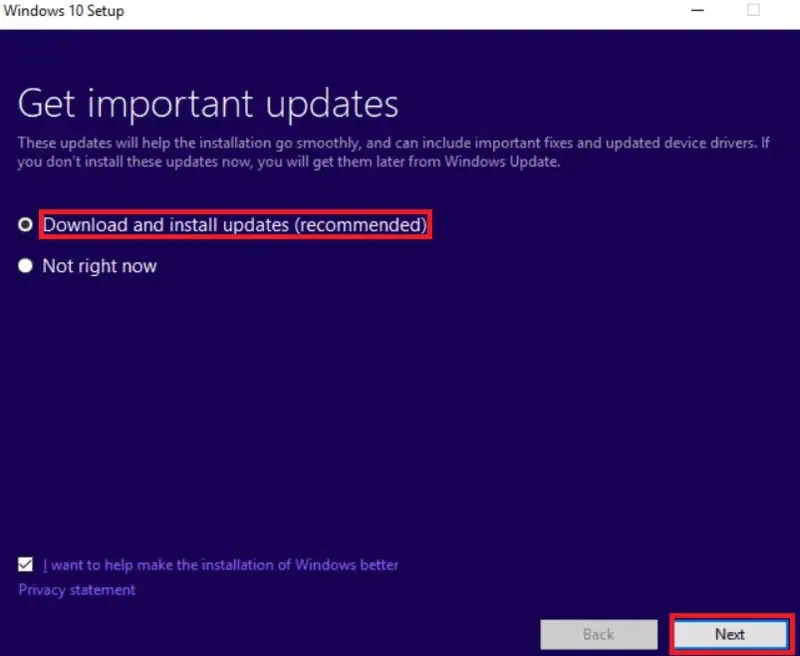
Windows 10 setup is ready > Download Updates.
Step 4: Confirm to Setup
Click on Change what to keep option and select an option as per your preference, which shows «Keep personal files, apps, and Windows settings«, «Keep personal files only«, or «Nothing«. Confirm the selected option > Click on Refresh.

2. Reinstall Windows 10 without Losing Data
With Windows 10, users may use the «Reset this PC» tool to help fix system issues by returning the internal system to its original configuration and properties. Now, we’ll see the required steps to install Windows 10 without losing personal files or data.
Step 1: Go to Settings > Reset this PC
Go to Settings > Update & Security > Recovery > Reset your PC > Get Started.
Step 2: Enter the Troubleshoot Mode
Another way, Create a Recovery Drive > Choose Keyboard Layout> Select Troubleshoot > Reset your PC.
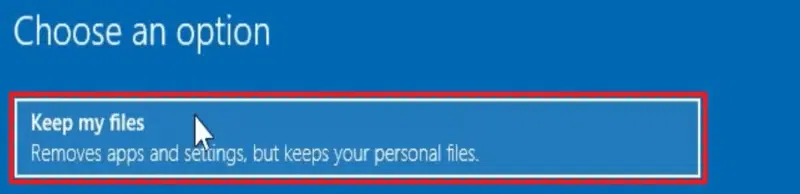
Step 3: Choose to «Keep» or «Remove» files
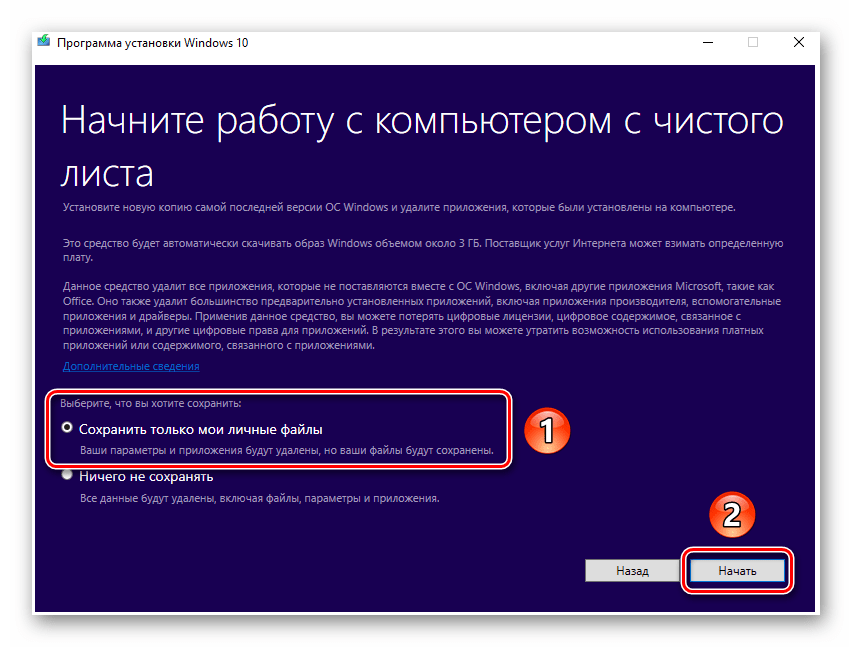
When users select the Reset PC option, they can see two options «Keep my Files» and «Remove Everything» > Select the «Keep my Files» option and click to «Reset».
3. Clean & Reinstall Windows 10 without Losing Files
This method can be used to upgrade Windows 10 if users would rather not lose internal games or other important data from USB drives or installation disk management. Now we’ll see some easy steps to clean and install Windows 10 without losing personal files.
Step 1: Go to Windows Setup to start
Insert Installation disc > Boot from it (If not present, user can install Windows media creation tool)
Step 2: Select Language & Proceed to Install
Select Language & Keyboard > Click on Next. Now, Click on «Install Now» > Type user Product Key (or skip it).
Step 3: Select the Dedicated Drive
Select the installation type as «Custom» > Select the C: proceed Drive > Click Next to proceed.
Common Issues and Troubleshooting Tips During Windows Reinstallation
While reinstalling Windows 10 without a CD or USB is generally straightforward, users may encounter some issues during the process. Below are some of the most common problems and troubleshooting tips to help you resolve them:
1. Windows 10 Reset or Reinstall Fails to Start
When attempting to reset or reinstall Windows 10 via the «Reset this PC» option, you may see an error message or the process may fail to start.
Possible Causes:
- Corrupted system files
- Issues with the recovery partition
- Lack of disk space or insufficient system resources
Troubleshooting Tips:
- Run Automatic Repair: If you cannot reset the PC normally, try booting into the Windows Recovery Environment (WinRE) and select Startup Repair.
- Check Disk Space: Make sure your system partition has enough free space to complete the reinstallation. You can use a disk cleanup tool or external storage to free up space.
- Use the Command Prompt: In WinRE, open Command Prompt and run the following command to repair the system files:
sfc /scannowThis will check for any corrupted files and attempt to fix them.
2. Error: «There was a problem resetting your PC»
During the reset process, you might encounter the error message, «There was a problem resetting your PC,» preventing the reinstallation.
Possible Causes:
- Corrupted or missing system files
- A damaged recovery partition
- Conflicting software or settings
Troubleshooting Tips:
- Check the Recovery Partition: Ensure that the recovery partition is intact. If it’s missing or corrupted, you may not be able to use the reset function. In such cases, using the Cloud Download method might be a viable solution.
- Perform a System Restore: If the reset option doesn’t work, try performing a system restore to a previous point where Windows was functioning properly.
- Use DISM Tool: Open the Command Prompt in WinRE and run the following command to fix corrupted system files:
DISM /Online /Cleanup-Image /RestoreHealth
3. Reinstallation Process is Stuck or Frozen
The reinstallation process may get stuck or freeze during certain stages, such as «Preparing» or «Installing.»
Possible Causes:
- Slow or unstable internet connection (for cloud-based reinstallations)
- Insufficient hardware resources (RAM or CPU)
- Corrupted Windows installation files
Troubleshooting Tips:
- Check Your Internet Connection: If you’re using Cloud Download, ensure that your internet connection is stable and fast enough to download the necessary installation files. A slow connection could cause the process to freeze or fail.
- Restart the Installation: If the process seems stuck, try restarting your computer and reattempting the reinstallation. If you’re using a recovery partition, ensure it hasn’t been altered or corrupted.
- Use Safe Mode: If the system is stuck at a certain point, boot into Safe Mode (press F8 or Shift + F8 during startup) and attempt the reset from there.
4. Error Message: «Windows Cannot be Installed»
While trying to reinstall Windows 10, you may see an error message that says, «Windows cannot be installed» or «The installation cannot proceed.»
Possible Causes:
- Hard drive partitioning issues
- Compatibility problems with your system hardware
- A damaged or full hard drive
Troubleshooting Tips:
- Check Hard Drive Health: Use tools like CHKDSK or CrystalDiskInfo to check the health of your hard drive. If there are any issues, consider replacing the hard drive before proceeding with the installation.
- Fix Partition Issues: If the problem is related to partitioning, boot into Command Prompt and use diskpart to clean the drive and create a new partition:
diskpart
list disk
select disk 0
clean
exit
After cleaning the disk, try the reinstallation again.
5. Missing Drivers After Reinstallation
After reinstalling Windows 10, some drivers (like for graphics, Wi-Fi, or sound) may be missing or not functioning properly.
Possible Causes:
- Windows did not automatically install the correct drivers
- Drivers were not included in the recovery partition or cloud installation
Troubleshooting Tips:
- Install Drivers Manually: Visit the official manufacturer’s website for your PC or device and download the latest drivers. Install them manually to ensure full compatibility.
- Use Windows Update: After reinstalling, check for updates by going to Settings > Update & Security and selecting Check for Updates. Sometimes, Windows Update will automatically detect and install missing drivers.
- Driver Update Software: You can also use third-party software like Driver Booster or DriverPack Solution to find and install missing or outdated drivers.
6. PC is Unable to Boot After Reinstallation
After reinstalling Windows 10, your PC might fail to boot up properly or enter into a boot loop.
Possible Causes:
- Corrupted bootloader
- Incorrect boot settings in BIOS
- Issues with the hard drive or SSD
Troubleshooting Tips:
- Repair the Bootloader: Boot into WinRE, open Command Prompt, and run the following commands to fix the bootloader:
bootrec /fixmbr bootrec /fixboot bootrec /rebuildbcd - Check Boot Order in BIOS: Ensure that your hard drive or SSD is set as the primary boot device in your BIOS settings.
- Perform System Repair: Use the Startup Repair option in WinRE to automatically detect and fix boot problems.
Conclusion
Reinstalling Windows 10 without losing your data is not only possible but also straightforward when you follow the correct procedures. By using the three methods explained above can help user also, you can address system issues, improve performance, and ensure a clean installation while keeping your files and applications safe. Regularly backing up your data and staying up to date about the latest Windows 10 features can further enhance your experience and prevent future bugs or problems.
Also Read
- How to Reinstall Windows 10 without CD?
- How to Reinstall Windows 10 without CD/USB Easily?
- How to Switch from Windows to Linux without Losing Data?
Reinstalling an operating system can feel overwhelming, particularly when it involves wiping the machine or troubleshooting software instability. Fortunately, Windows 10 provides a range of options to reinstall the OS without losing personal files, allowing you to restore system functionality with minimal disruption.
Windows 10 offers several methods to customize the reinstallation process based on specific needs. Options like “Reset this PC” and the Advanced Startup menu enable you to keep personal data while reinstalling, though it’s essential to note that applications and personalized settings may be removed. However, some workarounds—such as reinstalling essential programs from backup media or cloud storage — can help restore your setup more easily.
For those who encounter boot issues or prefer to use external media, the Windows 10 ISO installation option offers a reliable solution. By following these steps, you can address system issues, refresh your OS, and retain your important files, ensuring a smoother experience in getting your device back up and running.
Before beginning the Windows 10 reinstallation process, it’s important to decide on your desired outcome. Windows provides several reinstallation options, each impacting your files and applications differently. The table below outlines these options and how they affect your data and apps:
Swipe to scroll horizontally
| Type of reinstall | Option you can choose | What happens to your data? | What happens to your apps? |
|---|---|---|---|
| Reset Windows 10 | Keep my files | Preserved | Anything you installed is deleted |
| Reset Windows 10 | Remove everything | Everything is deleted | Everything is deleted |
| Reinstall Windows 10 using install media | Keep everything | Preserved | Preserved |
| Reinstall Windows 10 using install media | Keep personal data | Preserved | Everything is deleted |
| Reinstall Windows 10 using install media | Remove everything | Everything is deleted | Everything is deleted |
| Clean install of Windows 10 using install media | None available | Everything is deleted | Everything is deleted |
Method 1: Using the «Reset this PC» option

(Image: © ITPro)
This is the simplest method to reinstall Windows while keeping your personal files intact:
1. Right-click the Start button, then select Settings.
2. Go to Update & Security, then click Recovery from the left pane.
3. Under Reset this PC, click Get started.
4. Choose Keep my files to preserve your data, then follow the prompts to reset your system.
Note: This method removes installed applications and custom settings. Back up any essential apps before proceeding.
Method 2: Using the Advanced Startup menu
The Advanced Startup menu is another way to reinstall Windows 10 while keeping your files intact, especially when your PC is having trouble booting up normally.
1. Click Start, then go to Settings.
2. Navigate to Update & Security, and select Recovery.
3. Under Advanced startup, click Restart now.
4. Once your PC restarts, select Troubleshoot, then choose Reset this PC.
5. Select Keep my files, then follow the on-screen instructions to complete the reinstall process.
Note: This method will also remove installed applications and settings, so back up any important apps before proceeding.
Method 3: Using Windows 10 ISO image file
If you want more control over the reinstall process, using a Windows 10 ISO image file is a great option. Here’s how:
1. Download the Media Creation Tool from Microsoft to create a Windows 10 ISO file.
2. Right-click the ISO file, select Mount, then double-click the Setup.exe file.
3. Follow the prompts, and when asked, select Keep personal files, apps, and Windows settings, Keep personal files only, or Nothing, based on your needs.
Proceed with the installation, and your system will reinstall with the selected settings.
Common issues and troubleshooting tips during reinstallation
While reinstalling Windows 10 is usually straightforward, users may occasionally encounter issues that disrupt the process. Here are some common problems and troubleshooting steps to ensure a smooth reinstallation:
- Stuck on Loading Screen: If the installation process seems stuck on a loading screen, give it time — sometimes it takes longer than expected. If it remains unresponsive for over an hour, try restarting the computer and initiating the installation again. Ensure your device is connected to a stable power source to prevent accidental shutdowns.
- Error Codes: Windows 10 may display error codes if issues arise during reinstallation. Common codes like 0xC1900101 indicate driver-related problems. Try updating your device drivers before reinstalling or disconnecting unnecessary peripherals to avoid conflicts.
- Internet Connection Failures: A slow or interrupted internet connection can hinder the installation, especially if you’re using the Windows Update method. To avoid this, consider using an Ethernet connection or download the ISO file directly to use offline.
- Insufficient Disk Space: If you receive a notification about limited storage, free up space by moving non-essential files to an external drive or cloud storage. Windows 10 reinstallation generally requires at least 20GB of free space.
- Reinstallation Loop: Occasionally, users find their system caught in a reinstallation loop, where it repeatedly tries to reinstall. In this case, boot into Safe Mode and use the “Reset this PC” feature again, ensuring you select the correct reinstallation option.
Reinstall Windows 10: FAQ
How long does it take to reinstall Windows 10?
Reinstalling Windows 10 generally takes between 20 minutes to an hour, depending on factors like internet speed and system performance. A slow connection or an older device may extend the process, so it’s best to let it run uninterrupted.
While freezes or errors during reinstallation are uncommon, they can occasionally occur. If the update animation is still moving, it’s usually a sign that the process is working as intended. However, failures can happen, so it’s wise to back up your personal files and any important Windows 10 system files. This way, if an installation attempt fails, you’ll have everything needed to try again without data loss.
Do I need to reinstall Windows 10?
Reinstalling Windows 10 is one of the most in-depth processes you can attempt, and so it is generally a last resort. If you are wanting to completely reset a system, such as when someone else is going to take ownership of it, resetting the operating system is a common approach.
However, it is not advisable to reinstall Windows 10 on a routine basis – particularly if you are doing so to improve system performance. Although it can speed up Windows in the short term, there are many other techniques you can deploy to speed up Windows 10.
Other Windows 10 guides
Reinstalling Windows 10 will likely fix any problems you’re having with the operating system, however, it’s seen as a nuclear option and should only really be used as a last resort.
To avoid this, it’s worth performing the various other fixes you have available. We’ve detailed some of the most common Windows 10 problems that users face, and the simple fixes for them.
Sign up today and you will receive a free copy of our Future Focus 2025 report — the leading guidance on AI, cybersecurity and other IT challenges as per 700+ senior executives