
Call of Duty: Warzone is among the most pulsating battle royale blasters. Like any game, however, it still has some technical hiccups now and then. Some players have reported on the Blizzard forum they need to fix Call of Duty: Warzone not launching in Windows 11/10. Call of Duty: Warzone doesn’t start at all or gets stuck loading for those players.
There are numerous ways players can feasibly resolve Call of Duty: Warzone launch issues. Are you also trying to fix Call of Duty: Warzone not launching in Windows 11/10? If yes, this is how you can fix Call of Duty: Warzone when it doesn’t start in Windows 11/10.
1. Run the Battle.net Launcher as an Administrator
Running software as an administrator gives it full system access. As Battle.net is the launcher for Call of Duty: Warzone, it’s recommended that you configure that software to run as administrator. You can configure Battle.net to always run with elevated rights like this.
- If you have a Battle.net shortcut on your desktop, right-click it and select Properties. Alternatively, open the Battle.net folder in Explorer, right-click the Battle.net Launcher.exe file, and select Properties.
-
Select the Compatibility tab shown in the snapshot directly below.

- Click Run this program as administrator to select that checkbox option.
- Select Apply to save the new compatibility setting and click OK to exit.

Aside from the Battle.net launcher, select the same Run as administrator setting for the Call of Duty Warzone game. Open your Call of Duty: Modern Warfare folder in Explorer. Then select the Run as administrator option for Modern Warfare.exe and Modern Warfare Launcher.exe as outlined above.
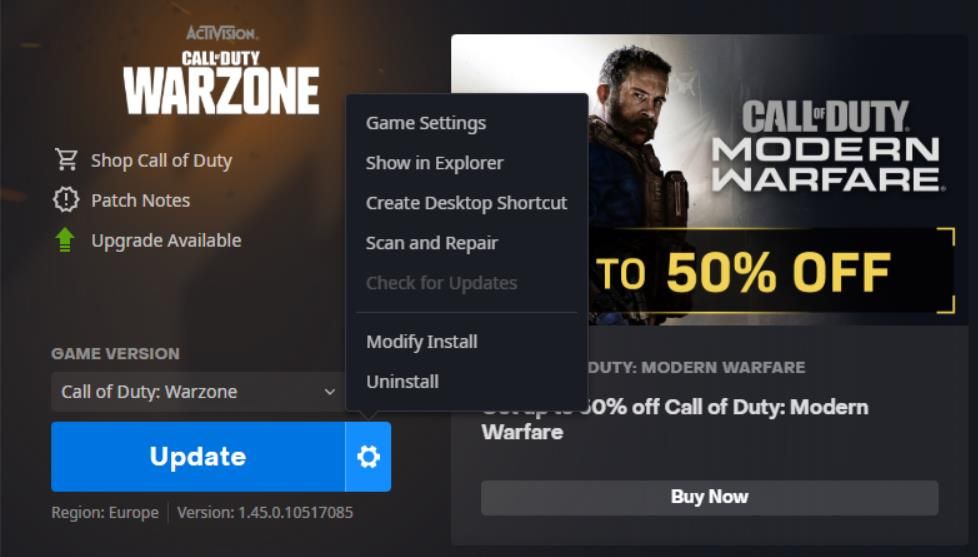
2. Verify Call of Duty: Warzone’s Game Files
You might need to repair Call of Duty: Warzone’s files when the game doesn’t start. Battle.net includes a handy Scan and Repair option for verifying game files. You can select that option as follows.
- Open the Battle.net launcher software.
- Select Warzone on the game bar near the top of Battle.net’s window.
-
Press the cog icon on the right of Call of Duty: Warzone’s Play button to bring up the menu shown directly below.

- Click the Scan and Repair option.
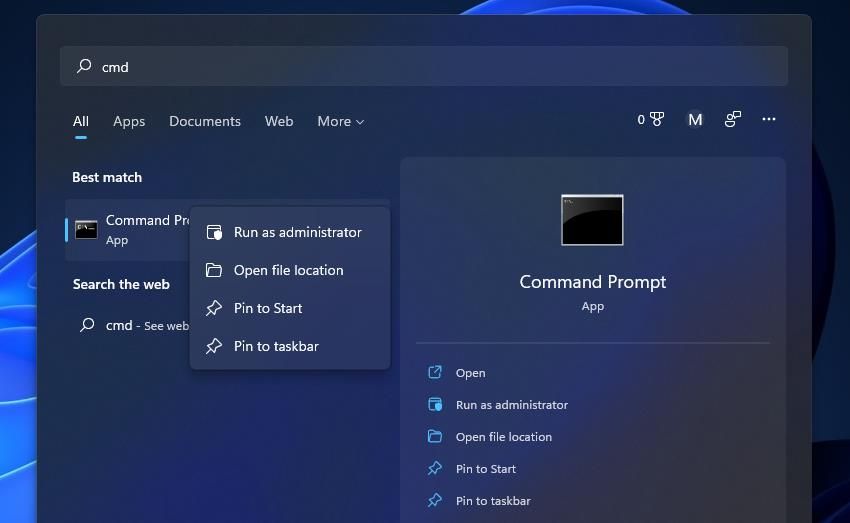
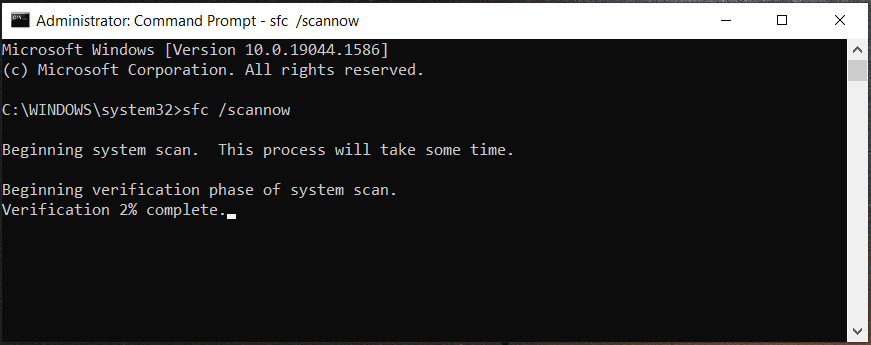
3. Run a System File Scan
Call of Duty: Warzone might not start because of wider system file issues. The command-based System File Checker tool will likely repair any corrupted system files, which could also fix Call of Duty: Warzone not launching.
Here is how to run an SFC scan in Windows 11:
- Launch the search box with the Win + S hotkey that opens it.
- To find Command Prompt, input cmd in the Type here to search box.
-
Click Command Prompt with the right mouse button to select Run as administrator.

-
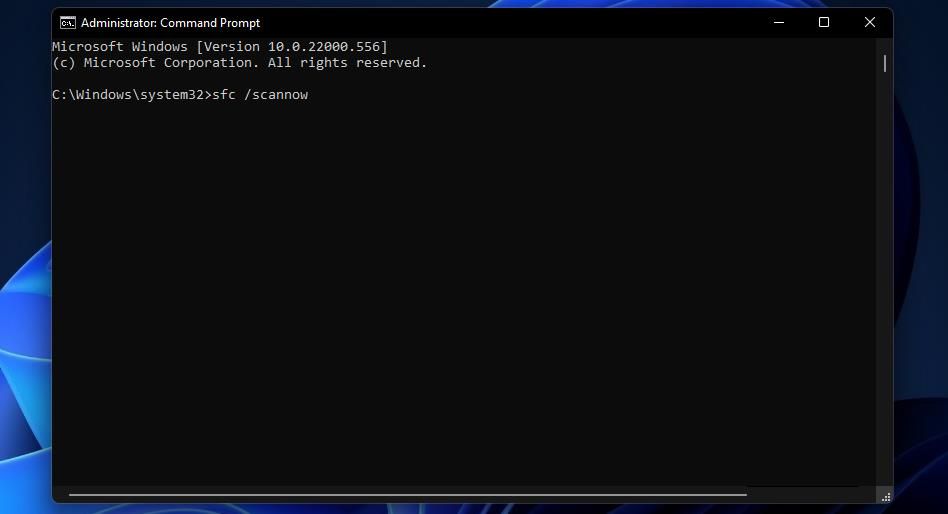
Before you run an SFC scan, input this deployment image servicing command:
DISM.exe /Online /Cleanup-image /Restorehealth - Press the Enter key to execute the entered command.
-
Then run your SFC scan by inputting this command and pressing Return:
sfc /scannow - The SFC scan will take a while. Don’t close the Command Prompt until the scan reaches 100 percent and displays an outcome message.
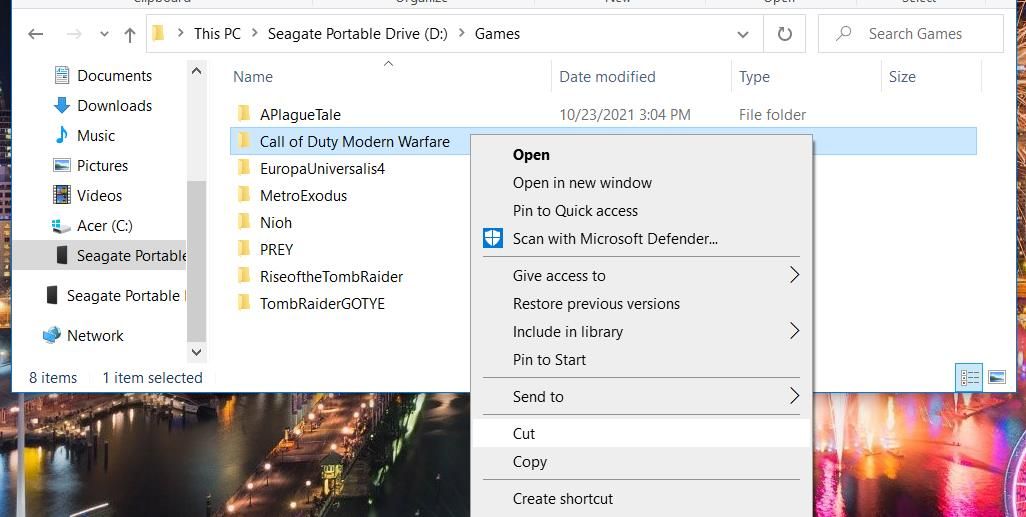
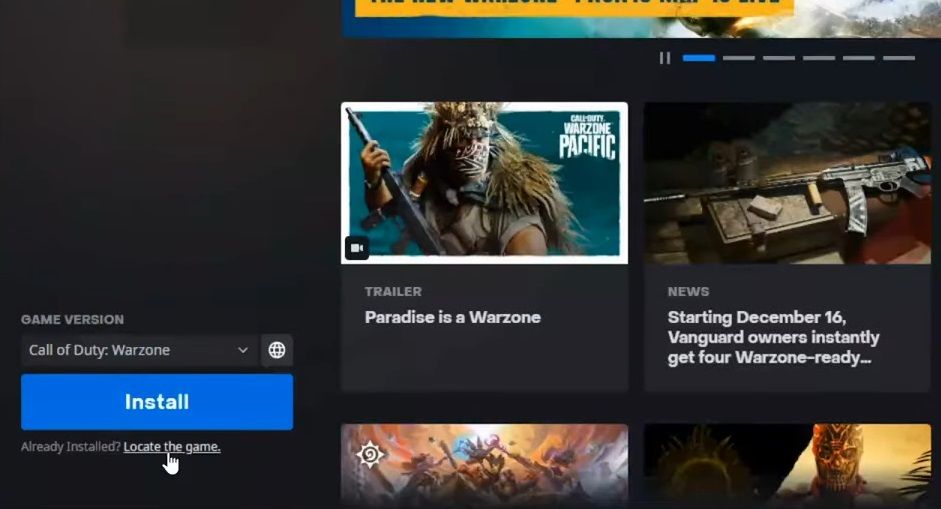
4. Change Call of Duty: Warzone’s Install Location
Some players have said they’ve been able to fix Call of Duty: Warzone not starting by changing the game’s install location. To do that, you’ll need to copy the Call of Duty Modern Warfare folder into a different directory.
Follow these steps to change Call of Duty: Warzone’s install location.
- Press the Win + E key combination to launch File Explorer.
- Navigate to the directory that includes the Call of Duty Modern Warfare folder.
-
Right-click the Call of Duty Modern Warfare folder to select Cut.

- Then open a different folder to switch Call of Duty: Warzone’s install location to.
- Right-click an area within the folder to select Paste, which will copy the Modern Warfare directory there.
- Launch the Battle.net software.
-
Now you should see a Locate the game option just below the blue Install button for Call of Duty: Warzone.

- Click the Locate the game option.
- Select the Call of Duty Modern Warfare folder in the new directory you copied it to.
- Click the Select Folder button.
- Then press the Play button to (hopefully) start Call of Duty: Warzone.
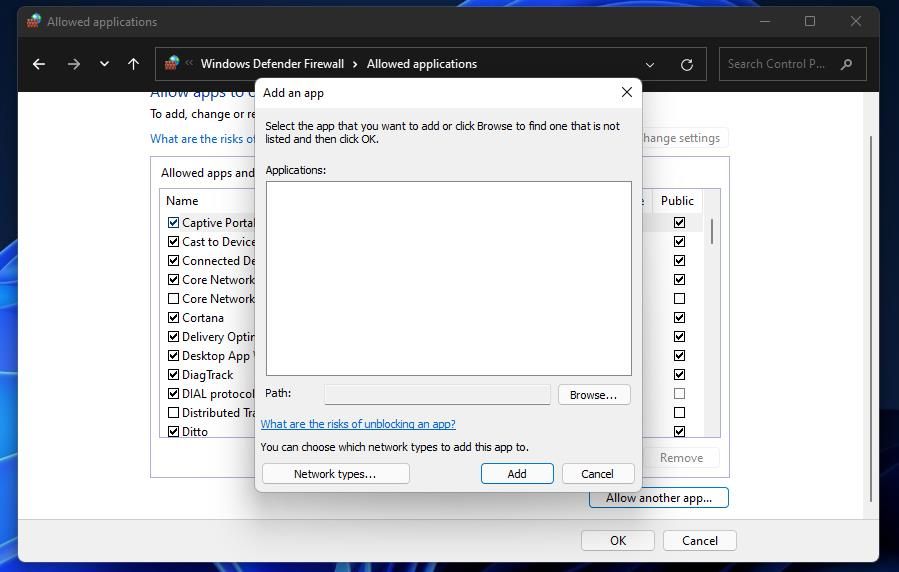
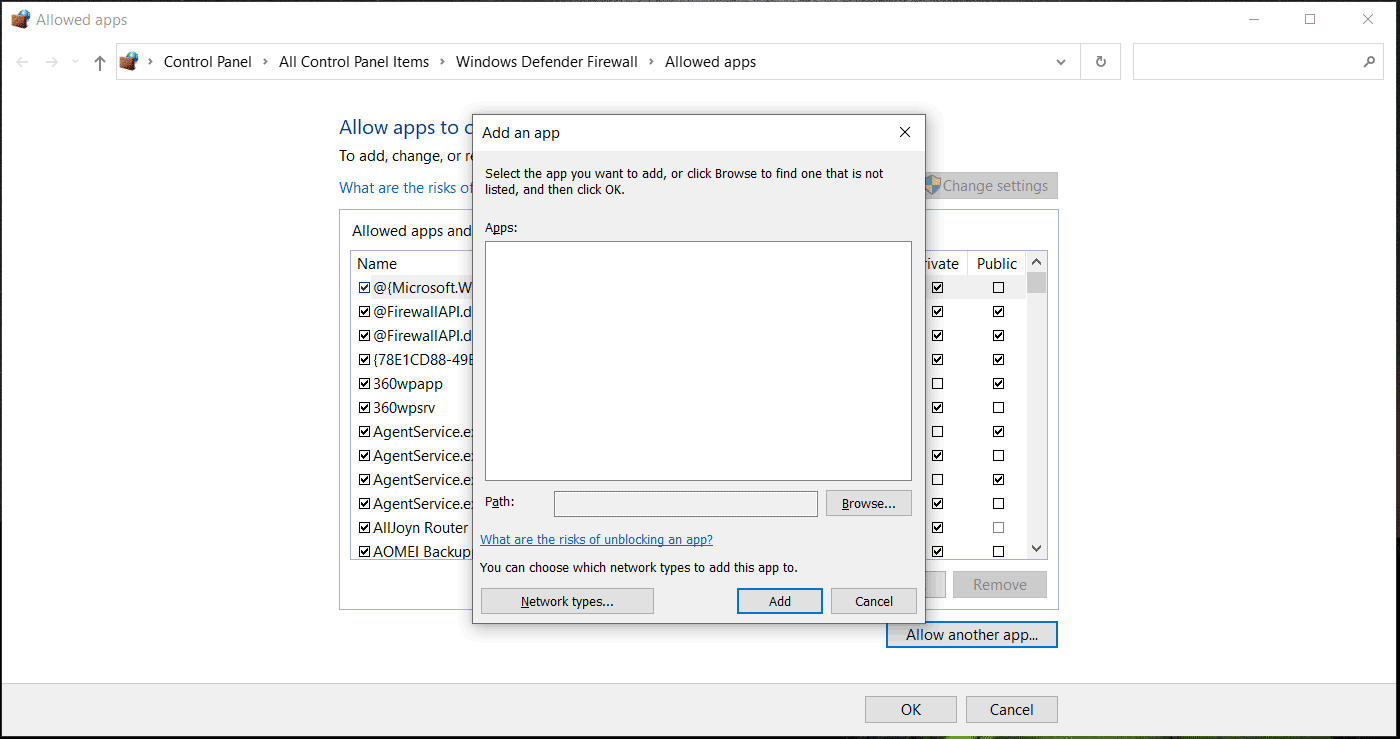
5. Allow the Battle.net Launcher Through the Windows Defender Firewall
Call of Duty: Warzone is a multiplayer game that firewalls can block from starting. So, make sure Windows Defender Firewall isn’t blocking Call of Duty: Warzone or the Battle.net launcher. This is how you can allow Battle.net through the Windows firewall.
- Open the Windows Firewall Control Panel applet.
-
Then click Allow an app or feature through Windows Defender Firewall in the Control Panel.

- Click the Change settings option.
-
Select the Private and Public checkboxes for the Battle.net Launcher app.

- Press the OK button to confirm.
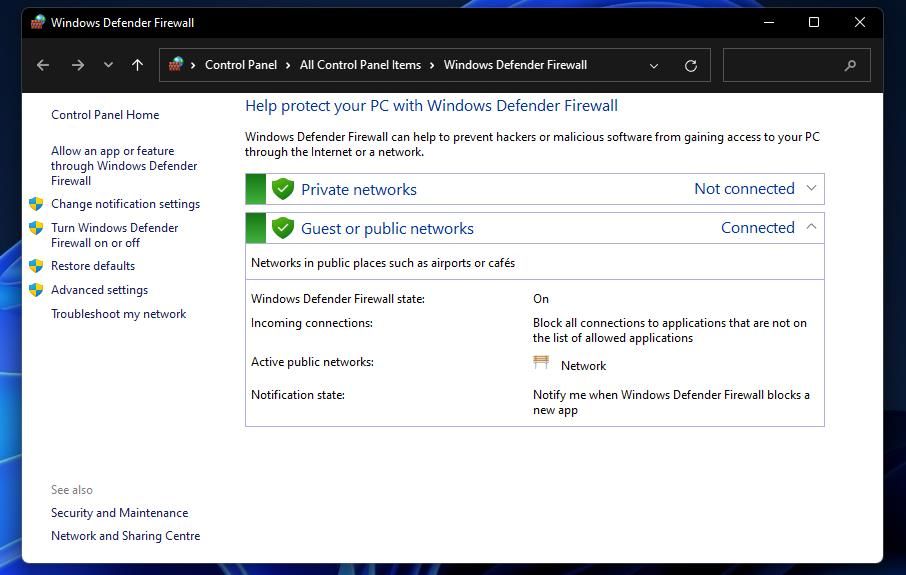

If the Battle.net Launcher app isn’t listed there, click the Allow another app button. Press the Browse button, select the Battle.net Launcher software, and then click Open. Click the Add option, and then select all the checkboxes for Battle.net.
Also, check the Public and Private checkboxes for Call of Duty: Modern Warfare. Make sure you’ve got those checkboxes selected as well to allow the game through the firewall.
6. Update Your PC’s Graphics Adapter Driver
Call of Duty: Warzone might not start because your graphics card’s driver is outdated, incompatible, or faulty. Updating or reinstalling the driver for your PC’s graphics card could be the solution in such a scenario. You can manually update the driver for your GPU by downloading the latest driver package for it from the NVIDIA or AMD website.
If you need some help doing this, check out how to update your graphics drivers for more info.
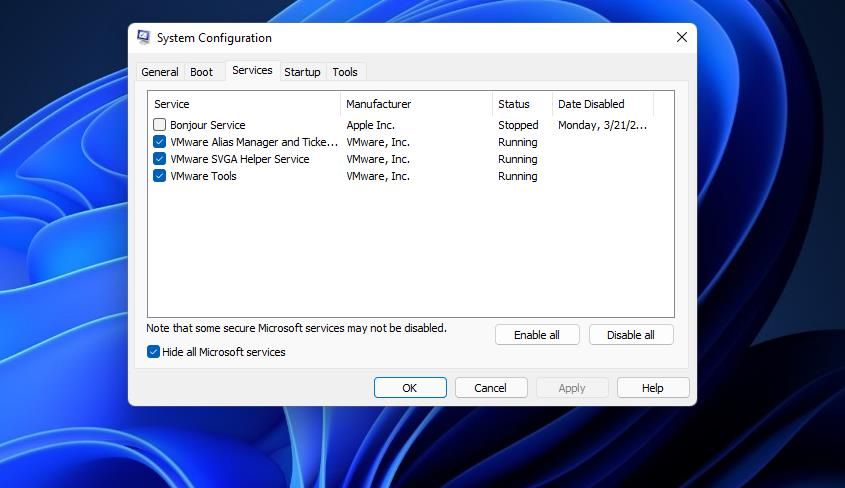
7. Clean Boot Your PC
You can exclude third-party startup programs and services from the Windows startup by clean booting. Clean booting your PC might filter out a program or service that could be conflicting with Battle.net or the Call of Duty: Warzone game. To clean-boot Windows, change the startup configuration settings like this.
- Click the Start menu’s icon with the right mouse button to select Run.
- Enter msconfig in the Open box within Run.
- Click OK to bring up the System Configuration window.
-
Uncheck the Load startup items checkbox.

-
Select the Services tab at the top of the System Configuration window.

- Click Hide all Microsoft services to select that setting, which excludes all the more essential system services.
- Press the Disable all button to uncheck all selected checkboxes for third-party services.
- Then click Apply > OK to save options and exit MSConfig.
- A dialog box prompt will open asking to restart. Click Restart there to clean boot your PC.
- Try launching Call of Duty: Warzone after restarting.
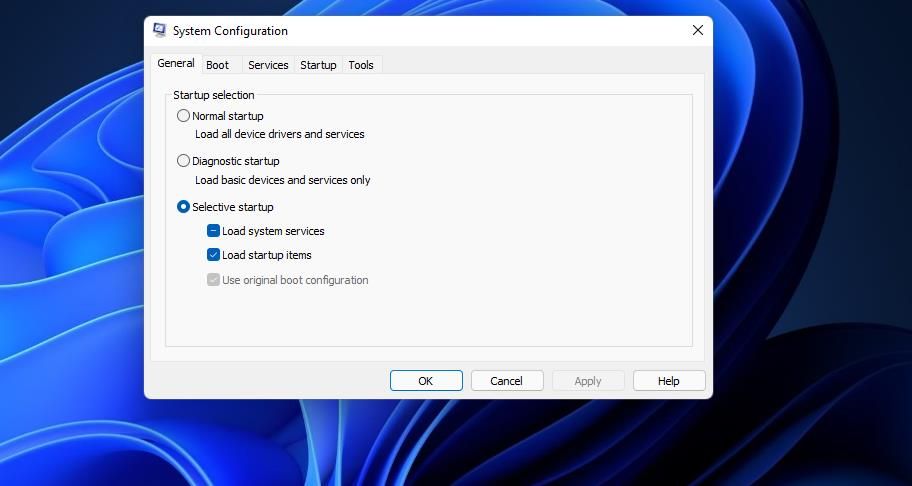
Did that fix the game not starting? If so, there was probably a background program or service conflicting with Call of Duty: Warzone. You can simply leave your boot configuration like it is or try to identify what software is causing the issue. Have a look at the Task Manager’s Startup tab to see what specific programs have been disabled from starting with Windows.
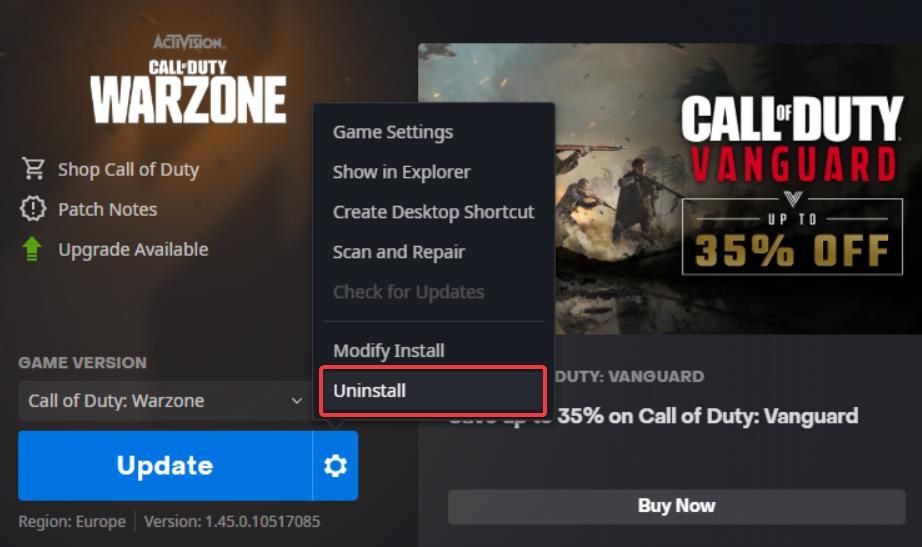
8. Reinstall Call of Duty: Warzone
Reinstalling Call of Duty: Warzone will replace its files. As the game is a big download, make this a last resort resolution if nothing else works.
Here is how to reinstall Call of Duty: Warzone:
- Open Battle.net’s window.
- Click All Games and select Call of Duty: Warzone.
-
Then click the cog icon on the Play button for Call of Duty: Warzone.

- Select the Uninstall option.
- Restart your desktop or laptop after uninstalling Call of Duty: Warzone.
- Open Battle.net again, and click the Install option for Call of Duty: Warzone.
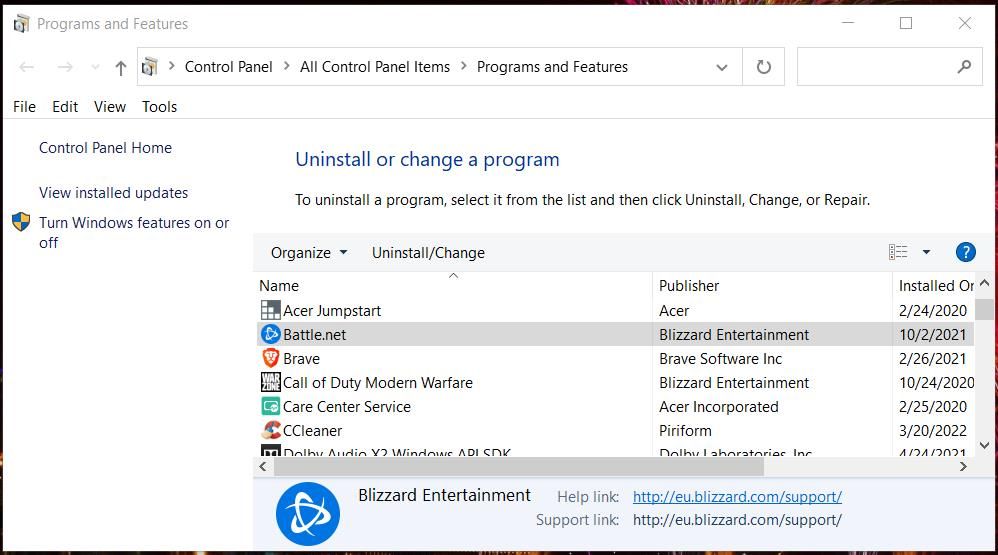
You can also try reinstalling Battle.net while you’re at it. To do that, press the Win + R hotkey, type appwiz.cpl in Run, and click OK. Select Battle.net in Programs and Features, and click the Uninstall/Change option for that software. Then download the latest version of the software from the Battle.net website to reinstall it.
If all else fails, you can contact Activision’s support service for Call of Duty: Warzone. To do so, log in to your account on the Activision website. Then click Support Options, select the Warzone game and a platform, and submit a support ticket from there.
Have Fun With Call of Duty: Warzone Again
Those confirmed resolutions will probably kick-start Call of Duty: Warzone in Windows 11/10 for most players. It can’t be promised those potential solutions will fix Warzone not starting for everybody, but they’re worth a shot. In addition to those, try disabling or even uninstalling third-party antivirus software that can interfere with the game.
This guide is to help players who are having issues running Call of Duty®: Warzone™ on PC.
Important Notes:
Windows Operating system
Call of Duty: Warzone supports Windows 10 and Windows 11. We recommend players keep up to date with the latest Windows 10 or Windows 11 version. Use the standard Windows updating process to apply the latest Windows version to your PC.
Learn more about Windows 10 Compatibility for Call of Duty: Warzone.
Call of Duty: Warzone does not support Windows 7 and Windows 8.
System Requirements
Be sure your PC meets the minimum system requirements for Call of Duty: Warzone.
Graphic Card Drivers
If you’re experiencing graphical issues in Call of Duty: Warzone, be sure to install the applicable video card drivers listed below.
- Nvidia: The recommended driver version for Call of Duty: Warzone is 526.86.
- AMD: The recommended driver version for Call of Duty: Warzone is 22.9.1.
- Intel: The recommended driver version for Call of Duty: Warzone is 31.0.101.4255.
Shader Preloading
Shader Preloading is an important part of the first boot process. Allow this process to complete before attempting to play the game. Navigating out of the Main Menu will cause the preloading to stop and can lead to performance issues.
Battle.net
- Try doing a Scan and Repair: Repairing Blizzard Games
- Disable any services or applications that may interfere with the game: Closing Background Applications
Steam
- Disable any programs that may interfere with Steam.
- Verify the integrity of the Game Files.
For issues with antivirus software:
If you are running antivirus software, we recommend adding the entire Call of Duty: Warzone game folder to your antivirus exception list.
- For Comodo users: Select Settings → Advanced Protection → Miscellaneous → Detect Shell Code Injections [Exclusion] and add the entire Call of Duty: Warzone game folder to the exclusion list.
- For BullGuard users: Select Settings → Main and uncheck Self protection.
If issues still persist:
- If you are using Razer Synapse, make sure to update to the latest driver.
- Perform a clean boot and only start up with the bare minimum programs: How to perform a clean boot in Windows
- If the game doesn’t start and you have disabled ASLR on Windows, re-enable it.
- Disable NZXT CAM, MSI Afterburner, and Razer Cortex, as these can conflict with Call of Duty: Warzone.
You can provide critical information to help identify, investigate, and resolve game crashes on PC by submitting a Call of Duty PC Crash Report.
-
Home
-
News
- Is COD Warzone Not Launching on PC? Try 8 Ways to Fix It!
By Vera | Follow |
Last Updated
Call of Duty Warzone not launching PC is a common situation when trying to open this free-to-play battle royale video game on Windows 11/10. If you are plagued by this tiresome issue, how to fix it? MiniTool gives multiple ways here to help you launch Warzone on PC for smooth use.
COD Warzone Not Launching PC Windows 11/10
Call of Duty (COD): Warzone, a battle royale video game, is completely free for all players, across many available platforms like Windows, PlayStation 4, and Xbox One. Although it has gained much popularity, it can run improperly and you can encounter many issues, for example, Warzone black screen, Warzone Friends not showing, Warzone Dev error 6635, and more.
Today, we will introduce another situation for you – Warzone not launching PC in Windows 11/10. According to users, Warzone won’t launch no matter what they do. Perhaps many things can prevent the game from opening on the PC, for example, a conflict between a program/service and the game, incorrect hardware configuration, an outdated driver, etc.
The good news is that you can easily fix this issue. Let’s see how to troubleshoot the COD issue.
How to Fix Warzone Not Launching PC
Run Warzone as Administrator
Warzone needs admin permissions to run properly. So, run this game as an administrator in these steps:
Step 1: Right-click on Battle.net and choose Run as administrator.
Step 2: Log in to your account and open Warzone.
Verify Integrity of Game Files
Corrupt or incomplete game files of COD Warzone can lead to issues while playing the game. To fix Warzone not launching on PC in Windows 11/10, you need to verify game files and do a repair.
Step 1: Open the Battle.net client and navigate to the Warzone page.
Step 2: Click the gear icon and choose Scan and Repair.
After checking, if you still can’t start Warzone on PC, try other ways.
Upgrade Graphics Card Driver
To make sure Warzone works well, installing an up-to-date graphics card driver is necessary. If Warzone won’t launch in Windows 11/10, update the GPU driver now.
Go to the website of NVIDIA, Intel, or AMD and download a proper GPU driver. Then, install it on your PC. Or, you can go to Device Manager, expand Display adapters, right-click on the GPU and choose Update driver. Here is a related article for you – How to Update Drivers in Windows 11? Try 4 Ways Here.
Run an SFC Scan
Besides game files, corrupted system files can also prevent Warzone from opening on your Windows 10/11 PC. So, you can choose to use System File Checker (SFC) to perform a scan.
Step 1: Run Command Prompt with admin rights in Windows 11/10.
Step 2: Type in sfc /scannow and press Enter.
Tip: Sometimes the SFC scan gets stuck and if you are bothered by this issue, go to find solutions from this post – Windows 10 SFC /Scannow Stuck at 4/5/30/40/73, etc.? Try 7 Ways.
Allow Battle.net through Windows Firewall
If the Battle.net app can’t get through Windows Firewall, the issue of Warzone not launching PC can happen in Windows 11/10. Do the thing below:
Step 1: Type firewall in the search box and click Firewall & network protection.
Step 2: Click Allow an app through firewall > Change settings.
Step 3: Check the Private and Public boxes for Battle.net.
Tip: If the Battle.net Launcher is not on the list, click Allow another app > Browse > Add to add it to the list.
Other Ways to Fix Warzone Not Launching PC
In addition, there are some other troubleshooting tips you should try if you can’t open Warzone on PC:
- Perform a clean boot
- Update Windows 11/10 to a new version
- Reinstall Warzone and Battle.net
If Warzone won’t launch/open on your Windows 11/10 PC, just try these solutions. If you have any other methods, tell us in the comment section.
About The Author
Position: Columnist
Vera is an editor of the MiniTool Team since 2016 who has more than 7 years’ writing experiences in the field of technical articles. Her articles mainly focus on disk & partition management, PC data recovery, video conversion, as well as PC backup & restore, helping users to solve some errors and issues when using their computers. In her spare times, she likes shopping, playing games and reading some articles.
After the launch of Call of duty Warzone 2.0, the player is facing crashing issues on the PC.
Don’t worry about it!
The CPU Guide provides the best working solution to solve Call of Duty Warzone 2.0 Crashing at Startup.
Solution 1: Restart the Game
Whenever you encounter Call Of Duty Warzone 2.0 Crashing on PC or any game bug, you should restart the game before trying any further solutions.
Restarting the game will eliminate any temporary error from the old cookies and cache or the system’s other software clashing with your gaming software.
All of these errors will be eradicated after a simple restart of the game/PC or any other platform you use.
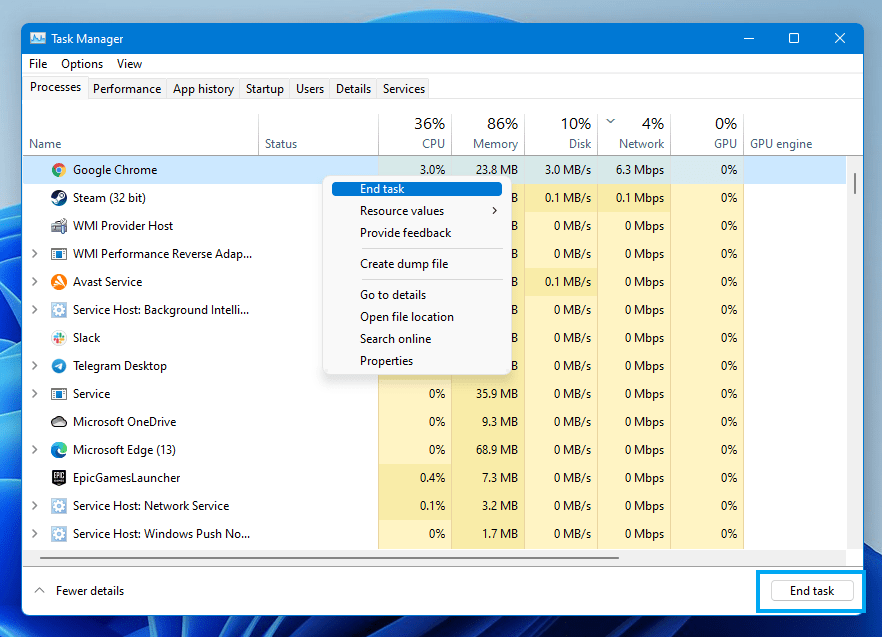
Solution 2: Close Unwanted Programs on Windows 11/10
If there are too many programs running in the background, using too much internet/RAM/Disk can cause COD WZ 2.0 to crash on Windows 11.
Closing unwanted programs will help you eliminate Errors.
So, let’s close unwanted programs:
- Press Ctrl + Shift + ESC keys to open Task Manager
- Now check which program is using more Network
- Right-click on that program and select End task

- And check if the error is solved or not.
Solution 3: Power Cycle Your Router
If the above solution didn’t work then this solution will work and provide a better internet connection which will help you solve the crashing
All you need to do is follow these steps:
- Turn off your router entirely by taking out the power cable from the power switch.
- Leave it for 5 to 10 minutes and then plug it back in.
- And check if the Wi-Fi is visible to you or not.
Make sure you restart those devices affected in the process for an accurate fix.
Best Routers To Buy
Budget Router
TP-Link WiFi 6 AX3000 Smart WiFi Router

Super Router
TP-Link Archer AX11000 Tri-Band Wi-Fi 6 Router

After power cycling your router it is better to Run your game as an administrator to avoid any errors.
Solution 4: Run the Battle net/ Steam as an Administrator
Running the program as an administrator will definitely help you eradicate crashing as it might lack the privileges required to run the Application.
Here is how you can run the application as an administrator:
- Go to the file/ folder.
- Then go to the Game Launcher/Steam client.
- Right-click on the Launcher icon
- A menu will open
- Select “Run as administrator “
Now the program will start running smoothly without giving you the crashing issue Startup.
The above solution is a temporary fix which helps you run the program or access folder. If you want to run the program permanently on administrator, then follow the next solution to solve game Crashing.
Solution 5: Run the Battle Net/ Steam as an Administrator (Permanently)
- Go to the folder/Application
- Right-click on it
- A menu will open
- Select Properties
- A new window will open
- Navigate to the “Compatibility Tab“
- Under the Settings heading
- Find “Run this Program as an administrator“
- Check the box for this option
- Click “Apply“
Now your program successfully Runs as an Administrator on Windows (Permanently) and you can easily open the program without repeating the steps again and again.
Hopefully, this will eradicate Warzone 2.0 crashing issue.
If this solution is still not helping to solve the error then try performing a Clean boot.
Solution 6: Perform a Clean Boot
Clean boot will help you eliminate the unnecessary applications which are running on the backend.
And shut down any applications which are conflicting with each other.
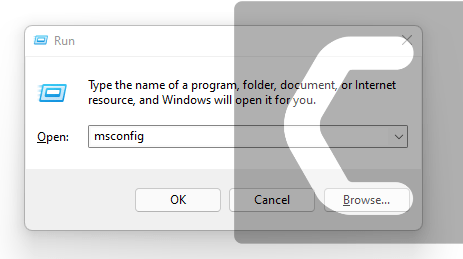
How to perform a clean boot on Windows 11?
Here is how to perform a Clean Boot on Windows 11:
- Press Windows Button + R Key

- The Run Dialogue Box will appear
- Type “MSConfig“
- Press Enter
- The System Configuration window will open

- Select Services tab

- Uncheck all the unnecessary services
- Only check those you need now
- Now click OK
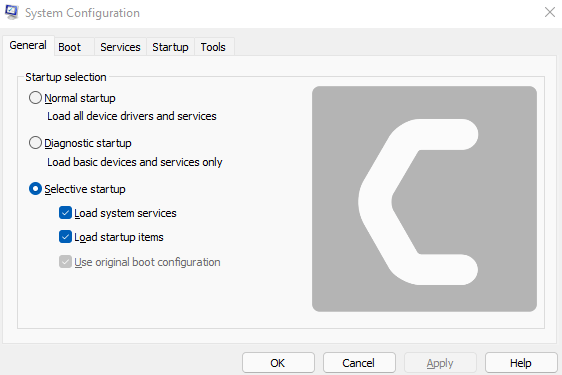
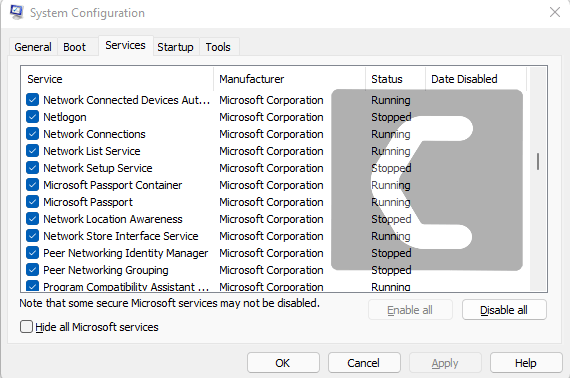
Now your clean boot is done, and it eliminated the unnecessary services which will enable you to play Warzone 2.0.
Solution 7: Keep your PC Updated
Sometimes your outdated PC is the main cause of the Outdated Graphics Card Driver on Windows.
Outdated drivers in your PC or your current Windows Version cannot support Warzone 2.0 or other gaming software. As you update your Windows all running drivers are updated too.
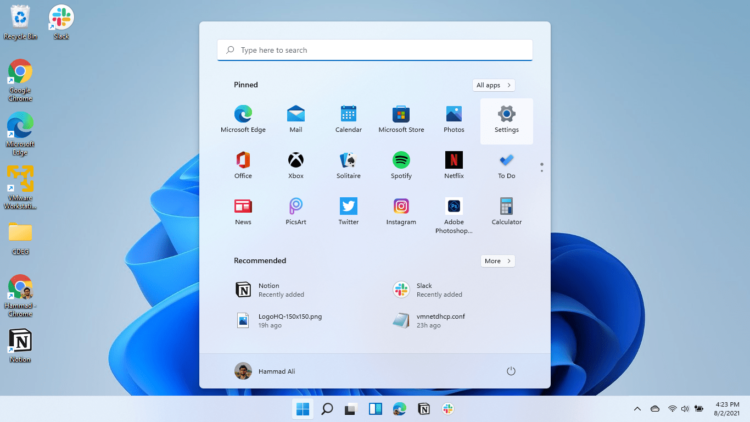
So, here is how you can update your PC:
- Click on the Windows icon

- Click on the Settings icon
- A new window will pop up
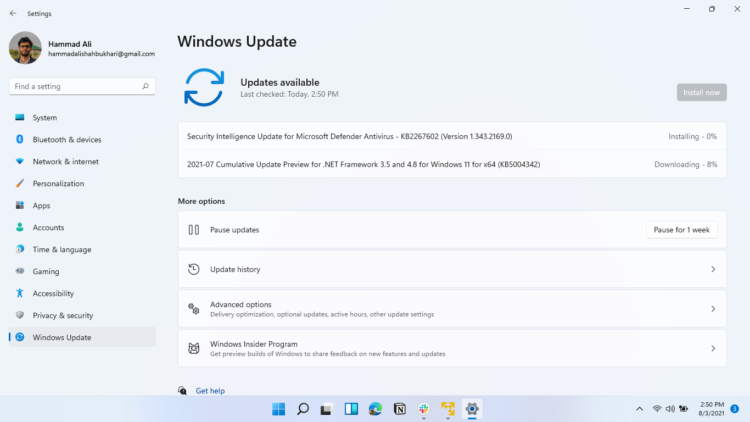
- Select Windows Update from the left menu
- The new Windows will pop up
- Then click on Check for updates.
- If there is any update it will start updating the PC.
You can also update your graphic drivers through Windows Update too.
Solution 8: Update Graphics Card Driver with Windows Update
Updating the graphic drivers will help you have a better and more stable graphical experience.
This will fix the “ Warzone 2.0 Crashing” and you will play without getting errors. Here is how you can update drivers via optional updates:
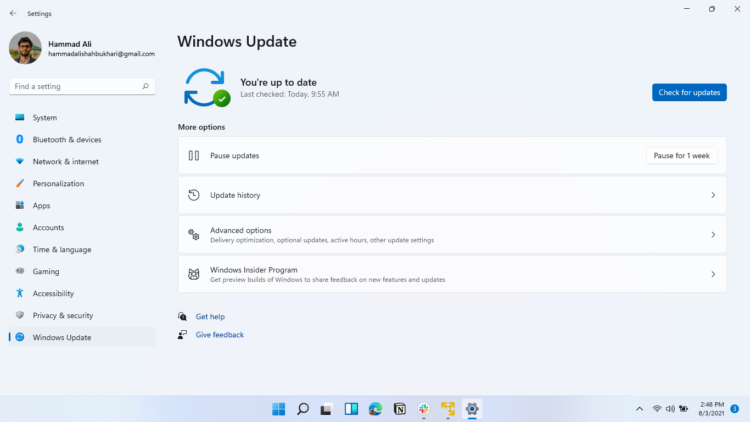
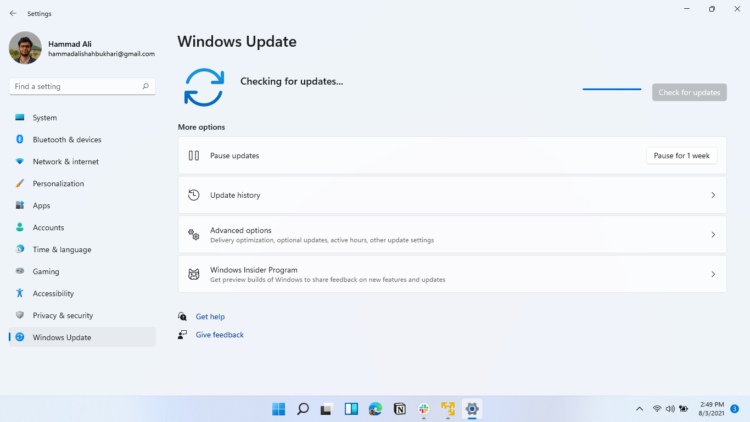
- Click on the Windows icon
- Click on the Settings icon
- A new window will pop up
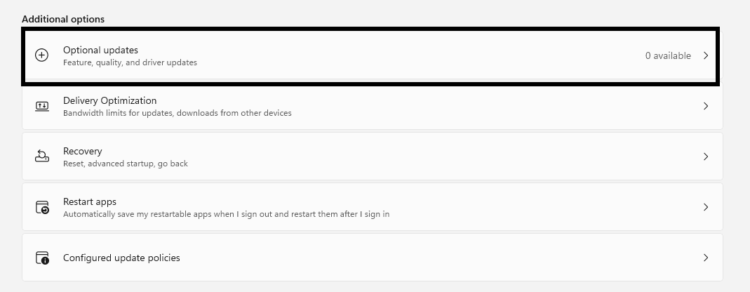
- Select Windows Update from the left menu
- The new window will pop up
- Now select Advanced options
- Click on Optional updates

- A new window will open
- Click on the drop-down button for Driver updates
- Now, select your desired drivers
- Now press the Download & Install button
If you cannot update your drivers through Windows Update, then you can try updating the Graphics Drivers through Device Manager.
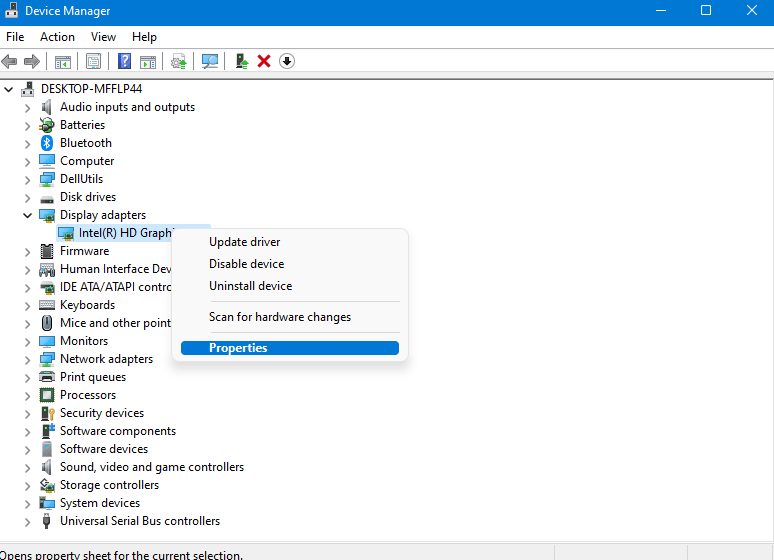
Solution 9: Update Graphics Card Driver via Device manager
We can update outdated graphic drivers in multiple ways.
If you cannot update your graphic drivers by updating Windows, you can try updating through the Device Manager too which in return will fix Warzone 2.0 Keeps Crashing on PC.
Here is how you can update drivers through Device Manager:
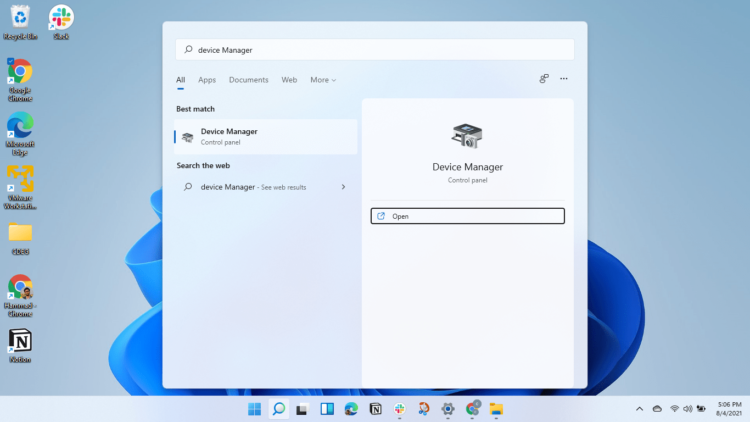
- Click on the Search icon
- Type Device Manager
- Click to open Device Manager
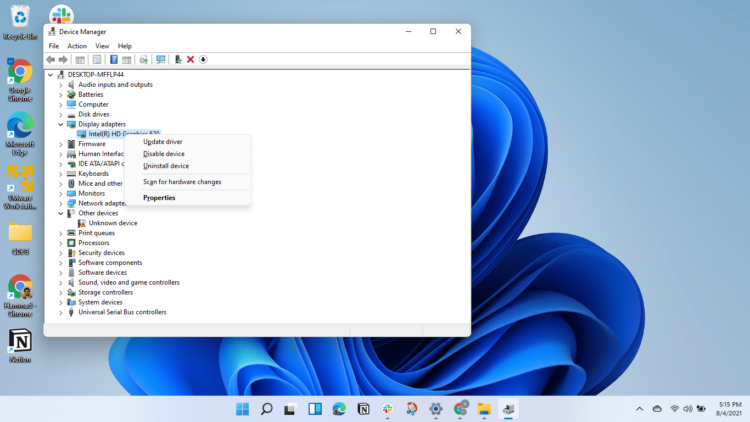
- Then select the Display adapters
- A further menu will open
- Right-click on the graphic card name
- Click on the Update driver
Rolling Back the Driver:
If you experiencing the Warzone 2.0 Crashing issue after updating your graphic drivers, then you can roll back the driver’s recent update to avoid errors in game.
Here is how you can roll back drivers:
- Click on the Search icon
- Type Device Manager
- Click to open Device Manager
- Then select the Display adapters
- A further menu will open
- Right-click on the graphic card name
- Click on the Properties

- A graphic card properties Windows will open
- Navigate to the Driver Tab
- There is an option for “Roll Back Drivers”. Click on it
- If the option of “Roll Back Drivers” is greyed out, this means that the driver did not update recently.
If this solution didn’t fix, then update the external GPU driver.
Solution 10: Check for Driver’s Updates of GPU/Video Card of different company
One of the highlighted issues is outdated GPU drivers leading to crashing
When Your video card has outdated drivers, it’s unable for GPU to align with the modern gaming experience and starts causing Warzone 2.0 errors.
So, we recommend updating the video card drivers.
Here are the direct links to the main GPU Making Companies:
- AMD
- Nvidia
- Intel
If the above solution didn’t work out for you, then try the next solution.
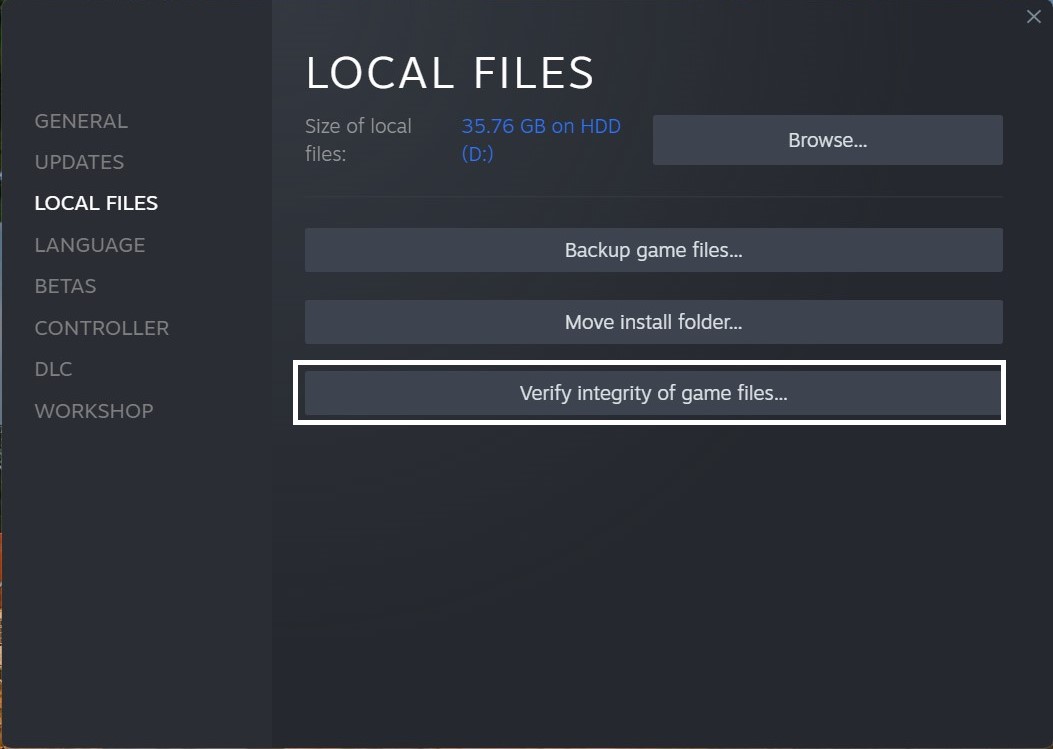
Solution 11: Verify the Game Files
Sometimes the game file will get corrupted or get deleted, which eventually causes Warzone 2.0 to crash.
Verify Game File in Steam:
Follow the steps to verify the game file on steam software:
- Launch the Steam Software
- Now login in the steam
- Navigate to the library
- Select the game and right-click on the game
- Now select properties
- Now click on the “Local file” Option
- A further menu will open
- Click on the “Verify Integrity of the Game Cache“

- Now the software is verifying the files, and this will take some time.
Sometimes the game file will get corrupted or get deleted which eventually causes game to Crash on the PC.
Verify Game File in Battle.Net
Here is how you can repair files in Battle.net:
- Open the battle.net desktop app
- Find Warzone 2.0 and
- Click on the cog icon small menu will appear select “Scan and Repair“
- Click on the Begin scan then you need a repair to finish
What is Steam software used for?
Steam software is an online platform that is used to play games and also hosts over 10,000 games.
This software allows the user to make a community and play games on the same platform.
Is Steam a virus? Can steam harm your computer?
Steam is a client gaming software that allows users to enjoy gaming by building the best community around them.
In current times, Steam has over 120 million active players around the world.
When you play games on Steam, your PC might get occupied, but it will not harm your computer.
Now move on to the Power Setting
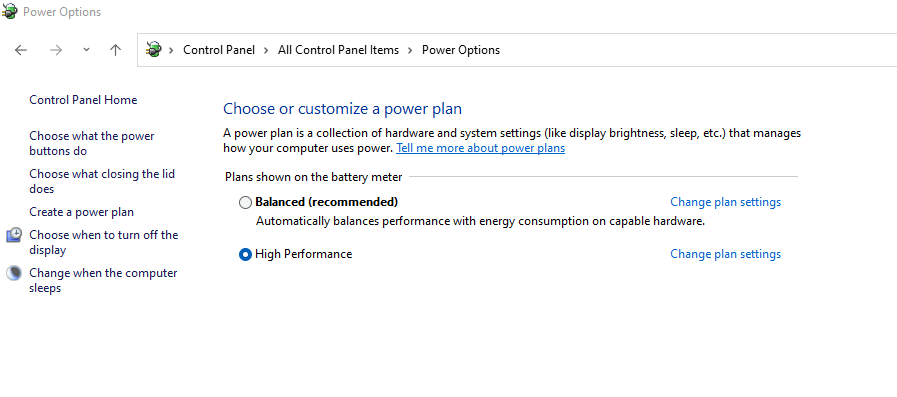
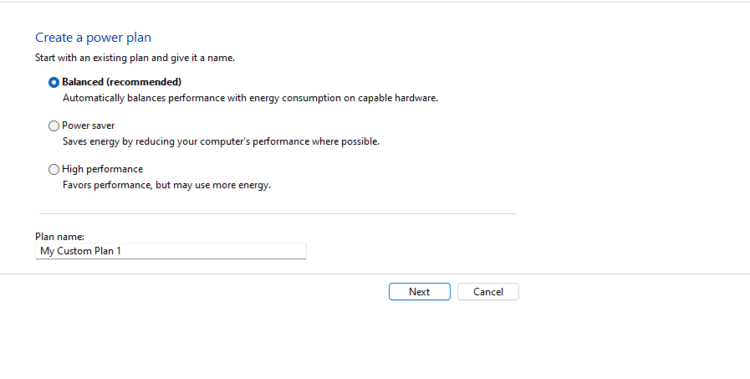
Solution 12: Change Power Settings
When your PC power plan is set on the Balanced option plan, your PC will provide less power to the game. This will eventually cause game lag or Warzone 2.0 (version 2022) Keeps Crashing.
To avoid the error follow the below steps to change Power settings:
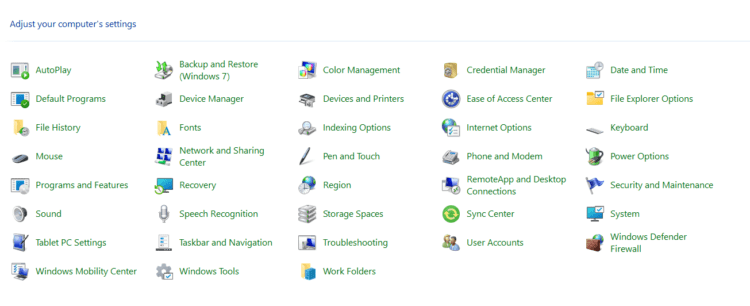
How do I change power settings in Windows 11?
- Go to the Control Panel
- Select the View option “Large Icon“

- Now find “Power Options” and click on it
- Choose your Power Plan “High Performance“

- If there is no other option expect a “Balanced“
- Then navigate to the left menu
- Select “Create a power plan“
- A new window will open
- Select the power plan to “High Performance“

- And click on Next
- The new power plan is available.
If the game still crashes in the middle of the match and uses the VPN service then it’s time to change the VPN to a better one.
Solution 13: Switch to a More Reliable VPN
Free VPN did not allow you to stream at full speed they set a limit to the free version which is not a very good internet speed for working or gaming.
The premium VPNs help players to achieve an uninterrupted gaming experience and will not compromise the FPS and ping of the game.
For your convince, I am listing down some most reliable plus they are working with other users without having Warzone 2.0 (version 2022).
DISCOUNTED VPNS FOR THE CPU GUIDE READERS
- Nord VPN

- VyprVPN

- Express VPN

- Avast Secure Line

- Zenmate


If you have any queries or suggestions, share your experience with us in the comments section down below.
Meet Hammad, a dynamic writer with a passion for gaming and a talent for analysis. With extensive years of experience in the gaming industry, Hammad has a unique perspective on the latest gaming trends and technologies. In addition to writing about gaming, Hammad also guides our team with marketing news and his investment analysis.