
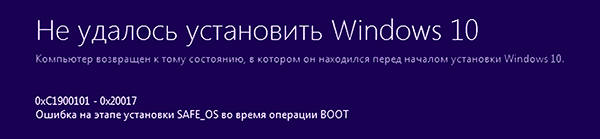
Среди распространенных ошибок при установке обновлений компонентов Windows 10 — ошибка 0xc1900101 с различными кодами и сообщениями, например: 0x4000d или 0x40017, сообщениями о SAFE_OS или SECOND_BOOT, а исправление ошибки и успешная установка новой версии ОС подчас сложная задача для начинающего пользователя.
Ранее эта же ошибка и по тем же причинам возникала при обновлении предыдущих версий ОС до Windows 10 (через Центр обновлений или с помощью утилиты Media Creation Tool) или при установке системы путем запуска setup.exe в уже установленной системе предыдущей версии — ошибка Windows Update c1900101 (0xC1900101) с различными цифровыми кодами: 20017, 4000d, 40017, 30018 и другими. Как правило, проблема бывает вызвана невозможностью программы установки обратиться к установочным файлам по той или иной причине, их повреждением, а также несовместимыми драйверами оборудования, недостаточным местом на системном разделе диска или ошибками на нем, особенностями структуры разделов и рядом других причин.
В этой инструкции — набор способов исправить ошибку Windows Update c1900101 (так она отображается в Центре обновлений) или 0xC1900101 (так эта же ошибка показывается в официальной утилите для обновления и установки Windows 10). При этом, дать гарантий того, что эти способы будут работать, не могу: это лишь те варианты, которые чаще всего помогают в указанной ситуации, но не всегда. Гарантированный способ избежать этой ошибки — чистая установка Windows 10 с флешки или диска (при этом для активации можно использовать ключ для предыдущей лицензионной версии ОС, а если ранее на компьютере уже была установлена 10-ка, ключ вводить не нужно вообще).
Как исправить ошибку 0xc1900101 при обновлении или установке Windows 10
Итак, ниже — способы исправления ошибки c1900101 или 0xc1900101, расположенные в порядке вероятности их способности решить возникшую проблему при установке Windows 10. Пробовать повторную установку можно, в общем-то после каждого из пунктов. А можно выполнять их по нескольку штук — как вам будет удобнее.
Простые способы исправления
Для начала 4 самых простых способа, которые срабатывают чаще других при появлении рассматриваемой проблемы.
- Удалите антивирус — если на вашем компьютере установлен какой-либо антивирус, полностью удалите его, желательно используя официальную утилиту от разработчика антивируса (можно найти по запросу Утилита удаления + название антивируса, см. Как удалить антивирус с компьютера). В качестве причин ошибки были замечены антивирусные продукты Avast, ESET, Symantec, но это вполне может происходить и с другими такими программами. После удаления антивируса обязательно перезагрузите компьютер. Внимание: такой же эффект могут оказывать утилиты для очистки компьютера и реестра, работающие в автоматическом режиме, удалите их тоже.
- Отключите от компьютера все внешние накопители и все не требующиеся для работы устройства, подключенные по USB (включая кард-ридеры, принтеры, геймпады, USB-хабы и подобные).
- Выполните чистую загрузку Windows и попробуйте выполнить обновление в этом режиме. Подробнее: Чистая загрузка Windows 10 (инструкция подойдет и для чистой загрузки Windows 7 и 8).
- Проверьте, достаточно ли свободного места на системном разделе жесткого диска (Диске C). В идеале, иметь 20-30 Гб свободными. См. Как очистить диск C от ненужных файлов, Как увеличить диск C за счет диска D.
- Если ошибка появляется в Центре обновления, то попробуйте обновиться до Windows 10 с помощью средства обновления до Windows 10 с сайта Microsoft (правда, оно может выдать ту же ошибку, если проблема в драйверах, дисках или программах на компьютере). Подробнее этот способ описан в инструкции Обновление до Windows 10.
Если ничто из указанного не сработало, переходим к более трудоемким способам (при этом не торопитесь устанавливать ранее удаленный антивирус и подключать внешние накопители).
Очистка файлов установки Windows 10 и повторная загрузка
Попробуйте такой вариант:
- Отключитесь от Интернета.
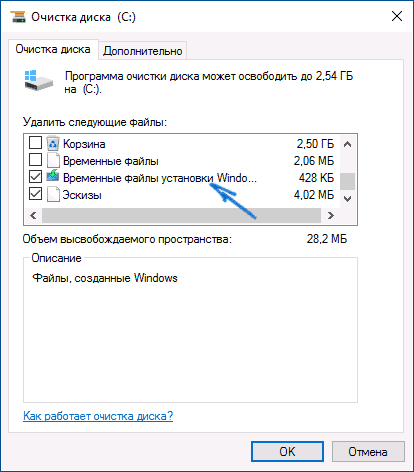
- Запустите утилиту очистки диска, нажав клавиши Win+R на клавиатуре, введя cleanmgr и нажав Enter.

- В утилите очистки дисков нажмите «Очистить системные файлы», а затем — удалите все временные файлы установки Windows.
- Зайдите на диск C и, если на нем имеются папки (скрытые, так что включите показ скрытых папок в Панель управления — Параметры проводника — Вид) $WINDOWS.~BT или $Windows.~WS, удалите их.

- Подключитесь к Интернету и либо снова запустите обновление через Центр обновлений, либо загрузите официальную утилиту с сайта Майкрософт для обновления, способы описаны в упомянутой выше инструкции по обновлению.

Исправление ошибки c1900101 в Центре обновлений
Если ошибка Windows Update c1900101 возникает при использовании обновления через Центр обновлений Windows, попробуйте следующие действия.
- Запустите командную строку от имени администратора и по порядку выполните следующие команды.
- net stop wuauserv
- net stop cryptSvc
- net stop bits
- net stop msiserver
- ren C:\Windows\SoftwareDistribution SoftwareDistribution.old
- ren C:\Windows\System32\catroot2 catroot2.old
- net start wuauserv
- net start cryptSvc
- net start bits
- net start msiserver
После выполнения команд закройте командную строку, перезагрузите компьютер и снова попробуйте выполнить обновление до Windows 10.
Обновление с использованием образа ISO Windows 10
Еще один простой способ «обойти» ошибку 0xc1900101 — использовать оригинальный образ ISO для обновления до Windows 10. Как это сделать:
- Скачайте образ ISO с Windows 10 к себе на компьютер одним из официальных способов (образ с «просто» Windows 10 включает в себя также и профессиональную редакцию, она не представлена отдельно). Подробно: Как скачать оригинальный образ ISO Windows 10.
- Смонтируйте его в системе (лучше стандартными средствами ОС, если у вас Windows 8.1).
- Отключитесь от Интернета.
- Запустите файл setup.exe с этого образа и произведите обновление (оно по результату не будет отличаться от обычного обновления системы).
Это основные способы исправить проблему. Но встречаются специфичные случаи, когда требуются иные подходы.
Дополнительные способы исправить проблему
Если ничто из описанного выше не помогло, попробуйте следующие варианты, возможно, в вашей конкретной ситуации рабочими окажутся именно они.
- Удалите драйвера видеокарты и сопутствующий софт видеокарты с помощью Display Driver Uninstaller (см. Как удалить драйвера видеокарты).
- Если в тексте ошибки присутствует информация про SAFE_OS во время операции BOOT, то попробуйте отключить Secure Boot в UEFI (БИОС). Также причиной этой ошибки может быть включенное шифрование дисков Bitlocker или иное.
- Выполните проверку жесткого диска с помощью chkdsk.
- Нажмите Win+R и введите diskmgmt.msc — посмотрите, не является ли ваш системный диск динамическим диском? Это может вызывать указанную ошибку. Однако, если системный диск — динамический, конвертировать его в базовый без потери данных не получится. Соответственно решение здесь — чистая установка Windows 10 с дистрибутива.

- Если на вашем компьютере установлены сторонние средства шифрования дисков или программы наподобие Крипто ПРО, они могут вызывать эту ошибку, в частности, с кодом 0x40017 SECOND_BOOT. Отключите стороннее шифрование, удалите такого рода утилиты. Для Крипто ПРО может сработать не удаление, а простое обновление программы.
- Для некоторых старых материнских плат, оснащенных контроллером FireWire IEEE 1394 помогает его отключение в БИОС.
- В некоторых случаях исправить ошибку помогает отключение технологий Intel VT-x/Vt-d или AMD-V в БИОС.
- Если у вас Windows 8 или 8.1, то можно попробовать следующие действия (предварительно сохранив важные данные): зайдите в параметры обновления и восстановления и запустите сброс Windows 8 (8.1) после того, как процедура будет завершена, не устанавливая никаких программ и драйверов, попробуйте выполнить обновление.

Пожалуй, это все, что я могу предложить на данный момент времени. Если вдруг помогли какие-то иные варианты, буду рад комментариям.
Ошибка 0xc1900101-0x30018 — это случайное событие, которое может возникать при обновлении вашей операционной системы до Windows 10 Anniversary. Точные причины, из-за которых возникает данная ошибка, все еще остаются загадкой для большинства пользователей и похоже на то, что возникать она может в разных ситуациях.
Обновление Anniversary является достаточно новым, так что эта ошибка должна быть исправлена в уже будущих обновлениях. Тем не менее, некоторые пользователи встречаются с данной ошибкой при обновлении до этого билда с ранних версий операционной системы.
Если вы пользователь, который встретился с подобной проблемой, то знаете, что существует несколько методов для исправления ошибки 0xc1900101-0x30018
Исправляем ошибку 0xc1900101-0x30018
Метод №1 Отключите ваш антивирус или любой сторонний Брандмауэр
Охранные программы на вашем компьютере довольно часто являются причинами вот таких вот проблем. Антивирусы часто делают ошибки и создают ложные тревоги. Особенно часто это происходит на Windows 10, так как та полагается на регулярные обновления, что бы поддерживать себя в форме.
Обычно самые популярное антивирусное обеспечение имеет опцию отключения активной защиты. Попробуйте нажать на иконку антивируса, которая находится в правом нижнем углу, правой кнопкой мыши и выберите отключить защиту(в зависимости от вашего антивируса).
Если же вы не хотите постоянно отключать свой антивирус, то попробуйте внести некоторые изменения в его список исключения. У разных версий антивирусов это можно сделать по разному, так что описывать здесь мало что можно. Для точных инструкций, вы можете посетить официальный сайт разработчика своего программного обеспечения.
Метод №2 Попробуйте обновить компьютер через проводное соединение
Порой ваше Интернет-соединение может сбоить, пускай даже на секунду. Именно это и может приводить к сбоям во время обновлений. Очевидно, что проводное соединение сети куда надежней, чем беспроводное. Попробуйте переключиться на кабель и попробовать обновить операционную систему снова.
Метод №3 Отключите любые присоединенные USB-устройства(не считая мыши и клавиатуры)
Сторонние драйвера довольно часто приводят к различным конфликтам в системе, особенно они вызывают много проблем у антивирусов и Брандмауэров. Все это вполне может мешать загрузке и установке обновлений для вашей операционной системы. Откровенно говоря, какие угодно драйвера в системе может встать на пути обновления Windows. Так что попробуйте отключить некоторые устройства от системы и посмотрите, удалось ли вам избавиться от ошибки 0xc1900101-0x30018.
Update Error 0xc1900101-0x30018 mostly occurs when you try to upgrade your Windows 10 operating system to the latest one. These error codes are numerous and too many to count. In a specific post, Microsoft listed these potential error codes along with brief information.
However, these data are completely worthless since there are no signs of what might be causing the problem or how to actually approach the solution. In this blog post, we explain some easy and effective methods. By using them you will certainly get rid of this issue.
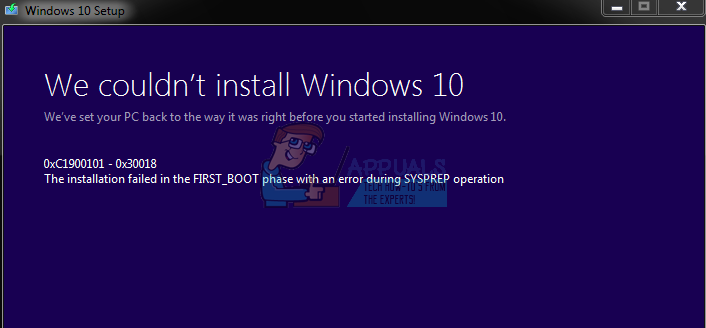
As per the user’s report, when they upgrade to Windows 10, it reaches a certain maximum limit. It then reverts back to the previous version of the operating system. It displays the following message.
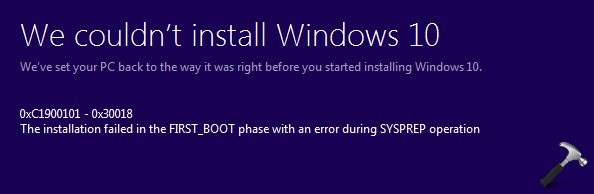
We couldn’t install Windows 10
We’ve set your PC back to the way it was right before you started installing Windows 10.
0xC1900101 – 0x30018
The installation failed in the FIRST_BOOT phase with the error during SYSPREP operation.
Here is a series of driver-related errors that frequently appear while upgrading to Windows 10 –
0xC1900101 – 0x300180xC1900101 – 0x3000D0xC1900101 – 0x200040xC1900101 – 0x4000D0xC1900101 – 0x200170xC1900101 – 0x2000c0xC1900101 – 0x40017

List of Contents
- Remove your antivirus
- Disconnect all peripherals
- Run SFC Utility and DISM Command
- Perform Disk Cleanup
- Reset Windows Update Components
- Use the Media Creation Tool
- Update or remove corrupted drivers
- Remove problematic applications
- Upgrade your BIOS
If you are getting an error code 0xc1900101-0x30018 while updating Windows 11/10, try out these suggestions one by one.
1. Disable or Uninstall your antivirus
Antivirus is designed to prevent malicious applications related to worms and trojans but sometimes removing these programs solves problems like Update Error 0xc1900101-0x30018. If you are experiencing the same issue, be sure to uninstall it and try to upgrade your Windows again. Here is how to do that –
- Right-click on the Start button and select Apps and Features.
- Locate the application you want to remove from the programs list.
- Once you find it, select it and hit the Uninstall button.
- Click on the Uninstall button again.
- If UAC asks for permission, click on the Yes button.
- Follow the on-screen instructions and be sure all the antivirus components are removed properly.
If the above procedure works, this might be a good time to switch to a different antivirus solution.
2. Disconnect all peripherals/secondary devices
Several users have asserted that they successfully installed the latest version of Windows 10 after disconnecting all external devices from their computers. Although this may sound like a third-grade solution, you should try it out as it has proven useful for some users. So, it is still worth a resolution.
3. Run SFC/DISM command-line programs
Update Error 0xc1900101-0x30018 can sometimes occur due to corrupted system files, but you can effectively get rid of this by performing the SFC scan and DISM command. To do that, you just need to do the following –
- Press Win + S to open the Windows Taskbar search.
- Type cmd in the search box and press Ctrl + Shift + Enter.
- When UAC prompts, click on the Yes button.
- In the elevated Command Prompt, type the below command line and hit Enter –
DISM.exe /Online /Cleanup-image /Restorehealth

- After that, run the system file checker to scan the corrupted files.
- Open the elevated command prompt again as explained earlier.
- When UAC prompts, click on the Yes button.
sfc /scannow

- Press Enter and wait for a while.
- When the scan process completes, try to update Windows.
4. Perform Disk Cleanup
Sometimes, low storage hard drives of your device might be the reason for occurring Update Error 0xc1900101-0x30018. In order to upgrade to Windows 10, you must have at least 16GB of storage. Not meeting this requirement, you may guess why you’ve experienced this issue. To free up your hard drive space, check out the guidelines mentioned below –
- Click on the Start button, type
cleanmgr. - Select the Disk Cleanup application from the best match.
- When a popup prompts on the screen, select the C: drive and hit the OK button.
- This will start searching for the spaces that it can free up.
- Click on the “Clean up system file” button.
- Again select the C: drive and hit the OK button. It calculates how much storage can be retrieved by removing the system files.
- Mark all the check-boxes except Downloads and press the OK button.
- The process of cleaning junk files will start immediately start.
5. Reset Windows Update Components
This might be quite a lengthy process but according to the users’ report, it helps to solve various update error codes. For more information, you can also check out the solutions listed in our dedicated article. To do it, follow the instructions below –
- Click on the Start button and type cmd.
- Right-click on Command Prompt and select Run as administrator.
- When UAC prompts on the screen, hit Yes to give permission.
- Now, run the following codes sequentially and hit Enter after each one –
net stop wuauserv
net stop cryptSvc
net stop bits
net stop msiserver
rmdir %windir%SoftwareDistribution /S /Q
net start wuauserv
net start cryptSvc
net start bits
net start msiserver
5. Once over, Restart your PC to save the changes.
6. Use the Media Creation Tool
If you’re still experiencing the issue, make sure to run the Media Creation Tool as an administrator to complete the upgrade process. In order to avoid the Update Error 0xc1900101-0x30018 at hand, follow the below steps one by one –
- Go to the Windows Upgrade page and download the Media Creation Tool.
- Right-click on the downloaded tool and select Run as administrator.
- If UAC prompts on the screen, click the Yes button to give your permission.
- On the following page, Accept the Applicable notices and license terms.
- Select Upgrade this PC now and hit the Next button.
- Here it would help if you waited for a while as the software prepares the necessary files.
- Select Download and install updates and click Next.
- Follow the on-screen instructions until you reach the Ready to install screen.
- Click on Change what to keep.
- Select Keep personal files and apps and then click Next.
- The installation will now start, follow the guidelines to complete it.
7. Update or Remove problematic drivers
If you’re trying to upgrade from Windows 10 to the latest version, follow the below guidelines to locate and remove all the faulty drivers –
- Press Win + E together to launch the File Explorer.
- Once it opens, click on This PC and open Local Disk (C:).
- On the following page, navigate to Windows > Panther.
- Locate the Setuperr.log and Setupact.log files to identify the faulty drivers.
- Keep in mind that you can only open the files if you take ownership of them.
- Once you find the problematic drivers, uninstall them.
Note – Alternatively, navigate to the second method of this page and follow the instructions to remove the corrupted drivers.
8. Remove problematic applications
Sometimes third-party software conflicts with the upgrade process that causes the Update Error 0xc1900101-0x30018 to occur. Several users claimed that certain programs like Acronis True Image and Trusteer Rapport are the main culprits for this problem.
If you use either of these applications or any other similar tool, remove it completely from your device and then attempt to perform the upgrade process. Some users reported that their problem was fixed after removing the faulty software, so be sure to try that.
9. Upgrade your BIOS
Unfortunately, if none of the above methods work for you, then finally you need to upgrade your BIOS to get rid of Update Error 0xc1900101-0x30018. As per the reports of some users, you might not be able to install a specific update if you have outdated BIOS. If you are going to proceed with this method then be cautious while executing as even a small mistake can cause severe damage to your device. To do it, follow the instructions below carefully –
- Open the Run dialog box.
- Type msinfo32 in the search box and click OK.
- In the System Information window, locate BIOS Version/Date in the Items column.

- Once you find it, note down its Value and then close the window.
- Open your web browser and navigate to the manufacturer’s website for your BIOS.
- Download the updated files and install them on your PC properly.
That’s it, I hope this guide helps to address the 0xc1900101-0x30018 issue on your Windows 11 or 10 PC.
If you received upgrade error 0xC1900101 – 0x30018 and you’re unable to upgrade to Windows 10, then this article may interest you. Upgrade error code 0xC1900101 – 0x30018 is one of the common error code you may see while switching to Windows 10 from your previous OS. The error code is shown as follows:
Page Contents
0xC1900101 – 0x30018
The installation failed in the FIRST_BOOT phase with an error during SYSPREP operation
As this is the generic error code and it doesn’t tell us what is the actual root cause, you need to start troubleshooting with general procedures first. In case if you can locate upgrade log, you might be able to spot the exact thing which blocked the upgrade.
FIX: Windows 10 Upgrade Error 0xC1900101 – 0x30018
According to Microsoft, upgrade error 0xC1900101 – 0x30018 occurs because one or more device drivers stopped responding to setup.exe during the upgrade process.
This means that, the probable cause here are device drivers on your system. A system may have multiple device drivers with each having their own importance. Some drivers might be incompatible with newer version and may stop responding to setup.exe. To bypass this problem, we recommend you to first update all your drivers manually. Also ensure that you’ve all latest Windows Update installed.
Second relevant factor which might cause this problem are presence of third-party security software. You should uninstall those third-party software temporarily and retry with upgrade.
Then there are some additional factors to be considered, if above suggestions didn’t help. If you’re using wireless connection, try switching to wired connection instead. File corruption can also be sometimes the culprit and hence you must try System File Checker tool for identify and fix it. Plus you’re always recommended to plug out external devices, while you perform Windows 10 upgrade.
In case, if you still continue to face the issue, look out for upgrade logs at $Windows.~BT\sources\Rollback and $Windows.~BT\sources\Panther and create a new thread on Microsoft Community including them. Log analysts present there may help you to spot exact cause and will suggest the remedy accordingly.
Hope something helps!
RELATED ARTICLES
Windows Update error codes are numerous and they are pretty much impossible to count. Microsoft has made a post where they listed all possible Windows Update error codes along with short descriptions but this information is pretty useless since there are not hints to what might be causing the problem or how to actually approach the solution.
Users are already reluctant enough about starting an update of anything, especially their operating system because that updating process usually slows the computer down, even if it’s only working in the background. However, receiving these errors codes puts people off even more and Microsoft definitely needs to do something in order to prevent these error messages from occurring so often.
0xC1900101 – 0x30018 Error
Upgrading from Windows 8.1 to Windows has always been a painful process, especially when you end up receiving this error message constantly at random intervals during the updating process. The error message manifests itself through a Blue Screen of Death and the real solution to this problem is yet to be announced by Microsoft.
The problem usually appears when you are trying to install Windows 10 to a computer running Windows 7, 8, or 8.1; but it can also appear when you try to install a regular update manually. Let’s find out just how to fix this issue!
Solution 1: Make Sure Your Computer Is Ready For the Update
There are quite a several steps you need to undertake before even running the update yourself. These steps are numerous but it shouldn’t take a long time before you are able to install the update yourself. Make sure you do everything on the list below and try to run the update after accomplishing this.
- Try temporarily disabling or uninstalling your antivirus software and turning off any 3rd-party firewall software you have running and see if the upgrade will succeed.
- If you are using a Wi-Fi connection, try switching to a wired connection using a network cable, and disable or uninstall your wireless network card.
- Remove any connected USB devices (except the keyboard and mouse) when attempting the upgrade.
- Open a Command Prompt (Admin), and type sfc /scannow to check for any damaged system files. Find out more info on how to accomplish this by reading our article on the topic.
- Make sure you’ve installed all the latest Windows Updates and latest drivers and updates from your hardware and software manufacturers. Check your motherboard manufacturer’s website for any BIOS updates for Windows 10. Uninstall any unnecessary hardware or software prior to upgrading to Windows 10.
- Perform a clean boot and try to accomplish the update process after booting. Find out more on how to perform a clean boot on Windows 8, 8.1, and 10 by clicking here.
- If you are using a SCSI hard disk, make sure you have drivers available for your storage device on a thumdrive and it is connected. During Windows 10 setup, click the Custom Advanced Option and use the Load Driver command to load the appropriate driver for the SCSI drive. If this does not work and setup still fails, consider switching to a IDE based hard disk.
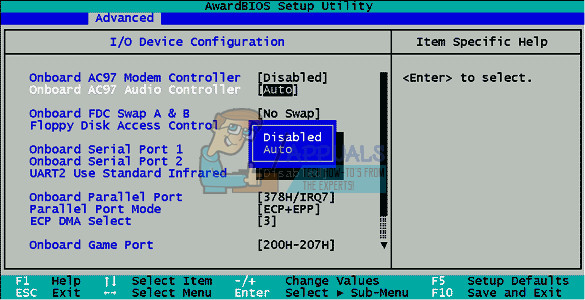
Solution 2: Disable the Onboard Sound in BIOS Settings
Several users have reported that disabling the onboard sound in BIOS managed to fix their issue and they were able to perform the update without issues. This is not a difficult operation and it can easily fix your problem. However, make sure you have performed all the necessary steps from the Solution 1 before moving forward to other solutions.
- Turn off your computer by going to the Start Menu >> Power Button >> Shut down
- Remove the add-on sound card if one has been installed. Many motherboards automatically disable onboard sound when another sound device is detected, and removing it might automatically restore your onboard sound. For desktop computers, you’ll need to open the case and gently pull the sound card out of the card slot; this card could be secured with a screw or locking clips. Laptops could have an expansion card or a USB sound device that should be removed.
- Restart your PC and enter BIOS by pressing the BIOS key while the system starts. The BIOS key is typically displayed on the boot screen, saying “Press ___ to enter Setup.” Common BIOS keys are F1, F2, Del, Esc and F10.
- Locate the settings option that changes the onboard sound. This could be under the “Advanced,” “Devices” or “Onboard Peripherals” menu and marked as “Onboard Audio,” “Sound…”.
- Choose the onboard sound settings and choose “Disabled.”
- Navigate to the Exit section and choose to Exit Saving Changes. This will proceed with the boot. Make sure you try to run the update again.
Solution 3: Install Windows Using Media Creation Tool
This particular error message is shown if you are updating Windows using the in-built Update Manager and it appears at random percentages during the update process. However, you can Assistant and alternative which goes by the name of Media Creation Tool which let’s you install Windows using the .ISO file you can download at Microsoft’s official page.
You can also use Rufus to perform the update for you by following the instructions from our article on the topic.
- Select Download tool, then select Run. You need to be an administrator to run this tool.
- On the License terms page, select Accept if you accept the license terms.
- On the What do you want to do? page, select Upgrade this PC now and then select Next.
- The tool will start downloading and then installing Windows 10. This table shows which edition of Windows 10 will be installed on your PC.
- When Windows 10 is ready to install, you’ll see a recap of what you’ve chosen and what will be kept during the upgrade. Select Change what to keep to set whether you would like to Keep personal files and apps, or Keep personal files only, or choose to keep Nothing during the upgrade.
- Save and close any open apps and files you may be running and, when you’re ready, select Install.
- It might take some time to install Windows 10, and your PC will restart a few times. Make sure you don’t turn your PC off.
Solution 4: Try the DISM Tool
Deployment Image Servicing and Management (DISM.exe) tool is a useful tool which can scan your Windows image for errors and mistakes you might have caused in it. It can be run easily by using Command Prompt and it can be used also to fix the errors automatically.
After running it, make sure you wait for at least half an hour for it to finish since the tool checks everything regarding your Windows image.
Find out more info on how to fix it by visiting this article we made on how to run DISM.exe.
Solution 5: Try This Simply Registry Hotfix
This particular fix was able to help countless people fix their Windows Update-related issue and it’s worth checking this out before running your Windows Update again.
Additionally, this particle solution was directly linked to solving this error messages by several users so please check this out. It basically gets rid of unused drivers on your computer which is a job your Disk Cleanup tool should take care off but for some reason it doesn’t.
- Open Command Prompt by typing “cmd” in the Search bar located at the taskbar.
- Copy and paste the following command and make sure you click Enter afterwards:
rundll32.exe pnpclean.dll,RunDLL_PnpClean /DRIVERS /MAXCLEAN
- Exit Command Prompt, restart your computer and make sure you run the update again.
Solution 6: Reset your Windows Update Components
This is quite a lengthy procedure but it helps users deal with their errors during their updates and it has proven to solve various error codes, including the one we are dealing with right now. However, make sure you have tried all of the solutions and steps above before trying this one as the ones above are much quicker.
- Type Command Prompt in the search bar and run it with administrator privileges.
- Kill the following processes: MSI Installer, Windows Update Services, BITS, and Cryptographic by copying and pasting the commands below. Make sure you click Enter after each one.
net stop msiserver
net stop wuauserv
net stop bits
net stop cryptSvc
- Rename the Catroot2 and Software Distribution folders. You can do this more easily by copying the following commands in the Command Prompt:
ren C:\Windows\SoftwareDistribution SoftwareDistribution.old
ren C:\Windows\System32\catroot2 Catroot2.old
- Start the MSI Installer, Windows Update Services, BITS, and Cryptographic services again by copying and pasting the commands below one after another.
net start wuauserv
net start cryptSvc
net start bits
net start msiserver
Solution 7: Using the Built-In Windows Troubleshooters
Windows 10 comes preinstalled with several troubleshooters which can automatically recognize the problem you are having and fix it for you in no time. These troubleshooters have helped a lot of people who are not so experienced in dealing with these issues themselves and the process takes almost no time at all.
- Open the Settings app by clicking on the Start button and then the gear icon just above. You can also search for it.
- Open the Update & Security section and navigate to the Troubleshoot menu.
- First of all, click on the Windows Update option and follow the instructions on screen to see whether there is something wrong with Windows Update services and processes.
- After the troubleshooter finishes, navigate to the Troubleshoot section again and open the Internet Connections troubleshooter.
- Check to see if the problem is solved.

Solution 8: Disable Wi-Fi in BIOS
It turns out that disabling Wi-Fi in BIOS helped several users deal with their problem so it’s worth giving this a shot. It’s not time-consuming and it may fix the issue for you as well. This particular solution is mostly for laptop users.
- Restart or turn on your computer.
- Enter BIOS by pressing the BIOS key while the system starts. The BIOS key is typically displayed on the boot screen, saying “Press ___ to enter Setup.” Common BIOS keys are F1, F2, Del, Esc and F10.
- Navigate to the Advanced section and locate your Wi-Fi card. If you are using the Wi-Fi card integrated in your laptop (if it came with the laptop), it should be under the “Integrated WLAN” option.
- Disable it and navigate to the Exit tab. Choose the Exit Saving Changes option which should save the changes and proceed with the boot.
- Try installing Windows 10 again.
Solution 9: Modify or Create a Registry Key
This particular registry key is known to be a cause for this particular error message so make sure you either create it or modify it in the following manner. However, you should backup your registry just in case you configure it incorrectly since changing the registry may cause unpredictable errors to your PC.
- Open the Registry Editor by searching for it in the Search box located in the Start menu or by using the Ctrl + R key combination in order to bring up the Run dialog box where you need to type “regedit”.
- Click on the File menu located at the top left part of the window and select the Export option.
- Choose where you want to save the changes to your registry.
- In case you cause some damage to the registry by editing it, simply open Registry Editor again, click File >> Import and locate the .reg file you exported beforehand.
- Alternatively, if you fail to Import the changes made to the registry, you can restore your system to a previous working state by using System Restore. Learn how to configure System Restore and how to use it by checking out our article on this topic via this link.
Now what we have created a backup for our registry, let’s get to the fix.
- Open the Registry Editor by following the instructions above in Step 1.
- Navigate to the following location in your registry by expanding the menus located at the left side of the window.
HKEY_LOCAL_MACHINE\SOFTWARE\Microsoft\Windows\CurrentVersion\WindowsUpdate\ OSUpgrade
- If this particular key doesn’t exist, right-click on the WindowsUpdate key, select New >> Key and name it OSUpgrade.
- In this particular location (OSUpgrade), right-click on the OSUpgrade folder and select New >> DWORD (32-bit) Value.
- Name this registry key as AllowOSUpgrade and click ok.
- Double-click on this new value and type 0x00000001 under the Value data setting and click OK.
- Restart your computer and check to see if the issue is fixed.
Kevin Arrows
Kevin Arrows is a highly experienced and knowledgeable technology specialist with over a decade of industry experience. He holds a Microsoft Certified Technology Specialist (MCTS) certification and has a deep passion for staying up-to-date on the latest tech developments. Kevin has written extensively on a wide range of tech-related topics, showcasing his expertise and knowledge in areas such as software development, cybersecurity, and cloud computing. His contributions to the tech field have been widely recognized and respected by his peers, and he is highly regarded for his ability to explain complex technical concepts in a clear and concise manner.