
Файл UXInit.dll считается разновидностью DLL-файла. DLL-файлы, такие как UXInit.dll, по сути являются справочником, хранящим информацию и инструкции для исполняемых файлов (EXE-файлов), например appidpolicyconverter.exe. Данные файлы были созданы для того, чтобы различные программы (например, Microsoft Office Access 2010) имели общий доступ к файлу UXInit.dll для более эффективного распределения памяти, что в свою очередь способствует повышению быстродействия компьютера.
К сожалению, то, что делает файлы DLL настолько удобными и эффективными, также делает их крайне уязвимыми к различного рода проблемам. Если что-то происходит с общим файлом DLL, то он либо пропадает, либо каким-то образом повреждается, вследствие чего может возникать сообщение об ошибке выполнения. Термин «выполнение» говорит сам за себя; имеется в виду, что данные ошибки возникают в момент, когда происходит попытка загрузки файла UXInit.dll — либо при запуске приложения Microsoft Office Access 2010, либо, в некоторых случаях, во время его работы. К числу наиболее распространенных ошибок UXInit.dll относятся:
- Нарушение прав доступа по адресу — UXInit.dll.
- Не удается найти UXInit.dll.
- Не удается найти C:\Windows\Temp\527D94AF-D053-4381-B105-0D815D53791E\wow64_microsoft-windows-uxinit_31bf3856ad364e35_10.0.16299.1004_none_6f1f7bf552458619\UXInit.dll.
- Не удается зарегистрировать UXInit.dll.
- Не удается запустить Microsoft Office Access 2010. Отсутствует требуемый компонент: UXInit.dll. Повторите установку Microsoft Office Access 2010.
- Не удалось загрузить UXInit.dll.
- Не удалось запустить приложение, потому что не найден UXInit.dll.
- Файл UXInit.dll отсутствует или поврежден.
- Не удалось запустить это приложение, потому что не найден UXInit.dll. Попробуйте переустановить программу, чтобы устранить эту проблему.
Файл UXInit.dll может отсутствовать из-за случайного удаления, быть удаленным другой программой как общий файл (общий с Microsoft Office Access 2010) или быть удаленным в результате заражения вредоносным программным обеспечением. Кроме того, повреждение файла UXInit.dll может быть вызвано отключением питания при загрузке Microsoft Office Access 2010, сбоем системы при загрузке UXInit.dll, наличием плохих секторов на запоминающем устройстве (обычно это основной жесткий диск) или, как нередко бывает, заражением вредоносным программным обеспечением. Таким образом, крайне важно, чтобы антивирус постоянно поддерживался в актуальном состоянии и регулярно проводил сканирование системы.
Note: Outbyte PC Repair tool has been proven to identify and fix the UXINIT.DLL error. See more information about Outbyte and Uninstall Instructions. Please review Outbyte EULA and Privacy Policy.
Introduction
One of the most common errors a Windows user faces is the missing DLL error. This error will simply not let you run the application. When you try to open the application you will notice a pop-up window with the following error message.
‘The program can’t start because UXINIT.DLL is missing from your computer’
Don’t worry! This is a common issue faced by Windows users all over the world and there are several ways to fix this.
In this detailed post, I’ll provide multiple solutions to fix the DLL file not found errors on Windows 11, 10, 8.1, 8, and 7 PCs.
What is a UXINIT.DLL error?
The term ‘DLL’ refers to dynamically linked libraries, which may be found in Windows 11, 10, 8, 7, and other previous OS versions. A dynamic link library (DLL) is a collection of small programs that larger programs can load when needed to complete specific tasks. The small program, called a DLL file, contains instructions that help the larger program handle what may not be a core function of the original program. These instructions can be called upon multiple programs simultaneously. When you run a program on any Windows operating system, much of the functionality of the program may be provided by DLLs.
A dependency is created every time a DLL is used by a program. If another program uses a DLL and somehow breaks the dependency between the two programs then the first program will no longer execute. That is when you will see errors like,
‘The program can’t start because UXINIT.DLL is missing from your computer. Try reinstalling the program to fix this problem.’
Causes of UXINIT.DLL Missing Error
The typical reasons for the ‘UXINIT.DLL missing error’ on Windows 10, 11, 8, 7, and other versions, are compiled below,
a) Deleted or corrupted UXINIT.DLL — The DLL file used by a certain program has modified or deleted UXINIT.DLL.
b) Missing or corrupted files of Microsoft Visual C++ Redistributable — The UXINIT.DLL file is part of the Microsoft Visual C++ software runtime library. VC++ Runtime libraries are DLL files required to run programs compiled with Microsoft Visual Studio. If some files are missing or if Visual Studio is not installed correctly, then the ‘UXINIT.DLL is missing’ error might appear.
c) System is infected with virus or malware – There is a possibility your system is corrupted or damaged with virus/malware. As a result, UXINIT.DLL may have been damaged or corrupt.
d) Damaged/corrupted System files – If your Windows system files are corrupted after engaging with programs containing a virus or some malicious applications then UXINIT.DLL might not work correctly.
Some other common UXINIT.DLL errors include:
UXINIT.DLL is missing
Cannot register UXINIT.DLL
Problem starting UXINIT.DLL
UXINIT.DLL Access Violation
The procedure entry point UXINIT.DLL error
UXINIT.DLL error loading
UXINIT.DLL crash
Cannot find UXINIT.DLL
UXINIT.DLL was not found
UXINIT.DLL could not be located
UXINIT.DLL — System Error
The program can’t start because UXINIT.DLL is missing from your computer. Try reinstalling the program to fix the problem.
There are several ways to fix this DLL error and we will be looking at them in detail below.
1. Download UXINIT.DLL
The UXINIT.DLL file can be manually downloaded and added/replaced with the missing or corrupt DLL file.
Step 1: Select and download the DLL files from the table below irrespective of the version of your OS i.e. Windows 11, 10, 8.1, 8 or 7.,
Download UXINIT.DLL
| Version | Description | OS | Size | Language | MD5 | SHA1 | Download |
|---|---|---|---|---|---|---|---|
| 10.0.10586.0 | Windows User Experience Session Initialization Dll | 32 | 57 KB | U.S. English |
56e6ddf… 56e… |
feb57d8… feb… |
|
| 10.0.10586.0 | Windows User Experience Session Initialization Dll | 64 | 78.5 KB | U.S. English |
a424ded… a42… |
6411213… 641… |
|
| 10.0.14393.0 | Windows User Experience Session Initialization Dll | 32 | 66 KB | U.S. English |
4c9a3a0… 4c9… |
e670981… e67… |
|
| 10.0.14393.0 | Windows User Experience Session Initialization Dll | 64 | 90 KB | U.S. English |
3803d95… 380… |
3172701… 317… |
|
| 6.1.7600.16385 | Windows User Experience Session Initialization Dll | 32 | 20.5 KB | U.S. English |
a12829e… a12… |
f555d83… f55… |
|
| 6.2.9200.16611 | Windows User Experience Session Initialization Dll | 32 | 43 KB | U.S. English |
fa15b8e… fa1… |
ef298a0… ef2… |
|
| 6.3.9600.17031 | Windows User Experience Session Initialization Dll | 32 | 49 KB | U.S. English |
f49cc89… f49… |
ba145e7… ba1… |
Step 2: Once downloaded, extract each file into separate folders using either Windows Compressed folders (comes with windows) or with an app like WinRAR.
Step 3: Next, copy the 64-bit ‘UXINIT.DLL’ file and paste it into the C:\Windows\System32 folder. And copy the 32-bit ‘UXINIT.DLL’ file and paste it into the C:\Windows\SysWOW64 folder. If there is an existing ‘UXINIT.DLL’ file in either of these folders then replace it with the new file. However, if you have a 32-bit Windows system then place only the 32-bit file into the C:\Windows\System32 folder.
Re-launch the affected program to see if the issue is fixed. If not, please try the next method.
2. Fix missing UXINIT.DLL error automatically
The missing DLL error can be fixed using a repair tool, like Outbyte PC Repair, which helps to solve any system issues, cleans up junk files, and fixes any DLL errors in the process.
Step 1: Download the installation file from here.
Step 2: Install PC Repair and scan your PC
Step 3: Click ‘Repair’ to fix all items that may cause the missing DLL errors.
Step 4: Launch the application to see if the error is fixed.
Recommended Download: Fix UXINIT.DLL error or missing UXINIT.DLL error with Outbyte.
Compatible with Windows 11, 10, 8, 7, Vista, XP and 2000
3. Re-register the DLL file
Another efficient method to fix the DLL error is to re-register the DLL file.
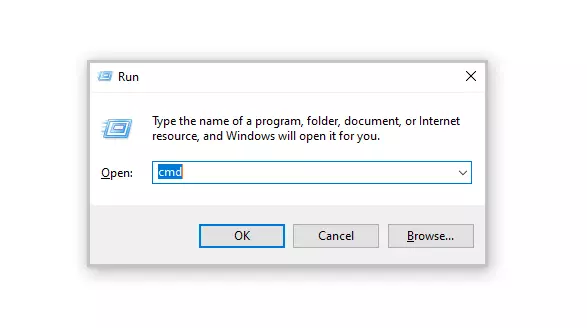
Step 1: Launch the Run utility by pressing Windows + R keys on your keyboard. Type in ‘cmd’ in the text input field. Then press Ctrl+Shift+Enter keys to open the Command Prompt in administrator mode.
Step 2: In the prompt window, select ‘Yes’ to allow Command Prompt to make modifications to your device.
Step 3: Now it’s time to unregister the DLL file from your computer. Type in or copy and paste the following command, then press Enter,
regsvr32 /u UXINIT.DLL
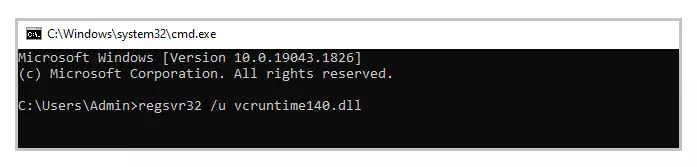
Note: Replace vcruntime140.dll with UXINIT.DLL
Step 4: Next, you need to re-register the file. To do this run the following command,
regsvr32 UXINIT.DLL
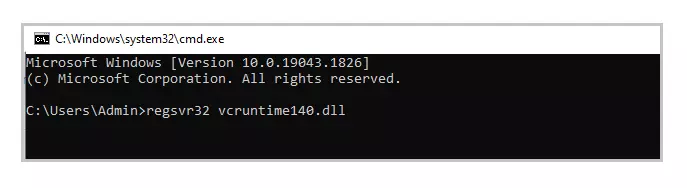
Note: Replace vcruntime140.dll with UXINIT.DLL
Step 5: Exit the Command Prompt and run the application again.
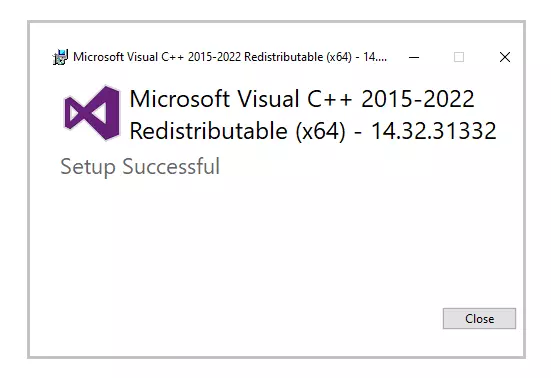
4. Reinstall the Latest Visual C++ Redistributable 2015 — 2022 for Visual Studio
The most commonly used solution is to re-install Microsoft Visual C++ Redistributable to fix DLL errors. Follow the steps mentioned below,
Step 1: To access the official page from where Microsoft Visual C++ Redistributable can be downloaded, please click on the link provided here
Select ‘Install’. The installation will begin and will take a couple of seconds to complete.
Step 2: Alternatively, you can also download it from below based on the version of Windows,
Download x86 version from here
Download x64 version from here
Step 3: Once you’ve selected the file, proceed to download. The download may take a while, depending on your internet connection speed.
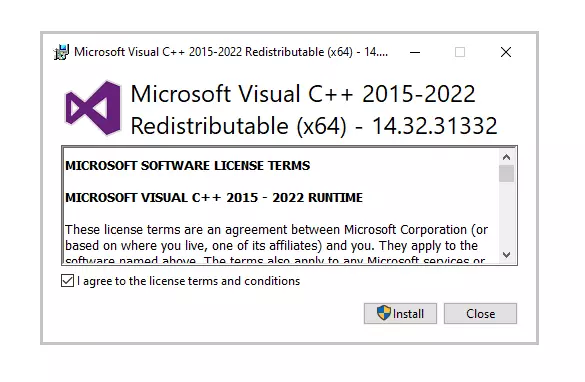
Step 4: Once the download is complete install the downloaded file. When the installation begins tick the ‘I agree to the license terms and conditions’ box and then click on ‘Install’.
Step 5: It may take a few minutes for the installation to finish. Once the installation is completed restart the computer and launch the program again to see if the DLL error is fixed.
5. Run System File Checker (SFC) Scan
Step 1: To open the Run utility, press Windows + R on your computer. Enter ‘cmd’ in the input area and then press Ctrl+Shift+Enter.
Step 2: Select ‘Yes’ in the pop-up window to open the command prompt in administrator mode.
Step 3: Next, enter the below command and press Enter to execute it,
sfc/scannow
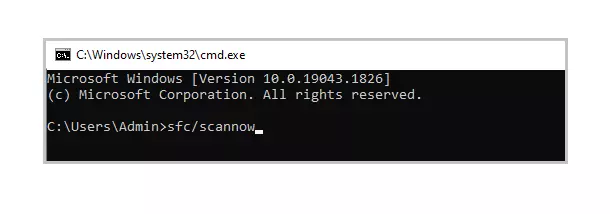
Step 4: This command will try to search and fix corrupt system files (including DLL files). Once the process is complete, you can check the log file created in the path shown in the command prompt. If in the log file you find details of the fixed DLL File then you can run the application again.

6. Reinstall the Program that cannot be launched
Step 1: Open Control Panel and click on ‘Uninstall a program’ under ‘Programs’.
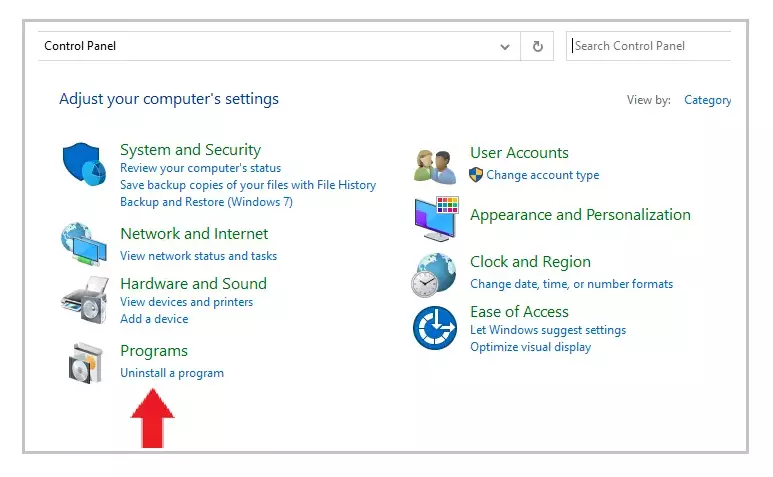
Step 2: Search and find the program you’re experiencing problems with and click on it.
Step 3: Then click on the ‘Uninstall’ button, and proceed to continue with the uninstallation procedure of the application.
Step 4: Reinstall the program from its source. Either download the setup file or if you already have it then run the installation again to check if you can run the application this time.
7. Update drivers
In some cases, DLL errors can occur due to drivers. If the DLL error message appeared during or after you installed a program, then first update your drivers to the latest version.
Alternatively, there is also a possibility you might face the DLL error after updating drivers. In such a scenario, you need to roll back the driver to the previous version.
There are two ways to update drivers,
Method 1: Automatically Update Drivers
Step 1: Use a tool like Outbyte Driver Updater that automatically searches for missing and out dated drivers in your system and updates it. You can download the tool from here
Step 2: Download time depends on your internet speed connection. Once the download is completed start with the installation of the tool.
Step 3: Launch the application.
Step 4: Inside the application run update. Then, the Driver Updater tool will scan your computer for out dated and missing drivers.
Step 5: Finally, select the drivers and click update.
Method 2: Manually Update Drivers
Step 1: Go to the Taskbar search box – enter the text Device Manager and select Device Manager.
Step 2: Select the hardware device that needs to be updated. Expand the selection – select the device, right-click and select ‘Update Driver’.
Step 3: Choose the ‘Search automatically for drivers’ option.
Step 4: If the latest drivers are found then they will be installed automatically.
Step 5: Sometimes, Windows might not be able to find the latest driver. In such cases, the user can visit the manufacturer’s website, search for the driver, and instructions on how to proceed with the installation.
8. System Restore
In this method, your PC needs to be restored to its earlier version when it was working without any error. There is a chance the new updates to your PC caused the error, so the user must remove the new updates and roll back to a previous version.
To apply System Restore, first, check if you have a previous backup of your system. To check this,
Step 1: Begin by clicking on the start button.
Step 2: To access the System Properties window, search for ‘Create a restore point’ and click the first result.
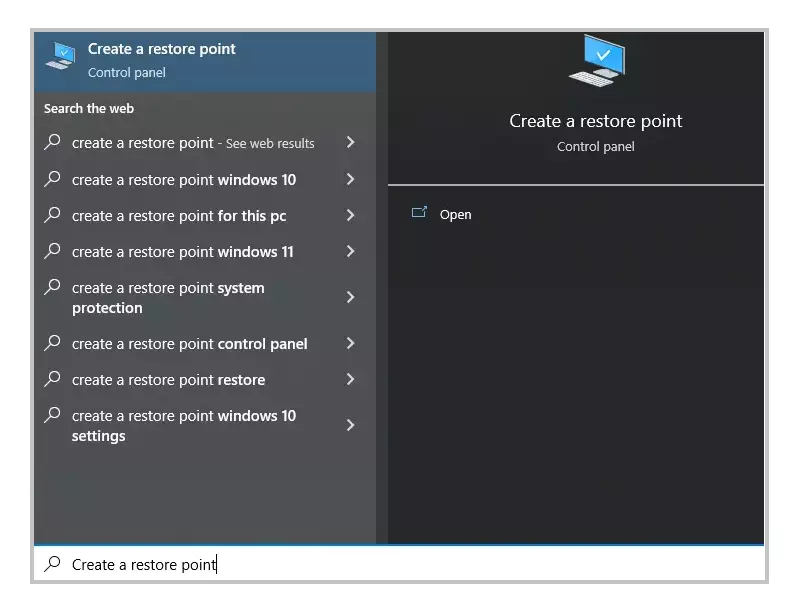
Step 3: Under the ‘System Protection’ tab select the ‘System’ drive. ‘Protection’ should be turned on for this drive.
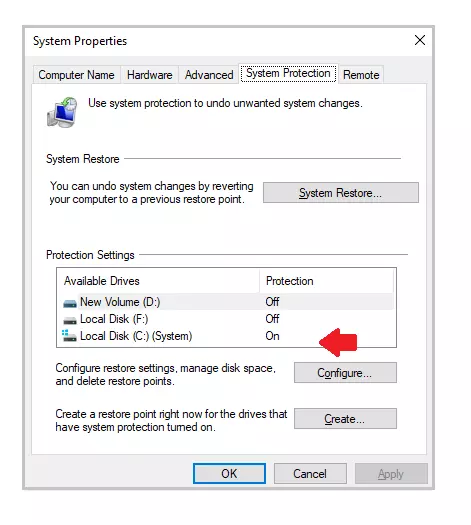
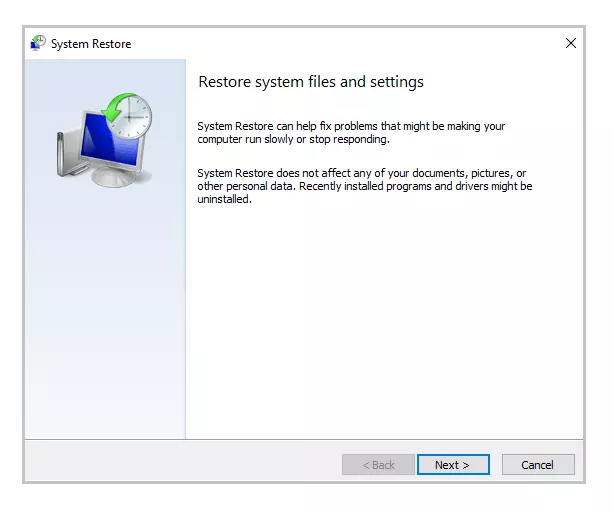
Step 4: Select ‘System Restore’ and click ‘Next’ on the initial screen
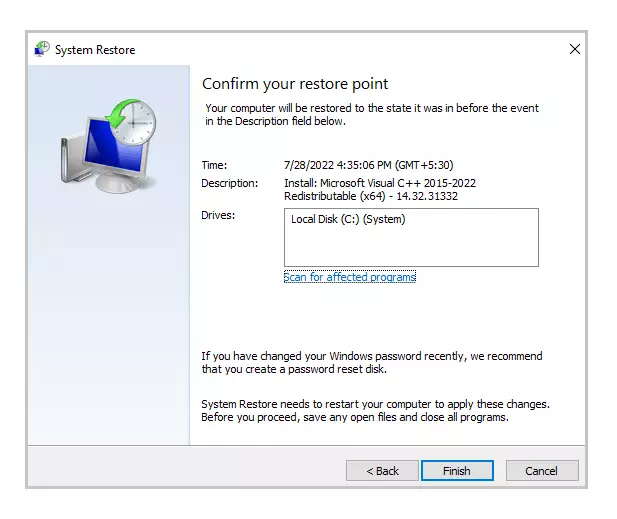
Step 5: A list of restore points will be displayed. Select the restore point when your application was running correctly without any error. Then select ‘Next’.
Step 6: Review your selection and click ‘Finish’. If a warning window pop-up appears then select Yes’.
Step 7: The System Restore will begin and your PC will restart once the process is complete. When you log in again, you will see a notification that the System Restore is complete. Now, you can run the application again to see if the error is fixed.
Note: If System Restore was not set up earlier or you’ve never backed up your PC before then this method might not apply to you.
9. Update Windows
UXINIT.DLL missing issues have been reported by several windows users to disappear by upgrading to the latest edition of Windows.
Step 1: Go to settings by selecting Start > Settings or using Windows + I shortcut
Step 2: Open the ‘Update and security’ option.

Step 3: See if there are any new updates by clicking on ‘Check for updates.’
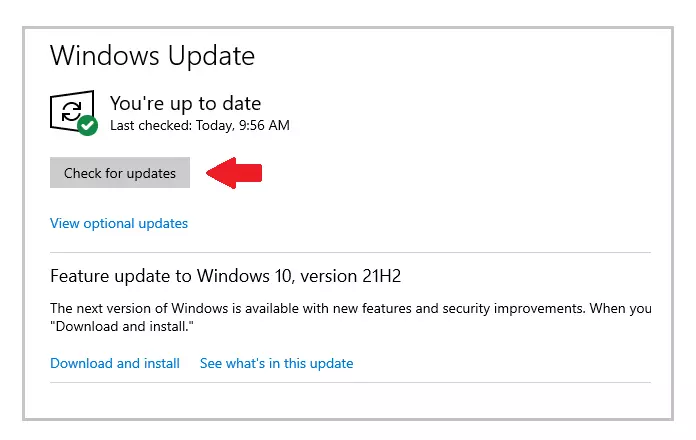
Step 4: If a newer version is discovered, then the windows update will download and install to the latest version.
Step 5: After installing the newest version, run the program again to check if you face the UXINIT.DLL was not found error.
Following these steps should have definitely helped you to fix the missing UXINIT.DLL error.
How to fix the issue reported by «error code uxinit.dll»
Special Offer
Instructions
The following steps should fix the uxinit.dll issue:
- Step 1.Download Outbyte PC Repair application See more information about Outbyte uninstall instructions EULA Privacy Policy
- Step 2.Install and launch the application
- Step 3.Click the Scan Now button to detect issues and abnormalities
- Step 4.Click the Repair All button to fix the issues
| Compatibility | Win 11, 10, 8, 7 |
| Download Size | 21.2 MB |
| Requirements | 300 MHz Processor, 256 MB RAM, 50 MB HDD |
Limitations: trial version offers an unlimited number of scans, backups and restores of your Windows system elements for free. Registration for the full version starts from USD 29.95.
A malfunction reported by «error code uxinit.dll» may happen due to a number of different factors. Common causes include incorrectly configured system settings or irregular entries in the system elements, to name a few. Such issues may be resolved with special software that repairs system elements and tunes system settings to restore stability.
The article provides details on what the issue means, potential causes, and ways to resolve the issue.
- 1Meaning of the «error code uxinit.dll»
- 2Causes of the «error code uxinit.dll»
- 3Ways to repair the «error code uxinit.dll»
Meaning of the «error code uxinit.dll»
«Error code uxinit.dll» is an issue name that usually contains details of the malfunction, including why it occurred, which system component or application malfunctioned, along with some other information. The numerical code in the issue name usually contains data that can be deciphered by the manufacturer of the component or application that malfunctioned. The issue with using this code may occur in many different locations within the system, so even though it carries some details in its name, it is still difficult for a user to pinpoint and fix the issue cause without specific technical knowledge or appropriate software.
Causes of the «error code uxinit.dll»
If you have received this warning on your PC, it means that there was a malfunction in your system operation. «Error code uxinit.dll» is one of the issues that users get as a result of the incorrect or failed installation or uninstallation of software that may have left invalid entries in your system elements, improper system shutdown due to a power failure or another factor, someone with little technical knowledge accidentally deleting a necessary system file or system element entry, as well as a number of other causes.
Ways to repair the «error code uxinit.dll»
For an immediate fix of such issues, advanced PC users may be able to repair it by manually editing system elements, and others may want to hire a technician to do it for them. However, since any manipulations with Windows system elements carry a risk of rendering the operating system unbootable, whenever a user is in any doubt of their technical skills or knowledge, they should use a special type of software that is meant to repair Windows system elements without requiring any special skills from the user.
The following steps should help fix the issue:
- Download Outbyte PC Repair application Special offer. See more information about Outbyte uninstall instructions EULA Privacy Policy
- Install and launch the application
- Click the Scan Now button to detect potential issue causes
- Click the Repair All button to fix found abnormalities
The same application can be used to run preventative measures to reduce the chance of this or other system issues appearing in the future.
UXInit.dll Informations — Download and Fix
Sometimes Windows system displays error messages regarding corrupted or missing UXInit.dll files. Situations like that can occur, for example, during a software installation process. Each software program requires certain resources, libraries, and source data to work properly. Corrupted or nonexistent UXInit.dll file can therefore effect in failed execution of the started process.
UXInit.dll file Windows User Experience Session Initialization Dll. The file was developed by for use with software. Here you will find detailed information about the file and instructions how to proceed in the event of UXInit.dll related errors on your device. You can also download UXInit.dll file compatible with Windows 10, Windows 8.1, Windows 8, Windows 7, Windows 7 devices which will (most probably) allow you to solve the problem.
Compatible with: Windows 10, Windows 8.1, Windows 8, Windows 7, Windows 7
User popularity
- 1 Information about UXInit.dll file
- 2 Errors related to UXInit.dll file
- 3 How to fix UXInit.dll related errors?
- 3.1 Scanning for malicious software
- 3.2 System and driver update
- 3.3 System File Checker tool
- 3.4 System recovery
- 4 Download UXInit.dll
- 4.1 List of UXInit.dll file versions
File info
| General information | |
|---|---|
| Filename | UXInit.dll |
| File extension | DLL |
| Description | Windows User Experience Session Initialization Dll |
| Software | |
|---|---|
| Program | Microsoft® Windows® Operating System |
| Author | Microsoft Corporation |
| Details | |
|---|---|
| MIME type | application/octet-stream |
| File type | Dynamic link library |
| System | Windows NT 32-bit |
| Copyrights | © Microsoft Corporation. All rights reserved. |
| Character set | Unicode |
| Language cod | English (U.S.) |

There are various types of errors related to UXInit.dll file. UXInit.dll file may be located in wrong file directory on your device, may not be present in the system, or may be infected with malicious software and therefore not work correctly. Below is a list of most common error messages related to UXInit.dll file. If you encounter one listed below (or similar), please consider the following suggestions.
- UXInit.dll is corrupted
- UXInit.dll cannot be located
- Runtime Error — UXInit.dll
- UXInit.dll file error
- UXInit.dll file cannot be loaded. Module was not found
- cannot register UXInit.dll file:
- UXInit.dll file could not be loaded
- UXInit.dll file doesn’t exist
UXInit.dll
Application could not be started because UXInit.dll file is missing. Reinstall the application to solve the problem.
OK
Problems related to UXInit.dll can be addressed in various ways. Some methods are meant only for advanced users. If you don’t have confidence in your skills, we suggest consulting a specialist. Fixing UXInit.dll file errors should be approached with utmost caution for any mistakes can result in unstable or unproperly working system. If you have the necassary skills, please proceed.
UXInit.dll file errors can be caused by various factors, so its is beneficial to try to fix them using various methods.
Step 1: Scan your computer for any malicious software
Windows files are commonly attacked by malicious software that prevents them from working properly. First step in addressing problems with UXInit.dll file or any other Windows system files should be scanning the system for malicious software using an antivirus tool.
If by any chance you don’t have any antivirus software installed on your system yet, you should do it immediately. Unprotected system is not only a source of file errors, but, more importantly, makes your system vulnerable to many dangers. If you don’t know which antivirus tool to choose, consult this Wikipedia article – comparison of antivirus software.
Step 2: Update your system and drivers.
Installing relevant Microsoft Windows patches and updates may solve your problems related to UXInit.dll file. Use dedicated Windows tool to perform the update.
- Go to the Windows «Start» menu
- Type «Windows Update» in the search field
- Choose the appropriate software program (name may vary depending on your system version)
- Check if your system is up to date. If any unapplied updates are listed, install them immediately.
- After the update has been done,restart your computer in order to complete the process.
Beside updating the system, it is recommended that you install latest device drivers, as drivers can influence proper working of UXInit.dll or other system files. In order to do so, go to your computer or device producer’s website where you will find information regarding latest driver updates.
Step 4: Restoring Windows system
Another approach is to restore system to previous state, before the UXInit.dll file error occured. In order to restore your system, follow the instructions below
- Go to the Windows «Start» menu
- Type «System Restore» in the search field
- Start the system restore tool – it’s name may differ depending on version of the system
- The application will guide you through the process – read the messages carefully
- After the process has finished, restart your computer.
If all the above-mentioned methods failed and the UXInit.dll file problem has not been resolved, proceed to the next step. Remember that the following steps are intended only for advanced users.
Download and replace UXInit.dll file
The last solution is to manually download and replace UXInit.dll file in appropriate folder on the disk. Select file version compatible with your operating system and click the «Download» button. Next, go to your web browser’s «Downloaded» folder and copy the downloaded UXInit.dll file.
Go to the folder where the file should be located and paste the downloaded file. Below is the list of UXInit.dll file example directory paths.
- Windows 10: C:\Windows\System32\
- Windows 8.1: C:\Windows\System32\
- Windows 8: 1: C:\Windows\System32\
- Windows 7: C:\Windows\System32\
- Windows 7: C:\Windows\System32\
If the steps did not solve your UXInit.dll file problem, you should consult a professional. A probability exists that the error(s) might be device-related and therefore should be resolved at the hardware level. A fresh operating system installation might be necessary – a faulty system installation process can result in data loss.
File versions list
Filename
UXInit.dll
System
Windows 10
File size
67584 bytes
Date
2017-03-18
| File details | ||
|---|---|---|
| MD5 | 742f0538fea956163e97ccc4ea27e779 | |
| SHA1 | 2edbe50bdd1c0b69b84c779bc9b8ab38626bd7ee | |
| SHA256 | 88d4d071efe51572e3f82e723f1d229e780e2eee01921cb99803522a12289f19 | |
| CRC32 | 982b55a8 | |
| Example file location | C:\Windows\System32\ |
Filename
UXInit.dll
System
Windows 8.1
File size
50176 bytes
Date
2014-11-21
| File details | ||
|---|---|---|
| MD5 | 21bd8c6a87adf2f0d27de9be7aa6f93a | |
| SHA1 | 43a5d722a4eb1b3232906e2700daed9a5011edf2 | |
| SHA256 | 2e5ec49c421cd3ff7b5f2a80f5e4d01489a181a2157c580bc06d25db676a0376 | |
| CRC32 | 96e22461 | |
| Example file location | C:\Windows\System32\ |
Filename
UXInit.dll
System
Windows 8
File size
44032 bytes
Date
2012-07-26
| File details | ||
|---|---|---|
| MD5 | cb57c778887fe7374c6aff6576460b4d | |
| SHA1 | b51fc2a8a59d75d335ad4779c1ca70d61e4c5a65 | |
| SHA256 | d2aac7e5ec4a82228212d6417489a8a1d5f40c13151209ced5651d2677b6d635 | |
| CRC32 | 90bece7e | |
| Example file location | 1: C:\Windows\System32\ |
Filename
UXInit.dll
System
Windows 7
File size
25088 bytes
Date
2009-07-14
| File details | ||
|---|---|---|
| MD5 | 9bc8610c32c96a2983a65dc21cafa921 | |
| SHA1 | 486a74ce102afa4f7a725ad9878d024eca05fbfe | |
| SHA256 | 2a4195f663c9d55939e3d8feaa208090fdb0b8801a60164a7325b53104797cbc | |
| CRC32 | 0c20ede4 | |
| Example file location | C:\Windows\System32\ |
Filename
UXInit.dll
System
Windows 7
File size
20992 bytes
Date
-0001-11-30
| File details | ||
|---|---|---|
| MD5 | a12829e9974f57e9b5dbfea7c93190f6 | |
| SHA1 | f555d83a65ba8dd724e3555bd8bdc424060e3eb4 | |
| SHA256 | 1ec2a36caf30a706b6082c5ca79b6a33fa99342e144508db1415d1611e631ebc | |
| CRC32 | 2ad3a8bc | |
| Example file location | C:\Windows\System32\ |
Нажмите для загрузки файла UXInit.dll.rar
|
Скачал сам поделись с друзьями. Поддержи сайт.
Нужна помощь в установке UXInit.dll?
Администрация сайта не несет ответственности за ваши действия
- Загрузите файл UXInit.dll на компьютер.
- Распакуйте и поместите файл в папку с требующей его программой.
- Скопируйте файл UXInit.dll в следующие системные директории.
- (Windows 95/98/Me) — C:\Windows\System
- (Windows NT/2000) — C:\WINNT\System32
- (Windows XP, Vista, 7) — C:\Windows\System32
В Windows x64 необходимо поместить файл в директорию C:\Windows\SysWOW64\
- Перезагрузите компьютер.
Проблемы с установкой? Прочтите рекомендации по установке DLL файлов
Ошибки UXInit.dll
Наиболее распространенные ошибки связанные с файлом.
- «UXInit.dll не найден.»
- «Файл UXInit.dll отсутствует.»
- «UXInit.dll нарушение прав доступа.»
- «Файл UXInit.dll не удалось зарегистрировать.»
- «Файл C:\Windows\System32\UXInit.dll не найден.»