
Здравствуйте! Устанавливаю Windows 10 и выскакивает ошибка «Не удалось завершить процесс установки. Чтобы установить Windows, перезапустите программу установки». Жму «ОК» и ошибка выходит по новой. В сети советуют открыть консоль и ввести команду msoobe.exe, но у меня опять выходит ошибка ««msoobe.exe» не является внутренней или внешней командой, исполняемой программой или пакетным файлом». Что я делаю не так и как продолжить инсталляцию операционной системы?
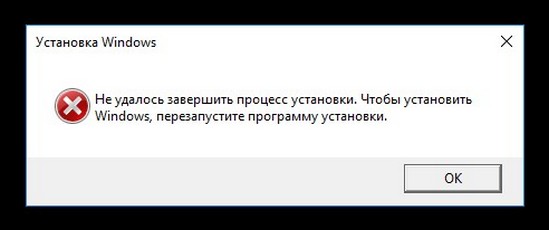

Не удалось завершить процесс установки
Привет друзья! Если у вас в процессе установки Windows 10 вышла ошибка «Не удалось завершить процесс установки. Чтобы установить Windows, перезапустите программу установки», то в интернете можно прочитать советы, где утверждается, что нужно просто перезапустить системный файл msoobe.exe, но хочу сказать, помогает это далеко не всегда. Лично у меня есть другое решение и о нём я расскажу в конце этой небольшой статьи статьи.
Итак, для перезапуска системного файла msoobe.exe, вводить в консоли нужно не просто msoobe.exe, а прописать в команде полный путь к файлу вот таким образом: C:\Windows\System32\oobe\msoobe.exe, сделать это можно так.
Не закрывая окно с ошибкой, жмем клавиатурное сочетание Shift и F10 и в открывшемся окне командной строки вводим команду:
oobe\msoobe.exe
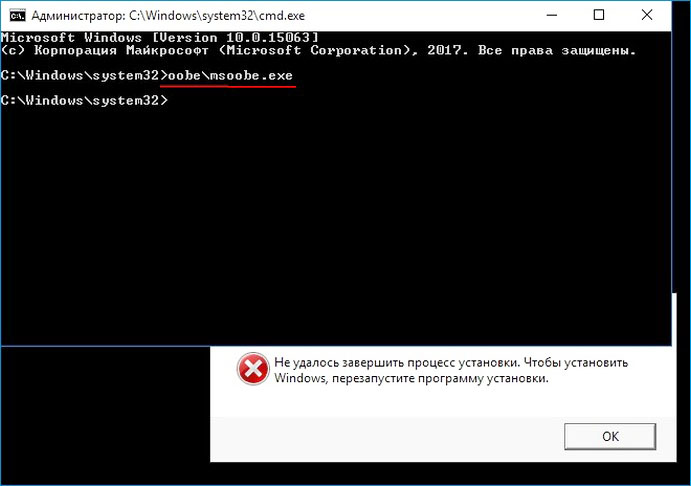
В результате автоматически продолжается установка OS, но часто дело дальше этого окна не продвигается и установка на этом застопоривается.
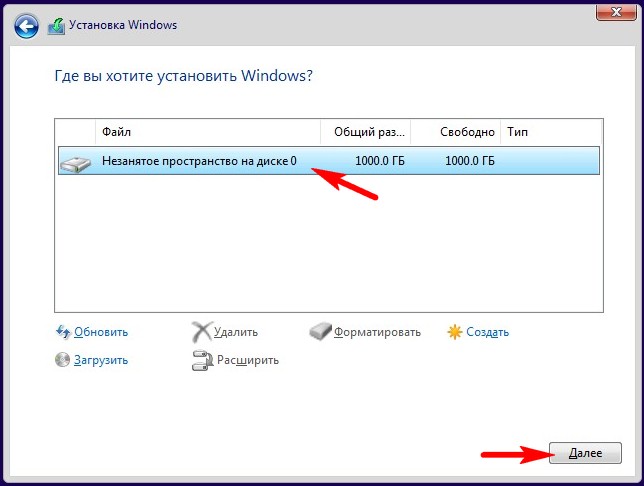
Если этот способ не поможет, то запустите процесс установки Windows 10 заново и в программе установки удалите все разделы на жёстком диске, устанавливая систему прямо в нераспределённое пространство. Это обязательно приведёт к успеху.
|
КАК запустить из %System32%\oobe утилиту msoobe.exe /a : ? | ☑ | ||
|---|---|---|---|---|
|
0
mojed 13.04.09 ✎ 09:52 |
Прошу подсказать |
|||
|
1
YF 13.04.09 ✎ 09:55 |
(0) Зайти в папку и 2 кликнуть по файлу |
|||
|
2
Fragster гуру 13.04.09 ✎ 09:58 |
пуск->выполнить>cmd |
|||
|
3
mojed 13.04.09 ✎ 10:23 |
получилось так |
Глупец, лишенный способности посмеяться над собой вместе с другими, не сможет долго выносить программирование. Фредерик Брукс-младший
-
Windows Support Forums
-
Installation, Updates and Activation
You should upgrade or use an alternative browser.
Unable to run oobe or msoobe on clean Win 11 install
-
Thread starter
Thread starterx509
-
Start date
Start date
x509
Well-known member
- Local time
- 3:49 PM
- Posts
- 207
- Location
-
Western USA
- OS
- Windows 11
-
-
#1
If it matters, I’m trying to install Win 11 on a system that already has a digital license for Win 10 Pro 64.
This tutorial Custom Install Windows 11 Tutorial says to use oobe \bypassnro or msoobe \bypassnro.
If you don’t have an Internet connection and none of the above worked for you, then press the Shift + F10 keys to open a command prompt. Copy and paste the OOBE\BYPASSNRO command into the command prompt, and press Enter. This will restart the computer, and take you back to step 15. You should then be able to click/tap on I don’t have internet when you get back to this step, and go to step 23D to set up a local account. (see bottom screenshot)
If the OOBE\BYPASSNRO command doesn’t work for you, then copy and paste the MSOOBE\BYPASSNRO command into the command prompt, and press Enter. This will restart the computer, and take you back to step 15. You should then be able to click/tap on I don’t have internet when you get back to this step, and go to step 23D to set up a local account. (see bottom screenshot)
However, neither command was recognized. Even plain oobe or msoobe was not recognized. What do I do now?
I’m posting this thread from a system still running Win 10 Pro.
My Computer
-
- OS
- Windows 11
- Computer type
- PC/Desktop
- Manufacturer/Model
- home built
- CPU
- AMD 7900x
- Motherboard
- ASUS AMD x670E ROG Strix E-A
- Memory
- 64 GB
- Graphics Card(s)
- Nvidia 3060 Ti (but wanting to upgrade)
- Sound Card
- built-in
- Monitor(s) Displays
- Dell 24″
- Cooling
- AIO for CPU, fans for case
- Keyboard
- Das Keyboard 4
- Mouse
- Corsair M65 (white)
- Browser
- Firefox
- Antivirus
- Bitdefender
- Other Info
- Also have Lenovo T14S laptop (me) and Lenovo Slim 71 (wife)
Try3
Well-known member
- Local time
- 11:49 PM
- Posts
- 3,342
- Location
-
CurrentCounty
- OS
- Windows 11 Home x64 Version 23H2 Build 22631.3447
-
-
#2
You should be in Windows\System32 and one of its subfolders contains the file bypassnro.cmd
OOBE used to be the only known subfolder containing bypassnro.
Then an HP user reported the subfolder MSOOBE contained bypassnro.
Perhaps there are more variations — just find the subfolder containing bypassnro.
And do please report back with what you find. I’m getting a new laptop next week and hope to benefit from your investigation when I’m in the OOBE stage.
Best of luck,
Denis
My Computer
-
- OS
- Windows 11 Home x64 Version 23H2 Build 22631.3447
- Local time
- 3:49 PM
- Posts
- 1,777
- OS
- Windows 11
-
-
#3
I’m trying to do a clean Win 11 install, completely clean of all the accumulated Windows 10 cruft from my old Wkindows. So the first thing I did with the Win 11 USB installer was wipe the drive clean. Then I started to do a clean install, and got as far as the screen «Let’s connect you to a network.» But I don’t want to connect to a network. I have fresh, latest version drivers that i want to install BEFORE connecting to the web. When I was doing Win 10 installs, this was not an issue.
Use Audit Mode.
My Computers
-
- OS
- Windows 11
- Computer type
- PC/Desktop
- Manufacturer/Model
- Homebuilt
- CPU
- AMD Ryzen 7 3800XT
- Motherboard
- ASUS ROG Crosshair VII Hero (WiFi)
- Memory
- 32GB
- Graphics Card(s)
- EVGA GeForce GTX 1080 Ti
-
- Operating System
- Windows 11 Education
- Computer type
- Laptop
- Manufacturer/Model
- Dell Inspiron 7773
- CPU
- Intel i7-8550U
- Memory
- 32GB
- Graphics card(s)
- Nvidia Geforce MX150
- Sound Card
- Realtek
- Monitor(s) Displays
- 17″
- Screen Resolution
- 1920 x 1080
- Hard Drives
- Toshiba 512GB NVMe SSD
SK Hynix 512GB SATA SSD
- Internet Speed
- Fast!
- Local time
- 4:19 AM
- Posts
- 186
- Location
-
India
- OS
- Windows 11 23H2
-
-
#4
My Computer
-
- OS
- Windows 11 23H2
- Computer type
- PC/Desktop
- Manufacturer/Model
- Assembled
- CPU
- Intel i7-7700k
- Motherboard
- Asrock Z270 Taichi
- Memory
- 16 GB
- Graphics Card(s)
- Intel 630 onboard
- Sound Card
- Onboard
- Monitor(s) Displays
- Benq 1080p
- Screen Resolution
- 1920*1080
- Hard Drives
- NVMe, SSD and HDD
- Case
- Cooler Master
- Keyboard
- Asus wireless
- Mouse
- Asus Wireless
- Internet Speed
- 75 Mbps
- Browser
- Chrome, Edge, Arc
- Antivirus
- Windows Defender
x509
Well-known member
- Local time
- 3:49 PM
- Posts
- 207
- Location
-
Western USA
- OS
- Windows 11
-
-
#5
Probably you should have used Rufus to write the USB that bypasses all those quirks !
How so? I had no problem with booting from the USB for installing Win 11. And for Win 10 never again problems either.
My Computer
-
- OS
- Windows 11
- Computer type
- PC/Desktop
- Manufacturer/Model
- home built
- CPU
- AMD 7900x
- Motherboard
- ASUS AMD x670E ROG Strix E-A
- Memory
- 64 GB
- Graphics Card(s)
- Nvidia 3060 Ti (but wanting to upgrade)
- Sound Card
- built-in
- Monitor(s) Displays
- Dell 24″
- Cooling
- AIO for CPU, fans for case
- Keyboard
- Das Keyboard 4
- Mouse
- Corsair M65 (white)
- Browser
- Firefox
- Antivirus
- Bitdefender
- Other Info
- Also have Lenovo T14S laptop (me) and Lenovo Slim 71 (wife)
-
-
#6
So run a Dir command to check what the subfolders are called.
You should be in Windows\System32 and one of its subfolders contains the file bypassnro.cmd
OOBE used to be the only known subfolder containing bypassnro.
Then an HP user reported the subfolder MSOOBE contained bypassnro.
Perhaps there are more variations — just find the subfolder containing bypassnro.And do please report back with what you find. I’m getting a new laptop next week and hope to benefit from your investigation when I’m in the OOBE stage.
Best of luck,
Denis
Oddly, I did a clean install on a Dell XPS laptop with the Tuesday’s update and was prepared to use oobe/bypassnro, but upon arriving at the screen to Shift + F10, the option was available to opt that I did not have internet.
My Computer
-
- OS
- Windows 11 Pro
- Computer type
- PC/Desktop
- Manufacturer/Model
- Personal Build
- CPU
- Ryzen 7 3700x
- Motherboard
- ASUS ROG Crosshair VI AMD X370
- Memory
- 32 GB
- Graphics Card(s)
- NVIDA GeForce GTX 1050 Ti
- Sound Card
- On board
- Monitor(s) Displays
- (2) AOC E2752Vh 27-inch
- Screen Resolution
- 1920 x 1080
- Hard Drives
- SSD M.2 and SATA
- Cooling
- Air cooling
- Keyboard
- Logitech K800 Wireless
- Mouse
- Logitech M705 Wireless
- Internet Speed
- 100 Mbps Download | 10 Mbps Upload
- Browser
- Firefox Beta
- Antivirus
- Windows Security???
- Other Info
- Microsoft 365 Family
Macrium Reflect (Paid)
eM Client
Adobe Acrobat DC (Subscription)
x509
Well-known member
- Local time
- 3:49 PM
- Posts
- 207
- Location
-
Western USA
- OS
- Windows 11
-
-
#7
So run a Dir command to check what the subfolders are called.
You should be in Windows\System32 and one of its subfolders contains the file bypassnro.cmd
OOBE used to be the only known subfolder containing bypassnro.
Then an HP user reported the subfolder MSOOBE contained bypassnro.
Perhaps there are more variations — just find the subfolder containing bypassnro.And do please report back with what you find. I’m getting a new laptop next week and hope to benefit from your investigation when I’m in the OOBE stage.
Best of luck,
Denis
@Try3
the good news and the bad news. The Good News is that there is an oobe subdirectory in Windows\System32, with an msoobe executable.
The Bad News is that running this program with the \bypassnro option did not accomplish anything useful. To be clear, I wasn’t connected to the web. what I got was a spinning circle for over 10 minutes. So I rebooted. Windows wanted me to log into account default0, but that login required a password. What password?
So I had to reinstall yet once more and try @NavyLCDR suggestion for Audit Mode, which did work.
My Computer
-
- OS
- Windows 11
- Computer type
- PC/Desktop
- Manufacturer/Model
- home built
- CPU
- AMD 7900x
- Motherboard
- ASUS AMD x670E ROG Strix E-A
- Memory
- 64 GB
- Graphics Card(s)
- Nvidia 3060 Ti (but wanting to upgrade)
- Sound Card
- built-in
- Monitor(s) Displays
- Dell 24″
- Cooling
- AIO for CPU, fans for case
- Keyboard
- Das Keyboard 4
- Mouse
- Corsair M65 (white)
- Browser
- Firefox
- Antivirus
- Bitdefender
- Other Info
- Also have Lenovo T14S laptop (me) and Lenovo Slim 71 (wife)
x509
Well-known member
- Local time
- 3:49 PM
- Posts
- 207
- Location
-
Western USA
- OS
- Windows 11
-
-
#8
My Computer
-
- OS
- Windows 11
- Computer type
- PC/Desktop
- Manufacturer/Model
- home built
- CPU
- AMD 7900x
- Motherboard
- ASUS AMD x670E ROG Strix E-A
- Memory
- 64 GB
- Graphics Card(s)
- Nvidia 3060 Ti (but wanting to upgrade)
- Sound Card
- built-in
- Monitor(s) Displays
- Dell 24″
- Cooling
- AIO for CPU, fans for case
- Keyboard
- Das Keyboard 4
- Mouse
- Corsair M65 (white)
- Browser
- Firefox
- Antivirus
- Bitdefender
- Other Info
- Also have Lenovo T14S laptop (me) and Lenovo Slim 71 (wife)
- Local time
- 3:49 PM
- Posts
- 1,777
- OS
- Windows 11
-
-
#9
Of course audit mode worked. But what you were initially looking for is the BypassNRO.cmd located in the C:\Windows\System32\oobe folder:

My Computers
-
- OS
- Windows 11
- Computer type
- PC/Desktop
- Manufacturer/Model
- Homebuilt
- CPU
- AMD Ryzen 7 3800XT
- Motherboard
- ASUS ROG Crosshair VII Hero (WiFi)
- Memory
- 32GB
- Graphics Card(s)
- EVGA GeForce GTX 1080 Ti
-
- Operating System
- Windows 11 Education
- Computer type
- Laptop
- Manufacturer/Model
- Dell Inspiron 7773
- CPU
- Intel i7-8550U
- Memory
- 32GB
- Graphics card(s)
- Nvidia Geforce MX150
- Sound Card
- Realtek
- Monitor(s) Displays
- 17″
- Screen Resolution
- 1920 x 1080
- Hard Drives
- Toshiba 512GB NVMe SSD
SK Hynix 512GB SATA SSD
- Internet Speed
- Fast!
- Local time
- 8:49 AM
- Posts
- 1,221
- Location
-
Newcastle NSW AUS
- OS
- Windows 11 2xH2 (latest update … forever anal)
-
-
#10
How so? I had no problem with booting from the USB for installing Win 11. And for Win 10 never again problems either.
But I hafta wonder. Why is Microsoft making a Win 11 clean install such a pain in the tuchus? Win 10 clean install was very straightforward.
Huh ???
Post 1 : Win 11 good, Win 10 bad
Post 2 : Win 10 good, Win 11 bad
(with apologies to George Orwell)
Last edited:
My Computers
-
- OS
- Windows 11 2xH2 (latest update … forever anal)
- Computer type
- PC/Desktop
- Manufacturer/Model
- HP Slim S01
- CPU
- Intel i5-12400
- Memory
- 8GB
- Graphics Card(s)
- NVIDIA GeForce GT730
- Sound Card
- OOBE
- Monitor(s) Displays
- Acer 32″
- Screen Resolution
- 1920×1080
- Hard Drives
- 512GB KIOXIA NVMe
1TB SATA SSD
- PSU
- OOBE
- Case
- OOBE
- Cooling
- OOBE
- Keyboard
- BT
- Mouse
- BT
- Browser
- Brave FFox Chrome Opera
- Antivirus
- KIS
-
- Operating System
- Windows 11 Pro 2xH2 (latest update … 4ever anal)
- Computer type
- Laptop
- Manufacturer/Model
- HP Pavillion 15
- CPU
- i7-1165G7 @ 2.80GHz
- Graphics card(s)
- Intel Iris Xe Graphics
- Hard Drives
- Samsung NVMe 512GB
+ numerous/multiple SSD Type C USB enclosures
- Internet Speed
- NBN FTTN 50
- Browser
- Brave
- Antivirus
- KIS
Try3
Well-known member
- Local time
- 11:49 PM
- Posts
- 3,342
- Location
-
CurrentCounty
- OS
- Windows 11 Home x64 Version 23H2 Build 22631.3447
-
-
#11
The Bad News is that running this program with the \bypassnro option did not accomplish anything useful.
What did you type in as your command?
oobe\bypassnro — is correct
oobe \bypassnro- is wrong
All the best,
Denis
My Computer
-
- OS
- Windows 11 Home x64 Version 23H2 Build 22631.3447
Try3
Well-known member
- Local time
- 11:49 PM
- Posts
- 3,342
- Location
-
CurrentCounty
- OS
- Windows 11 Home x64 Version 23H2 Build 22631.3447
-
-
#12
upon arriving at the screen to Shift + F10, the option was available to opt that I did not have internet.
Did you take a screenshot or photo by any chance?
I have not heard of the option you mentioned.
Denis
My Computer
-
- OS
- Windows 11 Home x64 Version 23H2 Build 22631.3447
- Local time
- 8:49 AM
- Posts
- 1,221
- Location
-
Newcastle NSW AUS
- OS
- Windows 11 2xH2 (latest update … forever anal)
-
-
#13
Tks for this solution. Worked a treat and solved my problem.
As another contributor suggested, I always use a Rufus USB set to bypass/ignore every obstacle that MS tries to put in place for a clean install, whether on a «compliant» device or a «non-compliant» device.
This time, I decided to try that good ole fashion original method using a boot USB newly created with Windows Media Creation Tool ({sniff} {sniff} pure nostalgia, haven’t done this for ages {sniff} {sniff}), and of course I struck the you-must-have-an-MS account brickwall. I reverted to the former practice of Shift+F10 > cmd window > taskmgr > enter > look for the network etc entry in running processes > end task. Damn and blast if MS hasn’t stopped that. Now a continuous loop of : you’ve lost the internet > try again > shift+f10 etc > you’ve lost the internet > try again > loop-de-loop adinfinitum
Then I remembered seeing something about oobe, searched, found this thread, bingo! Gotcha … User 1 MS 0. Note there is a post above that refers to the command as oobe{space}\nopassnro. That didn’t work but the same command without the space nailed it!!
(EDIT : Oops, just read @Try3 post above. Sorry for duplication)
Last edited:
My Computers
-
- OS
- Windows 11 2xH2 (latest update … forever anal)
- Computer type
- PC/Desktop
- Manufacturer/Model
- HP Slim S01
- CPU
- Intel i5-12400
- Memory
- 8GB
- Graphics Card(s)
- NVIDIA GeForce GT730
- Sound Card
- OOBE
- Monitor(s) Displays
- Acer 32″
- Screen Resolution
- 1920×1080
- Hard Drives
- 512GB KIOXIA NVMe
1TB SATA SSD
- PSU
- OOBE
- Case
- OOBE
- Cooling
- OOBE
- Keyboard
- BT
- Mouse
- BT
- Browser
- Brave FFox Chrome Opera
- Antivirus
- KIS
-
- Operating System
- Windows 11 Pro 2xH2 (latest update … 4ever anal)
- Computer type
- Laptop
- Manufacturer/Model
- HP Pavillion 15
- CPU
- i7-1165G7 @ 2.80GHz
- Graphics card(s)
- Intel Iris Xe Graphics
- Hard Drives
- Samsung NVMe 512GB
+ numerous/multiple SSD Type C USB enclosures
- Internet Speed
- NBN FTTN 50
- Browser
- Brave
- Antivirus
- KIS
Bree
Well-known member
- Local time
- 11:49 PM
- Posts
- 17,101
- Location
-
S/E England, UK
- OS
- Windows 11 Home
-
-
#14
The Good News is that there is an oobe subdirectory in Windows\System32, with an msoobe executable.The Bad News is that running this program with the \bypassnro option did not accomplish anything useful.
You do not run msoobe.exe, you run a .cmd script in the OOBE folder called BypassNRO.cmd.

My Computers
-
- OS
- Windows 11 Home
- Computer type
- Laptop
- Manufacturer/Model
- Acer Aspire 3 A315-23
- CPU
- AMD Athlon Silver 3050U
- Memory
- 8GB
- Graphics Card(s)
- Radeon Graphics
- Monitor(s) Displays
- laptop screen
- Screen Resolution
- 1366×768 native resolution, up to 2560×1440 with Radeon Virtual Super Resolution
- Hard Drives
- 1TB Samsung EVO 870 SSD
- Internet Speed
- 50 Mbps
- Browser
- Edge, Firefox
- Antivirus
- Defender
- Other Info
- fully ‘Windows 11 ready’ laptop. Windows 10 C: partition migrated from my old unsupported ‘main machine’ then upgraded to 11. A test migration ran Insider builds for 2 months. When 11 was released on 5th October 2021 it was re-imaged back to 10 and was offered the upgrade in Windows Update on 20th October. Windows Update offered the 22H2 Feature Update on 20th September 2022. It got the 23H2 Feature Update on 4th November 2023 through Windows Update, and 24H2 on 3rd October 2024 through Windows Update by setting the Target Release Version for 24H2.
My SYSTEM THREE is a Dell Latitude 5410, i7-10610U, 32GB RAM, 512GB NVMe ssd, supported device running Windows 11 Pro.
My SYSTEM FOUR is a 2-in-1 convertible Lenovo Yoga 11e 20DA, Celeron N2930, 8GB RAM, 256GB ssd. Unsupported device: currently running Win10 Pro, plus Win11 Pro RTM and Insider Dev, Beta, and RP 24H2 as native boot vhdx.
My SYSTEM FIVE is a Dell Latitude 3190 2-in-1, Pentium Silver N5030, 8GB RAM, 512GB NVMe ssd, supported device running Windows 11 Pro, plus Insider Beta, Dev, and Canary builds (and a few others) as a native boot .vhdx.
My SYSTEM SIX is a Dell Latitude 5550, Core Ultra 7 165H, 64GB RAM, 1TB NVMe SSD, supported device, Windows 11 Pro 24H2, Hyper-V host machine.
-
- Operating System
- Windows 11 Pro
- Computer type
- Laptop
- Manufacturer/Model
- Dell Latitude E4310
- CPU
- Intel® Core™ i5-520M
- Motherboard
- 0T6M8G
- Memory
- 8GB
- Graphics card(s)
- (integrated graphics) Intel HD Graphics
- Screen Resolution
- 1366×768
- Hard Drives
- 500GB Crucial MX500 SSD
- Browser
- Firefox, Edge
- Antivirus
- Defender
- Other Info
- unsupported machine: Legacy bios, MBR, TPM 1.2, upgraded from W10 to W11 using W10/W11 hybrid install media workaround. In-place upgrade to 22H2 using ISO and a workaround. Feature Update to 23H2 by manually installing the Enablement Package. In-place upgrade to 24H2 using hybrid 23H2/24H2 install media. Also running Insider Beta, Dev, and Canary builds as a native boot .vhdx.
My SYSTEM THREE is a Dell Latitude 5410, i7-10610U, 32GB RAM, 512GB NVMe ssd, supported device running Windows 11 Pro.
My SYSTEM FOUR is a 2-in-1 convertible Lenovo Yoga 11e 20DA, Celeron N2930, 8GB RAM, 256GB ssd. Unsupported device: currently running Win10 Pro, plus Win11 Pro RTM and Insider Dev, Beta, and RP 24H2 as native boot vhdx.
My SYSTEM FIVE is a Dell Latitude 3190 2-in-1, Pentium Silver N5030, 8GB RAM, 512GB NVMe ssd, supported device running Windows 11 Pro, plus Insider Beta, Dev, and Canary builds (and a few others) as a native boot .vhdx.
My SYSTEM SIX is a Dell Latitude 5550, Core Ultra 7 165H, 64GB RAM, 1TB NVMe SSD, supported device, Windows 11 Pro 24H2, Hyper-V host machine.
- Local time
- 3:49 PM
- Posts
- 3,733
- Location
-
CA
- OS
- Windows 11 Pro
-
-
#15
if connected to the internet, using a fake email address to bypass the MS account requirement is not working anymore.
After getting the message «oops something went wrong» and pressing next it still asks for a valid MS Account or to create a new MS Account.
Looks like they closed one more door for bypassing the requirement.
The only way around was by disconnecting from the network, press Shift + F10 and then entering the command oobe\bypassnro.
No idea if MS plans to get rid of that option too. Still worked for now.
I hope that installing without internet option will remain available.
My Computer
-
- OS
- Windows 11 Pro
- Computer type
- PC/Desktop
- Manufacturer/Model
- Dell XPS 8930
- CPU
- Intel I9-9900K
- Memory
- 64GB
- Graphics Card(s)
- NVIDIA RTX 2060
- Sound Card
- NVIDIA High Definition Audio
- Monitor(s) Displays
- 4k Samsung
- Screen Resolution
- 3840 x 2160
- Hard Drives
- 512GB NVMe, ADATA SU 800, 2TB HDD
- Local time
- 5:49 PM
- Posts
- 4,164
- Location
-
Texas, USA
- OS
- Win11 Pro 24H2
-
-
#16
1) Fully unattended. As the name implies, this type of answer file results in a 100% unattended installation. Boot your system from this media and come back in a little while. When you return you will find that Windows has been completely installed from start to finish with no input from you. Networking is disabled and a local account only has been created, no Microsoft account has been created.
2) Going the opposite direction, you can create an answer file that does the opposite — the installation is 100% manual, requiring the same user interaction as a manual installation EXCEPT that the answer file automatically bypasses the need for having the network enabled and it will create a local user account for you automatically. Other than this, the user is still guided through the setup just as with any manual installation.
Another reason that I like using answer files to install Windows is the complete versatility. I can automate parts of the installation while leaving other parts manual. I can customize just about every aspect of the installation. It also saves an amazing amount of time.
My Computers
-
- OS
- Win11 Pro 24H2
- Computer type
- PC/Desktop
- Manufacturer/Model
- Self-built
- CPU
- Intel i7 11700K
- Motherboard
- ASUS Prime Z590-A MB
- Memory
- 64GB (Waiting for warranty replacement of another 64GB for 128GB total)
- Graphics Card(s)
- No GPU — Built-in Intel Graphics
- Sound Card
- Integrated
- Monitor(s) Displays
- HP Envy 32
- Screen Resolution
- 2560 x 1440
- Hard Drives
- 1 x 1TB NVMe SSD
1 x 2TB NVMe SSD
1 x 4TB NVMe SSD
3 x 512GB 2.5″ SSD
1 x 4TB 2.5″ SSD
5 x 8TB Seagate Barracuda HDD
- PSU
- Corsair HX850i
- Case
- Corsair iCUE RGB 5000X mid tower case
- Cooling
- Noctua NF-S12A chromax.black.swap case fans (Qty. 7) & Home Computer Specifications, Configuration, and Usage Notes General Specifications ASUS Prime Z590-A motherboard, serial number M1M0KC222467ARP Intel Core i7-11700K CPU (11th Gen Rocket Lake / LGA 1200 Socket) 128GB Crucial Ballistix RGB DDR4 3200 MHz DRAM (4 x 32GB) Corsair iCUE RGB 5000X mid tower case Noctua NH-D15 chromax.black CPU cooler Noctua NF-S12A chromax.black.swap case fans (Qty. 7) & Corsair LL-120 RGB Fans (Qty. 3)
- Keyboard
- Corsair K70 Max RGB Magnetic Keyboard
- Mouse
- Logitech MX Master 3
- Internet Speed
- 1Gb Up / 1 Gb Down
- Browser
- Edge
- Antivirus
- Windows Defender
- Other Info
- The five 8TB drives and three 512GB SSDs are part of a DrivePool using StableBit DrivePool software. The three SSDs are devoted purely to caching for the 8TB drives. All of the important data is stored in triplicate so that I can withstand simultaneous failure of 2 disks.
Networking: 2.5Gbps Ethernet and WiFi 6e
-
- Operating System
- Win11 Pro 23H2
- Computer type
- Laptop
- Manufacturer/Model
- Lenovo ThinkBook 13x Gen 2
- CPU
- Intel i7-1255U
- Memory
- 16 GB
- Graphics card(s)
- Intel Iris Xe Graphics
- Sound Card
- Realtek® ALC3306-CG codec
- Monitor(s) Displays
- 13.3-inch IPS Display
- Screen Resolution
- WQXGA (2560 x 1600)
- Hard Drives
- 2 TB 4 x 4 NVMe SSD
- PSU
- USB-C / Thunderbolt 4 Power / Charging
- Mouse
- Buttonless Glass Precision Touchpad
- Keyboard
- Backlit, spill resistant keyboard
- Internet Speed
- 1Gb Up / 1Gb Down
- Browser
- Edge
- Antivirus
- Windows Defender
- Other Info
- WiFi 6e / Bluetooth 5.1 / Facial Recognition / Fingerprint Sensor / ToF (Time of Flight) Human Presence Sensor
- Local time
- 3:49 PM
- Posts
- 3,733
- Location
-
CA
- OS
- Windows 11 Pro
-
-
#17
As usual, there are so many ways to skin a cat. If you absolutely do not want to connect to a network and you want to create a local user account only, another super easy way to do so is to create a simple unattended answer file (autounattend.xml). While there are many ways to configure such an answer file, there are two main configurations that I use:1) Fully unattended. As the name implies, this type of answer file results in a 100% unattended installation. Boot your system from this media and come back in a little while. When you return you will find that Windows has been completely installed from start to finish with no input from you. Networking is disabled and a local account only has been created, no Microsoft account has been created.
2) Going the opposite direction, you can create an answer file that does the opposite — the installation is 100% manual, requiring the same user interaction as a manual installation EXCEPT that the answer file automatically bypasses the need for having the network enabled and it will create a local user account for you automatically. Other than this, the user is still guided through the setup just as with any manual installation.
Another reason that I like using answer files to install Windows is the complete versatility. I can automate parts of the installation while leaving other parts manual. I can customize just about every aspect of the installation. It also saves an amazing amount of time.
It may help if you could provide the exact procedure and a sample of the answer file for the fully unattended install.
Every new Build sems to need a different procedure to bypass the obstacles.
My Computer
-
- OS
- Windows 11 Pro
- Computer type
- PC/Desktop
- Manufacturer/Model
- Dell XPS 8930
- CPU
- Intel I9-9900K
- Memory
- 64GB
- Graphics Card(s)
- NVIDIA RTX 2060
- Sound Card
- NVIDIA High Definition Audio
- Monitor(s) Displays
- 4k Samsung
- Screen Resolution
- 3840 x 2160
- Hard Drives
- 512GB NVMe, ADATA SU 800, 2TB HDD
- Local time
- 5:49 PM
- Posts
- 4,164
- Location
-
Texas, USA
- OS
- Win11 Pro 24H2
-
-
#18
I’ll follow-up with some samples tomorrow (Thursday).
My Computers
-
- OS
- Win11 Pro 24H2
- Computer type
- PC/Desktop
- Manufacturer/Model
- Self-built
- CPU
- Intel i7 11700K
- Motherboard
- ASUS Prime Z590-A MB
- Memory
- 64GB (Waiting for warranty replacement of another 64GB for 128GB total)
- Graphics Card(s)
- No GPU — Built-in Intel Graphics
- Sound Card
- Integrated
- Monitor(s) Displays
- HP Envy 32
- Screen Resolution
- 2560 x 1440
- Hard Drives
- 1 x 1TB NVMe SSD
1 x 2TB NVMe SSD
1 x 4TB NVMe SSD
3 x 512GB 2.5″ SSD
1 x 4TB 2.5″ SSD
5 x 8TB Seagate Barracuda HDD
- PSU
- Corsair HX850i
- Case
- Corsair iCUE RGB 5000X mid tower case
- Cooling
- Noctua NF-S12A chromax.black.swap case fans (Qty. 7) & Home Computer Specifications, Configuration, and Usage Notes General Specifications ASUS Prime Z590-A motherboard, serial number M1M0KC222467ARP Intel Core i7-11700K CPU (11th Gen Rocket Lake / LGA 1200 Socket) 128GB Crucial Ballistix RGB DDR4 3200 MHz DRAM (4 x 32GB) Corsair iCUE RGB 5000X mid tower case Noctua NH-D15 chromax.black CPU cooler Noctua NF-S12A chromax.black.swap case fans (Qty. 7) & Corsair LL-120 RGB Fans (Qty. 3)
- Keyboard
- Corsair K70 Max RGB Magnetic Keyboard
- Mouse
- Logitech MX Master 3
- Internet Speed
- 1Gb Up / 1 Gb Down
- Browser
- Edge
- Antivirus
- Windows Defender
- Other Info
- The five 8TB drives and three 512GB SSDs are part of a DrivePool using StableBit DrivePool software. The three SSDs are devoted purely to caching for the 8TB drives. All of the important data is stored in triplicate so that I can withstand simultaneous failure of 2 disks.
Networking: 2.5Gbps Ethernet and WiFi 6e
-
- Operating System
- Win11 Pro 23H2
- Computer type
- Laptop
- Manufacturer/Model
- Lenovo ThinkBook 13x Gen 2
- CPU
- Intel i7-1255U
- Memory
- 16 GB
- Graphics card(s)
- Intel Iris Xe Graphics
- Sound Card
- Realtek® ALC3306-CG codec
- Monitor(s) Displays
- 13.3-inch IPS Display
- Screen Resolution
- WQXGA (2560 x 1600)
- Hard Drives
- 2 TB 4 x 4 NVMe SSD
- PSU
- USB-C / Thunderbolt 4 Power / Charging
- Mouse
- Buttonless Glass Precision Touchpad
- Keyboard
- Backlit, spill resistant keyboard
- Internet Speed
- 1Gb Up / 1Gb Down
- Browser
- Edge
- Antivirus
- Windows Defender
- Other Info
- WiFi 6e / Bluetooth 5.1 / Facial Recognition / Fingerprint Sensor / ToF (Time of Flight) Human Presence Sensor
- Local time
- 5:49 PM
- Posts
- 4,164
- Location
-
Texas, USA
- OS
- Win11 Pro 24H2
-
-
#19
Create media for automated unattended install of Windows 10
Once I have an answer file, if I am only making minor modifications, I will simply edit the file directly since it is simply a text file. However, for anyone not terribly familiar with answer files, you might want to load it into the Windows SIM as Kari instructs in the tutorial I linked to above.
Below are several sample answer files (as requested). I give a brief summary of each answer file prior to the file posting, but the comments within each answer file have a lot more detail.
This first answer file is FULLY UNATTENDED. It will wipe disk 0 when media with this answer file is booted without asking you are prompting you in any way. Be careful with this one!.
<?xml version="1.0" encoding="utf-8"?>
<!--
************
* WARNING! *
************
This answer file will cause Windows setup to WIPE disk 0 without any warning and to begin installation
to that disk. Change the disk number if installing to a disk other than disk 0.
******************
* END OF WARNING *
******************
Notes about this answer file:
It includes a Windows 10 / 11 Pro key.
It will install Windows to Disk 0.
It creates an Admin level user named "WinUser", full name "Windows User" with an initial password of "Password1".
Locale settings are set to United States English.
Time zone is set to US Central Time. Change this if needed.
It includes settings to bypass Windows 11 system requirements.
The size of the Recovery Tools partition created by this answer will be larger than normal at 2 GB. Change this if you are very short on space or prefer a smaller Recovery Tools partition.
This answer file can be used with both Windows 10 and 11. The settings to bypass
Windows 11 system requirement checks will have no effect on Windows 10.
END OF NOTES
-->
<unattend xmlns="urn:schemas-microsoft-com:unattend">
<settings pass="windowsPE">
<component name="Microsoft-Windows-International-Core-WinPE" processorArchitecture="amd64" publicKeyToken="31bf3856ad364e35" language="neutral" versionScope="nonSxS" xmlns:wcm="http://schemas.microsoft.com/WMIConfig/2002/State" xmlns:xsi="http://www.w3.org/2001/XMLSchema-instance">
<SetupUILanguage>
<UILanguage>en-US</UILanguage>
</SetupUILanguage>
<InputLocale>en-US</InputLocale>
<SystemLocale>en-US</SystemLocale>
<UILanguage>en-US</UILanguage>
<UILanguageFallback>en-US</UILanguageFallback>
<UserLocale>en-US</UserLocale>
</component>
<component name="Microsoft-Windows-Setup" processorArchitecture="amd64" publicKeyToken="31bf3856ad364e35" language="neutral" versionScope="nonSxS" xmlns:wcm="http://schemas.microsoft.com/WMIConfig/2002/State" xmlns:xsi="http://www.w3.org/2001/XMLSchema-instance">
<ImageInstall>
<OSImage>
<InstallTo>
<DiskID>0</DiskID>
<PartitionID>4</PartitionID>
</InstallTo>
<!--
Below you will find 6 lines that are commented out. These lines will allow you to specify a specific Windows edition to install
in those case where your Windows image has more than one of the same edition. As an example, suppose that you have more than
one Windows Pro edition. Maybe one of these is a standard Windows Pro edition, and another has Windows Pro with drivers added
for use in a specific system. If you are specifying a generic Windows Pro key for installation, setup will pause and expect
you to specify which Windows Pro edition to install since there is more than one. By uncommenting the section below, you
are telling setup exactly which one of these to install. Make sure to update the index value to the correct value for
your situation. You can ignore this if you are using a standard retail Windows installation media.
Note that you can also change the value for "key" to /IMAGE/NAME or /IMAGE/DESCRIPTION to specify the edition to be
installed by NAME or DESCRIPTION rather than by index number.
-->
<!--
<InstallFrom>
<MetaData wcm:action="add">
<Key>/IMAGE/INDEX</Key>
<Value>6</Value>
</MetaData>
</InstallFrom>
-->
</OSImage>
</ImageInstall>
<UserData>
<ProductKey>
<Key>VK7JG-NPHTM-C97JM-9MPGT-3V66T</Key>
</ProductKey>
<AcceptEula>true</AcceptEula>
</UserData>
<RunSynchronous>
<RunSynchronousCommand wcm:action="add">
<Order>1</Order>
<Path>reg add HKLM\System\Setup\LabConfig /v BypassTPMCheck /t reg_dword /d 0x00000001 /f</Path>
</RunSynchronousCommand>
<RunSynchronousCommand wcm:action="add">
<Order>2</Order>
<Path>reg add HKLM\System\Setup\LabConfig /v BypassSecureBootCheck /t reg_dword /d 0x00000001 /f</Path>
</RunSynchronousCommand>
<RunSynchronousCommand wcm:action="add">
<Order>3</Order>
<Path>reg add HKLM\System\Setup\LabConfig /v BypassRAMCheck /t reg_dword /d 0x00000001 /f</Path>
</RunSynchronousCommand>
<RunSynchronousCommand wcm:action="add">
<Order>4</Order>
<Path>reg add HKLM\System\Setup\LabConfig /v BypassCPUCheck /t reg_dword /d 0x00000001 /f</Path>
</RunSynchronousCommand>
</RunSynchronous>
<DiskConfiguration>
<Disk wcm:action="add">
<CreatePartitions>
<CreatePartition wcm:action="add">
<Order>1</Order>
<Size>2048</Size>
<Type>Primary</Type>
</CreatePartition>
<CreatePartition wcm:action="add">
<Order>2</Order>
<Size>260</Size>
<Type>EFI</Type>
</CreatePartition>
<CreatePartition wcm:action="add">
<Order>3</Order>
<Size>128</Size>
<Type>MSR</Type>
</CreatePartition>
<CreatePartition wcm:action="add">
<Extend>true</Extend>
<Order>4</Order>
<Type>Primary</Type>
</CreatePartition>
</CreatePartitions>
<ModifyPartitions>
<ModifyPartition wcm:action="add">
<Format>NTFS</Format>
<Label>WinRE</Label>
<Order>1</Order>
<PartitionID>1</PartitionID>
<TypeID>DE94BBA4-06D1-4D40-A16A-BFD50179D6AC</TypeID>
</ModifyPartition>
<ModifyPartition wcm:action="add">
<Format>FAT32</Format>
<Label>System</Label>
<Order>2</Order>
<PartitionID>2</PartitionID>
</ModifyPartition>
<ModifyPartition wcm:action="add">
<Order>3</Order>
<PartitionID>3</PartitionID>
</ModifyPartition>
<ModifyPartition wcm:action="add">
<Format>NTFS</Format>
<Label>Windows</Label>
<Letter>C</Letter>
<Order>4</Order>
<PartitionID>4</PartitionID>
</ModifyPartition>
</ModifyPartitions>
<DiskID>0</DiskID>
<WillWipeDisk>true</WillWipeDisk>
</Disk>
</DiskConfiguration>
</component>
</settings>
<settings pass="oobeSystem">
<component name="Microsoft-Windows-International-Core" processorArchitecture="amd64" publicKeyToken="31bf3856ad364e35" language="neutral" versionScope="nonSxS" xmlns:wcm="http://schemas.microsoft.com/WMIConfig/2002/State" xmlns:xsi="http://www.w3.org/2001/XMLSchema-instance">
<InputLocale>en-US</InputLocale>
<SystemLocale>en-US</SystemLocale>
<UILanguage>en-US</UILanguage>
<UILanguageFallback>en-US</UILanguageFallback>
<UserLocale>en-US</UserLocale>
</component>
<component name="Microsoft-Windows-Shell-Setup" processorArchitecture="amd64" publicKeyToken="31bf3856ad364e35" language="neutral" versionScope="nonSxS" xmlns:wcm="http://schemas.microsoft.com/WMIConfig/2002/State" xmlns:xsi="http://www.w3.org/2001/XMLSchema-instance">
<OOBE>
<HideEULAPage>true</HideEULAPage>
<HideOEMRegistrationScreen>true</HideOEMRegistrationScreen>
<HideOnlineAccountScreens>true</HideOnlineAccountScreens>
<HideWirelessSetupInOOBE>true</HideWirelessSetupInOOBE>
<ProtectYourPC>1</ProtectYourPC>
<UnattendEnableRetailDemo>false</UnattendEnableRetailDemo>
</OOBE>
<UserAccounts>
<LocalAccounts>
<LocalAccount wcm:action="add">
<Password>
<Value>UABhAHMAcwB3AG8AcgBkADEAUABhAHMAcwB3AG8AcgBkAA==</Value>
<PlainText>false</PlainText>
</Password>
<DisplayName>Windows User</DisplayName>
<Group>Administrators</Group>
<Name>WinUser</Name>
</LocalAccount>
</LocalAccounts>
</UserAccounts>
<TimeZone>Central Standard Time</TimeZone>
<AutoLogon>
<Enabled>true</Enabled>
<LogonCount>1</LogonCount>
<Username>WinUser</Username>
<Password>
<Value>UABhAHMAcwB3AG8AcgBkADEAUABhAHMAcwB3AG8AcgBkAA==</Value>
<PlainText>false</PlainText>
</Password>
</AutoLogon>
<FirstLogonCommands>
<SynchronousCommand wcm:action="add">
<CommandLine>reg add "HKLM\SOFTWARE\Microsoft\Windows NT\CurrentVersion\Winlogon" /v AutoLogonCount /t REG_DWORD /d 0 /f</CommandLine>
<Order>1</Order>
</SynchronousCommand>
</FirstLogonCommands>
</component>
</settings>
<settings pass="specialize">
<component name="Microsoft-Windows-Shell-Setup" processorArchitecture="amd64" publicKeyToken="31bf3856ad364e35" language="neutral" versionScope="nonSxS" xmlns:wcm="http://schemas.microsoft.com/WMIConfig/2002/State" xmlns:xsi="http://www.w3.org/2001/XMLSchema-instance">
<OEMName></OEMName>
<TimeZone>Central Standard Time</TimeZone>
<ComputerName></ComputerName>
</component>
</settings>
<cpi:offlineImage cpi:source="catalog://godzilla/data/windows/windows tools and deployment apps/assets and tools for deployment/catalog files for windows sim/windows 11 22h2 catalog files/install_windows 11 pro.clg" xmlns:cpi="urn:schemas-microsoft-com:cpi" />
</unattend>This next answer file does nothing other than to bypass the Windows 11 system requiremements:
<?xml version="1.0" encoding="utf-8"?>
<!--
Notes about this answer file:

The purpose of this answer file is to simply bypass the Windows 11 system requirement checks. It does NOT perform
an unattended instalation of Windows.

It includes a Windows 10 / 11 Pro key.

It includes settings to bypass Windows 11 system requirements.

This answer file can be used with both Windows 10 and 11. The settings to bypass Windows 11
system requirement checks will have no effect on Windows 10.

END OF NOTES
-->
<unattend xmlns="urn:schemas-microsoft-com:unattend">
    <settings pass="windowsPE">
        <component name="Microsoft-Windows-Setup" processorArchitecture="amd64" publicKeyToken="31bf3856ad364e35" language="neutral" versionScope="nonSxS" xmlns:wcm="http://schemas.microsoft.com/WMIConfig/2002/State" xmlns:xsi="http://www.w3.org/2001/XMLSchema-instance">
            <ImageInstall>
                <OSImage>
                    <InstallFrom>
                        <Path>\install.wim</Path>
                        <!--
Below you will find 4 lines that are commented out. These lines will allow you to specify a specific Windows edition to install
in those case where your Windows image has more than one of the same edition. As an example, suppose that you have more than
one Windows Pro edition. Maybe one of these is a standard Windows Pro edition, and another has Windows Pro with drivers added
for use in a specific system. If you are specifying a generic Windows Pro key for installation, setup will pause and expect
you to specify which Windows Pro edition to install since there is more than one. By uncommenting the section below, you
are telling setup exactly which one of these to install. Make sure to update the index value to the correct value for
your situation. You can ignore this if you are using a standard retail Windows installation media.

Note that you can also change the value for "key"  to /IMAGE/NAME or /IMAGE/DESCRIPTION to specify the edition to be
installed by NAME or DESCRIPTION rather than by index number.
-->
                        <!--
                        <MetaData wcm:action="add">
                            <Key>/IMAGE/INDEX</Key>
                            <Value>6</Value>
                        </MetaData>
-->
                    </InstallFrom>
                </OSImage>
            </ImageInstall>
            <UserData>
                <ProductKey>
                    <Key>VK7JG-NPHTM-C97JM-9MPGT-3V66T</Key>
                </ProductKey>
                <AcceptEula>true</AcceptEula>
            </UserData>
            <RunSynchronous>
                <RunSynchronousCommand wcm:action="add">
                    <Order>1</Order>
                    <Path>reg add HKLM\System\Setup\LabConfig /v BypassTPMCheck /t reg_dword /d 0x00000001 /f</Path>
                </RunSynchronousCommand>
                <RunSynchronousCommand wcm:action="add">
                    <Order>2</Order>
                    <Path>reg add HKLM\System\Setup\LabConfig /v BypassSecureBootCheck /t reg_dword /d 0x00000001 /f</Path>
                </RunSynchronousCommand>
                <RunSynchronousCommand wcm:action="add">
                    <Order>3</Order>
                    <Path>reg add HKLM\System\Setup\LabConfig /v BypassRAMCheck /t reg_dword /d 0x00000001 /f</Path>
                </RunSynchronousCommand>
                <RunSynchronousCommand wcm:action="add">
                    <Order>4</Order>
                    <Path>reg add HKLM\System\Setup\LabConfig /v BypassCPUCheck /t reg_dword /d 0x00000001 /f</Path>
                </RunSynchronousCommand>
            </RunSynchronous>
        </component>
    </settings>
    <cpi:offlineImage cpi:source="catalog://godzilla/data/windows/windows tools and deployment apps/assets and tools for deployment/catalog files for windows sim/windows 11 22h2 catalog files/install_windows 11 pro.clg" xmlns:cpi="urn:schemas-microsoft-com:cpi" />
</unattend>
This next answer file is just like the last one above except that in addition to bypassing Win 11 requirements, this one will also create a local user account for you automatically.
<?xml version="1.0" encoding="utf-8"?>
<!--
Notes about this answer file:

The purpose of this answer file is to bypass the Windows 11 system requirement checks, create a local user account, and
eliminate the need for an internet connection during setup. It does NOT perform an unattended installation of Windows.

It includes a Windows 10 / 11 Pro key.

It will create a local user account named "WinUser" with a full name of "Windows User" and a password of "Password1".

This answer file can also be used to setup Windows 10 since the setting to bypass Windows 11 requirement checks will
have no effect upon Windows 10 setup.

END OF NOTES
-->
<unattend xmlns="urn:schemas-microsoft-com:unattend">
    <settings pass="windowsPE">
        <component name="Microsoft-Windows-Setup" processorArchitecture="amd64" publicKeyToken="31bf3856ad364e35" language="neutral" versionScope="nonSxS" xmlns:wcm="http://schemas.microsoft.com/WMIConfig/2002/State" xmlns:xsi="http://www.w3.org/2001/XMLSchema-instance">
            <ImageInstall>
                <OSImage>
                    <InstallFrom>
                        <Path>\install.wim</Path>
                        <!--
Below you will find 4 lines that are commented out. These lines will allow you to specify a specific Windows edition to install
in those case where your Windows image has more than one of the same edition. As an example, suppose that you have more than
one Windows Pro edition. Maybe one of these is a standard Windows Pro edition, and another has Windows Pro with drivers added
for use in a specific system. If you are specifying a generic Windows Pro key for installation, setup will pause and expect
you to specify which Windows Pro edition to install since there is more than one. By uncommenting the section below, you
are telling setup exactly which one of these to install. Make sure to update the index value to the correct value for
your situation. You can ignore this if you are using a standard retail Windows installation media.

Note that you can also change the value for "key"  to /IMAGE/NAME or /IMAGE/DESCRIPTION to specify the edition to be
installed by NAME or DESCRIPTION rather than by index number.
-->
                        <!--
                        <MetaData wcm:action="add">
                            <Key>/IMAGE/INDEX</Key>
                            <Value>6</Value>
                        </MetaData>
-->
                    </InstallFrom>
                </OSImage>
            </ImageInstall>
            <UserData>
                <ProductKey>
                    <Key>VK7JG-NPHTM-C97JM-9MPGT-3V66T</Key>
                </ProductKey>
                <AcceptEula>true</AcceptEula>
            </UserData>
            <RunSynchronous>
                <RunSynchronousCommand wcm:action="add">
                    <Order>1</Order>
                    <Path>reg add HKLM\System\Setup\LabConfig /v BypassTPMCheck /t reg_dword /d 0x00000001 /f</Path>
                </RunSynchronousCommand>
                <RunSynchronousCommand wcm:action="add">
                    <Order>2</Order>
                    <Path>reg add HKLM\System\Setup\LabConfig /v BypassSecureBootCheck /t reg_dword /d 0x00000001 /f</Path>
                </RunSynchronousCommand>
                <RunSynchronousCommand wcm:action="add">
                    <Order>3</Order>
                    <Path>reg add HKLM\System\Setup\LabConfig /v BypassRAMCheck /t reg_dword /d 0x00000001 /f</Path>
                </RunSynchronousCommand>
                <RunSynchronousCommand wcm:action="add">
                    <Order>4</Order>
                    <Path>reg add HKLM\System\Setup\LabConfig /v BypassCPUCheck /t reg_dword /d 0x00000001 /f</Path>
                </RunSynchronousCommand>
            </RunSynchronous>
        </component>
    </settings>
    <settings pass="oobeSystem">
        <component name="Microsoft-Windows-Shell-Setup" processorArchitecture="amd64" publicKeyToken="31bf3856ad364e35" language="neutral" versionScope="nonSxS" xmlns:wcm="http://schemas.microsoft.com/WMIConfig/2002/State" xmlns:xsi="http://www.w3.org/2001/XMLSchema-instance">
            <UserAccounts>
                <LocalAccounts>
                    <LocalAccount wcm:action="add">
                        <Password>
                            <Value>UABhAHMAcwB3AG8AcgBkADEAUABhAHMAcwB3AG8AcgBkAA==</Value>
                            <PlainText>false</PlainText>
                        </Password>
                        <DisplayName>Windows User</DisplayName>
                        <Group>Administrators</Group>
                        <Name>WinUser</Name>
                    </LocalAccount>
                </LocalAccounts>
            </UserAccounts>
            <OOBE>
                <HideWirelessSetupInOOBE>true</HideWirelessSetupInOOBE>
                <UnattendEnableRetailDemo>false</UnattendEnableRetailDemo>
                <HideEULAPage>true</HideEULAPage>
                <HideOEMRegistrationScreen>true</HideOEMRegistrationScreen>
                <HideOnlineAccountScreens>true</HideOnlineAccountScreens>
                <ProtectYourPC>1</ProtectYourPC>
            </OOBE>
        </component>
    </settings>
</unattend>
Hopefully the above examples give you some ideas. If you have any specific questions related to this, let me know and I will try my best to answer.
My Computers
-
- OS
- Win11 Pro 24H2
- Computer type
- PC/Desktop
- Manufacturer/Model
- Self-built
- CPU
- Intel i7 11700K
- Motherboard
- ASUS Prime Z590-A MB
- Memory
- 64GB (Waiting for warranty replacement of another 64GB for 128GB total)
- Graphics Card(s)
- No GPU — Built-in Intel Graphics
- Sound Card
- Integrated
- Monitor(s) Displays
- HP Envy 32
- Screen Resolution
- 2560 x 1440
- Hard Drives
- 1 x 1TB NVMe SSD
1 x 2TB NVMe SSD
1 x 4TB NVMe SSD
3 x 512GB 2.5″ SSD
1 x 4TB 2.5″ SSD
5 x 8TB Seagate Barracuda HDD
- PSU
- Corsair HX850i
- Case
- Corsair iCUE RGB 5000X mid tower case
- Cooling
- Noctua NF-S12A chromax.black.swap case fans (Qty. 7) & Home Computer Specifications, Configuration, and Usage Notes General Specifications ASUS Prime Z590-A motherboard, serial number M1M0KC222467ARP Intel Core i7-11700K CPU (11th Gen Rocket Lake / LGA 1200 Socket) 128GB Crucial Ballistix RGB DDR4 3200 MHz DRAM (4 x 32GB) Corsair iCUE RGB 5000X mid tower case Noctua NH-D15 chromax.black CPU cooler Noctua NF-S12A chromax.black.swap case fans (Qty. 7) & Corsair LL-120 RGB Fans (Qty. 3)
- Keyboard
- Corsair K70 Max RGB Magnetic Keyboard
- Mouse
- Logitech MX Master 3
- Internet Speed
- 1Gb Up / 1 Gb Down
- Browser
- Edge
- Antivirus
- Windows Defender
- Other Info
- The five 8TB drives and three 512GB SSDs are part of a DrivePool using StableBit DrivePool software. The three SSDs are devoted purely to caching for the 8TB drives. All of the important data is stored in triplicate so that I can withstand simultaneous failure of 2 disks.
Networking: 2.5Gbps Ethernet and WiFi 6e
-
- Operating System
- Win11 Pro 23H2
- Computer type
- Laptop
- Manufacturer/Model
- Lenovo ThinkBook 13x Gen 2
- CPU
- Intel i7-1255U
- Memory
- 16 GB
- Graphics card(s)
- Intel Iris Xe Graphics
- Sound Card
- Realtek® ALC3306-CG codec
- Monitor(s) Displays
- 13.3-inch IPS Display
- Screen Resolution
- WQXGA (2560 x 1600)
- Hard Drives
- 2 TB 4 x 4 NVMe SSD
- PSU
- USB-C / Thunderbolt 4 Power / Charging
- Mouse
- Buttonless Glass Precision Touchpad
- Keyboard
- Backlit, spill resistant keyboard
- Internet Speed
- 1Gb Up / 1Gb Down
- Browser
- Edge
- Antivirus
- Windows Defender
- Other Info
- WiFi 6e / Bluetooth 5.1 / Facial Recognition / Fingerprint Sensor / ToF (Time of Flight) Human Presence Sensor
- Local time
- 3:49 PM
- Posts
- 3,733
- Location
-
CA
- OS
- Windows 11 Pro
-
-
#20
You do not run msoobe.exe, you run a .cmd script in the OOBE folder called BypassNRO.cmd.View attachment 58902
That is still the same with Build 26200.5001, at least for now.
Attachments

My Computer
-
- OS
- Windows 11 Pro
- Computer type
- PC/Desktop
- Manufacturer/Model
- Dell XPS 8930
- CPU
- Intel I9-9900K
- Memory
- 64GB
- Graphics Card(s)
- NVIDIA RTX 2060
- Sound Card
- NVIDIA High Definition Audio
- Monitor(s) Displays
- 4k Samsung
- Screen Resolution
- 3840 x 2160
- Hard Drives
- 512GB NVMe, ADATA SU 800, 2TB HDD
Similar threads
-
Windows Support Forums
-
Installation, Updates and Activation
Windows setup could not configure windows to run on this computer’s hardware
Вы — уверенный пользователь компьютера и Вам не чужда самостоятельная установка операционной системы семейства Windows на свой ПК или лэптоп. Но вот, скачав «свеженький» образ любимой версии ОСИ, и приступив к установке, ближе к завершению процесса появляется бонус в виде сообщения «Windows setup could not configure windows to run on this computer’s hardware» и что делать? Как поступить? Данная ошибка может завести в тупик, как было и со мной. Решение элементарное и простое, займет всего пару минут. Сталкиваясь с данной проблемой довольно часто, решил поведать секрет её устранения. Да, ошибка Windows setup could not configure windows to run on this computer’s hardware может появиться в процессе установки или обновления Windows 7, 8, 8.1, 10,11

ЧТО ОЗНАЧАЕТ ОШИБКА «Windows setup could not configure windows to run on this computer’s hardware»?
О чем говорит ошибка «Windows setup could not configure windows to run on this computer’s hardware»? В точном переводе это звучит так: Программе установки Windows не удалось настроить Windows для работы с оборудованием этого компьютера. Случается это из-за неверно настроенных системных настроек (извиняюсь за тавтологию) или нерегулярными записями в реестре Windows.
Исходя из этих данных, многие, впервые встретившие данное сообщение, начинают тщательно проверять настройки BIOS, меняя знакомые и неизвестные параметры. Но результата нет.

КАК УСТРАНИТЬ ОШИБКУ «Windows setup could not configure windows to run on this computer’s hardware»?
Ошибка Windows setup could not configure windows to run on this computer’s hardware, возникающая во время установки Виндовс решается так:
1) Если вы перезагрузили ПК / ноутбук? вам понадобиться заново спровоцировать эту ошибку: включить ноутбук и дождаться сообщения Windows setup could not configure windows to run on this computer’s hardware.
2) Одновременно нажимаем Shift+F10. ( появится черное консольное окно)
3) Прописываем в этом окне строку C:\Windows\System32\oobe\msoobe.exe . (возможно, у кого-то уже будет прописано C:\Windows\System32\ вам останется только дописать oobe\msoobe.exe)
4) Подождите 5 секунд, появится окно , где вам будет предложено вписать имя ПК. Далее продолжить обычный процесс установки Wibdows.
5) После этих, не сложных манипуляций, у вас опять появится это же окно с ошибкой, не бойтесь нажать «ок» и перезагрузить компьютер. Windows будет исправно работать.
!!!ЕСЛИ НЕ ПОМОГЛО!!!
Бывает, что выше преведенный способ, не помогает. Есть еще одно решение проблемы с «Windows setup could not configure windows to run on this computer’s hardware».
В таком случае, Вам придётся запустить установку Windows заново. На этапе разметки диска нужно проделать следующее:
1. Удалить диск С и все служебные разделы (при разметке MBR он будет 1, при GPT — 2 или 3)
2. Продолжить установку виндовс в НЕРАЗМЕЧЕННУЮ область (Не нажимать кнопку СОЗДАТЬ, отметить курсором неразмеченную область и нажать ДАЛЕЕ!!!)

Надеюсь, что данная статья оказалась для Вас полезной и Вы сэкономили время и деньги. Буду благодарен, если Вы нажмете кнопку «Поделиться» внизу страницы, я старался).

How to fix the OOBE error that may occur during Windows 10 install.
OOBE stands for “Out Of Box Experience” which is a type of install designed to make things easy when a customer switches on their brand new computer.
The following instructions apply if you are installing a fresh copy of Windows 10 on an older computer and run into this error.
(If you receive the OOBE error on a brand new computer, consider switching off and returning it to the vendor).
How To Fix OOBEKEYBOARD Error
- Open Command Promt
When you are on the screen that displays the OOBEKEYBORD error, press Shift + F10 to open the command prompt.
- Type the following command lines, followed by Enter after each one. Changing user_name & password to your own.
net user Administrator /active:yes
net user /add user_name password
net localgroup administrators user_name /add
cd %windir%\system32\oobe
msoobe.exe - Shutdown the computer & switch back on.
On entering the command to run msoobe.exe the message “Just A Moment” may hang on the screen. Force shutdown (press & hold power button) and start back up.
- Once Windows Loads, Sign out of Administrator
Log out of the Administrator account and sign in to your own newly created local account.
- Mark Administrator To Active:No
Once signed in to your own account, open command prompt as Admin and enter the following command:
net user Administrator /active:no
What These Instructions Have Just Done:
We have bypassed the part of the installation that asks for region, keyboard, network setup etc. This will all have to be corrected.
Go in and select the correct region, enter your network details and begin manually running Windows Updates.
What we have done is open up the (normally inactive) Administrator account to be able to manually add user details and progress with signing in.
It is strongly advised completing the above Step 5 and marking the Administrator account as inactive once you have gained access. You may need this account intact at a later date, or your tech support people may need this left alone to carry out future repairs.
If This Has Helped…
If this article has helped at all and solved the problem. Can we ask you to Subscribe to our YouTube channel. On the Computroon YouTube channel we post regular tech tips & tutorials. Here’s the link. www.youtube.com/computroon
Many thanks.