
-
daforkboy 😊peaceful
1) останавливаем службу лицензирования терминала net stop termservlicensing
2) удаляем C:\WINDOWS\system32\LServer\TLSLic.edb
3) запускаем службу net start termservlicensing
4) запускаем licmgr.exe
5) вводим маркер лицензий
6) останавливаем службу net stop termservlicensing
7) создаем копию C:\WINDOWS\system32\LServer\
на случий повторного сброса (остановить службу и заменить копией оригинал)
 запускаем службу net start termservlicensing
теоретически так, но надо проверять, когда время прийдет
Download Windows Speedup Tool to fix errors and make PC run faster
By default Windows 11/10/8/7 syncs your system time with Internet servers on a weekly basis. If you want to manually sync and update your system time with an Internet Time server like time.windows,com, you have to right-click on the Time in the taskbar > Adjust Time & date > Additional clocks > Internet Time tab > Change settings > Update now.
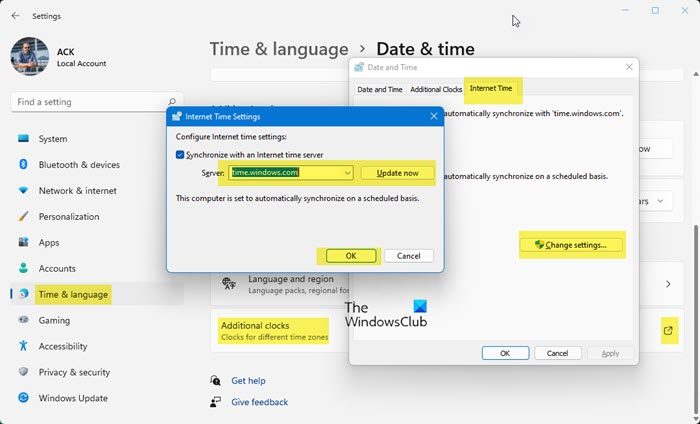
But what if you want to sync your time automatically, with the servers more frequently – like say daily? You may have your reasons for wanting to change this to daily – or even on a monthly basis! Let us see how you can do it. Before we proceed, let’s learn a few things about how Time synchronization works on Windows.
Windows Time Service – W32Time.exe
The Windows Time Service or W32Time.exe maintains date and time synchronization on all clients and servers in the network. If this service is stopped, date and time synchronization will be unavailable. If this service is disabled, any services that explicitly depend on it will fail to start.
Many Registry entries for the Windows Time service are the same as the Group Policy setting of the same name. The Group Policy settings correspond to the registry entries of the same name located in:
HKEY_LOCAL_MACHINE\SYSTEM\CurrentControlSet\Services\W32Time\
Windows Time Service Tool – W32tm.exe
W32tm.exe or the Windows Time Service Tool can be used to configure Windows Time Service settings. It can also be used to diagnose problems with the time service. W32tm.exe is the preferred command-line tool for configuring, monitoring, or troubleshooting the Windows Time service. TechNet throws more light on this.
To use this tool, you will have to open an elevated command prompt, type W32tm /? and hit Enter to get the list of all its parameters. When w32tm /resync is run, it tells the computer to synchronize its clock right away. When I ran this command I received the following error: The service has not been started. So the Windows Time service has to be started for this to work.
1] Using Task Scheduler
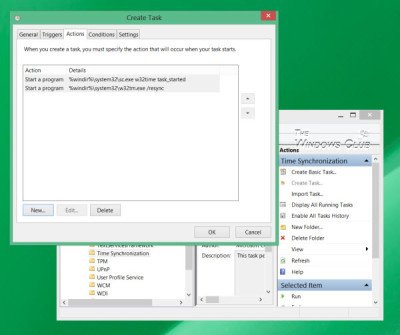
Now if you were to create a task using the Task Scheduler, to run the Windows Time Service and this sync command on a daily basis, as a Local Service with the highest privileges, you would be able to make your Windows computer synchronize your system time every day.
You will have to open the Task Scheduler and navigate to Task Scheduler Library > Microsoft > Windows > Time Synchronization. Now you will have to click on the Create Task… link to create the task. This post will tell you in detail how to schedule a task using Task Scheduler.
Under Actions, you would have to choose Start a program %windir%\system32\sc.exe with arguments start w32time task_started. This will ensure that the Windows Time service is running. You may then set the second action to Start a program %windir%\system32\w32tm.exe with the argument /resync. The other settings you may choose as per your personal preferences.
TIP: You can also change Time Zone with tzutil.exe.
2] Using Registry Editor
You can also see if this works for you. Open Windows Registry Editor and navigate to the following registry key:
HKEY_LOCAL_MACHINE\SYSTEM\ControlSet\Services\W32Time\TimeProviders\NtpClient
Select SpecialPollInterval.
This SpecialPollInterval entry specifies the special poll interval in seconds for manual peers. When the SpecialInterval 0x1 flag is enabled, W32Time uses this poll interval instead of a poll interval determined by the operating system. The default value on domain members is 3600.
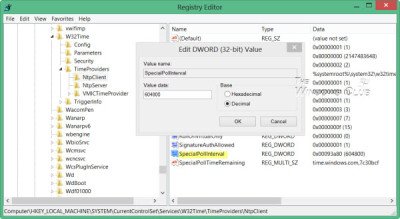
The default value on stand-alone clients and servers is 604,800. 604800 seconds is 7 days. So you may change this decimal value to 86400 to make it sync every 24 hours.
NOTE/UPDATE: OldFuddyDuddy adds below in the comments:
A much simpler and more robust registry change is to modify value of UpdateInterval:
Computer\HKEY_LOCAL_MACHINE\SYSTEM\CurrentControlSet\Services\W32Time\Config\UpdateInterval
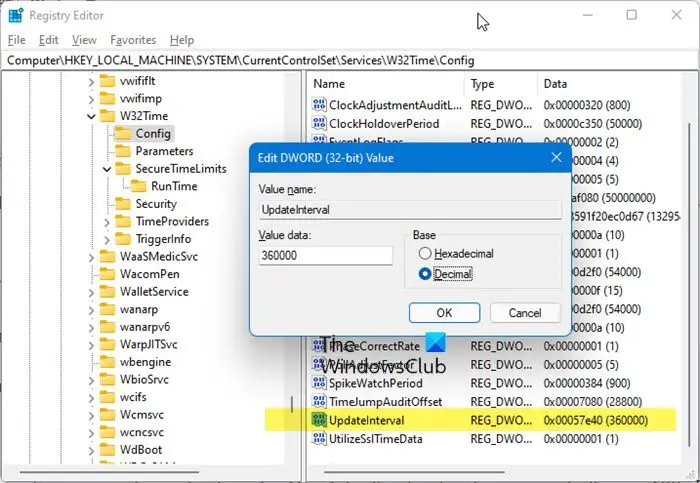
UdateInterval specifies the number of clock ticks between phase correction adjustments. The default value for domain controllers is 100. The default value for domain members is 30,000. The default value for stand-alone clients and servers is 360,000.
There is also the easy way out!
This freeware tool from DougKnox.com lets you change the Internet Time Update interval from Weekly to Daily or Hourly.
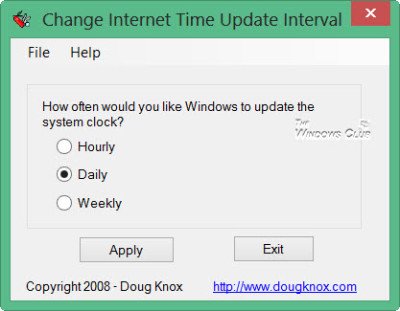
You will have to run the tool as an administrator.
Read: Check the accuracy of your system clock.
This post will help you if your Time Synchronization fails with the error – Windows Time Service not working.
Anand Khanse is the Admin of TheWindowsClub.com, a 10-year Microsoft MVP (2006-16) & a Windows Insider MVP (2016-2022). Please read the entire post & the comments first, create a System Restore Point before making any changes to your system & be careful about any 3rd-party offers while installing freeware.
Reader Interactions

This tutorial will show you how to completely reset Windows Update components and policies to default in Windows 10 and Windows 11.
Windows Update keeps Windows 11 updated by automatically downloading and installing the latest updates, drivers, and hotfixes released by Microsoft.
Sometimes you may have an issue with Windows Update such as not being able to download or install updates, error messages, not being able to search for new updates, pending updates issue, etc. These kind of issues can occur when the Windows Update database or components are corrupted, one or more services related to Windows Update are not running, etc.
Resetting the Windows Update components can usually solve these types of issues.
References:
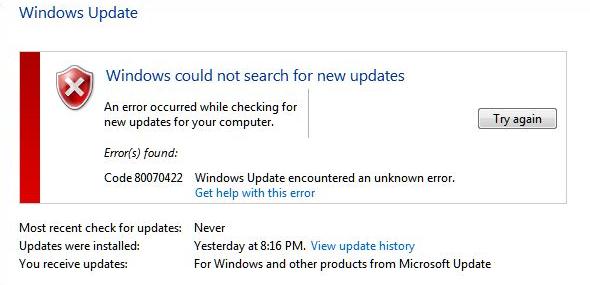
EXAMPLE: Windows Update

Here’s How:
1 Click/tap on the Download button below to download the ZIP file below.
Reset_Reregister_Windows_Update_Components_for_Windows11.zip
(Content of BAT file for reference)
Code:
@echo off

:: Prompt to Run as administrator
Set "Variable=0" & if exist "%temp%\getadmin.vbs" del "%temp%\getadmin.vbs"
fsutil dirty query %systemdrive%  >nul 2>&1 && goto :(Privileges_got)
If "%1"=="%Variable%" (echo. &echo. Please right-click on the file and select &echo. "Run as administrator". &echo. Press any key to exit. &pause>nul 2>&1& exit)
cmd /u /c echo Set UAC = CreateObject^("Shell.Application"^) : UAC.ShellExecute "%~0", "%Variable%", "", "runas", 1 > "%temp%\getadmin.vbs"&cscript //nologo "%temp%\getadmin.vbs" & exit
:(Privileges_got)

:: Checking and Stopping the Windows Update services
set b=0

:bits
set /a b=%b%+1
if %b% equ 3 (
   goto end1
)
net stop bits
echo Checking the bits service status.
sc query bits | findstr /I /C:"STOPPED"
if not %errorlevel%==0 (
    goto bits
)
goto loop2

:end1
cls
echo.
echo Cannot reset Windows Update since "Background Intelligent Transfer Service" (bits) service failed to stop. Please restart the computer, and try again.
echo.
pause
goto Start


:loop2
set w=0

:wuauserv
set /a w=%w%+1
if %w% equ 3 (
   goto end2
)
net stop wuauserv
echo Checking the wuauserv service status.
sc query wuauserv | findstr /I /C:"STOPPED"
if not %errorlevel%==0 (
    goto wuauserv
)
goto loop3

:end2
cls
echo.
echo Cannot reset Windows Update since "Windows Update" (wuauserv) service failed to stop. Please restart the computer, and try again.
echo.
pause
goto Start


:loop3
set c=0

:cryptsvc
set /a c=%c%+1
if %c% equ 3 (
   goto end4
)
net stop cryptsvc
echo Checking the cryptsvc service status.
sc query cryptsvc | findstr /I /C:"STOPPED"
if not %errorlevel%==0 (
    goto cryptsvc
)
goto Reset

:end4
cls
echo.
echo Cannot reset Windows Update since "Cryptographic Services" (cryptsvc) service failed to stop. Please restart the computer, and try again.
echo.
pause
goto Start


:Reset
Ipconfig /flushdns
del /s /q /f "%ALLUSERSPROFILE%\Application Data\Microsoft\Network\Downloader\qmgr*.dat"
del /s /q /f "%ALLUSERSPROFILE%\Microsoft\Network\Downloader\qmgr*.dat"
del /s /q /f "%SYSTEMROOT%\Logs\WindowsUpdate\*"

if exist "C:\$WinREAgent" rmdir /s /q "C:\$WinREAgent"

if exist "%SYSTEMROOT%\winsxs\pending.xml.bak" del /s /q /f "%SYSTEMROOT%\winsxs\pending.xml.bak"
if exist "%SYSTEMROOT%\winsxs\pending.xml" (
    takeown /f "%SYSTEMROOT%\winsxs\pending.xml"
    attrib -r -s -h /s /d "%SYSTEMROOT%\winsxs\pending.xml"
    ren "%SYSTEMROOT%\winsxs\pending.xml" pending.xml.bak
)

if exist "%SYSTEMROOT%\SoftwareDistribution\DataStore.bak" rmdir /s /q "%SYSTEMROOT%\SoftwareDistribution\DataStore.bak"
if exist "%SYSTEMROOT%\SoftwareDistribution\DataStore" (
    attrib -r -s -h /s /d "%SYSTEMROOT%\SoftwareDistribution\DataStore"
    ren "%SYSTEMROOT%\SoftwareDistribution\DataStore" DataStore.bak
)

if exist "%SYSTEMROOT%\SoftwareDistribution\Download.bak" rmdir /s /q "%SYSTEMROOT%\SoftwareDistribution\Download.bak"
if exist "%SYSTEMROOT%\SoftwareDistribution\Download" (
    attrib -r -s -h /s /d "%SYSTEMROOT%\SoftwareDistribution\Download"
    ren "%SYSTEMROOT%\SoftwareDistribution\Download" Download.bak
)

if exist "%SYSTEMROOT%\system32\Catroot2.bak" rmdir /s /q "%SYSTEMROOT%\system32\Catroot2.bak"
if exist "%SYSTEMROOT%\system32\Catroot2" (
    attrib -r -s -h /s /d "%SYSTEMROOT%\system32\Catroot2"
    ren "%SYSTEMROOT%\system32\Catroot2" Catroot2.bak
)


:: Reset Windows Update policies
reg delete "HKCU\SOFTWARE\Policies\Microsoft\Windows\WindowsUpdate" /f
reg delete "HKCU\SOFTWARE\Microsoft\Windows\CurrentVersion\Policies\WindowsUpdate" /f
reg delete "HKLM\SOFTWARE\Policies\Microsoft\Windows\WindowsUpdate" /f
reg delete "HKLM\SOFTWARE\Microsoft\Windows\CurrentVersion\Policies\WindowsUpdate" /f
gpupdate /force


:: Reset the BITS service and the Windows Update service to the default security descriptor
sc.exe sdset bits D:(A;CI;CCDCLCSWRPWPDTLOCRSDRCWDWO;;;SY)(A;;CCDCLCSWRPWPDTLOCRSDRCWDWO;;;BA)(A;;CCLCSWLOCRRC;;;IU)(A;;CCLCSWLOCRRC;;;SU)
sc.exe sdset wuauserv D:(A;;CCLCSWRPLORC;;;AU)(A;;CCDCLCSWRPWPDTLOCRSDRCWDWO;;;BA)(A;;CCDCLCSWRPWPDTLOCRSDRCWDWO;;;SY)


:: Reregister the BITS files and the Windows Update files
cd /d %windir%\system32
regsvr32.exe /s atl.dll
regsvr32.exe /s urlmon.dll
regsvr32.exe /s mshtml.dll
regsvr32.exe /s shdocvw.dll
regsvr32.exe /s browseui.dll
regsvr32.exe /s jscript.dll
regsvr32.exe /s vbscript.dll
regsvr32.exe /s scrrun.dll
regsvr32.exe /s msxml.dll
regsvr32.exe /s msxml3.dll
regsvr32.exe /s msxml6.dll
regsvr32.exe /s actxprxy.dll
regsvr32.exe /s softpub.dll
regsvr32.exe /s wintrust.dll
regsvr32.exe /s dssenh.dll
regsvr32.exe /s rsaenh.dll
regsvr32.exe /s gpkcsp.dll
regsvr32.exe /s sccbase.dll
regsvr32.exe /s slbcsp.dll
regsvr32.exe /s cryptdlg.dll
regsvr32.exe /s oleaut32.dll
regsvr32.exe /s ole32.dll
regsvr32.exe /s shell32.dll
regsvr32.exe /s initpki.dll
regsvr32.exe /s wuapi.dll
regsvr32.exe /s wuaueng.dll
regsvr32.exe /s wuaueng1.dll
regsvr32.exe /s wucltui.dll
regsvr32.exe /s wups.dll
regsvr32.exe /s wups2.dll
regsvr32.exe /s wuweb.dll
regsvr32.exe /s qmgr.dll
regsvr32.exe /s qmgrprxy.dll
regsvr32.exe /s wucltux.dll
regsvr32.exe /s muweb.dll
regsvr32.exe /s wuwebv.dll
netsh winsock reset
netsh winsock reset proxy

:: Set the startup type as automatic
sc config wuauserv start= auto
sc config bits start= auto
sc config DcomLaunch start= auto

:Start
net start bits
net start wuauserv
net start cryptsvc

:: Restart computer
cls
echo It is required to restart the computer to finish resetting Windows Update.
echo.
echo Please save and close anything open now, before the computer is restarted.
echo.
pause
echo.
echo.
echo.
echo *** Restart computer now. ***
echo.
pause
shutdown /r /f /t 0
2 Save the ZIP file to your desktop.
3 Unblock the ZIP file.
4 Extract the BAT file from the ZIP file.
5 Run the .bat file.
6 If prompted by UAC, click/tap on Yes to approve run as administrator.
7 When resetting Windows Update has finished you will be prompted to Please save and close anything open now, before the computer is restarted., and press any key to continue when ready. (see screenshot below)
If a service fails to stop after 3 attempts, the .bat file will automatically end with a «Failed to reset Windows Update» message and prompt to press a key to continue.
When a key is pressed, the .bat file will then restart any service it had stopped before closing the command prompt.
7 You will now be prompted to press any key to Restart computer now.
This will immediately restart the computer. Save and close anything open before continuing.
It is important to restart the computer immediately after running the .bat file to apply without opening anything else.

That’s it,
Shawn Brink
-
Reset_Reregister_Windows_Update_Components_for_Windows11.zip
Reset_Reregister_Windows_Update_Components_for_Windows11.zip
2 KB
· Views: 118,031
Last edited:
-
-
#2
Hello Shawn mate having great difficulties with downloading some particular updates namely KB5008353 (error 0x80073701) have tried all sorts of solutions that have been suggested and have just now tried to download your bat file but it will not do so. Any suggestions please? No hurry as I am just about to go offline for a while. As a by the by the security updates do download and install no problem and just so you know I am running the version that can be run on unsupported hardware.
-
- OS
- Windows 11 Pro 23H2 (OS Build 22631.4169) Desktop (OS Build 22621.4317)
- Computer type
- Laptop
- Manufacturer/Model
- Asus Vivo notebook X712FA or Desktop Ivy Bridge build
- CPU
- i7 -10510U / Intel i5 3750K
- Motherboard
- Asus generic & Asus P8Z77-V
- Memory
- Samsung 16GB DDR4 2666 MHz & G-Skill 16GB DDR3 2134MHz
- Graphics Card(s)
- On board Intel CPU graphics & Nvidia GeForce GTX 1050Ti
- Sound Card
- Laptop onboard & Xonar DSX Card
- Monitor(s) Displays
- Generic & Samsung 27″ SAM0C4C
- Hard Drives
- Samsung 970 Pro NMe & Samsung 870 EVO 500GB
- PSU
- N/A
- Case
- N/A
- Cooling
- Asus in built
- Keyboard
- Generic
- Mouse
- Logitec Wireless
- Internet Speed
- 50Mbs max allowance — occasionally up to 75Mbs
- Browser
- Brave
- Antivirus
- ESET Ultimate Security on both
- Other Info
- Desktop running Windows11 Pro with unsupported hardware fix
-
-
#3
For the above error please run:
0x80073701
| Message | Description | Mitigation |
|---|---|---|
| ERROR_SXS_ASSEMBLY_MISSING; The referenced assembly could not be found. | Typically, a component store corruption caused when a component is in a partially installed state. | Repair the component store with Dism RestoreHealth command or manually repair it with the payload from the partially installed component. From an elevated command prompt, run these commands: DISM /ONLINE /CLEANUP-IMAGE /SCANHEALTH DISM /ONLINE /CLEANUP-IMAGE /CHECKHEALTH DISM /ONLINE /CLEANUP-IMAGE /RESTOREHEALTH Sfc /Scannow Restart the device. |
-
- OS
- Windows 10
- Computer type
- Laptop
- Manufacturer/Model
- HP
- CPU
- Intel(R) Core(TM) i7-4800MQ CPU @ 2.70GHz
- Motherboard
- Product : 190A Version : KBC Version 94.56
- Memory
- 16 GB Total: Manufacturer : Samsung MemoryType : DDR3 FormFactor : SODIMM Capacity : 8GB Speed : 1600
- Graphics Card(s)
- NVIDIA Quadro K3100M; Intel(R) HD Graphics 4600
- Sound Card
- IDT High Definition Audio CODEC; PNP Device ID HDAUDIO\FUNC_01&VEN_111D&DEV_76E0
- Hard Drives
- Model Hitachi HTS727575A9E364
- Antivirus
- Microsoft Defender
- Other Info
- Mobile Workstation
-
-
#4
For the above error please run:
0x80073701
Message Description Mitigation ERROR_SXS_ASSEMBLY_MISSING; The referenced assembly could not be found. Typically, a component store corruption caused when a component is in a partially installed state. Repair the component store with Dism RestoreHealth command or manually repair it with the payload from the partially installed component. From an elevated command prompt, run these commands:
DISM /ONLINE /CLEANUP-IMAGE /SCANHEALTH
DISM /ONLINE /CLEANUP-IMAGE /CHECKHEALTH
DISM /ONLINE /CLEANUP-IMAGE /RESTOREHEALTH
Sfc /Scannow
Restart the device
Hi,
Where did you get that table with mitigation steps??
Thanks!
-
- OS
- Windows 11
- Computer type
- PC/Desktop
- Manufacturer/Model
- Build myself
- CPU
- Core i5 12600K
- Motherboard
- Asus Prime Z690M-Plus D4
- Memory
- DDR4 32 GB 3200Mhz GSkill
- Graphics Card(s)
- Geforce GTX 3060 TI
- Monitor(s) Displays
- Acer VG270S
- Screen Resolution
- 1080p
- Hard Drives
- 1TB SSD NVMe WD Blue
512 GB SSD Sata Crucial MX500
- PSU
- Zalman Zm750-hp Plus 750W
- Case
- Corsair Carbide 275Q Quiet Gaming Case
- Cooling
- Air Cooler DeepCool AS500 RGB 140mm
- Keyboard
- Sharkoon Skiller Mech 3
- Mouse
- Logitech G502 Hero
- Internet Speed
- 200 Mbps
- Browser
- Edge Chromium
- Antivirus
- Microsoft Defender
-
-
#5
It was more than two weeks ago and I no longer remember the source.
-
- OS
- Windows 10
- Computer type
- Laptop
- Manufacturer/Model
- HP
- CPU
- Intel(R) Core(TM) i7-4800MQ CPU @ 2.70GHz
- Motherboard
- Product : 190A Version : KBC Version 94.56
- Memory
- 16 GB Total: Manufacturer : Samsung MemoryType : DDR3 FormFactor : SODIMM Capacity : 8GB Speed : 1600
- Graphics Card(s)
- NVIDIA Quadro K3100M; Intel(R) HD Graphics 4600
- Sound Card
- IDT High Definition Audio CODEC; PNP Device ID HDAUDIO\FUNC_01&VEN_111D&DEV_76E0
- Hard Drives
- Model Hitachi HTS727575A9E364
- Antivirus
- Microsoft Defender
- Other Info
- Mobile Workstation
-
-
#6
Sorry to reply so late, but I had to thank you for the solution described above.
The original link was from here:
-
listoferrors-and-solutions.pdf
listoferrors-and-solutions.pdf
1.8 MB
· Views: 751
-
- OS
- Windows 11, Linux Ubuntu
-
-
#7
Thanks for the batch, it’s the most comprehensive that I’ve seen.
Question: is anything that it does related to Windows Update «cookies,» as in resetting/renewing them? Because I want to do that but can’t find any documentation about where they are or how (surely this is unrelated to Edge cookies, because that would be ridiculous). Maybe it’s just poor terminology.
Reference:
My Get-WindowsUpdateLog shows 0x80244007, and WU unfortunately can see nothing beyond Defender updates. It is unrelated to WSUS in my case, as I’m not using it.
-
- OS
- Windows 11
-
-
#8
Thanks for the batch, it’s the most comprehensive that I’ve seen.
Question: is anything that it does related to Windows Update «cookies,» as in resetting/renewing them? Because I want to do that but can’t find any documentation about where they are or how (surely this is unrelated to Edge cookies, because that would be ridiculous). Maybe it’s just poor terminology.
Hello mate,
The BAT doesn’t affect cookies, but it’s not going to hurt anything to see if it may help with the error or not.
-
- OS
- Windows 11 Pro for Workstations
- Computer type
- PC/Desktop
- Manufacturer/Model
- Custom self build
- CPU
- Intel i7-8700K 5 GHz
- Motherboard
- ASUS ROG Maximus XI Formula Z390
- Memory
- 64 GB (4x16GB) G.SKILL TridentZ RGB DDR4 3600 MHz (F4-3600C18D-32GTZR)
- Graphics Card(s)
- ASUS ROG-STRIX-GTX1080TI-O11G-GAMING (11GB GDDR5X)
- Sound Card
- Integrated Digital Audio (S/PDIF)
- Monitor(s) Displays
- 2 x Samsung Odyssey G75 27″
- Screen Resolution
- 2560×1440
- Hard Drives
- 1TB Samsung 990 PRO M.2,
4TB Samsung 990 PRO M.2,
8TB WD MyCloudEX2Ultra NAS
- PSU
- Seasonic Prime Titanium 850W
- Case
- Thermaltake Core P3 wall mounted
- Cooling
- Corsair Hydro H115i
- Keyboard
- Logitech wireless K800
- Mouse
- Logitech MX Master 3
- Internet Speed
- 1 Gbps Download and 35 Mbps Upload
- Browser
- Google Chrome
- Antivirus
- Microsoft Defender and Malwarebytes Premium
- Other Info
- Logitech Z625 speaker system,
Logitech BRIO 4K Pro webcam,
HP Color LaserJet Pro MFP M477fdn,
CyberPower CP1500PFCLCD
Galaxy S23 Plus phone
-
- Operating System
- Windows 11 Pro
- Computer type
- Laptop
- Manufacturer/Model
- Surface Laptop 7 Copilot+ PC
- CPU
- Snapdragon X Elite (12 core) 3.42 GHz
- Memory
- 16 GB LPDDR5x-7467 MHz
- Monitor(s) Displays
- 15″ HDR
- Screen Resolution
- 2496 x 1664
- Hard Drives
- 1 TB SSD
- Internet Speed
- Wi-Fi 7 and Bluetooth 5.4
- Browser
- Chrome and Edge
- Antivirus
- Windows Defender
-
-
#9
@Brink Yeah, I forgot to mention that I have used it but it has no effect on whatever this is. I’m only surmising that WU cookies are at play based on the MS article for the number, but there could easily be other reasons.
Update: Just wanted to include here that the solution was not to think of problems with WU itself (which is what the batch would address) but what could be stopping it from looking in the right place. The WU log turned out to have a more relevant error, 0x8007051F, which suggested a problem with the connection to Azure Active Directory. That’s resolved by the procedure mentioned here, which in turn allowed the PC to actually see WU again. An edge case of edge cases.
Last edited:
-
- OS
- Windows 11
-
-
#10
What is meant by Unblock the .bat file.
-
- OS
- Windows 11
- Computer type
- Laptop
- CPU
- AMD Ryzen 7 5700U
- Motherboard
- HP 887A (FP6)
- Memory
- 16.0GB Dual-Channel Unknown @ 1596MHz (22-22-22-52)
- Graphics Card(s)
- 512MB ATI AMD Radeon Graphics (HP)
- Monitor(s) Displays
- Generic PnP Monitor
- Screen Resolution
- 1920×1080
- Hard Drives
- 238GB KBG40ZNV256G KIOXIA (Unknown (SSD))
- Mouse
- Razer Naga Pro
- Internet Speed
- 424.4 Mbps download 230.5 Mbps upload
- Browser
- Microsoft Edge
- Antivirus
- Bitdefender Total Security
-
-
#11
What is meant by
Unblock the .bat file.
Hello,
The link below will help explain unblock more.

Unblock File Downloaded from Internet in Windows 11
This tutorial will show you different ways on how to unblock files downloaded from the Internet depending on how they were blocked in Windows 11. When you download files from the Internet, Windows 11 shows you a security warning every time you try to open it by default. Some file types are…
www.elevenforum.com
-
- OS
- Windows 11 Pro for Workstations
- Computer type
- PC/Desktop
- Manufacturer/Model
- Custom self build
- CPU
- Intel i7-8700K 5 GHz
- Motherboard
- ASUS ROG Maximus XI Formula Z390
- Memory
- 64 GB (4x16GB) G.SKILL TridentZ RGB DDR4 3600 MHz (F4-3600C18D-32GTZR)
- Graphics Card(s)
- ASUS ROG-STRIX-GTX1080TI-O11G-GAMING (11GB GDDR5X)
- Sound Card
- Integrated Digital Audio (S/PDIF)
- Monitor(s) Displays
- 2 x Samsung Odyssey G75 27″
- Screen Resolution
- 2560×1440
- Hard Drives
- 1TB Samsung 990 PRO M.2,
4TB Samsung 990 PRO M.2,
8TB WD MyCloudEX2Ultra NAS
- PSU
- Seasonic Prime Titanium 850W
- Case
- Thermaltake Core P3 wall mounted
- Cooling
- Corsair Hydro H115i
- Keyboard
- Logitech wireless K800
- Mouse
- Logitech MX Master 3
- Internet Speed
- 1 Gbps Download and 35 Mbps Upload
- Browser
- Google Chrome
- Antivirus
- Microsoft Defender and Malwarebytes Premium
- Other Info
- Logitech Z625 speaker system,
Logitech BRIO 4K Pro webcam,
HP Color LaserJet Pro MFP M477fdn,
CyberPower CP1500PFCLCD
Galaxy S23 Plus phone
-
- Operating System
- Windows 11 Pro
- Computer type
- Laptop
- Manufacturer/Model
- Surface Laptop 7 Copilot+ PC
- CPU
- Snapdragon X Elite (12 core) 3.42 GHz
- Memory
- 16 GB LPDDR5x-7467 MHz
- Monitor(s) Displays
- 15″ HDR
- Screen Resolution
- 2496 x 1664
- Hard Drives
- 1 TB SSD
- Internet Speed
- Wi-Fi 7 and Bluetooth 5.4
- Browser
- Chrome and Edge
- Antivirus
- Windows Defender
-
-
#12
Unblock is neither in the context menu nor Properties. Upon opening the file I didn’t get a warning by Open File nor Microsoft Defender SmartScreen. Nothing in PowerShell worked for me either.
-
- OS
- Windows 11
- Computer type
- Laptop
- CPU
- AMD Ryzen 7 5700U
- Motherboard
- HP 887A (FP6)
- Memory
- 16.0GB Dual-Channel Unknown @ 1596MHz (22-22-22-52)
- Graphics Card(s)
- 512MB ATI AMD Radeon Graphics (HP)
- Monitor(s) Displays
- Generic PnP Monitor
- Screen Resolution
- 1920×1080
- Hard Drives
- 238GB KBG40ZNV256G KIOXIA (Unknown (SSD))
- Mouse
- Razer Naga Pro
- Internet Speed
- 424.4 Mbps download 230.5 Mbps upload
- Browser
- Microsoft Edge
- Antivirus
- Bitdefender Total Security
-
-
#13
Unblock is neither in the context menu nor Properties. Upon opening the file I didn’t get a warning by Open File nor Microsoft Defender SmartScreen. Nothing in PowerShell worked for me either.
It must have already been unblocked.
Were you able to successfully reset Windows Update with the BAT file?
-
- OS
- Windows 11 Pro for Workstations
- Computer type
- PC/Desktop
- Manufacturer/Model
- Custom self build
- CPU
- Intel i7-8700K 5 GHz
- Motherboard
- ASUS ROG Maximus XI Formula Z390
- Memory
- 64 GB (4x16GB) G.SKILL TridentZ RGB DDR4 3600 MHz (F4-3600C18D-32GTZR)
- Graphics Card(s)
- ASUS ROG-STRIX-GTX1080TI-O11G-GAMING (11GB GDDR5X)
- Sound Card
- Integrated Digital Audio (S/PDIF)
- Monitor(s) Displays
- 2 x Samsung Odyssey G75 27″
- Screen Resolution
- 2560×1440
- Hard Drives
- 1TB Samsung 990 PRO M.2,
4TB Samsung 990 PRO M.2,
8TB WD MyCloudEX2Ultra NAS
- PSU
- Seasonic Prime Titanium 850W
- Case
- Thermaltake Core P3 wall mounted
- Cooling
- Corsair Hydro H115i
- Keyboard
- Logitech wireless K800
- Mouse
- Logitech MX Master 3
- Internet Speed
- 1 Gbps Download and 35 Mbps Upload
- Browser
- Google Chrome
- Antivirus
- Microsoft Defender and Malwarebytes Premium
- Other Info
- Logitech Z625 speaker system,
Logitech BRIO 4K Pro webcam,
HP Color LaserJet Pro MFP M477fdn,
CyberPower CP1500PFCLCD
Galaxy S23 Plus phone
-
- Operating System
- Windows 11 Pro
- Computer type
- Laptop
- Manufacturer/Model
- Surface Laptop 7 Copilot+ PC
- CPU
- Snapdragon X Elite (12 core) 3.42 GHz
- Memory
- 16 GB LPDDR5x-7467 MHz
- Monitor(s) Displays
- 15″ HDR
- Screen Resolution
- 2496 x 1664
- Hard Drives
- 1 TB SSD
- Internet Speed
- Wi-Fi 7 and Bluetooth 5.4
- Browser
- Chrome and Edge
- Antivirus
- Windows Defender
-
-
#14
No, it did prompt to reset, but I have the same version of Windows.
-
- OS
- Windows 11
- Computer type
- Laptop
- CPU
- AMD Ryzen 7 5700U
- Motherboard
- HP 887A (FP6)
- Memory
- 16.0GB Dual-Channel Unknown @ 1596MHz (22-22-22-52)
- Graphics Card(s)
- 512MB ATI AMD Radeon Graphics (HP)
- Monitor(s) Displays
- Generic PnP Monitor
- Screen Resolution
- 1920×1080
- Hard Drives
- 238GB KBG40ZNV256G KIOXIA (Unknown (SSD))
- Mouse
- Razer Naga Pro
- Internet Speed
- 424.4 Mbps download 230.5 Mbps upload
- Browser
- Microsoft Edge
- Antivirus
- Bitdefender Total Security
-
-
#15
No, it did prompt to reset, but I have the same version of Windows.
Are you able to use an ISO or MSU to update with instead?
-
- OS
- Windows 11 Pro for Workstations
- Computer type
- PC/Desktop
- Manufacturer/Model
- Custom self build
- CPU
- Intel i7-8700K 5 GHz
- Motherboard
- ASUS ROG Maximus XI Formula Z390
- Memory
- 64 GB (4x16GB) G.SKILL TridentZ RGB DDR4 3600 MHz (F4-3600C18D-32GTZR)
- Graphics Card(s)
- ASUS ROG-STRIX-GTX1080TI-O11G-GAMING (11GB GDDR5X)
- Sound Card
- Integrated Digital Audio (S/PDIF)
- Monitor(s) Displays
- 2 x Samsung Odyssey G75 27″
- Screen Resolution
- 2560×1440
- Hard Drives
- 1TB Samsung 990 PRO M.2,
4TB Samsung 990 PRO M.2,
8TB WD MyCloudEX2Ultra NAS
- PSU
- Seasonic Prime Titanium 850W
- Case
- Thermaltake Core P3 wall mounted
- Cooling
- Corsair Hydro H115i
- Keyboard
- Logitech wireless K800
- Mouse
- Logitech MX Master 3
- Internet Speed
- 1 Gbps Download and 35 Mbps Upload
- Browser
- Google Chrome
- Antivirus
- Microsoft Defender and Malwarebytes Premium
- Other Info
- Logitech Z625 speaker system,
Logitech BRIO 4K Pro webcam,
HP Color LaserJet Pro MFP M477fdn,
CyberPower CP1500PFCLCD
Galaxy S23 Plus phone
-
- Operating System
- Windows 11 Pro
- Computer type
- Laptop
- Manufacturer/Model
- Surface Laptop 7 Copilot+ PC
- CPU
- Snapdragon X Elite (12 core) 3.42 GHz
- Memory
- 16 GB LPDDR5x-7467 MHz
- Monitor(s) Displays
- 15″ HDR
- Screen Resolution
- 2496 x 1664
- Hard Drives
- 1 TB SSD
- Internet Speed
- Wi-Fi 7 and Bluetooth 5.4
- Browser
- Chrome and Edge
- Antivirus
- Windows Defender
-
-
#16
-
- OS
- Windows 11
- Computer type
- Laptop
- CPU
- AMD Ryzen 7 5700U
- Motherboard
- HP 887A (FP6)
- Memory
- 16.0GB Dual-Channel Unknown @ 1596MHz (22-22-22-52)
- Graphics Card(s)
- 512MB ATI AMD Radeon Graphics (HP)
- Monitor(s) Displays
- Generic PnP Monitor
- Screen Resolution
- 1920×1080
- Hard Drives
- 238GB KBG40ZNV256G KIOXIA (Unknown (SSD))
- Mouse
- Razer Naga Pro
- Internet Speed
- 424.4 Mbps download 230.5 Mbps upload
- Browser
- Microsoft Edge
- Antivirus
- Bitdefender Total Security
-
-
#17
-
- OS
- Windows 11 Pro for Workstations
- Computer type
- PC/Desktop
- Manufacturer/Model
- Custom self build
- CPU
- Intel i7-8700K 5 GHz
- Motherboard
- ASUS ROG Maximus XI Formula Z390
- Memory
- 64 GB (4x16GB) G.SKILL TridentZ RGB DDR4 3600 MHz (F4-3600C18D-32GTZR)
- Graphics Card(s)
- ASUS ROG-STRIX-GTX1080TI-O11G-GAMING (11GB GDDR5X)
- Sound Card
- Integrated Digital Audio (S/PDIF)
- Monitor(s) Displays
- 2 x Samsung Odyssey G75 27″
- Screen Resolution
- 2560×1440
- Hard Drives
- 1TB Samsung 990 PRO M.2,
4TB Samsung 990 PRO M.2,
8TB WD MyCloudEX2Ultra NAS
- PSU
- Seasonic Prime Titanium 850W
- Case
- Thermaltake Core P3 wall mounted
- Cooling
- Corsair Hydro H115i
- Keyboard
- Logitech wireless K800
- Mouse
- Logitech MX Master 3
- Internet Speed
- 1 Gbps Download and 35 Mbps Upload
- Browser
- Google Chrome
- Antivirus
- Microsoft Defender and Malwarebytes Premium
- Other Info
- Logitech Z625 speaker system,
Logitech BRIO 4K Pro webcam,
HP Color LaserJet Pro MFP M477fdn,
CyberPower CP1500PFCLCD
Galaxy S23 Plus phone
-
- Operating System
- Windows 11 Pro
- Computer type
- Laptop
- Manufacturer/Model
- Surface Laptop 7 Copilot+ PC
- CPU
- Snapdragon X Elite (12 core) 3.42 GHz
- Memory
- 16 GB LPDDR5x-7467 MHz
- Monitor(s) Displays
- 15″ HDR
- Screen Resolution
- 2496 x 1664
- Hard Drives
- 1 TB SSD
- Internet Speed
- Wi-Fi 7 and Bluetooth 5.4
- Browser
- Chrome and Edge
- Antivirus
- Windows Defender
Try3
Well-known member
-
-
#18
I can see that they’ve been written/edited separately but are the Win11 & Win10 batch files interchangeable?
Denis
-
- OS
- Windows 11 Home x64 Version 23H2 Build 22631.3447
-
-
#19
I can see that they’ve been written/edited separately but are the Win11 & Win10 batch files interchangeable?
Denis
Hello Denis,
Yes, you can use it for both W10 and W11.
-
- OS
- Windows 11 Pro for Workstations
- Computer type
- PC/Desktop
- Manufacturer/Model
- Custom self build
- CPU
- Intel i7-8700K 5 GHz
- Motherboard
- ASUS ROG Maximus XI Formula Z390
- Memory
- 64 GB (4x16GB) G.SKILL TridentZ RGB DDR4 3600 MHz (F4-3600C18D-32GTZR)
- Graphics Card(s)
- ASUS ROG-STRIX-GTX1080TI-O11G-GAMING (11GB GDDR5X)
- Sound Card
- Integrated Digital Audio (S/PDIF)
- Monitor(s) Displays
- 2 x Samsung Odyssey G75 27″
- Screen Resolution
- 2560×1440
- Hard Drives
- 1TB Samsung 990 PRO M.2,
4TB Samsung 990 PRO M.2,
8TB WD MyCloudEX2Ultra NAS
- PSU
- Seasonic Prime Titanium 850W
- Case
- Thermaltake Core P3 wall mounted
- Cooling
- Corsair Hydro H115i
- Keyboard
- Logitech wireless K800
- Mouse
- Logitech MX Master 3
- Internet Speed
- 1 Gbps Download and 35 Mbps Upload
- Browser
- Google Chrome
- Antivirus
- Microsoft Defender and Malwarebytes Premium
- Other Info
- Logitech Z625 speaker system,
Logitech BRIO 4K Pro webcam,
HP Color LaserJet Pro MFP M477fdn,
CyberPower CP1500PFCLCD
Galaxy S23 Plus phone
-
- Operating System
- Windows 11 Pro
- Computer type
- Laptop
- Manufacturer/Model
- Surface Laptop 7 Copilot+ PC
- CPU
- Snapdragon X Elite (12 core) 3.42 GHz
- Memory
- 16 GB LPDDR5x-7467 MHz
- Monitor(s) Displays
- 15″ HDR
- Screen Resolution
- 2496 x 1664
- Hard Drives
- 1 TB SSD
- Internet Speed
- Wi-Fi 7 and Bluetooth 5.4
- Browser
- Chrome and Edge
- Antivirus
- Windows Defender
Try3
Well-known member
-
-
#20
-
- OS
- Windows 11 Home x64 Version 23H2 Build 22631.3447
С Windows 10 Microsoft сделала неожиданный и неприятный момент запретив пользователю решать самому устанавливать или нет обновления системы. В Home и Pro версии пользователь уже не сможет легко управлять установкой и загрузкой обновлений.
Что нужно сделать, чтобы остановить и отключить Windows Update в Windows 10 и всегда контролировать обновление системы. Это особенно актуально, когда речь заходит о Windows 10 Home.
Разрешить только ручные обновления в Windows 10
Ранее одним из лучших решений для восстановления контроля над обновлениями было отключить службу Windows Update и включать его только тогда, когда вы хотели, чтобы система нашла и устанавливала доступные обновления.
Microsoft изменила доступное ранее, обходное решение в Windows 10 Fall Creators Update, закрыла эту лазейку. Существует еще один способ, отключить обновления Windows 10, который по-прежнему доступен, но для этого требуется изменить разрешения программы, отвечающей за проверку обновлений.
Хорошей новостью является то, что это не повлияет на ручную установку обновлений, но предотвратит автоматическую проверку обновлений в вашей системе. При использовании данного способа, существует также опция восстановления исходных настроек обновления, но я рекомендую создать резервную копию системного раздела перед внесением изменений в систему Windows 10.
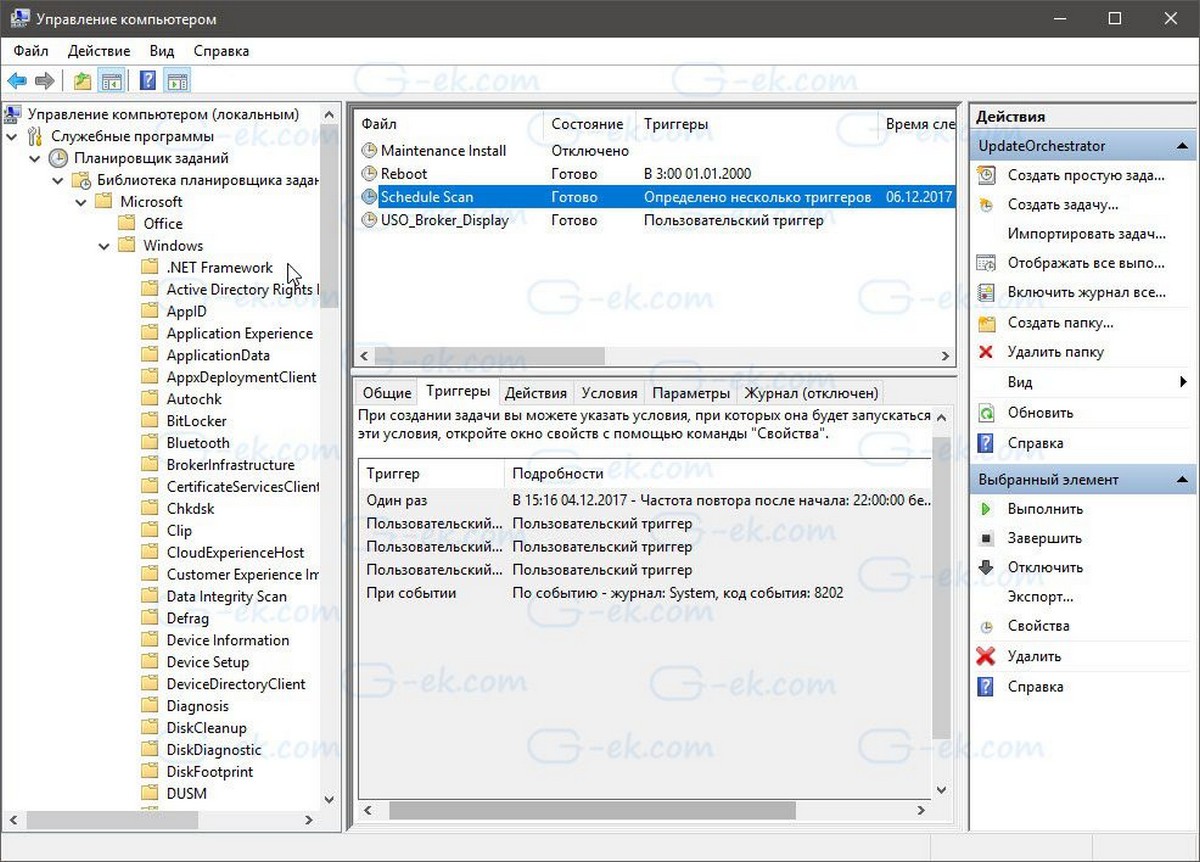
В Windows 10 в Планировщике есть задача, которая использует программу C:\Windows\System32\UsoClient.exe, для регулярного и автоматического получения обновлений. Вы найдете задачу в Библиотеке планировщика заданий Microsoft→ Windows→ UpdateOrchestrator→ Schedule Scan — Эта задача выполняет запланированное сканирование Центра обновления Windows.
Задача имеет несколько триггеров:
- первый: запускает ее один раз в день.
- второй: запускает ее как идентификатор журнала событий 8202.
- третий: настраиваемый триггер.
В данном способе, необходимо удалить все разрешения из файла UsoClient.exe. Благодаря чему, будет приостановлена проверка обновлений, вызванная задачами. Обратите внимание, что это не повлияет на обновления Защитника Windows, они все равно будут загружаться и устанавливаться автоматически.
Как Отключить автоматическое обновление Windows 10.
- Нажмите на клавишу Win, чтобы открыть меню «Пуск» Windows 10.
- Введите cmd.exe, выберите «Запуск от имени Администратора». Для этого, кликните правой кнопкой мыши на отображаемом результате и выберите запустить от имени администратора.
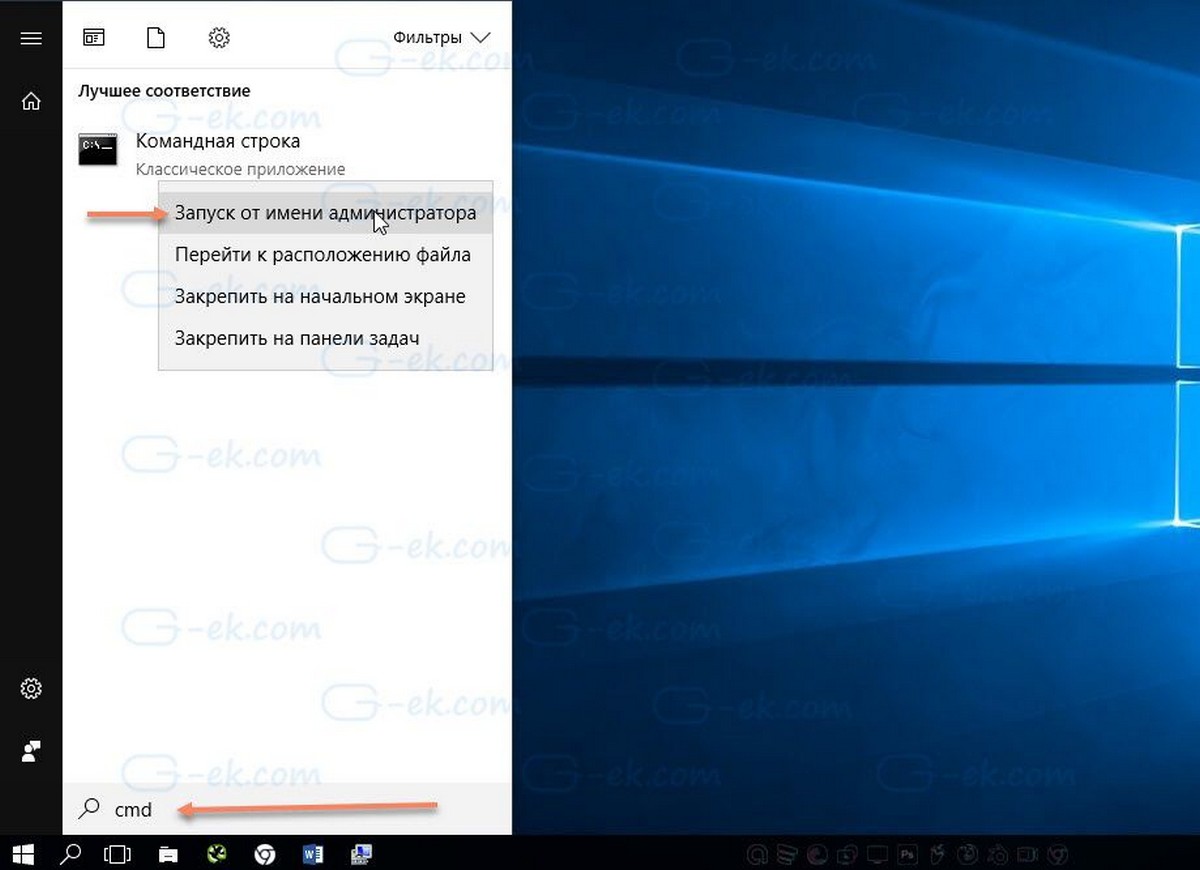
- Подтвердите приглашение UAC.
- Запустите команду:
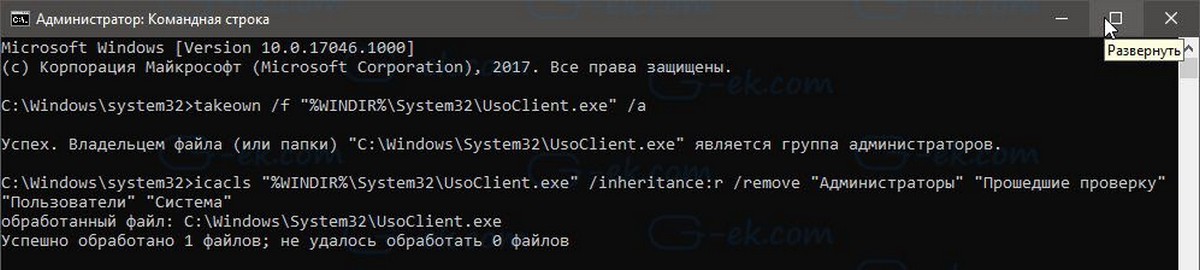
takeown /f "%WINDIR%\System32\UsoClient.exe" /a
Это перепишет права на файл и привяжет его к группе администратора, дающей вам полный контроль над файлом.
- Теперь выполните:
icacls "%WINDIR%\System32\UsoClient.exe" /inheritance:r /remove "Администраторы" "Прошедшие проверку" "Пользователи" "Система"
Эта команда удалит разрешения выбранных групп пользователей для файла.
Обратите внимание, что вам может потребоваться изменить имена групп, если вы используете английскую версию Windows:
icacls "%WINDIR%\System32\UsoClient.exe" /inheritance:r /remove "Administrators" "Authenticated Users" "Users" "System"
Читайте также: 15 Cпособов освободить место на диске в Windows 10
После выполнения последней команды, Вы должны получить сообщения об успешном выполнении, но вы можете проверить, что все разрешения были удалены, кликнув правой кнопкой мыши на файле «C:\Windows\System32\UsoClient.exe», выбрав свойства в контекстном меню и перейдя на вкладку «Безопасность».
В следующий раз, когда Windows 10 попытается запустить событие, связанное с обновлением, вы должны получить сообщение об ошибке «отказ в доступе» в результатах последнего запуска в списке задач UpdateOrchestrator.
Вы все еще можете запустить проверку обновлений вручную, открыв «Параметры» → «Обновление и безопасность».
Восстановление разрешений, как вернуть настройки автоматического обновления.
Чтобы вернуть настройки для автоматического обновления, Вы можете восстановить разрешения файла в любое время:
- Откройте командную строку с правами администратора, как описано выше.
- Запустите команду:
icacls "%WINDIR%\System32\UsoClient.exe" /reset
Эта команда сбросит все разрешения для UsoClient.exe, так что автоматическое обновление Windows 10, будет запущено снова.
Теперь вы: Какой тип обновления вы предпочитаете, ручной или автоматический? Как настроена ваша система?
Если служба обновлений Windows работает не корректно, обновления не загружаются или не устанавливаются, то самый простой и эффективней способ решить проблему со службой Windows Update – восстановить ее исходные настройки. В этой статье мы покажем, как сбросить конфигурацию агента и службы обновлений Windows Update.
Содержание:
- Средство устранения неполадок Центра обновления Windows
- Сброс настроек Windows Update с помощью PowerShell
- Утилита Reset Windows Update Tool
- Восстановление исходных настроек Windows Update из командной строки
Обычно для отладки и дебага ошибок службы обновления Windows администратору необходимо проанализировать коды ошибок в файле журнала обновлений %windir%\WindowsUpdate.log (в Windows 10 и 11 получить файл WindowsUpdate.log можно таким способом). Количество возможных ошибок, с которыми может столкнуться администратор при анализе журнала обновлений исчисляется десятками (список всех ошибок Windows Update) и процесс их разрешения в основном нетривиальный. В некоторых случаях вместо детального анализа ошибок Windows Update гораздо быстрее и проще сначала произвести полный сброс настроек службы Windows Update. После сброса Windows Update вы можете выполнить сканирование и поиск обновлений.
Средство устранения неполадок Центра обновления Windows
Прежде чем перейти к сбросу конфигурации центра обновления Windows, настоятельно рекомендуем сначала попробовать более встроенное средство для автоматического исправления проблем в службе обновления Windows – средство устранения неполадок Центра обновления Windows (Windows Update Troubleshooter).
В Windows 10 и 11 Windows Update Troubleshooter уже встроен в современную панель Settings. Для предыдущих версий Windows его придется скачать вручную по ссылкам ниже:
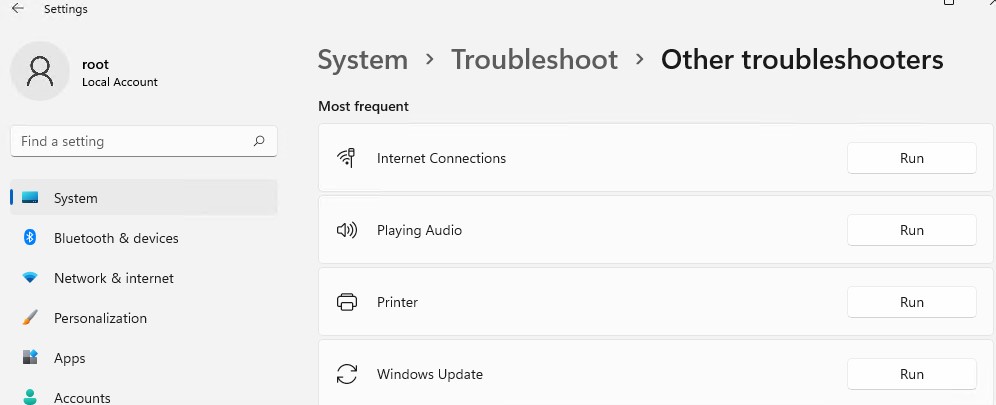
- Windows 11 — Settings -> System -> Troubleshooter -> Other Troubleshooter -> Windows Update;

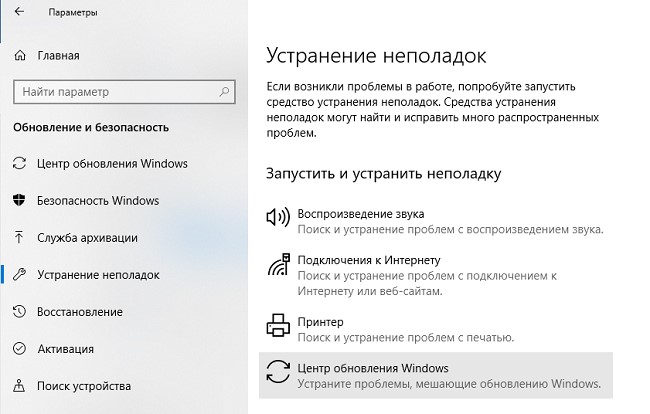
- Windows 10 – скачите wu10.diagcab по ссылке https://aka.ms/wudiag , либо запустите локальную версию инструмента: Пуск -> Параметры -> Обновления и безопасность -> Устранение неполадок -> Центр обновлений Windows (Start -> Settings -> Updates and Security -> Troubleshoot -> Additional Troubleshooters-> Windows Updates – resolve problems that prevent you from updating windows);

Для быстрого доступа к средствам исправления неполадок Windows можно использовать команду ms-settings:
ms-settings:troubleshoot - Windows 7 и Windows 8.1 — WindowsUpdate.diagcab (https://aka.ms/diag_wu).
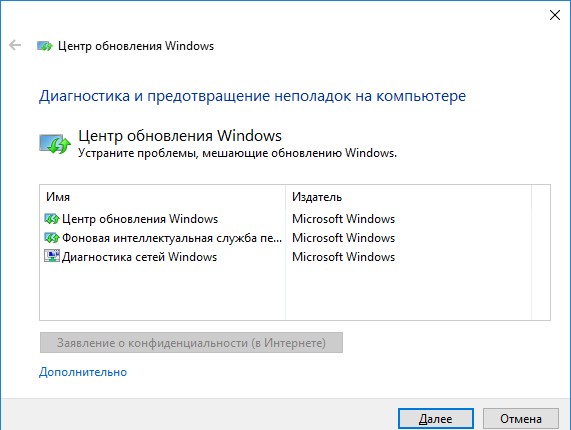
Дождитесь пока средство устранения неполадок Центра обновления Windows просканирует систему и попытается автоматически исправить все ошибки в службе Windows Update и связанных компонентах.
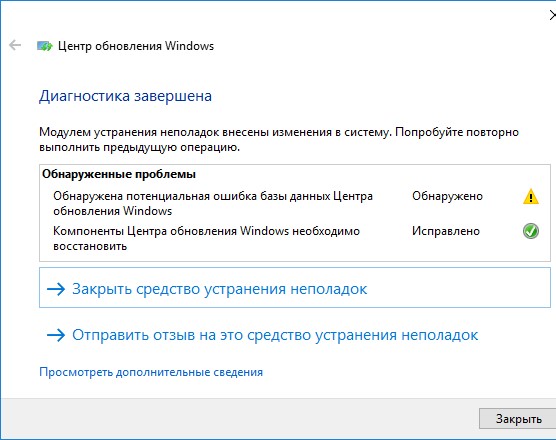
В моем случае была обнаружена и исправлена потенциальная ошибка в базе данных Центра обновления Windows. После этого перезагрузите компьютер и попробуйте выполнить поиск обновлений. Если обновления не загружаются или не устанавливаются, перейдите к следующему этапу.
Сброс настроек Windows Update с помощью PowerShell
Вы можете использовать PowerShell модуль PSWindowsUpdate для сброса настроек агента и службы Windows Update.
Установите модуль на свой компьютер из галереи скриптов PSGallery:
Install-Module -Name PSWindowsUpdate
Разрешите запуск PowerShell скриптов:
Set-ExecutionPolicy –ExecutionPolicy RemoteSigned -force
Выполните команду:
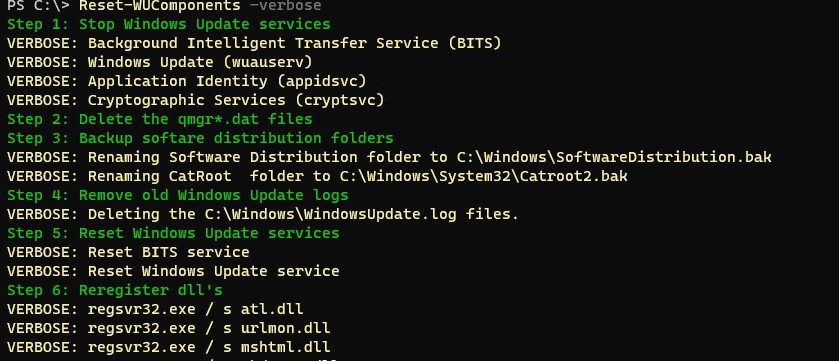
Reset-WUComponents –verbose
Команда Reset-WUComponents выполняет действия, по остановке служб, перерегистрации dll и очистке каталога C:\Windows\SoftwareDistribution, что и описанный чуть ниже bat скрипт.
VERBOSE: Background Intelligent Transfer Service (BITS)
VERBOSE: Windows Update (wuauserv)
VERBOSE: Application Identity (appidsvc)
VERBOSE: Cryptographic Services (cryptsvc)
Step 2: Delete the qmgr*.dat files
Step 3: Backup software distribution folders
VERBOSE: Renaming Software Distribution folder to C:\Windows\SoftwareDistribution.bak
VERBOSE: Renaming CatRoot  folder to C:\Windows\System32\Catroot2.bak
 Step 4: Remove old Windows Update logs
VERBOSE: Deleting the C:\Windows\WindowsUpdate.log files.
Step 5: Reset Windows Update services
VERBOSE: Reset BITS service
VERBOSE: Reset Windows Update service
Step 6: Reregister dll's
VERBOSE: regsvr32.exe / s atl.dll
VERBOSE: regsvr32.exe / s urlmon.dll
VERBOSE: regsvr32.exe / s mshtml.dll
VERBOSE: regsvr32.exe / s shdocvw.dll
VERBOSE: regsvr32.exe / s browseui.dll
VERBOSE: regsvr32.exe / s jscript.dll
VERBOSE: regsvr32.exe / s vbscript.dll
VERBOSE: regsvr32.exe / s scrrun.dll
VERBOSE: regsvr32.exe / s msxml.dll
VERBOSE: regsvr32.exe / s msxml3.dll
VERBOSE: regsvr32.exe / s msxml6.dll
VERBOSE: regsvr32.exe / s actxprxy.dll
VERBOSE: regsvr32.exe / s softpub.dll
VERBOSE: regsvr32.exe / s wintrust.dll
VERBOSE: regsvr32.exe / s dssenh.dll
VERBOSE: regsvr32.exe / s rsaenh.dll
 VERBOSE: regsvr32.exe / s gpkcsp.dll
VERBOSE: regsvr32.exe / s sccbase.dll
VERBOSE: regsvr32.exe / s slbcsp.dll
VERBOSE: regsvr32.exe / s cryptdlg.dll
VERBOSE: regsvr32.exe / s oleaut32.dll
VERBOSE: regsvr32.exe / s ole32.dll
VERBOSE: regsvr32.exe / s shell32.dll
VERBOSE: regsvr32.exe / s initpki.dll
VERBOSE: regsvr32.exe / s wuapi.dll
VERBOSE: regsvr32.exe / s wuaueng.dll
VERBOSE: regsvr32.exe / s wuaueng1.dll
VERBOSE: regsvr32.exe / s wucltui.dll
VERBOSE: regsvr32.exe / s wups.dll
VERBOSE: regsvr32.exe / s wups2.dll
VERBOSE: regsvr32.exe / s wuweb.dll
VERBOSE: regsvr32.exe / s qmgr.dll
VERBOSE: regsvr32.exe / s qmgrprxy.dll
VERBOSE: regsvr32.exe / s wucltux.dll
VERBOSE: regsvr32.exe / s muweb.dll
VERBOSE: regsvr32.exe / s wuwebv.dll
Step 7: Reset WinSock
VERBOSE: netsh winsock reset
Step 8: Reset Proxy
VERBOSE: netsh winhttp reset proxy
Step 9: Start Windows Update services
VERBOSE: Cryptographic Services (cryptsvc)
VERBOSE: Application Identity (appidsvc)
VERBOSE: Windows Update (wuauserv)
VERBOSE: Background Intelligent Transfer Service (BITS)
Step 10: Start Windows Update services
VERBOSE: wuauclt /resetauthorization /detectnow
Запустите поиск обновлений из панели управления или выполните поиск доступных обновлений с помощью команды PowerShell:
Get-WUList

Утилита Reset Windows Update Tool
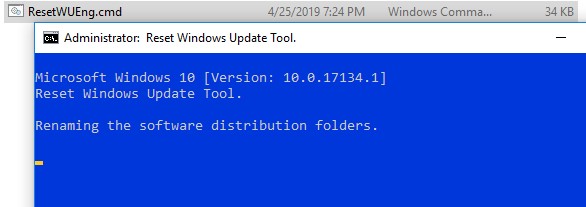
Есть еще одни полезный и простой инструмент для сброса настроек Windows Update — Reset Windows Update Tool. Раньше это скрипт был доступен на TechNet. Сейчас автор ведет репозиторий на GitHub (м https://github.com/ManuelGil/Script-Reset-Windows-Update-Tool ).
Для загрузки предлагается скомпилированный exe файл (C++) или обычный скрипт. Я предпочитаю использовать cmd скрипт.
- Скачайте ResetWUEng.zip и распакуйте на диск;
- Запустите файл ResetWUEng.cmd с правами администратора;
- Скрипт определит вашу версию ОС (в моем примере это Windows 10) и предложит 18 различных опций. Некоторые из них напрямую не относятся к сбросу настроек агента WU, но могут быть полезны для исправления различных неисправностей в Windows (проверка диска chkdsk, исправление ошибок в образе Windows с помощью DISM, сброс Winsock, очистка временных файлов и т.д.);

- Для сброса настроек Windows Update достаточно использовать опцию 2 — Resets the Windows Update Components (Сбросить компоненты службы обновления Windows). Нажмите 2 и Enter;
- Скрипт автоматически выполнит все действия, которые мы описали выше при выполнении ручного сброса агента обновлений Windows из командной строки.

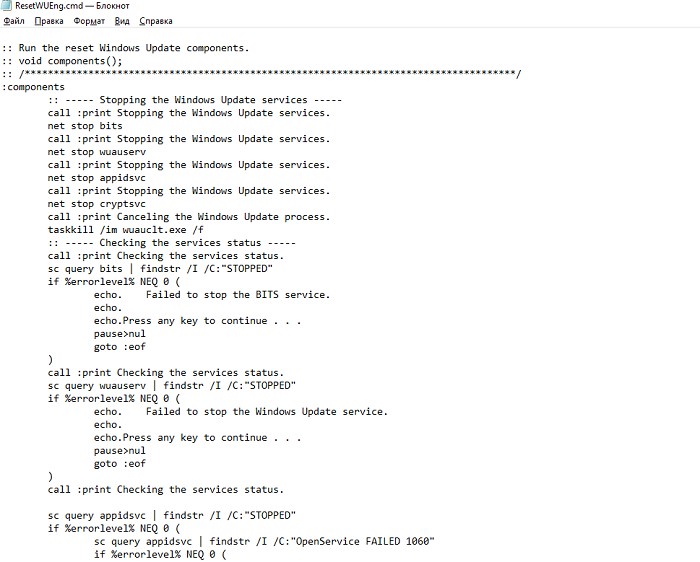
Вы можете самостоятельно посмотреть, что делает скрипт, открыв в файл ResetWUEng.cmd в любом текстовом редакторе и изучив его содержимое. Например, опция 2 отправляет на процедуру components.

- После окончания работы скрипта Reset Windows Update Agent перезагрузите компьютер и проверьте работу службы обновлений.

Скрипт ResetWUEng.cmd универсальный и подходит для всех версий Windows: начиная с Windows XP и вплоть до Windows 11.
Восстановление исходных настроек Windows Update из командной строки
Процесс сброса настроек агента и службы обновления Windows состоит из нескольких этапов. Все описанные операции выполняются в командной строке и собраны в один bat файл (готовый скрипт можно скачать по ссылке ниже).
С помощью данного скрипта можно полностью сбросить конфигурацию службы Центра обновлений Windows, и очистить локальный кэш обновлений. Скрипт является универсальный и будет работать как в Windows 11/10/8.1/7, так и в Windows Server 2022/2019/2016/2012 R2/2008 R2. Скрипт помогает устранить большинство типовых ошибок в работе службы Windows Update, когда центр обновлений перестает загружать новые обновления или пишет, что при установке обновления возникают ошибки.
Убедитесь, что настройки Windows Update на вашем компьютере на задаются с помощью доменных или локальных политик. Для вывода результирующих настроек GPO можно воспользоваться утилитой gpresult или rsop.msc. Можно сбросить настройки локальной GPO по этой инструкции.
Итак, по порядку о том, что делает скрипт:
- Остановить службы Windows Update (Центр обновлений Windows), BITS и службы криптографии:
net stop bits
net stop wuauserv
net stop appidsvc
net stop cryptsvc
taskkill /im wuauclt.exe /f - Удалить служебных файлы qmgr*.dat в каталоге %ALLUSERSPROFILE%\Application Data\Microsoft\Network\Downloader\:
Del "%ALLUSERSPROFILE%\Application Data\Microsoft\Network\Downloader\qmgr*.dat" - Переименовать служебные каталоги, в которых хранятся конфигурационные файлы и кэш обновлений (в случае необходимости их можно будет использовать как резервные копии). После перезапуска службы обновления, эти каталоги автоматически пересоздадутся:
Ren %systemroot%\SoftwareDistribution SoftwareDistribution.bak
Ren %systemroot%\system32\catroot2 catroot2.bak - Удаление старого журнала windowsupdate.log
del /f /s /q %windir%\windowsupdate.log - Сброс разрешений на службы BITS и Windows Update (в случае, если права на службы были изменены)
sc.exe sdset bits D:(A;;CCLCSWRPWPDTLOCRRC;;;SY) (A;;CCDCLCSWRPWPDTLOCRSDRCWDWO;;;BA) (A;;CCLCSWLOCRRC;;;AU) (A;;CCLCSWRPWPDTLOCRRC;;;PU)
sc.exe sdset wuauserv D:(A;;CCLCSWRPWPDTLOCRRC;;;SY) (A;;CCDCLCSWRPWPDTLOCRSDRCWDWO;;;BA) (A;;CCLCSWLOCRRC;;;AU) (A;;CCLCSWRPWPDTLOCRRC;;;PU)
sc.exe sdset cryptsvc D:(A;;CCLCSWLOCRRC;;;AU)(A;;CCDCLCSWRPWPDTLOCRSDRCWDWO;;;BA)(A;;CCDCLCSWRPWPDTLCRSDRCWDWO;;;SO)(A;;CCLCSWRPWPDTLOCRRC;;;SY)S:(AU;FA;CCDCLCSWRPWPDTLOCRSDRCWDWO;;WD)
sc.exe sdset trustedinstaller D:(A;;CCLCSWLOCRRC;;;AU)(A;;CCDCLCSWRPWPDTLOCRSDRCWDWO;;;BA)(A;;CCDCLCSWRPWPDTLCRSDRCWDWO;;;SO)(A;;CCLCSWRPWPDTLOCRRC;;;SY)S:(AU;FA;CCDCLCSWRPWPDTLOCRSDRCWDWO;;WD) - Перерегистрация файлов системных динамических библиотек (dll), связанных со службами BITS и Windows Update:
cd /d %windir%\system32
regsvr32.exe /s atl.dll
regsvr32.exe /s urlmon.dll
regsvr32.exe /s mshtml.dll
regsvr32.exe /s shdocvw.dll
regsvr32.exe /s browseui.dll
regsvr32.exe /s jscript.dll
regsvr32.exe /s vbscript.dll
regsvr32.exe /s scrrun.dll
regsvr32.exe /s msxml.dll
regsvr32.exe /s msxml3.dll
regsvr32.exe /s msxml6.dll
regsvr32.exe /s actxprxy.dll
regsvr32.exe /s softpub.dll
regsvr32.exe /s wintrust.dll
regsvr32.exe /s dssenh.dll
regsvr32.exe /s rsaenh.dll
regsvr32.exe /s gpkcsp.dll
regsvr32.exe /s sccbase.dll
regsvr32.exe /s slbcsp.dll
regsvr32.exe /s cryptdlg.dll
regsvr32.exe /s oleaut32.dll
regsvr32.exe /s ole32.dll
regsvr32.exe /s shell32.dll
regsvr32.exe /s initpki.dll
regsvr32.exe /s wuapi.dll
regsvr32.exe /s wuaueng.dll
regsvr32.exe /s wuaueng1.dll
regsvr32.exe /s wucltui.dll
regsvr32.exe /s wups.dll
regsvr32.exe /s wups2.dll
regsvr32.exe /s wuweb.dll
regsvr32.exe /s qmgr.dll
regsvr32.exe /s qmgrprxy.dll
regsvr32.exe /s wucltux.dll
regsvr32.exe /s muweb.dll
regsvr32.exe /s wuwebv.dll - Сброс параметров Winsock
netsh winsock reset - Сброс параметров системного прокси
netsh winhttp reset proxy - Опционально. При использовании локального сервера WSUS, возможно дополнительно сбросить текущую привязку клиента к серверу WSUS путем удаления следующих параметров в ветке реестра HKLM\SOFTWARE\Microsoft\Windows\CurrentVersion\WindowsUpdate:
REG DELETE "HKLM\SOFTWARE\Microsoft\Windows\CurrentVersion\WindowsUpdate" /v AccountDomainSid /f
REG DELETE "HKLM\SOFTWARE\Microsoft\Windows\CurrentVersion\WindowsUpdate" /v PingID /f
REG DELETE "HKLM\SOFTWARE\Microsoft\Windows\CurrentVersion\WindowsUpdate" /v SusClientId /f
REG DELETE "HKLM\SOFTWARE\Policies\Microsoft\Windows\WindowsUpdate" /v TargetGroup /f
REG DELETE "HKLM\SOFTWARE\Policies\Microsoft\Windows\WindowsUpdate" /v WUServer /f
REG DELETE "HKLM\SOFTWARE\Policies\Microsoft\Windows\WindowsUpdate" /v WUStatusServer /f - Запуск остановленных служб:
sc.exe config wuauserv start= auto
sc.exe config bits start= delayed-auto
sc.exe config cryptsvc start= auto
sc.exe config TrustedInstaller start= demand
sc.exe config DcomLaunch start= auto
net start bits
net start wuauserv
net start appidsvc
net start cryptsvc - Опционально. Для Windows 7 и 8.1 можно установить/переустановить последнюю версию агента Windows Update Agent (WUA). Скачать актуальную версию агента можно со страницы https://support.microsoft.com/en-us/kb/949104. Нужно скачать файл для вашей версии Windows

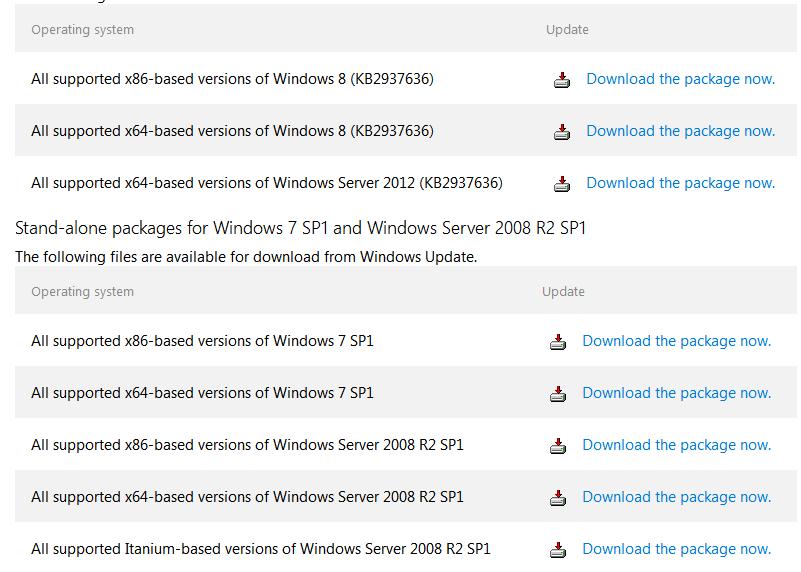
Актуальная версия агента WUA для Windows 7 SP1 x64 — 7.6. Принудительная переустановка агента WindowsUpdate выполняется следующими командами:
- для Windows 7 x86:
WindowsUpdateAgent-7.6-x86.exe /quiet /norestart /wuforce - для Windows 7 x64:
WindowsUpdateAgent-7.6-x64.exe /quiet /norestart /wuforce
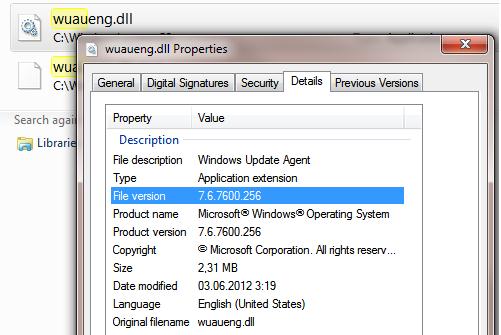
Совет. Текущую версию агента Windows Update Agent (WUA) в Windows 7 можно узнать в свойствах файла %windir%\system32\Wuaueng.dll. В нашем примере это 7.6.7600.256.

- для Windows 7 x86:
Осталось перезагрузить компьютер и запустить синхронизацию с сервером Windows Update /WSUS.
wuauclt /resetauthorization /detectnow
Затем зайдите в Центр обновления и проверьте, пропали ли проблемы при поиске, скачивании и установке обновлений.
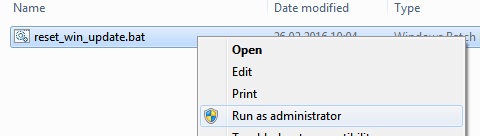
Сам скрипт reset_win_update.bat можно скачать по ссылке reset_win_update.zip (пункты 9 и 11 в скрипте не выполняются, т.к. являются опциональными). Скрипт нужно скачать, распаковать и запустить с правами администратора.
После этого перезагрузите компьютер, затем зайдите в Центр обновлений и проверьте, пропали ли проблемы при поиске, скачивании и установке обновлений.
Если обновления Windows стали скачиваться и устанавливать корректно, можно удалить папки резервные копии папок:
Ren %systemroot%\SoftwareDistribution SoftwareDistribution.bak
Ren %systemroot%\system32\catroot2 catroot2.bak
Если ничего не помогло, попробуйте вручную скачать и установить последнее кумулятивное обновление для вашей версии Windows из каталога обновлений Microsoft Update Catalog.