Иногда система Windows отображает сообщения об ошибках поврежденных или отсутствующих файлов compmgmt.msc. Подобные ситуации могут возникнуть, например, во время процесса установки программного обеспечения. Каждая программа требует определенных ресурсов, библиотек и исходных данных для правильной работы. Поэтому поврежденный или несуществующий файл compmgmt.msc может повлиять на неудачное выполнение запущенного процесса.
Файл был разработан Microsoft для использования с программным обеспечением Windows. Здесь вы найдете подробную информацию о файле и инструкции, как действовать в случае ошибок, связанных с compmgmt.msc на вашем устройстве. Вы также можете скачать файл compmgmt.msc, совместимый с устройствами Windows 10, Windows 8.1, Windows XP, Windows 8.1, Windows 8, Windows 7, Windows Vista, которые (скорее всего) позволят решить проблему.
Совместим с: Windows 10, Windows 8.1, Windows XP, Windows 8.1, Windows 8, Windows 7, Windows Vista
Популярность пользователя
Исправьте ошибки compmgmt.msc
- 1 Информация о файле compmgmt.msc
- 2 Ошибки, связанные с файлом compmgmt.msc
- 3 Как исправить ошибки, связанные с compmgmt.msc?
- 3.1 Сканирование на наличие вредоносных программ
- 3.2 Обновление системы и драйверов
- 3.3 Инструмент проверки системных файлов
- 3.4 Восстановление системы
- 4 Скачать compmgmt.msc
- 4.1 Список версий файла compmgmt.msc
Информация о файле
| Основная информация | |
|---|---|
| Имя файла | compmgmt.msc |
| Расширение файла | MSC |
| Тип | Executable Application |
| Описание | Microsoft Management Console Snap-in |
| Программного обеспечения | |
|---|---|
| программа | Windows 10 |
| Программного обеспечения | Windows |
| автор | Microsoft |
| Версия программного обеспечения | 10 |
| подробности | |
|---|---|
| Размер файла | 113256 |
| Самый старый файл | 2006-09-18 |
| MIME тип | application/xml |
Наиболее распространенные проблемы с файлом compmgmt.msc
Существует несколько типов ошибок, связанных с файлом compmgmt.msc. Файл compmgmt.msc может находиться в неправильном каталоге файлов на вашем устройстве, может отсутствовать в системе или может быть заражен вредоносным программным обеспечением и, следовательно, работать неправильно. Ниже приведен список наиболее распространенных сообщений об ошибках, связанных с файлом compmgmt.msc. Если вы найдете один из перечисленных ниже (или похожих), рассмотрите следующие предложения.
- compmgmt.msc поврежден
- compmgmt.msc не может быть расположен
- Ошибка выполнения — compmgmt.msc
- Ошибка файла compmgmt.msc
- Файл compmgmt.msc не может быть загружен. Модуль не найден
- невозможно зарегистрировать файл compmgmt.msc
- Файл compmgmt.msc не может быть загружен
- Файл compmgmt.msc не существует
compmgmt.msc
Не удалось запустить приложение, так как отсутствует файл compmgmt.msc. Переустановите приложение, чтобы решить проблему.
OK
Проблемы, связанные с compmgmt.msc, могут решаться различными способами. Некоторые методы предназначены только для опытных пользователей. Если вы не уверены в своих силах, мы советуем обратиться к специалисту. К исправлению ошибок в файле compmgmt.msc следует подходить с особой осторожностью, поскольку любые ошибки могут привести к нестабильной или некорректно работающей системе. Если у вас есть необходимые навыки, пожалуйста, продолжайте.
Как исправить ошибки compmgmt.msc всего за несколько шагов?
Ошибки файла compmgmt.msc могут быть вызваны различными причинами, поэтому полезно попытаться исправить их различными способами.
Шаг 1.. Сканирование компьютера на наличие вредоносных программ.
Файлы Windows обычно подвергаются атаке со стороны вредоносного программного обеспечения, которое не позволяет им работать должным образом. Первым шагом в решении проблем с файлом compmgmt.msc или любыми другими системными файлами Windows должно быть сканирование системы на наличие вредоносных программ с использованием антивирусного инструмента.
Если по какой-либо причине в вашей системе еще не установлено антивирусное программное обеспечение, вы должны сделать это немедленно. Незащищенная система не только является источником ошибок в файлах, но, что более важно, делает вашу систему уязвимой для многих опасностей. Если вы не знаете, какой антивирусный инструмент выбрать, обратитесь к этой статье Википедии — сравнение антивирусного программного обеспечения.
Шаг 2.. Обновите систему и драйверы.
Установка соответствующих исправлений и обновлений Microsoft Windows может решить ваши проблемы, связанные с файлом compmgmt.msc. Используйте специальный инструмент Windows для выполнения обновления.
- Откройте меню «Пуск» в Windows.
- Введите «Центр обновления Windows» в поле поиска.
- Выберите подходящую программу (название может отличаться в зависимости от версии вашей системы)
- Проверьте, обновлена ли ваша система. Если в списке есть непримененные обновления, немедленно установите их.
- После завершения обновления перезагрузите компьютер, чтобы завершить процесс.
Помимо обновления системы рекомендуется установить последние версии драйверов устройств, так как драйверы могут влиять на правильную работу compmgmt.msc или других системных файлов. Для этого перейдите на веб-сайт производителя вашего компьютера или устройства, где вы найдете информацию о последних обновлениях драйверов.
Шаг 3.. Используйте средство проверки системных файлов (SFC).
Проверка системных файлов — это инструмент Microsoft Windows. Как следует из названия, инструмент используется для идентификации и адресации ошибок, связанных с системным файлом, в том числе связанных с файлом compmgmt.msc. После обнаружения ошибки, связанной с файлом %fileextension%, программа пытается автоматически заменить файл compmgmt.msc на исправно работающую версию. Чтобы использовать инструмент:
- Откройте меню «Пуск» в Windows.
- Введите «cmd» в поле поиска
- Найдите результат «Командная строка» — пока не запускайте его:
- Нажмите правую кнопку мыши и выберите «Запуск от имени администратора»
- Введите «sfc / scannow» в командной строке, чтобы запустить программу, и следуйте инструкциям.
Шаг 4. Восстановление системы Windows.
Другой подход заключается в восстановлении системы до предыдущего состояния до того, как произошла ошибка файла compmgmt.msc. Чтобы восстановить вашу систему, следуйте инструкциям ниже
- Откройте меню «Пуск» в Windows.
- Введите «Восстановление системы» в поле поиска.
- Запустите средство восстановления системы — его имя может отличаться в зависимости от версии системы.
- Приложение проведет вас через весь процесс — внимательно прочитайте сообщения
- После завершения процесса перезагрузите компьютер.
Если все вышеупомянутые методы завершились неудачно и проблема с файлом compmgmt.msc не была решена, перейдите к следующему шагу. Помните, что следующие шаги предназначены только для опытных пользователей
Загрузите и замените файл compmgmt.msc
Последнее решение — вручную загрузить и заменить файл compmgmt.msc в соответствующей папке на диске. Выберите версию файла, совместимую с вашей операционной системой, и нажмите кнопку «Скачать». Затем перейдите в папку «Загруженные» вашего веб-браузера и скопируйте загруженный файл compmgmt.msc.
Перейдите в папку, в которой должен находиться файл, и вставьте загруженный файл. Ниже приведен список путей к каталогу файлов compmgmt.msc.
- Windows 10: C:\Windows\System32\
- Windows 8.1: C:\Windows\System32\
- Windows XP: —
- Windows 8.1: —
- Windows 8: —
- Windows 7: —
- Windows Vista: —
Если действия не помогли решить проблему с файлом compmgmt.msc, обратитесь к профессионалу. Существует вероятность того, что ошибка (и) может быть связана с устройством и, следовательно, должна быть устранена на аппаратном уровне. Может потребоваться новая установка операционной системы — неправильный процесс установки системы может привести к потере данных.
Список версий файлов
Имя файла
compmgmt.msc
система
Windows 10
Размер файла
113256 bytes
Дата
2011-04-12
| Подробности файла | ||
|---|---|---|
| MD5 | f04c119c159670c9271623454bec3254 | |
| SHA1 | 1f42aed72c659b75b9e5a2ff1e284c0649765c3c | |
| SHA256 | 2456bd374082d03520d844b922ad58ff1e3850c0dc0c3683c9c54d4f538f2c19 | |
| CRC32 | 1d89f808 | |
| Пример расположения файла | C:\Windows\System32\ |
Имя файла
compmgmt.msc
система
Windows 8.1
Размер файла
113257 bytes
Дата
2014-11-21
| Подробности файла | ||
|---|---|---|
| MD5 | 528ecebbc2ccd480da345c2a4b9b8f32 | |
| SHA1 | 47b851b06b81de28bda1a587d39b3f817a72057b | |
| SHA256 | 715f733df4c1701c3788d58826779cb84a691ff47c9bdf883b35a479c3bb01a8 | |
| CRC32 | 6f21812c | |
| Пример расположения файла | C:\Windows\System32\ |
Имя файла
compmgmt.msc
система
Windows XP
Размер файла
38302 bytes
Дата
2008-04-14
| Подробности файла | ||
|---|---|---|
| MD5 | 6be18fd6fb54082fe72627b1d481579c | |
| SHA1 | 798295b3f6b819474401cfb3a9f83e8cf465e5c9 | |
| SHA256 | ab735b7a1ed708841cb7e1ce3e64f8ad1e53997aaa8ebdf6b08b29d76e603531 | |
| CRC32 | 44ff7481 | |
| Пример расположения файла | — |
Имя файла
compmgmt.msc
система
Windows 8.1
Размер файла
113256 bytes
Дата
2011-04-12
| Подробности файла | ||
|---|---|---|
| MD5 | f04c119c159670c9271623454bec3254 | |
| SHA1 | 1f42aed72c659b75b9e5a2ff1e284c0649765c3c | |
| SHA256 | 2456bd374082d03520d844b922ad58ff1e3850c0dc0c3683c9c54d4f538f2c19 | |
| CRC32 | 1d89f808 | |
| Пример расположения файла | — |
Имя файла
compmgmt.msc
система
Windows 8
Размер файла
113256 bytes
Дата
2011-04-12
| Подробности файла | ||
|---|---|---|
| MD5 | f04c119c159670c9271623454bec3254 | |
| SHA1 | 1f42aed72c659b75b9e5a2ff1e284c0649765c3c | |
| SHA256 | 2456bd374082d03520d844b922ad58ff1e3850c0dc0c3683c9c54d4f538f2c19 | |
| CRC32 | 1d89f808 | |
| Пример расположения файла | — |
Имя файла
compmgmt.msc
система
Windows 7
Размер файла
113256 bytes
Дата
2011-04-12
| Подробности файла | ||
|---|---|---|
| MD5 | f04c119c159670c9271623454bec3254 | |
| SHA1 | 1f42aed72c659b75b9e5a2ff1e284c0649765c3c | |
| SHA256 | 2456bd374082d03520d844b922ad58ff1e3850c0dc0c3683c9c54d4f538f2c19 | |
| CRC32 | 1d89f808 | |
| Пример расположения файла | — |
Имя файла
compmgmt.msc
система
Windows Vista
Размер файла
113256 bytes
Дата
2011-04-12
| Подробности файла | ||
|---|---|---|
| MD5 | f04c119c159670c9271623454bec3254 | |
| SHA1 | 1f42aed72c659b75b9e5a2ff1e284c0649765c3c | |
| SHA256 | 2456bd374082d03520d844b922ad58ff1e3850c0dc0c3683c9c54d4f538f2c19 | |
| CRC32 | 1d89f808 | |
| Пример расположения файла | — |
«Управление компьютером» в Windows — специальная консоль для доступа к основным инструментам администрирования локального компьютера, а при необходимости — и удаленных компьютеров. Оснастка доступна во всех актуальных версиях системы.
В этой инструкции для начинающих о способах открыть Управление компьютером в Windows 11 и Windows 10, большинство из которых сработают и в предыдущих версиях системы.
Контекстное меню кнопки «Пуск»
Один из самых быстрых способов перейти к утилите «Управление компьютером» — использовать контекстное меню кнопки «Пуск».
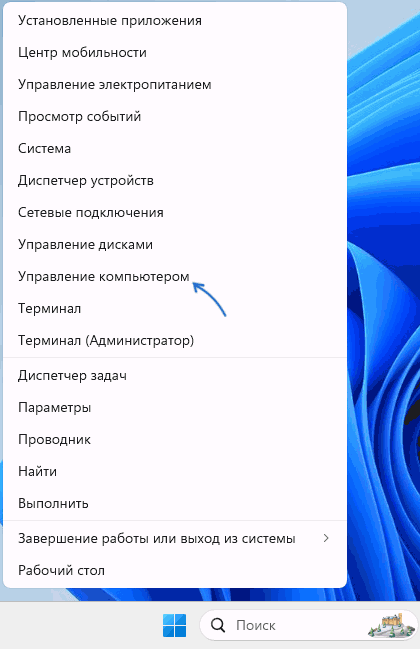
Достаточно нажать правой кнопкой мыши по кнопке «Пуск», после чего выбрать соответствующий пункт в появившемся меню.
Это же меню можно вызвать не только с помощью мыши, но и используя сочетание клавиш Win+X на клавиатуре, где Win — клавиша с эмблемой Windows, а X — клавиша с соответствующей латинской буквой.
Поиск Windows
Второй быстрый метод, который я рекомендую использовать во всех случаях, когда вы не знаете, как открыть тот или иной встроенный инструмент Windows — использовать встроенные функции поиска.

Начните набирать «Управление компьютером» в поиске на панели задач и, когда нужный элемент найдётся, откройте его.
Окно «Выполнить»
Вы можете использовать диалоговое окно «Выполнить» для запуска управления компьютером:
- Нажмите клавиши Win+R на клавиатуре.
- Введите compmgmt.msc в открывшемся окне и нажмите «Ок» или клавишу Enter.


В результате нужный элемент управления будет открыт. В этом контексте вас могут заинтересовать и другие полезные команды диалогового окна «Выполнить».
Значок «Этот компьютер»
Следующая возможность — использовать значок «Этот компьютер» на рабочем столе (если включено его отображение) или аналогичный значок в Проводнике.

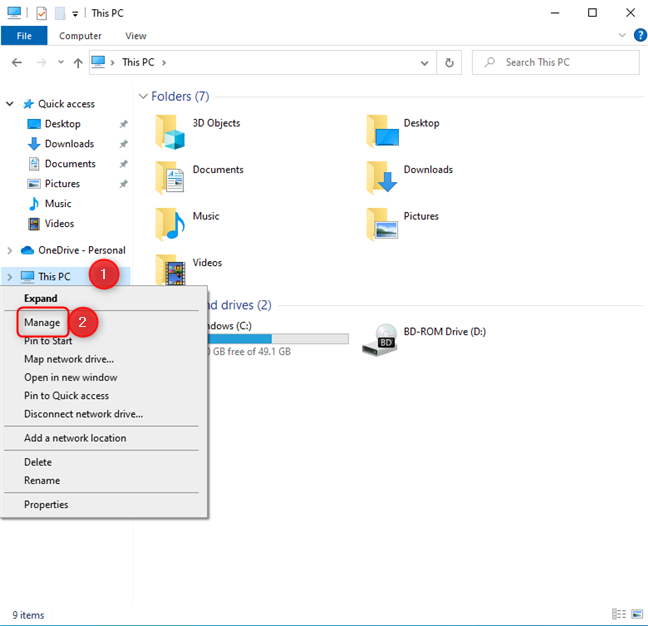
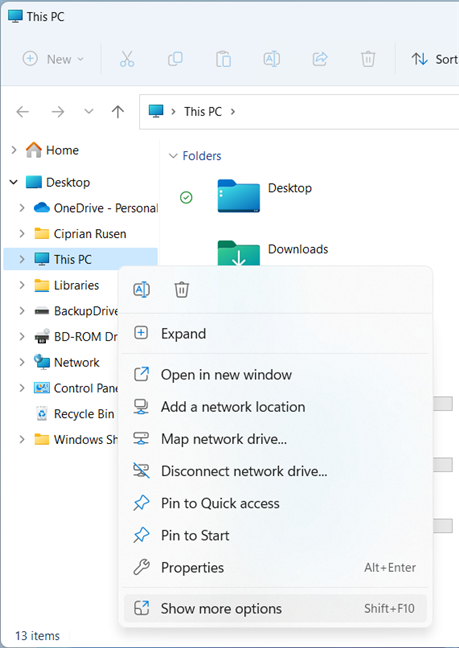
Нажмите правой кнопкой мыши по значку «Этот компьютер» и выберите пункт «Управление» для запуска управления компьютером. В Windows 11 после нажатия правой кнопкой мыши потребуется нажать «Показать дополнительные параметры», чтобы появилось классическое контекстное меню с нужным элементом.
В разделе «Все приложения» в меню «Пуск», а также в панели управления Windows 11 присутствует папка «Инструменты Windows».

Она, в свою очередь, содержит ярлыки для запуска большинства встроенных системных инструментов, включая «Управление компьютером».
Помимо указанных методов, вы можете использовать запуск compmgmt.msc из командной строки, диспетчера задач, путем создания ярлыка, или ручным запуском файла
C:\WINDOWS\system32\compmgmt.msc
Если при попытке запуска оснастки «Управление компьютером» вы видите сообщение об ошибке, связанной с тем, что она ограничена политикой (подробнее на тему: Консоль управления MMC не может создать оснастку), вы можете:
Если у вас остаются вопросы, касающиеся рассмотренной темы, вы можете задать их в комментариях ниже — я постараюсь дать ответ.
In this post, we will show you how to open Computer Management on a Windows 11/10 PC. Computer Management is a powerful application that allows you to access a variety of administrative tools from a single interface, including Task Scheduler, Event Viewer, Device Manager, Windows Services Manager, and more. The tool is primarily designed for system administrators and advanced users, but with some technical knowledge and administrative privileges, you can effectively use Computer Management to monitor various aspects of your system, manage system resources, diagnose and troubleshoot issues, and perform other basic operations.

To use Computer Management, you should know how to open it on a Windows 11/10 PC. Interestingly, there are multiple ways to open the tool. In this post, we will take a detailed look at them so that you can choose the one that is most accessible and convenient for you. Knowing alternative methods also helps during troubleshooting and ensures the tool can be accessed whenever needed.
Here are the various methods of opening Computer Management on a Windows 11/10 PC:
- Use Windows Search
- Use the Power User menu
- Use File Explorer
- Use Command Prompt/PowerShell/Windows Terminal
- Use the Run command
- Use Start menu
- Use Control Panel
- Use a Desktop Shortcut
- Use Task Manager
Let us have a look at them one by one.
1] Use Windows Search

Windows Search allows you to quickly find files, programs, emails, and other items on your system.
To open Computer Management using Windows Search, place your cursor in the search box on the left side of the taskbar and type ‘computer’. Computer Management will show up in search results. Click ‘Open‘ or ‘Run as administrator’ on the right panel.
2] Use the Power User menu

Power User menu, also known as the WinX (Win+X) menu offers another convenient way to open Computer Management.
Right-click on the Start button icon. A menu will appear. Click on Computer Management. The app will open on your computer screen.
3] Use File Explorer

You can use File Explorer in two different ways to open Computer Management.
First, open the File Explorer window (click on the Folder icon in your taskbar) and navigate to This PC in the left panel. Right-click and select Manage (or right-click > Show more options > Manage).
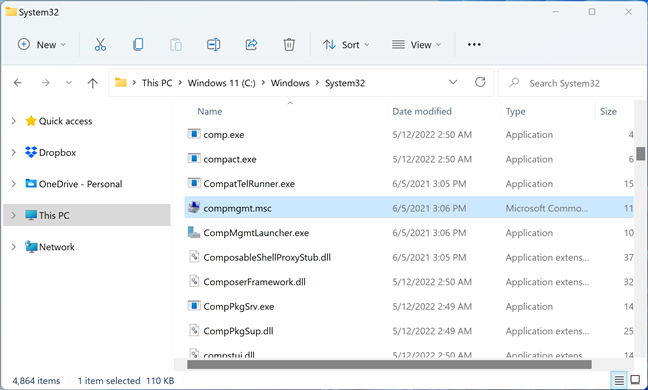
Second, open file Explorer and type compmgmt.msc in the address bar on top. Press the Enter key to open Computer Management.
The second method navigates you to the physical location of the Computer Management file, which is C:\Windows\System32\compmgmt.msc. You can try this method if you’re not able to open Computer Management using other methods.
4] Use Command Prompt/PowerShell/Windows Terminal

To open Computer Management using Command Prompt or PowerShell or Windows Terminal, launch the command line tool you prefer.
To open Command Prompt, press Win+R, type cmd in the Run dialogue box, and press Enter. To open PowerShell or Windows Terminal, press Win+X followed by I.
Once the app runs, execute the following command:
compmgmt.msc
The above command will open Computer Management on your Windows 11/10 PC.
5] Use the Run command

The Run dialogue box offers a quick way to open programs and system tools without navigating through menus.
To open Computer Management using the Run dialog box, press Win+R, type compmgmt.msc in the Run dialogue box, and press Enter.
6] Use Start menu

Start menu is a central hub that provides access to various features, settings, and applications on your system.
To open Computer Management using the Start menu, click on the Start button in the taskbar or press the Windows key. Then click on All apps button in the top-right corner. Navigate to the Windows Tools option in the list of apps and click on it. A window will appear. Double-click on Computer Management to open the app.
Note: Administrative Tools has been renamed into Windows Tools in Windows 11. If you’re using Windows 10, you’ll have to open the Windows Administrative Tools folder to open Computer Management.
7] Use Control Panel

Another method of opening Computer Management is using the Control Panel.
Press Win+R, type control in the Run dialogue box, and hit Enter. The Control Panel window will appear. Navigate to System and Security > Windows Tools/Administrative Tools. Double-click on Computer Management to open it on your Windows PC.
8] Use a Desktop Shortcut

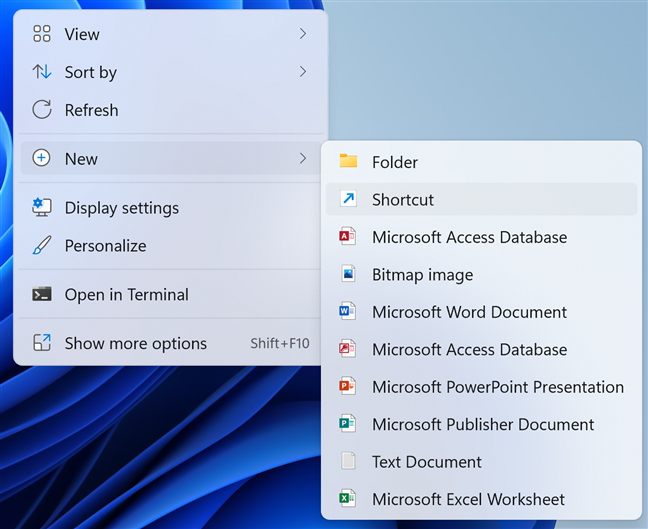
You may create a desktop shortcut for Computer Management to run the app quickly from your desktop.
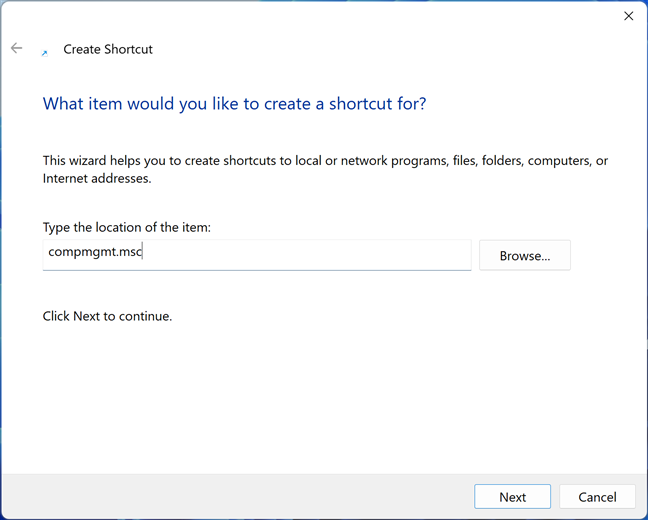
Right-click anywhere in the empty area on your desktop and select New > Shortcut. Create Shortcut window will appear. Type C:\WINDOWS\system32\compmgmt.msc or simply compmgmt.msc in the Type the location of the item field and click on the Next button. Type Computer Management in the Type a name for this shortcut field and click on the Finish button. The app’s icon will appear on your desktop. Double-click on the icon to open the app.
9] Use Task Manager

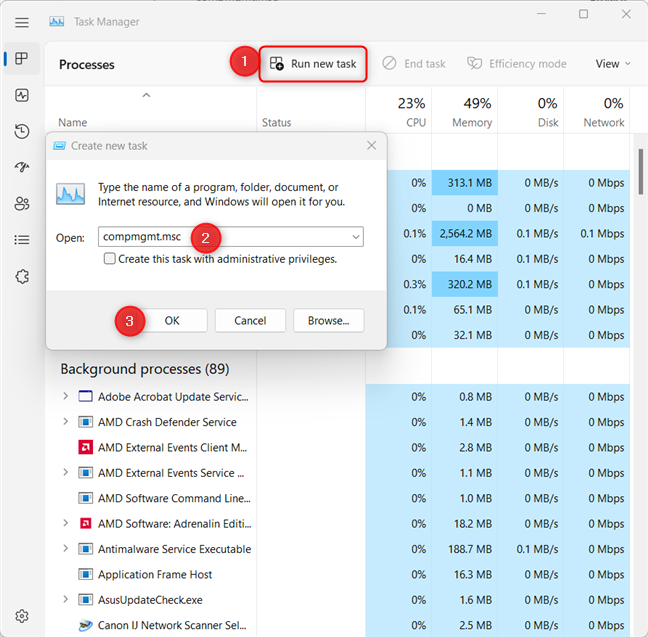
You can also open Computer Management using the Task Manager app in Windows.
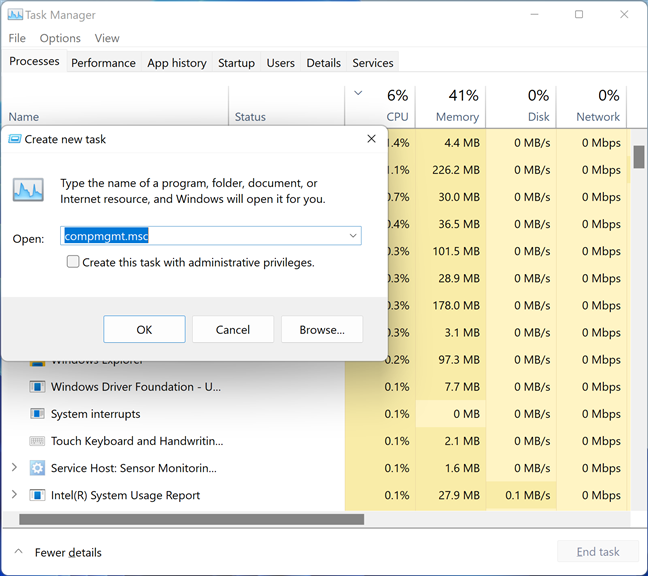
Open Task Manager and click on the Run new task button on top. Type compmgmt.msc in the Create new task window and hit Enter.
I hope you find this useful.
Read: Computer Management not opening or responding in Windows.
How to disable computer management in group policy?
To Disable Computer Management MMC Snap-in via group policy, open the Group Policy Editor by pressing Win+R and typing gpedit.msc in the Run dialogue box. In the Group Policy Editor window, navigate to User Configuration > Administrative Templates > Windows Components > Microsoft Management Console > Restricted/Permitted snap-ins in the left panel. Double-click on Computer Management in the right panel. In the Computer Management properties window, select Disabled and click on Apply > OK. Close the Group Policy Editor and reboot your PC to apply the changes.
Read: How to open Disk Management in Windows.
How do I access MMC in Windows 11?
To open MMC or Microsoft Management Console, press Win+R and type mmc in the Run dialogue box. Press Enter and select Yes in the User Account Control prompt. Alternatively, you can use Command Prompt or Windows PowerShell to access MMC in Windows 11. Press Win+X to open the Power User menu. Select Terminal (Admin). Select Yes in the UAC prompt. Type mmc in the PowerShell window and press the Enter key.
Related: Local Users and Groups is missing from Computer Management.
Computer Management is part of many Windows versions, and it’s an old tool that geeks and IT pros appreciate. You can think of this app as a control panel that gives you access to many advanced administration tools: Task Scheduler, Event Viewer, Performance Monitor, Device Manager, Disk Management, Services, and more. When you have to troubleshoot Windows, Computer Management gives you access to many tools you need in one place. However, to use it, you need to know how to start it. Here’s how you can open Computer Management in Windows 10 and Windows 11:
NOTE: This guide covers Windows 10 and Windows 11. To keep this guide short, most screenshots are taken in Windows 11. However, things work the same in Windows 10, and you can even use some of these methods in Windows 7 if you still use this dated operating system. If you do not know your version of Windows, read this tutorial: How to tell what Windows I have?
1. Use the Computer Management shortcut from the WinX menu
One of the fastest ways to open Computer Management is to use the WinX menu or the Power User menu. To access it, either press the Windows + X keys on your keyboard or right-click or tap-and-hold the Start icon. In the menu that appears, choose Computer Management.
Press Win + X, followed by G to open Computer Management
If you prefer using the keyboard, you can press Windows + X, followed by G, for the same result, and the Computer Management window opens immediately.
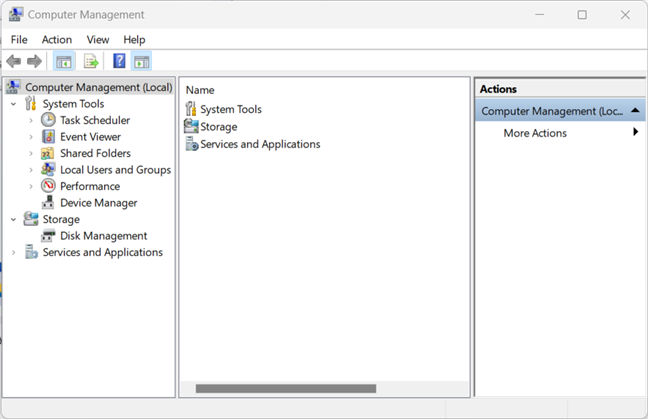
Computer Management in action
The WinX menu works the same in Windows 10 and Windows 11, even though it looks slightly different.
TIP: Here are 8 things you can do with Computer Management in Windows.
2. Use Search to run Computer Management
If you’re using Windows 10, click or tap inside the Search box on the taskbar. Then, type the word computer. Then, in the Windows 10 Search window, click or tap the Computer Management result.
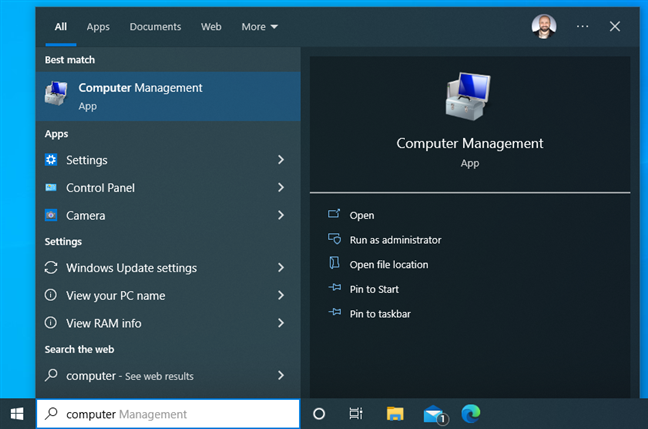
In Windows 10, search for Computer Management
NOTE: Here are 12 tips on how to search in Windows 10.
If you’re using Windows 11, click or tap the Search icon, type the word computer and click or tap the Computer Management search result, which should be at the top of the list.
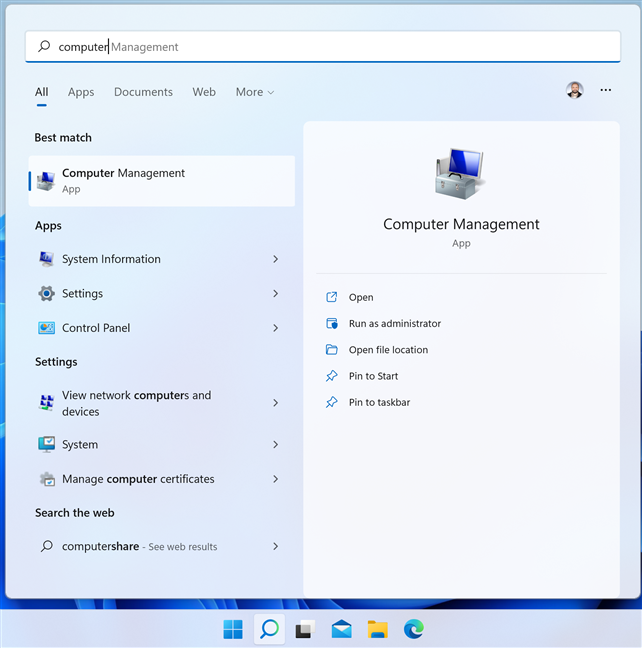
In Windows 11, search for Computer Management
If you prefer using the keyboard, you can search even faster like this: press the Windows key, type the word computer, and press Enter as soon as you see your search results.
3. Open Computer Management from CMD, PowerShell, or Windows Terminal
You can start Computer Management from the Command Prompt too. The command you need to use works just as well in PowerShell and Windows Terminal. Therefore, start the command-line tool you prefer, using any of the following guides:
- How to open Command Prompt. Here’s also How to open Command Prompt when Windows doesn’t boot.
- 9 ways to open PowerShell in Windows (including as administrator)
- 9 ways to open the Windows Terminal
Then, in the command-line app you’ve started, run this command and press Enter:
mmc compmgmt.msc
Or, simply:
compmgmt.msc
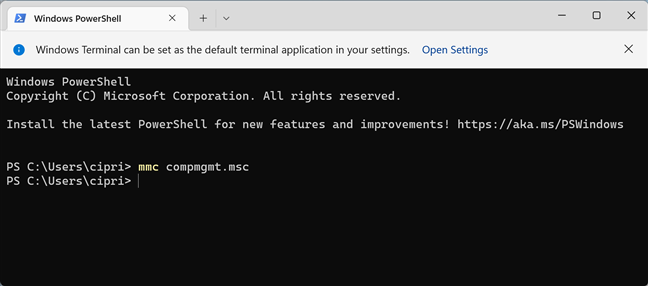
Run mmc compmgmt.msc in CMD, PowerShell, or Terminal
Both commands open the Computer Management tool.
4. The Run command for opening Computer Management
The Run window is another quick way of opening system tools in Windows, and you can use it to open Computer Management too. Press the Windows + R keys on your keyboard to access the Run window, and type either of these commands:
compmgmt.msc
mmc compmgmt.msc
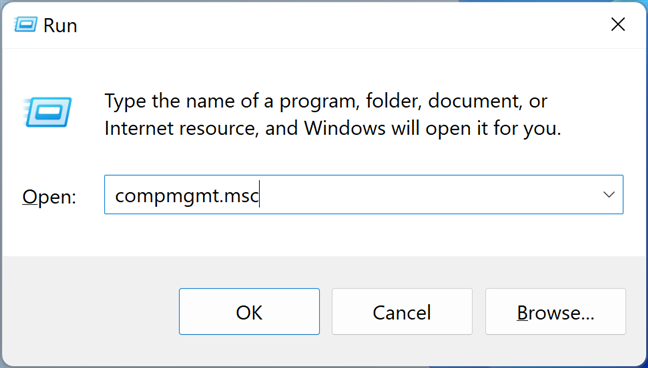
Run compmgmt.msc
Press Enter on the keyboard or click or tap OK to see the Computer Management window on your screen.
5. Use the Start Menu to start Computer Management
In Windows 10, this method is rather quick. However, that’s not the case for Windows 11. I’ll cover both operating systems, starting with Windows 10:
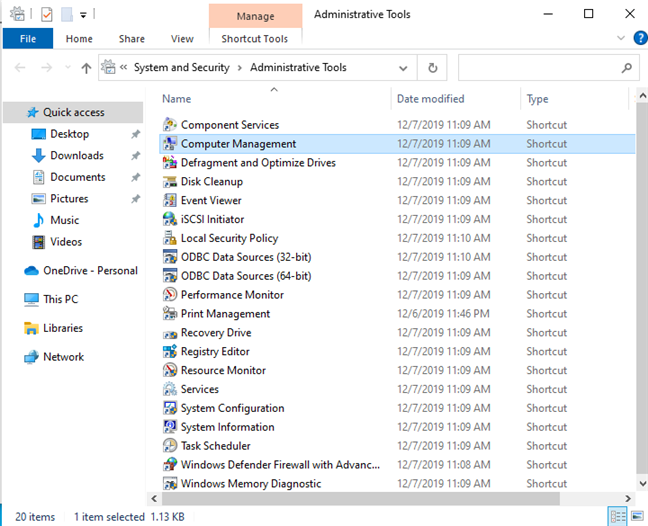
In Windows 10, click or tap on Start, and scroll down the list of apps to those that start with the letter W. There, open the Windows Administrative Tools folder, and click or tap Computer Management.
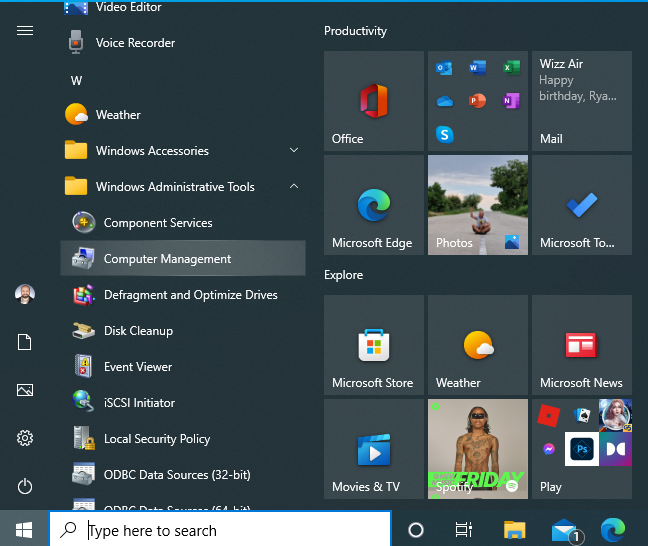
Open Computer Management from the Windows 10 Start Menu
If you’re using Windows 11, click or tap Start and then All apps. Next, scroll down the list of apps to those that start with the letter W. There, click or tap on Windows Tools.
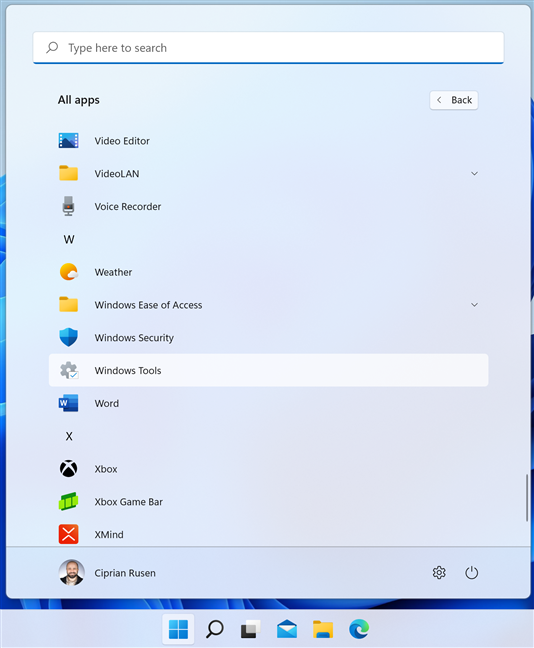
In the Windows 11 Start Menu, go to All Apps > Windows Tools
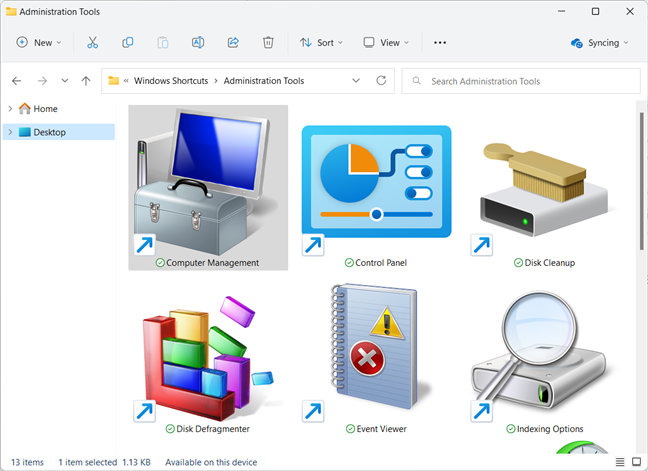
In the Windows Tools window, locate the Computer Management shortcut, and click or tap on it.
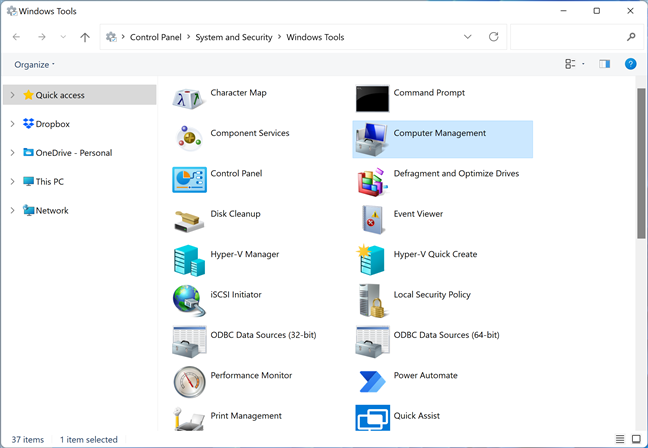
Find and run the Computer Management shortcut
TIP: If you’re new to Windows 11, here’s how to use the Windows 11 Start Menu.
6. How to use the Control Panel to open Computer Management
Another method starts with you opening the Control Panel. Then, go to “System and Security > Administrative Tools.”
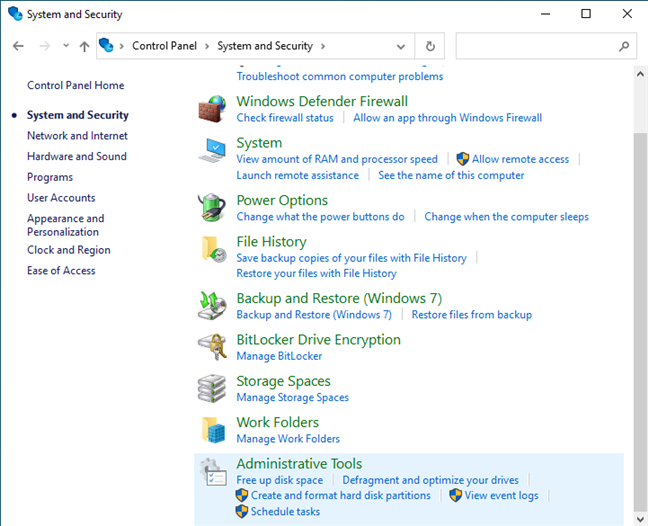
Go to Control Panel > System and Security > Administrative Tools
If you’re using Windows 11, be aware that Administrative Tools has been renamed into Windows Tools. Therefore, in this operating system, go to “System and Security > Windows Tools.”
Then, find the Computer Management shortcut and double-click on it.
Double-click on the Computer Management shortcut
7. Create a Computer Management shortcut and pin it on your desktop
You can also create a shortcut for Computer Management and place it on your desktop or someplace else. To make the shortcut, right-click or tap and hold anywhere on the empty space on your desktop, and choose “New > Shortcut.”