
This guide will explain how to utilize a SetupComplete.cmd batch file in a Windows 7 image. The SetupComplete.cmd batch file can be used to run commands after an image has been deployed or restored. This can facilitate the cleanup of unattend files, the installation of drivers, or other common post-deployment tasks.
1. On the Windows 7 image, we will need to be logged in as either the administrator account or your installer account with administrator permissions.
2. Open up Windows Explorer and browse to C:\Windows\Setup
3. You will notice that you may or may have a setup folder. We will want to create a new folder in here called Scripts as in C:\Windows\Setup\Scripts.
4. Once we have created the Scripts folder, go into it to create a new text file. Rename it as SetupComplete.cmd.
5. Right-Click on the SetupComplete.cmd and choose the Edit command. This will open the file in Notepad.
6. Add your entries in here and then save the file. These commands are run after setup completes but before unattend executes any synchronous or asynchronous commands.
For example, if you are deploying images using an unattend.xml file, we will probably want to remove that file since it can contain sensitive data such as the Windows 7 CD Key and passwords. So for my example, I will cleanup all of the unattend files used for deploying by adding these commands:
del /q /f c:\windows\system32\sysprep\unattend.xml
 del /q /f c:\windows\panther\unattend.xml
You can also silently install drivers using a silent flag or even rerun the Windows Assessment Utility (which checks to see if you can enable Aero or not) by adding this line:
winsat formal
If you have the Novell Client installed in your image, you can have it apply a settings file (MNsettings) by adding this line:
c:\novell\client\setup.exe /NCPF:MNsettings.txt
This SetupComplete.cmd file will run after setup is completed and before any synchronous commands are executed in the unattend.xml.
7. Finally, sysprep your image. You can also add this file after you have sysprepped and captured the image if you are using .wim images and using imagex.
SetupComplete.cmd Essentials
– Location: C:\Windows\Setup\Scripts\SetupComplete.cmd
– Runs as the system user account
– Runs after setup completes but before any synchronous or asynchronous commands are executed in the unattend.xml file
– Requires use of a full path for the location to .exe or .msi files
Jimmy Shttp://blogs.tech-recipes.com/jimmyselix
Jimmy Selix is an early adopter that loves to be one of the first on the block to have the latest and greatest in technology and gadgets. Another love of his is being able to share his knowledge to others seeking it. Feel free to drop any comments or questions that you may have.
Время на прочтение7 мин
Количество просмотров80K
Пошаговая инструкция с примерами

Наверняка каждый может вручную установить и настроить операционную систему Windows. Но для случая, когда в производственных целях эту задачу следует выполнить десятки или сотни раз, возникает необходимость автоматизированной установки.
В этой статье описываются основные шаги и советы как создать «тихую», автоматизированную установку операционной системы, настроить ее и оттестировать результат. Безусловно, в сети можно найти достаточно большое количество статей и советов про отдельные фазы такой задачи, но общие инструкции и ответы на вопросы: С чего начать? Что необходимо подготовить? Какие основные шаги процесса? – к сожалению, редкость.
Поэтому, ответы на эти вопросы здесь найдут те, кто выполняют такую задачу впервые.
Windows Embedded Standard 7×64 выбрана в качестве операционной системы для примеров.
Требования к рабочей машине:
Должны быть установлены:
- Windows Embedded Standard 7 SP1 (Tools)
Toolkit можно скачать тут (evaluation version)
В предыдущих версиях Windows для редактирования файлы ответов используется Windows System Image Manager (SIM). Windows SIM – это часть Windows Automated Installation Kit (AIK), которую можно скачать тут. Интерфейс Image Configuration Editor в Windows Embedded Standard 7 Tools очень схож с интерфейсом Windows SIM.
Должны быть доступны:
- Оригинальный ISO-образ для установки Windows(+лицензионный ключ, если не планируется ставить evaluation версию).
- Все необходимые драйвера для целевого устройства.
- Приложения, которые планируется установить в системе сразу после установки ОС.
Основные инструменты:
- Windows Embedded Standard 7 SP1 (Tools)\Image Configuration Editor (ICE)
- Windows Embedded Standard 7 SP1 (Tools)\Windows PE Tools Command Prompt
- Symantec Ghost\Ghost Boot Wizard
Перед началом работы рекомендуется ознакомиться с данными инструментами и фазами установки Windows.
Структура папок в рабочей среде:
Создайте рабочую папку. Например, папку с именем “Work”.
Скопируйте содержание оригинального ISO-образа с установкой Windows в свою рабочую директорию. В результате должно получиться следующее:
Обратите внимание на две подпапки в Distribution Share (DS) folder: “$OEM$ Folders” и “Out-Of-Box Drivers”.
Создайте папку “Work\DS\Out-of-Box Drivers\”. Тут будут храниться необходимые для целевого устройства драйвера.
Создайте структуру папок “Work\DS\$OEM$ Folders\(CustomFolder)\$OEM$\$$”. Тут будут храниться дополнительные файлы, приложения, реестровые файлы, конфигурации и скрипты.
Содержание папки \$OEM$\$$ автоматически копируется в папку %WINDIR%, поэтому может быть использовано на любой фазе установки Windows. Более детально о $OEM$ папках.
Последовательность шагов для создания автоматизированной установки:
Шаг 1. Создание файла ответов AutoUnattend.xml.
Шаг 2. Добавление в процесс автоматической установки ОС драйверов.
Шаг 3. Добавление дополнительных приложений и системных настроек с помощью файла ответов, скриптов и команд.
Шаг 4. Создание тестового образа.
Шаг 5. Снятие образа с тестовой машины и развертывание на целевых устройствах.
Эти шаги можно поделить на подпункты со множеством деталей. Но в данной статье планируется дать только общее видение выполнения поставленной задачи.
1. Создание файла ответов AutoUnattend.xml.
Чтобы сделать установку полностью автоматизированной, нужно как минимум дать ответы на все вопросы мастера установки Windows. Файл ответов в XML-формате содержит все необходимые для этого поля.
Image Configuration Editor (ICE) может быть использован для создания и редактирования файла ответов автоматизированной установки. Конечно, для этого можно использовать любой текстовый редактор, но уже без удобств и графического интерфейса ориентированного на данную задачу ICE.
ICE позволяет создавать файл ответов, добавлять компоненты (features), драйвера и все необходимые опции, позволяющие сделать установку полностью автоматизированной.
Интуитивный пользовательский интерфейс и расширенная система поиска делают ICE приоритетным при выборе инструмента создания и редактирования файла ответа.
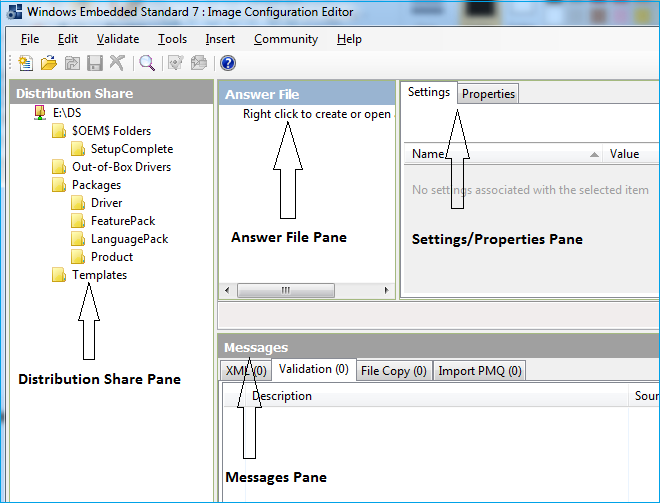
Для начала работы с ICE:
- Откройте Distribution Share (DS): в нашем случае это будет “Work\DS”.
- Создайте новый (blank) файл ответов. Добавьте компоненты и опции.
Features
Windows Features (в данном тексте здесь и дальше в качестве русского эквивалента используется слово «компонент») добавляются в соответствии с требованиями целевого устройства. ICE может автоматически добавить необходимые и опциональные компоненты после того, как вы добавите требуемый минимум.
Если Ваше устройство ограничено в размере дискового пространства – обратите внимание на показатель Estimated Footprint: это предположительный размер, который займет Windows на диске после установки.

Options
У всех компонентов есть одно или несколько свойств. Как минимум, необходимо определить ответы на вопросы стандартной установки: язык установки по умолчанию, подтверждение Microsoft Software License Terms, ключ продукта, на какой диск и в какой раздел будет установлена Windows, локальные установки.
Также автоматически можно задать следующие настройки Windows Welcome: язык и регион, имя пользователя, имя компьютера, обои рабочего стола, дата и время, текущее местоположение, домашняя группа, беспроводная сеть, пароль администратора.
Все опции настраиваются на одной или несколькоих фазах установки Windows. Обратите внимание на какой конкретной фазе Вы планируете настроить конкретную опцию.
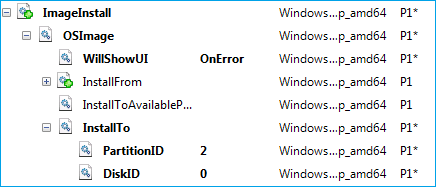
Настройка дисков
На первой фазе установки Windows (Windows PE) можно настроить создание и удаление разделов физического диска. Набор опций позволяет удалить существующие разделы, создать новые разделы, указать типы, задать форматы, буквы и метки разделов, выбрать на какой диск будет установлена Windows.
Чтобы создать новый раздел на диске для опции DiskConfiguration/Disk/CreatePartitions в контекстном меню выберите действие «Insert New CreatePartition«.

В появившемся разветвлении CreatePartition введите:
- Порядковый номер создаваемого раздела (Order);
- Тип (Type) — Primary, EFI, Extended, Logical или MSR;
- Размер (Size);
- И будет ли раздел фиксированного размера либо расширяемый (Extend) — true или false. Если Extend=true, опцию Size задавать не нужною
Чтобы добавить дополнительные характеристики к созданным разделам для опции DiskConfiguration/Disk/ModifyPartitions в контекстном меню выберите действие «Insert New ModifyPartition».

В появившемся разветвлении ModifyPartition введите:
- Порядковый номер (Order) — он должен совпадать с порядковым номером в разделе CreatePartition;
- Метку раздела (Label);
- Букву раздела (Letter);
- Формат (Format) — NTFS или FAT32;
- Будет ли раздел фиксированного размера либо расширяемый (Extend) — true или false;
- Активность раздела (Active) — true либо false;
- Тип раздела (TypeID). Например, для системного раздела, используемого для хранения инструментов восстановления системы, TypeID следует присвоить 0х27.

Опция ImageInstall позволяет выбрать на какой из разделов будет устанавливаться операционная система.
Проверка и сохранение файла ответов
Чтобы проверить файл ответов на ошибки используйте F5. Предупреждения и ошибки будут отображены в панели сообщений.
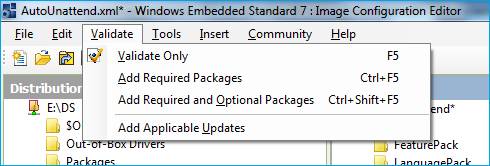
Если были пропущены обязательные пакеты, их можно добавить автоматически с помощью сочетаний клавиш Ctrl+F5.
Ctrl+Shift+F5 добавляет все обязательные и опциональные пакеты. Используя эту опцию, следует обратить внимание на то, что footprint может быть значительно превышен.
Файл ответов должен быть назван Autounattend.xml и сохранен в корень рабочей директории.
2. Добавление драйверов в процесс автоматической установки ОС.
Чтобы включить в автоматическую установку драйвера, необходимо заранее скачать их с официального сайта и:
- Добавить в Out-Of-Box drivers папку с установочными файлами драйверов.
- Добавить в одну из фаз установки Windows путь к каждому драйверу. Внимание: определенный драйвер должен быть установлен на определенном этапе (в определенной фазе).
3. Добавление дополнительных приложений и системных настроек с помощью файла ответов, скриптов и команд.
Чтобы добавить дополнительные файлы в установку используется папка $OEM$. Директория $OEM$ и ее подпапки автоматически определяются установкой Windows и копируются на жесткий диск.
Например, все файлы и папки из “DS\$OEM$ Folders\\$OEM$\$$” будут скопированы в %WinDir%. Запускать скрипты и установку приложений можно прямо оттуда.
Для использования папки $OEM$ необходимо сделать следующее:
- В файле ответов свойству “UseConfigurationSet” присвоить значение “true”
- В панели Distribution Share в ICE развернуть $OEM$ Folders.
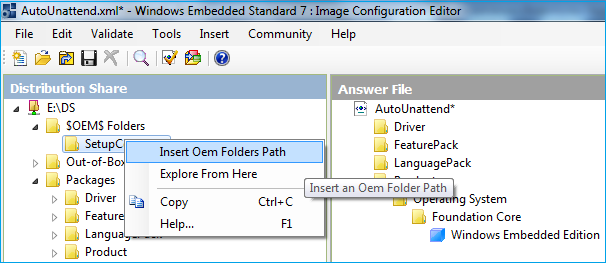
- Нажать правой кнопкой мыши на CustomFolder, и выбрать “Insert Oem Folders Path”.
Чтобы сразу после установки ОС автоматически установить приложения, задать их настройки, добавить записи реестра и файлы, можно использовать следующие способы:
- RunSynchronous и RunAsynchronous команды в файле ответов.
- FirstLogonCommands в файле ответов. Эти команды выполняются автоматически при первом логоне пользователя в систему.
- SetupComplete.cmd запускается автоматически в конце установки ОС. Установка Windows ищет файл с именем SetupComlete.cmd в директории “%WINDIR%\Setup\Scripts”, поэтому следует скопировать этот файл в директорию “DS\$OEM$ Folders\(CustomFolder)\$OEM$\$$\Setup\Scripts” в рабочей папке.
У каждого из этих способов есть свои плюсы и минусы. И обязательно следует учитывать контекст выполнения команд.
Для «тихой» установки приложений во время установки ОС используйте соответствующие ключи: /s, /silent или /r с setup.iss файлом для InstallShield установки, /qn для MSI-пакетов, /verysilent /SP — для InnoSetup, /s для Wiseinstaller и т.д. Используйте help и опцию /? чтобы ознакомиться с опциями командной строки установки приложения.
4. Создание тестового образа.
Тестовый образ может быть создан как ISO-образ или как загрузочный USB.
Пример создания ISO-образа, используя инструмент oscdimg (%ProgramFiles%\Windows Embedded Standard 7\Tools\AMD64\oscdimg.exe) для случая, если папка Work лежит в корне диска С:
oscdimg -bC:\work\boot\etfsboot.com -u2 -h m c:\work c:\work\wes7x64_test.iso
Для тестовых целей советуем включить в установку на время тестирования стандартные инструменты для проверки всех необходимых конфигураций (accessories, Microsoft management console и т.д.).
5. Снятие образа с тестовой машины и развертывание на целевых устройствах.
Если запланировано сделать образ с тестовой машины и применить его на целевых устройствах, для начала нужно подготовить тестовую машину с помощью SYSPREP. Это требование от Microsoft. Иначе Microsoft не предоставляет поддержку продукта.
Sysprep подготавливает установку Microsoft Windows к дублированию, аудиту и доставке клиенту.
Sysprep удаляет данные конкретной системы из Windows, такие как ComputerSID. Поэтому подготовка с помощью SYSPREP – важный шаг в создании образа.
Создать образ можно используя WindowsPE с инструментами ImageX или SymantecGhost.
Используя WindowsPE Tools Command Prompt можно создать загрузочный WinPE образ с автоматизированным созданием wim-файла.
Используя Symantec Ghost\Ghost Boot Wizard можно создать загрузочный Ghost образ с автоматизированным созданием ghost-файла.
Каждый из этих образов может быть использован для дальнейшей доставки на целевые устройства.
Образ, полученный в результате, может быть использован в lite-touch и zero-touch стратегии развертывания.
Skip to content
When the Windows Operating system is installed via a clean installation or via an upgrade, the Windows Setup binary is executed. The Windows setup allows custom scripts to be executed such as the SetupComplete.cmd and ErrorHandler.cmd to enable the installation of applications or the execution of other tasks during or after the Windows setup process is completed. These scripts are stored in the following location:
%WINDIR%\Setup\Scripts\SetupComplete.cmd

%WINDIR%\Setup\Scripts\ErrorHandler.cmd
Using the ErrorHandler.cmd script it is possible to execute arbitrary code when the Windows operating system is upgraded. Even though it could be considered as an unconventional tactic, it could be combined with scheduled tasks for example to run Windows Setup and establish persistence. The following code can be used as a proof of concept of code execution that will display a message box when the Windows Setup binary is initiated:
using System;
using System.Collections.Generic;
using System.Linq;
using System.Threading.Tasks;
using System.Windows.Forms;

namespace Windows_setup1
{
    internal static class Program
    {
        [STAThread]
        static void Main()
        {
            string message = "Visit pentestlab.blog";
            string title = "Pentestlaboratories";
            MessageBox.Show(message, title);
        }
    }
}

Since the Windows Setup will look during execution and when an error is caused in the setup process for the presence of ErrorHandler.cmd inside the Scripts folder, it is possible to use this script to execute arbitrary code.

Running the setup.exe will cause an error which as a result will force the execution of ErrorHandler.cmd script.

Replacing the message box executable with an implant will allow a command and control session to be established.

The process tree of the implant is specified below:
Setup.exe --> cmd.exe --> demon.x64.exe
References
- https://www.hexacorn.com/blog/2022/01/16/beyond-good-ol-run-key-part-135/
- https://cocomelonc.github.io/persistence/2023/07/16/malware-pers-22.html
The Windows 10 Setup program, or setup.exe which is part of the installation media, supports a set of command line arguments. Using those arguments, you can modify the behavior of Windows installation. In this article we will review command line switches available for setup.exe in Windows 10.
So, Setup.exe installs or upgrades Windows. The following command line arguments can be used to modify the behavior of Windows installation:
Switch: /auto
Parameters : Upgrade; DataOnly; Clean
Action : Automate install with migration choice for the installation.
The media setup UI and progress screens are shown by default, but are automated.
This switch also assumes the following default configurations :
EULA acceptance, Dynamic Update is enabled, telemetry collection and upload opt — in, OOBE will be skipped, PBR will be updated or created.
Example : setup.exe /auto upgrade
Switch : /quiet
Parameters : N /A
Action : The quiet flag will suppress any setup UX, including rollback UX
Example : setup.exe /auto upgrade /quiet
Switch : /pkey
Parameters : 5×5 product key
Action : Supplies setup with the specified product key.
This parameter is not necessary when upgrading with volume licensed media or media that contains a pid.txt in the sources folder.
Example : setup.exe /auto upgrade /pkey ABC12-DEF34-GHI56-JKL78-MNP90
Switch : /showoobe
Parameters : Full; None
Action : When /showoobe is set to Full, the end user must interactively complete OOBE.
Alternatively, when /showoobe is set to None, OOBE is skipped and components are set to their default settings.
Example : setup.exe /auto upgrade /showoobe full
Switch : /noreboot
Parameters : N /A
Action : Setup will not automatically reboot the PC when it completes down — level OS tasks.
The next time the PC is rebooted, setup will continue.
Example : setup.exe /auto upgrade /noreboot
Switch : /DynamicUpdate
Parameters : Enable; Disable
Action : Specifies whether setup will perform Dynamic Update operations (search, download, and install updates).
Example : setup.exe /auto upgrade /DynamicUpdate disable
Switch : /Postoobe \setupcomplete.cmd
Parameters : Local file path or UNC network path to a file named setupcomplete.cmd
Action : Injects setupcomplete.cmd file from the specified location.
Setupcomplete.cmd is a customized script to perform tasks after the installation completes but before first user login.
It is run with System privileges.
Example : setup.exe /auto upgrade /postoobe c:\script\setupcomplete.cmd
Switch : /Postrollback
Parameters : Local file path or UNC network path to a file named setuprollback.cmd
Action : Injects setuprollback.cmd file from the specified location.
Setuprolback.cmd is a customized script to perform tasks after the installation fails and the PC has rolled back to its previous OS.
It is run with the same privileges as the user or process that launched setup.
Example : setup.exe /auto upgrade /postrollback \MyShare\script\setuprollback.cmd
Switch : /installfrom
Parameters : Local file path or network path to a specific.wim
Action : Specifies location for installation source media /files
Example : setup.exe /auto clean /installfrom d:\myWim\customwim.wim
Switch : /PBRUpdate
Parameters : Enable; Disable
Action : When /PBRUpdate is set to Enable, setup will update or create the PBR partition.
Conversely, when /PBRUpdate is set to Disable, setup will not update or create the PBR partition
Example : setup.exe /auto upgrade /PBRupdate disable
Switch : /migratealldrivers
Parameters : All; None
Action : When /migratealldrivers is set to All, setup will attempt to migrate all drivers as part of the installation.
In contrast, when /migratealldrivers is set to None, setup will not migrate anydrivers as part of the installation.
NOTE: this switch should only be used in testing and test envoriments.It should not be used in production.
Example : setup.exe /auto upgrade /migratealldrivers none
Switch : /installdrivers
Parameters : Local file path or UNC network path to a folder that contains.inf files
Action : Setup will inject all driver.infs found in the specified location during the installation process.
Setup will recursively search through all the subfolders of the specified location.
Example : setup.exe /auto upgrade /installdrivers c:\myUpgrade\drivers
Switch : /Telemetry
Parameters : Enable; Disable
Action : When /Telemetry is set to Enable, setup will collect and upload telemetry generated by the installation.
However, when /Telemetry is set to Disable, setup will not collect and upload installation — related telemetry.
Example : setup.exe /auto upgrade /Telemetry enable
Switch : /copylogs
Parameters : Local file paths and UNC network paths
Action : Upon failure, setup will copy or upload compressed logs to the specified location.
Please note that the PC and /or user must have permission and network access to the specified file path.
This command runs in the system context so may not have permissions to copy to locations that require user permissions
Example : setup.exe /auto upgrade /copylogs \MyShare\UpgradeLogs
Here are some usage examples.
An admin wants to upgrade the departments PCs from Windows 7 Enterprise overnight. He does not want the setup user interface to appear, but he does want the end users to manually go through the Out of box experience(known as OOBE) experience.
The following command line can be used to orchestrate the full upgrade to Windows vNext, requiring user input only once the machine reaches OOBE :
Setup.exe /auto upgrade /quiet /showoobe full
Alternatively, a deployment engineer may want to collect logs and other diagnostic information from test PCs in the event of a failure.
The following command line instructs setup invoke the setuprollback.cmd script after an installation failure :
Setup.exe /auto upgrade /installdrivers c:\myUpgrade\drivers /postrollback c:\setuprollback.cmd
That’s it. Have something to add? Welcome to comments! (via MDL).
Support us
Winaero greatly relies on your support. You can help the site keep bringing you interesting and useful content and software by using these options:
If you like this article, please share it using the buttons below. It won’t take a lot from you, but it will help us grow. Thanks for your support!
Using the setupcomplete.cmd file offers an alternative, and perhaps more traditional, approach to adding commands compared to the unattend.xml method
It is a cmd file to be placed in c:\windows\setup\scripts with name setupcomplete.cmd
Caution: The file runs under the system account privileges.
Upon execution, a black command window appears. Ensure that no commands within this script are overly time-consuming, as there’s a potential risk of abrupt system reboots. Technicians or users might mistakenly assume the installation process has stalled and force a restart.
Resource: Microsoft
Pro Tip: Some manufacturers still employ this method in their master images. If you’re working with a manufacturer’s image, it’s wise to verify the existence of this file.