
When you’re deploying Windows 10 in a customized environment, you specify the selective settings in an answer file. For those, who are not familiar with an answer file, here is what it is. An answer file is an XML file, usually contains the customized settings that would be used by Windows Setup during the installation. Most of the IT professionals like to deploy custom settings in their workplace/organization and it raises the need of answer file. It is located as unattend.xml in Panther folder under windows directory (%windir% or C:\Windows). Extended information on answer file is available in this documentation.
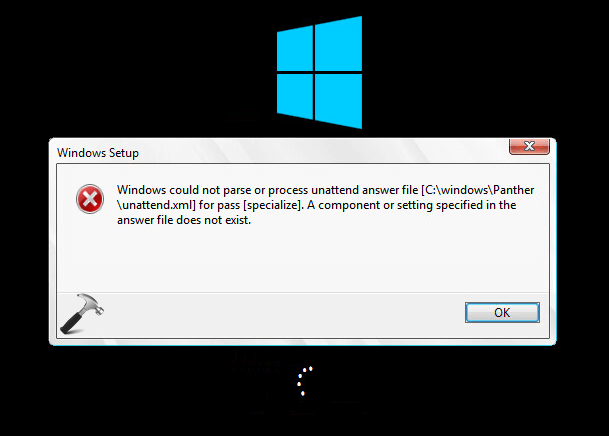
So if there are some incorrect entries in the answer file, Windows Setup won’t be able to process the file. In such a condition, following error will come into play:
Page Contents
Windows could not parse or process the unattend answer file for pass [specialize]. A component or setting specified in the answer file does not exist.
So if you’re facing this issue while deploying Windows 10, and if you know how to correct answer file errors, simply recheck the unattended.xml file and remove the extra code that is not applicable to your environment or causing the issue. Here, note the in some cases, Windows displays the components which is causing error so it would be easy for you to rectify the code. But if you’re an end user with not enough knowledge about modifying answer file and you incidentally started facing this problem, here is how to correct it.
FIX : Windows Could Not Parse Or Process The Unattend Answer File For Windows 10
Windows usually checks for unattend.xml file in %windir%/Panther. By following the steps mentioned below, you’ll be able to allow Windows to skip looking for unattend answer file. Once it skipped answer file verification, it would be able to boot without the above mentioned error. Here’s how to make this possible:
1. When this error appears, simply press Shift + F10 to bring Command Prompt.
2. Now in the Command Prompt window, type regedit.exe command to open Registry Editor. In the Registry Editor window, navigate to following key:
HKEY_LOCAL_MACHINE\SYSTEM\Setup\Status\ChildCompletion
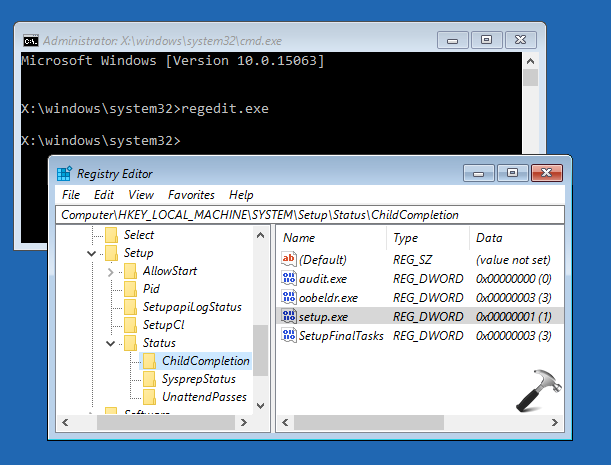
3. In the right pane of ChildCompletion folder, look for setup.exe named registry DWORD (REG_DWORD), the value for which might be corresponding to 1. Double click on that same DWORD and change its Value data to 3 (refer below screenshot). Click OK. Close Registry Editor and Continue to your existing operating system and reboot then.
After restarting your system, Windows will be able to skip checking for unattend answer file and you’ll be able to boot fine, without the error.
That’s it!
RELATED ARTICLES
Problem Explanation
You’ve created a new image, captured it and attempted deployment and received the error:
«Windows could not parse or process unattend answer file [C:\windows\Panther\unattend.xml] for pass [specialize]. A component or setting specified in the answer file does not exist.»
Alternatively, you’ve just made a new MDT Task Sequence and slipstreamed updates into it and received the same error.
Symptoms
- Infinitely looping on first boot
- Windows has encountered a problem, press ok to restart.
- C:\Windows\Panther\Unattend.xml Error (described above)
Reasons
The cause of this is simple, it’s internet explorer 10.0 which you have installed either within the image or slipstreamed into the image.
Fix [SOLVED]
Actually simple, but only if you know where to look and since you’ve probably scrolled down and ignored everything I said above, I’ll get to the point, follow these instructions:
- In your MDT Deployment Workbench, go to your list of task sequences.
- Right click the task sequence you are using to deploy out your new image with IE 10.
- Go to the properties of this task sequence.
- Choose the OSInfo tab and click «Edit Unattend.xml»
- Wait about a year for it to load up the catalogue…. (depending on your machine speed, this can take quite a while, this opens the Windows System Image Manager (WSIM)
- Go to Unattend -> Components -> Specialize
- Choose the Microsoft-Windows-IE-InternetExplorer-Neutral from the list
- Find IE-WelcomeMessage
- The Status should say false, if it doesn’t make sure it does.
- Right click this value and in the context menu (the right click menu) UNTICK «write image value» (See Image for a visual aid)

11. Save the Unattend.xml and to be on the safe side update your deployment share (though I don’t believe this is needed but it makes you feel better inside)
Reinstall your image onto your client and it should work fine for you now 
EDIT [17-11-2013 — MDT 2013]
Having spoken with some of my colleagues I have ascertained that by using MDT 2013 they have not encountered this issue, however if you need to maintain support to deploy Windows XP images then you will not be able to upgrade.
Windows 10: “Reset this PC” Windows 10 Install Errors — [C:\WINDOWS\Panther\unattend.xml] — Unable to…
Discus and support “Reset this PC” Windows 10 Install Errors — [C:\WINDOWS\Panther\unattend.xml] — Unable to… in Windows 10 Installation and Upgrade to solve the problem; I used the “Reset this PC” function through Windows 10 on my laptop in order to improve processing speed, inability to run multiple programs decently…
Discussion in ‘Windows 10 Installation and Upgrade’ started by Christie Hilgert, Sep 12, 2019.
-
“Reset this PC” Windows 10 Install Errors — [C:\WINDOWS\Panther\unattend.xml] — Unable to…
I used the “Reset this PC” function through Windows 10 on my laptop in order to improve processing speed, inability to run multiple programs decently and overall buggy functioning across the laptop and charging function. I do believe some windows files had become corrupted which led me to this step today.
I was not watching the entire time but the laptop performed several resets while the process took place (like it should) and I saw the blue loading screen get to at least 89% complete. The next thing I noticed was the following error message:
Install Windows:
Windows could not parse or process unattend answer file [C:\WINDOWS\Panther\unattend.xml] for pass [auditUser]. The settings specified in the answer file cannot be applied. The error was detected while processing settings for component [Microsoft-Windows-Deployment].
Pressing “Ok” causes the laptop to restart and boot to the log in screen for “Administrator” but has a continuous loading circle underneath and no password entry option. After a few seconds it changes to a black screen with the following error message:
Install Windows:
Windows could not complete the installation. To install Windows on this computer, restart the installation.
Pressing “Ok” here causes a repeat of the above “Administrator” log in cycle.
Laptop specs:
Dell Inspiron Laptop — from Best Buy
2017 — Intel i7-7500U Processor
Came with Windows 10 pre-installed
Internal SSD was replaced through Dell warranty a year ago
Can someone PLEASE tell me how to solve this issue and get Windows back on my laptop and functioning without the need to repurchase a key? I have geek squad protection through Best Buy would would really like to solve this immediately. If I can manage to keep my files great but it’s not the end of the world if I lose them since I backed the laptop up this morning.
PLEASE HELP! Thank you in advance!

-
Installing Windows 10 on New PC?
I’m going to be building a new PC on Christmas and want to install Windows 10 on it. I have Windows 10 on my current PC, which I installed upgrading from 8.1 with the files on a USB. How do I go about installing a clean copy of Windows 10 on this new PC? I think I recall something about installing it once makes Microsoft recognize your hardware, but since this will be a PC I’m not sure what steps I need to take. Do I need to go 8.1 -> 10 or is there a method of going directly to 10?
-
Installing Windows 10 on New PC?What’s your intended PC specs ??
-
“Reset this PC” Windows 10 Install Errors — [C:\WINDOWS\Panther\unattend.xml] — Unable to…
Unattend xml File….
hiiii
i would like to install windows via WDS Server. How To Create Unattend .XML File in Server 2012……
Regard
Mohit

“Reset this PC” Windows 10 Install Errors — [C:\WINDOWS\Panther\unattend.xml] — Unable to…
-
“Reset this PC” Windows 10 Install Errors — [C:\WINDOWS\Panther\unattend.xml] — Unable to… — Similar Threads — “Reset PC” Install
-
Unable to reset PC
in Windows 10 Software and Apps
Unable to reset PC: Slowly but surely my laptop has been slowing down and doing unexpected things and in some cases not carrying out an action for no reason I’m aware of, so I finally bit the bullet and decided to reset the PC using the option to retain my files.After nearly 5 hours of preparing… -
Unable to Reset This PC using Cloud Install
in Windows 10 Gaming
Unable to Reset This PC using Cloud Install: It’s showing me this error.https://answers.microsoft.com/en-us/windows/forum/all/unable-to-reset-this-pc-using-cloud-install/cf1abe1f-73d4-4188-bf95-8a43805cc4e1
-
Unable to Reset This PC using Cloud Install
in Windows 10 Software and Apps
Unable to Reset This PC using Cloud Install: It’s showing me this error.https://answers.microsoft.com/en-us/windows/forum/all/unable-to-reset-this-pc-using-cloud-install/cf1abe1f-73d4-4188-bf95-8a43805cc4e1
-
Unable to Reset This PC using Cloud Install
in Windows 10 Installation and Upgrade
Unable to Reset This PC using Cloud Install: It’s showing me this error.https://answers.microsoft.com/en-us/windows/forum/all/unable-to-reset-this-pc-using-cloud-install/cf1abe1f-73d4-4188-bf95-8a43805cc4e1
-
Windows 10 autounattend xml installation problem
in Windows 10 Virtualization
Windows 10 autounattend xml installation problem: Hi guys, I have a problem with autounattend XML install. Basically, I have a Windows image that is downloaded from MS and edited to skip all steps for setup. The windows boots and wipe the hard drive created partitions, select language, and created one admin account with the… -
Windows 10 autounattend xml installation problem
in Windows 10 Support
Windows 10 autounattend xml installation problem: Hi guys, I have a problem with autounattend XML install. Basically, I have a Windows image that is downloaded from MS and edited to skip all steps for setup. The windows boots and wipe the hard drive created partitions, select language, and created one admin account with the… -
Unable to reset PC
in Windows 10 BSOD Crashes and Debugging
Unable to reset PC: One day, I accidentally unplugged the power and the system files are corrupted. Tried DISM, SFC etcStill unable to recover. Now i would want to reset my whole PC, but I had tried this. After it rebooted, it was back to usual and said something like something prevented…
-
Unable to update Windows 10 or reset PC
in Windows 10 Installation and Upgrade
Unable to update Windows 10 or reset PC: Error 0x800706ba2019-04 Cumulative Update for Windows 10 Version 1709 for x64-based Systems (KB4493441) — Error 0x800706ba
Hello, I’ve run into a problem where I’m unable to update windows or reset/refresh my PC.
Every time I try to reset/refresh my PC, it fails and…
-
xml error
in AntiVirus, Firewalls and System Security
xml error: When doing a scan with free version of Spybot I get the message (in bold) below about file 180702-213610.xml. Has been on the ‘cleaner’ page for a few days. What is 180702-213610.xml? Is it a virus? Has it been cleaned based on note in green below? I use Webroot…
Users found this page by searching for:
-
c:\\windows\panther\unatended\xml.
,
-
panther parsing error on laptop
-
-
#1
Good day, I’m new to NTLite and after creating an ISO and installing it I keep getting an error message stating issues with answer file panther. Afterwards installation won’t go through and will keeps restarting. Thank you.
-
-
#2
Please attach your preset file (after removing any user passwords or possible license keys).
-
-
#3
Please see attached
Please attach your preset file (after removing any user passwords or possible license keys).
-
autounattend.xml
-
-
#4
1. Is there a reason for using a pirated Windows XP product key? Or is this a placeholder?
For a normal Enterprise install, you should use a generic install or KMS product key.
2. <WillShowUI> is an invalid attribute for <ProductKey>.
-
-
#5
1. Is there a reason for using a pirated Windows XP product key? Or is this a placeholder?
For a normal Enterprise install, you should use a generic install or KMS product key.
2. <WillShowUI> is an invalid attribute for <ProductKey>.
1. I just placed it as a placeholder instead of putting the correct one.
2. What attribute should i place
Thank you
-
-
#6
I had to make a few corrections in your autounattend.xml, before it passed OOBE.
1. Removed these directives as they’re deprecated, and can potentially interfere with other settings:
Code:
                               <SkipMachineOOBE>true</SkipMachineOOBE>
                               <SkipUserOOBE>true</SkipUserOOBE>
2. Fixed <Name> as it must be one word.
3. Removed this:
Code:
                                <ProductKey>
                                        <Key>fckgw-rhqq2-yxrkt-8tg6w-2b7q8</Key>
                                        <WillShowUI>Always</WillShowUI>
                                </ProductKey>
Code:
                                <ProductKey>
                                        <Key>fckgw-rhqq2-yxrkt-8tg6w-2b7q8</Key>
</ProductKey>-
autounattend-FIXED.xml
autounattend-FIXED.xml
4.1 KB
-
-
#7
Hello,
I’m trying to create an unattended Windows 11 Pro version that asks for a product key after installation.
In IT we need a Windows 11 Pro version where we only have to worry about it at the end of the installation. We don’t have the time to be there during the installation.
-
-
#8
I’m trying to create an unattended Windows 11 Pro version that asks for a product key after installation.
In IT we need a Windows 11 Pro version where we only have to worry about it at the end of the installation. We don’t have the time to be there during the installation.
From Unattended mode, enable Specialize / Skip auto activation and don’t provide any product keys.
Add a new command to Post-Setup (User) to launch System Settings:
| Command | Parameters |
| cmd | /c start ms-settings:activation |
-
-
#10
Hello,
I’m trying to create an unattended Windows 11 Pro version that asks for a product key after installation.
In IT we need a Windows 11 Pro version where we only have to worry about it at the end of the installation. We don’t have the time to be there during the installation.
My experience with several laptops (HP and Lenovo) has been that if the keys were activated in Windows 11 previously, and the mainboard is not replaced, the laptops will be automatically re-activated after deployment of an image.
I think the «skip product key during installation» is an «unattend.xml» feature, and I usually work in WSIM. The XML tag would be:
XML:
<SkipAutoActivation>true</SkipAutoActivation>And I can see this is added in your NTLite XML file.
-
-
#11
OEM PC’s (Dell, HP, Lenovo, ASUS) have BIOS product keys and will auto-activate. A specific product key is required in Unattended if you want to override the SKU. For example, installing Pro on a Home-edition PC.
-
-
#12
It’s more about installing Windows 11 on Mini PCs and virtual machines.
Can you adjust my XML and upload it again so that it works? I’ve already invested 40 hours and it doesn’t work, the last time it was under Windows 7 it wasn’t a problem.
-
-
#13
Setup only provides one chance to enter the license key, during WinPE before the install begins. If you decide to skip it, then it’s your responsibility to provide the license after the install is completed.
Most users run a Post-Setup licensing script, or use my suggestion and run a command to launch the Activation screen on the desktop. This part hasn’t changed since W7, except for the settings app.
-
-
#14
Yes, but the unattended installation doesn’t go through, now there are always errors when creating the user. Always mistakes, I’m tired of it. I invested 40 hours.
-
-
#15
You’re frustrated, but haven’t really explained your project other than posting an Unattended file. It’s more constructive to share the working preset (again remove any user passwords or license key) to see if you’ve done something wrong.
-
-
#16
Yes, but the unattended installation doesn’t go through, now there are always errors when creating the user. Always mistakes, I’m tired of it. I invested 40 hours.
I tried your preset above, and Windows 11 reaches the login screen. However, it seems you have not created a user to login inside your «unattend.xml», and the built-in Administrator account is disabled by default.
I can feel the frustration, but please understand that many of us have spent more than 400 hours just to get everything sorted out as intended. I have spent more than 10 years to work smoothly with MDT for Win7/10/11.
I would suggest you do the following:
1) Reset the «SkipMachineOOBE» and «SkipUserOOBE» options in Unattended section inside NTLite, as both are deprecated in Windows 11.
2) You need to create a local user account for login. Press the «Add local account» button at the top of the toolbar inside NTLite to create one.
Living Table of Contents
- MDT Tutorial: Prologue & Requirements
- MDT Tutorial Part 1: Installation
- MDT Tutorial Part 2: Initial Configuration
- MDT Tutorial Part 3: Imaging
- MDT Tutorial Part 4: CustomSettings.ini
- MDT Tutorial Part 5: Bootstrap.ini
- MDT Tutorial Part 6: Customizing Boot Media
- MDT Tutorial Part 7: Customizing Base MDT Template & ADK WinPE Template WIM
- MDT Tutorial Part 8: Unattend.xml
- MDT Tutorial Part 9: Logging
- MDT Tutorial Part 10: CustomSettings.ini Validation Testing & Troubleshooting Part 1
- MDT Tutorial Part 11: Troubleshooting Part 2: Windows could not parse or process unattend answer file [C:\windows\Panther\unattend.xml] for pass [specialize]. The answer file is invalid.
- MDT Tutorial Part 11: Troubleshooting Part 3: Windows could not parse or process unattend answer file [C:\windows\Panther\unattend.xml] for pass [specialize]. The answer file is invalid.
- MDT Tutorial Part 11: Troubleshooting Part 4: Task Sequence Variable is Being Overwritten
- MDT Tutorial Part 11: Troubleshooting Part 5: Invalid DeploymentType value “” specified. The deployment will not proceed.
- MDT Tutorial Part 11: Troubleshooting Part 6: Unable to mount the WIM, so the update process cannot continue
- MDT Tutorial Part 11: Troubleshooting Part 7: Non-Fatal OSD Errors & Warnings
What These Guides Are:
A guide to help give you some insight into the troubleshooting process in general.
What These Guides Are Not:
A guide to fix all issues you’re going to encounter.
We’re going to role-play a bunch of scenarios and try to work through them. Remember in math where you had to show your work? Well, what follows is like that which is why this post is [more than] a [little] lengthy.
Your last victory is short lived as the same error message appears and this time unattend.xml looks fine:

Stumped, you might search for ‘Microsoft-Windows-Shell-Setup’ which might lead you here:
https://docs.microsoft.com/en-us/windows-hardware/customize/desktop/unattend/microsoft-windows-shell-setup
As you review each section carefully the issue becomes clear: The computer name is more than 15 characters.
Copypasta Closing
Hopefully these examples will help give you an idea of the overall troubleshooting process. Most of the time the problems you’ll encounter will be caused by a typso, order of operations or a ‘known issue’ that requires a specific process to be followed.
As you make changes to your environment, here’s what I recommend:
- Be diligent about keeping a change log so you can easily backtrack
- Backup your CS.INI or Bootstrap.ini before you make any changes
- Backup your ts.xml or unattend.xml (in DeploymentShare\Control\TaskSequenceID) before you make any changes
- Introduce small changes at time with set checkpoints in between and set milestones markers where you backup core files (e.g cs.ini bootstrap.ini ts.xml unattend.xml etc) to help minimize frustration troubleshooting.
And if when you do run into some turbulence, upload relevant logs (at least smsts.log but be prepared to submit others depending on the issue) to a file sharing service like OneDrive, post on TechNet then give a shout to your resources on Twitter.
Good Providence to you!