
Windows updates and upgrades were things you only looked forward to every few months or even years. But since Microsoft decided to stop introducing new Windows versions after Windows 10, we began to see frequent updates. The twice-yearly feature and quality rollouts are practically full upgrades themselves.
Updating and upgrading your system is part of the most sacred activity of owning a computer because you don’t want to use an insecure and incompetent computer.
When you initiate an upgrade, Windows begins to download installation files to your system. These files are stored in different locations on your hard drive. For starters, you have the SoftwareDistribution folder, which stores update files before they’re installed.
Another folder associated with the Windows upgrade process is the Panther folder, which we’ll be discussing.
Some users have come across the folder and are asking questions about it, mostly because it’s located in folders with strange characters and takes up a lot of space. In this article, we’ll be clearing the confusion about the folder.
What is the Windows Panther folder?
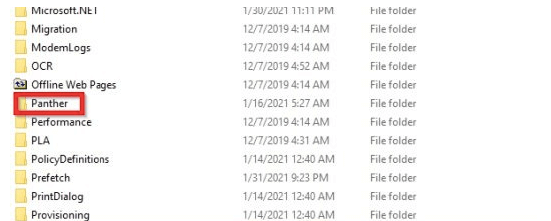
The Panther folder contains setup, installation, and upgrade log files for Windows. In Windows 10, the folder’s location depends on your upgrade installation stage, and you can only see it when you allow the File Explorer to show hidden content.
The phases and corresponding locations are as follows:
Down-level phase: C:$WINDOWS.~BT\Sources\Panther
Windows Preinstallation Environment phase: X:$WINDOWS.~BT\Sources\Panther
Online configuration phase or first boot phase: C:\WINDOWS\PANTHER
Windows Welcome phase: C:\WINDOWS\PANTHER
Rollback phase: C:$WINDOWS.~BT\Sources\Panther
The Panther folder has its uses. The installation files can help you roll back to your previous Windows 10 build if you don’t fancy your upgrade or are having compatibility issues. The log files can help you track and resolve problems with the installation process.
Can I delete Panther in Windows 10?
Many users have asked if it is safe to delete the C:\WINDOWS\PANTHER folder. The simple answer is YES.
The folder contains essential log files and data that will come in handy if something goes wrong during installation. The log files would point you to underlying problems that stopped the installation process. However, if the installation went fine and you don’t intend to roll back to your previous Windows build, you can delete the folder as this poses no risk to your system’s current state. Windows will also remove the program after a period anyway.
That said, you have to be careful with how you go about getting rid of the folder.
How to remove the Panther folder in Windows OS
The Panther folder can take up a lot of space on your hard drive. This is why most users want to get rid of it. Remember that if you intend to go back to your previous Windows 10 build, you have to keep the folder intact.
Using the regular right-click-and-delete option isn’t recommended if you want to remove the folder from your system. The safe option is using the Disk Cleanup utility.
The following steps will show you what to do:
- Click on the folder icon in the taskbar or right-click the Start button and select File Explorer.
- You can also hold the
Windows logo key and punch the Ekey to open the File Explorer. - After File Explorer shows up, go to the left pane and click on This PC.
- Next, go to the Devices and Drives section in the right pane, right-click on your main volume where the folder is located, which should be the Disk C under normal circumstances, and then click on Properties in the context menu.
- Once the disk’s Properties dialog window shows up, click on the Disk Cleanup button under the General tab.
- After you see the Disk Cleanup window, check the boxes beside the temporary files that you wish to delete, then click on the OK button.
- Once the cleanup process is complete, restart your computer.
You can also go through the Settings application to clear out Windows installation files. Follow these steps:
- Right-click the Start button and select Settings or tap the
Windows logo and Ikeyboard buttons together. - After Settings shows up, click on the System icon.
- Once you see the System interface, go to the left pane and click on Storage.
- Go to the right side of the screen and click on “Temporary files.”
- Allow Windows to scan your temporary files.
- Once the scan is complete, select the categories of temporary files that you want to get rid of, and then click on the Remove Files button.
That’s how to get rid of the Panther folder.
PRO TIP
If you want to get rid of large temporary files and folders without having to go through the long process of using the Disk Cleanup utility, Auslogics BoostSpeed can help. The tool is designed to help you automatically remove such programs and leftover registry keys that might disturb your PC’s performance.
Conclusion
That’s it. You no longer have to worry about the Panther folder. It’s completely safe and useful in certain situations. You can always keep it if you have space on your hard drive until Windows automatically deletes it.
The Windows Setup log files are located in various locations on your hard drive. These locations depend on the setup step. The panther folder is the folder where you will receive installation, configuration, or update log files.
The Windows Panther folder can be in different locations depending on the setup step:
- Down-level phase
C:\$WINDOWS.~BT\Sources\Panther- Windows Preinstallation Environment phase
C:\$WINDOWS.~BT\Sources\Panther- Online configuration phase or first boot phase
C:\WINDOWS\PANTHER- Windows Welcome phase
C:\WINDOWS\PANTHER- Rollback phase
C:\$WINDOWS.~BT\Sources\PantherThese log files can be most helpful for troubleshooting every step of the Windows 10 installation. Renaming or deleting has no negative consequences.
If you have completed the update installation, the Panther folder may be in GB.
Folder Panther blue
In some versions of Windows, the folder name is displayed in blue. This means that the folder has been compressed.
Is it safe to delete the Panther folder
If you are sure that the installation was successful, you can delete the Panther folder.
Information about some other Windows folders:
$SysReset folder | $windows. ~BT and $Windows. ~ WS Folders | Folder $WinREAgent | Folder WinSxS | REMP folder | ProgramData folder | Folders System32 and SysWOW64 | Native folder | Folders Catroot and Catroot2.
- Related problems: $GetCurrent folder
- Related problems: $Winreagent folder
➡️ Video tutorial for Windows Panther folder in Windows 10 / 11
Back to top button
-
Home
-
Knowledge Base
- What Is Windows Panther Folder? Where Is It? Can You Delete It?
By Daisy | Follow |
Last Updated
The Panther folder is a folder where you will get installation, setup, or upgrade log files. Windows Installer log files are located in various locations on your hard disk. These locations depend on the setup phase. Continue to read to get more details.
What Is Windows Panther?
The Windows Panther folder contains Windows setup, installation, and upgrade log files. In Windows 10, the location of this folder depends on your upgrade installation phase, and you can only see it if you allow File Explorer to show hidden content. In some versions of Windows, Windows Panther folder names are blue. This means the folders are compressed.
The stages and corresponding positions are as follows:
- Down-level phase: C:$WINDOWS.~BT\Sources\Panther
- Windows Preinstallation Environment phase: X:$WINDOWS.~BT\Sources\Panther
- Online configuration phase or first boot phase: C:\WINDOWS\PANTHER
- Windows Welcome phase: C:\WINDOWS\PANTHER
- Rollback phase: C:$WINDOWS.~BT\Sources\Panther
Tips:
Tip: To learn information about other types of Windows folders, you can go to the MiniTool official website.
Can I Remove Windows Panther in Windows 10?
Many users have asked if it is safe to delete the C:\WINDOWS\PANTHER folder. The simple answer is yes. This folder contains necessary log files and data that will come in handy if something goes wrong during the installation.
The log files indicate potential problems that stopped the installation process. However, if the installation went well and you don’t plan to roll back to a previous Windows version, you can delete this folder, as this will not put the current state of the system at risk. In any case, Windows also deletes the program after a while. It means, you have to be careful how you delete folders.
Also see:
- What Is WindowsApps Folder and How to Access & Delete It?
- What Is the Found.000 Folder and Should You Delete It?
How to Delete Windows Panther Folder?
The Panther folder can take up a lot of hard drive space. That’s why most users want to get rid of it. Remember, if you plan to go back to a previous Windows 10 version, you must keep the folder intact.
If you want to delete a folder from your system, the normal right-click and delete options are not recommended. The safe bet is to use the Disk Cleanup utility or the Settings application.
Way 1: Via Disk Cleanup
The first method is via Disk Cleanup. Here are the instructions:
Step 1: Press the Windows key and E key together to open File Explorer.
Step 2: Once File Explorer appears, go to the left pane and click This PC.
Step 3: Next, go to the Devices and Drives section in the right pane, right-click on the main volume where the folder is located, which should normally be Disk C, and click Properties in the context menu.
Step 4: Under the General tab, click the Disk Cleanup button.
Step 5: Next, check the boxes next to the temporary files you want to delete and click the OK button.
After the cleaning process is complete, restart your computer.
Way 2: Via Settings
You can also clear Windows Panther files through the Settings app. The following are the steps:
Step 1: Press the Windows + I keys at the same time to open the Settings application.
Step 2: Next, click the System icon and go to the left pane. Then, click Storage.
Step 4: Go to the right side of the screen and click Temporary Files. Allow Windows to scan your temporary files.
Step 5: After the scan is complete, select the category of temporary files you want to delete and click the Delete Files button.
Final Words
Now, you have known what Windows Panther is. Should you delete it? The answer is Yes. Besides, this post has introduced 2 ways for you to delete the folder.
About The Author
Position: Columnist
Having been an editor at MiniTool since graduating college as an English major, Daisy specializes in writing about data backups, disk cloning, and file syncing as well as general computer knowledge and issues. In her free time, Daisy enjoys running and going with friends to the amusement park.
-
A file named panther has appeared in my windows file. My antivirus program hasn’t detected anything and I’ve experienced no ill effects but I don’t know where it came from. I didn’t knowingly install it. I checked for «panther» and it sounds pretty old. I’ve run a cleaner in safe mode and it didn’t detect it either. Should I be concerned? Can I just delete this file and forget about it? What do you think?
-
chaslang
MajorGeeks Admin — Master Malware Expert
Staff MemberWelcome to Major Geeks!
What is the file extension? Make sure you have enabled viewing of file extensions per the directions here: How to view hidden, system files & folders!
How large is the file and what is the file date?
Are you saying it is in the C:\windows folder?
A file named panther.exe is known as a trojan.
-
OK Let’s see if i can answer all your questions.
there is actually a folder named panther that is in my C:\windows folder. within that folder are three other folders as well as eleven different files.
The Panther folder is dated 6-11-06The folders and files that are in the C:\windows\panther folder are as follows with their size in KB and dates
1. actionqueue — 4.69KB — 3/11/2007
2. setup.exe — 0.00KB — 3/1/2007
3. UnattendGC — 213KB — 11/10/2006the eleven files are:
1. cbs_unattend.log — 32KB — 11/10/2006
2. cbs_unattend.log.dpx — 16KB — 11/10/2006
3. cbs unattend.log.perf — 16KB — 11/10/2006
4. DDACLSys.log — 4KB — 3/1/2007
5. diagerr.xml — 2KB — 3/1/2007
6. diagwrn.xml — 4KB — 3/1/2007
7. pkgmgr.xml — 4KB — 3/2/2007
8. setupact.log — 295KB — 3/1/2007
9. setuperr.log — 0KB — 3/1/2007
10. unattend.bld — 4KB — 11/10/2006
11. unattend.xml — 30.xml — 3/11/2007In the subfolder C:\windows\Panther\actionqueue there are four files
1. auditSystem.uaq — 2KB — 3/1/2007
2. auditUser.uaq — 1KB — 3/1/2007
3. oobeSystem.uaq — 1KB — 3/11/2007
4. specialize.uaq — 2KB — 3/1/2007the subfolder C:\windows\Panther\setup is empty and dated 3/1/2007
The subfolder C:\windows\Panther\UnattendGC has four files
1. diagerr/xml — 18KB — 3/11/2007
2. diagwrn.xml — 18KB — 3/11/2007
3. setupact.log — 178KB — 3/11/2007
4. setuperr.log — 1KB — 3/1/2007The whole Panther file is 622 KB
-
chaslang
MajorGeeks Admin — Master Malware Expert
Staff MemberWhat Windows OS do you have? You should have told us this in your first message. I have a feeling you are going to say Vista. If so, this is normal. See the below:
http://forums.microsoft.com/TechNet/ShowPost.aspx?PostID=1355345&SiteID=17
http://technet2.microsoft.com/Windo…459b-4504-b1cb-c10472fbe87b1033.mspx?mfr=true
-
You’re right I should have told you the OS in the first post.
And you are also right that it is Vista.
From the links you posted I gather that the thing is supposed to be there.
I thank you for your assistance. -
chaslang
MajorGeeks Admin — Master Malware Expert
Staff MemberYou’re welcome. Surf safely!
Downloads All In One Tweaks
\ Android
\ Anti-Malware
\ Anti-Virus
\ Appearance
\ Backup
\ Browsers
\ CD\DVD\Blu-Ray
\ Covert Ops
\ Drive Utilities
\ Drivers
\ Graphics
\ Internet Tools
\ Multimedia
\ Networking
\ Office Tools
\ PC Games
\ System Tools
\ Mac/Apple/Ipad Downloads
Other News:
Top Downloads
\ News (Tech)
\ Off Base (Other Websites News)
\ Way Off Base (Offbeat Stories and Pics)
Social:
Facebook
\ YouTube
\ Twitter
\ Tumblr
\ Pintrest
\ RSS Feeds
«Здравствуйте, снова вранье у Вас», ворвался ко мне в личку Telegram читатель Антон. Так его возмутила викторина про количество разделов, создаваемых программой установки Windows в разметке GPT.
Назначенный мной правильный ответ «4» выбрал лишь каждый пятый читатель. Думаю, что большинство из 46%, проголосовавших за «3» в лучшем случае заглянули в оснастку управления дисками. Но она не показывает раздел MSR в отличие от diskpart.
Однако Антон принес отличный аргумент! До первой перезагрузки создается только три раздела, а потом – это уже не программа установки. Ведь установочную флэшку можно вытащить без ущерба для процесса.
[+] Сегодня в программе
О чем эта статья
Если вынести эмоции за скобки, такая позиция вполне имеет право на жизнь. Здорово, что читатель заметил существенное изменение под капотом программы установки – новый порядок создания разделов. О чем я ему и сказал, попутно доставив свою позицию более развернуто, но без технических нюансов. Их удобнее излагать в блоге, и сегодня я разберу:
- что считается программой установки
- какие именно разделы создаются на каком этапе установки актуальных версий Windows
- в какой версии Windows 10 произошли значимые изменения в этой сфере
- почему поведение системы изменилось
Отталкиваться надо от setup.exe на установочном диске. Бесспорно, это программа, которая может выполнять разнообразные задачи:
- Чистая установка Windows путем загрузки с флэшки, на чем мы фокусируемся сегодня
- Обновление или переустановка ОС поверх путем запуска setup.exe из-под работающей системы
- Проверка совместимости
- Загрузка в среду восстановления
- Сжатие системных файлов
- и многое другое
Определение программы установки
Я всегда вкладывал в понятие программа установки Windows (Windows setup) более широкий смысл нежели приложение или процесс setup.exe. Программа установки работает от загрузки с флэшки до входа на рабочий стол. Она документирует свой процесс в различных журналах, из которых нам сегодня интересны файлы setupact.log в папках %windir%\panther и %windir%\panther\unattendGC.
В документации процесса установки Windows сейчас говорится так. Программа установки Windows запускает и перезапускает компьютер, собирает информацию, копирует файлы и создает или настраивает конфигурационные параметры. На странице в таблицу сведены три этапа программы установки: Windows PE, Online Configuration и Windows Welcome.
Здесь нет противоречий моему видению. Однако давайте рассмотрим эти этапы детальнее.
Ключевые этапы установки
Изучение автоустановки ОС хорошо прокачивает понимание процесса установки. Я давно вижу его через призму конфигурационных проходов.
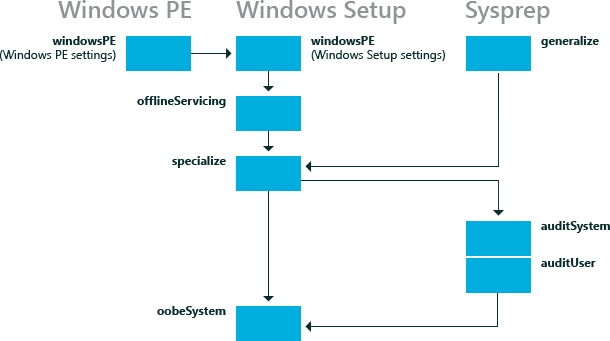
Эта картинка живет в документации со времен Windows 8. Интересно, что в эпоху Vista она слегка отличалась — тогда просто забыли нарисовать маршрут generalize → specialize.
windowsPE
При запуске с флэшки или ISO загрузчик передает управление процессом программе установки, реализованной с помощью файла setup.exe из корня флэшки.
Выполняется загрузка Windows PE, задаются языковые настройки этого этапа, указывается издание ОС, ключ продукта и т.д. В конце прохода windowsPE создается структура разделов и к разделу с системой применяется install.wim. Этап венчает перезагрузка, первая в серии.
specialize
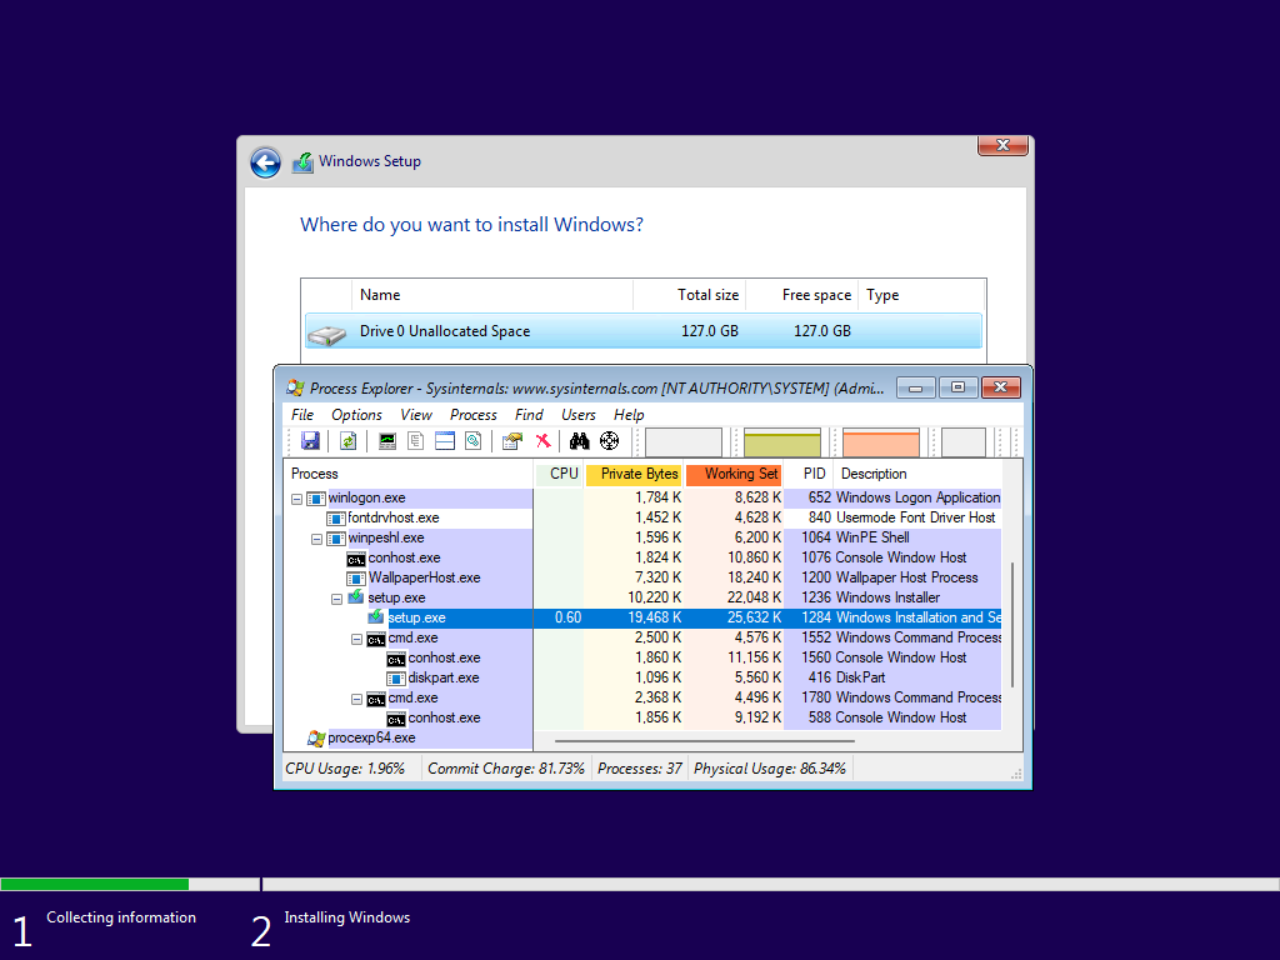
После перезагрузки установочная флэшка действительно не нужна, потому что все необходимое уже есть на диске. Начинается проход specialize. Тезис читателя программа установки работает ровно до первой перезагрузки, видимо, подразумевал setup.exe. Это утверждение проверяется визуальным анализом или по логам.
На виртуальной машине я заранее подключил второй VHDX с Process Explorer. В начале этапа я нажал Shift+F10 и запустил утилиту.
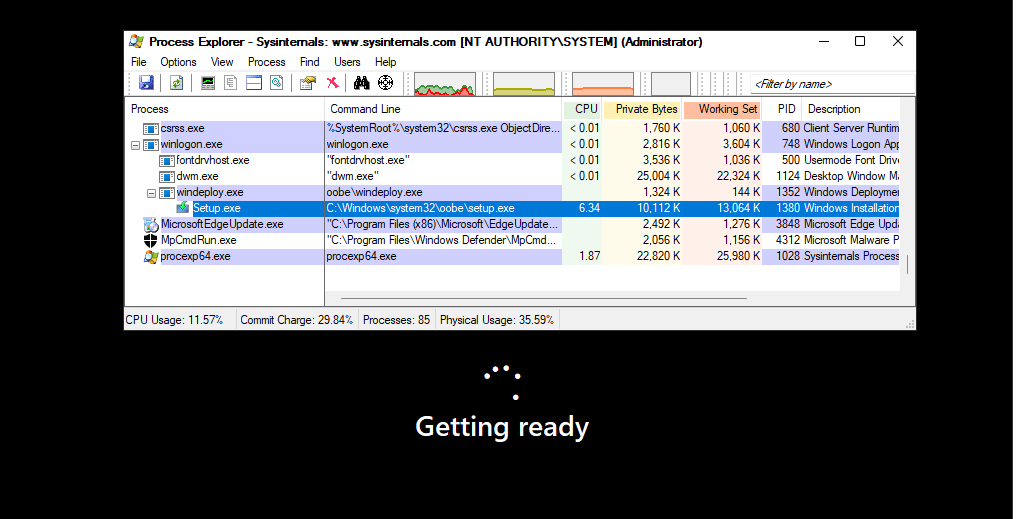
Но это необязательное упражнение, потому что куда проще посмотреть лог установки. Здесь и далее фрагменты лога публикуются с купюрами для экономии места.
2022-02-20 10:27:50, Info [0x0601dc] IBS    Setup has completed phase 2 at 2022-02-20 10:27:50
2022-02-20 10:27:50, Info [0x090009] PANTHR CBlackboard::Close: f:\$windows.~bt\sources\panther\setupinfo.
2022-02-20 10:28:20, Info      IBS    ------------------------------------------------
2022-02-20 10:28:20, Info [0x0601c1] IBS    InstallWindows:Install Path = C:\Windows\system32\oobe
2022-02-20 10:28:20, Info [0x0601c2] IBS    InstallWindows:Setup Phase = 4
2022-02-20 10:28:20, Info [0x0601cb] IBS    InstallWindows:Continuing Setup after completing WinPE phase. Working directory = C:\Windows\Panther
2022-02-20 10:28:20, Info [0x0601ce] IBS    Setup has started phase 4 at 2022-02-20 10:28:20
2022-02-20 10:28:20, Info [0x0601cf] IBS    Install source is C:\Windows\system32\oobe
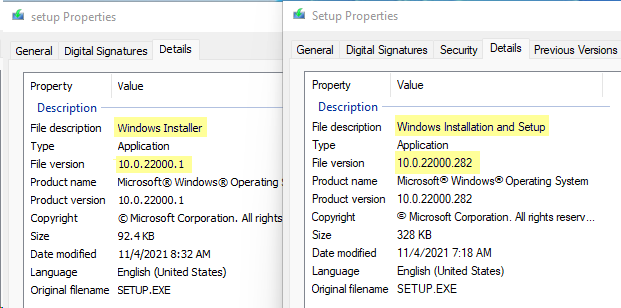
Как видите, сразу запускается setup.exe, но из папки C:\Windows\system32\oobe! Этот файл (на картинке справа) содержится в WIM-образе и отличается от одноименного файла в корне ISO (слева) не только размером и версией, но и описанием.
Антон, конечно, прав в том, что setup.exe из корня флэшки не задействован в процессе после первой перезагрузки. Но программа установки продолжается, и делает это при участии одноименного файла.
Впрочем, сначала в игру с пакетами APPX вступает sysprep. А самая заметная работа setup.exe на этом проходе – создание раздела со средой восстановления! После инвентаризации имеющихся разделов выполняется попытка создания раздела RE. Перед этим раздел с ОС сжимается.
2022-02-20 10:30:19, Info [setup.exe]  Attempting to create a new partition for WinRE
2022-02-20 10:30:19, Info [setup.exe] winreGetNewPartitionWithCoInit CoInitialize error hr = 0x80010106
2022-02-20 10:30:19, Info [setup.exe] winreGetNewPartitionWithCoInit Will shrink the OS volume with : 634388480
2022-02-20 10:30:19, Info [setup.exe] winreGetNewPartitionWithCoInit Will create partition with size: 633339904
2022-02-20 10:30:19, Info [setup.exe] winreGetVolumeGUIDPath returning \\?\Volume{81c6049a-d88c-4340-baa1-21f77a8efdca}\
2022-02-20 10:30:19, Info [setup.exe] winreGetNewPartition root: C:\Windows OS volume GUID: \\?\Volume{81c6049a-d88c-4340-baa1-21f77a8efdca}\
2022-02-20 10:30:20, Info [setup.exe] winreShrinkVolume Shrinking the OS volume with: 634388480
2022-02-20 10:30:24, Info [setup.exe] winreShrinkVolume returning TRUE
2022-02-20 10:30:24, Info [setup.exe] winreProcessVolume returning TRUE
2022-02-20 10:30:24, Info [setup.exe] winreEnumerate returning TRUE
2022-02-20 10:30:24, Info [setup.exe] winreCreatePartition Will create partition at offset: 135729774592 with size: 633339904
2022-02-20 10:30:24, Info [setup.exe] winreCreatePartition create partition successfully, actual offset is: 0x1F9A200000
2022-02-20 10:30:25, Info [setup.exe] winreCreatePartition returning TRUE
2022-02-20 10:30:25, Info [setup.exe]  New WinRE partition created
Обратите внимание, что все операции предваряются временем и названием процесса. Это не всегда исполняемый файл, но в случае с setup.exe так и есть. Создав раздел, программа установки перекидывает в него winre.wim и настраивает среду восстановления как по нотам.
2022-02-20 10:30:25, Info [setup.exe] Found target partition: use the new WinRE partition, offset: 135729774592
2022-02-20 10:30:25, Info [setup.exe] --Install on target OS step 5: set WinRE settings and restore system to a good state when hitting any errors
2022-02-20 10:30:25, Info [setup.exe] Enter SetWinRESettings
2022-02-20 10:30:25, Info [setup.exe] Copying WinRE from C:\Windows\system32\Recovery to staging location on \\?\GLOBALROOT\device\harddisk0\partition4
2022-02-20 10:30:35, Info [setup.exe] Copied WinRE to staging location
2022-02-20 10:30:35, Info [setup.exe] Creating BCD entry
2022-02-20 10:30:35, Info [setup.exe] WinRE created BCD entry: : {E4D8F2EF-9279-11EC-98A3-DA5CDA31F70A}
2022-02-20 10:30:35, Info [setup.exe] Moving Winre and boot.sdi from staging location to target
2022-02-20 10:30:35, Info [setup.exe] Moved Winre and boot.sdi from staging location to target
2022-02-20 10:30:35, Info [setup.exe] Updating reagent.xml
2022-02-20 10:30:35, Info [setup.exe] Set WinRE location path to: \Recovery\WindowsRE
2022-02-20 10:30:35, Info [setup.exe] Set recovery guid
2022-02-20 10:30:35, Info [setup.exe] Set OS build version: 22000.1.amd64fre.co_release.210604-1628
2022-02-20 10:30:35, Info [setup.exe] Set Wimboot state: 0
2022-02-20 10:30:35, Info [setup.exe] Set install state to: enabled
2022-02-20 10:30:36, Info [setup.exe] WinRE is installed
Этап specialized завершают операции CBS. Приложение setup.exe дальнейшего участия в установке не принимает.
OOBE
Программа установки продолжается. Система уже полностью установлена, и красочным процессом пользовательской настройки рулят файлы с однокоренными OOBE именами. Сначала отрабатывает конфигурационный проход oobeSystem, если обнаруживается файл ответов. Затем запускается msoobe.exe для формирования последовательности окон в мастере – регион, раскладки клавиатуры, учетная запись и т.д.
2022-02-20 10:32:08, Info [windeploy.exe] Launching [C:\Windows\system32\oobe\oobeldr.exe /system]...
2022-02-20 10:32:08, Info [oobeldr.exe] OOBELdr.exe launched with command-line [/system]...
2022-02-20 10:32:08, Info [oobeldr.exe] Parsing command line arguments...
2022-02-20 10:32:08, Info [oobeldr.exe] Parsing the following command line: [/system]
2022-02-20 10:32:08, Info [oobeldr.exe] Status for unattend pass [oobeSystem] = 0x0
2022-02-20 10:32:08, Info [oobeldr.exe] Found no unattend file for oobeSystem pass; skipping pass.
2022-02-20 10:32:08, Info [oobeldr.exe] Successfully ran oobeSystem pass.
2022-02-20 10:32:08, Info [oobeldr.exe] Waiting for essential OOBE services to start...
2022-02-20 10:32:08, Info [oobeldr.exe] OrchestrateWaitForOOBEServices: Wait was already done; not waiting again
2022-02-20 10:32:08, Info [oobeldr.exe] Essential OOBE services started successfully.
2022-02-20 10:32:08, Info [oobeldr.exe] Launching [C:\Windows\system32\oobe\msoobe.exe]...
2022-02-20 10:32:09, Info [msoobe.exe] ----------------------------------------------------------
2022-02-20 10:32:09, Info [msoobe.exe] Starting OOBE
Создание разделов в разметке GPT программой установки
В своем гайде по ручному созданию разделов я когда-то советовал diskpart из-за проблемы с размером раздела со средой восстановления в Windows 8.1. Когда ее исправили, я стал рекомендовать программу установки.
Это было проще всего для неопытных пользователей и сводило к минимуму ущерб от кривых рук. Загрузился с диска, дошел до управления разделами, выделил неразмеченное пространство и нажал кнопку «Создать». Красота!
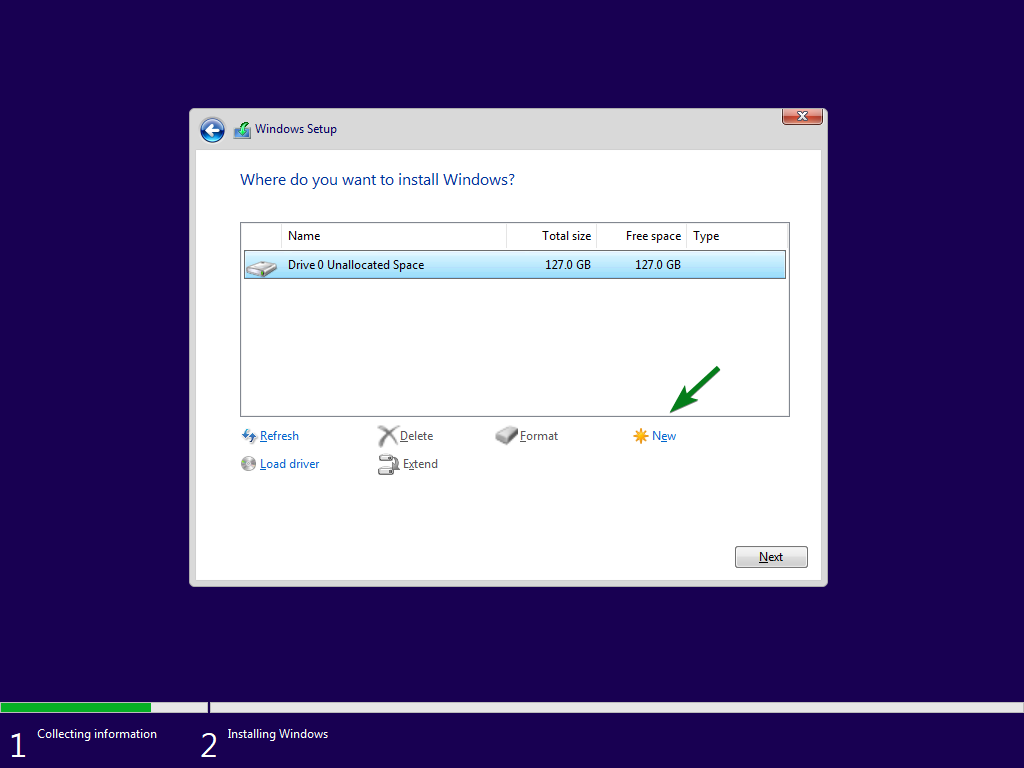
В этом сценарии создавалось четыре раздела, причем раздел Windows RE шел первым слева. На картинке конфигурация разделов по умолчанию из документации времен Windows 8.х.

Рекомендации Microsoft
Microsoft еще с 2015 года декларировала в блогах, документации и опубликованном там скрипте diskpart новый подход – раздел Windows RE должен быть крайним справа. Предполагалось обновление среды восстановления при установке новой версии ОС поверх старой. Расположение справа от раздела с ОС позволяло при необходимости отжать место у системы и увеличить за его счет раздел RE.

Однако в программе установки все оставалось по-прежнему еще почти пять лет. Как объяснил ПМ Windows RE, они не видели срочности. В Microsoft считают, что подавляющее большинство систем не проходят через чистую установку, т.к. настраиваются изготовителями ноутбуков или ИТ-специалистами в организациях. Утверждение выглядит спорно, но оно не лишено смысла, если ограничиться системами, приносящими деньги Microsoft.
Изменения в Windows 10 20H1
Своим рекомендациям Microsoft начала следовать начиная с Windows 10 20H1. Теперь до первой перезагрузки создается только три раздела – EFI (на картинке — System), MSR и Windows. А раздел Windows RE (на картинке — Recovery) создается на этапе specialize, лог вы видели выше.
По той же причине отныне нажатие кнопки «Создать» на этапе управления дисками не приведет к появлению раздела Windows RE. Можно, конечно, дождаться окончания этапа specialize, но потом надо будет зачищать разделы от файлов. Тогда уж проще и быстрее в diskpart все сделать.
Поэтому в своей статье я уже не рекомендую тот или иной способ. Если вам нужна среда восстановления на отдельном разделе нежели на разделе с ОС, логично сразу создавать структуру с помощью diskpart. Но ничто не мешает сделать это впоследствии.
Остается открытым вопрос, почему раздел Windows RE создается только после первой перезагрузки. Ведь можно было бы создавать его справа одновременно с другими разделами. В логах этапа specialize я не нашел ответа, там стандартная рутина – ищем выделенный раздел среды восстановления, и если не находим, пытаемся создать.
2022-02-20 10:30:19, Info [setup.exe] Get downlevel ReAgent config
2022-02-20 10:30:19, Info [setup.exe]  Downlevel config file path: \Recovery\ReAgentOld.xml
2022-02-20 10:30:19, Info [setup.exe]  Checking for downlevel WinRE installation.
2022-02-20 10:30:19, Info [setup.exe] DisableUpdateEnhancedConfigInfo
2022-02-20 10:30:19, Info [setup.exe] First round search
2022-02-20 10:30:19, Info [setup.exe] Get ReAgent config
2022-02-20 10:30:19, Info [setup.exe] GetReAgentConfig Config file path: C:\Windows\system32\Recovery\ReAgent.xml
2022-02-20 10:30:19, Warning                      [setup.exe] Failed to get recovery entries: 0xc0000225
2022-02-20 10:30:19, Info [setup.exe] winreGetWinReGuid returning 0X490
2022-02-20 10:30:19, Info [setup.exe] ReAgentConfig::ReadBcdAndUpdateEnhancedConfigInfo WinRE disabled, WinRE Guid could not be determined  (0x490)
2022-02-20 10:30:19, Info [setup.exe] FindWinReSourceImageAndPartition No source winre.wim was specified.  Checking for a staged winre.wim.
2022-02-20 10:30:19, Info [setup.exe] FindWinReSourceImageAndPartition using winre.wim from C:\Windows\system32\Recovery
2022-02-20 10:30:19, Info [setup.exe] --Install on target OS step 2: detect and fix if there is any issue for winre settings
2022-02-20 10:30:19, Info [setup.exe] DetectAndFixWinReIssues nothing to do because winre is not enabled.
2022-02-20 10:30:19, Info [setup.exe] --Install on target OS step 3: check if we can keep winre.wim in the same partition if it is staged.
2022-02-20 10:30:19, Info [setup.exe] --Install on target OS step 4: check if we can put winre.wim in other partitions or create one if needed.
2022-02-20 10:30:19, Info [setup.exe] CanPutWinREOnOtherPartitions WinRE is not staged. Searching for a suitable partition for WinRE.
2022-02-20 10:30:19, Info [setup.exe] Entering FindTargetPartition
2022-02-20 10:30:19, Info [setup.exe] Start looping through each partition and initialize os partition, recovery partition and system partition for MBR
2022-02-20 10:30:19, Info [setup.exe]  Checking partition at offset 1048576, partition number: 1
2022-02-20 10:30:19, Info [setup.exe]  skip GPT Partition which type is not PARTITION_MSFT_RECOVERY_GUID
2022-02-20 10:30:19, Info [setup.exe]  Checking partition at offset 16777216, partition number: 2
2022-02-20 10:30:19, Info [setup.exe]  skip partition because it is not on the same disk as staging partition
2022-02-20 10:30:19, Info [setup.exe]  Checking partition at offset 122683392, partition number: 3
2022-02-20 10:30:19, Info [setup.exe]  find OS partition
2022-02-20 10:30:19, Info [setup.exe] Complete looping through each partition
2022-02-20 10:30:19, Info [setup.exe] ----Search target partition option #1: try existing WinRE partition
2022-02-20 10:30:19, Info [setup.exe] ----Search target partition option #2: try first recovery partition
2022-02-20 10:30:19, Info [setup.exe] ----Search target partition option #3: try system partition for MBR
2022-02-20 10:30:19, Info [setup.exe] ----Search target partition option #4: try new recovery partition if allowed
2022-02-20 10:30:19, Info [setup.exe]  Attempting to create a new partition for WinRE
Возможно, текущая реализация призвана обеспечить максимальную совместимость. Между проходами windowsPE и specialize есть еще offlineServicing. Он служит для применения изменений к распакованному WIM-образу – установки языковых пакетов, драйверов и т.д. Поэтому инвентаризацию разделов решили выполнять уже после этих действий.
Заключение
Процесс установки Windows весьма консервативный. Этап Windows PE не менялся уже много лет, если не считать легкий макияж окон. Изменения под капотом конфигурационных проходов наверняка происходят, но отслеживать их можно лишь скрупулезным сравнением журналов программы установки.
Новый порядок создания разделов, пожалуй, одно из самых заметных изменений в последние годы. Хотя и оно фактически скрыто от глаз пользователя, а обнаруживается лишь прерыванием установки или изучением лога.