
In this tutorial we will learn how to integrate the SQLite database into a WinForms application using C# language on the .NET platform.
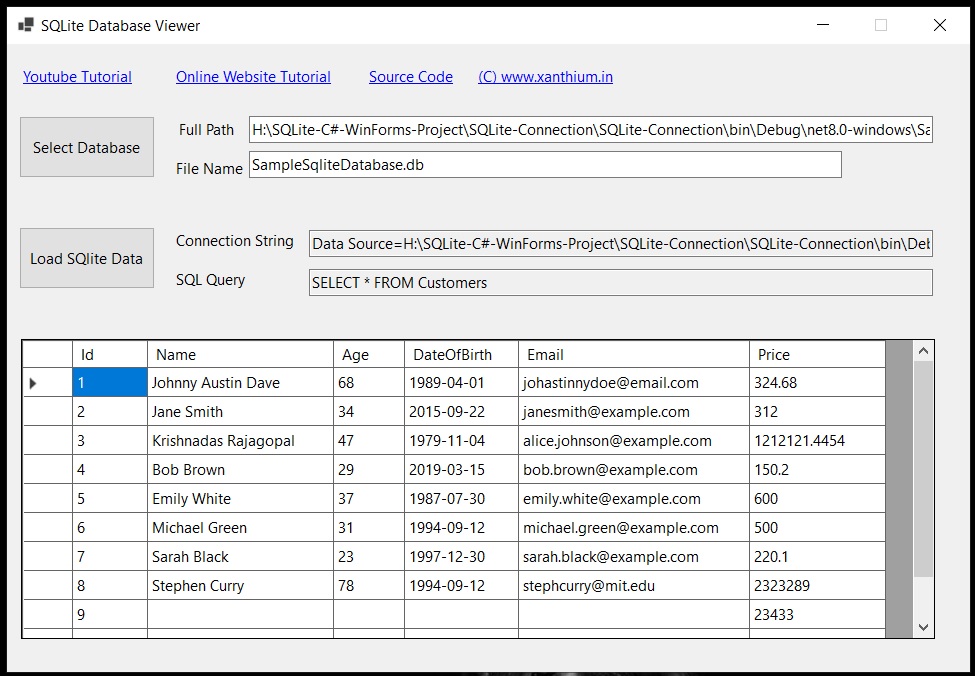
The Winforms application shown below can open a connection to a SQLite database and display the contents of the database table on a Form using DataGridView control.
In the previous tutorial we learned how to connect to SQLite database from command line using C# and perform database operations like read, write ,update etc.
Here we will learn to create a C# WinForms GUI application that will interact with a SQLite database on disk and perform basic database CRUD operations
The WinForms application will open a SQLite database on the disk using the OpenFileDialog control and display the contents of the SQLite database on a WinForms DataGridView Control for easy manipulation.
Contents
- Source Codes
- Creating a C# SQLite WinForms Project
- Installing System.Data.SQlite.Core Package
- Connecting to SQLite Database using WinForms
- Creating a Connection String
- Displaying SQLite data on Windows Form GUI
- Using SQLiteDataAdapter Class with SQLite
- Displaying SQLite data using DataGridView Control
Source Codes
All the source codes for C# WinForms SQLite Project along with Sample database and Visual Studio Solutions are available on our GitHub Repo
- Download C# WinForms SQLite Project Source Codes from GitHub
- Browse C# WinForms SQLite Project Source Codes from GitHub
Creating a C# SQLite WinForms Project
Here we will be using Visual Studio Community Edition to Create and Compile the SQLite WinForms Project. If you want you can use the .NET SDK CLI tools also but Visual Studio is better due to the presence of the GUI Form Designer.
The SQLite WinForms Project is specific to the Windows platform (windows 10,Windows 11) as the support for WinForms is limited or non existent in other platforms like Linux or Mac OS.
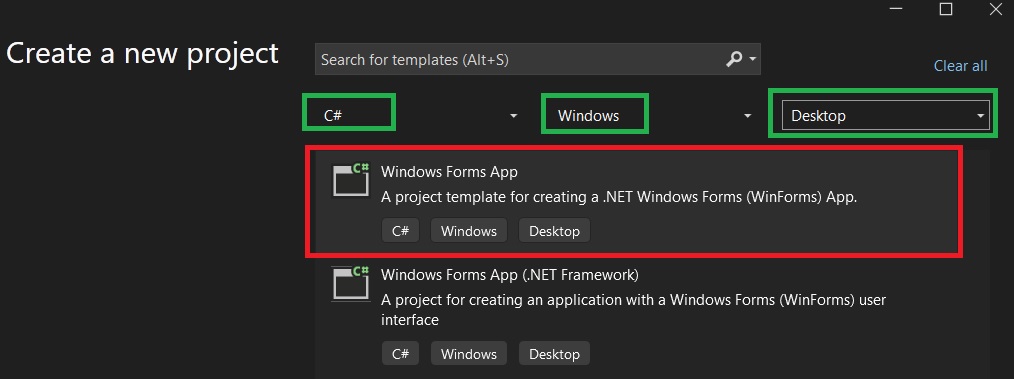
First we will create a Desktop WinForms Project for C# language as Shown below.
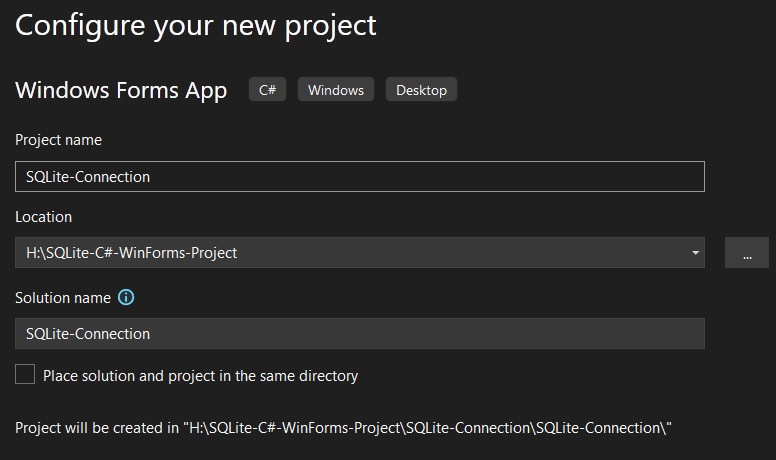
After which give a suitable name to your C# SQLite Project and save it in your disk.
Installing System.Data.SQlite.Core Package
Now to access the various classes and methods needed to communicate and manipulate the SQLite database we need to install the System.Data.SQlite.Core Package.
-
System.Data.SQlite.Core contains only the core methods and classes needed to access the SQlite database .Fo our Purpose this library will be enough.
-
While System.Data.SQLite package has support for LINQ and Entity Framework 6,You can also use that library .
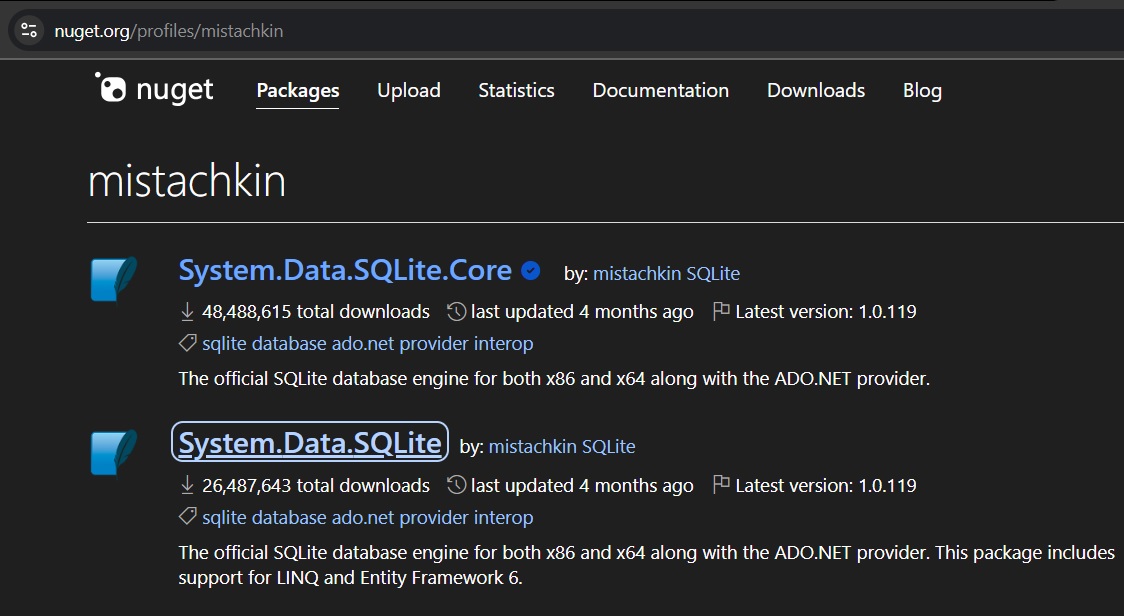
Now we will install System.Data.SQlite.Core to our Visual Studio Project using NuGet Package manager.
Go to Tools -> «Nuget Package Manager» ->«Manage NuGet Packages for Solution«. As shown below
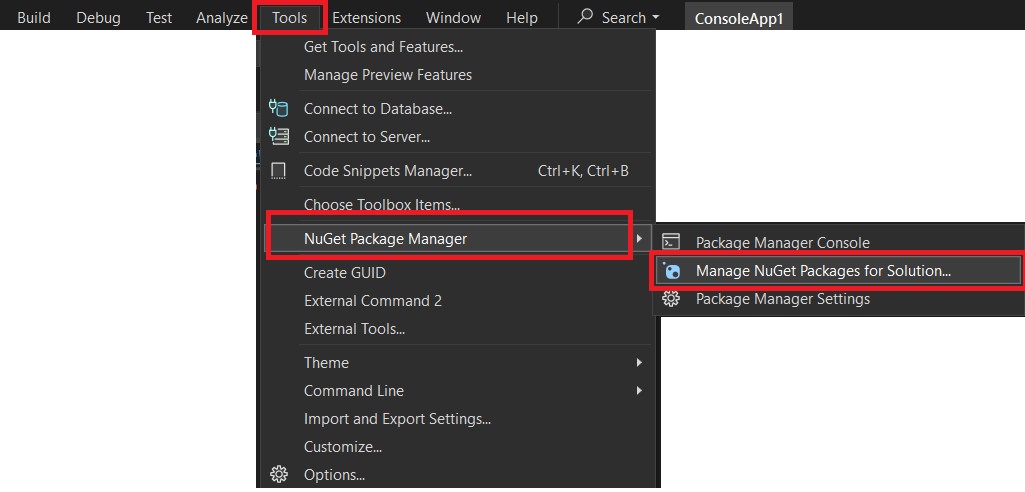
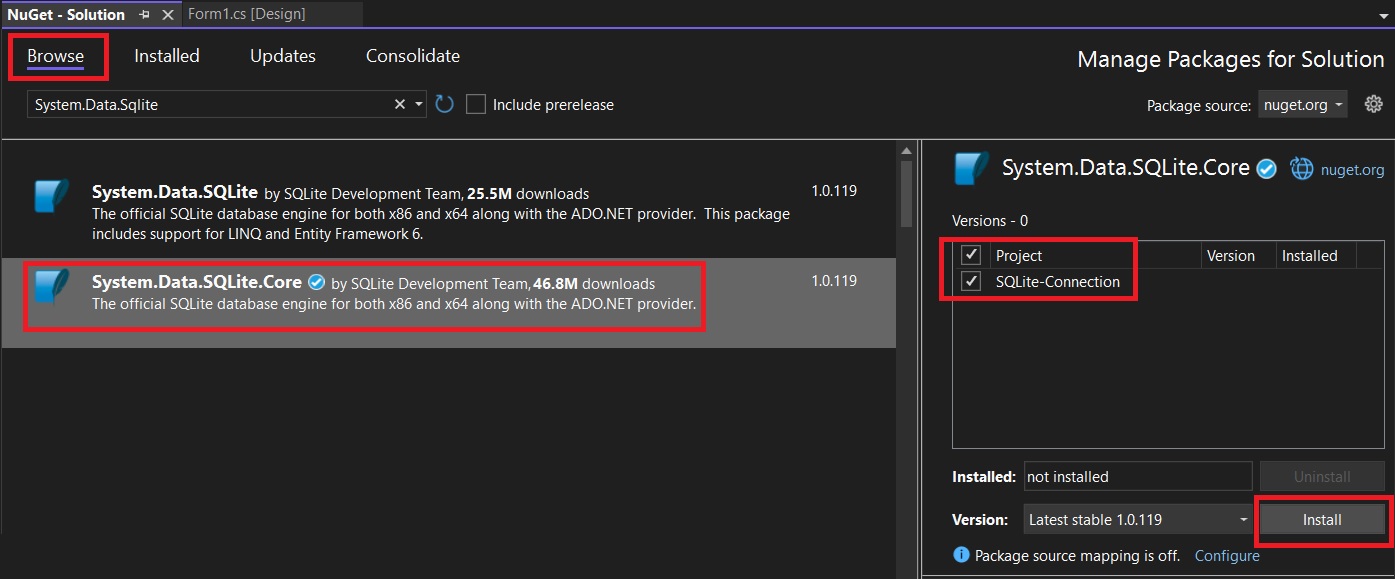
Under Browse tab, search for System.Data.SQlite.Core Select it and click install as shown below.
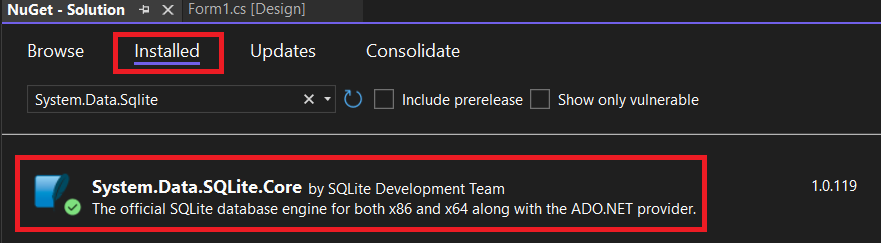
After successful installation it will show up under installed tab, As shown below
Connecting to SQLite Database
Now we will open a connection to the SQLite database from our WinForms GUI app using C# and open it. Here we will be opening an existing SQLite database on disk instead of creating it from scratch. You can download the sample database from our GitHub Repo (above).If you are curious on how to create a SQLite database using C#, check this tutorial .
Here we will be using the OpenFileDialog Control available in the WinForms GUI framework to open a connection to the SQLite database.
OpenFileDialog Control is used to manually locate the SQLite database file in our File system and use the FileName property to get the full path to the SQLite db.
Once we have the full path to the database ,we can construct a connection string and open a connection to the SQLite database.
The code snippet below show how to create a dialog box to open a connection to SQLite database. Please use the full code from our GitHub Repo
String SQliteDatabaseFilePath = "";
OpenFileDialog OpenDatabaseFileDialog = new OpenFileDialog()
OpenDatabaseFileDialog.InitialDirectory = Environment.CurrentDirectory;
OpenDatabaseFileDialog.Title = "Open SQLite Database File";
if (OpenDatabaseFileDialog.ShowDialog() == DialogResult.OK)
{
   SQliteDatabaseFilePath = OpenDatabaseFileDialog.FileName;
}
The Entire code is inside the Button Click Event handler of the Button «Select Database«.So when we click the button the above code will run and open a dialog box to select the database.
Here we create a OpenFileDialog object called OpenDatabaseFileDialog
OpenFileDialog OpenDatabaseFileDialog = new OpenFileDialog()you can set the default directory which the OpenFileDialog will try to open by setting the InitialDirectory property. Here it is set to current directory. you can also set to specific directory like shown below
OpenDatabaseFileDialog.InitialDirectory = @"C:\documents"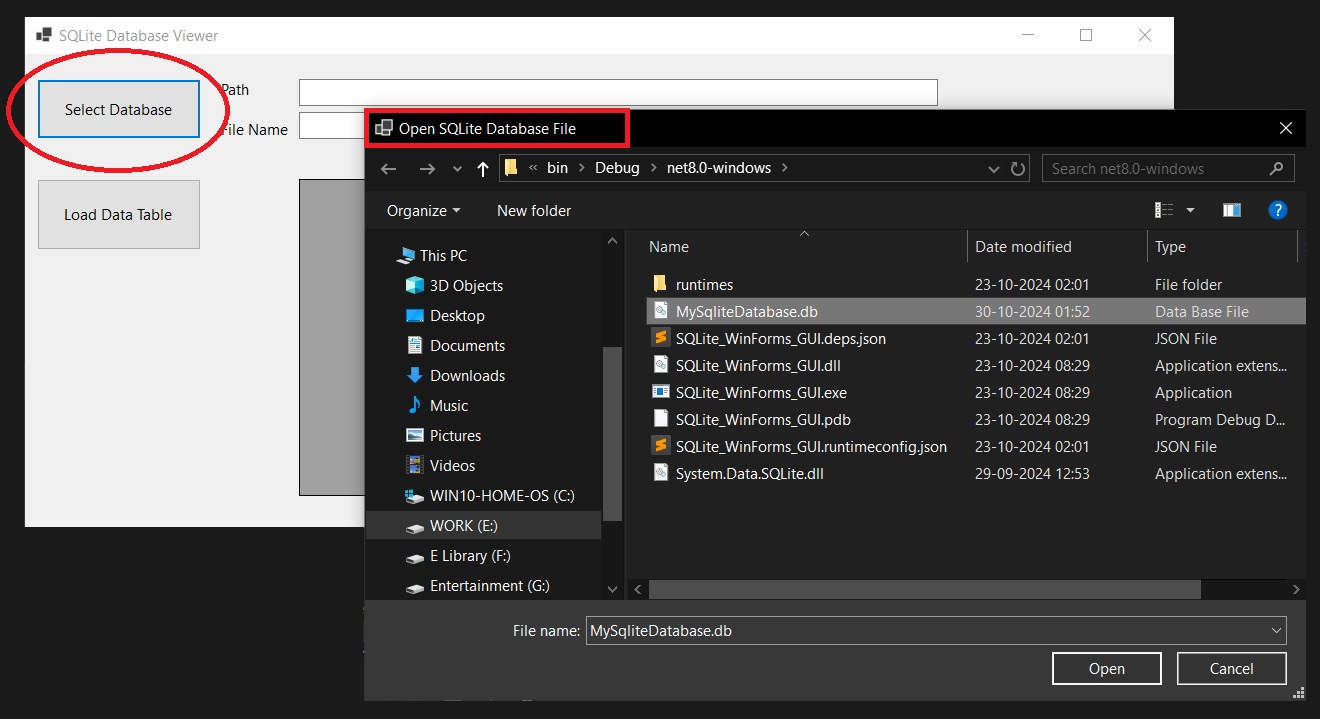
When ShowDialog() method is called on the OpenFileDialog , it displays the dialog to the user and pauses the execution of the program until the user closes the dialog (either by selecting a file or canceling the operation).
- If the user selects a file and clicks «OK«, ShowDialog() returns DialogResult.OK.
- If the user cancels or closes the dialog without selecting a file, it returns DialogResult.Cancel.
if (OpenDatabaseFileDialog.ShowDialog() == DialogResult.OK)
{
   SQliteDatabaseFilePath = OpenDatabaseFileDialog.FileName;
}
The above code checks whether the user presses Ok (Open) or Cancel button in the dialogue. If the user presses Ok (Open),the full path of the the selected file here SQLite database is stored in the string variable SQliteDatabaseFilePath.
You can then display the full filename and path on the respective text boxes as shown below.
TextBox_DB_Path.Text = SQliteDatabaseFilePath;
TextBox_DB_Name.Text = Path.GetFileName(SQliteDatabaseFilePath);
here we are using the Path.GetFileName() to isolate just the file name from the full path.

Creating a Connection String
Once we have managed to get the full path to our database, We will create a connection String to communicate with our SQLite database.
String ConnectionString = $"Data Source={SQliteDatabaseFilePath};FailIfMissing=True";Here FailIfMissing=True because we want to connect with the existing database ,not create a new one .
Once we have the connection string ,we can open a connection to our database using the SQLiteConnection class as shown below.
using (SQLiteConnection MyConnection = new SQLiteConnection(ConnectionString)) // Create a SqliteConnection object called Connection
{
   MyConnection.Open();              //open a connection to sqlite 3 database
}
Here we will learn how to display the data present in a SQLite database in a tabular or grid view on a Windows Form using the DataGridView Control present in WinForms.
For displaying SQLite table Data on a Windows Form, You should be aware of the following classes which we will use in our code.
- SQLiteDataAdapter — provided by the System.Data.SQLite library
- DataTable — part of the System.Data Namespace
- DataGridView — Part of the WinForms Namespace
Using SQLiteDataAdapter Class with SQLite
The SQLiteDataAdapter class in C# is part of the System.Data.SQLite library and is used to interact with SQLite database by retrieving data and sending updates from DataSet or DataTable to the database.
The SqlDataAdapter acts as a bridge between the database and the in-memory data representation, typically a DataSet or DataTable.

The below code shows how to use the SQLiteDataAdapter class to fill a DataTable instance with data from a SQLite database.
//Partial code on using SQLiteDataAdapter class in C#
using (SQLiteConnection MyConnection = new SQLiteConnection(ConnectionString)) //Create a SqliteConnection object called Connection
{
MyConnection.Open(); //open a connection to the database
String SQLQuerySelectAll = "SELECT * FROM Customers";
// Create a SQLiteDataAdapter to retrieve data
using (SQLiteDataAdapter dataAdapter = new SQLiteDataAdapter(SQLQuerySelectAll, MyConnection))
{
DataTable dataTable = new DataTable(); // Create a DataTable to hold the data
dataAdapter.Fill(dataTable); // Use the Fill method to retrieve data into the DataTable
//Display data
foreach (DataRow row in dataTable.Rows)
{
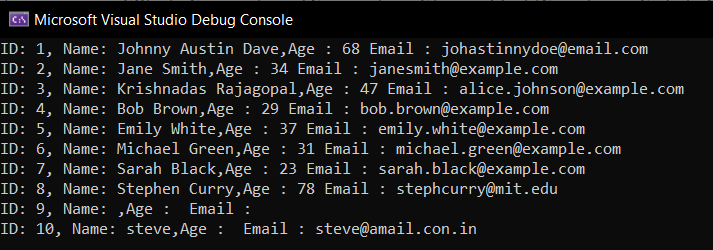
Console.WriteLine($"ID: {row["id"]}, Name: {row["name"]}, Age : {row["age"]} Email : {row["Email"]}");
}
}
}If you run the code you will see the below output.
using (SQLiteDataAdapter dataAdapter = new SQLiteDataAdapter(SQLQuerySelectAll, MyConnection))
{
   DataTable dataTable = new DataTable(); // Create a DataTable to hold the data
   dataAdapter.Fill(dataTable);           // Use the Fill method to retrieve data into the DataTable
}
We create a SQLiteDataAdapter instance called dataAdapter and then we call the Fill() method.
When you call the Fill() method, the dataAdapter executes the SQLQuerySelectAll (SELECT * FROM Customers) query against the SQLite database and retrieves the result set which is then used to fill the dataTable.
Then we call a foreach loop to iterate through the rows inside the dataTable.
You can also use
Console.WriteLine($"{dataTable.Rows[0]["name"]}");//name value in first coloumn
Console.WriteLine($"{dataTable.Rows[1]["name"]}");
Console.WriteLine($"{dataTable.Rows[2]["name"]}");
to list row by row.
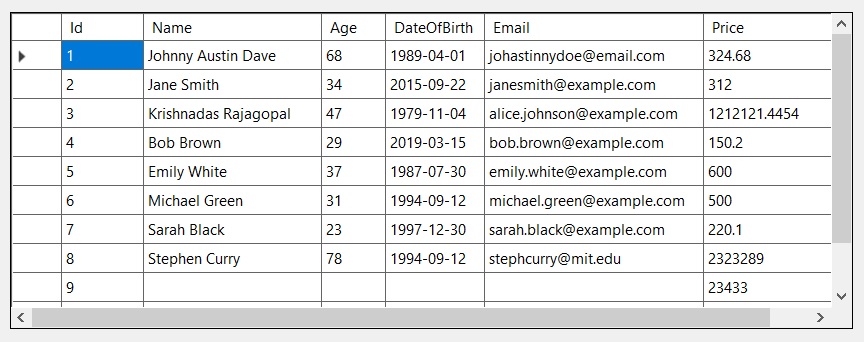
Displaying the SQLite data using DataGridView Control
DataGridView control is a powerful and flexible data presentation control in Windows Forms (WinForms), part of the .NET platform. It provides a customizable, tabular interface for displaying, editing, and interacting with data in a grid-like format. It is commonly used to display data from databases, arrays, lists, or other data sources in a tabular form.
DataGridView allows users to edit the contents of the cells directly, whether it’s text, numbers, dates, or other types of data. You can control whether the cells are read-only or editable.
Before we display something ,make sure that the database you are using has some data in it which we can display on a windows form. You can download our sample database from our GitHub Repo.
So you can drag the control to your form from the Toolbox.
You can then populate the DataGridView control using a dataTable object.
using (SQLiteDataAdapter dataAdapter = new SQLiteDataAdapter(SQLQueryExecuted, MyConnection))
               {
                   DataTable dataTable = new DataTable();
                   dataAdapter.Fill(dataTable);

                   dataGridView1.DataSource = dataTable; //populate the datagrid view
               }
Here the contents of the DataGridView control will depend upon the SQL query Executed and the the Contents of the SQLite database table.
In our case we are putting all the code for Opening a connection to the database and displaying the SQLite data inside the Button Click Handler of the Load SQLite Data Button on our app.
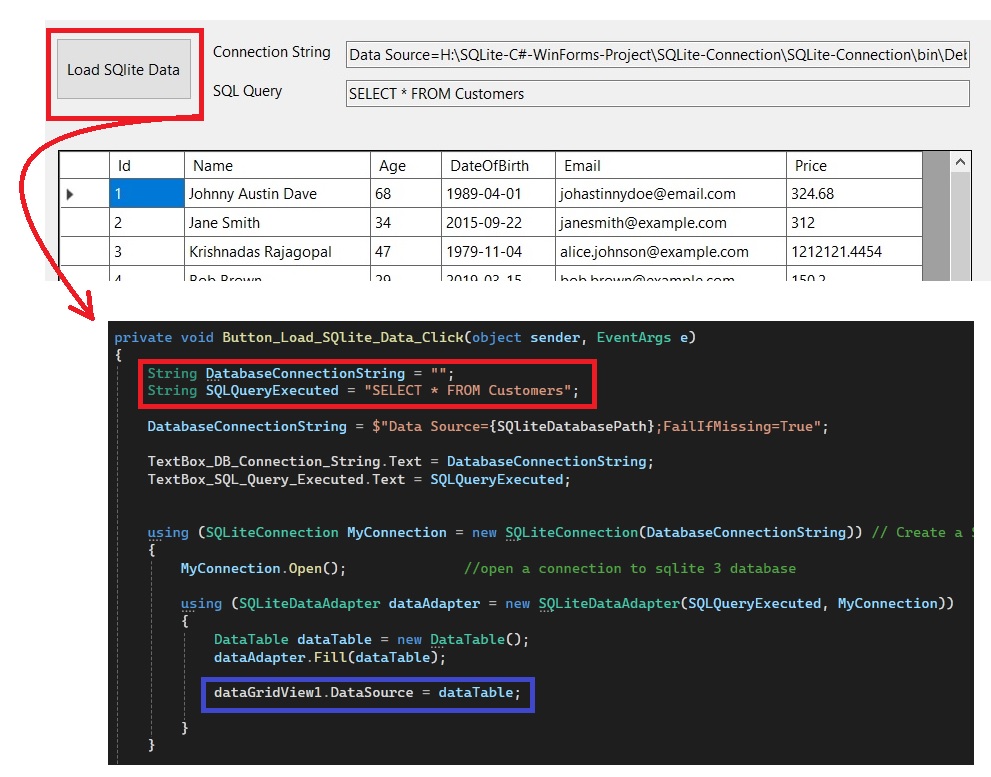
C# Code for displaying the SQLite database data is shown below.
private void Button_Load_SQlite_Data_Click(object sender, EventArgs e)
{
   String DatabaseConnectionString = "";

   String SQLQueryExecuted = "SELECT * FROM Customers"; //SQL Query to be executed

   DatabaseConnectionString = $"Data Source={SQliteDatabasePath};FailIfMissing=True"; //create database connection using the full path

   TextBox_DB_Connection_String.Text = DatabaseConnectionString;
   TextBox_SQL_Query_Executed.Text = SQLQueryExecuted;
   using (SQLiteConnection MyConnection = new SQLiteConnection(DatabaseConnectionString)) // Create a SqliteConnection object called Connection
   {
       MyConnection.Open();              //open a connection to sqlite 3 database

        using (SQLiteDataAdapter dataAdapter = new SQLiteDataAdapter(SQLQueryExecuted, MyConnection))
       {
           DataTable dataTable = new DataTable();
           dataAdapter.Fill(dataTable);

           dataGridView1.DataSource = dataTable; //Populate the datagridview
       }
   }
}
Here we will be giving the SQL Query
String SQLQueryExecuted = "SELECT * FROM Customers";So that all the data available in the sample database table called Customers is shown on the DataGridView table.
You can change this query to suit your needs, without making any changes to the datagridview table.
For example ,you can give the following query to display only select columns.
String SQLQueryExecuted = "SELECT id,name,email FROM Customers";On executing this you will get the following output.
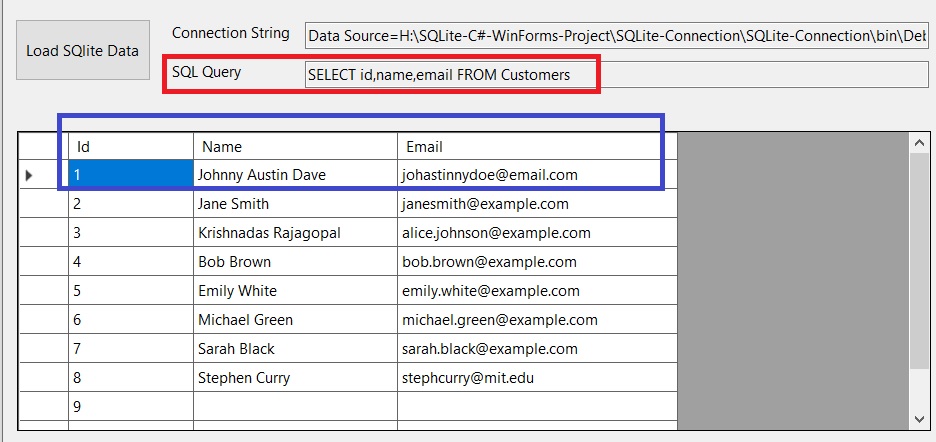
only id ,name and email are shown and the table automatically resizes to suit your needs.
You can also display other tables by changing the SQL String.
Here we are displaying another database from Kaggle.

Introduction: Beginners Guide to Building SQLite GUI Applications Using C# (Csharp) and WinForms
In this Instructable ,
You will learn how to read data from a SQLite database on disk and display it on a Windows WinForms Application in a tabular format. This form of application can be used to visualize or manipulate the data gathered by a sensor system in a human friendly way.
The Original Article along With Source Codes can be downloaded using the below link.
- Learn to integrate SQLite Database with WinForms GUI using C#
Supplies
This is a purely Software based Project. All the things required for our project can be freely downloaded from the Internet.
We will be using Visual Studio Community Edition to develop our Code as it has an easy to use Drag and Drop GUI builder which helps in Rapid Application development.
DownloadVisual Studio Community Edition from Microsoft Website
Basic knowledge of C# and WinForms API is needed.
Basic knowledge of How to connect with SQLite Database and Read/ Write data to it using C# is required.
You can also use DB Browser for SQLite to Visualize data in your database during debugging purposes.
Step 1: What Is WinForms ,Pro’s / Con’s and Future of API
WinForms (Windows Forms) is a graphical user interface (GUI) toolkit for developing desktop applications on the Windows platform. It is part of the .NET Framework and allows developers to create rich, native Windows applications.
Is WinForms Dead?
No, WinForms is not dead, but it is considered «legacy» in many circles, particularly as Microsoft shifts more focus to newer technologies like WPF (Windows Presentation Foundation) and UWP (Universal Windows Platform), and the more modern .NET Core and .NET 5/6/7/8 frameworks.
While it isn’t actively being pushed as the future of Windows development, it still has a large installed base and remains widely used. Microsoft continues to support it, especially in .NET 5 and beyond, where WinForms has received updates for modern .NET versions.
Advantages of WinForms
WinForms is a Mature and Stable Technology and has been around since the early 2000s, and it’s a tried-and-tested technology. Many apps are still running on WinForms, and it’s a stable choice for building applications.
The drag-and-drop designer in Visual Studio makes it easy to design UI layouts quickly. Developers can focus on the logic while the framework takes care of much of the UI complexity.
The Form Designer also help newer programmers concentrate on application logic rather than being bogged by UI code as in the case with WPF. It is ideal for Rapid Prototyping of Ideas and designs.
Disadvantages of WinForms
WinForms is designed primarily for Windows applications. It doesn’t support cross-platform development, unlike MAUI or WPF, which can be used to target multiple platforms.
Step 2: Creating a WinForms C# Project in Visual Studio
To create a WinForms C# project in Visual Studio,
Once Visual Studio is installed and opened,
click on the Create a new project button from the start screen.
In the Create a New Project window, use the search bar or the filters to find Windows Forms App (.NET Framework) if you are targeting the traditional .NET Framework. If you’re working with newer versions like .NET Core, .NET 5, or .NET 8, you can select Windows Forms App which is designed for these modern frameworks.
Here we will be using .NET LTS version. After selecting the template, click Next.
The next step involves configuring your project. Provide a Project Name, Location, and Solution Name for the project.
Once this is set up, click Create to proceed.
Visual Studio will then generate your basic WinForms project, which includes a Form1.cs file by default. This file will serve as the main window for your application.
You’ll also see a Form1.Designer.cs file, which automatically manages the UI elements of your form. In this Designer view, you can easily drag and drop various controls, such as buttons, textboxes, and labels, from the Toolbox on the left-hand side of the screen. This allows you to visually design your form without manually writing the layout code.
To add functionality, switch to the Code view of Form1.cs. Here, you can define events for the controls you added. For instance, if you added a button to the form, you can double-click the button in the Designer view, and Visual Studio will generate a button click event handler in your Form1.cs file. This is where you can write the logic for what should happen when the user interacts with the button.
After writing your code, you can run the application by pressing F5 or clicking the Start button in Visual Studio.
Step 3: Installing Required Namespaces Using NuGet
We need to install the required namespaces to our Visual Studio project before starting the development of our SQLite WinForms Application.
You can use the NuGet Package Manager present in the Visual Studio to install the required namespaces.
For our SQlite development We can use
- System.Data.SQLite
- System.Data.SQLite.Core
Both of the are suitable here
System.Data.SQLite is a .NET library that provides a ADO.NET interface for interacting with SQLite Database, which is a serverless, self-contained database engine. It enables .NET developers to use SQLite databases within their applications by providing a set of classes that allow to interact with SQLite.Provides support for LINQ and EF Core.
System.Data.SQLite.Core is a more minimal version of the System.Data.SQLite package. It provides a core set of functionality for interacting with SQLite databases, but it is designed for use with more modern .NET applications, especially .NET Core and .NET 5+.
We can use either one of them
Here i am using System.Data.SQLite.Core as only minimal API are required.
Step 4: Opening a SQLite Database Using FileOpenDialog API
Now we will connect to a SQLite database from our WinForms GUI app and open it using the OpenFileDialog Control available in the WinForms GUI framework.
The OpenFileDialog is a common dialog that allows users to open files from their computer. It is part of the System.Windows.Forms namespace and provides an easy way to implement a file selection interface for your application. When using OpenFileDialog, users can navigate their file system, select a file, and return that file’s path to your application
Here we will use OpenFileDialog to navigate through the file system and select the SQLite database on the disk. We will then use .FileName property of OpenFileDialog Object to get the full path to the database.
if (OpenDatabaseFileDialog.ShowDialog() == DialogResult.OK)
{
SQliteDatabaseFilePath = OpenDatabaseFileDialog.FileName;
}
This Full path is then used to create a connection string to open the SQLite Database using the SQLiteConnection class.
String ConnString = $»Data Source={SQliteDatabaseFilePath};FailIfMissing=True»;
Step 5: Reading and Writing Into SQLite Using SQLiteDataAdapter Class
Once the connection to the database is open by using the SQLiteConnection class we will use an adapter class called SQLiteDataAdapter to move data back and forth between the database .It is part of the System.Data.SQLite library, .
The SQLiteDataAdapter class is used to interact with SQLite data by retrieving data from a database and populating a DataSet or DataTable. It also allows for updating the data back to the database after modifications are made in the DataSet
Her is a code to retrieve data from a sqlite database and to populate a datatable class which is then used as a data source to the winforms DataGridView Control.
// Create a SQLiteDataAdapter to retrieve data
using (SQLiteDataAdapter dataAdapr = new SQLiteDataAdapter(SQLQuery, MyConn))
{
DataTable dTable = new DataTable();
dataAdapr.Fill(dTable);
}
The code
DataTable dTable = new DataTable();
initializes a new instance of a DataTable, which serves as an in-memory representation of a table, containing rows and columns of data. At this point, the DataTable is empty and ready to be filled with data.
dataAdapter.Fill(dTable);
the above code ,uses the Fill() method of a DataAdapter to execute a SQL query against the database and load the resulting data into the DataTable.
The Fill() method retrieves the data from the database and stores it within the DataTable, which enables the application to work with the data in the memory, allowing the viewing, and display in a UI control like a DataGridView.
Full code available in Github (link above)
Step 6: Using DataGridView to Display SQLite Tables on Windows Form
In the next step we will use the datatable to fill the DataGridview.
A DataGridView is a control in WinForms used to display tabular data in a grid format. It allows users to view, edit, and interact with data in rows and columns.
Each column represents a field, and each row represents a record. You can bind a DataGridView to various data sources, like a DataTable or a database, and it automatically populates with the data.
Before using make sure that you add that into your Form1 by dragging from ToolBox
Here we will give datatable dTable as input to the DataSource property of the DataGridview control
Here the contents of the DataGridView control will depend upon the SQL query Executed and the the Contents of the SQLite database table.
All these codes are placed inside a button event handler. So when we press the button ,A connection to the selected SQLite database is created and data is displayed on the DataGridView Control.
Время на прочтение10 мин
Количество просмотров35K
На первый взгляд нижеприведённый материал может показаться ещё одним банальным «хэллоууорлдом», «туториалом от Капитана Очевидность», коих уже предостаточно на просторах Сети, но это впечатление обманчиво. На деле чтобы добиться того же результата с нуля у WinForms-программиста, не работавшего ранее с Entity Framework Core (не путать с классической Entity Framework) и вооружённого только уже валяющимися в изобилии на просторах Сети туториалами по EF Core и документацией может уйти куда больше времени, чем он наивно ожидал до того, как взялся за дело. Так случилось и со мной. Посему хочу поделиться опытом.
Основная проблема заключается в том, что имеющиеся материалы по EF Core в подавляющем большинстве не подразумевают использование Visual Studio (вместо этого подразумевается использование легковесного кроссплатформенного тулинга .NET Core) и уж точно не берут в расчёт, что кому-то захочется использовать EF Core в дэсктопном приложении на основе фрэймворка Windows Forms (вместо этого как правило подразумевается использование ASP.NET core). Но задачи и ситуации, в которых предпочтительно (или и вовсе необходимо) решение в виде дэсктопного приложения всё-ещё встречаются, и свои преимущества (как, разумеется, и недостатки) у Entity Framework Core по сравнению с Entity Framework 6 есть. Кроме того в доступных в Сети примерах как правило рассматриваются только наиболее элементарные действия типа добавления записи в БД, при этом даже вопрос последующего извлечения данных зачастую не рассматривается, а в нём уже есть не очевидные моменты. Также можно заметить, что EF Core достаточно активно развивается и многие инструкции теряют актуальность в т.ч. по этой причине.
В своих попытках решить такую элементарную на первый взгляд задачу, как разработка минимального демонстрационного приложения WinForms с использованием EF Core в VisualStudo 2015 я натолкнулся на целый проблем типа исключений, неожиданного поведения, непонимания как сделать нечто, что в туториалах подразумевается как самоочевидное и т.п. В результате некоторые шаги из тех, что я приведу ниже пришлось нащупывать практически в слепую, гугля, задавая вопросы и экспериментируя.
В качестве платформы я выбрал .NET Framework 4.6.1 (версия 4.6.2 почему-то не появляется в списке доступных у меня в Visual Studio, но и при выборе 4.6.1 всё работает, возможно будет работать и с более ранними версиями, но я не проверял), в качестве среды разработки — Visual Studio Community Edition 2015 Update 3, в качестве СУБД — SQLite, в качестве ОС — Windows 7 64-bit.
Ниже приведу список шагов, результатом которых стало исправно работающее демонстрационное приложение и в процессе выполнения которых не было получено ни одного сообщения об ошибке.
0. Проверяем, что установлены последние версии .NET Framework 4.6.2 (web installer, offline installer) и Visual Studio 2015 Update 3 (update web installer, update offline installer ISO, web installer полной версии Visual Studio 2015 Update Community Edition 3, offline installer ISO полной версии Visual Studio 2015 Update Community Edition 3 с интергрированным обновлением)
1. Устанавливаем Windows Management Framework 5.0 чтобы обновить PowerShell до версии 5.0. У меня (после установки Windows 7 и Visual Studio 2015 и всех обновлений к ним) в системе была версия 2.0 и далее в процессе я получил сообщение об ошибке с требованием более новой версии
2. Устанавливаем .NET Core 1.0.1 tools Preview 2 (web installer, может использоваться для создания offline-дистрибутива при помощи ключа /layout).
3. Обновляем расширение Visual Studio для работы с репозиториями NuGet. Для этого либо скачиваем актуальную на данный момент версию 3.5.0.1996 по прямой ссылке либо добавляем в настройки Visual Studio соответствующий репозиторий расширений для автоматического обновления.
4. Создаём новый проект типа Windows Forms Application. Я назвал его «Vs2015WinFormsEfcSqliteCodeFirst20170304Example» (актуальный на 04.03.2017 пример WinForms-приложения с использованием Entity Framework Core, подхода «code-first» и СУБД SQLite в Visual Studio 2015). В качестве target framework выбираем .NET Framework 4.6.1.
5. Нажимаем правой кнопкой мыши по нашему проекту в панели Solution Explorer, выбираем Manage NuGet Packages…, переходим на вкладку Browse, устанавливаем Microsoft.EntityFrameworkCore.Sqlite.Design и Microsoft.EntityFrameworkCore.Tools. Для установки актуальных версий может потребоваться установить галочку «Include prerelease», в стабильных версиях может чего-то не хватать или наличествовать неисправленные баги. Я установил последние на данный момент Microsoft.EntityFrameworkCore.Sqlite.Design 1.1.0 и Microsoft.EntityFrameworkCore.Tools 1.1.0-preview4-final. Если возникнут проблемы с установкой Microsoft.EntityFrameworkCore.Tools можно попробовать сделать это через командную строку NuGet: в меню выбрать Tools — NuGet Package Manager — Package Manager Console, в появившейся консоли (которая, кстати, ещё понадобится нам далее) после приглашения «PM>» ввести «Install-Package Microsoft.EntityFrameworkCore.Tools -Pre»
PM> Install-Package Microsoft.EntityFrameworkCore.Tools -Pre6. Создаём файлы исходного кода классов модели данных. Для порядка я поместил их в подпапку «Model» (некоторые называют её «Entities», некоторые кидают все классы в корень проекта, а некоторые и вовсе в один файл). Модель описывает учебный пример базы данных, хранящей список городов и людей в/из них. Каждый человек может быть связан только с одним городом, может быть неизвестно из какого он города вообще.
Vs2015WinFormsEfcSqliteCodeFirst20170304ExampleContext.cs
using Microsoft.EntityFrameworkCore;

namespace Vs2015WinFormsEfcSqliteCodeFirst20170304Example.Model
{
    public class Vs2015WinFormsEfcSqliteCodeFirst20170304ExampleContext : DbContext
    {
        public DbSet<City> Cities { get; set; }

        public DbSet<Person> People { get; set; }

        protected override void OnConfiguring(DbContextOptionsBuilder optionsBuilder)
        {
            optionsBuilder.UseSqlite("Filename=Vs2015WinFormsEfcSqliteCodeFirst20170304Example.sqlite");
        }
    }
}
City.cs
using System.Collections.Generic;
using System.ComponentModel.DataAnnotations.Schema;

namespace Vs2015WinFormsEfcSqliteCodeFirst20170304Example.Model
{
    public class City
    {
        public int Id { get; set; }

        public string Name { get; set; }

        [InverseProperty("City")]
        public virtual ICollection<Person> People { get; set; }
    }
}
Person.cs
using System.ComponentModel.DataAnnotations.Schema;

namespace Vs2015WinFormsEfcSqliteCodeFirst20170304Example.Model
{
    public class Person
    {
        public int Id { get; set; }

        public string Name { get; set; }

        public string Surname { get; set; }

        public int? CityId { get; set; }

        [InverseProperty("People")]
        public virtual City City { get; set; }
    }
}
7. Разрешаем скрипты PowerShell, если этого не сделать может возникнуть ошибка «…\packages\Microsoft.EntityFrameworkCore.Tools.1.1.0-preview4-final\tools\init.ps1 cannot be loaded because running scripts is disabled on this system.» Для этого переходим в командную строку NuGet (выбрать Tools — NuGet Package Manager — Package Manager Console в меню) и выполняем следующую команду
PM> Set-ExecutionPolicy RemoteSigned8. Создаём «миграции». Для этого, сохранив и откомпилировав наш код (просто чтобы удостовериться в отсутствии явных опечаток) переходим в командную строку NuGet и выполняем следующую команду.
PM> Add-Migration -Name "Vs2015WinFormsEfcSqliteCodeFirst20170304ExampleMigration" -Context "Vs2015WinFormsEfcSqliteCodeFirst20170304ExampleContext"в результате у нас в проекте должна появиться папка «Migrations» и два файла в ней: «Vs2015WinFormsEfcSqliteCodeFirst20170304ExampleContextModelSnapshot.cs» и «20170304204355_Vs2015WinFormsEfcSqliteCodeFirst20170304ExampleMigration.cs» (разумеется число в начале последнего у вас будет другое — это ни что иное, как дата и время в момент генерации в очевидном формате, я её потом вообще удалил оставив только «Vs2015WinFormsEfcSqliteCodeFirst20170304ExampleMigration.cs»).
9. Редактируем сгенерированные файлы чтобы добавить условие уникальности (unique constraint, также известное как вторичный ключ) на имя города (в реальности, конечно, бывают города с одинаковыми именами, но для примера будет не лишним)
Vs2015WinFormsEfcSqliteCodeFirst20170304ExampleMigration.cs
using Microsoft.EntityFrameworkCore.Migrations;

namespace Vs2015WinFormsEfcSqliteCodeFirst20170304Example.Migrations
{
    public partial class Vs2015WinFormsEfcSqliteCodeFirst20170304ExampleMigration : Migration
    {
        protected override void Up(MigrationBuilder migrationBuilder)
        {
            migrationBuilder.CreateTable(
                name: "Cities",
                columns: table => new
                {
                    Id = table.Column<int>(nullable: false)
                        .Annotation("Sqlite:Autoincrement", true),
                    Name = table.Column<string>(nullable: true)
                },
                constraints: table =>
                {
                    table.PrimaryKey("PK_Cities", x => x.Id);

                    // Эта строка добавлена вручную
                    table.UniqueConstraint("UQ_Cities_Name", x => x.Name);
                });

            migrationBuilder.CreateTable(
                name: "People",
                columns: table => new
                {
                    Id = table.Column<int>(nullable: false)
                        .Annotation("Sqlite:Autoincrement", true),
                    CityId = table.Column<int>(nullable: true),
                    Name = table.Column<string>(nullable: true),
                    Surname = table.Column<string>(nullable: true)
                },
                constraints: table =>
                {
                    table.PrimaryKey("PK_People", x => x.Id);
                    table.ForeignKey(
                        name: "FK_People_Cities_CityId",
                        column: x => x.CityId,
                        principalTable: "Cities",
                        principalColumn: "Id",
                        onDelete: ReferentialAction.Restrict);
                });

            migrationBuilder.CreateIndex(
                name: "IX_People_CityId",
                table: "People",
                column: "CityId");
        }

        protected override void Down(MigrationBuilder migrationBuilder)
        {
            migrationBuilder.DropTable(
                name: "People");

            migrationBuilder.DropTable(
                name: "Cities");
        }
    }
}
Vs2015WinFormsEfcSqliteCodeFirst20170304ExampleContextModelSnapshot.cs
using Microsoft.EntityFrameworkCore;
using Microsoft.EntityFrameworkCore.Infrastructure;
using Vs2015WinFormsEfcSqliteCodeFirst20170304Example.Model;

namespace Vs2015WinFormsEfcSqliteCodeFirst20170304Example.Migrations
{
    [DbContext(typeof(Vs2015WinFormsEfcSqliteCodeFirst20170304ExampleContext))]
    partial class Vs2015WinFormsEfcSqliteCodeFirst20170304ExampleContextModelSnapshot : ModelSnapshot
    {
        protected override void BuildModel(ModelBuilder modelBuilder)
        {
            modelBuilder
                .HasAnnotation("ProductVersion", "1.1.0-rtm-22752");

            modelBuilder.Entity("Vs2015WinFormsEfcSqliteCodeFirst20170304Example.Model.City", b =>
                {
                    b.Property<int>("Id")
                        .ValueGeneratedOnAdd();

                    b.Property<string>("Name");

                    b.HasKey("Id");

                    // Эта строка добавлена вручную
                    b.HasIndex("Name").IsUnique();

                    b.ToTable("Cities");
                });

            modelBuilder.Entity("Vs2015WinFormsEfcSqliteCodeFirst20170304Example.Model.Person", b =>
                {
                    b.Property<int>("Id")
                        .ValueGeneratedOnAdd();

                    b.Property<int?>("CityId");

                    b.Property<string>("Name");

                    b.Property<string>("Surname");

                    b.HasKey("Id");

                    b.HasIndex("CityId");

                    b.ToTable("People");
                });

            modelBuilder.Entity("Vs2015WinFormsEfcSqliteCodeFirst20170304Example.Model.Person", b =>
                {
                    b.HasOne("Vs2015WinFormsEfcSqliteCodeFirst20170304Example.Model.City", "City")
                        .WithMany("People")
                        .HasForeignKey("CityId");
                });
        }
    }
}
10. Генерируем файл БД. Для этого в командной строке NuGet выполняем следующую команду
PM> Update-Database -Context "Vs2015WinFormsEfcSqliteCodeFirst20170304ExampleContext"Файл БД создастся в той же директории, где находится скомпилированный exe-шник нашего приложения, у меня это «…\Vs2015WinFormsEfcSqliteCodeFirst20170304Example\bin\Debug\Vs2015WinFormsEfcSqliteCodeFirst20170304Example.sqlite».
На данном этапе мы уже можем заглянуть внутрь созданного файла, например с помощью официального консольного клиента sqlite3 или бесплатной кроссплатформенной GUI оболочки DB Browser for SQLite, и удостовериться, что таблицы создались корректно. Помимо наших таблиц «Cities» и «People» мы также найдём там таблицу «__EFMigrationsHistory» со служебной информацией EF Core и «sqlite_sequence» со служебной информацией SQLite.
11. Теперь перейдём к дизайнеру нашей формы, разместим на ней кнопочку, щёлкнем и на ней дважды чтобы создать обработчик события нажатия на кнопку и перейти к редактированию его кода. Ниже привожу свой код, демонстрирующий основные действия с записями БД. Я ещё имею привычку всегда переименовывать Form1 в MainForm и контролы аналогично по смыслу (в данном случае единственный контрол button1 в mainButton), но это дело вкуса и принятых в вашей команде стандартов именования.
MainForm.cs
private void mainButton_Click(object sender, EventArgs e)
{
    // Удаляем все записи из обеих таблиц
    using (var context = new Vs2015WinFormsEfcSqliteCodeFirst20170304ExampleContext())
    {
        foreach (var person in context.People)
            context.Remove(person);

        foreach (var city in context.Cities)
            context.Remove(city);

        context.SaveChanges();
    }

    // Добавляем новые записи в таблицу городв и затем
    // новые записи в таблицу людей, ссылаясь на добавленные города
    using (var context = new Vs2015WinFormsEfcSqliteCodeFirst20170304ExampleContext())
    {
        var praha = new City { Name = "Praha" };

        var london = new City { Name = "London" };

        var madrid = new City { Name = "Madrid" };

        var jan = new Person { Name = "Jan", City = praha };

        var john = new Person { Name = "John", City = london };

        var juan = new Person { Name = "Juan", City = madrid };

        context.Cities.AddRange(praha, london, madrid);

        context.People.AddRange(jan, john, juan);

        context.SaveChanges();
    }

    // Загружаем запись о добавленном ранее городе из БД,
    // добавляем нового человека в этот город,
    // изменяем добавленную ранее запись о человеке (добавляем фамилию)
    using (var context = new Vs2015WinFormsEfcSqliteCodeFirst20170304ExampleContext())
    {
        // Обратите внимание на конструкцию Include(city => city.People)
        // если написать просто context.Cities.Single(city => city.Name == "London");
        // то город найдётся, но его список .People будет равен null.
        // В production коде при использовании .Single также необходимо добавить обработку случаев,
        // когда удовлетворяющих запросу записей нет или когда их болше одной
        var london = context.Cities.Include(city => city.People)(city => city.Name == "London");

        var peter = new Person { Name = "Peter", City = london };

        var john = london.People.Single(person => person.Name == "John");

        john.Surname = "Smith";

        context.Add(peter);

        context.Update(john);

        context.SaveChanges();
    }
}
Разумеется в реальной жизни вы реализуете в приложении более богатый интерфейс, более осмысленную логику, добавите обработку исключений и валидацию данных для их предотвращения, приведённого же примера достаточно для понимания того, как это сделать.
Скачать весь приведённый выше и сопутствующий код можно тут.
Microsoft.Data.Sqlite and C# WinForms Integration Challenges
Integrating Microsoft.Data.Sqlite with C# WinForms can be a daunting task, especially when the available resources are scattered across different platforms and frameworks. The primary challenge lies in the scarcity of dedicated tutorials or examples that specifically address the use of Microsoft.Data.Sqlite within the context of C# WinForms. Most of the available resources either focus on .NET Core, UWP, or utilize other libraries like System.Data.SQLite, leaving developers in a quandary when trying to find relevant guidance.
The Microsoft.Data.Sqlite library is a lightweight, efficient, and modern library designed to work seamlessly with .NET applications. However, its integration with WinForms, a framework primarily used for desktop applications, requires a nuanced understanding of both the library and the framework. The lack of comprehensive documentation or tutorials that bridge this gap can lead to confusion and inefficiencies, especially for developers who are new to either Microsoft.Data.Sqlite or C# WinForms.
One of the key issues is the difference in the way Microsoft.Data.Sqlite handles database connections and operations compared to other libraries like System.Data.SQLite. Microsoft.Data.Sqlite is designed to be more aligned with the .NET Core ecosystem, which means that some of the traditional approaches used in WinForms might not directly apply. This misalignment can lead to challenges in setting up the database connection, executing queries, and managing transactions within a WinForms application.
Moreover, the absence of clear examples or tutorials that demonstrate the integration of Microsoft.Data.Sqlite with WinForms can make it difficult for developers to understand how to structure their code, handle exceptions, and optimize performance. This lack of guidance can result in suboptimal implementations, where developers might resort to workarounds or hacks that could compromise the stability and efficiency of their applications.
Scarcity of Dedicated Resources and Misaligned Documentation
The scarcity of dedicated resources for integrating Microsoft.Data.Sqlite with C# WinForms can be attributed to several factors. Firstly, Microsoft.Data.Sqlite is relatively new compared to other libraries like System.Data.SQLite, which have been around for a longer time and have a more established community. As a result, there are fewer resources and tutorials available that specifically address the use of Microsoft.Data.Sqlite in the context of WinForms.
Secondly, the focus of Microsoft.Data.Sqlite documentation and tutorials is often on .NET Core and UWP, which are more modern and widely adopted frameworks for building cross-platform applications. WinForms, on the other hand, is a legacy framework primarily used for desktop applications, and it doesn’t receive the same level of attention in the context of modern libraries like Microsoft.Data.Sqlite.
This misalignment in documentation and resources can lead to confusion among developers who are trying to integrate Microsoft.Data.Sqlite with WinForms. For instance, the official Microsoft documentation for Microsoft.Data.Sqlite provides a comprehensive guide on how to use the library with .NET Core, but it doesn’t offer specific guidance for WinForms. This lack of targeted documentation can make it difficult for developers to find the information they need to get started with Microsoft.Data.Sqlite in a WinForms application.
Another issue is the difference in the way Microsoft.Data.Sqlite handles certain operations compared to other libraries. For example, Microsoft.Data.Sqlite uses a different approach for parameterized queries, which can be confusing for developers who are used to working with System.Data.SQLite. This difference in approach can lead to errors and inefficiencies if not properly understood and addressed.
Furthermore, the lack of examples or tutorials that demonstrate the integration of Microsoft.Data.Sqlite with WinForms can make it difficult for developers to understand how to structure their code, handle exceptions, and optimize performance. This lack of guidance can result in suboptimal implementations, where developers might resort to workarounds or hacks that could compromise the stability and efficiency of their applications.
Step-by-Step Integration and Best Practices for Microsoft.Data.Sqlite in WinForms
To address the challenges of integrating Microsoft.Data.Sqlite with C# WinForms, it is essential to follow a structured approach that includes setting up the environment, establishing a database connection, executing queries, and managing transactions. This section provides a detailed guide on how to achieve this integration, along with best practices to ensure a robust and efficient implementation.
Setting Up the Environment
The first step in integrating Microsoft.Data.Sqlite with a C# WinForms application is to set up the development environment. This involves installing the necessary NuGet packages and configuring the project to use Microsoft.Data.Sqlite. To install the Microsoft.Data.Sqlite package, open the NuGet Package Manager in Visual Studio and search for «Microsoft.Data.Sqlite». Once the package is installed, you can start using it in your WinForms application.
Establishing a Database Connection
Once the environment is set up, the next step is to establish a connection to the SQLite database. This involves creating a connection string and using it to open a connection to the database. The connection string typically includes the path to the SQLite database file and any additional parameters required for the connection. Here is an example of how to create and open a connection to a SQLite database using Microsoft.Data.Sqlite:
using Microsoft.Data.Sqlite;

string connectionString = "Data Source=path_to_your_database.db";
using (var connection = new SqliteConnection(connectionString))
{
    connection.Open();
    // Perform database operations here
}
In this example, the SqliteConnection class is used to create a connection to the SQLite database. The connection.Open() method is used to open the connection, and the using statement ensures that the connection is properly disposed of after use.
Executing Queries
With the database connection established, the next step is to execute queries against the database. This involves creating a SqliteCommand object, setting its CommandText property to the SQL query, and executing the query using the ExecuteNonQuery, ExecuteScalar, or ExecuteReader methods. Here is an example of how to execute a simple query using Microsoft.Data.Sqlite:
using (var command = connection.CreateCommand())
{
    command.CommandText = "SELECT * FROM your_table";
    using (var reader = command.ExecuteReader())
    {
        while (reader.Read())
        {
            // Process the data here
        }
    }
}
In this example, the SqliteCommand class is used to create a command object, and the CommandText property is set to the SQL query. The ExecuteReader method is used to execute the query and retrieve the results, which are then processed using a while loop.
Managing Transactions
Transactions are an essential part of database operations, especially when performing multiple related operations that need to be executed as a single unit. Microsoft.Data.Sqlite provides support for transactions through the SqliteTransaction class. Here is an example
Provide feedback
Saved searches
Use saved searches to filter your results more quickly
Sign up
Appearance settings