
The Windows Explorer process, explorer.exe, is a key component of the Windows OS, providing vital user interface functions. Unfortunately, malware often tries to disguise as explorer.exe to hide in plain sight. This comprehensive guide takes a deep dive into explorer.exe.

What is the Windows Explorer Process?
Explorer.exe handles the Windows GUI shell experience, managing critical UI elements like the desktop, taskbar, Start menu, File Explorer, and more. Its key functions include:
- Drawing the desktop and launching taskbar, gadgets, Start menu etc.
- Managing the visible Windows on screen, like opening, closing, moving, sizing windows.
- Displaying the File Explorer, enabling navigation of files and folders.
- Providing access to system settings and controls via Control Panel.
- Managing user account control (UAC) prompts for admin permissions.
- Handling notifications from system and software.
Explorer.exe is always running in Windows, providing access to the underlying OS functionality via the friendly graphical interface.
File Details
Here are some quick facts on explorer.exe:
- Location: C:\Windows
- Default name: explorer.exe
- Digitally signed by: Microsoft Corporation
Explorer.exe resides in the Windows folder and is authenticated by Microsoft’s digital signature to certify it’s legitimate.
Normal Explorer.exe Behavior
When functioning normally, here’s what to expect from explorer.exe:
- Single instance – Only one explorer.exe process runs at a time. Multiple instances are suspicious.
- Parent process – Explorer.exe is spawned by the Windows Logon process, winlogon.exe.
- Consistent location – Explorer.exe only runs from the Windows system folder.
- Low resource usage – It has a small memory and CPU footprint. High utilization indicates an issue.
- No child processes – Explorer.exe doesn’t spawn any other processes directly.
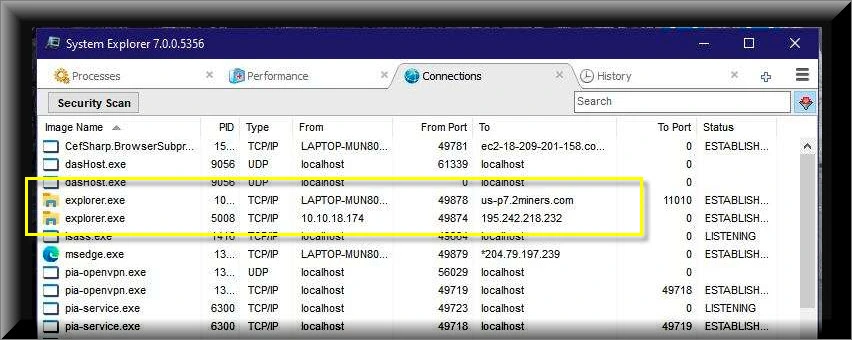
- No network activity – Explorer.exe itself does not make any network connections.
As long as explorer.exe adheres to these expected parameters, the process is legitimate and trustworthy.
How Malware Abuses Explorer.exe
Unfortunately, malware authors regularly target explorer.exe for impersonation due to its critical role. Common tactics include:
Mimicry
Malware uses the name explorer.exe for its executables and places them in the Windows folder, impersonating the real process.
Substitution
Some malware shuts down the legitimate explorer.exe process and substitutes its own malicious version in its place.
DLL injection
Malware injects malicious DLLs into the real explorer.exe process, exploiting its privileges to stealthily execute code.
Privilege escalation
By assuming explorer.exe’s identity, malware inherits its high level access to bypass security controls.
Persistence
Malware abusing explorer.exe often implements persistence mechanisms to stubbornly reinfect if removed.
Once embedded into explorer.exe’s trusted processes, malicious imposters can:
- Log keystrokes to steal passwords and data
- Download more malware
- Take control of the computer
- Create backdoors for remote access
- Deploy ransomware across files
- Monitor and modify system settings
- Disable security software
The elevated Explorer permissions let malware bypass many restrictions to achieve these activities.
How to Spot Malicious Explorer.exe
While sneaky, counterfeit explorer.exe can be exposed through these telltale signs:
Verify Location
Real explorer.exe only runs from the Windows folder. Other locations point to an imposter.
Check Parent Process
Use Process Explorer to check the parent process. Legitimate explorer.exe is spawned by winlogon.exe.
Look for Multiple Instances
There should only be one explorer.exe process. Extra copies are highly suspicious.
Confirm Digital Signature
The real explorer.exe contains a verified Microsoft digital signature. Malware may carry an invalid signature or none at all.
Inspect System Changes
Malware may modify system settings like policies, drivers, services and the registry to maintain persistence.
Monitor Resource Usage
Check CPU, memory and disk usage for anomalies. Malicious explorer.exe often consumes more resources than the real process.
Examine Network Traffic
Inspect traffic using Wireshark. The legitimate explorer.exe does not connect to the internet directly at all.
Catching these signs of impersonation can reveal if an explorer.exe is legitimate or a malicious pretender.
Removing Malicious Explorer.exe
This malware removal guide may appear overwhelming due to the number of steps and numerous programs that are being used. We have only written it this way to provide clear, detailed, and easy-to-understand instructions that anyone can use to remove malware for free.
Please perform all the steps in the correct order. If you have any questions or doubts at any point, stop and ask for our assistance.
To remove the Explorer.exe Trojan and other malware from your computer, follow these steps:
- STEP 1: Use Rkill to terminate malicious processes
- STEP 2: Uninstall malicious programs from Windows
- STEP 3: Reset browsers back to default settings
- STEP 4: Use Malwarebytes to remove for Trojans and Unwanted Programs
- STEP 5: Use HitmanPro to remove Rootkits and other Malware
- STEP 6: Use AdwCleaner to remove Malicious Browser Policies and Adware
- STEP 7: Perform a final check with ESET Online Scanner
- STEP 8: Run the System File Checker (SFC) tool
- STEP 9: Run the Disk Check tool
STEP 1: Use Rkill to terminate malicious processes
In this first step, we will download and run Rkill to terminate malicious processes that may be running on your computer.
RKill is a program that was developed at BleepingComputer.com that attempts to terminate known malware processes so that your normal security software can then run and clean your computer of infections. When RKill runs it will kill malware processes and then removes incorrect executable associations and fixes policies that stop us from using certain tools.
-
Download Rkill.
You can download RKill to your computer from the below link. When at the download page, click on the Download Now button labeled iExplore.exe. We are downloading a renamed version of Rkill (iExplore.exe) because some malware will not allow processes to run unless they have a certain filename.
-
Run RKill.
After downloading, double-click the iExplore.exe icon to kill malicious processes. In most cases, downloaded files are saved to the Downloads folder.
The program may take some time to search for and end various malware programs.
When it is finished, the black window will close automatically and a log file will open. Do not restart your computer. Proceed to the next step in this guide.

STEP 2: Uninstall malicious programs from Windows
In this second step, we will manually check if any unknown or malicious programs are installed on the computer. Sometimes adware and browser hijackers can have a usable Uninstall entry that can be used to remove them.
Windows 11Windows 10Windows 8Windows 7
-
Press the Windows key + I on your keyboard to open the Settings app.
First, open Windows Settings by pressing Windows+I on your keyboard. You can also right-click your Start button and select “Settings” from the list.

-
In the Settings app, click on “Apps” and then “Apps & features”.
When Settings opens, click “Apps” in the sidebar, then select “Apps & Features”.

-
Find the malicious program in the list of installed apps and uninstall it.
In Apps & Features settings, scroll down to the app list and search for unknown or suspicious programs. To make things easier, you can sort all installed programs by their installation date. To do this, click “Sort by” and select “Install date”.
Look out for any suspicious program that could be behind all the drama – anything you don’t remember downloading or that doesn’t sound like a genuine program. When you find a malicious program, click the three dots button beside it and select “Uninstall” in the menu that appears.
If you have checked your computer for malicious programs and did not find any, you can proceed with the next step in this guide.
-
Follow the prompts to uninstall the program.
In the next message box, confirm the uninstall process by clicking on Uninstall, then follow the prompts to uninstall the malicious program.
Make sure to read all of the prompts carefully, because some malicious programs try to sneak things in hoping that you won’t read them closely.


-
Press the Windows key + I on your keyboard to open the Settings app.
Press the Windows key + I on your keyboard to open the Settings app. You can also ope the Settings app by clicking the Start button on the taskbar, then select “Settings” (gear icon).

-
In the Settings app, click on “Apps”.
When the “Windows Settings” window opens, click on “Apps“. By default, it should open “Apps and Features” but if it doesn’t, select it from the list on the left.

-
Find the malicious program in the list of installed apps and uninstall it.
In Apps & Features settings, scroll down to the app list and search for unknown or suspicious programs. To make things easier, you can sort all installed programs by their installation date. To do this, click “Sort by” and select “Install date”.
Look out for any suspicious program that could be behind all the drama – anything you don’t remember downloading or that doesn’t sound like a genuine program. When you find a malicious program, click on it and select “Uninstall” in the menu that appears.
If you have checked your computer for malicious programs and did not find any, you can proceed with the next step in this guide.
-
Follow the prompts to uninstall the program.
In the next message box, confirm the uninstall process by clicking on Uninstall, then follow the prompts to uninstall the malicious program.
Make sure to read all of the prompts carefully, because some malicious programs try to sneak things in hoping that you won’t read closely.


-
Go to “Program and Features”.
Right-click on the Start button in the taskbar, then select “Programs and Features”. This will take you directly to your list of installed programs.

-
Search for malicious program and uninstall it.
The “Programs and Features” screen will be displayed with a list of all the programs installed on your computer. Scroll through the list until you find any unknown or suspicious program, then click to highlight it, then click the “Uninstall” button.
Look out for any suspicious program that could be behind all the drama – anything you don’t remember downloading or that doesn’t sound like a genuine program.
If you have checked your computer for malicious programs and did not find any, you can proceed with the next step in this guide.

-
Follow the on-screen prompts to uninstall malicious program.
In the next message box, confirm the uninstall process by clicking on Yes, then follow the prompts to uninstall malicious program. Make sure to read all of the prompts carefully, because some malicious programs try to sneak things in hoping that you won’t read closely.


-
Open the “Control Panel”.
Click on the “Start” button, then click on “Control Panel“.
-
Click on “Uninstall a Program”.
When the “Control Panel” appears, click on “Uninstall a Program” from the Programs category.

-
Search for malicious programs and uninstall them.
The “Programs and Features” screen will be displayed with a list of all the programs installed on your computer. Scroll through the list until you find any suspicious or unknown program, then click to highlight it, then click the “Uninstall” button.
Look out for any suspicious program that could be behind all the drama – anything you don’t remember downloading or that doesn’t sound like a genuine program.If you have checked your computer for malicious programs and did not find any, you can proceed with the next step in this guide.

-
Follow the on-screen prompts to uninstall malicious program.
In the next message box, confirm the uninstall process by clicking on Yes, then follow the prompts to uninstall malicious program. Make sure to read all of the prompts carefully, because some malicious programs try to sneak things in hoping that you won’t read closely.


If you are experiencing difficulty while attempting to uninstall a program, you can use Revo Uninstaller to completely remove the unwanted program from your computer.
Now that the malicious programs have been removed from your computer, we can proceed with the next step in this guide.
STEP 3: Reset browsers back to default settings
In this step, we will remove spam notifications, malicious extensions, and change to default any settings that might have been changed by malware.
Please note that this method will remove all extensions, toolbars, and other customizations but will leave your bookmarks and favorites intact. For each browser that you have installed on your computer, please click on the browsers tab below and follow the displayed steps to reset that browser.
ChromeFirefoxMicrosoft EdgeInternet Explorer
Reset Chrome for Windows to default settings
We will now reset your Chrome browser settings to their original defaults. This will reset your startup page, new tab page, search engine, and pinned tabs. It will also disable all extensions and clear temporary data like cookies. Your favorites, history, and saved passwords will not be cleared.
-
Click the three dots in the top-right corner and then click on “Settings”.
Open Chrome and click on the menu button (represented by three vertical dots) in the top right corner of the window. In the dropdown menu that opens, click “Settings“.

-
Click “Advanced”.
Chrome’s “Settings” should now be displayed in a new tab or window, depending on your configuration. In the left sidebar, click on the “Advanced” link.

-
Click “Reset and clean up”.
In the left sidebar, under the “Advanced” section, click on “Reset and clean up“.

-
Click “Reset settings to their original defaults”.
In the main window, the “Reset and clean up” section is visible, as shown in the screenshot below. Click on “Reset settings to their original defaults“.
-
Click “Reset settings”.
A confirmation dialog will now be displayed, detailing the components that will be restored to their default state should you continue with the reset process. To complete the restoration process, click on the “Reset settings” button.

-
(Optional) Reset Chrome Data Sync.
In case a malicious extension reinstalls itself even after performing a browser reset, you have an additional option to reset the data sync for your browser. To do this, navigate to chrome.google.com/sync and click on the Clear Data button.


Reset Firefox for Windows to default settings
We will now reset your Firefox browser settings to their default. The reset feature fixes many issues by restoring Firefox to its factory default state while saving your essential information like bookmarks, passwords, web form auto-fill information, browsing history, and open tabs.
-
Click the three horizontal lines in the top-right corner and then click on “Help”.
Click on Firefox’s main menu button, represented by three horizontal lines. When the drop-down menu appears, select the option labeled “Help“.

-
Click “More troubleshooting information”.
From the Help menu, click on “More troubleshooting information“.

-
Click on “Refresh Firefox”
When the “Troubleshooting Information” page opens, click on the “Refresh Firefox” button.

-
Confirm that you want to reset your browser settings.
To finish the reset process, click on the “Refresh Firefox” button in the new confirmation window that opens.
-
Click “Finish”.
Firefox will now close itself and will revert to its default settings. When it’s done, a window will list the information that was imported. Click on “Finish“.
Your old Firefox profile will be placed on your desktop in a folder named “Old Firefox Data“. If the reset didn’t fix your problem you can restore some of the information not saved by copying files to the new profile that was created. If you don’t need this folder any longer, you should delete it as it contains sensitive information.


Reset Microsoft Edge to default settings
We will now reset your Microsoft Edge browser settings to their default. This will reset your startup page, new tab page, search engine, and pinned tabs. It will also disable all extensions and clear temporary data like cookies. Your favorites, history, and saved passwords will not be cleared.
-
Click the three dots in the top-right corner and then click on “Settings”.
In the top right corner, click on Microsoft Edge’s main menu button, represented by three horizontal dots. When the drop-down menu appears, click on “Settings“.

-
Click on “Reset Settings”.
On the left side of the window, click on “Reset Settings“.
-
Click on “Restore settings to their default values”.
In the main window, click on “Restore settings to their default values“.

-
Click “Reset”.
A confirmation dialog should now be displayed, detailing the components that will be restored to their default state should you continue with the reset process. To complete the restoration process, click on the “Reset” button.
Microsoft Edge will now erase all your personal data, browsing history, and disable all installed extensions. Your bookmarks, though, will remain intact and still be accessible.


Reset Internet Explorer to default settings
We will now reset your Internet Explorer browser settings to their default. You can reset Internet Explorer settings to return them to the state they were in when Internet Explorer was first installed on your computer.
-
Go to “Internet Options”.
Open Internet Explorer, click on the gear icon in the upper-right part of your browser, then select “Internet Options“.
-
Select the “Advanced” tab, then click “Reset”
In the “Internet Options” dialog box, select the “Advanced” tab, then click on the “Reset” button.
-
Click on “Reset”.
In the “Reset Internet Explorer settings” section, select the “Delete personal settings” checkbox, then click on the “Reset” button.
-
Click on “Close”.
When Internet Explorer has completed its task, click on the “Close” button in the confirmation dialogue box.
Close your browser and then you can open Internet Explorer again.
STEP 4: Use Malwarebytes to remove for Trojans and Unwanted Programs
In this next step, we will we will install Malwarebytes to scan and remove any infections, adware, or potentially unwanted programs that may be present on your computer.
Malwarebytes stands out as one of the leading and widely-used anti-malware solutions for Windows, and for good reason. It effectively eradicates various types of malware that other programs often overlook, all at no cost to you. When it comes to disinfecting an infected device, Malwarebytes has consistently been a free and indispensable tool in the battle against malware. We highly recommend it for maintaining a clean and secure system.
-
Download Malwarebytes for Windows
You can download Malwarebytes by clicking the link below.
-
Install Malwarebytes
After the download is complete, locate the MBSetup file, typically found in your Downloads folder. Double-click on the MBSetup file to begin the installation of Malwarebytes on your computer. If a User Account Control pop-up appears, click “Yes” to continue the Malwarebytes installation.

-
Follow the On-Screen Prompts to Install Malwarebytes
When the Malwarebytes installation begins, the setup wizard will guide you through the process.
-
You’ll first be prompted to choose the type of computer you’re installing the program on—select either “Personal Computer” or “Work Computer” as appropriate, then click on Next.

-
Malwarebytes will now begin the installation process on your device.

-
When the Malwarebytes installation is complete, the program will automatically open to the “Welcome to Malwarebytes” screen.

-
On the final screen, simply click on the Open Malwarebytes option to start the program.

-
-
Enable “Rootkit scanning”.
Malwarebytes Anti-Malware will now start, and you will see the main screen as shown below. To maximize Malwarebytes’ ability to detect malware and unwanted programs, we need to enable rootkit scanning. Click on the “Settings” gear icon located on the left of the screen to access the general settings section.

In the settings menu, enable the “Scan for rootkits” option by clicking the toggle switch until it turns blue.

Now that you have enabled rootkit scanning, click on the “Dashboard” button in the left pane to get back to the main screen.
-
Perform a Scan with Malwarebytes.
To start a scan, click the Scan button. Malwarebytes will automatically update its antivirus database and begin scanning your computer for malicious programs.

-
Wait for the Malwarebytes scan to complete.
Malwarebytes will now scan your computer for browser hijackers and other malicious programs. This process can take a few minutes, so we suggest you do something else and periodically check the status of the scan to see when it is finished.
-
Quarantine detected malware
Once the Malwarebytes scan is complete, it will display a list of detected malware, adware, and potentially unwanted programs. To effectively remove these threats, click the “Quarantine” button.

Malwarebytes will now delete all of the files and registry keys and add them to the program’s quarantine.
-
Restart your computer.
When removing files, Malwarebytes may require a reboot to fully eliminate some threats. If you see a message indicating that a reboot is needed, please allow it. Once your computer has restarted and you are logged back in, you can continue with the remaining steps.


STEP 5: Use HitmanPro to remove Rootkits and other Malware
In this fifth step, while the computer is in normal back, we will download and run a scan with HitmanPro to remove Trojans, rootkits, and other malicious programs.
HitmanPro is a second-opinion scanner that takes a unique cloud-based approach to malware scanning. HitmanPro scans the behavior of active files and also files in locations where malware normally resides for suspicious activity. If it finds a suspicious file that’s not already known, HitmanPro sends it to its clouds to be scanned by two of the best antivirus engines today, which are Bitdefender and Kaspersky.
Although HitmanPro is shareware and costs $24.95 for 1 year on 1 PC, there is no limit on scanning. The limitation only kicks in when there is a need to remove or quarantine detected malware by HitmanPro on your system and by then, you can activate the one-time 30-days trial to enable the cleanup.
-
Download HitmanPro.
You can download HitmanPro by clicking the link below.
HITMANPRO DOWNLOAD LINK
(The above link will open a new web page from where you can download HitmanPro) -
Install HitmanPro.
When HitmanPro has finished downloading, double-click on “hitmanpro.exe” (for 32-bit versions of Windows) or “hitmanpro_x64.exe” (for 64-bit versions of Windows) to install this program on your computer. In most cases, downloaded files are saved to the Downloads folder.

You may be presented with a User Account Control pop-up asking if you want to allow HitmanPro to make changes to your device. If this happens, you should click “Yes” to continue with the installation.

-
Follow the on-screen prompts.
When HitmanPro starts you will be presented with the start screen as shown below. Click on the “Next” button to perform a system scan.


-
Wait for the HitmanPro scan to complete.
HitmanPro will now begin to scan your computer for malicious programs.
-
Click on “Next”.
When HitmanPro has finished the scan, it will display a list of all the malware that it has found. Click on the “Next” button to have HitmanPro remove the detected items.

-
Click on “Activate free license”.
HitmanPro may now require to activate the free 30-days trial to remove the malicious files. To do this, click on the “Activate free license” button to begin the free 30 days trial and remove all the malicious files from your computer.

When the malware removal process is complete, it will display a screen that shows the status of the various programs that were removed. At this screen, you should click on the Next button and then if prompted you should click on the Reboot button. If HitmanPro does not prompt you to reboot, please just click on the Close button.


STEP 6: Use AdwCleaner to remove Malicious Browser Policies and Adware
In this next step, we will use AdwCleaner to remove malicious browser policies and unwanted browser extensions from your computer.
AdwCleaner is a free popular on-demand scanner that can detect and remove malware that even the most well-known anti-virus and anti-malware applications fail to find. This on-demand scanner includes a lot of tools that can be used to fix the side effects of adware. browser hijackers and other malware.
-
Download AdwCleaner.
You can download AdwCleaner by clicking the link below.
-
Double-click on the setup file.
Double-click on the file named “adwcleaner_x.x.x.exe” to start AdwCleaner. In most cases, downloaded files are saved to the Downloads folder.

AdwCleaner program will now open and you will be presented with the program’s license agreement. After you read it, click on the I agree button if you wish to continue. If Windows prompts you as to whether or not you wish to run AdwCleaner, please allow it to run.

-
Enable “Reset Chrome policies” to remove malicious browser policies.
When AdwCleaner starts, on the left side of the window, click on “Settings” and then enable “Reset Chrome policies“.

-
Click on the “Scan” button.
On the left side of the AdwCleaner window, click on “Dashboard” and then click “Scan” to perform a computer scan.

-
Wait for the AdwCleaner scan to finish.
AdwCleaner will now scan your computer for malware. This process can take a few minutes.
-
Click on “Quarantine” to remove malware.
When the AdwCleaner scan is completed it will display all of the items it has found. Click on the “Quarantine” button to remove the malicious programs from your computer.

-
Click on “Continue” to remove the malicious programs.
AdwCleaner will now prompt you to save any open files or data as the program will need to close any open programs before it starts to clean. Click on the “Continue” button to finish the removal process.

AdwCleaner will now delete all detected malware from your computer. When the malware removal process is complete, you may be asked to restart your computer.


STEP 7: Perform a final check with ESET Online Scanner
This step involves installing and running a scan with ESET Online Scanner to check for any additional malicious programs that may be installed on the computer..
ESET Online Scanner is a free second-opinion scanner, designed to rescue your computer from malware (viruses, trojans, rootkits, etc.) that have infected your computer despite all the security measures you have taken (such as anti-virus software, firewalls, etc.).
-
Download ESET Online Scanner.
You can download ESET Online Scanner by clicking the link below.
-
Double-click on esetonlinescanner.exe to run the installer.
When ESET Online Scanner has finished downloading, double-click on “esetonlinescanner.exe” to install it program on your computer. In most cases, downloaded files are saved to the Downloads folder.

-
Install ESET Online Scanner.
When ESET Online Scanner starts you will be presented with the start screen as shown below. Select your desired language from the drop-down menu and click Get started.

In the Terms of use screen, click Accept.
Select your preference for the Customer Experience Improvement Program and the Detection feedback system and click Continue.
-
Start a Full Scan with ESET Online Scanner
Click on Full Scan to perform an in-depth inspection of the entire computer.
Select Enable for Detection of Potentially Unwanted Applications, then click Start scan.
-
Wait for the ESET Online Scanner scan to finish.
ESET Online Scanner will now begin to scan your computer for malware. This process can take quite a while, so we suggest you do something else and periodically check on the status of the scan to see when it is finished.
-
ESET Online Scanner will automatically remove the malicious files.
At the end of the scan, the Found and resolved detections screen will be displayed. You can click View detailed results to view specific information. Detected threats are automatically cleaned and quarantined.


STEP 8: Run the System File Checker (SFC) tool
In this step, we will use System File Checker (SFC) tool to detect and repair files that may have been corrupted by malware.
The SFC tool scans all protected system files on your computer and replaces any files that are corrupt or damaged with a cached copy that is stored in a compressed folder at %WinDir%\System32\dllcache. By running the SFC tool, you can help ensure that your system is functioning properly and fix any issues.
-
Open Command Prompt as Administrator.
To open the Command Prompt as an administrator in Windows, type “cmd” in the search bar and then right-click on the Command Prompt result and select “Run as administrator” as shown in the image below.

A User Account Control (UAC) prompt will appear asking for permission to allow the program to run. Click “Yes”.
-
Type “sfc /scannow”.
You will now be presented with a black screen called the ‘Administrator: Command Prompt’. On this screen, type “sfc /scannow” to scan for and repair any corrupt system files.
-
Restart your computer.
Restart your computer if sfc /scannow repaired files. System File Checker may or may not prompt you to restart but even if it doesn’t, you should restart anyway.
-
Run again sfc /scannow.
Run again sfc /scannow to check if the files were repaired.


STEP 9: Run the Disk Check tool
As a final step, we will utilize the Disk Check tool, commonly referred to as “chkdsk,” to identify and resolve any issues that were caused by malware.
This tool checks your hard disk for errors and can fix any issues it finds. To use the Disk Check tool, you will need to open the command prompt and enter the “chkdsk” command followed by the drive letter (e.g., “chkdsk C:”). You can also add the “/f” flag to the command to instruct the tool to fix any errors it finds. By running the Disk Check tool, you can help ensure that your hard disk is functioning properly and fix any issues that may be causing high disk usage.”
-
Open Command Prompt as Administrator.
To open the Command Prompt as an administrator in Windows, type “cmd” in the search bar and then right-click on the Command Prompt result and select “Run as administrator” as shown in the image below.
A User Account Control (UAC) prompt will appear asking for permission to allow the program to run. Click “Yes”.
-
Type “chkdsk /f /r”
You will now be presented with a black screen called the ‘Administrator: Command Prompt’. On this screen, type “chkdsk /f /r” to repair any errors on your hard drive.
-
Restart your computer
The Disk Check tool may require you to restart your computer in order to complete the scan and repair process. Type “Y” and click on Enter, then restart the computer.
A CHKDSK command can take a long time, especially when performed on larger drives. Once it’s done, however, it will present a summary of results including total disk space, byte allocation, and, most importantly, any errors that were found and corrected.


Your computer should now be free of the Explorer.exe Trojan and other malware.
If your current antivirus allowed this malicious program on your computer, you may want to consider purchasing Malwarebytes Premium to protect against these types of threats in the future.
If you are still having problems with your computer after completing these instructions, then please follow one of the steps:
- Run a computer scan with ESET Online Scanner
- Ask for help in our Windows Malware Removal Help & Support forum.
The Bottom Line
The explorer.exe process is the critical GUI gateway to Windows functionality. Unfortunately malware developers are eager to exploit it.
While disheartening, telltale signs separate legitimate explorer.exe from dangerous fakes. Using the investigative and removal techniques outlined here, you can keep this vital process working for you, not against you.
Staying alert and using the right tools, most users can defend against malware abusing this key system file. But if evidence points to a deeper infection, leverage the seasoned professionals at Microsoft Support to restore a compromised system.
Stay secure out there, keep your eyes peeled for shady explorer.exe, and think twice before trusting even essential system processes! With proper care, no Windows component needs to undermine your computer’s security.
Here are 10 basic security tips to help you avoid malware and protect your device:
To avoid potential dangers on the internet, it’s important to follow these 10 basic safety rules. By doing so, you can protect yourself from many of the unpleasant surprises that can arise when using the web.
✔Advanced Anti-Malware Protection ✔Blocks Harmful Websites ✔Custom Malware Fixes Just For You
*Source of claim SH can remove it. Trial w/Credit card, no charge upfront; full terms.
Is Explorer.exe malicious? No, it is not. The legitimate Explorer.exe file is a secure system process developed by Microsoft for Windows operating systems. However, creators of malware, such as viruses, worms, and Trojans, intentionally use the same file name to evade detection.
Explorer.exe is a malicious computer program that uses disguise to enter its victims’ computers and then launch various harmful processes. Explorer.exe can be described as a Trojan horse virus that can be used differently depending on what the hackers controlling it are after.
Trojan horses have been around for a very long time and it is likely that all of this article’s readers have, at one point or another, heard about this infamous category of malware. However, not all Trojans are the same and while some could easily be detected by most antivirus programs, others, especially newer ones such as Explorer.exe, could silently infect any computer (even those protected by high-quality security programs) and conduct all sorts of harmful actions.
One of the key characteristics of this malware type is that its representatives are quite versatile and can be tasked with the completion of many different criminal goals. At the current moment, the information we have about Explorer.exe doesn’t allow us to confidently tell you the ultimate purpose of this threat, yet we can still give you an idea of what could be expected if this virus enters a given computer.
The Explorer.exe Virus
The versatility of the Trojan Horse viruses oftentimes makes them and the damage they could cause unpredictable, especially when the threat is as new as the Explorer.exe virus. Still, there are certain tendencies of how Trojans tend to be used.
SUMMARY:
Please follow all the steps below in order to remove Explorer.exe!
How to remove Explorer.exe
- First, click the Start Menu on your Windows PC.
- Type Programs and Settings in the Start Menu, click the first item, and find Explorer.exe in the programs list that would show up.
- Select Explorer.exe from the list and click on Uninstall.
- Follow the steps in the removal wizard.
If you have a Mac virus, please use our How to remove Ads on Mac guide.
If you have an Android virus, please use our Android Malware Removal guide.
If you have an iPhone virus, please use our iPhone Virus Removal guide.
What we suggest you do first is, check the list of programs that are presently installed on the infected device and uninstall any rogue software that you find there:
- From the Start Menu, navigate to Control Panel ->>> Programs and Features ->>> Uninstall a Program.
- Next, carefully search for unfamiliar programs or programs that have been installed recently and could be related to Explorer.exe.
- If you find any of the programs suspicious then uninstall them if they turn out to be linked to Explorer.exe.
- If a notification appears on your screen when you try to uninstall a specific questionable program prompting you to just alter it or repair it, make sure you choose NO and complete the steps from the removal wizard.
Remove Explorer.exe from Chrome
- Click on the three dots in the right upper corner
- Go to more tools
- Now select extensions
- Remove the Explorer.exe extension
- Once you open Chrome, click on the three-dots icon to open the browser’s menu, go to More Tools/ More Options, and then to Extensions.
- Again, find the items on that page that could be linked to the malware and/or that might be causing problems in the browser and delete them.
- Afterwards, go to this folder: Computer > C: > Users > *Your User Account* > App Data > Local > Google > Chrome > User Data. In there, you will find a folder named Default – you should change its name to Backup Default and restart the PC.
- Note that the App Data folder is normally hidden so you’d have to first make the hidden files and folders on your PC visible before you can access it.
How to get rid of Explorer.exe on FF/Edge/etc.
- Open the browser and select the menu icon.
- From the menu, click on the Add-ons button.
- Look for the Explorer.exe extension
- Get rid of Explorer.exe by removing it from extensions
If using Firefox:
- Open Firefox
- Select the three parallel lines menu and go to Add-ons.
- Find the unwanted add-on and delete it from the browser – if there is more than one unwanted extension, remove all of them.
- Go to the browser menu again, select Options, and then click on Home from the sidebar to the left.
- Check the current addresses for the browser’s homepage and new-tab page and change them if they are currently set to address(es) you don’t know or trust.
If using MS Edge/IE:
- Start Edge
- Select the browser menu and go to Extensions.
- Find and uninstall any Edge extensions that look undesirable and unwanted.
- Select Settings from the browser menu and click on Appearance.
- Check the new-tab page address of the browser and if it has been modified by the malicious program or another unwanted app, change it to an address that you’d want to be the browser’s new-tab page.
How to Delete Explorer.exe
- Open task manager
- Look for the Explorer.exe process
- Select it and click on End task
- Open the file location to delete Explorer.exe
- Access the Task Manager by pressing together the Ctrl + Alt + Del keys and then selecting Task Manager.
- Open Processes and there try to find a process with the name of the unwanted software. If you find it, select it with the right button of the mouse and click on the Open File Location option.
- If you don’t see a malicious process in the Task Manager, look for another suspicious process with an unusual name. It is likely that the unwanted process would be using lots of RAM and CPU so pay attention to the number of resources each process is using.
- Tip: If you think you have singled out the unwanted process but are not sure, it’s always a good idea to search for information about it on the Internet – this should give you a general idea if the process is a legitimate one from a regular program or from your OS or if it is indeed likely linked to the adware.
- If you find another suspicious process, open its File Location too.
- Once in the File Location folder for the suspicious process, start testing all of the files that are stored there by dragging them to our free online scanner available below.
-
Each file will be scanned with up to 64 antivirus programs to ensure maximum accuracy
This scanner is free and will always remain free for our website’s users.
This file is not matched with any known malware in the database. You can either do a full real-time scan of the file or skip it to upload a new file. Doing a full scan with 64 antivirus programs can take up to 3-4 minutes per file.
Drag and Drop File Here To Scan
Analyzing 0 s
Each file will be scanned with up to 64 antivirus programs to ensure maximum accuracy
This scanner is based on VirusTotal’s API. By submitting data to it, you agree to their Terms of Service and Privacy Policy, and to the sharing of your sample submission with the security community. Please do not submit files with personal information if you do not want them to be shared.
- If the scanner finds malware in any of the files, return to the Processes tab in the Task Manager, select the suspected process, and then select the End Process option to quit it.
- Go back to the folder where the files of that process are located and delete all of the files that you are allowed to delete. If all files get deleted normally, exit the folder and delete that folder too. If one or more of the files showed an error message when you tried to delete them, leave them for now and return to try to delete them again once you’ve completed the rest of the guide.
How to Uninstall Explorer.exe
- Click on the home button
- Search for Startup Apps
- Look for Explorer.exe in there
- Uninstall Explorer.exe from Startup Apps by turning it off
- Now you need to carefully search for and uninstall any Explorer.exe-related entries from the Registry. The easiest way to do this is to open the Registry Editor app (type Regedit in the windows search field and press Enter) and then open a Find dialog (CTRL+F key combination) where you have to type the name of the threat.
- Perform a search by clicking on the Find Next button and delete any detected results. Do this as many times as needed until no more results are found.
- After that, to ensure that there are no remaining entries lined to Explorer.exe in the Registry, go manually to the following directories and delete them:
- HKEY_CURRENT_USER/Software/Random Directory.
- HKEY_CURRENT_USER/Software/Microsoft/Windows/CurrentVersion/Run/Random
- HKEY_CURRENT_USER/Software/Microsoft/Internet Explorer/Main/Random
What is Explorer.exe virus?
One particularly common way of using a Trojan virus is disguising the threat as a program many users would willingly download onto their computers. Once the user opens the disguised virus, the Trojan would demand Admin privileges and since the victim doesn’t know he or she is dealing with malware, they are likely to provide the requested privileges. After that, the virus would be free to do anything in the system. Usually, the access given to the malware is used for forcing the computer to carry out tasks such as Bitcoin mining for the hackers or spam email distribution. In those cases, the user is likely to notice the unwanted activities but they’d be powerless to stop them because the Trojan won’t allow it as long as it stays in the system. In most cases, such activities drain the computer’s resources and cause slow-downs, freezes, errors, and, in the more severe cases, BSOD crashes.
Is Explorer.exe virus dangerous?
Another common way Trojans are being used nowadays is to secretly deliver Ransomware to victims’ computers. In those cases, the Trojan plays a secondary role and the primary threat is the file-locking Ransomware.
Some Trojans , like Explorer.exe virus, Altruistic and PoSetup, are able to do spy on their victims. Any sensitive personal information gained by a Trojan could be used in harmful ways that could lead to various unforeseen consequences for the user.
These examples are only a small portion of all the possible things a Trojan could be used to complete. Even though we can’t tell you what Explorer.exe virus might do if it’s in your machine, we strongly advise you to not wait for the results of the infection. Instead, use the instructions we provide here and remove the threat before it has completed its agenda.
Brandon is a researcher and content creator in the fields of cyber-security and virtual privacy. Years of experience enable him to provide readers with important information and adequate solutions for the latest software and malware problems.
Brandon is a researcher and content creator in the fields of cyber-security and virtual privacy. Years of experience enable him to provide readers with important information and adequate solutions for the latest software and malware problems.
Многопоточность и параллелизм в Python: потоки, процессы и гринлеты
py-thonny 06.05.2025
Параллелизм и конкурентность — две стороны многопоточной медали, которые постоянно путают даже бывалые разработчики.
Конкурентность (concurrency) — это когда ваша программа умеет жонглировать. . .
Распределенное обучение с TensorFlow и Python
AI_Generated 05.05.2025
В машинном обучении размер имеет значение. С ростом сложности моделей и объема данных одиночный процессор или даже мощная видеокарта уже не справляются с задачей обучения за разумное время. Когда. . .
CRUD API на C# и GraphQL
stackOverflow 05.05.2025
В бэкенд-разработке постоянно возникают новые технологии, призванные решить актуальные проблемы и упростить жизнь программистам. Одной из таких технологий стал GraphQL — язык запросов для API,. . .
Распознавание голоса и речи на C#
UnmanagedCoder 05.05.2025
Интеграция голосового управления в приложения на C# стала намного доступнее благодаря развитию специализированных библиотек и API. При этом многие разработчики до сих пор считают голосовое управление. . .
Реализация своих итераторов в C++
NullReferenced 05.05.2025
Итераторы в C++ — это абстракция, которая связывает весь экосистему Стандартной Библиотеки Шаблонов (STL) в единое целое, позволяя алгоритмам работать с разнородными структурами данных без знания их. . .
Разработка собственного фреймворка для тестирования в C#
UnmanagedCoder 04.05.2025
C# довольно богат готовыми решениями – NUnit, xUnit, MSTest уже давно стали своеобразными динозаврами индустрии. Однако, как и любой динозавр, они не всегда могут протиснуться в узкие коридоры. . .
Распределенная трассировка в Java с помощью OpenTelemetry
Javaican 04.05.2025
Микросервисная архитектура стала краеугольным камнем современной разработки, но вместе с ней пришла и головная боль, знакомая многим — отслеживание прохождения запросов через лабиринт взаимосвязанных. . .
Шаблоны обнаружения сервисов в Kubernetes
Mr. Docker 04.05.2025
Современные Kubernetes-инфраструктуры сталкиваются с серьёзными вызовами. Развертывание в нескольких регионах и облаках одновременно, необходимость обеспечения низкой задержки для глобально. . .
Создаем SPA на C# и Blazor
stackOverflow 04.05.2025
Мир веб-разработки за последние десять лет претерпел коллосальные изменения. Переход от традиционных многостраничных сайтов к одностраничным приложениям (Single Page Applications, SPA) — это. . .
Реализация шаблонов проектирования GoF на C++
NullReferenced 04.05.2025
«Банда четырёх» (Gang of Four или GoF) — Эрих Гамма, Ричард Хелм, Ральф Джонсон и Джон Влиссидес — в 1994 году сформировали канон шаблонов, который выдержал проверку временем. И хотя C++ претерпел. . .
In today’s digital age, computer viruses have become a common threat to our devices and personal information. One such virus that has plagued Windows 10 users is the Explorer.exe virus. This malicious software can cause severe damage to your computer, compromising its performance and your privacy. Therefore, it is crucial to understand how to safely remove the Explorer.exe virus from your Windows 10 system to ensure the safety and proper functioning of your device.
Signs And Symptoms Of The Explorer.exe Virus On Windows 10
The Explorer.exe virus can wreak havoc on your Windows 10 system if not detected and removed promptly. Understanding its signs and symptoms is crucial in identifying the presence of this malware. One common indicator is a significant decrease in the overall performance of your computer. You may notice that programs take longer to load, and your system becomes sluggish and unresponsive.
Another sign of the Explorer.exe virus is frequent system crashes or sudden freezing of applications. Your files and folders may also become inaccessible, or strange icons and shortcuts may appear on your desktop without your knowledge. Additionally, excessive pop-up advertisements or redirection to unfamiliar websites are telltale signs of this malware infection.
If your antivirus program or task manager becomes disabled without your consent, it is highly likely that the Explorer.exe virus has infiltrated your system. By being vigilant for these signs and acting swiftly, you can protect your Windows 10 PC from further damage and eliminate the virus effectively.
Understanding the Nature of the Explorer.exe Virus and its Impact on Windows 10
The Explorer.exe virus is a type of malware that specifically targets the Windows operating system, including Windows 10. This virus is designed to infect and manipulate the explorer.exe process, which is a crucial component of the Windows shell responsible for managing the graphical user interface.
Once infected, the explorer.exe virus can cause a range of troublesome issues on your Windows 10 system. These can include unexpected system crashes, slow performance, frequent freezing, and even the theft of personal information. It may also lead to the installation of additional malware or unwanted programs.
Understanding the nature and impact of the explorer.exe virus is crucial in effectively removing it from your Windows 10 system. By familiarizing yourself with its behavior and the potential risks it poses, you can take necessary measures to safeguard your computer and protect your personal data.
In the remaining sections of this article, we will guide you through the identification, removal, and prevention of the explorer.exe virus on Windows 10, ensuring the safety and security of your system.
Step-by-Step Guide: Identifying And Locating The Explorer.exe Virus On Windows 10
The first step in removing the Explorer.exe virus from your Windows 10 system is to correctly identify and locate the infected files. This step-by-step guide will help you in doing just that.
Start by opening the Task Manager by pressing Ctrl + Shift + Esc on your keyboard. Once the Task Manager window appears, navigate to the Processes tab. Look for any suspicious or unknown processes with the name “explorer.exe”. Keep in mind that the legitimate explorer.exe process will always be located in the “C:Windows” folder.
To further confirm the presence of the virus, right-click on the suspicious process and select “Open file location”. This will take you directly to the location of the explorer.exe file. If the file is not located in the “C:Windows” folder or has a different name, it is highly likely that it is the Explorer.exe virus.
It is recommended to research the identified file name online to gather more information about its nature and potential risks. Once you have confirmed the presence of the virus, proceed to the next step for removal.
Effective Ways To Remove The Explorer.exe Virus Manually On Windows 10
Removing the Explorer.exe virus manually can be a daunting task, but with careful steps, it is possible to effectively eliminate the malware from your Windows 10 computer. Start by ensuring that you have updated antivirus software installed and running on your system. This will help detect and quarantine any malicious files associated with the Explorer.exe virus.
Next, access the Task Manager by pressing Ctrl+Shift+Esc. Look for any suspicious processes or applications running in the background and end them immediately. Be cautious not to terminate any essential system processes.
Afterward, navigate to the Windows registry editor by pressing Windows+R, typing “regedit” and hitting Enter. Carefully search for any entries related to the Explorer.exe virus and delete them. Exercise caution, as editing the registry incorrectly can cause system instability.
Once the registry is clean, proceed to remove any malicious files and folders associated with the virus. Use Windows File Explorer to locate and delete these files, which are commonly found in the %AppData% and %Temp% folders.
Lastly, reboot your computer to ensure all changes have taken effect. Run a full system scan using your antivirus software to confirm that the Explorer.exe virus has been successfully removed. Regularly update your antivirus software and practice safe browsing habits to prevent future infections.
Using Antivirus Software To Safely Remove The Explorer.exe Virus On Windows 10
Antivirus software is a crucial tool in combating the explorer.exe virus on Windows 10. These programs are designed to detect and eliminate various types of malware, including viruses, trojans, and adware. By using antivirus software, you can ensure a safe and effective removal of the explorer.exe virus from your system.
To begin the process, download and install a reputable antivirus program that is compatible with Windows 10. Once installed, update the software to ensure it has the latest virus definitions. This will improve the program’s ability to identify and remove the virus.
Next, perform a full system scan using the antivirus software. This scan will thoroughly examine all files and directories on your computer, searching for any instances of the explorer.exe virus. Depending on the size of your system and the speed of your computer, this scan may take some time.
Once the scan is complete, review the results provided by the antivirus software. If the explorer.exe virus is found, follow the software’s instructions to quarantine or remove the infected files. It is important to carefully follow these instructions to avoid accidentally removing legitimate system files.
After the infected files have been removed, restart your computer to complete the removal process. It is also recommended to regularly update your antivirus software and perform scans to prevent future infections. By utilizing antivirus software, you can safely remove the explorer.exe virus on Windows 10 and protect your system from potential threats.
Performing A System Restore To Eliminate The Explorer.exe Virus On Windows 10
Performing a system restore is a safe and effective way to eliminate the Explorer.exe virus on Windows 10. A system restore allows you to revert your computer’s settings and configuration to a previous point in time when it was virus-free.
To perform a system restore, follow these steps:
1. Press the Windows key and type “system restore” in the search bar. Click on the “Create a restore point” option from the search results.
2. In the System Properties window, click on the “System Restore” button. This will open the System Restore wizard.
3. Select the option to “Restore my computer to an earlier time” and click “Next”.
4. Choose a restore point from the list that was created before your computer was infected with the Explorer.exe virus. Click “Next” and then “Finish”.
5. Your computer will restart and the system restore process will begin. This may take some time, so be patient.
6. Once the system restore is complete, your computer will restart again, and hopefully, the Explorer.exe virus will be completely eliminated.
Performing a system restore is a reliable method to remove the Explorer.exe virus and restore your computer to a healthy state.
Utilizing Safe Mode To Remove The Explorer.exe Virus On Windows 10
In order to safely remove the Explorer.exe virus on Windows 10, utilizing Safe Mode can be an effective strategy. Safe Mode allows you to run your computer with only essential drivers and services, which can help isolate and remove the virus more effectively. Here’s a step-by-step guide on how to use Safe Mode to remove the Explorer.exe virus:
1. Restart your computer and continuously press the F8 key until the Advanced Boot Options menu appears.
2. Use the arrow keys to select “Safe Mode” or “Safe Mode with Networking” and press Enter.
3. Once in Safe Mode, open the Task Manager by pressing Ctrl + Shift + Esc.
4. Navigate to the “Processes” tab and look for any suspicious or unfamiliar processes related to Explorer.exe.
5. Right-click on the suspicious process and select “End Task” to terminate it.
6. Open File Explorer and navigate to the location of the Explorer.exe file (usually in C:Windows).
7. Right-click on the Explorer.exe file and select “Delete” to remove it.
8. Empty your Recycle Bin to permanently delete the virus-infected file.
By using Safe Mode to remove the Explorer.exe virus, you can minimize the chance of the virus interfering with the removal process and ensure a safer removal experience. Remember to regularly update your antivirus software and practice safe browsing habits to prevent future infections.
Ensuring Long-Term Protection Against The Explorer.exe Virus On Windows 10
To ensure long-term protection against the Explorer.exe virus on Windows 10, it is crucial to adopt preventive measures and practice good cybersecurity habits. Here are some key steps to follow:
1. Keep Windows 10 updated: Regularly installing the latest updates from Microsoft helps patch vulnerabilities that could be exploited by viruses like the Explorer.exe virus.
2. Install reputable antivirus software: Choose a reliable antivirus program and keep it updated. Perform regular scans to detect and remove any potential threats.
3. Enable Windows Defender: Windows 10 comes with built-in antivirus protection called Windows Defender. Make sure it is enabled to provide an additional layer of defense against malware.
4. Exercise caution when downloading files: Be mindful of the sources from which you download files. Avoid suspicious or untrustworthy websites, and always scan downloaded files with your antivirus software before opening them.
5. Enable Windows Firewall: Activate the Windows Firewall to block unauthorized access to your system and prevent malware infections.
6. Be cautious with email attachments: Do not open email attachments from unknown senders, as they can contain infected files. Delete suspicious emails and empty your spam folder regularly.
By following these proactive steps, you can help safeguard your Windows 10 system against the Explorer.exe virus and other potential threats, ensuring long-term protection and peace of mind.
FAQ
FAQ 1: What is the explorer.exe virus on Windows 10?
The explorer.exe virus is a malicious program that disguises itself as the legitimate Windows File Explorer process (explorer.exe). It can cause various issues, such as system slowdown, crashes, pop-up ads, and even data theft. Identifying and removing this virus is crucial for maintaining a secure system.
FAQ 2: How can I detect the explorer.exe virus on my Windows 10?
Detecting the explorer.exe virus can be challenging as it camouflages itself as a legitimate system process. However, some common signs include frequent system crashes, unusually high CPU usage by explorer.exe, unauthorized changes in system settings, and the presence of unfamiliar processes in the Task Manager. It is recommended to use reliable antivirus software and perform regular system scans to detect and remove the virus.
FAQ 3: How do I safely remove the explorer.exe virus on Windows 10?
To safely remove the explorer.exe virus from your Windows 10 system, follow these steps:
1. Update your antivirus software: Ensure that your antivirus software is up to date. This is crucial as new virus definitions help detect the latest threats, including the explorer.exe virus.
2. Perform a full system scan: Initiate a full system scan using your antivirus software. Allow the scan to complete thoroughly, as it will identify and quarantine/remove any infected files associated with the explorer.exe virus.
3. Delete suspicious files and processes: Check the quarantined or infected files identified by the antivirus software. If any files are related to the explorer.exe virus, delete them. Additionally, use the Task Manager to identify and terminate any suspicious processes running on your system.
4. Clear cache and temporary files: Use disk cleanup tools or third-party utilities to clear temporary files and cache, as the explorer.exe virus may leave remnants in these locations.
5. Update Windows and software: Ensure that your Windows operating system and all installed software are kept up to date with the latest security patches. Regularly installing updates helps strengthen your system’s defenses against viruses and other malware.
Final Verdict
In conclusion, removing the explorer.exe virus on Windows 10 is crucial to protect the system’s security and ensure its smooth operation. By following the steps mentioned in this article, users can safely eliminate the virus and prevent any potential harm to their files and personal information. It is recommended to keep antivirus software up to date and regularly scan the computer to detect and remove any viruses or malware. Additionally, practicing safe browsing habits, such as not downloading or clicking on suspicious links, can further reduce the risk of encountering such viruses in the future.

- Процесс dwm.exe — что это и может ли быть вирусом?
- Ремонт компьютеров Красноярск
- Установка ПО недорого в Красноярске
Узнать о заражении компьютера вирусами можно разными способами. Иногда об этом подскажет пользователю всплывающие на экране или в браузере подозрительные сообщения, в некоторых случаях скорость работы компьютера сильно замедляется. А для проверки своих предположений можно не только запустить антивирус (который далеко не в 100% случаев обнаруживает угрозу), но и просто открыть Диспетчер задач на вкладке процессов. Здесь в списке исполняемых программ часто встречается Explorer.EXE. Может ли он быть вирусом? В большинстве случаев – нет, но иногда под процесс пытается замаскироваться какой-то вредоносный код.

Назначение настоящего процесса explorer.exe
На самом деле исполняемый файл explorer.exe (или «Проводник») отвечает за поддержку пользовательского интерфейса и является одной из системных программ уже 25 лет (начиная с Windows 95). Он находится в папке Windows основного каталога и занимает от 1 до 3 МБ дискового пространства. В Диспетчере задач можно увидеть, что файл занимает уже больше места – обычно в пределах 20-30 МБ. Но для современного компьютера, на котором, даже при работе с офисными программами, стоит не меньше 2-4 ГБ ОЗУ, такой объём всё равно оказывается незаметным.
Ситуация становится серьёзной, если процесс explorer.exe требует больше памяти, чем обычно. Иногда – 200-300 МБ, в некоторых случаях – больше гигабайта. Даже на достаточно мощном компьютере работа такой «тяжёлой» программы становится заметной. Однако «Проводник» в этом случае совершенно ни при чём. Виноват вирус, который попал на ПК из Интернета при установке ПО или с помощью «спам»-сообщений по электронной почте, и теперь выполняет различные фоновые процессы. Вторая причина проблемы – повреждение системного файла, который перестаёт исполнять свои функции.
Проверка на возможность подмены
Убедиться в том, что процесс на самом деле вредоносный, можно в течение нескольких минут. В первую очередь, стоит запустить уже установленный на компьютере антивирус. Иногда, не обнаруживая вредоносный код при запланированном сканировании в фоновом режиме, антивирусная программа справляется со своей задачей после запуска вручную.
Пока антивирус работает, стоит снова открыть Диспетчер задач и, найдя процесс explorer.exe, перейти в ту папку, где расположен запустивший его файл. Это может быть «Windows» или «Windows\System32». Такой файл, скорее всего, не является вирусом. Расположение в любом другом каталоге – повод для дополнительной проверки и удаления вредоносного кода.

Решение проблемы
Первый этап решения проблемы – установить другой антивирус, потому что основная программа, защищающая компьютер от сетевых угроз, вирус пропустила. Для постоянной защиты стоит выбрать платную программу. Если такой возможности нет – одну из хороших бесплатных или условно-бесплатных типа Malwarebytes или AVZ. Или даже разовую, предназначенную для однократной проверки ПК, такую как Dr.Web CureIt. Запуск антивируса в большинстве случаев решает проблему.

Второй этап, который можно выполнить и до использования антивирусного приложения – восстановление файла explorer.exe. сделать это можно, скачав его из сети из надёжных источников или восстановив систему Windows с помощью заранее созданных точек восстановления (правда, для этого сначала нужно было включить такую функцию в настройках).
Ещё один способ предполагает использование встроенной утилиты SFC. Для этого сначала вызывается командная строка (нажатие «Win» + «R» и ввод команды «cmd») и в ней вводится «sfc /scannow». Поиск неполадок требует достаточно много времени. Но, если ни антивирус, ни системная утилита проблему не обнаружили, для решения вопроса может понадобиться обращение к специалисту – или, в качестве крайней мере, переустановка системы.
антивирусное ПО, вирусы, антивирусы, диспетчер задач, explorer.exe
- Просмотров: 32425