
Последнее обновление: 31.10.2015
По способу взаимодействия с другими сборками и приложениями сборки можно разделить на две категории: закрытые и разделяемые.
Закрытые сборки это обычные сборки приложения, которые мы создаем в Visual Studio. Например, при создании библиотеки классов dll
создается закрытая сборка. Впоследствии эту закрытую сборку мы можем использовать, подключив ее к другому проекту. А чтобы
подключить к другому проекту, эту сборку можно просто положить рядом с исполняемым файлом и добавить в проект ссылку на нее через
Add Reference. И на одной машине может быть десяток приложений, которые используют разные копии одной и той же сборки.
Если мы захотим удалить приложение, мы можем также удалить и используемую им закрытую сборку, и это не скажется на работе
других приложений на локальной машине.
Иначе обстоит дело с разделяемыми сборками. По умолчанию при создании проекта visual Studio уже добавляет в проект ссылки на
ряд разделяемых сборок. Открыв узел References (Ссылки). Например, Microsoft.CSharp.dll, System.dll, System.Core.dll — это все разделяемые сборки.
Разделяемые сборки находятся в глобальном кэше сборок (Global Assembly Cache). Местоположение кэша сборок отличается в зависимости от
версии .NET, установленной на локальной машине. До .NET 4.0 глобальный кэш находился в каталоге C:\Windows\assembly.
Начиная же с версии .NET 4.0 кэш сборок размещается по пути C:\Windows\Microsoft.NET\assembly\GAC_MSIL
Строгое имя сборки
Чтобы поместить сборку в GAC (глобальный кэш), эта сборка должна обладать строгим именем. В состав строгого имени входят следующие компоненты:
-
Имя сборки без расширения
-
Номер версии. Благодаря разграничению по версии можно использовать разные версии одной и ой же сборки
-
Открытый ключ
-
Необязательное значение для культуры (при локализации сборки)
-
Цифровая подпись, которая создается с помощью хэш-значения содержимого сборки и значения секретного ключа. Секретный ключ представляет собой файл
с расширением *.snk.
Благодаря строгому имени гарантируется уникальность сборки в глобальном кэше.
Чтобы создать строгое имя, можно воспользоваться инструментарием, который имеется в Visual Studio. Допустим, мы создали проект
по типу Class Library (Библиотека классов). И теперь мы хотим подписать сборку, которая будет компилироваться, строгим именем. Для
этого нажмем в окне Solution Explorer (Обозреватель решений) на имя проекта правой кнопкой мыши и в появившемся меню выберем пункт
Properties (Свойства). На вкладке свойств выберем пункт Signing:
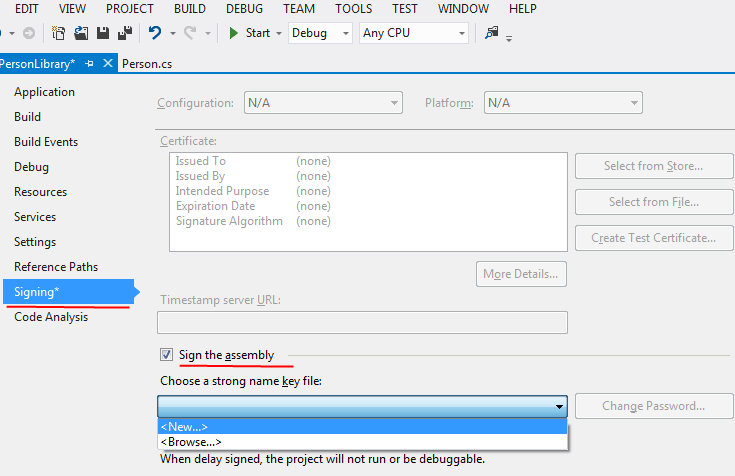
Отметим флажок Sign the assembly (Подписать сборку), как показано на рисунке. И чтобы создать новый секретный ключ, выберем в выпадающем списке
пункт New. После этого откроется окно настроек секретного ключа:

Дадим новому ключу какое-нибудь имя и нажмем ОК. После этого в структуре проекта можно будет увидеть файл ключа:
После задания сборке строгого имени ее можно добавлять в GAC. Для этого воспользуемся утилитой, которая идет в комплекте с .NET Framework,
под названием gacutil.exe.
Откроем командную строку под администратором. Во-первых, найдем расположение утилиты gacutil.exe на локальной машине. У меня, например,
она расположена в каталоге C:\Program Files\Microsoft SDKs\Windows\v8.0A\bin\NETFX 4.0 Tools. И вначале перейдем в этот каталог:
C:\Windows\system32>cd C:\Program Files\Microsoft SDKs\Windows\v8.0A\bin\NETFX 4.0 Tools
Теперь воспользуемся одной из команд данной утилиты. Наиболее используемые команды:
-
-i имя_сборки — установка сборки в GAC
-
-l — вывод всего списка сборок в GAC
-
-u имя_сборки — удаление сборки из GAC
Теперь вводим в командной строке команду на добавление:
C:\Program Files\Microsoft SDKs\Windows\v8.0A\bin\NETFX 4.0 Tools>gacutil -i Полное_имя_сборки
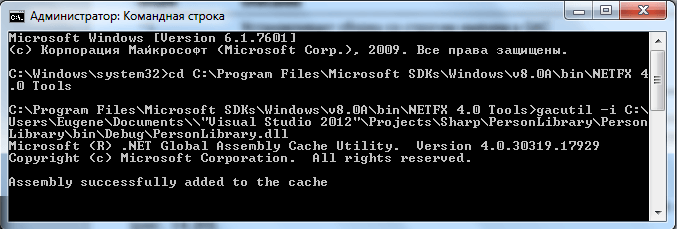
Как видно, на рисунке, в моем случае полное имя сборки C:\Users\Eugene\Documents\Visual Studio 2012\Projects\Sharp\PersonLibrary\PersonLibrary\bin\Debug\PersonLibrary.dll.
И если добавление прошло успешно, то командная строка отобразит:
Assembly successfully added to the cache
И после добавления в папке C:\Windows\Microsoft.NET\assembly\GAC_MSIL мы сможем найти добавленную сборку — для нее будет создан
отдельный каталог, как и для остальных сборок, который будет носить краткое имя сборки.
Теперь мы можем использовать нашу сборку из GAC. Для этого создадим какой-нибудь проект и в окне Solution Exlplorer (Обозреватель решений)
нажмем на узел Referenses (Ссылки). В появившемся меню выберем Add Reference… (Добавить ссылку):
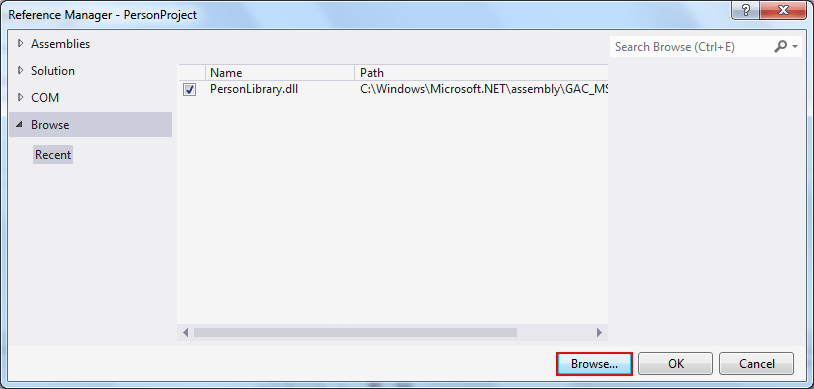
В окне добавления ссылки на сборку нажмем внизу на кнопку Browse (Обзор) и найдем в GAC нашу сборку. После этого она будет добавлена в проект, и
мы сможем использовать весь заложенный в ней функционал.
Back to: C#.NET Tutorials For Beginners and Professionals
In this article, I am going to discuss How to Install an Assembly into GAC in .NET Framework with Examples. Please read our previous article where we discussed Strong and Weak Assemblies in .NET Framework.
What is GAC?
GAC stands for Global Assembly Cache and it contains only the Strong Named Assemblies. Each computer where the Common Language Runtime is installed has a machine-wide code cache called the Global Assembly Cache. An assembly is said to be strongly named when it contains the following properties
- The Assembly Name.
- Version Number.
- The Assembly should have been signed with the Private/Public Key Pair.
The Global Assembly Cache stores assemblies specifically designated to be shared by several applications on the computer. It is recommended to install an assembly into GAC, only when required and shared by applications, otherwise, they should be kept private.
Starting with .NET Framework 4, the default location for the Global Assembly Cache (GAC) is C:\Windows\Microsoft.NET\assembly. In earlier versions of the .NET Framework, the default location is C:\Windows\Assembly.
How to Install an Assembly into GAC in .NET Framework?
To install an assembly into the GAC, the assembly must be strongly named, otherwise, you will get an error stating Failure adding assembly to the cache: Attempt to install an assembly without a strong name. There are 2 ways to install an assembly into GAC.
- Simply Drag and Drop
- Use GacUtil.exe (GAC Utility Tool)
Creating a Strongly Named Assembly in .NET Framework:
First, create a class library project with the name SampleAssembly and then rename the Class1.cs class file with Calculator.cs class file and then copy and paste the following code into it.
namespace SampleAssembly
{
    public class Calculator
    {
        public int Calculate(int x, int y)
        {
            return x + y;
        }
    }
}
When you compile the above project, it will create an assembly with the name SampleAssembly.dll and this is not a strong name assembly. Let us try to add the SampleAssembly.dll into GAC and see what happens. The Physical Path of our Assembly is
D:\Projects\AssemblyDemo\SampleAssembly\bin\Debug\SampleAssembly.dll
Next, open Visual Studio Command Prompt in Administrator mode and then copy and paste the following command and press the enter button. Here, -i is for installation, similarly, if you want to uninstall an assembly, then you need to use -u.
Gacutil -i D:\Projects\AssemblyDemo\SampleAssembly\bin\Debug\SampleAssembly.dll
Once you type the above command and press the enter button, then you will see the following error saying Failure adding assembly to the cache: Attempt to install an assembly without a strong name.

This is because our assembly is not a strong name assembly and it is not signed with any private public key. To prove this, create a console application and then copy and paste the following code into it. You need to replace the path as per your SampleAssembly.
using System;
using System.Reflection;
namespace AssemblyDemo
{
    class Program
    {
        static void Main(string[] args)
        {
            //Replace D:\Projects\AssemblyDemo\SampleAssembly\bin\Debug\SampleAssembly.dll
            //With your Assembly Path
            Console.WriteLine(Assembly.LoadFile(@"D:\Projects\AssemblyDemo\SampleAssembly\bin\Debug\SampleAssembly.dll"));
            Console.ReadKey();
        }
    }
}
Now, run the application and you should see that the PublicKeyToken value is null as shown in the below image.

How to Make the Assembly a Strong Name Assembly?
To make our assembly strongly named we need to sign our assembly with a Private and Public Key Pair and we have discussed this in our previous article.
In the .NET Framework, we have a tool called Strong Naming Tool (sn.exe) and we can use this (sn.exe) tool to generate the Private Public Key pair. Again, in order to use this tool, we need to use the Developer Command Prompt for Visual Studio. So, open Developer Command Prompt for Visual Studio in Administrator mode and then type sn.exe -k D:\MyKeyFileForSampleAssembly.snk and press enter button as shown in the below image.

Once you type the required command and press enter, the key file with the name MyKeyFileForSampleAssembly.snk should be generated in the D: Drive
Once you generated the Key file, then you need to use the AssemblyKeyFile attribute in the AssemblyInfo class to sign the assembly with a strong name. So, open the AssemblyInfo class file of the SampleAssembly project, and then to the constructor of the AssemblyKeyFile attribute, we need to pass the path of the key file that contains the private and public keys as shown below.
[assembly: AssemblyKeyFile(@”D:\MyKeyFileForSampleAssembly.snk”)]
Once you add the above AssemblyKeyFile attribute, build the solution. Once you build the solution, now your assembly sign with a private-public key pair. Now, our assembly contains the Public Key Token. To see the assembly information, please execute the Console Application again and you should see the following output.
Now, you can see, our assembly contains the name, version number, and public key token which are required for a strongly named assembly. Now, let us try to install the SampleAssembly.dll to GAC. So, open Visual Studio Developer Command Prompt in Administrator mode and then type Gacutil -i D:\Projects\AssemblyDemo\SampleAssembly\bin\Debug\SampleAssembly.dll command and press the enter button as shown in the below image.
Here, you can see, we are getting the message saying Assembly successfully added to the cache. You can find the assembly in the following location.
C:\WINDOWS\Microsoft.NET\assembly\GAC_MSIL\SampleAssembly\v4.0_1.0.0.0__8f8fc05537931ee7
How to use the SampleAssembly in other Projects?
Let us assume we want to consume Calculate method of the Calculator class from our console application. But, here, we are not going to add the reference to the Class Library project, rather we will add the reference to the Assembly from the GAC.
First, we need to add a reference to the SampleAssembly.dll from the location (C:\WINDOWS\Microsoft.NET\assembly\GAC_MSIL\SampleAssembly\v4.0_1.0.0.0__8f8fc05537931ee7) where it is stored in GAC as shown in the below image from our console application.
Now, modify the Main method of the Program class of our Console Application as shown below.
using SampleAssembly;
using System;
namespace AssemblyDemo
{
    class Program
    {
        static void Main(string[] args)
        {
            Calculator calculator = new Calculator();
            Console.WriteLine(calculator.Calculate(100, 200));
            Console.ReadKey();
        }
    }
}
Now, run the application and you will get the output as expected.
How to Uninstall an Assembly from GAC in .NET Framework?
To uninstall an assembly from the GAC, using the GAC utility, we need to use the following command.
Gacutil -u SampleAssembly
If there are multiple versions of SampleAssemblyin the GAC, then all those versions will be removed by the above command. If you want to remove only one of the assemblies then specify the full name as shown below.
gacutil -u SampleAssembly,Version=1.0.0.0,PublicKeyToken=8f8fc05537931ee7
So, open Visual Studio Developer Command Prompt in Administrator mode and then type the gacutil -u SampleAssembly,Version=1.0.0.0,PublicKeyToken=8f8fc05537931ee7 command and press the enter button as shown in the below image.
In the next article, I am going to discuss DLL Hell Problems and How to Overcome DLL Hell Problems in .NET Framework with Examples. Here, in this article, I try to explain How to Install an Assembly into GAC in .NET Framework with Examples. I hope you enjoy this How to Install an Assembly into GAC in .NET Framework article.
About the Author: Pranaya Rout
Pranaya Rout has published more than 3,000 articles in his 11-year career. Pranaya Rout has very good experience with Microsoft Technologies, Including C#, VB, ASP.NET MVC, ASP.NET Web API, EF, EF Core, ADO.NET, LINQ, SQL Server, MYSQL, Oracle, ASP.NET Core, Cloud Computing, Microservices, Design Patterns and still learning new technologies.
Skip to content
Hope, some of you still think that the default GAC folder is c:\windows\assembly [%windir%\assembly] as such. But there is a BIG “NO”.
Yes, starting with the .NET Framework 4, the default location for the global assembly cache has been changed.
Reference: http://msdn.microsoft.com/en-us/library/yf1d93sz(v=vs.110).aspx
In .NET Framework 4.0, the GAC went through a few changes. The GAC was split into two, one for each CLR. The CLR version used for both .NET Framework 2.0 and .NET Framework 3.5 is CLR 2.0. There was no need in the previous two framework releases to split GAC. The problem of breaking older applications in Net Framework 4.0.
To avoid issues between CLR 2.0 and CLR 4.0, the GAC is now split into private GAC’s for each runtime. The main change is that CLR v2.0 applications now cannot see CLR v4.0 assemblies in the GAC.
.NET 2.0 GAC:
- c:\windows\assembly – Non-native 32bit and 64bit assemblies.
.NET 4.0 GAC, below are the folders.
- c:\windows\Microsoft.NET\assembly\GAC_32 – Non-native 32bit assemblies.
- c:\windows\Microsoft.NET\assembly\GAC_64 – Non-native 64bit assemblies visible only on 64bit Windows.
- c:\windows\Microsoft.NET\assembly\GAC_MSIL – Non-native MSIL (AnyCPU – 32bit & 64bit) assemblies.
Note:
While trying to load assemblies from the GAC, the CLR first looks at the GAC specific to the platform. If it is unable to find the same, it then moves to the GAC_MSIL.
Happy reading! 🙂
We have created the hello.exe assembly in our previous article and installed it into Global Assembly Cache (GAC). Let’s look at where in GAC this assembly is installed.
As we discussed in our previous article(s), GAC is the location where shared assemblies will be placed. Where this GAC is located? For the .Net version prior to 4.0, run time use, C:\Windows\assembly as the GAC. From version 4.0, it is C:\Windows\Microsoft.NET\assembly.
Let’s open GAC, and see what it contains. At the command prompt type the following command to go to GAC.
cd c:\Windows\Microsoft.NET\assembly
If .NET version 4.0 or higher is installed, type the above command. Otherwise, type the below command:
cd c:\Windows\assembly
Usually, these folders contain the following structure:
+ GAC
+ GAC_32
+ GAC_64
+ GAC_MSIL
+ NativeImages_vx.x.xxxxx_32
+ NativeImages_vx.x.xxxxx_64
- The GAC folder is for backward compatibility with older versions of .Net (1.0 and 1.1).
- GAC_32 and GAC_64 folders are for assemblies for 32-bit and 64-bit platforms respectively.
- GAC_MSIL folder contains the assemblies which are developed with pure .Net code.
- NativeImages_vx.x.xxxxx_32 and NativeImages_vx.x.xxxxx_64 folders contain assemblies compiled to native code for 32-bit and 64-bit platforms. Where vx.x.xxxxx is the run-time version number.
Let’s check in to GAC where our hello.exe file exists. Type the following command at the command prompt.
gacutil /l hello
This command will list the assembly information. It returns:
c:\Visual Studio Projects 2012>gacutil /l hello
Microsoft (R) .NET Global Assembly Cache Utility. Version 4.0.30319.17929
Copyright (c) Microsoft Corporation. All rights reserved.

The Global Assembly Cache contains the following assemblies:
hello, Version=0.0.0.0, Culture=neutral, PublicKeyToken=f5d51cce1ddbf0b7, proc
essorArchitecture=MSIL

Number of items = 1
Observe the result that, GAC contains hello assembly of version=0.0.0.0. We have installed .Net 4.x in our system. So, our hello assembly would be in the “c:\Windows\Microsoft.NET\assembly” folder. Open this folder in the command prompt. As we developed our hello assembly using pure .Net code; so, our assembly must be in the GAC_MSIL folder. Open the GAC_MSIL folder and check for the hello folder. Once you find open the hello folder, you will find the below folder structure.
- hello
  - v4.0_0.0.0.0__f5d51cce1ddbf0b7
    . hello.exe
hello.exe found in the “GAC_MSIL\hello\v4.0_0.0.0.0__f5d51cce1ddbf0b7” folder. This is the place gacutil installed our assembly into GAC.
Let’s closely look at folder name “v4.0_0.0.0.0__f5d51cce1ddbf0b7”.
- v4.0 is the .Net run-time version we used to create the assembly.
- 0.0.0.0 is our hello assembly’s version number. Because we are not set any version number for our assembly. So, it’s showing 0.0.0.0 as our assembly’s version.
- f5d51cce1ddbf0b7 is the public key token. Do you remember we generated a key pair and added it to our assembly? This is the public key token we generated using the Strong Name Tool (sn.exe).
But why does it generate folder structure under hello assembly? This is one of the advantages of an assembly. Assemblies support multiple versions and we can deploy multiple versions side-by-side. Each assembly will store in the respective version-based folder. Because of this, it eliminates versioning problems, we normally face with normal DLLs.
We will discuss assembly versioning in our next article.
This describes how to modify a VS project to automatically GAC an assembly after a build and optionally include debug info.
Introduction
This article describes how to configure a VS 2003 or 2005 project to automatically GAC an assembly after a build. It also describes how to move the debug information into the GAC.
Background
I first used this technique a couple of years ago when working on projects with quite a bit of shared code. Most of the framework assemblies were put into the GAC for the projects to share. This became a useful technique for debugging the project in the same manner in which it would be deployed to production.
In a project file you can automatically GAC an assembly after a build by putting the following in the Post-Build event.
"C:\Program files\Microsoft Visual Studio 8\SDK\v2.0\Bin\GacUtil.exe"
                            -i "$(TargetPath)"
Obviously if you’re in a team environment, you’ll probably want to use environment variables like %ProgramFiles%. To the best of my knowledge there is no environment variable pointing to the full path. If you open a VS command prompt this directory is added to the path variable, but oddly that’s not available during a build.
Note: for 2003 the path is C:\Program Files\Microsoft Visual Studio .NET 2003\SDK\v1.1\Bin. After adding this, you need to address the opposite side of the problem: Ungacing before a build. In the pre-build event put:
"C:\Program files\Microsoft Visual Studio 8\SDK\v2.0\Bin\GacUtil.exe"
                            -u $(TargetName)
Most of you could have probably figured this out on your own, if you haven’t already. The problem I ran into is that once I had gaced an assembly, the debug info didn’t go with it, no matter how I built the assembly. This is where things get sortof weird. The GAC is actually a top secret series of folders under the windows\assembly folder. If you pull this folder up in Explorer, you get a «special» window that allows you to perform GAC administration (e.g. drag and drop install, delete, etc.). If you open a command prompt and go to the same directory you’ll see something like this:
Volume in drive C has no label.
 Volume Serial Number is D43F-9977

 Directory of C:\WINDOWS\assembly

10/06/2006  01:22 PM    <DIR>          GAC
10/16/2006  04:25 PM    <DIR>          GAC_32
11/20/2006  01:42 PM    <DIR>          GAC_MSIL
07/11/2006  09:44 AM    <DIR>          NativeImages1_v1.1.4322
10/19/2006  05:07 PM    <DIR>          NativeImages_v2.0.50727_32
11/20/2006  01:42 PM    <DIR>          temp
11/20/2006  01:42 PM    <DIR>          tmp
               0 File(s)              0 bytes
               7 Dir(s)  11,621,462,016 bytes free
This is the super-secret GAC area where things actually go. The GAC folder is for .NET 1.1 assemblies, the GAC_MSIL is (mostly) for .NET 2.0 assemblies. If you go under the GAC_MSIL folder («cd GAC_MSIL» for those too young to remember DOS commands) you’ll see a series of directories with the same names as the assemblies in your GAC (at least the 2.0 assemblies) As an example we’ll play with System.Xml. enter the System.Xml directory («cd System.Xml«) and you’ll see this:
Volume in drive C has no label.
 Volume Serial Number is D43F-9977

 Directory of C:\WINDOWS\assembly\GAC_MSIL\System.Xml

10/16/2006  04:24 PM    <DIR>          .
10/16/2006  04:24 PM    <DIR>          ..
10/16/2006  04:24 PM    <DIR>          2.0.0.0__b77a5c561934e089
               0 File(s)              0 bytes
               3 Dir(s)  11,621,388,288 bytes free
This is how multiple versions of the same assembly can be in the GAC at the same time. The folder name is constructed as follows: %VersionInfo%_%CultureInfo%_%PublicKeyToken%. Therefore if you’ve gaced 1.0 and 1.1 of an assembly, there will be two folders here. I assume the token is there in case two vendors put out assemblies with the same name, but I’m guessing here. Moving on. Going into this folder you’ll find your long lost assembly hidden away.
Volume in drive C has no label.
 Volume Serial Number is D43F-9977

 Directory of C:\WINDOWS\assembly\GAC_MSIL\System.Xml\2.0.0.0__b77a5c561934e089

10/16/2006  04:24 PM    <DIR>          .
10/16/2006  04:24 PM    <DIR>          ..
10/16/2006  04:24 PM         2,035,712 System.XML.dll
               1 File(s)      2,035,712 bytes
               2 Dir(s)  11,621,388,288 bytes free
If you want debug info for your gaced assembly, the PDB needs to go here. And there’s no automatic way to get it here. I generally try to keep pre and post build events fairly generic, but in this case I don’t know how to do it without some sort of helper program. If you put the following command in your post build event you can copy the PDB here:
copy "$(TargetDir)$(TargetName).pdb" "C:\windows\assembly\GAC_MSIL
            \$AssemblyName$\$VersionNumber$__$PublicKeyToken$\"
Replacing $AssemblyName$ with your assembly name, etc. (The $() macros are actual macros understood by msbuild, don’t change those). The $AssemblyName$, $VersionNumber$, and $PublicKeyToken$ variables are NOT macros. You need to explicitly define these or create a helper program to discover them. I have in the past written a little command line utility to parse assemblies information and put their debug information into the GAC. That’s a little beyond the scope of this post, but I might cover it later. Here’s the gotchas. Microsoft apparently did not want you messing with these directories directly, so they’ve protected them. You «cannot» access them in any way except the command line. This means you can’t whip out a little vbscript file to do it, you can’t do it in C#, you can «only» do it through the command line or a .bat file. (Believe me, I’ve tried). So if you try to automate this, the best you can do is to write out a batch file then run it. Sortof clumsy, but it works. I’ve found that this method doesn’t work so well if you want to build and GAC more than one version of an assembly. In this instance I did away with the prebuild event (unregister) and changed the post-build event to:
"C:\Program files\Microsoft Visual Studio 8\SDK\v2.0\Bin\GacUtil.exe"
                            -i "$(TargetPath)" /f
Which means force a replacement if there is an existing version in the GAC. This allowed me to build 2.1 without removing 2.0 (just in case anything depended on 2.0).