
Readers help support Windows Report. We may get a commission if you buy through our links.
Read our disclosure page to find out how can you help Windows Report sustain the editorial team. Read more
There are multiple services that run in the background to facilitate the operation of your computer. However, some services, such as the wmpnscfg.exe, can raise doubts about what it is, especially when it results in high CPU usage.
In this guide, we will share with you all the details you need to understand what the wmpnscfg.exe file is and what its importance is on your computer. Let us check out the guide.
What is wmpnscfg.exe?
The wmpnscfg.exe file is associated with the Windows Media Player. The main work of this wmpnscfg.exe file is to alert the user when a new media device is connected or found on the network.
Moreover, it is also responsible for starting the Windows Media Player Network Sharing Service (NSS) and then waiting for any notifications from the service.
When the user taps on the notification, the wmpnscfg.exe file launches the Windows Media Player and asks the user to either allow or deny the new network found on the network.
The usable location of the wmpnscfg.exe file is C:\Program Files\Windows Media Player\. There is another file that runs along with the wmpnscfg.exe file, which is the wmpnetwrk.exe.
Should I remove the wmpnscfg.exe file?
Since it is an important file, malware or adware can attack it and mask it to steal your data. However, there haven’t been many reports related to this.
So, if you don’t think you need the services of the wmpnscfg.exe file, we suggest you disable the service instead of removing it from your computer.
You can learn the different methods to disable the wmpnscfg.exe file on your computer in the next section below.
How can I disable the wmpnscfg.exe file?
1. Disable media sharing in Media Player
- Launch Windows Media Player.
- Click on Library and select Media Sharing from the drop-down menu list.

- Uncheck both the Find media that others are sharing and Share my media options.

- Click OK.
- Hit the Yes button in a dialogue prompt that appears.


This is the easiest way to disable media sharing on Windows Media Player and get rid of the wmpnscfg.exe file running on your computer.
2. Disable the feature in Services
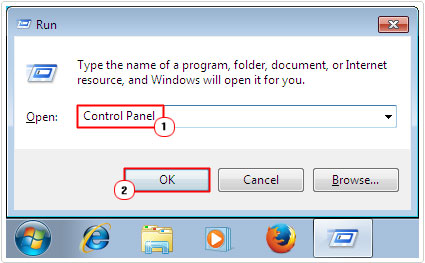
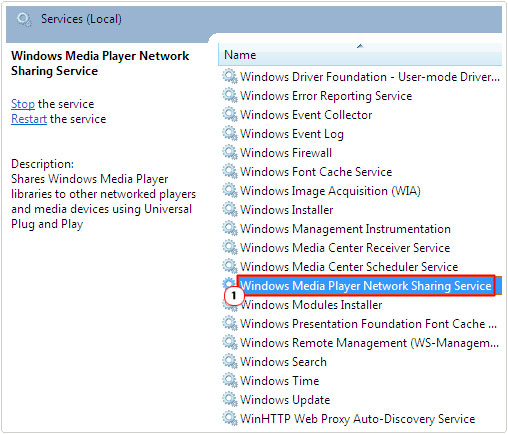
- Press the Win + R keys to open the Run dialogue.
- Type services.msc and press OK.

- Locate Windows Media Player Network Sharing Service and double-click on it to open it.

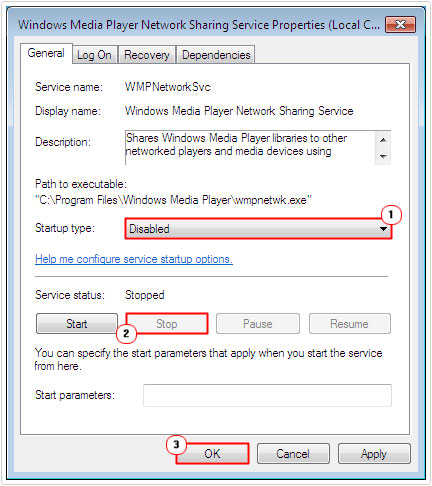
- Select the Startup type to Disabled from the drop-down.
- Also, press the Stop button under the Service status section.
- Click Apply and OK to apply the changes.
- Restart your computer.


You can also disable the media sharing feature, the wmpnscfg.exe file, by following the above steps in the Services menu. This will ensure that the service doesn’t run automatically.
We have listed in our guide some of the services that you can easily and safely disable on your Windows computer.
- Plugin-container.exe: What is it & Should I Remove it?
- Conhost.exe: What is it & how to Fix Its High CPU Usage
3. Use Registry Editor to disable the feature
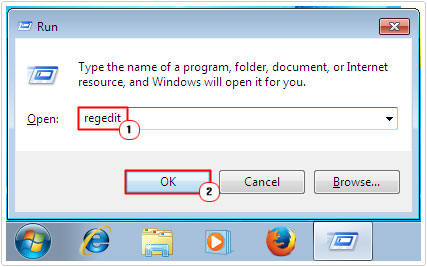
- Press the Win + R keys to open the Run dialogue.
- Type regedit and press OK.
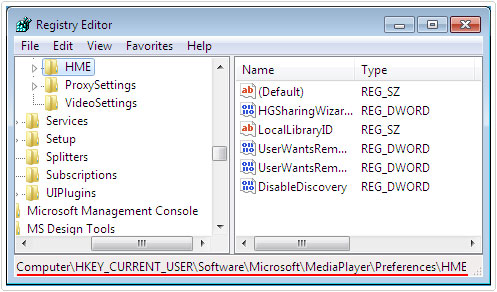
- Navigate to the below path and press Enter.
HKEY_CURRENT_USER\Software\Microsoft\MediaPlayer\Preferences\HME
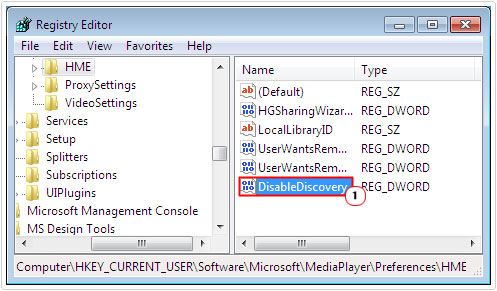
- Double-click the DisableDiscovery DWORD on the right side.
- Change the Value Data to 1 from 0 and click OK.
- Restart your computer.


The Media Sharing feature, i.e., the wmpnscfg.exe can also be disabled from the Registry Editor by following the above steps. You can check out our guide that will help you to restore the registry without having a backup.
Also, we have a guide that explains 5 different ways to fix the corrupt registry on a Windows PC. You can also check out our list of the best registry cleaners to easily resolve registry-related issues.
Besides, you can read out guide on how to fix broken registry items in Windows 11. This will also help you mitigate the registry-related issues.
This is it from us in this guide. If you are getting a Wmplayer.exe error on your PC, then you can apply the solutions in our guide to resolve the problem.
Multiple users have also reported that they are coming across the WMVCORE.dll not found error. Fortunately, you can easily resolve this issue by following the solutions in our dedicated guide.
We have also given detailed information on how you can get the Windows Media Center on your computer. Do note that there are only unofficial methods to get it.
Feel free to let us know in the comments below if you understood the wmpnscfg.exe file on your PC.
Sagar Naresh
Sagar is a web developer and technology journalist. Currently associated with WindowsReport and SamMobile. When not writing, he is either at the gym sweating it out or playing country music on his guitar.
He is an avid traveler and has been to 15 countries, going to more places soon. TRAVEL and WORK is his mantra for a peaceful life.
Attention Before you read this post, I highly recommend you check out my resources page for access to the tools and services I use to not only maintain my system but also fix all my computer errors, by clicking here!
It’s most likely that you noticed the wmpnscfg.exe process while you were browsing through Windows Task Manager. Wmpnscfg.exe is a Windows Media Player (WMP) process, and since, it’s highly unlikely that you actually use WMP; you’d probably want to know why it’s running.
It’s not a process that consumes an awful amount of resources, but it can be rather annoying, when you close it, only for it to restart itself.
What Is Wmpnscfg.exe?
When a new media device becomes available across your network, the wmpnscfg.exe will display a popup notification in your system tray. When you click on the notification window, it will automatically launch WMP where you can share your files.
Wmpnscfg.exe is a Windows Media Player component that allows for media network sharing. This process will notify the user when a new media device has connected to the network. To put it simply, this process allows the end users to share media files across a network, usually between the computer and a third-party device, such as Xbox 360.
Wmpnscfg.exe is an important though not crucial aspect of Windows Media Player. This file works as a substitute for Windows Media Connect, which has now been integrated into the latest versions of WMP. That said; disabling file sharing in Windows Media Player will usually not be enough to prevent this process from starting back up. However, this process can also be quite handy, when sharing media with another computer, across a network.
Common Wmpnscfg.exe Issues
There are a number of issues associated with this process. However, of these many issues, the ones that tend to occur most often are as follows:
- When the system first boots up, the operating system loads two instances of the wmpnscfg.exe process. This number slowly increases over time until you have an excessive number of wmpnscfg.exe processes running in the background.
- When waking your computer out of sleep mode, it’s not uncommon for the user to be confronted with the following error message:
“Wmpnscfg.exe – Application Error” “The instruction at 0xff42c01 referenced memory at 0x02450d01. The memory could not be written. Click OK to terminate the program.”
The referenced memory location will vary from error to error, but the error message itself, remains the same.
- Numerous instances of the wmpnscfg.exe process are loaded into memory, causing other running applications to crash.
Common Causes of Wmpnscfg.exe Issues
The various processes and applications that run on your computer have an enormous effect on its performance, wmpnscfg.exe notwithstanding. If you are yet to experience any real problems with this process, then it’s probably because you do not use it to share media. The general one fits all solution, is to uninstall the application in the event of a problem.
With that said the most common causes for issues with the Wmpnscfg.exe process are as follows:
- The application associated with the process (which is Windows Media Player) is either outdated or corrupted. Windows Media Player must be working correctly, in order for the network sharing service (wmpnscfg.exe) to work.
- Certain DLL files required for wmpnscfg.exe to work are either missing or corrupt.
- The computer has been infected with a virus.
- The Windows registry has been corrupted, resulting in wmpnscfg.exe errors. The registry is an integral component of the operating system, and so, errors, corruption and faults within this component can cause errors in applications and device drivers.
How to Fix It
There are several things that can be done to fix wmpnscfg.exe based issues. The solution that you do eventually adopt should depend greatly on the extent of the problem(s) on your computer. Typically, performance issues won’t require such drastic measures as error messages.
With that said, I suggest you continue reading for working solutions, to problems associated with wmpnscfg.exe.
Run a Malware Scan
It’s not uncommon for your wmpnscfg.exe issue(s) to be due to a virus infection. If your system is infected with a malicious file, such as spyware, malware or Trojan horse, then the wmpnscfg.exe may have been compromised. In situations like this, a virus will get onto your system and disguise itself as a legitimate process (such as wmpnscfg.exe in this case), giving the hacker backdoor access to your computer.
Symptoms will include wmpnscfg.exe application errors, prohibiting Windows Media Player from working. Thus, as a solution, you should definitely run a full virus scan of your system, using SpyHunter, an antimalware tool which is the very best in the marketplace today.
Anyway, you can acquire SpyHunter from here:
CLICK HERE TO CHECK OUT SPYHUNTER
Reinstall Application
If you’re having problems with the wmpnscfg.exe process, whether it’s not allowing you to share media files or it’s constantly crashing the WMP, then you should consider reinstalling the application. To do that, simply do the following:
Note: These instructions are for Windows Vista/7/8/8.1/10 based systems.
1. First, boot into your computer with full administrative rights.
2. Then press + R, type Control Panel and click on OK.
3. When Control Panel loads up, click on Programs.
4. This will take you to the Programs option, from here, click on Turn Windows features on or off.
5. A Windows Feature applet should appear (wait for it to finish loading), then click on the + symbol next to Media Features, and un-tick the box next to Windows Media Player and click on OK.

 Windows failed to start – exe