
A single computer is often shared between multiple users, Windows XP, Windows Vista, Windows 7 makes it easier for users to share a computer using the Fast User Switching feature enabled, it allows more than one user to log on simultaneously at a single computer, for example, if you are currently logged onto a computer, another user can log on to watch movies, without you having to close your open programs and log off. Once the user is finished, you can return to your session where all your programs will still be running.
In Windows 7 / Vista – Method 1: Using Local Group Policy Editor
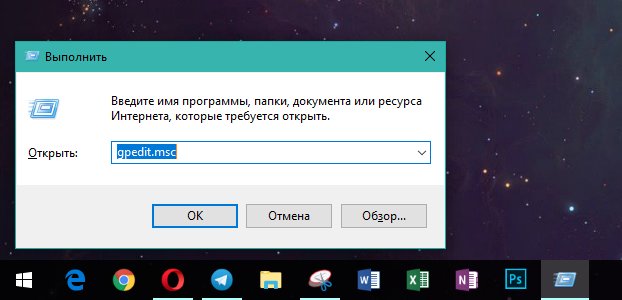
Click Start, type gpedit.msc in the Start Search or Run dialog box and press Enter.

Now navigate to the following location:
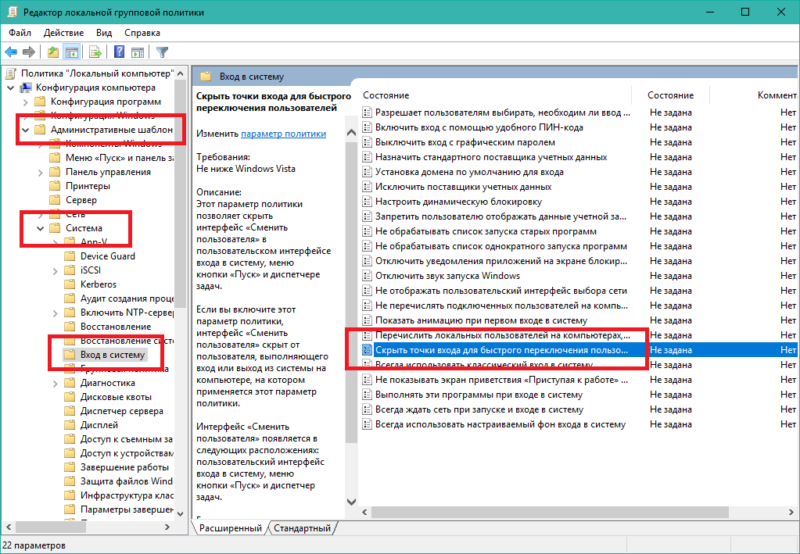
Local Computer Policy > Computer Configuration > Administrative Templates > System > Logon

To Disable Fast User Switching:
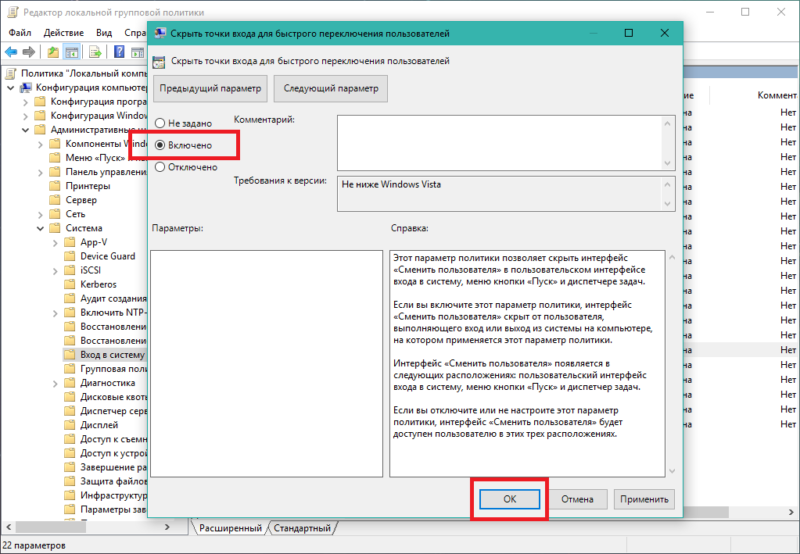
Set Hide entry points for Fast User Switching to Enabled. By enabling the policy, Administrators can hide the Switch user button in the Logon UI, the Start menu and the Task Manager.
To Enable Fast User Switching:
Set Hide entry points for Fast User Switching to Not configured for enabling Fast User Switching.

Group Policy Editor does not exist in certain editions of Windows Vista. Alternately, you can change the settings via the registry.
In Windows Vista – Method 2: Using Registry
To change settings via registry, follow these simple steps:
Click Start, type regedit.exe in the Start Search or Run dialog box and press Enter.

Navigate to the following branch:
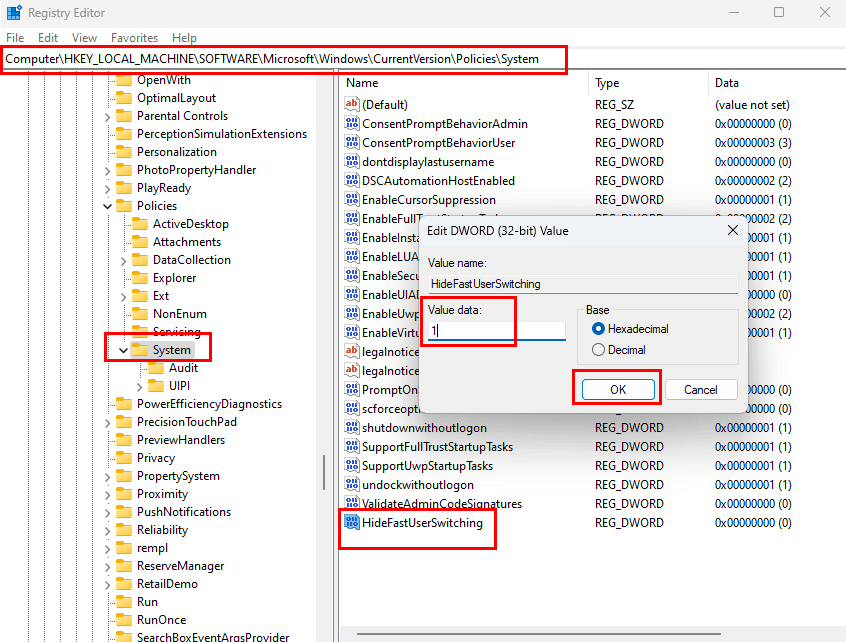
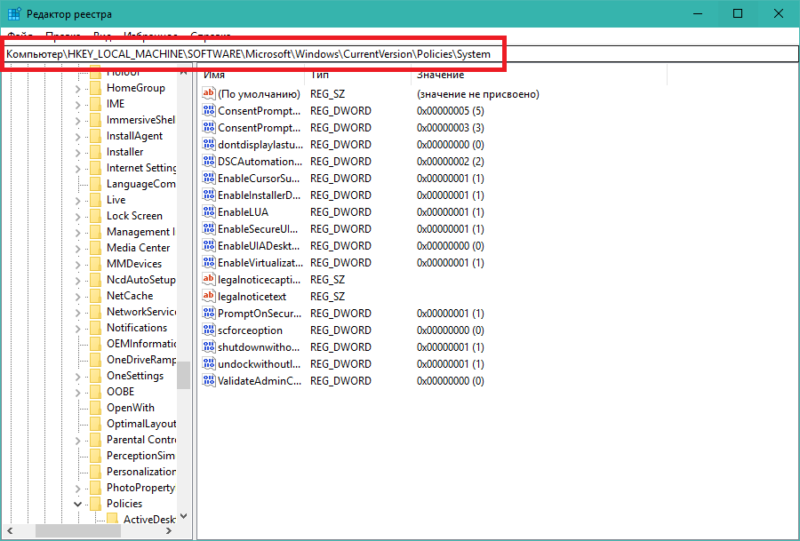
HKEY_LOCAL_MACHINE \ SOFTWARE \ Microsoft \ Windows \ CurrentVersion \ Policies \ System

Create a DWORD (32-bit) Value named HideFastUserSwitching by right clicking on the right side of the editor and selecting New > DWORD(32bit) Value.

Set the Value data for HideFastUserSwitching to 1
In Windows XP
Open Control Panel and then User Accounts.

Click Change the way users log on or off option.

Check Use the Fast User Switching check box and now click the Apply Options button.

And on the contrary, if you want Fast User Switching to be disabled, leave the checkmark unchecked in Fast User Switching option and click the Apply options button.

And you are done !

В некоторых ситуациях возникает необходимость запретить встроенную в Windows 7 функцию быстрого переключения пользователей. Сделать это через доступные настройки не получится. Придется править системный реестр или вносить изменения в групповые политики.
Проще всего будет воспользоваться «Редактором локальной групповой политики».

Для этого нужно выполнить следующие действия:
- Нажимаем кнопку «Пуск» и в поле поиска вводим строку «gpedit.msc» (без кавычек), и затем нажимаем клавишу Enter.
- В открывшемся редакторе ЛГП по порядку раскрываем строки дерева политик. Сначала «Конфигурация компьютера», затем «Административные шаблоны», далее «Система» и затем «Вход в систему».
- Из списка в правой части окна редактора выбираем и открываем элемент «Скрыть точки входа для быстрого переключения пользователей».
- Переключатель «Не задано / Включить / Отключить» устанавливаем в положение «Включить» и сохраняем изменения.
После этих манипуляций кнопка «Смена пользователя» будет скрыта во всех местах, где она была до этого (вход в систему, диспетчер задач, кнопка «Пуск»).
Want to let another user quickly access their content or software data on your Windows 11 PC without slowing down your work? You can utilize the Fast User Switching feature of the Windows 11 operating system. If you don’t know how to enable it, use the feature, or disable the functionality, keep reading.
The Fast User Switching feature in Microsoft Windows 11 allows users to log in to a PC while keeping other users logged in and their applications running. This allows multiple users to use the computer without interrupting what other users are working on. You can enable or disable fast user switching using the methods mentioned below in this article.
Contents
- 1 What Is Windows Fast User Switching?
- 2 How to Enable or Disable Fast User Switching on Windows 11
- 2.1 1. Creating a Group Policy Modification
- 2.2 2. Using the Registry Editor
- 2.3 3. Execute a Command Prompt or PowerShell Command
- 3 How to Use Fast User Switching
- 3.1 Switch User Accounts From Task Manager
- 3.2 Switch User Profile From Start Menu
- 4 Fast User Switching FAQs
- 4.1 How do I enable or disable fast user switching in Windows 11?
- 4.2 What is the fast user switching feature?
- 4.3 Is there a limit to fast user switching Windows 10 or 11?
- 4.4 What are the disadvantages of Fast User Switching on Windows 11?
- 5 Conclusion
All Windows PCs allow you to create a user account and log into the device using that user profile. While you’re logged in using a specific user account, Windows OS writes all data about favorites, history, alerts, desktop settings, etc., in a reserved folder for that specific user account. Other users can’t access these data from their profiles. All modern Microsoft Windows OSs since Windows XP come with an additional feature about user accounts. This is commonly known as Fast User Switching.
In this process, you no longer need to log out of your user account. Thus, you don’t need to close apps and files in the middle of the work. Another user can securely log in to their Windows user accounts from the Start menu, Task Manager, etc. When their work is done, they can log off. Now, you can log in to your account and will find that all the apps are running as you left them. The process also doesn’t disconnect any network connectivity. Hence, downloads or streaming from another user account keeps running.
There are no user account limits for the Fast User Switching function. You can switch to unlimited user accounts, provided that the system is robust enough to support such actions. If you set up one of the best high-spec PC at work or home and allow fast switching to user accounts for multiple individuals, it actually means many users are using the same device simultaneously.
How to Enable or Disable Fast User Switching on Windows 11
Instant switching of users on Windows 11 should be active by default. However, if you see that the feature isn’t active, you can do the following to enable it. These methods are similar in dated Windows operating systems like Win 10, 8, 7, XP, etc. Just reverse the methods to disable the feature.
1. Creating a Group Policy Modification
One of the easiest ways to enable or disable the fast switching of user accounts is by making quick changes in the Local Group Policy Editor tool. Here’s how it’s done:
- Click the Start menu or Windows flag to launch Start.
- Type Group and you should see the Edit group policy option under the Best match section of the search result. Click on it.
- The Local Group Policy Editor appears.
- Access the Logon Group Policy setting by expanding the following:
- Local Computer Policy
- Computer Configuration
- Administrative Templates
- System
- Logon
- On the right side of the Local Group Policy Editor, you must see various Logon settings.
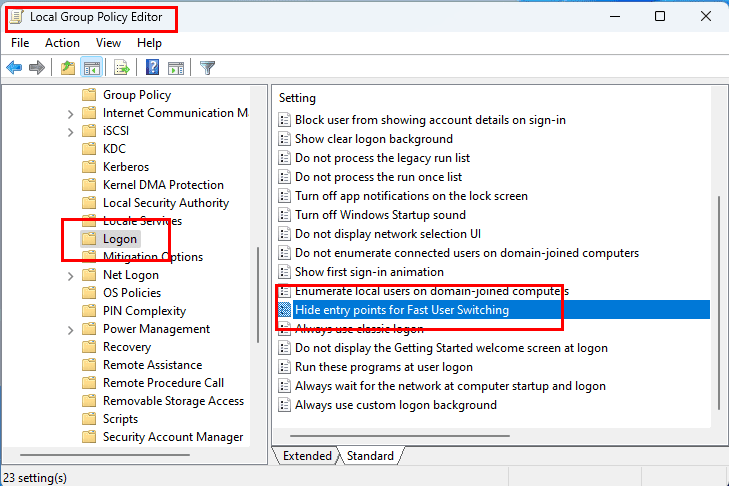
- Scroll down the list to locate the “Hide Entry Points for Fast User Switching” setting.
- Double-click to open the “Hide Entry Points for Fast User Switching” setting.
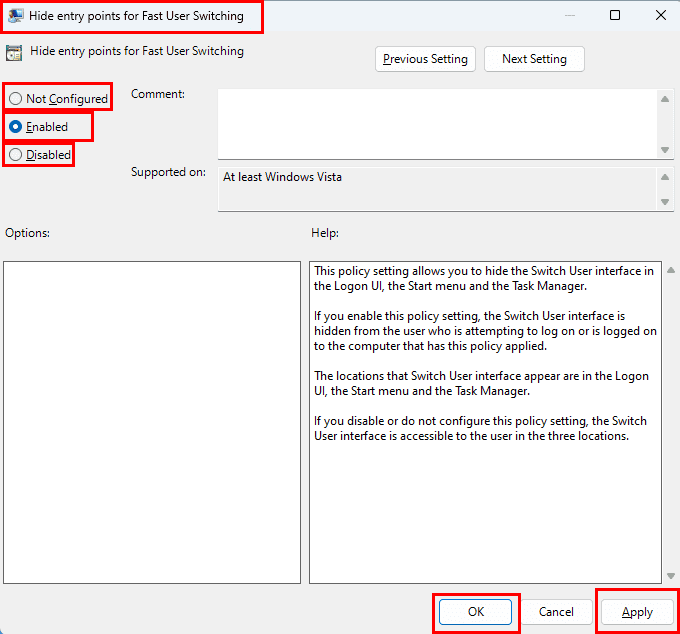
- If you see Not Configured is the default selection, here’s what you can do:
- Select Enabled to turn Fast User Switching off.
- Set it to Disable to activate the instant user switching feature.
- You must click Apply and then select OK to save the changes.
You can also apply this method on earlier Windows PCs like Windows 10, 8, 7, Vista, etc.
2. Using the Registry Editor
The Registry Editor is another great place to make system-wide changes to the user interface, features, etc. Here’s how you can use this tool to activate fast user account switching on Windows 11:
- Hold the Windows Key and press R to bring up the Run dialog box.
- Type regedit then press Enter.
- Expand the following Registry keys:
- HKEY_LOCAL_MACHINE
- SOFTWARE
- Microsoft
- Windows
- CurrentVersion
- Policies
- System
- Look for a value called HideFastUserSwitching.
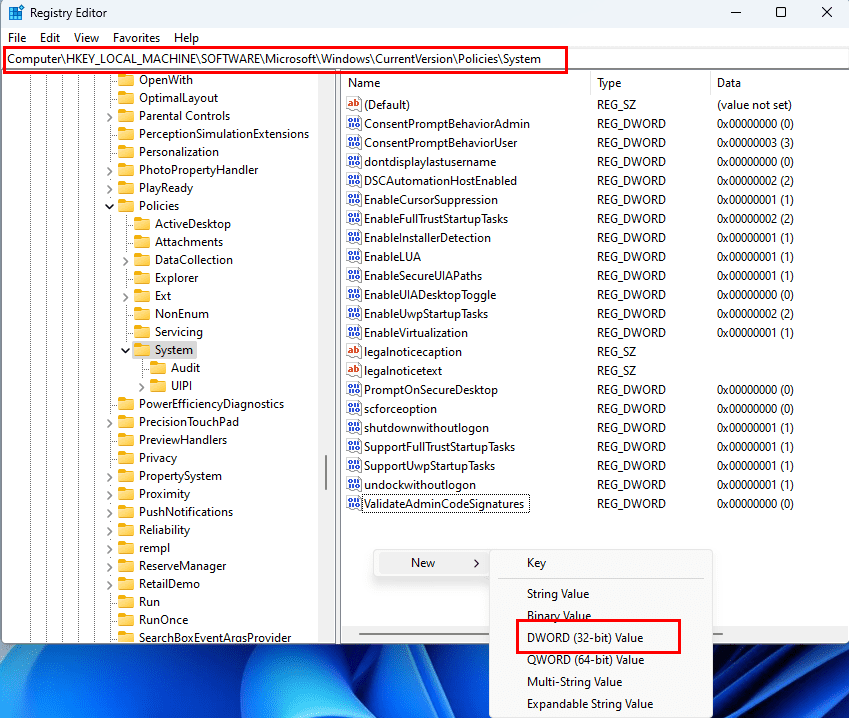
- If it does not exist, right-click the System folder, and select New DWORD (32-bit) Value to create a new blank value.
- Now, rename the DWORD (32-bit) Value to HideFastUserSwitching.
- Press Enter to confirm the rename of the value.
- Double-click HideFastUserSwitching.
- Change the Value data to 1 to disable Fast User Switching.
- When you need the feature, open the HideFastUserSwitching value and change the Value data to 0.
3. Execute a Command Prompt or PowerShell Command
Suppose you’re in hurry and find the above methods too manual. I’ve got another intuitive method for you to activate fast account switching. In this process, you need to execute a programming code on Windows 11 Command Prompt or PowerShell. Don’t worry! I’ll provide the code you need to run. Just follow these steps:
- Hit the Windows key on your keyboard and type PowerShell.
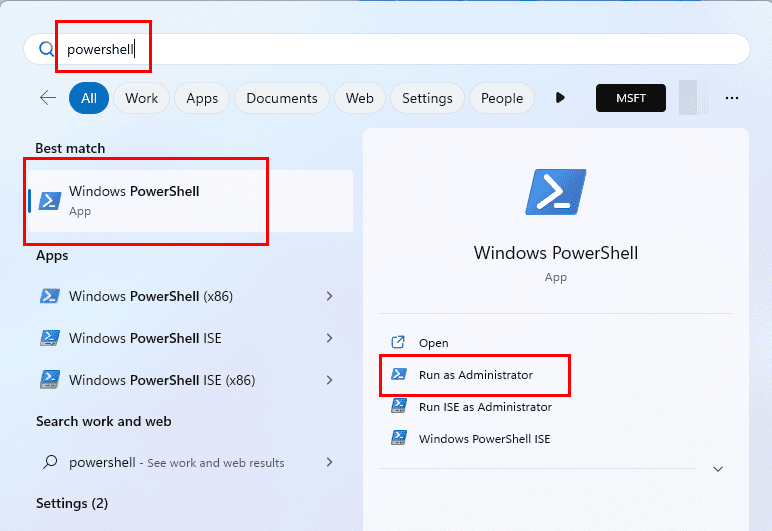
- Whichever Windows terminal app you open, you must run them as an administrator.
- Now, copy and paste the following code onto the terminal app:
powershell -windowstyle hidden -command "Start-Process cmd -ArgumentList '/s,/c,REG Delete HKLM\SOFTWARE\Microsoft\Windows\CurrentVersion\Policies\System /V HideFastUserSwitching /F & REG Delete HKCU\Software\Microsoft\Windows\CurrentVersion\Policies\System /V HideFastUserSwitching /F & taskkill /f /im explorer.exe & start explorer.exe' -Verb runAs"
- Hit Enter to activate fast switching of Windows 11 users.
- If you want to deactivate the feature, just use the following command:
powershell -windowstyle hidden -command "Start-Process cmd -ArgumentList '/s,/c,REG ADD HKLM\SOFTWARE\Microsoft\Windows\CurrentVersion\Policies\System /V HideFastUserSwitching /T REG_DWORD /D 00000001 /F & REG Delete HKCU\Software\Microsoft\Windows\CurrentVersion\Policies\System /V HideFastUserSwitching /F & taskkill /f /im explorer.exe & start explorer.exe' -Verb runAs"
How to Use Fast User Switching
There are many ways to log in to another Windows 11 user account without logging out of the existing session. The following are the most effortless ones:
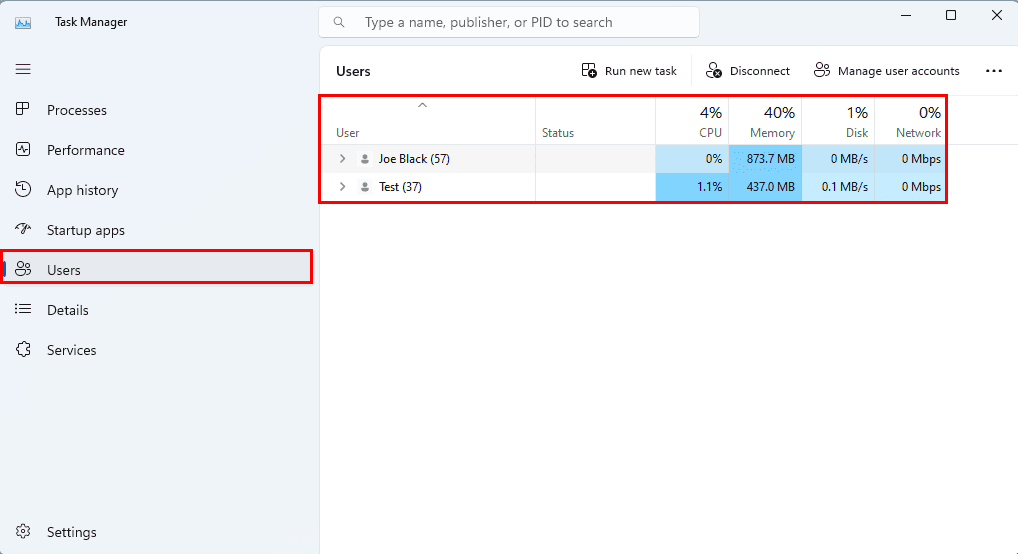
Switch User Accounts From Task Manager
- Open the Task Manager by pressing Ctrl + Shift + Esc altogether.
- Now, click the Users icon to navigate to the Users section on Task Manager.
- You should see all the added user accounts there.
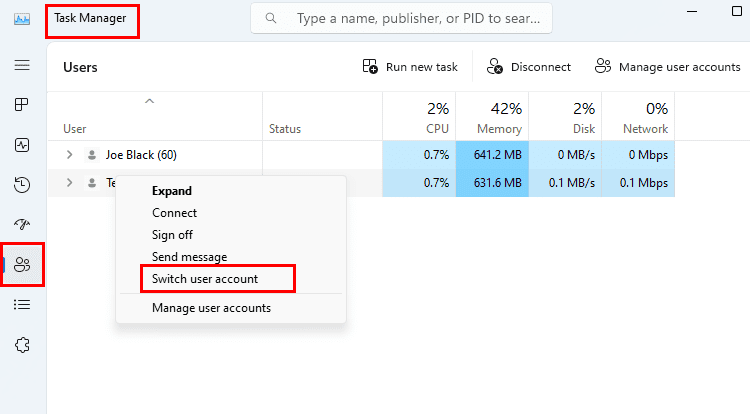
- Right-click on the user account you want to switch to and select Switch user account from the context menu.
- You’ll now see the login screen of Windows 11.
- Enter the password for your other account to log in.
If you don’t find the above feature on a dated Windows PC, you can use the next method.
- Click the Windows flag or Start menu.
- You should see your User Account avatar or profile picture in the bottom left corner.
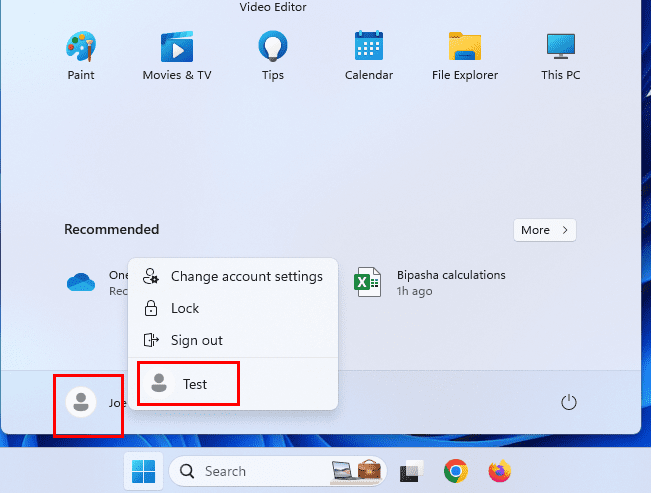
- Right-click on the avatar or user profile.
- On the next menu that opens, click the alternative user account to which you want to log in.
- Enter the password and complete the login process.
Fast User Switching FAQs
How do I enable or disable fast user switching in Windows 11?
The feature is usually by default active on your Windows 11 PC. If you’re unable to switch to a different user account without logging out of the existing one, follow any of the three methods mentioned earlier in this article.
What is the fast user switching feature?
You no longer need to stop your work in the middle to let another employee sign in to a share Windows 11 or 10 PC when you use quick switching of accounts. Windows 11 or 10 keeps your work and apps running in the background. However, the new user isn’t able to see your work, apps, or documents.
Is there a limit to fast user switching Windows 10 or 11?
There is no limit on the number of users you can fast switch on your Windows 11 or 10 PC. However, more than two user accounts, while logged in simultaneously, will seriously impact the performance of the system. All the user accounts use CPU, HDD read and write bandwidth, RAM, Network, and GPU. Thus, the Windows PC must distribute the entire reserve to all the user accounts currently logged in and becomes sluggish. You must enhance the CPU, GPU, and RAM to use fast switching effortlessly.
Also read: Best CPUs for Video Editing 2022
What are the disadvantages of Fast User Switching on Windows 11?
No doubt the feature is truly excellent in home, business, or school setups where different users share a common computer. The feature is also useful for software, website, and mobile app developers. However, it also has some drawbacks and these are as outlined here:
- The cost of the device increases as you need to invest in additional RAM, CPU, and GPU power
- If two or more users are using one specific app and one of them trying to update the app, the update may not work
- Even if the update works, the users will face different issues with the software until you perform a complete system restart
- Shutting down the PC from one profile will force stop all the processes on other logged-in user accounts
Conclusion
So, this is how you can use the Fast User Switching feature on Windows 11. Depending on your technical expertise, choose the method that you think is the easiest for you. If you know another cool way to switch user accounts quickly without stopping work, do share that in the comment section. Don’t forget to share this article on your social media handles to help your fans, friends, and colleagues.
Next up, how to enable or disable User Account Control (UAC) in Windows. You may also want to explore how to add a new user account to Windows 11.
|
|
|
1 / 1 / 0 Регистрация: 24.07.2015 Сообщений: 85 |
|
|
17.08.2015, 02:15. Показов 8989. Ответов 5 Доброго времени суток уважаемые форумчане! Спрашиваю в этом разделе, так как вопрос мне подкинул антивирус. Пользуюсь авастом, бесплатной лицензией, без всяких дополнений. ОС: Windows 7 Домашняя базовая x64. Так вот я ради интереса полез искать, быстрое переключение пользователей, а оказывается нету … (и вообще, на самом ли деле этим можно оптимизировать комп если он слабенький.. и вообще хорошие ли советы дает мне антивирус?)
0 |
|
105 / 67 / 1 Регистрация: 11.07.2010 Сообщений: 436 |
|
|
17.08.2015, 03:38 |
|
|
конфигурация компьютера какая? на советы аваста лично я бы клал большой болт , так как для меня аваст не антивирус а решето дырявое.
0 |
|
1 / 1 / 0 Регистрация: 24.07.2015 Сообщений: 85 |
|
|
17.08.2015, 11:12 [ТС] |
|
|
Dimaker, по поводу аваста согласен, но все же просто принципиально интересно как эти вещи сделать. Кликните здесь для просмотра всего текста
Модель HP Pavilion dv6 Notebook PC Дисплей: Имя ОС Microsoft Windows 7 Домашняя базовая кстати раньше такого не было: при удалении файлов (музыка допустим, 100 треков) начинаются тормоза, указатель мыши передвигается с большим затруднением. не пойму из-за чего.
0 |
|
105 / 67 / 1 Регистрация: 11.07.2010 Сообщений: 436 |
|
|
17.08.2015, 14:17 |
|
|
а зачем на него вы 64 битную ось ставили? ее обычно ставят если оперативной памяти больше 4 гб
1 |
|
1 / 1 / 0 Регистрация: 24.07.2015 Сообщений: 85 |
|
|
17.08.2015, 17:49 [ТС] |
|
|
Dimaker, Вы считаете что лучше все таки поставить Win x86 ?
0 |
|
105 / 67 / 1 Регистрация: 11.07.2010 Сообщений: 436 |
|
|
23.08.2015, 21:15 |
|
|
варианта 2, либо докупать память или ставить 86
1 |
|
BasicMan Эксперт 29316 / 5623 / 2384 Регистрация: 17.02.2009 Сообщений: 30,364 Блог |
23.08.2015, 21:15 |
|
6 |
|
Новые блоги и статьи
Все статьи Все блоги / |
||||
|
Распределенное обучение с TensorFlow и Python
AI_Generated 05.05.2025 В машинном обучении размер имеет значение. С ростом сложности моделей и объема данных одиночный процессор или даже мощная видеокарта уже не справляются с задачей обучения за разумное время. Когда. . . |
CRUD API на C# и GraphQL
stackOverflow 05.05.2025 В бэкенд-разработке постоянно возникают новые технологии, призванные решить актуальные проблемы и упростить жизнь программистам. Одной из таких технологий стал GraphQL — язык запросов для API,. . . |
Распознавание голоса и речи на C#
UnmanagedCoder 05.05.2025 Интеграция голосового управления в приложения на C# стала намного доступнее благодаря развитию специализированных библиотек и API. При этом многие разработчики до сих пор считают голосовое управление. . . |
Реализация своих итераторов в C++
NullReferenced 05.05.2025 Итераторы в C++ — это абстракция, которая связывает весь экосистему Стандартной Библиотеки Шаблонов (STL) в единое целое, позволяя алгоритмам работать с разнородными структурами данных без знания их. . . |
Разработка собственного фреймворка для тестирования в C#
UnmanagedCoder 04.05.2025 C# довольно богат готовыми решениями – NUnit, xUnit, MSTest уже давно стали своеобразными динозаврами индустрии. Однако, как и любой динозавр, они не всегда могут протиснуться в узкие коридоры. . . |
|
Распределенная трассировка в Java с помощью OpenTelemetry
Javaican 04.05.2025 Микросервисная архитектура стала краеугольным камнем современной разработки, но вместе с ней пришла и головная боль, знакомая многим — отслеживание прохождения запросов через лабиринт взаимосвязанных. . . |
Шаблоны обнаружения сервисов в Kubernetes
Mr. Docker 04.05.2025 Современные Kubernetes-инфраструктуры сталкиваются с серьёзными вызовами. Развертывание в нескольких регионах и облаках одновременно, необходимость обеспечения низкой задержки для глобально. . . |
Создаем SPA на C# и Blazor
stackOverflow 04.05.2025 Мир веб-разработки за последние десять лет претерпел коллосальные изменения. Переход от традиционных многостраничных сайтов к одностраничным приложениям (Single Page Applications, SPA) — это. . . |
Реализация шаблонов проектирования GoF на C++
NullReferenced 04.05.2025 «Банда четырёх» (Gang of Four или GoF) — Эрих Гамма, Ричард Хелм, Ральф Джонсон и Джон Влиссидес — в 1994 году сформировали канон шаблонов, который выдержал проверку временем. И хотя C++ претерпел. . . |
C# и сети: Сокеты, gRPC и SignalR
UnmanagedCoder 04.05.2025 Сетевые технологии не стоят на месте, а вместе с ними эволюционируют и инструменты разработки. В . NET появилось множество решений — от низкоуровневых сокетов, позволяющих управлять каждым байтом. . . |
Наверх

Функция быстрого переключения пользователей или “Fast User Switching” появилась еще в Windows XP и на самом деле является очень полезной на устройствах, которыми пользуются несколько пользователей. За счет этой возможности переключиться на другую учетную запись можно за считанные секунды, без необходимости выходить из другого профиля.
Надо понимать, что несмотря на свою полезность, Fast User Switching имеет несколько недочетов. К примеру, если вы работаете за компьютером с активной другой учетной записью, отключение устройства может привести к потере данных профиля. И если в этом случае система предупредит пользователя о необходимости выйти из другой записи для сохранения информации, второй минус Fast User Switching более ощутимый. Дело в том, что при работе с компьютером остальные профили, вошедшие в систему, потребляют ресурсы компьютера, поэтому могут замедлить работу вашего ПК.
Отключение Fast User Switching оставит возможность работать за устройством нескольким пользователям, но избавит от вышеописанных недостатков. Учтите, что эта инструкция не удаляет из Windows 10 Fast User Switching полностью, лишь прячет так называемую «точку входа» из меню Пуск, экрана входа в систему или Диспетчера задач. После отключения быстрого переключения, пользователи должны будут закрывать все свои приложения, сохранять документы и затем выходить из профиля, чтобы переключиться на другую учетную запись.
Примечание: все действия этой инструкции выполняются от имени Администратора. Вам понадобится учетная запись Админа, либо пароль от нее.
Избавиться от функции быстрого переключения пользователей можно двумя способами. Выбор будет зависеть от того, какая редакция операционной системы у вас используется:
- С помощью Редактора локальных групповых политик. Метод не подходит для редакции Windows 10 Домашняя.
- С помощью Редактора реестра. Метод подходит для всех версий Windows 10.
Также обратите внимание на то, что эта инструкция поможет вам отключить Fast User Switching на Windows 8.1 / 8 и Windows 7.
Отключение Fast User Switching с помощью Редактора групповых политик
- Нажмите Win + R и введите gpedit.msc. На запрос разрешения UAC. Опционально, вы можете отключить Контроль учетных записей.

- В левой части экрана перейдите по пути: Конфигурация компьютера – Административные шаблоны – Система – Вход в систему.

- В правой части окна найдите пункт Отключить точки входа для быстрого переключения пользователей. Дважды кликните на него.
- Установите переключатель в положение Включено.
- Нажмите Применить, а затем Ок.
- Закройте все окна и перезагрузите компьютер.
- После выполнения этих действий в меню действий для учетной записи в меню Пуск исчезнет опция переключения на другой профиль.
Чтобы вернуть все назад, проделайте все те же шаги, только вместо Включено установите Не задано.
Как отключить быстрое переключение пользователей через редактор реестра
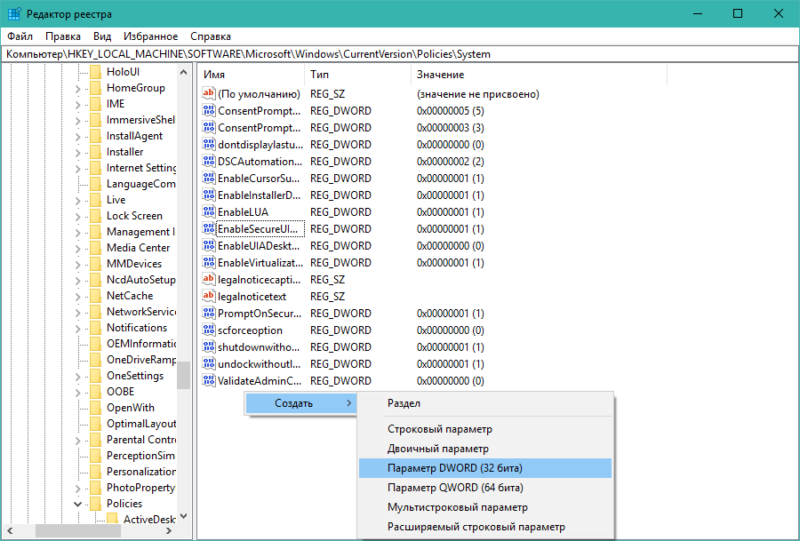
Метод для тех, у кого установлена Windows 10 Home или Windows 10 Home Single Language. На этих двух версиях операционной системы нет редактора групповых политик, поэтому придется воспользоваться редактором реестра. Разумеется, этот же метод применим и для остальных редакций Windows 10, вроде Профессиональной или Корпоративной.
- Нажмите Win + R и введите regedit. Нажмите Ok или Enter на клавиатуре. Откроется редактор реестра.
- Перейдите по пути: HKEY_LOCAL_MACHINE\SOFTWARE\Microsoft\Windows\CurrentVersion\Policies\System. Учтите, что на компьютерах с Windows 10 Creators Update 1703 и выше, можно скопировать путь прямо в окно адреса редактора реестра. Это избавляет пользователя от необходимости блуждать по дебрям реестра Windows.

- В правой части окна кликните правой кнопкой мыши по пустому месту и выберите Создать – Параметр DWORD (32 бита).
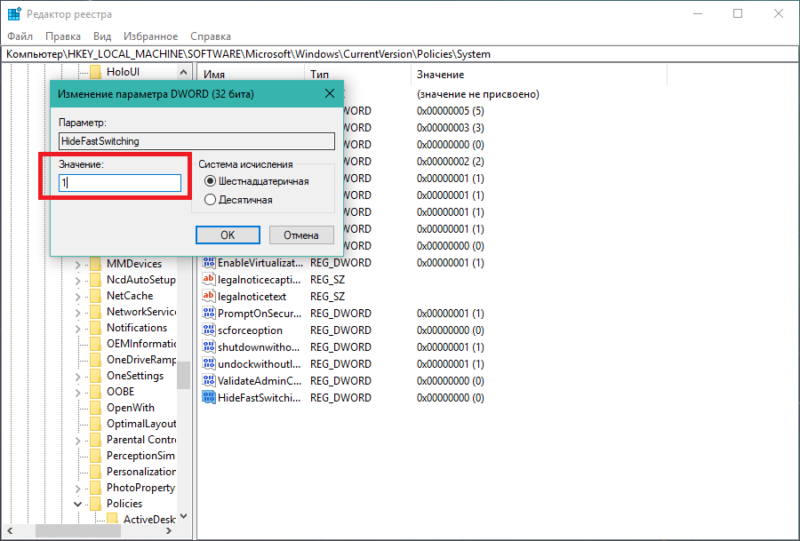
- Назовите новый параметр HideFastSwitching. Кликните по нему дважды и установите значение 1. Нажмите Ок.
- Закройте все окна и перезагрузите компьютер.
Вернуть все назад можно простой сменой значения созданного параметра с 1 на 0, либо просто удалить HideFastSwitching. После этого не забудьте перезагрузить компьютер.