
Multiple monitors setup doesn’t only look great but also boosts productivity as things can be done much more efficiently. In Windows 11, you are allowed to connect (extend) any number of monitors. The limit depends on how many display ports you have on your hardware (particularly your graphics card).
If you have a multiple monitors setup and would like to switch between the monitors, e.g. changing the main display from monitor 1 to monitor 2, or moving a monitor from one side to the other, this post will show you a detailed guide on how to manage your multiple displays on Windows 11 desktop or laptop computer.
This guide outlines several methods on how to quickly switch between monitors or rearrange them on Windows 11 – via Display Settings, keyboard shortcuts, or Nvidia Control Panel.
Also see: How to Set Different Wallpaper on Each Monitor (Windows 11)
Switch between monitors in Windows 11
If you have two or more monitors and are using the “Extend these displays” setting, you can switch between the monitors by changing the main display from one monitor to another, or rearranging them (moving only with mouse) via the Windows 11 Display Settings.
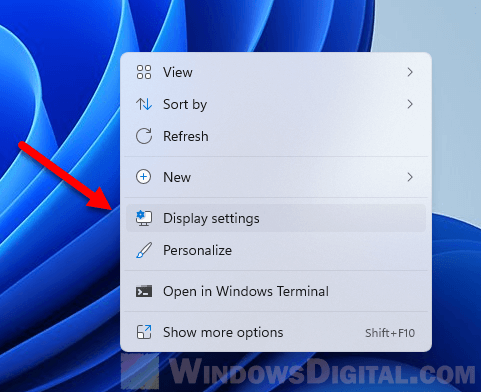
First, on Windows 11, right-click anywhere on your desktop and select Display Settings. Alternatively, you can open the display settings via Settings > System > Display.
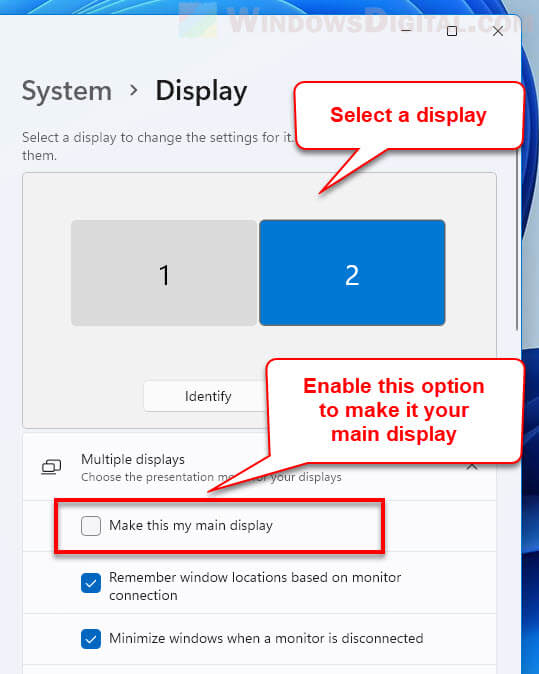
In the display settings, you can change the main display by selecting a monitor and enable the “Make this my main display” option. For example, if Monitor 1 is your current main display, to change the main display to Monitor 2 instead, select Monitor 2 and tick the checkbox for “Make this my main display”.
If you have no idea which monitor is monitor 1, 2 or so on, click the Identify button. Windows will then show you the number that represents the monitor on the screen of each of your monitors.
Related issue: Game Stuttering and Lag on Dual Monitor
Rearrange monitors on Windows 11
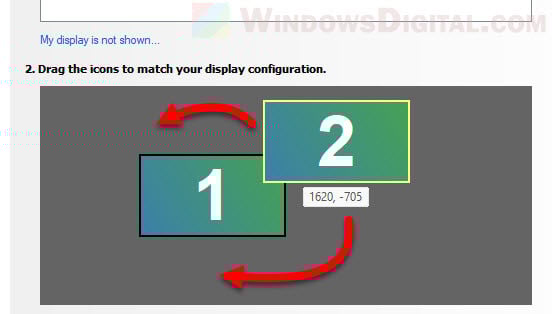
You can also move the monitor to rearrange them by clicking and dragging the display to any position you like to match your monitors setup. This is useful when you have physically swapped the positions of your monitors and you need to rearrange them. Click and drag a monitor to any position you want.
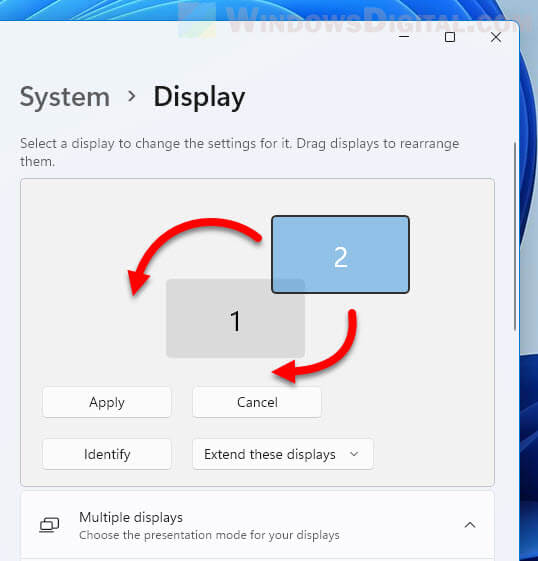
For example, if your monitor 2 is on top of your monitor 1 physically, you can drag the monitor 2 to the top of monitor 1 so that when you move your mouse upward from monitor 1, the mouse cursor can reach monitor 2.
Show only 1 monitor
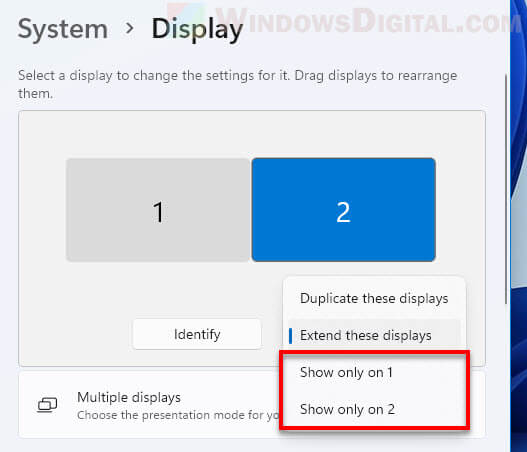
If you have multiple monitors connected to your PC but you only want to show your display on one monitor, to switch between which monitor to show the display on Windows 11, in the display settings, click the drop-down menu next to Identify, and then select “Show only on 1” or “Show only on 2” (or other monitor if you have more than just 2 monitors) to show your display only on the selected monitor.
Switch between two monitors with keyboard
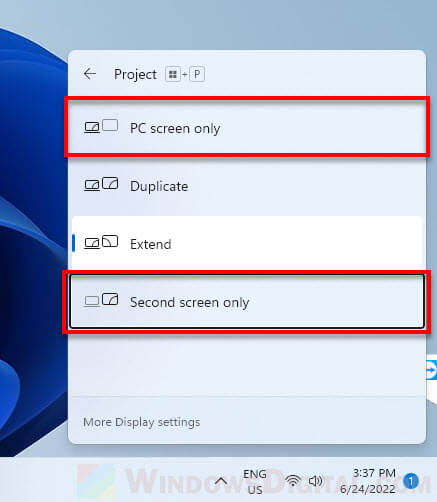
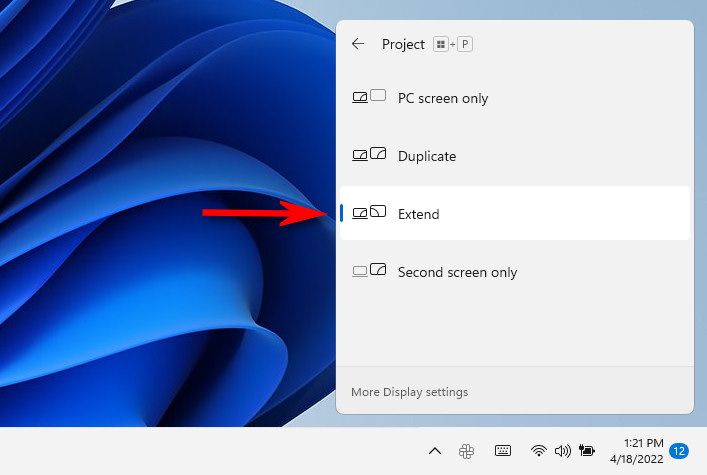
To quickly switch between monitors or display mode using keyboard shortcuts, press the Windows + P key to open the “Project” pane. You can select one of the available display options in Windows 11.
- PC screen only – Showing only your main display.
- Duplicate – This mode will duplicate your main display across all other monitors.
- Extend – Extending the screen to other available monitors (the default display mode).
- Second screen only – When selected, Windows will show the display on second monitor only.
To switch between the available options, after opening the Project pane, use the Up Arrow or Down Arrow key to navigate between the options and then press Enter to select an option.
Alternatively, after bringing up the Project pane, you can continue pressing and holding the Windows key while repeatedly pressing the P key to navigate between the options. Then, release both keys to select the highlighted option.
Switch between monitors via NVIDIA Control Panel
If you are using an NVIDIA graphics card and have properly installed NVIDIA video driver and its companion software, you can also switch between your monitors in Windows 11 via the NVIDIA Control Panel.
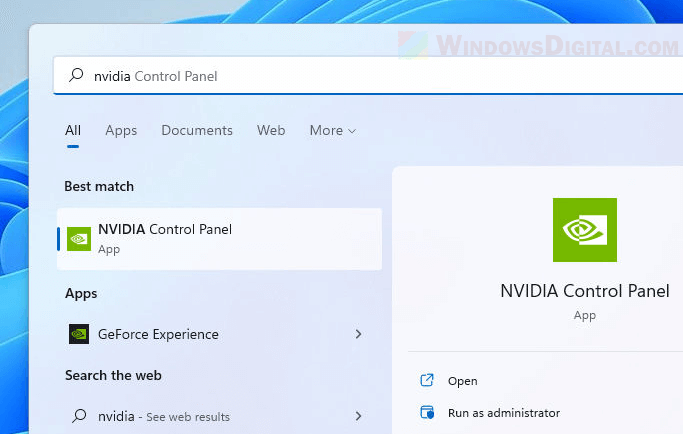
In Windows 11, search for and open NVIDIA Control Panel via Start.
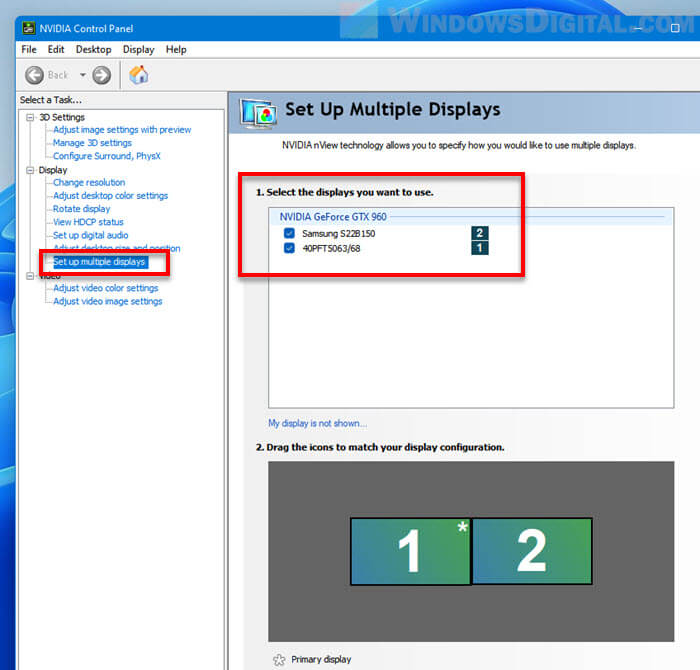
On the left pane, click “Set up multiple displays” under “Display”. You may need to click Display to expand it in order to see the options. From there, you can select the displays you want to use, or deselect any display you don’t want to use.
At the bottom part of the settings, you can make any monitor your main display by right-clicking it and select “Make primary“. Feel free to also experiment with the “Clone with” option if you want to clone your screen.
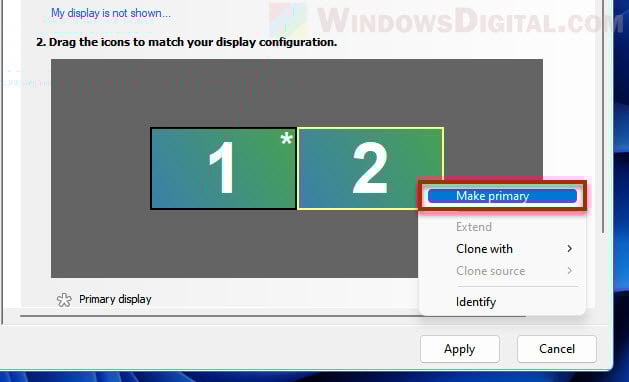
In addition, you can also reposition the display by simply dragging the display to match your desired display configuration.
More and more people use dual monitor to do multi-windows multi-tasking for increasing the work efficiency. With Windows keyboard shortcuts, we can operate multiple Windows programs more quickly and smoothly. Here we have compiled Windows 11 keyboard shortcuts related to work on dual monitor. As a dual-monitor enthusiast, don’t miss them!
Swith between Extend/Duplicate Mode — Windows logo key+P

✤ You normally work with a large desktop in Extend mode. When you need to conduct a small meeting, you can use this shortcut to open Windows projection menu and switch to Duplicate mode in one second.

Move window to the next screen — Windows logo key+Shift + ← / →

✤ When activating one app program, sometimes Windows system would automatically open the app on the second screen. In this case, you can use this shortcut to switch the app windows back to the screen you want.
✤At a counter or face-to-face meeting, you can use this shortcut to switch files or applications to the other party’s screen. (The maximized window will still be displayed maximized after being moved. If the non-maximized window is moved, you can use Win + ↑ to maximize the window.)
Show the Desktop— Windows logo key+D

✤ This shortcut has the same function as «Show Desktop» in the lower right corner of the main-screen taskbar, showing the desktop quickly. Accessing files or app shortcuts on desktop is piece of cake.
✨ Touchpad gesture with same function
① Swipe with 3 fingers Down:show the desktop
② Swipe with 3 fingers Up :revert back to the original
Switch Audio devices — Windows logo key+G

✤ When you have multiple speakers and want to quickly switch the sound output devices, you can use this shortcut to call up Xbox game bar and select the desired sound device from the «Sound» button on the game bar. If you don’t want to use the mouse to switch the speaker on the task bar, this shortcut is an alternative.

Open Task view — Windows logo key+Tab

✤ Windows 11 provides a Task view on Virtual Desktop to quickly show all windows. When wanting to close a window quickly among multiple windows, you can use this shortcut to list all windows and find the one you need to close directly.

✨ Touchpad gesture with same function
① Swipe with 3 fingers Up: open task view
② Swipe with 3 fingers Down: revert back to the original
Rotate the display — Ctrl+Alt + ← / ↑ / → / ↓

✤ Do you often need to read portrait documents, or need to set the screen portrait for coding? This shortcut allows you to get rid of the multiple steps of Windows Display Settings. Rotate the screen in one second and turn the screen as you wish.
📌Note: Windows Screen Rotation Shortcuts are shortcuts provided by Intel Graphics Command Center. If the display orientation does not change after you press these shortcuts, please refer to the following article for instructions and troubleshooting.
View full-scaled portrait picture in portrait mode
Copy & Paste — Ctrl+C & Ctrl+V


Dual monitors and Ctrl+C & Ctrl+V are a powerful combination to boost office work efficiency. If you haven’t tried it yet, you must read this article:
Select All/Page — Ctrl+A

Instead of looking for «Select All» in the app toolbar, this shortcut allows you to select all text and page content directly, especially for those applications that do not have a «Select All» tool, such as Chrome, PDF Reader, etc. When you need to copy all text, use this shortcut to select and then use Ctrl+C, Ctrl+V to get the full page backup in a second.
Conclusion
Windows 11 shortcuts are convenient, but they should be used circumstantially. Some of the shortcuts are a bit redundant in dual monitors, e.g. using the Windows logo key + ←/→ to flatten one window to the left/right half. Instead of using one-half of the screen to compare documents, it’s clearer to put two documents directly on two screens. After all, simplicity and exactness are the ultimate goals we strive for!
Multiple virtual desktops are great for productivity, but to utilize this feature well, you’ll want to know how to switch between desktops in Windows 11.
Virtual desktops are a lifesaver for people who need multiple monitors but have just one at hand. They reduce clutter, improve organization, and enhance productivity, but if you aren’t switching between them seamlessly, you’re missing out.
In this guide, we’ll show you the exact steps to switch between desktops, and to boost your efficiency, check out these 7 hidden Windows 11 features.
How to switch between desktops in Windows 11
Note: To change the position of the virtual desktops, you can drag and reposition them on Task view.
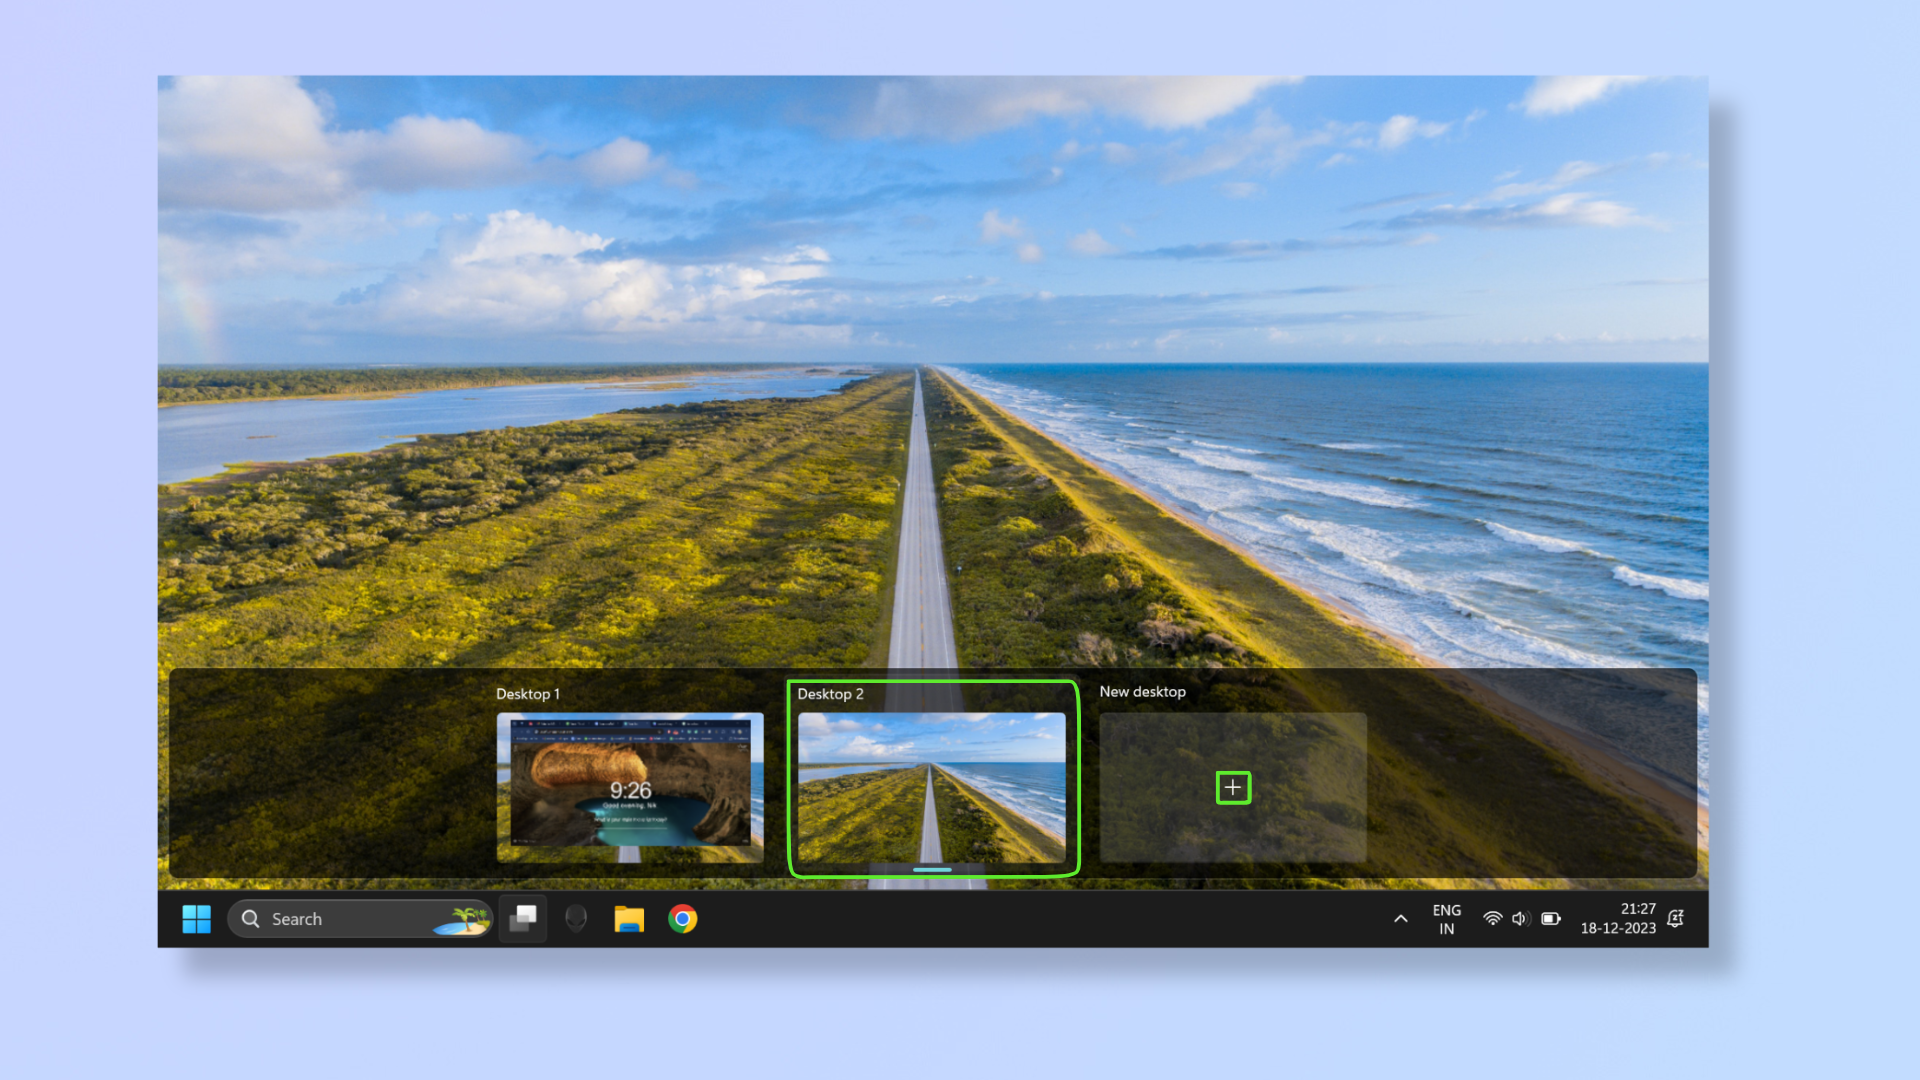
1. Press Windows key + Tab
(Image: © Future)
Press the Windows key + Tab to bring up the Task View. If you don’t have a second desktop open, click the plus icon to create a new one, and then click the new Desktop to open it.
To switch between the desktops, press the Windows key + Tab and click the desktop you want to switch to.
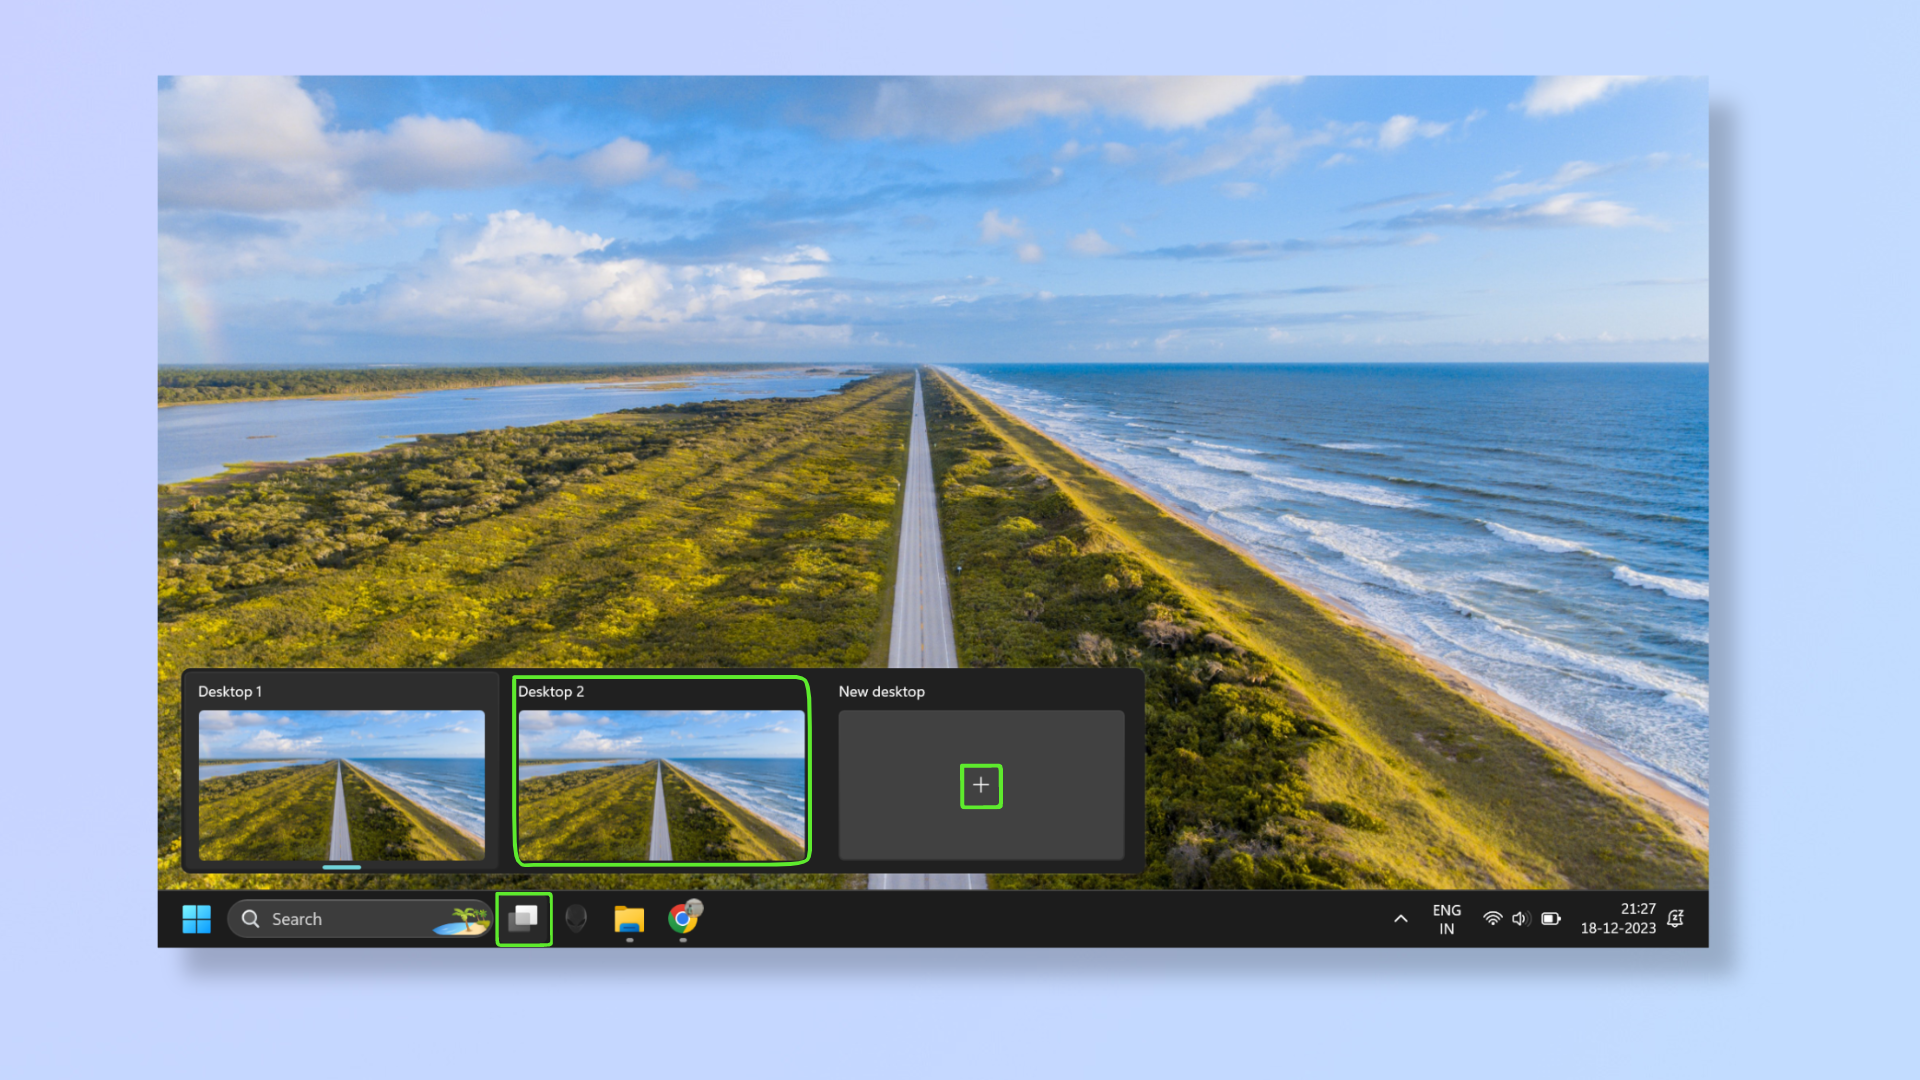
2. Use the Task view button
(Image: © Future)
Hover over the Task view button (overlapping squares icon). To create and launch a new desktop, click the plus icon. To switch between the desktops, hover over the Task view button and click the desktop you want to switch to.
3. Use touchpad gestures
(Image: © Future)
Swipe with four fingers to the left or right on the touchpad to switch between desktops. This option will not let you create a new desktop.
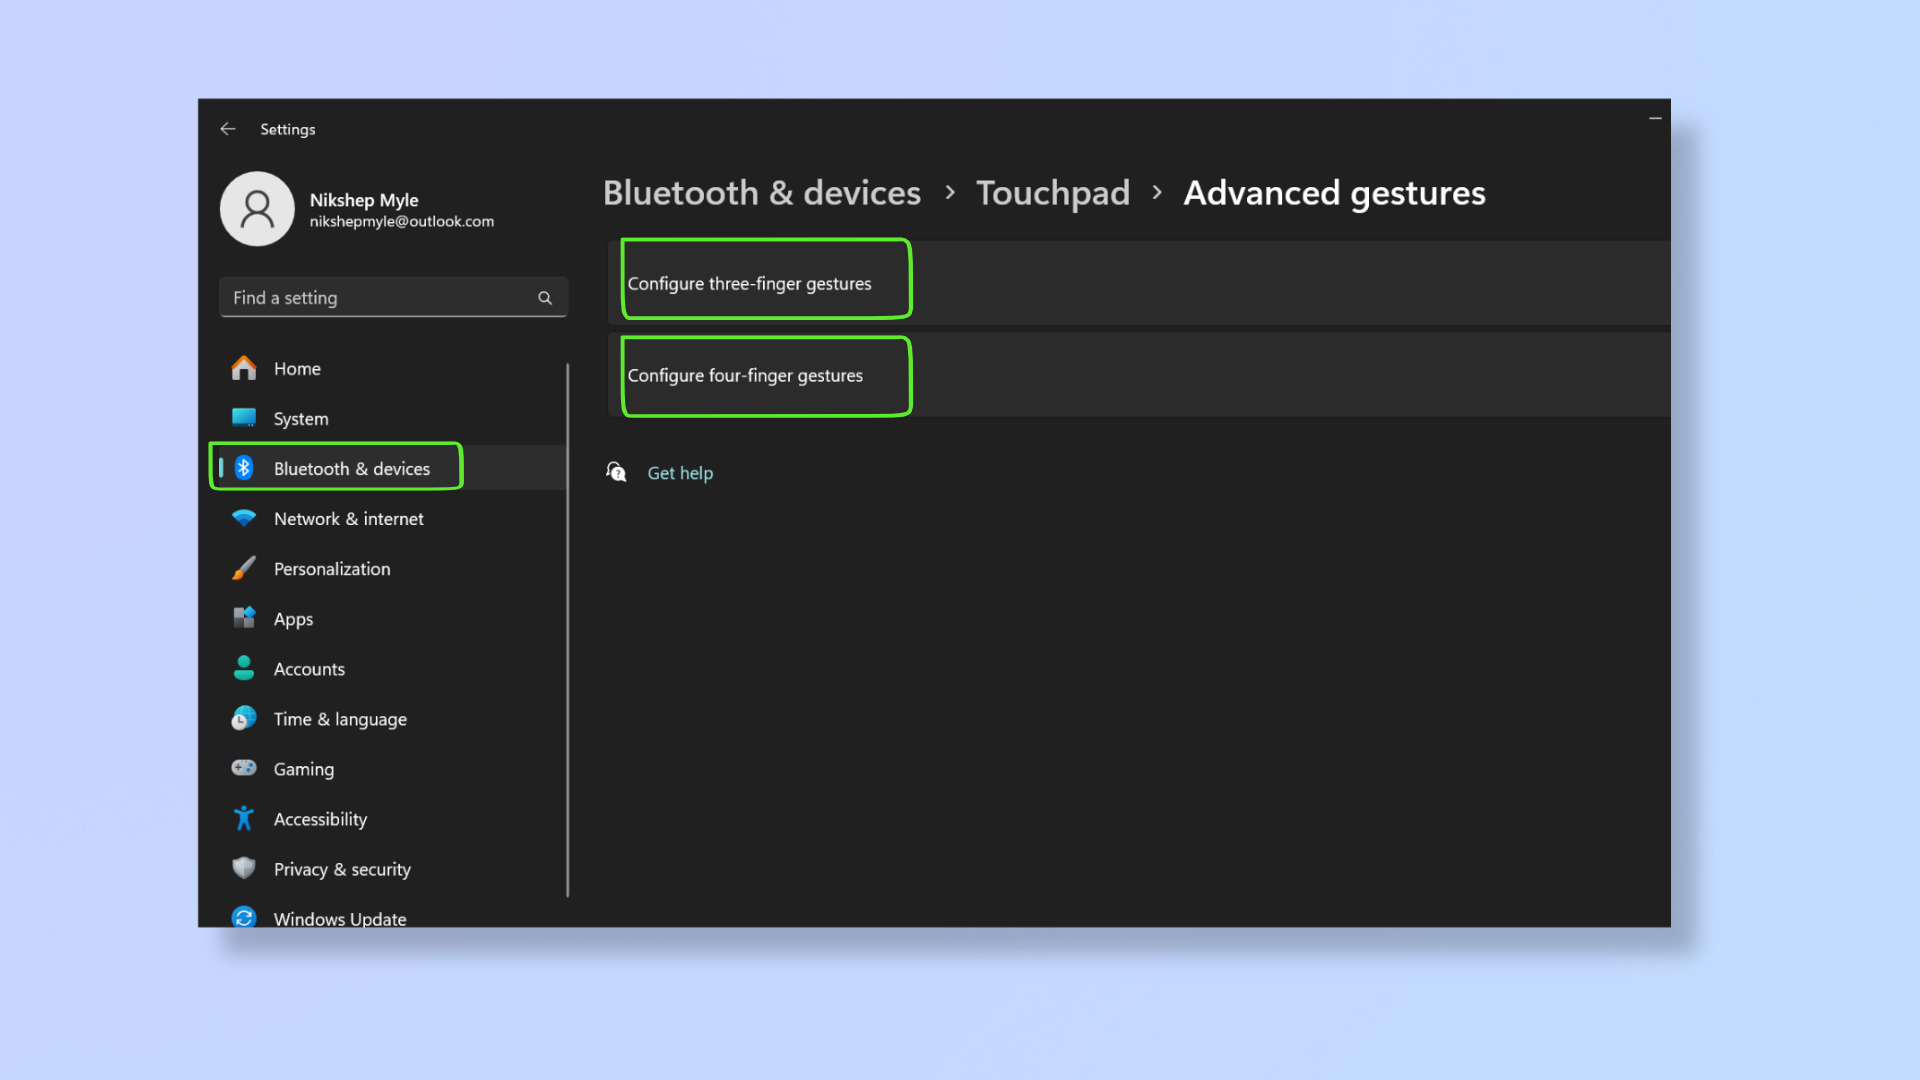
To change the gesture to switch between desktops or to bring up the Task view, press Windows + I to open Settings, then click Bluetooth & devices, scroll down to select Touchpad, then scroll down to select Advanced gestures. Here, you can assign Task view or switch desktop functions to three-finger and four-finger gestures.
Windows 11’s multiple desktops are sure to streamline your workflow. For more tutorials on Windows 11, read how to convert an MBR partition to GPT on Windows 11, how to see your computer’s RAM specs on Windows 11, and how to find your MAC address on Windows 11.
Get instant access to breaking news, the hottest reviews, great deals and helpful tips.
Nikshep Myle is a freelance writer covering tech, health, and wellbeing. He has written for popular tech blogs like TechRadar, GadgetReview, SlashGear, and Creative Bloq, and has extensively reviewed consumer gadgets. When he’s not writing, you’ll find him meditating, gaming, discovering new music, and indulging in adventurous and creative pursuits.
Switching monitor 1 and 2 in Windows 11 is a breeze once you know where to look. By adjusting the display settings, you can easily reorder your monitors to fit your needs. Whether you’re looking to streamline your workflow or just want a better viewing experience, this guide will walk you through the necessary steps.
In this section, we’ll cover the steps to switch your primary and secondary monitors on Windows 11. This will help you to adjust which screen is considered your main display and how you want your workspace to be arranged.
Step 1: Right-click on your desktop
Right-click anywhere on your desktop and select “Display settings” from the context menu.
When you right-click on the desktop, a list of options will appear. Choosing “Display settings” will bring you to the settings menu where you can manage multiple monitors.
Step 2: Identify your monitors
Click the “Identify” button to see which monitor is labeled as 1 and which as 2.
This button will display a large number on each screen, helping you to identify which monitor is currently set as 1 and which as 2.
Step 3: Select the monitor you want to be primary
Click on the monitor you want to set as your primary display.
Clicking on a monitor in the display settings will highlight it, allowing you to adjust its settings, such as making it your main display.
Step 4: Set the selected monitor as your main display
Check the box that says “Make this my main display.”
This checkbox will appear under the display settings for the selected monitor. Checking it will set the chosen screen as the primary monitor where your taskbar and Start menu will appear.
Step 5: Apply the changes
Click “Apply” to save your changes.
After making your selection, you need to click the “Apply” button to update your display settings. Your monitors will flicker briefly as the settings take effect.
Once you’ve completed these steps, your monitors will be rearranged according to your new settings. Your primary monitor will now show the taskbar and Start menu, making it the main focus of your workspace.
Tips for Switching Monitor 1 and 2 in Windows 11
- Always ensure your monitor cables are correctly connected and secured before making changes in the settings.
- If you’re using a laptop with an external monitor, set the external monitor as the primary display for a larger workspace.
- Use the “Multiple displays” dropdown to choose how you want your screens to interact (duplicate, extend, or show only on one).
- Regularly update your graphics drivers to avoid any display issues.
- If your monitors are not correctly recognized, try restarting your PC or re-plugging the cables.
Frequently Asked Questions
Can I switch my monitors back easily?
Yes, you can follow the same steps to change back to your original settings at any time.
What if my monitors aren’t displaying correctly?
Ensure your cables are firmly connected and try restarting your computer. If problems persist, updating your graphics drivers might help.
Do these steps work with any type of monitor?
Yes, these steps work with any monitors connected to your Windows 11 PC, whether they are identical models or different ones.
What do I do if the “Make this my main display” option is grayed out?
This might happen if your current primary display is disabled. Ensure all monitors are enabled and connected properly.
Will rearranging my monitors affect my desktop icons?
Rearranging your monitors may move desktop icons, especially if you change the primary display. You may need to manually rearrange your icons afterward.
Summary
- Right-click on your desktop.
- Select “Display settings.”
- Click “Identify.”
- Click the monitor you want to be primary.
- Check “Make this my main display.”
- Click “Apply.”
Conclusion
Switching monitor 1 and 2 in Windows 11 is a straightforward task that can greatly enhance your computing experience. Whether you’re setting up a new workspace or tweaking your current setup, knowing how to adjust your display settings is crucial. Always remember to double-check your connections and monitor settings to ensure everything runs smoothly. For more tips and tricks on optimizing your Windows 11 experience, don’t hesitate to explore further reading or reach out to tech forums. And now that you know how to manage your monitors, why not give it a try and see how it improves your productivity?
Matthew Burleigh has been writing tech tutorials since 2008. His writing has appeared on dozens of different websites and been read over 50 million times.
After receiving his Bachelor’s and Master’s degrees in Computer Science he spent several years working in IT management for small businesses. However, he now works full time writing content online and creating websites.
His main writing topics include iPhones, Microsoft Office, Google Apps, Android, and Photoshop, but he has also written about many other tech topics as well.
Read his full bio here.
Sign in to your How-To Geek account
Quick Links
-
First, Make Sure Extend Mode Is On
-
Move Windows Between Displays Using the Mouse
-
Move Windows Between Displays Using the Keyboard
If you’re running multiple monitors on Windows 11, it’s easy to move an existing app window between two or more displays. We’ll show you how to do it using the mouse or a keyboard shortcut.
First, Make Sure Extend Mode Is On
To move Windows between more than one display, you’ll need to use a special multi-monitor mode called «Extend,» which extends your desktop across all available monitors. To do so, press Windows+P on your keyboard to open the «Project» menu (as in «projection»). Select «Extend» in the menu when it appears.
It’s important to note that some games that support multiple monitors have their own in-game multi-display settings. Make sure you check the game’s settings mode for display options after switching to Extend mode to make sure they work properly.
Move Windows Between Displays Using the Mouse
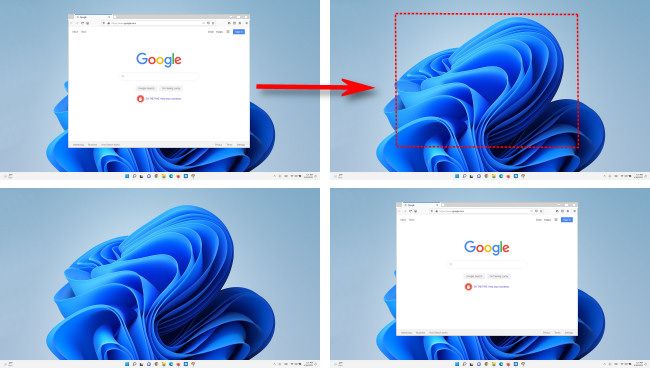
Now that you’re in Extend mode, it’s easy to move app windows between two or more monitors with your mouse. Click the title bar of the window you want to move and drag it to the edge of the screen toward your target display. When the window meets the edge of the first screen, it will begin to appear on the other monitor. Release your mouse button once the app window is where you want it.
To reverse the process, just drag the window back to the edge of the screen again.
Move Windows Between Displays Using the Keyboard
In Windows 11, you can also move a window to another display instantly thanks to a handy keyboard shortcut—no mouse required. Here’s how to do it:
- To move a window to a display oriented to the left of your current display, press Windows + Shift + Left Arrow.
- To move a window to a display oriented to the right of your current display, press Windows + Shift + Right Arrow.
This keyboard shortcut method works across as many monitors you have hooked to your PC. If a window reaches the highest-numbered monitor while moving, it will wrap around and appear on the lowest-numbered monitor, and vice-versa.
Good luck, and have fun using multiple monitors in Windows 11!