
Для установки Windows 11 (или при обновлении с Windows 10), ваш компьютер должен соответствовать определённом минимальным системам требованиям: наличие чипа TPM 2.0 (Trusted Platform Module), режим UEFI + Secure Boot, 4 Гб RAM, 64 Гб диск и совместимый двухъядерный процессор 1 ГГц (не все процессоры поддерживаются!). Microsoft ограничивает установку Windows 11 на несовместимые компьютеры, выполняя проверку на соответствие системным требования перед началом установки Windows. В этой статье мы покажем, как установить Windows 11 на несовместимые устройства без проверки требований к CPU, TPM, Secure Boot (и т.д.)
Если компьютер не соответствует минимальным требованиям для Windows 11, то при установке ОС появится ошибка:
Запуск Windows 11 на этом компьютере не возможен
. Этот компьютер не соответствует минимальным требованиям к системе для установки этой версии Windows. Дополнительные сведения см. на сайте aka.ms/WindowsSysReq
This PC can’t run Windows 11
. This PC doesn’t meet the minimum system requirements to install this version of Windows. For more information, visit aka.ms/WindowsSysReq<
Чтобы понять, каким конкретно требованиям не соответствует вашим компьютер, нужно изучить лог ошибок установки Windows 11 setuperr.log. В этом файле содержаться только ошибки установки Windows (полный лог установки находится в файле setupact.log, но изучать его сложно из-за большого объема).
Чтобы открыть файл лога ошибок установки Windows, откройте командную строку прямо на экране установки, нажав
Shift + F10
и выполните команду:
notepad x:\windows\panther\setuperr.log
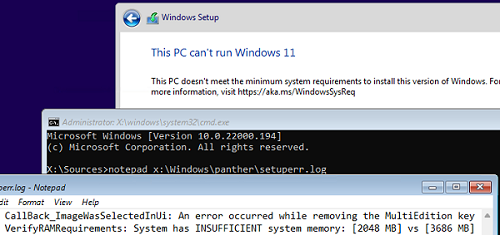
В нашем случае ошибка говорит, что на компьютере недостаточно оперативной памяти (всего 2 Гб вместо 3).
2021-11-11 10:57:51, Error VerifyRAMRequirements: System has INSUFFICIENT system memory: [2048 MB] vs [3686 MB]
Обратите внимание, что если ваш компьютер не соответствует нескольким системным требованиям для установки Windows, то в логе будет указана только первая из причин. Т.е. если вы исправили (или пропустили) одну из ошибок несовместимости, то при следующем запуске установки Windows 11 в логе будет содержаться следующая ошибка совместимости.
После того, как мы добавили RAM появилась другая ошибка:
2021-11-11 11:13:37, Error VerifyTPMSupported:Tbsi_GetDeviceInfo function failed - 0x8028400f[gle=0x0000007a]
Т.е. установщик определил, что на компьютере отсутствует TPM чип.
Если вы устанавливаете Windows 11 в виртуальную машину VMWare, вы можете добавить виртуальный TPM чип в соответствии с этой статьей. Для Hyper-V используется другая инструкция.
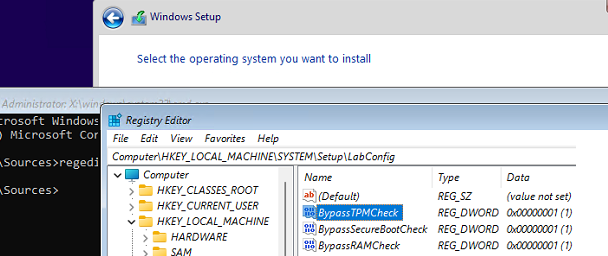
Однако вы можете продолжить установку Windows 11, просто игнорировал одно или все требования совместимости.
Для этого нужно в командной строке на экране установки Windows 11:
- Запустить редактор реестра
regedit.exe
; - Перейти в раздел HKEY_LOCAL_MACHINE\SYSTEM\Setup и создать новую ветку с именем LabConfig;
- В этой ветке нужно создать DWORD параметры со значением 1 для тех проверок совместимости, которые вы хотите пропустить при установке
Доступны следующие параметры, позволяющие установить Windows 11 на устройства:
-
BypassCPUCheck
– с несовместимыми процессорами; -
BypassTPMCheck
– без чипа TPM 2; -
BypassRAMCheck
– не проверять минимальное количество RAM -
BypassSecureBootCheck
–с Legacy BIOS (или UEFI с отключенным Secure Boot) -
BypassStorageCheck
– не проверять размер системного диска
Например, чтобы не проверять наличие TPM модуля при установке, нудно создать параметр реестра BypassTPMCheck со значением 1. Параметр можно создать с помощью графического редактора реестра или с помощью команды:
reg add HKLM\SYSTEM\Setup\LabConfig /v BypassTPMCheck /t REG_DWORD /d 1
Аналогичным образом нужно создать другие параметры для проверок, который вы хотите пропустить при установке Windows 11.
Затем вернитесь в окно установки Window 11, вернитесь на шаг назад и продолжите обычную установки без проверки совместимости.
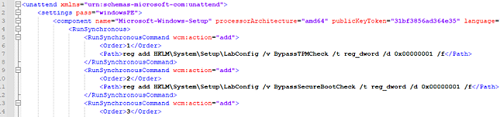
Вы можете модифицировать установочный ISO образ Windows 11, чтобы все эти проверки TPM, SecureBoot, диск, память, CPU) пропускались автоматически при установке ОС.
Для этого создайте текстовый файл AutoUnattend.xml со следующим содержимым:
<unattend xmlns="urn:schemas-microsoft-com:unattend">
<settings pass="windowsPE">
<component name="Microsoft-Windows-Setup" processorArchitecture="amd64" publicKeyToken="31bf3856ad364e35" language="neutral" versionScope="nonSxS" xmlns:wcm="http://schemas.microsoft.com/WMIConfig/2002/State" xmlns:xsi="http://www.w3.org/2001/XMLSchema-instance">
<RunSynchronous>
<RunSynchronousCommand wcm:action="add">
<Order>1</Order>
<Path>reg add HKLM\System\Setup\LabConfig /v BypassTPMCheck /t reg_dword /d 0x00000001 /f</Path>
</RunSynchronousCommand>
<RunSynchronousCommand wcm:action="add">
<Order>2</Order>
<Path>reg add HKLM\System\Setup\LabConfig /v BypassSecureBootCheck /t reg_dword /d 0x00000001 /f</Path>
</RunSynchronousCommand>
<RunSynchronousCommand wcm:action="add">
<Order>3</Order>
<Path>reg add HKLM\System\Setup\LabConfig /v BypassRAMCheck /t reg_dword /d 0x00000001 /f</Path>
</RunSynchronousCommand>
<RunSynchronousCommand wcm:action="add">
 <Order>5</Order>
<Path>reg add HKLM\System\Setup\LabConfig /v BypassCPUCheck /t reg_dword /d 0x00000001 /f</Path>
</RunSynchronousCommand>
<RunSynchronousCommand wcm:action="add">
<Order>4</Order>
<Path>reg add HKLM\System\Setup\LabConfig /v BypassStorageCheck /t reg_dword /d 0x00000001 /f</Path>
</RunSynchronousCommand>
</RunSynchronous>
<UserData>
<ProductKey>
<Key></Key>
</ProductKey>
</UserData>
</component>
</settings>
</unattend>
Если вы хотите отключить экран создания онлайн аккаунта Microsoft при установке Windows 11, добавьте в файл следующий секцию компонента:
<component name="Microsoft-Windows-Shell-Setup" processorArchitecture="amd64" publicKeyToken="31bf3856ad364e35" language="neutral" versionScope="nonSxS" xmlns:wcm="http://schemas.microsoft.com/WMIConfig/2002/State" xmlns:xsi="http://www.w3.org/2001/XMLSchema-instance">
<OOBE>
<HideOnlineAccountScreens>true</HideOnlineAccountScreens>
<HideWirelessSetupInOOBE>true</HideWirelessSetupInOOBE>
<ProtectYourPC>3</ProtectYourPC>
</OOBE>
</component>
Скопируйте данный файл в корень установочной USB флешки с Windows 11.
Если вам нужно добавить файл ответов в ISO образ Windows 11, распаккуйте его содержимое в любую папку на компьютере, скопируйте в этот каталог файл AutoUnattend.xml и пересоберите ISO образ.
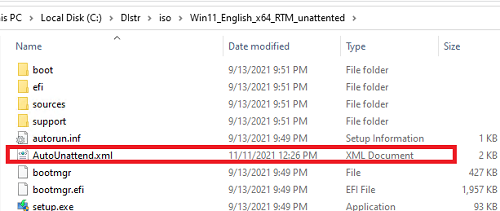
Я использовал для создания образа бесплатную утилиту DISM++ (Toolkit -> ISO maker).
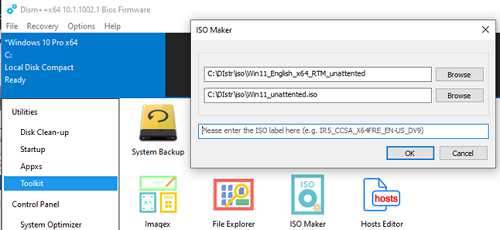
Теперь никакие проверки совместимости не будут производится при установке Windows 11.
В новой версии утилиты Rufus, использующейся для создания загрузочных USB флешек, появилась специальная опция Extended Windows 11 Installation (no TPM/no Secure Boot/8Gb- RAM). Данная опция позволяет создать образ для установки Windows 11 без проверки TPM и Secure Boot:

Bypass Windows 11 Upgrade Assistant / PC Health Check / TPM and CPU Settings. Ignore PC Health Check results.
To bypass the Windows 11 Upgrade Assistant and avoid the TPM and CPU requirement checks, you can modify specific registry values to trick the system into thinking your computer meets the necessary requirements. This method addresses common error messages, such as:
- This PC doesn’t currently meet Windows 11 system requirements.
- TPM 2.0 must be supported and enabled on this PC.
- The processor isn’t currently supported for Windows 11.
The Upgrade Assistant checks the following registry key to determine eligibility:
- HKEY_CURRENT_USER\Software\Microsoft\PCHC
- Set the
UpgradeEligibilityvalue (DWORD) to1.
- Set the
This alone will allow the Upgrade Assistant to proceed, but to complete the upgrade process on systems with unsupported TPM or CPU, you must also modify this registry key:
- HKEY_LOCAL_MACHINE\SYSTEM\Setup\MoSetup
- Set the
AllowUpgradesWithUnsupportedTPMOrCPUvalue (DWORD) to1.
- Set the
Once both values are configured, you can upgrade to Windows 11 by running the 4 MB Upgrade Assistant file rather than using the full Windows 11 ISO. This method allows you to bypass hardware compatibility checks while minimizing the hassle of downloading the entire ISO file.
How to Use
Simply save the reg file and run it then hit Yes to apply the tweaks to the system. No scripts or excessive modifications required.
Bypassing the CPU check in Windows 11 has become a hot topic since Microsoft introduced stricter hardware requirements for its latest operating system. This decision aims to enhance security and performance but has left many users with older systems feeling excluded. In this article, we will explore the reasons behind these hardware requirements, the implications of bypassing them, and the step-by-step methods to do it.
Understanding Windows 11 Hardware Requirements
When Microsoft announced Windows 11, it introduced a list of minimum system requirements, including specific CPU models, TPM (Trusted Platform Module) 2.0 support, and Secure Boot capability. The minimum CPU requirement is particularly noteworthy; Microsoft has mandated that only processors on the Windows 11 compatibility list can run the OS. This list primarily includes newer Intel and AMD processors.
Why the Strict CPU Requirement?
-
Security Enhancements: Windows 11 is designed with security as a core feature. Modern CPUs incorporate security features that older models lack, such as virtualization-based security and memory encryption, which can help protect against malware and other security threats.
-
Performance Benefits: Microsoft aims to ensure that Windows 11 runs smoothly and can utilize advanced features. Older processors may not support the new technology that improves the operating system’s performance.
-
Support and Updates: Maintaining a high level of support for older hardware can introduce complexity into the software development process, leading to increased costs and development times.
While some users appreciate these advancements, others with capable older hardware find themselves locked out of Windows 11. This has led to various discussions and methods within the tech community regarding how to bypass these checks.
The Risks of Bypassing CPU Checks
Before engaging in any methods to bypass the Windows 11 CPU check, it is crucial to understand the potential risks:
-
Stability Issues: Bypassing the CPU check can lead to instability in the OS. If the system isn’t designed to run Windows 11, users may experience crashes, sluggish performance, or software incompatibilities.
-
Security Vulnerabilities: Older CPUs may not support essential security features, leaving the system more vulnerable to attacks. Without proper security measures, users may be exposed to risks.
-
Lack of Updates: Microsoft may not provide updates or support for systems that bypass hardware requirements, potentially leaving users without crucial security patches.
-
Warranty and Support: If you encounter issues while using an unsupported version of Windows, you might void support agreements or warranties.
Bypassing the CPU Check: Step-by-Step Methods
If you have considered the risks and still wish to proceed with bypassing the Windows 11 CPU check, there are a couple of methods to accomplish this. Below are detailed steps for one of the prevalent methods:
Method 1: Registry Edit
-
Backup Your Data: Before making any changes, back up your important files. Registry edits can lead to system instability if not done correctly.
-
Access the Registry Editor:
- Press
Win + Rto open the Run dialog. - Type
regeditand hit Enter. - If prompted by User Account Control, click «Yes.»
- Press
-
Navigate to the Following Path:
HKEY_LOCAL_MACHINESYSTEMSetup -
Create a New Key:
- Right-click on the «Setup» folder.
- Select “New” > “Key” and name it
LabConfig.
-
Create Values in LabConfig:
- Right-click on
LabConfig, select “New” > “DWORD (32-bit) Value.” - Name it
BypassCPUCheckand set its value to1. - Repeat the process for
BypassTPMCheck,BypassSecureBootCheck, and set all their values to1.
- Right-click on
-
Exit the Registry Editor: Close the registry editor and restart your computer.
-
Install Windows 11: Proceed with the Windows 11 installation process. The CPU check should now be bypassed.
Method 2: Using Windows 11 Installation Media
Another common method involves using a bootable USB drive with Windows 11 installation files:
-
Create a Bootable USB Drive: Use the Windows Media Creation Tool to create a bootable USB drive.
-
Modify the Install.wim File:
- After creating the USB drive, navigate to the
sourcesfolder. - Locate the
install.wimfile. You’ll need a program like DISM (Deployment Image Servicing and Management) to modify it. - Use the following command to mount the WIM file:
DISM /Mount-WIM /WimFile:E:sourcesinstall.wim /index:1 /MountDir:C:WIMMount - Within the mounted WIM file, navigate to:
C:WIMMountWindowsPanther - Locate
setupact.logand open it with a text editor. Look for checks related to hardware compatibility. - You could edit the values associated with CPU checks within this log, but this can become complex and risky.
- After creating the USB drive, navigate to the
-
Un-mount the WIM File: Once you have finished editing, don’t forget to unmount the WIM:
DISM /Unmount-WIM /MountDir:C:WIMMount /Commit -
Boot from USB Drive: Restart your computer, boot from the USB drive, and start the installation of Windows 11.
Final Thoughts
While bypassing the CPU check in Windows 11 might allow you to install the OS on unsupported hardware, it’s essential to weigh the benefits against the potential risks. Stability, security, and support are significant considerations that could affect your experience with the operating system.
For users who require Windows 11 for specific applications or functionalities, upgrading hardware may be a reasonable investment in the long run. However, for those who are tech-savvy and understand the risks, the methods outlined can allow you to enjoy the latest version of Windows despite the hardware restrictions.
Ultimately, the decision to bypass the CPU check should be undertaken with caution, a clear understanding of potential consequences, and a readiness to face issues that may arise. Always ensure that you maintain system backups and be prepared for troubleshooting efforts if they become necessary.
Want to Bypass Windows 11 Requirements & CPU Check?
If yes then you are in the right place.
Although, Microsoft released its latest Windows OS with lots of new features and improvements.
But still, there are so many users who are struggling with the unsupported hardware issues.
And that’s why users are asking to bypass these requirements. Most of them are having issues with their Processor and CPU.
Moreover, in the previous post, I have already shared a detailed guide on how to bypass secure boot and TPM 2.0.
You can check them out and if they didn’t work for you, then this post will definitely gonna help you out in this.
So, let’s see how it works…
Table of Contents

But before we begin, here is a quick overview.
Although, Microsoft made all these system requirements mandatory for improving security and privacy. But these requirements made it users very hard to upgrade to Windows 11 OS. And that’s why Microsoft itself suggested one way to bypass these requirements, which we will be discussing later in detail.
Apart from this, I have also seen many users who also don’t know how to check the system compatibility for Windows 11. And if you have already done this, then I would suggest you to check again using the above link.
Moreover, I have also seen many cases where the users were fulfilling all the requirements but the CPU features were disabled. And that’s why I have recently posted about how to turn on TPM 2.0 in any BIOS for Windows 11.
And if you have already done all this, then follow the given ways.
So, let’s get started…
1. Bypass Windows 11 Requirements [ Offical Microsoft Way ]
After getting all these comments related to these incompatible system requirements, Microsoft officially stated this on their support page. And using this method you can easily avoid all these security CPU checks.
But Microsoft also stated that they don’t recommend this method and can cause security issues on your Windows 11 PC. Apart from this, you can easily use these registry keys to bypass the TPM 2.0 requirements.
So, let’s see how it works…
1. First, Press Windows+R keys to open the run window
2. Type Regedit on the run and press enter.

3. A window will open, Go to this location- HKEY_LOCAL_MACHINE\SYSTEM\Setup\MoSetup

4. Now, create a DWORD (32-bit) value called AllowUpgradesWithUnsupportedTPMorCPU.

5. Now change the value of AllowUpgradesWithUnsupportedTPMorCPU to 1 and click on the OK button.
6. Close all the windows and restart your computer.
And Done! Now you have successfully bypassed the TPM and other system requirements.
Note:- Please be careful while making changes to the registry files because it can cause serious problems if configured incorrectly.
Now, let’s move to the next way…
2. Using Custom Windows 11 Installation Media of Rufus
In this method, I will show you how easily you can bypass all Windows 11 installation requirements like TPM, Secure Boot, and also the minimum 8 GB RAM requirement. Just you have to follow the given steps where I have used the Rufus tool to create a custom installation media without all these requirements checks.
So, let’s see how it works…
1. First, download the Windows 11 ISO file from the given link.
2. After that, download the Rufus beta version from the given source.
3. Once Rufus is downloaded, double-click on it to run.
4. Now insert the USB Drive into your laptop or PC.

5. After that, click on the SELECT button. ( On the left of Boot selection )

6. Now navigate to the ISO Image file that you have downloaded earlier and then click on Open.

7. Now under the Image option section, click on the drop-down menu and select the Extended Windows 11 Installation (no TPM/no Secure Boot/8GB – RAM) option.

8. At last, click on the START button and then wait for a few minutes while Rufus is creating your Win 11 custom installation USB.

And Done! Now you can use this USB to upgrade your PC.
Now let’s move to the next method…
3. Bypass TPM Check via Media Creation Tool
This method is for the users who want to do a clean Windows 11 install and do not like upgrading from the previous version of Windows. In this method, you will need a USB drive or an ISO file that disables the TPM detection. And then you will need a custom MediaCreationTool by Aveyo’s.
So, let’s see how it works…
1. First, Go to the MediaCreationTool GitHub page.
2. Now, you will see a ‘Download Zip’ option in the top right corner, so click on it to download the file.

3. Now, extract the downloaded zip file.
4. Run the extracted “MediaCreationTool.bat” file. You may see a message as ‘Windows protected your PC’ message. Click on the more info option.

5. Now click on the Run anyway button.

6. After that, It will ask for the MCT version, so select the 11 from the list.

7. Now, select the Create USB option if you have a USB drive.
8. After that, Windows Powershell will ask for your permission, Click on the ‘Yes’ button. You may see a bar saying ‘Windows 10 setup’ don’t worry it will create the Windows 11 ISO file.
9. Now select which media to choose as a USB flash drive and then click on Next.

10. After that, select the USB location and click on the Next button.

11. Now, the tool will start downloading the installation files and will also create Windows 11 bootable USB drive for you.

12. Now, just use the flash drive or ISO file for installation and you will not face any issue regarding TPM requirements.
And done! Now if you want to download Windows 11 media creation official one, then you can check out this link.
4. Using Windows 11 TPM Bypass Script
I know it’s really hard to bypass Windows 11 TPM requirement but this last way will definitely help you in fixing the TPM issues on your computer. In this method, we will be using a script for skipping all these CPU check requirements.
Note:- This is an open-source MediaCreationTool. You just have to run a part of this script.
So, let’s see how it works…
1. Open this GitHub Bypass Script link.
2. Scroll down the above link and look for “Skip_TPM_Check_on_Dynamic_Update_v2.cmd”
3. Now, copy all the lines of this page.

4. Open the notepad on your computer and Paste the copied lines of code.

5. Now, save the notepad file named “disable-tpm-check.cmd” on the desktop screen.
6. Now, double-click on the saved file, and a small popup Windows PowerShell will open up, so click on the Yes button.
7. A PowerShell will open, the top line written is “Skip YPM Check on Dynamic Update [installed]. Run it only once and the TPM check will be disabled.
![Skip YPM Check on Dynamic Update [installed]](https://www.buildsometech.com/wp-content/uploads/2021/10/Skip-YPM-Check-on-Dynamic-Update-installed.png "Skip YPM Check on Dynamic Update installed")
8. Now, just go ahead with Windows 11 update and you will not face any requirement issues.

Note:- Apart from this, if you want to download Windows 11 beta version then you can check this official file link.
That’s it for now…
Conclusion
So, that’s all about bypassing system requirements for installing Windows 11 on your PC without fulfilling the TPM 2.0, Secure Boot, Processor, or any other hardware requirement. Just you have to follow the given step-by-step guides and you will easy to go.
Also, after doing all these settings you may not get the real security features from Microsoft which are made for this operating system.
Stay tuned for the next post…
Feel free to share your thoughts via comments and also tell us if you know any better way on How to Bypass Windows 11 Requirements & CPU Check.
If you liked this post, don’t forget to share.
Have you ever wondered if it’s possible to install Windows 11 without going through the CPU check? Well, it turns out there is a way to bypass this requirement and proceed with the installation. This surprising workaround has caught the attention of many tech enthusiasts who are looking to upgrade to Windows 11 on their older devices.
When it comes to Install Windows 11 Bypass CPU Check, it’s important to understand the background and significance of this process. Microsoft introduced certain hardware requirements with Windows 11, including a TPM 2.0 chip and a compatible CPU. However, for those who don’t meet these requirements, the bypass method offers an alternative solution. By disabling the TPM and modifying certain system files, users can install Windows 11 on older devices, even without a supported CPU. This workaround has gained popularity as it allows individuals to experience the latest features of Windows 11 on their existing hardware.
If you want to install Windows 11 without going through the CPU check, there is a method you can try. However, it is important to note that bypassing the CPU check may result in compatibility issues and potential performance issues. To bypass the CPU check, you will need to modify the registry settings. This involves making changes to the Windows Registry, which can be risky if not done correctly. It is recommended to proceed with caution and create a backup of your system before attempting this method. Consulting with a professional or referring to official Microsoft resources is advised.

Understanding the CPU Check in Windows 11 Installation
The installation process for Windows 11 includes a CPU check to ensure compatibility and optimal performance. This check verifies whether your device meets the minimum requirements set by Microsoft. However, there may be instances where you want to bypass the CPU check in order to install Windows 11 on a device that is not officially supported. In this article, we will explore the concept of bypassing the CPU check in Windows 11 and the potential risks and benefits associated with this process.
Why Bypass the CPU Check in Windows 11 Installation?
Bypassing the CPU check in Windows 11 installation may be necessary for several reasons. One of the primary reasons is to install Windows 11 on a device that does not meet the official hardware requirements but is otherwise capable of running the operating system smoothly. This can be particularly useful for older devices or those with unsupported processors.
Another reason for bypassing the CPU check is for testing purposes. If you are a developer or a tech enthusiast who wants to experiment with Windows 11 on different hardware configurations, bypassing the CPU check can enable you to do so.
Note that bypassing the CPU check is not recommended for the average user, as it may lead to unstable performance, system crashes, and compatibility issues. It should only be attempted by experienced users who fully understand the potential risks involved.
Methods to Bypass the CPU Check in Windows 11
There are various methods available to bypass the CPU check in Windows 11 installation, but it’s important to note that these methods are unofficial and not endorsed by Microsoft. Proceed with caution and at your own risk.
1. Registry Modification: This method involves making changes to the Windows Registry to disable the CPU check during installation. It requires advanced knowledge of the Registry Editor and the ability to navigate through the system registry. The specific steps for this method may vary depending on the version of Windows 11 you are installing.
2. Modifying Installation Media: Another method is to modify the installation media of Windows 11 to remove or bypass the CPU check. This can be done by extracting the contents of the installation ISO or creating a custom installation media with the necessary modifications. This method requires technical expertise and may void any warranties or support from Microsoft.
3. Third-Party Tools: There may be third-party tools available that claim to bypass the CPU check in Windows 11 installation. These tools should be used with caution, as they may introduce security risks or compatibility issues. It is important to research and verify the credibility of the tool before using it.
Risks and Considerations
Bypassing the CPU check in Windows 11 installation comes with certain risks and considerations. It is crucial to understand these before attempting to bypass the check:
- Compatibility Issues: Bypassing the CPU check may lead to compatibility issues with certain hardware components or drivers. Some features or functionalities of Windows 11 may not work optimally or may not work at all.
- Stability and Performance: Running Windows 11 on unsupported hardware may result in unstable performance, frequent crashes, and system instability. The operating system may not be able to utilize the hardware resources efficiently.
- Security Risks: By bypassing the CPU check, you may expose your device to security vulnerabilities, as the operating system may not receive necessary updates or security patches specifically designed for unsupported hardware.
- Lack of Official Support: Microsoft will not provide technical assistance or support for devices running Windows 11 on unsupported hardware configurations.
Exploring the Risks and Benefits of Bypassing the CPU Check
While bypassing the CPU check in Windows 11 installation may offer the opportunity to install the operating system on unsupported devices, it is important to carefully consider the risks and benefits involved.
Benefits of Bypassing the CPU Check
1. Extending the Lifespan of Older Devices: Bypassing the CPU check allows you to run Windows 11 on older devices that do not meet the official requirements. This can help extend the usability of these devices and make them compatible with the latest features and security updates.
2. Compatibility with Unsupported Processors: If you have a device with an unsupported processor, bypassing the CPU check may enable you to install and use Windows 11 without any major issues. This can be beneficial if you rely on specific software or tools that are only compatible with Windows 11.
3. Testing and Development: Bypassing the CPU check allows developers and tech enthusiasts to experiment with Windows 11 on different hardware configurations. This can facilitate testing, software development, and discovering compatibility issues.
Risks of Bypassing the CPU Check
1. System Instability: Running Windows 11 on unsupported hardware introduces the risk of system instability. This can result in frequent crashes, performance issues, and incompatibility with certain software or hardware components.
2. Security Vulnerabilities: Bypassing the CPU check may expose your device to security vulnerabilities, as the operating system may not receive necessary updates and security patches designed specifically for unsupported hardware. This can compromise the overall security of your system.
3. Lack of Official Support: Microsoft will not provide technical assistance or support for devices running Windows 11 on unsupported hardware configurations. This means you may not receive necessary updates or troubleshooting guidance for any issues that may arise.
It is essential to weigh the risks and benefits before deciding to bypass the CPU check in Windows 11 installation. It is strongly recommended to perform thorough research, backup your data, and seek professional advice if unsure about your device’s compatibility.

How to Install Windows 11 by Bypassing the CPU Check
If you want to install Windows 11 on a computer that doesn’t meet the official system requirements, you may wonder if there is a way to bypass the CPU check. While Microsoft strongly advises against installing Windows 11 on unsupported hardware, there are some methods that enthusiasts have discovered to try and bypass the CPU check. Here are a few possible solutions:
- Using a Registry Hack: Some users have reported success by modifying the Windows Registry to trick the system into thinking that their CPU meets the requirements. Although this method may work, it is not recommended, as it can cause stability and compatibility issues.
- Using Unofficial Tools: There are third-party tools available that claim to bypass the CPU check and allow the installation of Windows 11 on unsupported hardware. However, these tools are not endorsed by Microsoft and can pose security risks, so proceed with caution.
- Opting for Insider Builds: Microsoft offers Windows Insider Program, which provides early access to Windows updates and allows users to install preview builds of Windows 11. While this may not technically bypass the CPU check, it allows you to experience Windows 11 on unsupported hardware.
It is important to note that attempting to bypass the CPU check and installing Windows 11 on unsupported hardware may lead to performance issues, instability, and compatibility problems. It is generally recommended to upgrade your hardware to meet the official system requirements for a smoother Windows 11 experience.
Key Takeaways: «Install Windows 11 Bypass CPU Check»
- Check if your PC meets the minimum system requirements for Windows 11 installation.
- Download the Windows 11 ISO file from a reliable source.
- Create a bootable USB drive using a tool like Rufus.
- Edit the Windows 11 ISO file to bypass the CPU check.
- Install Windows 11 on your PC by booting from the USB drive.
Frequently Asked Questions
Here are some commonly asked questions about bypassing the CPU check during the installation of Windows 11.
1. Can I bypass the CPU check and install Windows 11?
Yes, it is possible to bypass the CPU check and install Windows 11, but it is not recommended. The CPU check is in place to ensure that your system meets the minimum requirements for running Windows 11 smoothly and without any compatibility issues. Bypassing the CPU check can lead to performance issues, system instability, and software incompatibility. It is always best to upgrade your hardware if it does not meet the requirements rather than bypassing the check entirely.
2. How can I check if my CPU is compatible with Windows 11?
To check if your CPU is compatible with Windows 11, you can use the PC Health Check tool provided by Microsoft. This tool will analyze your system’s hardware and software to determine if it meets the minimum requirements for running Windows 11. If your CPU is not compatible, the tool will provide recommendations for hardware upgrades or alternatives.
If you’re more tech-savvy, you can also check the specific CPU requirements for Windows 11 on Microsoft’s website and compare them with the specifications of your CPU. However, using the PC Health Check tool is the easiest and most reliable way to determine compatibility.
3. Are there any risks associated with bypassing the CPU check?
Yes, bypassing the CPU check comes with certain risks. Windows 11 has specific hardware requirements to ensure optimal performance and compatibility. Bypassing the CPU check can result in a system that is not stable, experiences frequent crashes, and may not run some software properly. It can also lead to security vulnerabilities as your hardware may not have the necessary security features required by Windows 11. It is always recommended to meet the hardware requirements before installing Windows 11 to avoid these risks.
4. Are there any workarounds to bypass the CPU check?
While there may be workarounds available to bypass the CPU check during the Windows 11 installation, it is important to note that these methods are not officially supported by Microsoft. These workarounds typically involve modifying system files or using third-party tools, which can be complex and risky. Additionally, bypassing the CPU check can result in an unstable system and software compatibility issues. It is always recommended to upgrade your hardware if it does not meet the requirements instead of trying to bypass the CPU check.
5. What are the consequences of bypassing the CPU check?
If you choose to bypass the CPU check and install Windows 11 on an incompatible system, there can be several consequences. These may include performance problems, frequent crashes and system instability, software incompatibility, and a higher risk of security vulnerabilities due to missing hardware security features. Bypassing the CPU check can also result in future Windows updates not being compatible with your system, leading to further issues and the need for additional workarounds. It is always best to upgrade your hardware to meet the requirements before installing Windows 11.
To conclude, bypassing the CPU check to install Windows 11 is not recommended or supported by Microsoft. It is important to note that the CPU check is in place for valid reasons, including compatibility and performance issues.
Attempting to bypass the CPU check can lead to various problems, such as instability, software conflicts, and potential security vulnerabilities. It is always best to adhere to the system requirements specified by Microsoft to ensure a smooth and secure operating system experience.