
When Windows Boot Manager stops working, it can be frustrating. But don’t fret; fixing it is often straightforward. This guide will walk you through the steps to repair Windows Boot Manager on Windows 10 using easy-to-follow instructions. You’ll learn how to use Windows installation media, access Command Prompt, and run essential commands. By the end of this tutorial, your system should boot up normally again.
Step-by-step tutorial on Fixing Windows Boot Manager Windows 10
In this section, you’ll find a detailed and comprehensive guide to fixing Windows Boot Manager issues. Follow these steps carefully, and you should be back up and running in no time.
Step 1: Create Windows Installation Media
First, create a Windows installation media using a USB drive or DVD.
You’ll need another working computer to download the Windows 10 installation tool and create the media. Make sure your USB drive has at least 8GB of free space. This media will help you access repair tools.
Step 2: Boot from Installation Media
Next, insert the installation media into your computer and restart it.
You may need to change the boot order in your BIOS settings to boot from the USB or DVD. Press the appropriate key (usually F2, F12, ESC, or DEL) to enter the BIOS menu. Save your changes and restart.
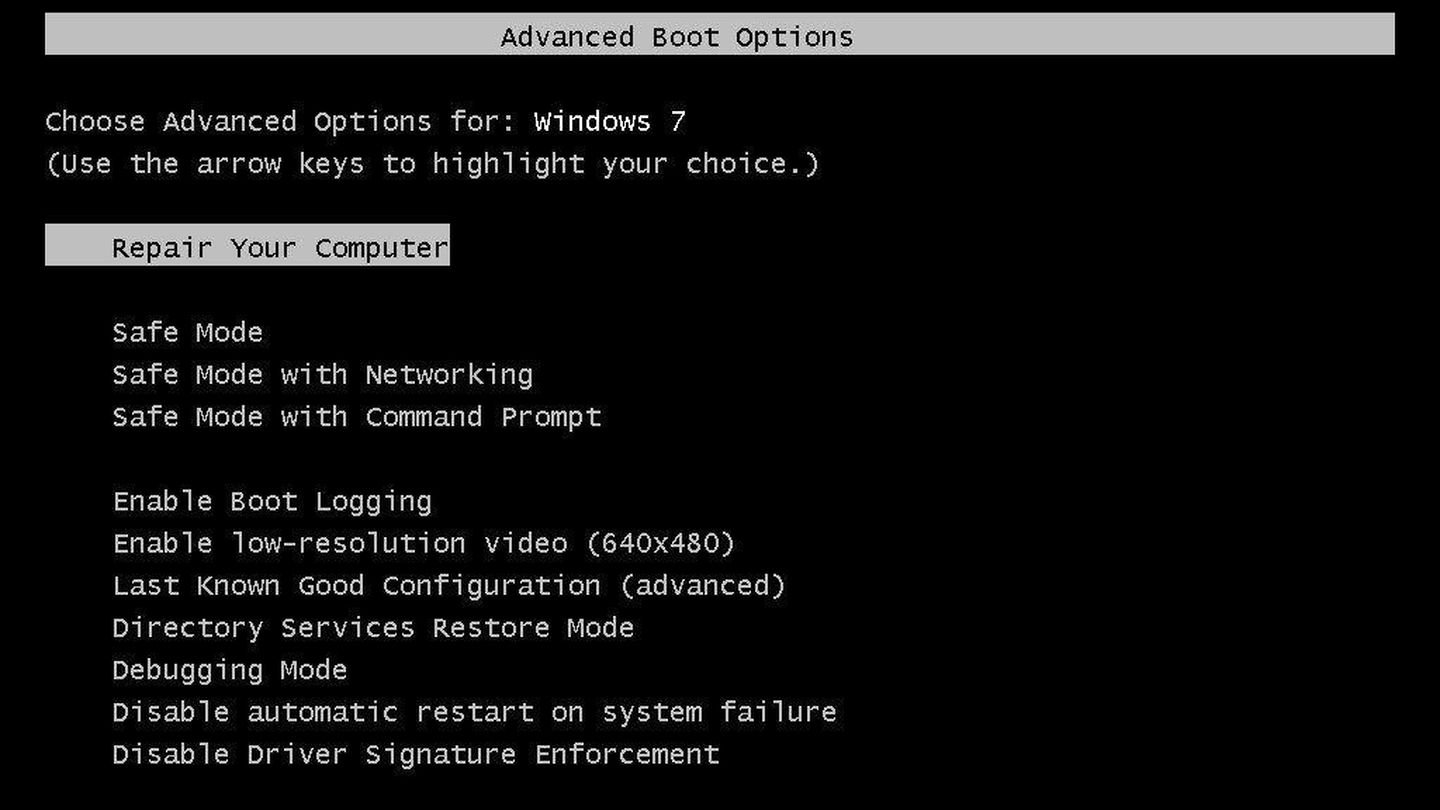
Step 3: Access Repair Options
Once the system boots from the media, choose your language preferences and click “Next.”
Click the “Repair your computer” option on the bottom left of the screen. This will take you to the Windows Recovery Environment (WinRE), where you’ll find useful troubleshooting tools.
Step 4: Open Command Prompt
In the WinRE menu, select “Troubleshoot,” then “Advanced options,” and finally “Command Prompt.”
The Command Prompt is a powerful tool for fixing boot issues. It allows you to run specific commands that can repair the boot manager.
Step 5: Run Bootrec Commands
Type and execute the following commands one by one: bootrec /fixmbr, bootrec /fixboot, bootrec /scanos, and bootrec /rebuildbcd.
Each command serves a unique purpose. bootrec /fixmbr fixes the master boot record, bootrec /fixboot writes a new boot sector, bootrec /scanos scans for Windows installations, and bootrec /rebuildbcd rebuilds the boot configuration data.
Step 6: Restart Your Computer
Type exit to close Command Prompt and restart your computer.
Remove the installation media before restarting. Your computer should now boot up normally if the Boot Manager issue has been resolved.
After completing these steps, your computer should boot into Windows 10 without any problems. If issues persist, further troubleshooting may be needed.
Tips for Fixing Windows Boot Manager Windows 10
- Backup Important Data: Before you begin, ensure all important data is backed up to avoid data loss.
- Check for Hardware Issues: Sometimes, boot problems are caused by hardware failures.
- Use Safe Mode: Try booting in Safe Mode to diagnose and fix issues without full system load.
- Keep Installation Media Handy: Always have a Windows installation media for emergencies.
- Update BIOS/UEFI: Ensure your BIOS or UEFI firmware is up to date.
Frequently Asked Questions
How do I know if the boot manager is the problem?
If your computer shows errors like “BOOTMGR is missing” or fails to find a bootable device, the boot manager might be the issue.
Can I fix the boot manager without installation media?
It’s challenging but possible using built-in recovery options, though installation media is recommended.
What if the bootrec commands don’t work?
Try additional commands like chkdsk /r or consult a professional for hardware diagnostics.
Will this process delete my files?
No, these commands only fix the boot manager, not your files.
How can I prevent future boot manager issues?
Keep your system updated, regularly back up data, and avoid sudden shutdowns.
Summary of Steps
- Create Windows Installation Media.
- Boot from Installation Media.
- Access Repair Options.
- Open Command Prompt.
- Run Bootrec Commands.
- Restart Your Computer.
Conclusion
Fixing Windows Boot Manager Windows 10 doesn’t have to be daunting. With the right tools and a bit of patience, you can resolve boot issues and get back to using your computer effortlessly. Always remember the importance of regular backups and keeping your system updated to prevent such issues in the future. If you’re ever unsure or run into problems beyond your skill set, don’t hesitate to seek professional help. For further reading, consider looking into more advanced troubleshooting techniques or forums for community support.
Matt Jacobs has been working as an IT consultant for small businesses since receiving his Master’s degree in 2003. While he still does some consulting work, his primary focus now is on creating technology support content for SupportYourTech.com.
His work can be found on many websites and focuses on topics such as Microsoft Office, Apple devices, Android devices, Photoshop, and more.
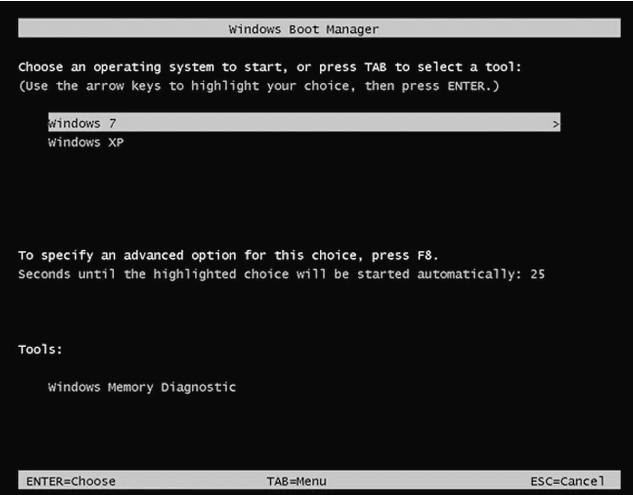
Help! Boot Manager Keeps Popping Up
«Hi, my boot manager keeps popping up every time I start my laptop. Is there any way to make it go back to normal so that it can just start automatically without going into the boot manager screen?»

What Is Windows Boot Manager (BOOTMGR Definition)
Windows Boot Manager (BOOTMGR) is a tool for booting the operating system. When our computer has multiple operating systems installed, it calls up the Boot Manager in Windows 10/8/7. When the computer starts, you can choose the system you want to start.
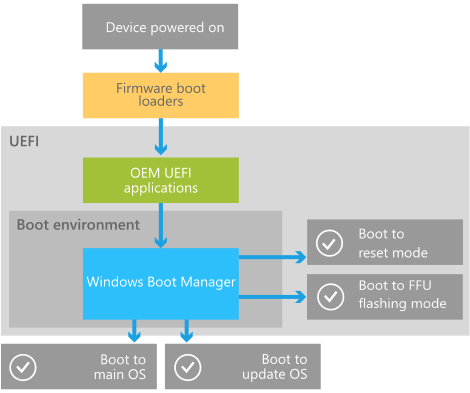
Inside the boot environment, individual boot applications started by the Boot Manager provide functionality for all customer-facing scenarios before the device boots. The following picture illustrates the process at a high level. (The picture is from Microsoft)
As mentioned at the beginning, Windows 10 always enters the Windows Boot Manager interface when booting. What should you do to fix it? You cannot remove the Windows Boot Manager. However, you can reduce the time that it waits for you to answer. Thus, you can use Command-Line to enable or disable Windows Boot Manager or use the System Configuration tool to modify the default behavior.
Solution 1. Enable or Disable Windows Boot Manager with CMD
You must run as administrator to disable or enable Windows Boot Manager with command prompt. Follow the steps below to enable or disable Windows Boot Manager.
Step 1. Next to the Windows Start menu, in the «Search Windows» box, type cmd.
Step 2. On the search result, right-click on the «Command Prompt» and select «Run as administrator».
Step 3. Once the command prompt pops up, type in the following command and press «Enter» after you type each command.
- bcdedit /set {bootmgr} displaybootmenu yes
- bcdedit /set {bootmgr} timeout 30.
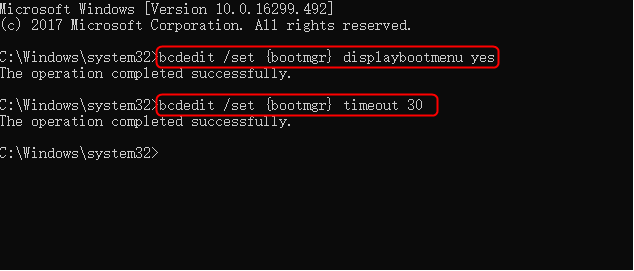
Timeout determines how long the boot manager is displayed. You can specify the timeout value in seconds according to your requirement.
Step 4. If you intend to disable Windows Boot Manager, type bcdedit / set {bootmgr} timeout 0 and hit «Enter».

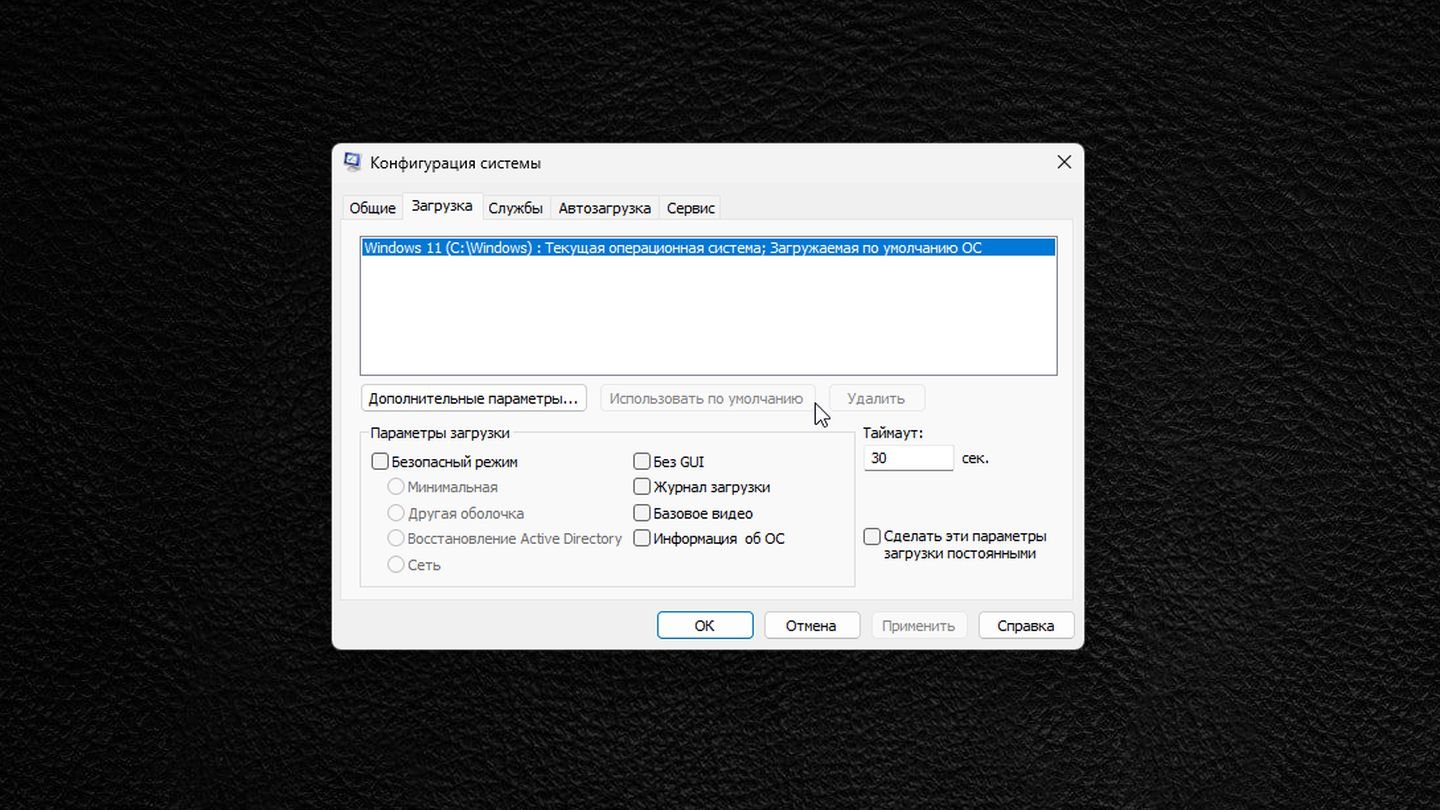
Solution 2. Modify Windows Boot Manager with System Configuration
If you are not familiar with CMD, you can also open System Configuration to modify BOOTMGR. Here are the steps:
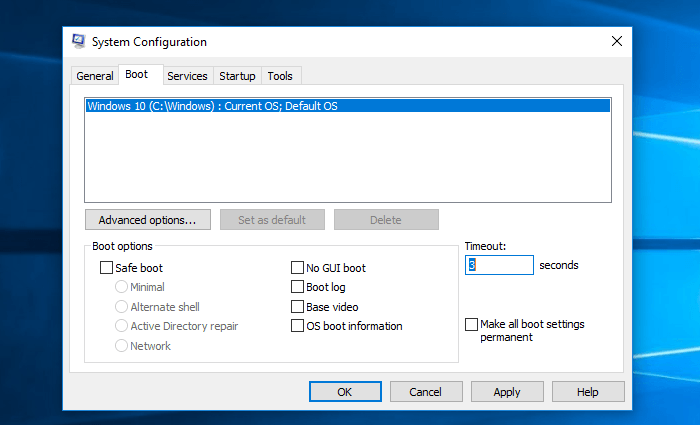
Step 1. Press Windows + R key, input msconfig, and hit «Enter» to open the System Configuration utility.

Step 2. Select the «Boot» tab on the System Configuration window that opens.
Step 3. Adjust the Timeout time to the lowest possible time, in seconds, which is probably 3.
Bonus Tip — How to Safeguard Your Data in Windows 10/8/7
To avoid extra data loss problems during the process, you are advised to protect your data first. You can back up files with file backup software. If the data have gone forever, you can run EaseUS EaseUS Data Recovery Wizard to get them back. EaseUS Data Recovery Wizard recovers the essential data from any disaster.
Restore data with EaseUS data recovery software.
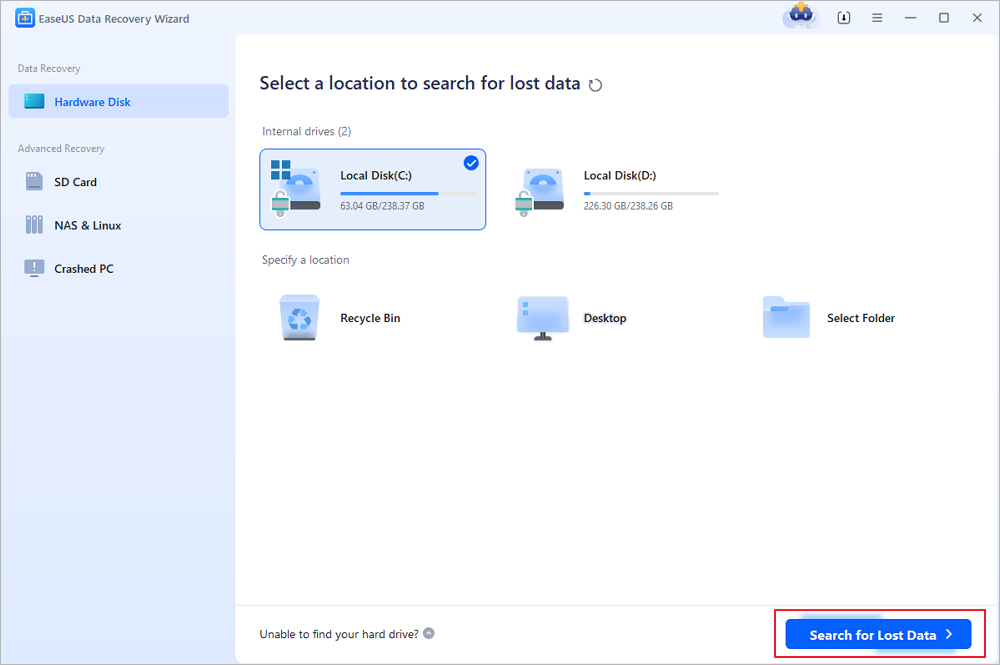
Step 1. Select a location and start scanning
Launch EaseUS Data Recovery Wizard, hover on the partition/drive where the deleted files were stored. Click «Search for Lost Data» to find lost files.
Step 2. Select the files you want to recover
When the scanning has finished, select the deleted files you want to recover. You can click on the filter to display only the file types you want. If you remember the file name, you can also search in the search box, which is the fastest way to find the target file.

Step 3. Preview and recover deleted files
Preview the recoverable files. Then, select files you want to restore and click «Recover» to store the files at a new storage locations instead of the disk where the data was previously lost. You can choose a cloud storage, such as OneDrive, Google Drive, etc., and click «Save» to save your recovered files.

Conclusion
If you encounter the Windows Boot Manager interface when booting up, you don’t have to worry about it. The most likely reason is that the old system residual files are not deleted. You can refer to the above methods to delete them and the issue will be repaired.
Многие из наc сталкиваются с Windows Boot Manager, но не понимают, что это такое. Иногда данное меню появляется при загрузке ноутбука. Что делать в таких ситуациях? Рассказываем в нашем материале.
Источник: Super User / Boot Manager
Windows Boot Manager (bootmgr) — это системный компонент операционной системы Windows, который отвечает за загрузку операционной системы. Он был введен в Windows Vista и продолжает использоваться в последующих версиях, включая Windows 7, 8, 10 и 11. Boot Manager является частью архитектуры загрузки системы и выполняет несколько ключевых функций:
- Управление процессом загрузки — Windows Boot Manager определяет, какую операционную систему запускать, и передает управление загрузке ядра (Windows Loader, winload.exe). В случае, если на компьютере установлено несколько операционных систем, Boot Manager предоставляет меню для выбора, какую из них загрузить;
- Загрузка загрузочного конфигурационного файла (BCD) — Boot Manager загружает и интерпретирует данные из Boot Configuration Data (BCD) — это хранилище, в котором содержатся параметры и опции загрузки для установленных операционных систем;
- Работа с многозагрузочными конфигурациями — Boot Manager поддерживает загрузку нескольких операционных систем, позволяя пользователю выбирать среди них при старте компьютера.
Сравнение с NTLDR
Источник: Wondershare Recover It / NTLDR
NTLDR (NT Loader) — это предшественник Windows Boot Manager, который использовался в более ранних версиях Windows, таких как Windows NT, 2000 и XP. Хотя NTLDR и Boot Manager выполняют схожие функции, они существенно различаются по архитектуре, функциональности и возможностям.
|
Boot Manager |
NTLDR |
|
|
Архитектура |
Имеет модульную архитектуру и разделяет функции между несколькими компонентами, такими как Boot Manager (bootmgr) и Windows Loader (winload.exe). Это позволяет более гибко управлять процессом загрузки и расширяет возможности загрузчика |
Был монолитным загрузчиком, который управлял загрузкой операционной системы и сразу загружал ядро Windows, а также мог загружать более старые версии DOS с использованием файла boot.ini. |
|
Поддержка современных технологий |
Поддерживает как MBR, так и GPT (GUID Partition Table), а также работает в средах UEFI, что делает его более универсальным и современным инструментом для управления загрузкой операционной системы. |
Был ограничен по своим возможностям и не поддерживал современные технологии, такие как UEFI, и новые файловые системы. Он работал только с MBR (Master Boot Record) и не мог эффективно взаимодействовать с новыми аппаратными стандартами. |
|
Конфигурация и управление |
Boot Manager использует более сложную и мощную систему конфигурации на базе BCD (Boot Configuration Data), которая предоставляет расширенные возможности для настройки и управления процессом загрузки, включая поддержку различных операционных систем и конфигураций оборудования. |
Конфигурация загрузки в NTLDR осуществлялась через простой текстовый файл boot.ini, который ограничивал возможности пользователя в настройке загрузки и усложнял управление многозагрузочными системами. |
|
Графический интерфейс |
Предлагает более удобный и понятный графический интерфейс для выбора операционной системы, что упрощает взаимодействие пользователя с системой. |
Предоставлял текстовое меню для выбора операционной системы при многозагрузочной конфигурации, что было функционально, но ограничено в возможностях. |
Как работает Windows Boot Manager
Работа начинается сразу после включения компьютера и завершает свои действия перед запуском ядра операционной системы.
Этапы загрузки
Процесс загрузки с использованием Windows Boot Manager можно разделить на несколько этапов:
- Инициализация BIOS/UEFI. Когда компьютер включается, первичный процесс загрузки начинается с BIOS (Basic Input/Output System) или UEFI (Unified Extensible Firmware Interface). Эта программа загружается первой и проверяет основные компоненты системы (процессор, память, устройства ввода-вывода). BIOS или UEFI определяет, с какого устройства нужно загрузить операционную систему (жесткий диск, SSD, USB-накопитель и так далее);
- Загрузка Windows Boot Manager. После завершения работы BIOS/UEFI управление передается Windows Boot Manager, который находится на системном разделе жесткого диска (обычно этот раздел скрыт от пользователя). Boot Manager загружает и читает файл конфигурации BCD (Boot Configuration Data), который содержит информацию о доступных операционных системах и их параметрах загрузки;
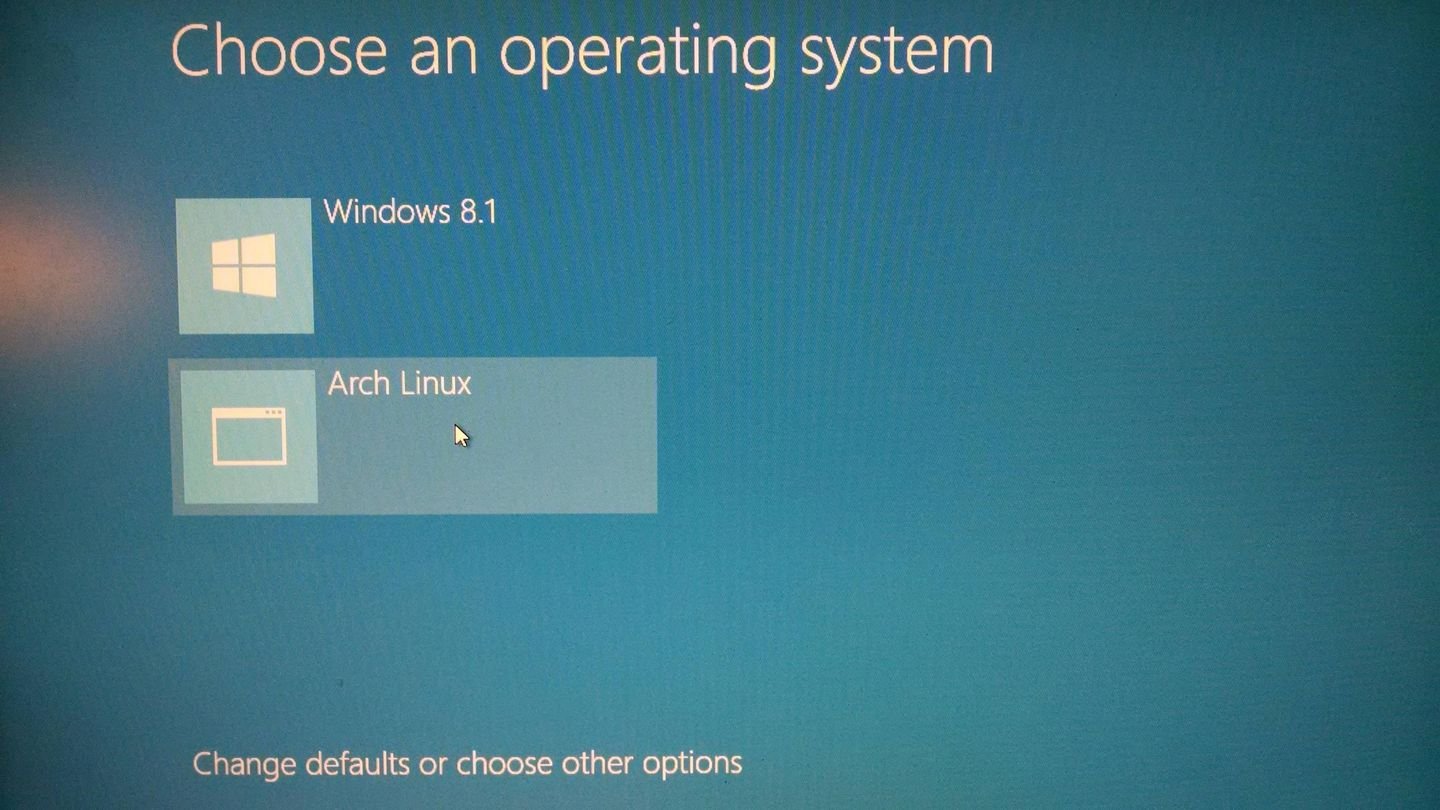
- Меню выбора операционной системы. Если на компьютере установлено несколько операционных систем, Windows Boot Manager отображает меню выбора, позволяя пользователю выбрать, какую операционную систему загрузить. В случае отсутствия альтернативных ОС Boot Manager автоматически загружает единственную доступную систему;
- Передача управления Windows Loader. После выбора или автоматической загрузки операционной системы Windows Boot Manager передает управление Windows Loader (winload.exe). Этот компонент отвечает за загрузку ядра операционной системы и всех необходимых драйверов для начала работы системы;
- Загрузка ядра операционной системы. Windows Loader загружает ядро Windows, инициализирует системные драйверы и запускает системные процессы, такие как управление памятью и взаимодействие с оборудованием. После успешной загрузки ядра система переходит в стадию инициализации пользовательских процессов и служб.
Конфигурационные файлы
Windows Boot Manager использует несколько конфигурационных файлов и данных для управления процессом загрузки:
- BCD (Boot Configuration Data) — является центральным хранилищем конфигурационных данных, которые используются Windows Boot Manager. В нем содержатся записи о каждой установленной операционной системе, а также параметры загрузки, такие как путь к загрузчику ОС, режимы загрузки (обычный, безопасный или другой), а также параметры, влияющие на работу оборудования;
- winload.exe — исполняемый файл, загружаемый Windows Boot Manager после выбора операционной системы. Он отвечает за загрузку ядра и начальных драйверов, необходимых для запуска ОС;
- bootmgr — является основным исполняемым файлом Windows Boot Manager. Он хранится в корне системного раздела и загружается BIOS/UEFI для инициализации процесса загрузки.
Взаимодействие с BIOS/UEFI
Источник: Xataka Windows / BIOS и UEFI
BIOS и UEFI — это программные интерфейсы, которые находятся на границе между аппаратным обеспечением компьютера и операционной системой. Их основная задача — инициализировать и тестировать оборудование перед запуском операционной системы, а также передать управление загрузчику (в данном случае Windows Boot Manager).
BIOS работает в режиме реального времени и использует MBR (Master Boot Record) для управления загрузкой. В случае с BIOS Windows Boot Manager хранится на системном разделе, и управление передается через указание на загрузочный сектор диска, который запускает bootmgr.
UEFI является более современным интерфейсом и поддерживает работу с GPT (GUID Partition Table), что позволяет управлять загрузкой более эффективно и использовать объемы дисков, превышающие 2 ТБ. В UEFI Windows Boot Manager находится в разделе EFI, и управление передается через специальный загрузочный менеджер UEFI, который запускает bootmgfw.efi (аналог bootmgr в среде UEFI).
BIOS и UEFI могут работать в разных режимах. Для Windows это может быть либо Legacy BIOS, либо UEFI. При использовании UEFI возможна работа в режимах Secure Boot, который предотвращает загрузку неподписанного кода, тем самым защищая систему от вредоносных программ.
Можно ли отключить Windows Boot Manager?

Источник: Make Use Of / Windows Logo
Технически, Windows Boot Manager можно отключить, но это не рекомендуется для стабильной работы системы. Boot Manager является ключевым компонентом процесса загрузки Windows и управляет выбором операционной системы, настройками конфигурации загрузки и взаимодействием с ядром системы.
Отключение Boot Manager может привести к ряду проблем, таких как невозможность загрузить операционную систему, нарушение конфигураций многозагрузочных систем или повреждение данных загрузки.
Почему не рекомендуется отключать Boot Manager
- Отключение Windows Boot Manager может сделать систему нестабильной или даже нерабочей. Этот компонент управляет процессом загрузки и обеспечивает правильную передачу управления ядру ОС. Без него Windows не сможет корректно загружаться;
- Если на вашем компьютере установлено несколько операционных систем (например, Windows и Linux), отключение Boot Manager приведет к потере возможности выбирать между ними при загрузке. Это может усложнить процесс управления многозагрузочными конфигурациями;
- В современных системах с UEFI и Secure Boot отключение Boot Manager может привести к нарушению работы системы безопасности, а также вызвать ошибки при загрузке ОС;
- Boot Manager опирается на файл конфигурации BCD для управления параметрами загрузки, такими как выбор операционной системы или безопасный режим. Без Boot Manager система не сможет корректно обрабатывать эти параметры.
Временное отключение
Если необходимо временно отключить или скрыть меню Windows Boot Manager, это можно сделать путем изменения настроек. Однако важно понимать, что такое отключение является временной мерой, и система будет по-прежнему использовать Boot Manager для загрузки.
Можно настроить время отображения меню выбора операционной системы. Для этого нужно изменить тайм-аут в файле BCD с помощью утилиты bcdedit. Например:
- bashCopy codebcdedit /timeout 0
Это отключит отображение меню выбора ОС, и система будет загружаться автоматически без задержки.
Если на компьютере установлено несколько операционных систем, можно выбрать одну из них по умолчанию и автоматически загружать её, не отображая меню выбора. Это можно сделать через настройки системы:
- Нажмите Win + R, введите msconfig.

Источник: CQ / Windows 11
- В разделе «Загрузка» выберите нужную ОС и установите ее по умолчанию.
Источник: CQ / Windows 11
- Установите таймер загрузки на 0 секунд.
Альтернативные варианты загрузки одной ОС
В системах с UEFI вы можете настроить загрузку ОС напрямую через интерфейс UEFI, выбрав в меню загрузки нужный диск или раздел, содержащий операционную систему. Это позволяет загружаться в обход некоторых функций Boot Manager, но в случае сбоя все равно потребуется восстановить Boot Manager.
Существуют сторонние загрузчики, такие как GRUB (обычно используется в системах Linux), которые могут управлять процессом загрузки на уровне выше, чем Boot Manager. Однако использование таких загрузчиков требует знаний и конфигурации и может привести к дополнительным сложностям в системах с Windows.
Заглавное фото: HP
When you use the dual operating system on your Windows, every time the Windows Boot Manager screen comes up asking to choose the operating system to start. This is a great way when using dual boot but if you are using only the OS it slows down the boot process. In this tutorial, we will explain what Windows Boot Manager is and how you can enable or disable the Windows Boot Manager screen in Windows 10.
What is Windows Boot Manager?
Windows Boot Manager commonly known as BOOTMGR is a small piece of software that loads from volume boot code. It is essential for booting Windows. Furthermore, the Windows Boot Manager is hidden and located in the root directory. Winload.exe is executed by BOOTMGR essential for the Windows boot process.
Usually, the disk partition that doesn’t have a drive letter and is often labeled as System Reserved has BOOTMGR. If you don’t have a system reserved partition, BOOTMGR will be located on the C drive.
BootMGR is missing is the most common error faced by Windows users. To resolve it, you can see that our article on BOOTMGR is missing.
Now that we know what Windows Boot Manager is, let’s move further to know why we need to disable it and how to disable the Windows Boot Manager.
The Need to Disable Windows Boot Manager
If you are using dual OS, Windows Boot Manager gives an option to choose the operating system. However, when there’s only one OS this slows down the boot process. Therefore, to reduce the wait time we should disable the Windows Boot Manager.
However, the Windows Boot Manager cannot be completely removed but we can disable it. All this can be done via the System Configuration (msconfig.exe) tool. Here’s how to do this:
How to Enable/Disable Windows Boot Manager on Windows 10?
To reduce wait time and to speed up the boot process on Windows 10 use the given methods to disable Windows 10 boot manager.
Tip: Be careful while using the steps explained below any unnecessary change made might lead to a mess.
Method 1: Use Command Prompt
Step 1: Type cmd in the Cortana search box, right-click Command Prompt and select Run as administrator.
Step 2: Enter the following commands one by one in the command prompt window and press the Enter key after entering each command.
- bcdedit /set {bootmgr} displaybootmenu yes
- bcdedit /set {bootmgr} timeout 30
Tip: Here, the timeout followed by the number tells for how long the boot manager will be displayed. The timeout value is in seconds.

Step 3: To disable Windows Boot Manager, enter bcdedit /set {bootmgr} timeout 0 and press Enter.

Alternatively, to disable BOOTMGR you can use bcdedit /set {bootmgr} displaybootmenu no command and press Enter.
Remember: If you use the above command you cannot use below Method 2
Method 2: Change System Properties
Editing system properties will help enable or disable the Windows Boot Manager.
Step 1: Press Windows + R to open the Run dialog box.
Step 2: Here, type sysdm.cpl and click OK.

Step 3: This will open the System Properties window. Here select Advanced option > Settings under Startup and Recovery option.

Step 4: Checkmark the option Time to display list of operating systems box and set the time value. Click OK to save the changes.

Step 5: To disable BOOTMGR, uncheck Time to display the list of operating systems box or edit the timer to 0 and click OK.
Using these simple steps, you can easily enable or disable Windows Boot Manager on Windows 10. In addition to this, if you are facing a problem with permissions to allow a dual operating system to read further.
Usually, when the secure boot option is enabled you are not allowed to boot Windows when more than 1 OS is installed. Therefore, to allow dual boot you’ll need to disable secure boot.
What is a Secure boot?
Secure boot is a feature of the Unified Extensible Firmware Interface (UEFI), a replacement for BIOS. It is a security gate with a more advanced interface and enough technical options. Secure boot analyses codes before they are executing if a code has genuine digital signatures, Secure Boot will let it pass. However, if the digital signatures are unrecognized it will be blocked by Secure Boot from running and the system will require a restart.
Therefore, to use a dual operating system sometimes you might need to disable Secure Boot. However, keep in mind we do not recommend disabling Secure Boot as it helps keep you safe.
Disabling Secure Boot will allow you to perform the following operations:
- Booting Windows from external device USB, etc.
- Booting Windows using password recovery tools
Steps to disable Secure Boot on Windows 10
1. Type Advanced Startup in Cortana search bar. Select Change Advanced Startup options.
2. Now under the Settings window click on Recovery option in the left pane > Restart now under Advanced startup.

3. This will restart your Windows 10 in an advanced mode where you will get various advanced options.
Click Troubleshoot.4. Next, click on the Advanced options.5. Here, select UEFI Firmware Settings. This will restart your system click on restart on the next screen.6. Your system will now restart in BIOS. Here click on the security tab under BIOS settings.
7. Choose the Secure Boot option using the up and down arrow key.
8. Next, use the arrow keys to change Secure Boot from Enabled to Disabled.
9. Press enter, save the settings and exit.
Wasn’t it simple? Do share your feedback in the comments box. If you find this article helpful, share it with others and follow us on the social network to stay updated with the latest articles, tutorials, and tech news.
Frequently Asked Questions –
Q1. What is Windows Boot Manager?
Windows Boot Manager is a legitimate software provided by Microsoft. It is a UEFI based small in size but the crucial piece of software to set up the boot environment.
Q2. How do I get to Windows Boot Manager?
To access Windows Boot Manager, you need to head to the Start Menu> Settings > Update & Security> Recovery. Under Advanced Startup, click on the Restart button and it will reboot your PC. That’s where you see the Windows Boot Manager in action to help your device boot up.
Q3. Do I need Windows Boot Manager?
Yes, you need Windows Boot Manager on your Windows PC to help you boot up the device properly. Do not remove it from the computer or else the computer can malfunction or fail to boot.
Q4. What happens if I delete Windows Boot Manager?
If you deleted Windows Boot Manager from your computer, it will not function properly and also the Windows version logo will not appear on the screen. If you have more than one drive on your device and you want to stop seeing the Windows Boot Manager menu, you can remove a partition.
Enable or Disable Windows Boot Manager on Windows 11/10
The Windows Boot Manager is an integral component of the Windows operating system that manages the booting process. It is responsible for loading the operating system and providing users with a choice of operating systems in cases where multiple systems are installed. Understanding how to enable or disable Windows Boot Manager can be crucial for troubleshooting and managing boot options, especially for users who encounter issues during startup or who want to customize their boot sequences. In this article, we will explore what the Windows Boot Manager does, the steps to enable or disable it, and the potential implications of these actions.
Understanding Windows Boot Manager
Before we delve into the enabling or disabling process, it’s important to understand what Windows Boot Manager is and how it works. Windows Boot Manager is a part of the Windows operating system that loads and runs the OS itself. It initializes the operating system environment and determines which installed OS to load if multiple operating systems are present on the machine.
When you turn on your computer, the BIOS or UEFI firmware first starts and then loads the boot manager from the disk. The boot manager presents a boot menu if multiple configurations are available, allowing users to select which OS to boot. In single-OS setups, it typically loads Windows directly without presenting a menu.
Reasons to Enable or Disable Windows Boot Manager
There are several reasons one might want to enable or disable the Windows Boot Manager:
- Troubleshooting Boot Issues: If your operating system fails to start correctly, disabling and re-enabling the Boot Manager can sometimes rectify the issue.
- Dual-Boot Configurations: Users with multiple operating systems on the same machine might need to manage Boot Manager settings to choose which OS to load.
- Customizing Startup Behavior: Users might want to set a specific OS as the default, which entails enabling or disabling Boot Manager options.
- Performance Optimization: In some rare instances, users may perceive a performance improvement by altering boot settings.
Prerequisites
Before modifying boot settings, it’s crucial to ensure you have administrative privileges on your Windows machine. Furthermore, you should back up your important files to prevent data loss in case something goes wrong during the process.
Enabling Windows Boot Manager
If Windows Boot Manager is disabled, you may need to enable it to regain control over your boot settings. Below are steps to enable it:
Method 1: Using Command Prompt
-
Open Command Prompt:
- Press
Win + Xand select Windows Terminal (Admin) or Command Prompt (Admin).
- Press
-
Run the Command:
- Type the following command and press Enter:
bcdedit /set {bootmgr} path EFIMicrosoftBootbootmgfw.efi - This command sets the Boot Manager path, enabling it as the default boot manager.
- Type the following command and press Enter:
-
Reboot Your Machine:
- After running the command, restart your computer. Windows Boot Manager should now be active.
Method 2: Using Windows Settings
-
Open Settings:
- Press
Win + Ito open the Settings.
- Press
-
Navigate to Update & Security:
- Go to Update & Security and then click on Recovery.
-
Advanced Startup:
- Click on Restart now under Advanced startup. Your PC will restart and bring you to the Choose an option menu.
-
Troubleshoot:
- Select Troubleshoot, then Advanced options, and click on UEFI Firmware Settings.
- Next, click on Restart to enter the UEFI settings.
-
Enable Boot Options:
- Once in the UEFI settings, locate the Boot tab and check for an option related to enabling Windows Boot Manager.
- Save changes and exit.
-
Restart:
- Allow your system to boot, at which point Boot Manager should be enabled.
Disabling Windows Boot Manager
If you need to disable Windows Boot Manager, either for troubleshooting or specific configurations, follow the steps below:
Method 1: Using Command Prompt
-
Open Command Prompt:
- Press
Win + Xand select Windows Terminal (Admin) or Command Prompt (Admin).
- Press
-
Run the Command:
- To disable Boot Manager, enter the command:
bcdedit /set {bootmgr} path EFIBootbootmgfw.efi - This command sets a different boot path that can effectively disable the Windows Boot Manager.
- To disable Boot Manager, enter the command:
-
Reboot:
- Restart your computer to apply the changes.
Method 2: Through System Configuration (msconfig)
-
Open Run Dialog:
- Press
Win + Rto open the Run dialog.
- Press
-
Type msconfig:
- Enter
msconfigand hit Enter.
- Enter
-
Boot Tab:
- In the System Configuration window, navigate to the Boot tab.
-
Modify Boot Settings:
- Here you can disable other boot options if they exist. Make sure to set your primary OS accordingly.
- Uncheck Safe boot if it is checked, and adjust any other settings as required.
-
Apply and Restart:
- Click Apply and then OK. Restart your PC to enforce these changes.
Important Considerations
While enabling and disabling Windows Boot Manager can be an effective way to troubleshoot issues or configure your operating system preferences, there are several points that users should keep in mind:
-
Backup Important Data: Any changes to the boot configuration carry the potential risk of making your system unbootable. Always back up your important data before making such changes.
-
Dual-Boot Systems: If you are using a dual-boot configuration, simply disabling the Boot Manager may render one of the operating systems inaccessible. A thorough understanding of which operating systems are installed and how they interact with Boot Manager is crucial.
-
System Stability: The Boot Manager plays a critical role in the stability of your OS. Disabling it improperly may lead to boot failures or system crashes.
-
Firmware Settings: In some cases, accessing your firmware settings (BIOS or UEFI) may be necessary for further boot configurations.
-
Restoring Default Settings: If you encounter boot issues after altering Boot Manager settings, it’s advisable to restore settings to their defaults. You can typically do this from the UEFI/BIOS settings menu.
Common Issues and Troubleshooting
In the course of enabling or disabling the Boot Manager, users may encounter several common issues. Below are some potential problems and their solutions:
-
Inability to Boot into Windows:
- If the system fails to boot after altering Boot Manager settings, you may need to use a Windows installation media to access recovery options and restore default configurations.
-
Missing Operating System Options:
- If you cannot see your operating system in the Boot Manager menu, use the bcdedit tool to ensure all operating systems are listed correctly in the Boot Configuration Data.
-
System Not Restarting Properly:
- Restart your computer in safe mode to determine if drivers or software are causing the issue. You can do this by accessing the Advanced Startup Options.
-
Error Messages:
- Any error messages during boot may provide specific information about what went wrong. Make note of these and search for them online or in Microsoft’s documentation for tailored solutions.
-
Accessing Recovery Options:
- In cases where direct booting isn’t possible, use installation media or recovery drives to access repair tools, which may restore your Boot Manager settings.
Advanced Configuration
For advanced users looking to customize their boot configurations, there are several options available:
-
Boot Order: Modify the boot order in the BIOS/UEFI to prioritize specific drives or operating systems.
-
Timeout Settings: Use
bcdeditto adjust the timeout for how long the Boot Manager should wait before booting the default OS. -
Custom Boot Menu: Customize the boot menu by adding, modifying, or removing entries using command-line utilities or third-party software.
-
Creating Bootable USB Drives: Consider creating bootable USB drives to troubleshoot boot problems more efficiently.
-
Using Third-Party Boot Managers: For those who desire features beyond what Windows Boot Manager offers, there are third-party boot managers available that provide more extensive configurations.
Conclusion
The ability to enable or disable Windows Boot Manager on Windows 11 or 10 offers users a valuable tool in managing their operating systems, particularly for troubleshooting and custom configurations. Whether you are troubleshooting startup issues, configuring dual-boot systems, or simply managing your machine’s boot settings, understanding how to work with the Boot Manager is essential for a smooth computing experience.
By following the detailed steps outlined in this article, users can confidently navigate the complexities of the Windows Boot Manager, ensuring that their system functions optimally and meets their needs. Remember to always back up your data and proceed with caution when making changes to boot settings, as the ramifications can significantly impact system functionality.