
Certain bugs in your Windows OS affect some hardware and software components on your device, causing a Blue Screen of Death (BSoD) error. These bugs need to be fixed and removed. One such error caused due to an issue with the device driver is the BUGCODE_USB_DRIVER error. If you have been avoiding a Windows update, it’s time to get update it right away. This should ideally resolve the problem. But what to do if there’s some other underlying issue causing this error?
This article will tread through different solutions to this issue and help you overcome the problem without any need for expert assistance.
What causes the BUGCODE_USB_DRIVER error?
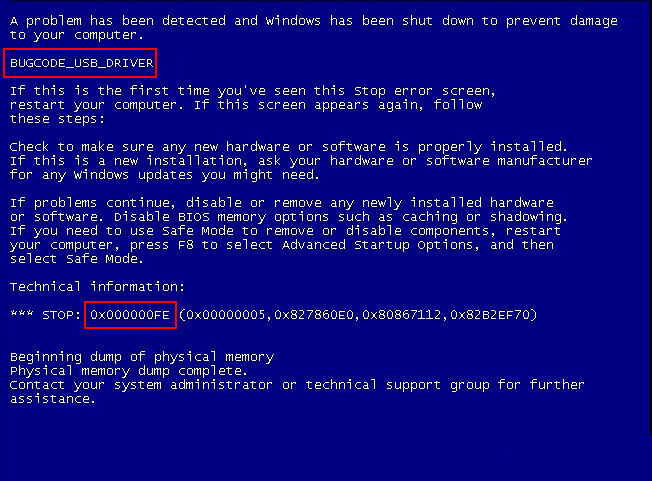
The BUGCODE_USB_DRIVER error is one of the many errors that cause BSOD on your system. The screen goes blue, abruptly killing all the current programs running on your PC.
This error is predominantly caused due to installation of a corrupt USB device driver or a damaged USB device connected to your Windows 10 PC. If not resolved on time, this error may also cause severe data loss from your PC. You can easily identify this error if your screen turns blue, your system automatically restarts, and the following error message appears on your Windows 10 PC:
The sudden BSoD further causes loss of any unsaved data and corruption in existing data. While the solutions discussed below will help you resolve the BUGCODE_USB_DRIVER BSOD error, you can also use Stellar Data Recovery Professional for Windows to get back any lost, deleted, or corrupt data.
How to solve the BUGCODE_USB_DRIVER error on Windows 10?
There are certain easy DIY fixes to counter the USB driver error. Let’s discuss each one of them in detail below.
Solution 1: Update your Windows 10 to the latest version
You might be facing BSoD caused by the BUGCODE_USB_DRIVER error due to an outdated version of Windows 10. You need to check for updates and install them to fix the error. Here’s how to do it.
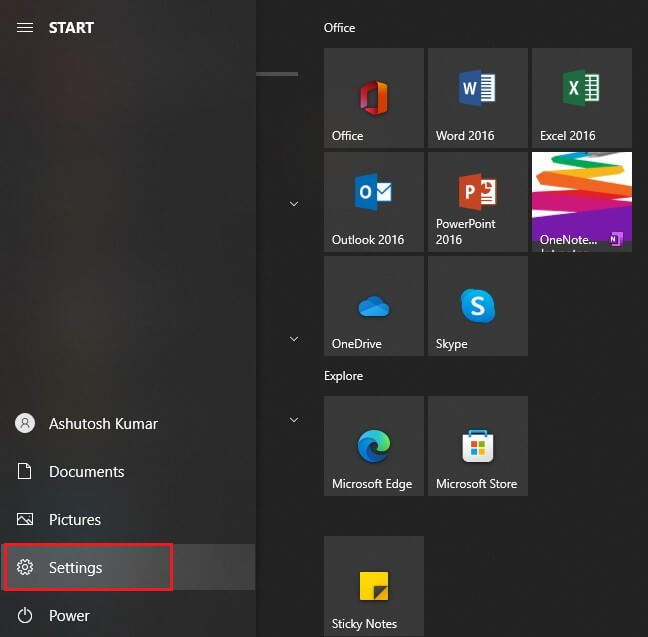
Step 1: Click the Windows Start button and select Settings.
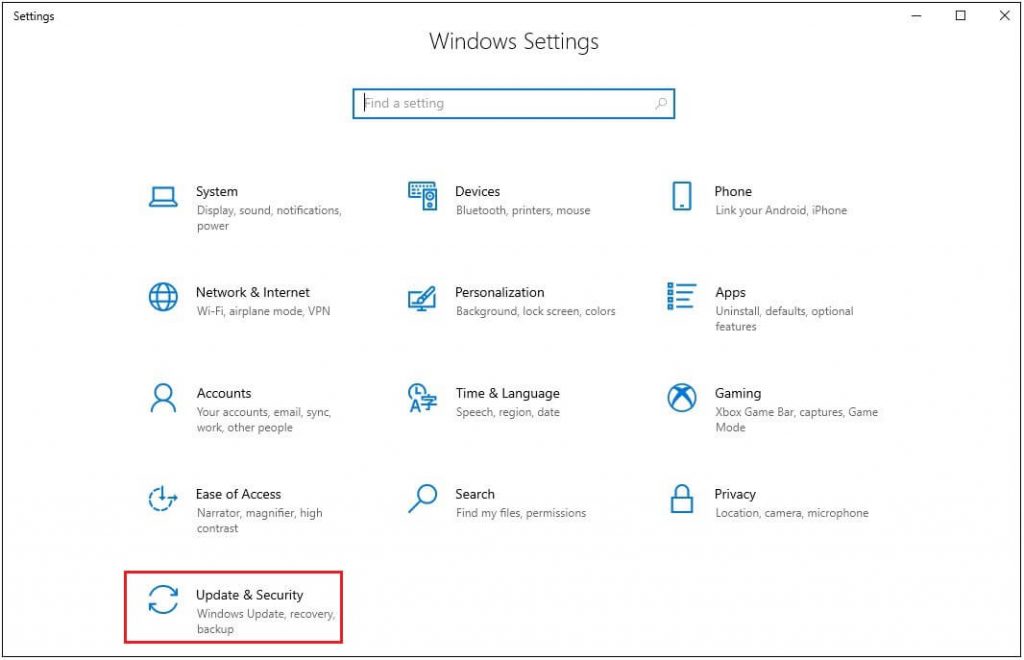
Step 2: In the Settings window, select Updates & Security.
Step 3: Click on the Check for Updates button and wait for the process to complete.
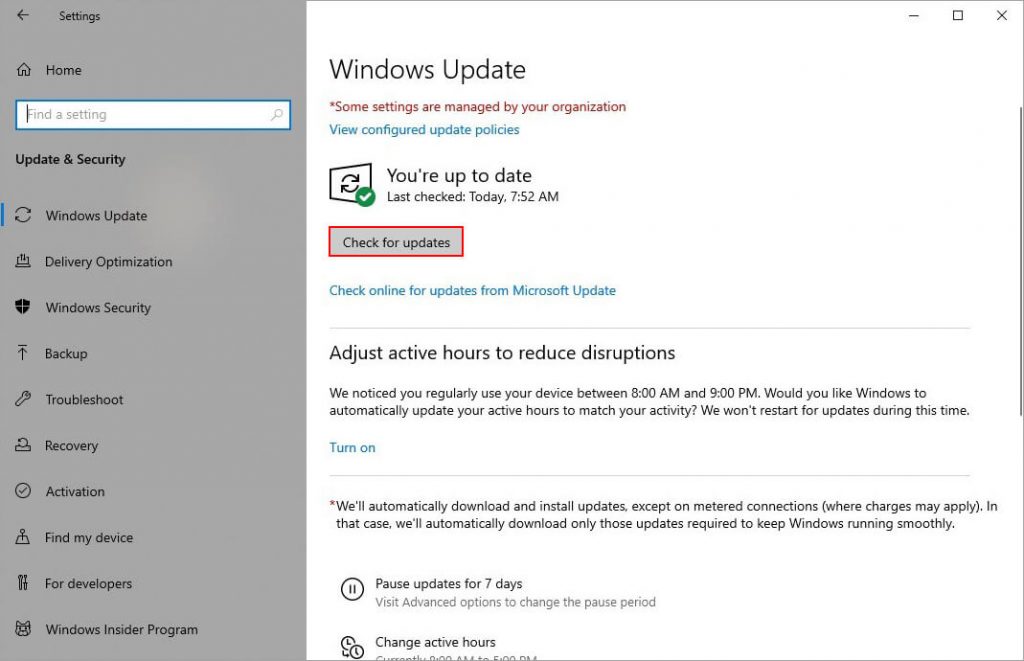
Step 4: If you see any pending updates, click Install Now.
The Windows 10 OS will install the updates automatically. Restart the system once the update is complete and check if the problem is resolved.
Solution 2: Update the drivers
One of the prominent reasons for the above error is broken, corrupt or missing driver. However, you can update your system and other drivers to resolve the issue at hand. Follow the steps below to update your system drivers.
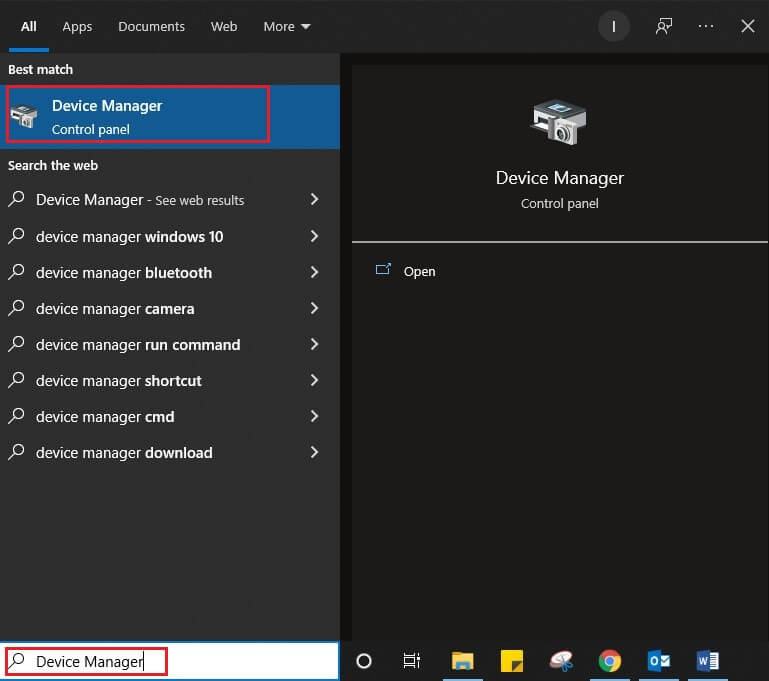
Step 1: Search for Device Manager in the Cortana search bar and click the first search result to launch Device Manager.
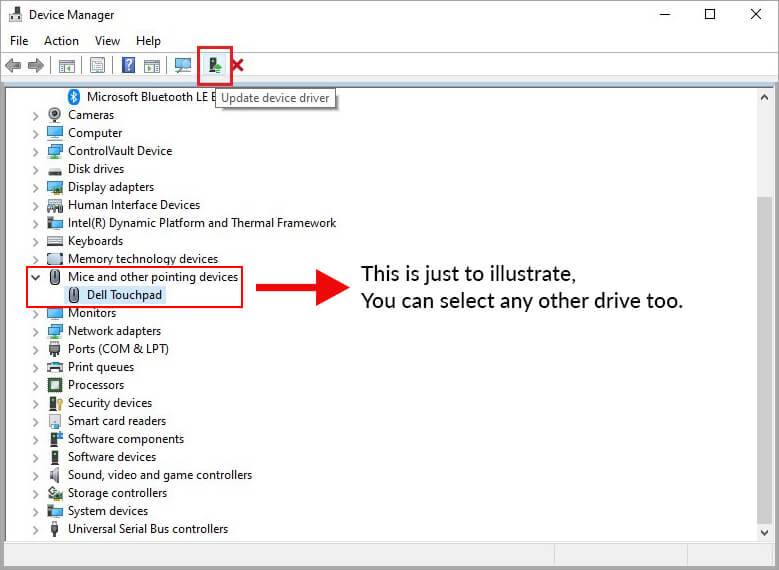
Step 2: From the list, select the category to see the devices. Select the driver and click the Update Device Driver button on the top ribbon.
Step 3: Click on Search automatically for drivers.
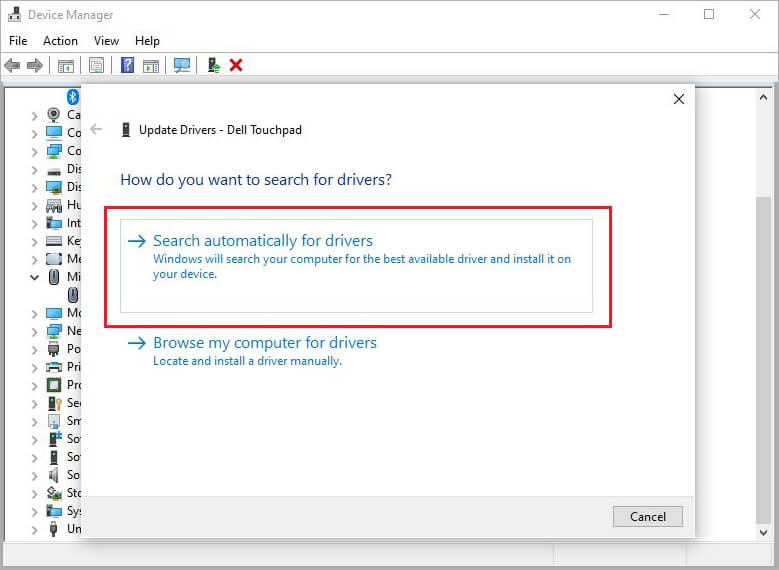
Step 4: Click Update Driver,and Windows will find and install the updated version of the selected driver.
If Windows cannot find the updated version for a third-party driver, you can check the manufacturer’s website to download the updated version and install it. Alternatively, you can reinstall the driver by following the steps below.
Step 1: Open the Device Manager.
Step 2: Select the device you want to reinstall, right-click on it, and select Uninstall.
Step 3: Restart your PC. Windows will automatically try to reinstall the driver.
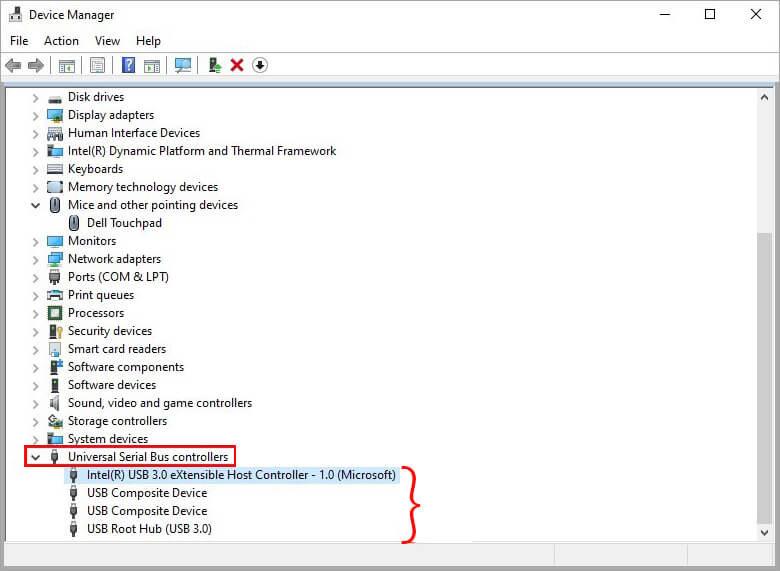
Note: You also need to update the USB root hub driver present under the Universal Serial Bus controllers section in the list. The rest of the process remains the same as described above.
Solution 3: Disable Overclocking on your Windows 10 PC
Overclocking is a process of increasing the clock rate of your PC in BIOS to enhance the PC’s performance. However, working at an accelerated speed can put the PC under stress or start overheating it. This may also result in BUGCODE_USB_DRIVER error. . So try disabling Overclocking on your PC using the following steps and see if this resolves the error:
Step 1: Open Settings > Update & Security > Windows Update.
Step 2: Click Restart Now button under the Advanced Startup section.
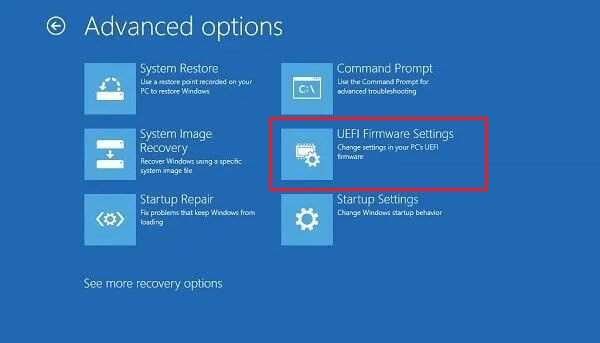
Step 3: Once your PC restarts, click Troubleshoot > Advanced Options > UEFI Firmware Settings.
Step 4: Your BIOS setup will open. Click the Advanced tab and select Overclocking Performance Menu.
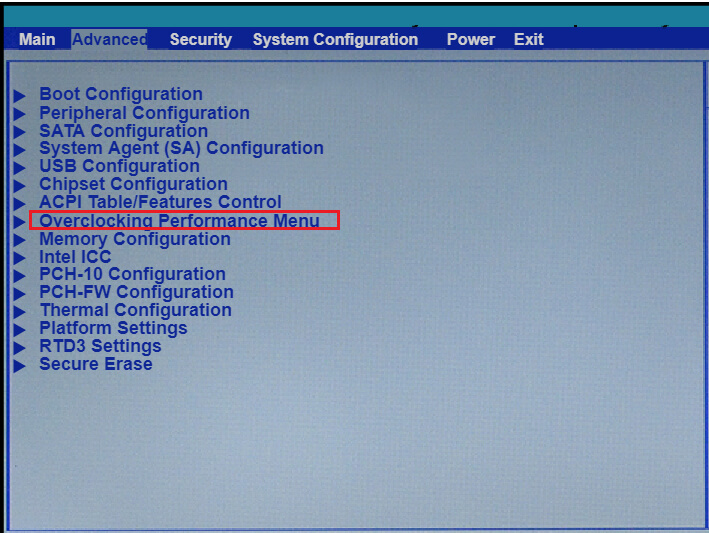
Step 5: Locate Overclock and disable it. Restart your Windows 10 PC for the changes to take effect.
Note: Any changes in the BIOS setup may harm the data and the system itself. In case of data loss due to an error in BIOS setup, use a trusted Windows data recovery software to recover your lost data.
Solution 4: Disable USB selective suspend
The power settings on your system can cause a BUG CODE USB DRIVER error. You need to disable the USB selective suspend option from your power settings to remedy this problem. Here’s how to do it.
Step 1: Click Windows + S and select Power Options from the list.
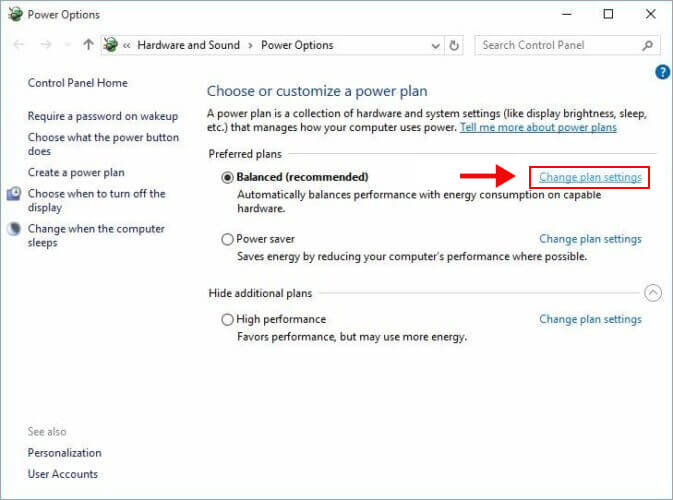
Step 2: Click the Change plan settings option in front of your current power plan.
Step 3: In the Edit Plan Settings window, click the Change advance power settings option.
Step 4: In the Power Options window, click USB Settings to expand it.
Step 5: Click USB selective suspend and select Disable from the options.
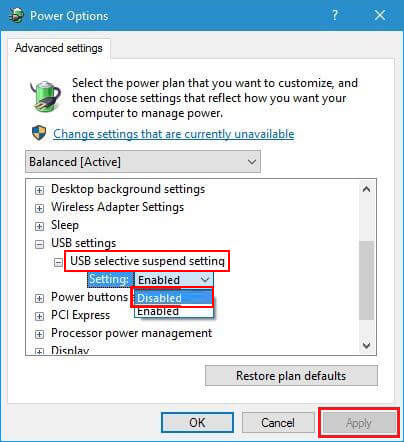
Step 6: Click Apply > OK to save the changes.
Solution 5: Disconnect Webcam on your Windows 10 PC
Some users have reported that the BUGCODE_USB_DRIVER error causing BSoD is due to the Webcam on your computer. You can counter the problem by disabling the Webcam on your Windows 10 PC. If you are using a detachable webcam, you need to simply unplug it from your device and then move ahead to disable the integrated Webcam on your PC. Follow the steps below to disable your integrated Webcam.
Step 1: Launch Device Manager and locate the option Cameras in the list.
Step 2: Click Cameras and right-click on the camera driver option.
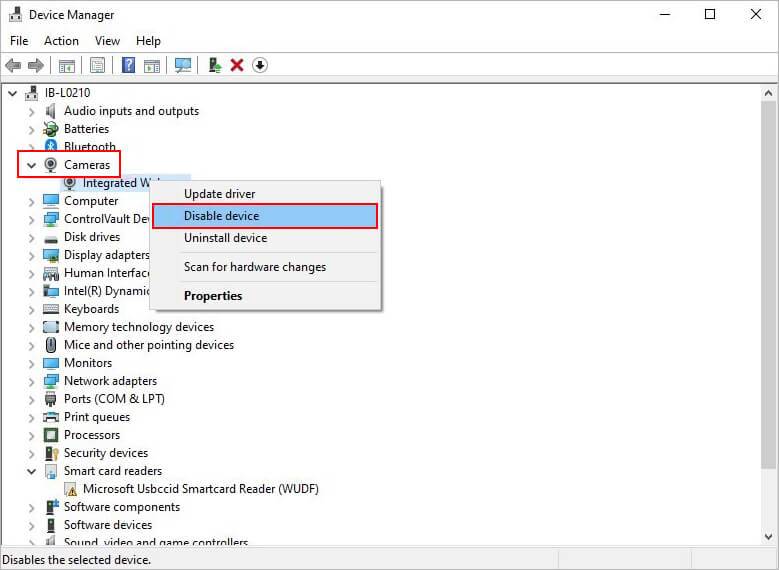
Step 3: Select Disable Device/Disable from the right-click options.
Restart your system and check if the BSOD error is resolved.
Solution 6: Check and fix hardware issues on your PC
The BSOD error may also emanate from a faulty hardware component on your system. You can easily check for faulty hardware using the File Manager on your Windows PC. To check for the problem with hardware components, follow the steps given below.
Step 1: Click Start > Device Manager.
Step 2: Click on the component category you want to check to expand.
Step 3: Right-click the component and select Properties.
Step 4: Click the General tab and check the device’s status in the box below.
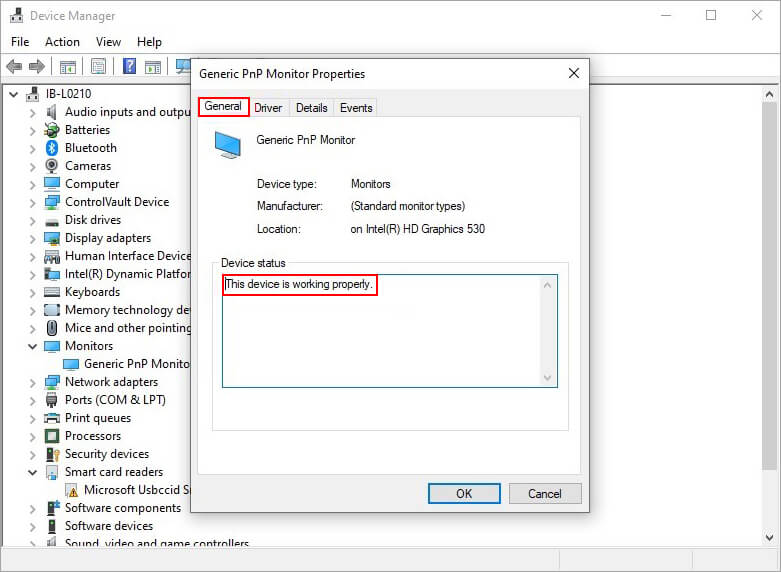
Step 5: If the Device status shows that the device is working properly, everything is fine.
Move on to other suspected devices and repeat the above steps.
Solution 7: Detach peripheral devices on your PC
There are instances when the problem is not with your system’s integrated software or hardware components. You need to check and remove any faulty peripheral devices connected to your PC in such a case. The peripheral devices include a mouse, keyboard, monitor, joystick, etc.
If you have peripheral devices attached to your system, try removing them and restarting your computer. Now if your computer boots up normally, it’s clear that there was an issue with the connected devices. To identify the culprit, attach the peripheral devices one by one and keep checking if the BSoD error reappears. Once identified, remove the device and replace it with a new one or get it repaired.
Solution 8: Turn on Microsoft Defender Antivirus
If the BUG CODE USB DRIVER error appeared after attaching a particular USB drive, the USB drive might be infected with some virus or malware. Unfortunately, viruses and malware can cause BSoD and even damage your system’s integrity by infecting crucial system files. However, if you have enabled the Microsoft Defender Antivirus, it will immediately try to nullify the impact of any such threat.
Microsoft Defender Antivirus is a built-in security mechanism to protect your system against any viruses or malware attack. However, it will work only if you have enabled it on your PC. You can easily enable the Microsoft Defender Antivirus on your Windows 10 PC, and rest assured of protection from minor and major attacks on your PC. You can also use third-party antivirus software to scan your system and USB drives.
Solution 9: Uninstall the USB controllers
The USB controller manages the communication between the USB and the system OS. If this communication is interrupted or distorted, it may result in issues ranging from an unrecognized USB device to damaged controllers that may further corrupt the system files. To uninstall the USB controllers, you can use the steps discussed below.
Step 1: Open the Device Manager.
Step 2: Locate the Universal Serial Bus Controllers in the list and click to expand it.
Step 3: Right-click on the first driver in the drop-down list and select Uninstall from the options.
Step 4: Similarly, uninstall all the other drivers in the list under Universal Serial Bus Controllers section.
Restart your PC for the changes to take effect and check if your system starts normally.
Solution 10: Repair logical and physical errors using the chkdsk command
You might not be able to manually point out any logical or physical issues with your disk files. You can use the Command Prompt to detect and repair any such problem. Here’s how to fix logical errors in disk files.
Step 1: Type cmd in the search box and select Run as Administrator under the Command Prompt option in search results.
Step 2: Insert the command chkdsk C: /f and hit Enter.
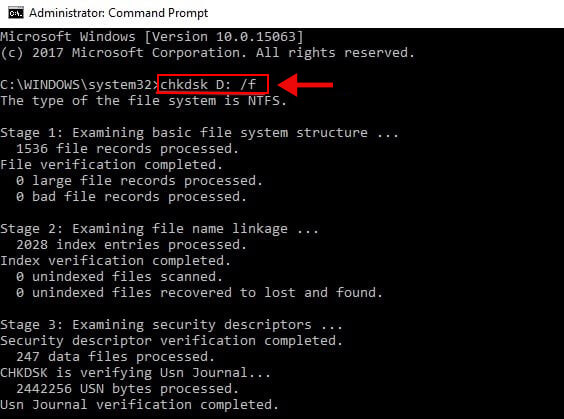
Note: Replace the letter C in the above command with your system drive letter.
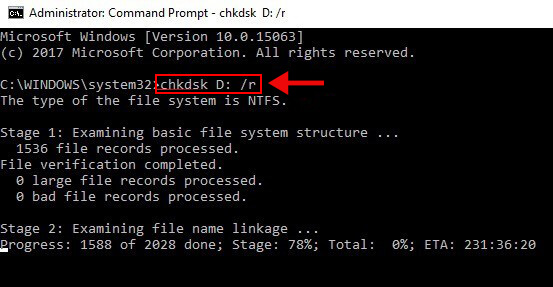
The above command will detect and fix logical errors. To resolve the physical errors, replace the above command with chkdsk C: /r.
Caution: If you don’t use the /for /r parameter, the command prompt will show the message ‘file needs to be repaired/fixed,’ but it won’t repair on its own.
Conclusion
Any error that causes BSoD can prove disastrous for your system and its data. BUG CODE USB DRIVER error with code 0x000000FE is no exception to this. Even while using the solutions given above, if you don’t implement a solution as instructed, you might commit an error and succumb to the resulting data loss. We have minutely described each solution step-by-step so that you may not face any difficulty while resolving the error at hand. However, if you come across a situation where you need to recover the accidentally deleted or corrupt data, you can use Stellar Data Recovery Professional for Windows. It is an easy-to-use software with a simple UI and powerful recovery algorithm to get back your data from almost any data loss situation .
Was this article helpful?
FAQs
What is Code 43 problem in USB?
If you receive an error message that reads ‘Windows has stopped this device because it has reported problems (code 43)’ it is the code 43 problem. This problem arises when the Device Manager stops the USB functioning due to issues in the USB device. As a result, the USB data becomes inaccessible, and if the problem persists, you may encounter data loss.
Solutions to BUGCODE_USB_DRIVER here will guide you to fix the BSOD issue. The bug check value of this Blue screen of death error is 0x000000FE. The code is self-explanatory and indicates that USB driver is the cause of the problem. Moreover, the fatal generally occurs because of bugs in certain system driver files such as usbhub.sys, winusb.sys or usbport.sys. Addition to USB, bad drivers, malware or virus attacks, defective system components, missing system files might also be a reason.
If you have been getting BUGCODE USB DRIVER, refer to this guide as we have put together all the possible workarounds. Now, depending on the situation with your computer, the solution will work.
BUGCODE_USB_DRIVER Error BSOD in Windows 10 Solutions
Here is how to fix BUGCODE_USB_DRIVER Error BSOD in Windows 10 –
1] Disable automatic Restart
A big headache that comes along with such BSOD error is computer randomly restarts. You see, Windows 10 reboots automatically when getting BUGCODE_USB_DRIVER. Even though it is a good thing for the system, it can really test the patience of the users. What’s worse is if they have been working on something important and the system leads the computer to crash.
So if you too are in the victim-list, here is a quick workaround for you to try. It’s possible for users to stop your computer from shutting down automatically. All you need is a simple change in settings. Follow the below steps for the same –
Step-1: If you have been working on anything, save it and close the applications. Once you are on desktop, right-click on This PC icon. Choose Properties.
Step-2: From the Properties window that comes up, select “Advanced system settings”.
Step-3: It will be followed by the System properties wizard. In the same, select the Settings button under the head entitled “Startup and Recovery”.
Step-4: This will launch the Startup and recovery wizard.
Step-5: Further, go to the ‘System failure’ section. There, uncheck the box located next to Automatically restart.
Step-6: Finally, click on OK.
There! You have successfully blocked out the automatic system restart.
2] Scan USB device to Fix BUGCODE_USB_DRIVER
As you can see in the error’s name itself, it might be related to some external device that you recently connected. So, if you started getting the error BUGCODE_USB_DRIVER after connecting some USB device to your system you might want to run a scan on the same and see whether it is infected by any kind of malware. Some viruses that may find a way into the USB drive can cause the error Bugcode USB Driver.
In order to scan for any malicious activities in the said device, you can simply use your antivirus utility. Depending on the tool that you use, there would be a USB scan or custom scan option somewhere. You just need to run the same.
3] Uninstall USB Controller
In the case of BUGCODE_USB_DRIVER BSOD, many users found it helpful to simply uninstall USB driver for once. Given below is the sequence of steps for uninstalling the USB controller –
- First of all, type devmgmt.msc in the Windows search and press Enter in order to open Device Manager console.
- In the list, find and expand “Universal Serial Bus Controllers”.
- When it expands, you’ll see a list of drivers listed there. Right-click on the first driver and then, click Uninstall device. Confirm uninstalling when asked.
- Repeat this uninstall procedure for all the other drivers present in the expanded menu.
- Finally, go for a system restart.
4] Use Microsoft Windows Security to resolve BUGCODE_USB_DRIVER Error
Not just the USB-drive, but malware attacks in other important areas of the device may cause the said BSOD error. It is possible for viruses to enter your system through various internet-based or offline sources. Once entered these can be quite problematic in many cases. This nasty software may interfere with the working of the system and delete important files. It may even corrupt the system components. Virus or no virus, it would be quite healthy for your device if you do a periodic scan for any kind of malicious software on your PC. The best thing is we won’t even need any external utility for the same. Now that Windows comes with its own security tool that is Windows Security, you can keep your device safe with that. Here are the simple steps to use the utility.
- First of all, simply launch the Windows Security application from the system tray. Just select the shield icon there. You can even search the same in the Windows search bar.
- There, navigate to Virus & threat protection once you are in the app. The option is available on the left-hand side.
- Select the Scan options link and then select the Full scan radio button. This would initiate a complete scan of the system and its components and every file in it. It would ensure that nothing is left behind.
- Then, click on the ‘Scan now’ button.
- It might take some time as the program scans through each and every file on the hard disk.
- Once the check is over it would display the results found during the process. Then simply click on the Clean Threats button.
- Select Remove in the subsequent option and finally hit on Start actions button. This would clear out all those threats detected in the course of the scan.
5] Install Patches
Updating the Windows is pretty much a simple process and it can go a long way in keeping your PC trouble-free. Windows updates are carried out automatically the most systems. However, some users may deliberately postpone the update process which may sometimes lead to errors like BUGCODE_USB_DRIVER. If that’s the case with you too, there is nothing to worry still. You can carry out the process manually too. Moreover, manually downloading Windows 10 updates is an equally simple method. Here’s what you need to do to check for the available new cumulative updates or builds –
- Open the built-in Settings app by pressing the key with Windows key + I together. Alternatively, you can search it or can launch from the Action Center => All settings.
- Once the application shows up, go to the Update & Security category.
- In the right pane of the subsequent page, click on Check for updates button.
- With this, your system will start a scan for new updates. In case new patches are available, they will be listed and you need to click the “Download” button to get them.
- Finally, once your OS installs the new updates, restart the system when prompted.
The BUGCODE USB DRIVER BSOD would be fixed in case the new updates resolve the bugs and problems causing it. A tip for users here – have secure connectivity while downloading new patches. It prevents problems like incomplete installation.
6] Deal with the driver related issues
In order to make hardware components of a computer work properly drivers play the most crucial role. They essentially instruct and makes those components function. There would be a driver or even multiple drivers for every device connected to your PC. Therefore for ensuring the proper functioning of every hardware component of your system, you need to keep your device drivers up to date. Failing to do so may cause glitches and errors all along.
Especially, in the context of the Bugcode USB Driver BSOD in Windows 10, you might want to pay close attention to any USB device drivers. Here is exactly what you need to do for checking and updating these devices –
- In the Run window (Win logo + R key) or Search box, simply type “devmgmt.msc” and press Enter.
- When the Device Manager opens up, go through the list and see if any of the devices listed there has a yellow exclamation mark on them. Pay particular attention to USB connections.
- If so, click and expand the specific device. You will now be able to see the respective drivers of it.
- Now right-click on each of the drivers of the device and select Update driver option from the fly-out menu.
- The system will scan for any available updates for the driver. If found simply follow the onscreen instructions to install the same. Finally, reboot the system.
7] Clean Junks to Fix BUGCODE_USB_DRIVER
Just like flatter at your home or workplace can slow you down, the junk heaping up in your computer can cause a lot of trouble for it. They can even cause various errors such as BUGCODE_USB_DRIVER. These unwanted and temporary files heap up in your system as you browse through the internet or in the course of downloading and deleting various files. Therefore, in order to ensure the healthy functioning of your computer, you should occasionally clean up junk files or unwanted files piling up in your download folder. There is the Disk Cleanup utility in Windows that you can use for this.
Now, something that you need to remember in the course of cleaning up these is that you may end up deleting some files that are important to you as well. So, before you initiate the Disk Cleanup, double-check that you have moved any important files in these folders.
- The first step is pressing Win + R hotkey together in order to open the Run dialog box. In it, type ‘cleanmgr’. Then you can either hit the Enter key or can click on the OK button you see there.
- A small pop-up window would appear asking for selection of the drive you want to clean up. Select C: drive as that’s where all the junk gets stored.
- Then, choose OK. The Disk Cleanup utility will now do the calculation of the space in which it can release junk.
- Click Cleanup system files button.
- In the small window that follows with a list of a folder, select all boxes other than Downloads (just in case there is an important document in there). We’d rather suggest you filter out any important documents from all those folders in advance and move them before you start the cleaning process. This way, you will be able to clean up all the temporary and unnecessary files that remain.
- Now, once selected, go for the Ok button there. This would start the cleanup process, which may take some time.
- Lastly, reboot the device normally when the procedure ends up.
8] Run RAM test
Random Access Memory is an integral part of your computer system. RAM has a role to play in every task that is being performed on your PC. Therefore, having any kind of trouble in the memory area can cause serious interruptions in the functioning of your device. There are many factors that can cause problems in RAM, like power surge, device overheating, etc. Such troubles are also known to be creating blue screen errors as well including BUGCODE USB DRIVER. So make sure that you check for any kind of RAM issues if you are facing BSOD. Here’s what you can do about it –
- Either select ‘All settings’ from the notification area or simply press Windows key + I. This would open the Windows Settings app on your computer.
- Then, search the keyword ‘memory’ in the text box on the top of the Settings app.
- In the results that are loaded, double-click on “Diagnose your computer’s memory problems” to launch Memory Diagnostic.
- When the window kicks in, select the first option which would also be the recommended option, saying “Restart now and check for problems“. Don’t forget to save any unsaved work before you allow restart, or it may be permanently lost.
- Then, the system will go through its initial restart. There would be two rounds of restart in this fix. When the PC powers up, a blue screen will show up, which will display the progress of the problem diagnosis.
- The system will restart once again then after the memory problem scan is over. Any detected issues will be displayed on the screen after reboot.
9] Remove anti Malware software
You probably know that Malware can cause a lot of problems in any computer system. So it would be fair if you have a third-party antivirus tool on your PC. What you might not know is that such third party apps sometimes can cause conflict with Microsoft’s own security application that is Windows Security. Even though it is very rare, you might want to try uninstalling those tools to see if they are the ones causing the errors. Here’s how you can uninstall the program –
- Open the Control Panel by searching cp in the search box.
- Go to the Programs and Features applet.
- From all those applications listed there in that section simply select the third-party antivirus tools that you would like to uninstall.
- Click on the Uninstall button on the top ribbon once you have selected the app.
- Confirm when prompted and see whether the BUGCODE_USB_DRIVER error that you have been facing is resolved.
10] Enter Safe Mode to solve BUGCODE_USB_DRIVER
“Safe Mode” is one of the options in Windows that you can use in case you are unable to figure out what is wrong with your PC. It is a good option to get rid of, at least temporarily any problematic components. When you boot Windows 10 in safe mode it will be having only the basic default settings and programs. No third party software will be able to function or interfere or cause an error in such a state. Here is how you can enter Safe Mode –
- Click on the Start menu and then the Power button. Select the Restart option and simultaneously press the Shift key.
- In case you are encountering difficulty in normally starting your Windows then the OS will automatically display the recovery options after failing to start up multiple times. Simply press on the Advanced Repair options that you see on the Recovery options screen.
- Thereafter, select Troubleshoot and then Advanced options.
- In the Advanced options screen you have to select “Startup settings“.
- This will be followed by a list of Advanced boot options. There select the Restart button. Finally, execute a hit on the respective number that corresponds to the Safe Mode. In order to enable safe mode, F4 is the number that you need to press.
11] Perform a Disk Check
The system may experience fatigue or functionality problems when working for long hours continuously. In a few instances, this can eventually lead to BUGCODE_USB_DRIVER. However, the quick fix for this situation is trying the check disk function in Windows. What it basically does is checking the overall integrity and performance of the system and finding any problems or with logical file systems or such. Another function it does is marking the hard bad sectors so that they will be stopped from being put to use and thereby from making any interruptions.
Using this function is pretty easy and you just need to pass a simple command to work this. Here is what you need to do –
- Get access to the elevated Command Prompt using any of the preferred procedures.
- In the command line copy-paste or type the following command –
chkdsk C: /f /r /x - Finally press Enter. The disk check function will start.
12] Run Blue Screen Troubleshooter to fix BUGCODE_USB_DRIVER
One of the smooth simple and easy methods of fixing many types of errors with computers would be troubleshooters. They make the whole error resolving task simple for us. Windows moreover have specific troubleshooters for some commonly occurring errors or issues. Blue screen troubleshooter is one of them, thankfully for us. So whenever you confront BUGCODE_USB_DRIVER or any other kind of error, try this function. It may fix blue screen of death once and for all. In order to use the blue screen troubleshooter functionality simply follow along with the steps given below –
- Launch the Windows Settings application and go to the Update & security tile.
- Navigate to the Troubleshoot section on the left. Find Blue screen option on the right pane and select it.
- Click Run the troubleshooter button. Restart the system after the process ends and see whether the problem has been resolved.
13] Uninstall similar applications installed on the system
If you have multiple applications on your system that perform the same functions, this could be the problem too. Duplicate or similar applications mainly cause various conflicts. So, uninstall any duplicate apps on your PC that you are not putting to use. Here is how you can do this –
- Right-click on Start and choose “Apps and features” from the Win+X menu.
- On the subsequent page, locate the programs that are serving similar purposes. Select them and click Uninstall.
- Go through the guidelines of the app to remove it from the device.
Uninstalling an application would be as simple as that.
14] Getting rid of problematic updates
In a few rare cases, there have been some serious bugs and compatibility issues with certain updates released by Microsoft. The problem could even arise when the updates fail to properly install on your system. Furthermore, incomplete download or trouble in installation can also cause discrepancies in the functioning of your computer. So, if you think that’s the case with you, or if you have been facing the BUGCODE_USB_DRIVER after getting the latest patch you can try uninstalling the same. To get rid of the latest updates, here are the steps that you need to follow –
- Open the Settings application on your device and then, navigate to Update & Security.
- Click on the link saying “View update history” followed by a hit on Uninstall updates on the following page.
- When the ‘Installed updates’ window of the Control Panel launches, select the latest patch here. Hit on the ‘Uninstall’ button on the top.
- If UAC prompts up, allow it to remove the patch.
15] Disconnect and check for any faulty hardware accessories
There have been some cases where compatibility problems of hardware components of a device caused BUGCODE USB DRIVER error. To check if that’s the case with you, please disconnect any hardware device that you recently connected to your computer. Once you remove it, restart Windows 10 PC and check if the problem still persists. You can then reconnect the same.
Take note that the issue can be with the obsolete device driver also. If that’s the case you can go to the manufacturer’s website and see if there is an update available for the same.
16] Run System File Checker
Even if a single system component or file goes missing the entire working of the computer can be disturbed. Everything in a PC, thus, has its own importance. It would be great if you can check out any problems in these areas. Thankfully for us, checking for any faulty or missing file is not as complex as it seems like. Here’s the simplest method for you to check the same with this System File Checker.
- Press”Win + Q” hotkeys and type cmd.exe in the search box. Right-click on Command Prompt. Choose “Run as administrator”.
- Click Yes when UAC asks for permission to go ahead.
- A black window will open up. When it does simply type the following command where the cursor blinks –
sfc /scannow - Press Enter to start the scan and as you may see on the screen itself, it is going to take a while.
- So, don’t get impatient and let the PC scan and complete the process. In the end, if, there is any discrepancy with the system components or there have been any missing files, Windows will automatically fix it.
17] The final options: System Restore or Reinstall Windows
In case none of the above fixes or anything else is working, you can do either of the two things – “System Restore” or complete reinstallation of Windows 10.
For doing a System Restore, you should already be having a restore point that you previously created. In case you have a restore point, simply search and open the tool and follow the on-screen instructions to complete the procedure.
Note that in both these cases, you may lose files on your PC. So, make sure you take a backup of all important stuff on your system. Following is the index of fixes to explore them in detail –
Methods:
1] Disable automatic Restart
2] Scan USB device
3] Uninstall USB Controller
4] Use Microsoft Windows Security
5] Install Patches
6] Deal with the driver related issues
7] Clean Junks
8] Run RAM test
9] Remove anti Malware software
10] Enter Safe Mode
11] Perform a Disk Check
12] Run Blue Screen Troubleshooter
13] Uninstall similar applications installed on the system
14] Get rid of problematic updates
15] Disconnect and check for any faulty hardware accessories
16] Run System File Checker
17] The final options: System Restore or Reinstall Windows
That’s all!!
The blue screen of death errors force stops your PC completely. These errors can be a nightmare for users. One of the BSOD errors is the BUGCODE_USB_DRIVER error.
The error indicates that the issue either lies in the USB driver or hardware. USB drivers help in establishing a medium of communication between USB devices and your operating system. Therefore, it is better to keep your drivers updated to have hassle-free connections with your Windows OS.
It is recommended to update USB drivers for Windows 10, 11, and other version devices. The drivers are issued by Microsoft and can be manually downloaded from the official website. Or an alternate way is to rely on driver updater software that can automatically perform the driver updates.
The Bit Driver Updater software can enhance the performance of your PC and provide reliable drivers. It does not require your system specifications to find the compatible drivers and can scan your device within a few minutes to provide the list of pending updates. Also, all your driver data can be restored and backed up if required.
The write-up below mentions the best possible methods to fix BUGCODE_USB_DRIVER blue screen error in your Windows 10 device.
How to Fix BUGCODE_USB_DRIVER Blue Screen Error?
Before you try the following methods make sure your Windows has no pending updates. Check for updates in the Settings app. Perform the updates and disconnect the hardware which can cause an error on your PC. Now proceed with the following methods in the order they listed until you find the one that works for your device.
FIX 1: Update USB Drivers
The BUGCODE_USB_DRIVER blue screen error can be due to a corrupted, missing, or outdated USB driver. The best ways to fix bugcode USB driver blue screen error is by downloading the updated USB drivers by any of the following methods:
Method 1: Update USB Drivers through Device Manager
You can update the USB driver in a partly-manual way from the Device Manager. Refer to the steps below to download the latest version of USB drivers.
Step 1: Use the Windows and R keys together on your keyboard to open the Run command prompt.

Step 2: Write devmgmt.msc command to open Device Manager and click on Enter key or OK option.

Step 3: Find the Universal Bus Controllers and expand the section.
Step 4: Right-click on each driver and click on the update option.
Step 5: Select the option that allows your PC to search for updates automatically. Install the drivers with the help of on-screen instructions once the download completes.

Also Read: Windows Stop Code Error OR Blue Screen Error Codes (Fixed)
Method 2: Update USB Drivers Automatically Through Bit Driver Updater
An alternate or easy method to update the USB driver is by using a Driver Updater tool. The Bit Driver Updater software allows you to automatically download all the pending driver updates. You can also schedule these driver updates at your convenient time. The tool holds a backup of all the driver specific data that can be restored easily.
Here are the steps to download Bit Driver Updater and use it to easily update USB or all the other outdated drivers.
Step 1: Download the driver update tool from the download link below and install it on your Windows PC.
Step 2: Run the Bit Driver Updater and begin the scan for outdated drivers with Scan Drivers option.

Step 3: Locate USB drivers and click on Update Now button to download the latest version of the driver software.
Step 4: Install the driver file by following the instructions displayed on your desktop screen.
The Pro version of the Bit Driver Updater software can update all the drivers with a single click. The Update All option allows users to complete the updation process of all the drivers that need an update. Moreover, it provides technical support around the clock and comes with a 60-day money-back guarantee.

Use any of the above methods to update USB drivers and check if the error is fixed. If the updated driver could not fix blue screen caused by bugcode_usb_driver error, move on to the next fix.
FIX 2: Uninstall Faulty or Internal Apps
The internal apps or services such as VMWare, Virtual Box, etc can be the cause of USB errors. Therefore, it is recommended to uninstall these applications to fix the error.
Step 1: Enter ‘turn Windows features on or off ’ in the search bar and click on it to open.
Step 2: A list of all the internal apps will be displayed. Find Hyper-V and click on the checkbox to uncheck it. Apply the changes by using the OK option.
Now check if the BUGCODE_USB_DRIVER error of BDOS is fixed. In case the issue remains, try the next method to fix it.
Also Read: How To Fix Blue Screen of Death (BSOD) Errors on Windows 8
FIX 3: Update Power Settings
For some users updating power settings helped in fixing BUGCODE_USB_DRIVER blue screen error. Refer to the steps below to change the power settings on your Windows 10 device.
Step 1: Open Run command dialog box with the help of shortcut keys Windows+R.
Step 2: Write the powercfg.cpl command and press enter key on your keyboard.
Step 3: Select the option ‘change plan settings’ present next to the current power plan of your device.
Step 4: Select the option ‘change advanced power settings’ and open USB settings.
Step 5: Click on the USB selective suspend option and disable all the mentioned plans under the suspend settings.
Once disabled apply the changes and click on OK to update the power settings.
Now check if the updated power settings could solve BUGCODE_USB_DRIVER BSOD error on your Windows device.
Also Read: How to Fix Status_Device_Power_Failure Bluetooth Error in Windows 10
BUGCODE_USB_DRIVER Blue Screen Error In Windows 10: FIXED
We hope the above methods helped you fix the blue screen error BUGCODE_USB_DRIVER. Use these methods in the order of their listing to save time and effort. Also, before you start trying the fixes make sure the USB drivers on your PC are up to date. Update the driver manually from the website. Download Bit Driver Updater software to automatically update USB and other outdated drivers. The automatic method is a recommended option to update drivers as it requires no extra time and effort from the users.
If you need further assistance drop your queries in the comments. Also, subscribe to our blog to never miss an update on our tech-related and informative blogs.
This post will guide you in fixing yet another annoying Blue Screen of Death error, “BUGCODE_USB_DRIVER”. This particular BSOD error occurs due to some issue with usbhub.sys, winusb.sys, or usbport.sys system driver file. When you encounter this kind of Stop error on your Windows 10 PC, it indicates that an error has occurred in the Universal Serial Bus or USB driver. The USB driver is issued by Microsoft themselves and it comes along with the Windows 10 system which is why it is difficult to download its latest version using a web browser. Thus, you need to take some basic steps to resolve the problem.
Carefully follow the given fixes below to fix the BUGCODE_USB_DRIVER Blue Screen error and before you proceed, you need to create a System Restore Point, this way you have some backup in case something goes out of hand.
Option 1 – Update the USB Controller Drivers
- First, click the Start button and type “device manager”.
- Then click on the “Device Manager” from the search results to open it.
- From there, look for the “Universal Serial Bus controllers” option and then right-click on each one of the USB drivers and select the Update Driver from the menu.
- Restart your PC and then click the “Search automatically for updated driver software” option.
You also have the option to update the motherboard and the USB driver from the manufacturer’s official website.
Option 2 – Check for any available Windows Updates
Another you can try is to check if there are any Windows Updates available to make sure that your Windows 10 PC has all the latest updates installed. All you have to do is go to Settings > Update &security. From there, just click on the Check for updates button.
Option 3 – Uninstall conflicting programs and services
There are certain programs like VMWare, Virtual Box, Hyper-V Virtualization services that might be in conflict with the USB port drivers on the parent operating system. Thus, you can try uninstalling the aforementioned programs and other similar ones to see if it fixes the BSOD error.
- In the search box, type in “control” and then click on Control Panel (desktop app) among the search results.
- After that, select Programs and Features from the list which will give you a list of all the programs installed on your computer.
- From there, look for the concerned program and select it and then uninstall it.
Note: If you have downloaded the app from the Windows Store, you can simply right-click on it from the application list and then uninstall it.
If uninstalling the programs mentioned above didn’t help, you might want to try putting your PC in a Clean Boot State to help you find the faulty program.
- Log onto your PC as an administrator.
- Type in MSConfig in the Start Search to open the System Configuration utility.
- From there, go to the General tab and click “Selective startup”.
- Clear the “Load Startup items” check box and make sure that the “Load System Services” and “Use Original boot configuration” options are checked.
- Next, click the Services tab and select the “Hide All Microsoft Services” check box.
- Click Disable all.
- Click on Apply/OK and restart your PC. (This will put your PC into a Clean Boot State. And configure Windows to use the usual startup, just simply undo the changes.)
Option 4 – Modify the Power Settings
- In the Cortana Search box, type “power options” and then select Power Options from the search results.
- After opening Power Options, click on Change plan settings for your selected power plan.
- Next, click on Change advanced power settings.
- Then look for USB Settings and click on it to expand it.
- Now expand the USB selective suspend setting and then disable it.
- After that, click on the Apply and then OK buttons to save the changes made.
Option 5 – Check for any hard disk errors
- On your desktop, right-click on the “This PC” or computer icon and then select Manage to open the Disk Management. Here you get to check your drive’s health.
- Next, click on Disk Management on the left side panel.
- From there, check the state of your drives. If it shows that all your partitions are healthy then it means all is good and that the problem may have something to do with some physical issues with your hard drive.
You might also want to run the CHKDSK utility to help you fix any issues with your hard disk. If your hard drive has issues with integrity, the update will really fail as the system will think that it’s not healthy and that’s where the CHKDSK utility comes in. The CHKDSK utility repairs hard drive errors that might be causing the problem.
- Open Command Prompt with admin privileges.
- After opening Command Prompt, execute the following command and hit Enter:
chkdsk /f /r
- Wait for the process to be completed and then restart your computer.
Do You Need Help with Your Device?
Our Team of Experts May Help
Troubleshoot.Tech Experts are There for You!
GET HELP
Troubleshoot.Tech experts work with all versions of Microsoft Windows including Windows 11, with Android, Mac, and more.
Share this article:
You might also like
What exactly is no audio device malfunction?
No audio device error is among the malfunctions that many Computer consumers run into. No sound or audio can be heard from the computer when the error occurs.
Solution
Error Causes
There are numerous elements that may be the basis of this malfunction. Corrupted or broken sound card drivers, incorrect Device Manager Options for example, or even incorrect BIOS configurations.
Further Information and Manual Repair
How could you recover the standard production of audio by your personal computer and solve this malfunction?
Like a number of additional malfunctions, the method of the repair depends on its trigger. To properly solve this dilemma, you are required to run through an evaluation of the pc system so that you can pinpoint the cause. This is because there are numerous variables, which alone, or concurrently may trigger this dilemma.
These measures will allow you to work out the no sound device error in your personal computer programs, identify the trigger and fix it.
Follow the directions in step 1 if your computer has an onboard audio device installed in it and assess the BIOS settings. You can jump step 1 and move to step two if you utilize a separate sound card.
STEP #1 — Assess the BIOS options.
No sound device error can be caused by incorrect BIOS configurations in your Personal Computer. By fixing these settings if they are the cause of the malfunction, you can easily solve it. Make Sure you restart the pc and immediately access the BIOS options.
By locating the Sound card, which is usually known as the AC97 Audio, you should subsequently open the Integrated Peripherals. As soon as you locate it, set it to Allow or Auto.
Finally, you should access the On-Board Audio AC97 Control and set it to Allow or Auto as well. If it doesn’t solve the situation, proceed to Step Two.
STEP #2 — Analyze the Device Manager
No sound device malfunction can be additionally caused by malfunctions with the Device Manager.
To solve this issue, go to My Computer, right-click it, select properties, click on the Hardware tab, then click on Device Manager. At this windowpane, analyze the movie, audio, and game controllers. If you learn that there is a cross on any of the sub things, right-click it subsequently and set it to Enable.
The sound card driver may have not been correctly installed or may be damaged if there is Exclamatory Mark or Question Mark on the device manager menu.
This does not mean that the sound card driver is ok. It may have malfunctioned even though you do not locate anything unusual. This is because the Device Manager doesn’t always recognize errors in audio hardware.
After this, you can proceed to step 3.
STEP #3 — Upgrade or reinstall the Sound Card Driver.
About 80% of «no sound system discovered/installed» malfunctions come from broken and/ or out-of-date card drivers. The sound card will not be detected by the Windows Operating System, when the audio card driver is corrupted, damaged, or out-of-date and therefore no sound will be produced by your computer.
If this is the cause of the no sound device malfunction, you should reinstall the Audio Card Driver on your computer. Still, you can utilize driver upgrade applications on the web that will help you upgrade out-of-date drivers.
Read More
Living in today’s world sadly is still living in the COVID-19 pandemic. It has been more than a year and sadly pandemic is still very strong and we are battling it on a daily basis.
Governments all over the world are trying to battle pandemics in their own way with their own ideas and prevention measures. We as individuals can not very much influence how will the pandemic itself go but fortunately in this modern age of information we can at least follow and be in the loop at the current state of the situation regarding it.
Today instead of having a troubleshooting article or tips and trick for your PC we are doing something else but in the domain of internet technology, you know, just to keep everything still IT related ????
Below you will find websites with small descriptions of what they do to keep yourself informed and hope to get over this dreadful pandemic.
-
The WHO’s COVID-19 Dashboard
If you are interested in real-time COVID-19 information about active cases, death tool so far, new cases and the number of vaccines administrated so far I would recommend WHO’s dashboard. How WHO is a non-government institution composed of doctors from all over the world with just a single goal in mind, to help and put an end to this pandemic is a great non-biased source of information on the current state of virus spread.
-
Vaccine Finder
Please be aware that Vaccinefinder is working only on the territory of the United States of America. The reason why it was included in this list is that basically it is a great idea and I hope to see this site expand on other world regions or at least that inspires the emergence of another worldwide website with this type of content.
If you live in the USA, this site will be a great help since you can track where and how many shots are distributed to states and even towns in America. -
COVID tracking project
This site is also for U.S. residents, this time it is about tracking cases in each state with details and statistics. If you are interested in more detailed statistics of hospitalized patients per state or overall you are just interested in statistics about the pandemic in the U.S. this site might provide all the information about your needs.
-
NPR
On national public radio or NPR for short, there is a special section devoted to the coronavirus where new articles about pandemic are released daily with new information and new findings on how to battle it and the current state of things. A great informational site to keep up with the current state of things.
-
Google’s COVID-19 page
Google has not been inactive during this pandemic and on its page specially dedicated to the COVID-19 virus you can find a lot of free information updated daily. From safety and prevention tips to data about pandemics there is a lot of ground covered on-page and we recommend at least going through the prevention section to inform yourself how to keep yourself and others safe.
-
Coronavirus tracker
This daily updated chart can show how many cases and deaths are from chosen time period all in form of a chart, you can see charts for each country in the world how COVID cases rose or dropped along with the death tool it brought.
There you go, 6 websites to track and inform yourself about this dreaded pandemic which has managed to change the world and people’s lives forever, sadly on the bad side.
Read More
There are times when the Windows Search results do not include what you want to search. However, if you are trying to search for something that’s located on your desktop and Libraries, they would appear right away on the search results. Actually, the issue is not with the search but with the list of files and folders that Windows can index. If you encounter this issue, read on as this post will guide you on how to fix it.
The Windows 10 operating system, ever since Windows v1903 was released, offers two kinds of searches – the classic and the enhanced search. You may have to add more folders to the classic search or use the enhanced mode to resolve the issue. In other words, to fix the problem with the Start Menu Search, you can try to enable the Enhanced Mode or add folders to the Class Search or remove the excluded folders, as well as run the Search and Indexing troubleshooter. For more information, refer to each one of the options provided below.
Option 1 – Try to enable the Enhanced Mode
To fix the problem, you have to enable the Enhanced Mode search and configure the folders you want to be indexed. How? Follow these steps:
- First, you have to go to Settings > Search > Searching Windows.
- Next, select the radio button for the Enhanced option.
- After that, select the folders you want the Windows Indexer to exclude from the Enhanced Search mode.
Option 2 – Try to add folders to the Class Search
If you don’t want to enable the Enhanced search mode, then you might want to add folders that are important to you. All you have to do is configure the Search Indexing Options by following these steps:
- Go to Settings > Search > Classic and from there, click on the “Customize search locations” option.
- Next, click on Modify in the pop-up window that appears.
- Then add drives and folders that are important to you. Once the indexing is completed, Windows will be able to find the file and display it in the search results.
Option 3 – Try removing the excluded folders
If you have already enabled the Enhanced mode but your files still don’t appear, then you might want to check out the excluded folder list.
- The first thing you have to do is go to Search and from there, you will find a list of folders under the Excluded folder list.
- Next, click on the excluded folder that you want to remove by clicking on the “Remove Excluded folders” button.
- If you are using the Classic search, you have to check if the index has restrictions on the file type. You can find it in Advanced options > File Types.
Note: If you want to search in Documents, you could also enable the Index Properties and File Contents. This should resolve the problem.
Option 4 – Try to run the Search and Indexing troubleshooter
You might also want to run the Search and Indexing troubleshooter in Windows 10 as it checks whether the settings for the Windows Start Search are in place and automatically corrects any issues if the update or software installation has changed the settings. To run it just click on the Start button and select Settings > Updates and Security > Troubleshoot. From there, select the Search and Indexing Troubleshooter.
Read More
Runtime Error 429 — What is it?
Error 429 is a type of runtime error. It sometimes occurs when you use the new operator or the CreateObject function in Microsoft Visual Basics to create an instance of a Microsoft Office application.
The error code is displayed on your computer screen in the following format:
Runtime Error ‘429’: Active X component Can’t Create Object
Solution
Error Causes
The runtime error code 429 is triggered for several reasons. These include:
- Mistake in the application
- Incorrect system configuration
- Missing ActiveX components in the application
- Damaged Active X and class application components
- DLL required by the application is damaged
- Active X object was not registered properly
- Corrupted applications
- Corrupted Windows registry
- Class ID issues
The runtime error code 429 not only causes you inconvenience as it hampers your ability to access programs but delays in repairing this error code can lead to serious PC damages such as system freezes, crashes, and failures.
Further Information and Manual Repair
To resolve the runtime error 429 on your PC, try the following recommended solutions:
1. Re-register the Application Causing the Error
Identify the Office application causing the error and re-register it. For instance, if Office Excel is the prime cause of the error message pop up, simply re-register it.
Click on the start menu and then run. Then type this in “: C:/Program Files/Microsoft Office/Office/Excel.exe /regserver” and press OK.
This will hopefully resolve the issue.
2. Go to The Microsoft Windows Script Update Page and Download Microsoft Updated Installation File
This will also assist you in repairing runtime error 429.
Simply follow the installation wizard and update your MS Office Applications. The corrupted files and missing components in them would be easily corrected by the update file. However, if this doesn’t work, then this means that the cause is more crucial than you think.
It is either related to damaged Active X objects or a corrupted Windows registry.
3. Repair the Active X objects and the Registry
To repair both the registry and the Active X objects in one go, it is advisable to download Restoro.
This is an advanced, next-generation, highly and multi-functional PC repair tool. It is deployed with powerful and numerous utilities like a registry cleaner, Active X and class scanner, privacy error detector, and system stability module.
The registry cleaner embedded in this repair tool enables you to wipe out obsolete, unnecessary, malicious, and invalid files and registry entries saved in the registry. It frees up your disk space, repairs damaged DLL files and the registry thus resolving the runtime error 429 on your system.
The Active X object and Class feature identifies and scans Active X issues on your PC and resolves them right away.
Besides this, with this error tool, you can also scan for viruses and also improve your PC performance.
Why Total System Care?
Total System Care is a one-stop solution to resolve all kinds of PC-related issues including the runtime error 429.
To run it on your system, you don’t have to be a computer programmer. It is very easy to operate. It has easy navigation and a user-friendly interface. There is nothing complex about it. It is safe and efficient. It resolves all PC issues in a few seconds.
You can run it in the background while performing other tasks on your system.
Furthermore, it is compatible with all Windows versions.
Click here to download Total System Care and resolve the Runtime Error 429 on your system today.
Read More
As you already know, the Windows Update mechanism in Windows 10 is a bit complex as it depends on thousands of files and services in order to properly function. There are DLL files and services that support this mechanism’s proper functioning. And so if there is any malfunction with any of these files or services, it will result in some errors when running Windows Update. One of these errors is the error code 0x8e5e0147 which has the following error message:
“There was a problem installing some updates, but we’ll try again later. If you keep seeing this and want to search the web or contact support for information, this may help – Error 0x8e5e0147”
To fix this error, there are several methods you can try. You can run the Windows Update troubleshooter or reset the Windows Update components manually or clear the SoftwareDistribution folder and install the update manually. You could also reset the Windows Update Agent to default using a command in PowerShell.
Option 1 – Try to run the Windows Update troubleshooter
The first thing you can do to fix the Windows Update error code 0x8e5e0147 is to run the Windows Update Troubleshooter. To run it, go to Settings and then select Troubleshoot from the options. From there, click on Windows Update and then click the “Run the troubleshooter” button. After that, follow the next on-screen instructions and you should be good to go.
Option 2 – Try to reset the Windows Update components
If by any chance that the third option didn’t work, you can also try resetting the Windows Update components as it could also help you resolve the Windows Update error. How? Refer to the following steps:
- Open Command Prompt with admin privileges.
- After that, type each one of the following commands and hit Enter after you key in one after the other.
- net stop wuauserv
- net stop cryptsvc
- net stop bits
- net stop msiserver
Note: The commands you entered will stop the Windows Update components such as Windows Update service, Cryptographic services, BITS and MSI Installer.
- After disabling WU components, you need to rename both the SoftwareDistribution and Catroot2 folders. To do that, type each one of the following commands below and don’t forget to hit Enter after you type one command after the other.
- ren C:/Windows/SoftwareDistribution/SoftwareDistribution.old
- ren C:/Windows/System32/catroot2/Catroot2.old
- Next, restart the services you’ve stopped by entering another series of commands. Don’t forget to hit Enter after you key in one command after the other.
- net start wuauserv
- net start cryptsvc
- net start bits
- net start msiserver
- Close Command Prompt and reboot your PC.
Option 3 – Try downloading and installing the Windows Updates manually
Windows Update error code 0x8e5e0147 might be due to a Windows Update that has failed. So if it is not a feature update and only a cumulative update, you can download the Windows Update and install it manually. But first, you need to find out which update has failed, and to do so, refer to the following steps:
- Go to Settings and from there go to Update and Security > View Update History.
- Next, check which particular update has failed. Note that Updates that have failed to install will be displayed under the Status column which has a label of “Failed”.
- After that, go to the Microsoft Download Center and look for that update using its KB number and once you find it, download and then install it manually.
Note: You can also use the Microsoft Update Catalog, a service from Microsoft that provides a list of software updates that can be distributed over a corporate network. With the help of this service, it can be easier for you to find Microsoft software updates, drivers as well as fixes.
Option 4 – Try to reset the Windows Update Agent
Since you can’t update the Windows Update Agent on your Windows 10 computer manually, you can try resetting it instead and you can do it using the Reset Windows Update Agent tool which you can download from the official Microsoft website. This tool allows you to:
-
- Scan all protected system file and replace the corrupted one’s (sfc /scannow)
- Scan, detect, and repair corruptions in Windows system image
- Clean up superseded components
- Reset Windows Update components
- Change invalid values in Windows Registry
- Delete temporary files
Moreover, this tool also allows you to carry out these operations:
- Open Internet Explorer settings
- Search for Windows Updates
- Explorer for local or online solutions
- Restart your computer
Read More
Upgrading your computer from Windows 7 or Windows 8 to Windows 10 or even upgrading Windows 10 to a new version is not that simple. The setup initially checks for all the drivers and other software utilities installed on your computer and verifies and blockages or upgrade or upgrade blocks with respect to any of those drivers or any of those software utilities regardless if you use the Windows 10 ISO or the Windows 10 Upgrade Assistant. One of these common errors, when you upgrade or update your computer, is the “The Display is not compatible with Windows 10” error. This kind of Windows Upgrade error is related to the compatibility of the Graphics Driver installed in your computer. But worry not for this post will guide you in fixing this problem.
The “The display is not compatible with Windows 10” error has the same workarounds as the following errors:
- These devices aren’t fully compatible with Windows 10.
- The display is not compatible with Windows 10. Check with the manufacturer for support.
- The display manufacturer hasn’t made your display compatible with Windows 10. Check with the manufacturer for support.
To resolve this Windows Upgrade error, here are some suggestions that could help:
Option 1 – Check for incompatible drivers in your computer
- Open the Device Manager from the WinX Menu.
- Then expand the list for Display Adapters.
- Next, right-click on the NVIDIA Graphics Card list and select Enable.
- After that, right-click on it again and click on the “Update Driver Software…” option.
- After doing so, a new window will appear and from there, click on the “Search automatically for updated driver software” option.
- Then check if Windows is now able to detect your Graphics Card as well as the latest driver for it. If not, proceed to the next step.
- Right-click on the driver again and click on the “Update Driver Software…” option.
- Now click on the Browse my computer for driver software option and then click on Let me pick from a list of device drivers on my computer.
- Afterward, select a compatible driver for your computer named NVIDIA Graphics Card and then proceed.
- Wait for the whole process to be completed and restart your computer to successfully apply the changes made.
Option 2 – Get the latest version of Graphics drivers from the manufacturer’s website
In case you don’t know the manufacturer of the Graphics Processing Unit or GPU of your computer, you need to check first. They’re usually NVIDIA, Intel, or AMD. So if your computer’s Graphics Processing Unit is manufactured by NVIDIA, you need to get the latest version from their official website.
Option 3 – Try to install the latest Graphics driver in Compatibility Mode
If you’re not able to install the Graphics drivers you’ve downloaded, you can try installing them again but this time using Compatibility mode. Follow the steps below to do so:
- You need to download the driver and place it on your desktop.
- After that, right-click on it and select Properties.
- Next, switch to the Compatibility tab where you should see two options:
- Compatibility troubleshooter, and let Windows figure out what works best for you. If it fails, follow the next.
- Manually choose the version of Windows it was correctly working.
- You also have the option to change the DPI settings and see if that helps. Then click the Apply and OK buttons.
- Now right-click on the file and select the “Run as administrator” option to install. After that, you should now be able to change your screen aspect ratio to what you were using early on.
Note: If you have other programs that won’t work on the existing version of Windows, then make sure to run the program in a Compatibility mode.
Option 4 – Try to run the Program Compatibility Troubleshooter
You might also want to run the Program Compatibility Troubleshooter. This built-in troubleshooter is available in the Windows Update & Security section. From there, select Troubleshoot. This will find a list of programs for you and since you have already downloaded the driver files, just click on Not Listed located at the top of the program list. After that, browse and select the driver files and then let the program do its job.
Read More
Hello everyone, I hope you are all doing well. Today we will be changing the Windows Lock Screen background. Changing the lock screen background is a very easy task and it can be done in a very short time. So let’s jump right into it.
The first thing you need to do is to press the Windows start button on the bottom left and then press settings.
Once the settings screen appears, choose and click on Personalization.

Inside personalization, click on the Lock Screen tab.

On the right screen, under the picture, you will find Windows spotlight, click on it to bring a drop-down menu up.

Your choice is presented as a single picture for background or slideshow, a series of pictures that are going to be looped in a given time interval.
If you would like just a single picture for your background, choose that and click on it.

Once you are in choose picture dialog, click on the browse button and navigate to the picture on your storage which you would like to have as a background.
If however, you fancy slideshow as your lock screen background, click on the background drop-down menu and choose the slideshow. Next, click on add a folder and navigate to a folder where you have pictures that you would like to have as a slideshow for your Windows lock screen.

Read More
If you are frequently experiencing slow loading of folders in your Windows 10 computer, Downloads folder for instance, then you’ve come to the right place as this post will help you resolve such issue. Slow loading of folders is a common problem faced by many users even when they are using the latest hardware like SSDs. So if you experience the same thing, be it with the Downloads folder or other folders on your computer, there is a way to resolve that issue and make the folder load faster.
Slow-loading means when you attempt to open the folder, it takes a couple of seconds before it displays its contents. In such cases, you’ll see a green loading address bar that says “Working on it” which can get quite annoying especially if you are in a hurry. And if you notice that this only happens in the Downloads folder, there certainly is something wrong. This kind of problem can occur on SSDs and normal hard drives. The main reason behind the occurrence of this problem is that the folder may have been optimized for viewing photos or other media formats which is why it takes quite longer than usual to load all the files and their thumbnails. However, since the Downloads folder usually contains all kinds of files like documents, zip files, audio/video files, etc. there is no need to optimize this folder for media files only because doing so is only going to make the Windows File Explorer slow in loading the folder’s contents and thumbnails which does not exist for many files.
Option 1 – Configure the Downloads folder
- Right-click on the Downloads folder or the folder you’re having trouble opening.
- Then click on Properties and go to the Customize tab.
- After that, click on the “Optimize this folder for” option in the drop-down menu.
- Next, select General items from the drop-down which might have been set by default to Pictures or Video.
- You also have the option to apply this template to all the subfolders, that is if your folder has any subfolders.
- Now apply the settings and restart Windows Explorer.
Note: Once you’ve completed the steps above, it should now make the folder content display a lot faster than before. Now try to open the Downloads folder which would not take much time as you will see the changes right away.
Option 2 – Run CHKDSK to check your disk for errors
When it comes to some issues concerning the hard drive or removable devices, there is a utility in Windows that might help which is called “chkdsk”. This error check utility can help with several issues in the system including File System Error -2147219196.
- Tap the Win + S keys to open the Search box.
- Then type “command prompt” in the field and from the search results that appear, right-click on Command Prompt and select “Run as administrator”.
- After opening an elevated command prompt, copy and paste the following command and hit Enter:
chkdsk /r /f
- Now if you are prompted to run CHKDSK after your reboot your PC, just tap Y and reboot your PC.
- If CHKDSK is not able to find any errors, tap the Win + E keys and navigate the access window. From there, right-click on the concerned drive and click on Properties.
- After opening Properties, click on the tab Tools and then click on the “Check” button under the Error-checking section.
- Wait until the process is completed and then restart your computer.
- Once your computer has restarted, try accessing the file and check if the error persists.
Read More
The quickest and easiest way to log into your computer is when you use the PIN feature in Windows 10. Even though it is a bit slower compared to biometric logins such as Fingerprint and Iris scanning that comes under Windows Hello, the PIN feature is definitely less complicated. However, just like any other module of the software, it is also prone to some errors. In this post, you will be guided in fixing several PIN errors such as 0xd00000e5, 0x8007139f, and 0x8009003. These errors could be caused at different points in time like when you change or create a PIN or when you log into your computer.
To fix the 0xd00000e5, 0x8007139f and 0x8009003 PIN errors, there are various solutions you can try. You may empty the contents of the NGC folder or remove and change the PIN or the password. You could also use the Group Policy Editor or reset the ACLs in the NGC folder as well as run built-in tools like System File Checker and the DISM tool.
Option 1 – Take ownership of the NGC folder and delete its contents
- Boot your computer first into Safe Mode.
- Next, you need to take ownership of the Ngc folder first and you can do that using Command Prompt.
- Type “command prompt” in the Windows Search bar and then right-click on the relevant search result and select “Run as administrator”.
- After that, if a User Account Control or UAC prompt appears, just click on Yes to proceed.
- Next, type and enter this command: TAKEOWN /F C:WindowsServiceProfilesLocalServiceAppDataLocalMicrosoftNgc
- Note that the <path> is the location of the folder or file in File Explorer.
- Now type and enter this second command: ICACLS C:WindowsServiceProfilesLocalServiceAppDataLocalMicrosoftNgc /grant administrators:F
- Finally, once the command has been executed, restart your computer.
- Once your computer has restarted, delete all the contents in the Ngc folder and check if the error is now fixed.
Option 2 – Try to remove and change the PIN or password
The 0xd00000e5, 0x8007139f, and 0x8009003 PIN errors could be caused by some conflicting issues with the PIN or password you have set for the User Account of your computer. Thus, you have to remove or change the PIN or password to fix these PIN errors.
- Remove the PIN by going to Settings > Accounts > Sign-in options.
- From there, go to the PIN section and click on the Remove button.
- You will be asked to verify your account to proceed in removing the PIN, enter your credentials.
- Restart your computer and then set up a new PIN.
- Once you’re done, restart your computer and check if the error is gone now.
Option 3 – Try to use the Group Policy Editor
- Tap the Win + R keys to open the Run utility and type “gpedit.msc” in the field and tap Enter to open the Group Policy Editor.
- Next, navigate to this policy setting: Computer Configuration > Administrative Templates > System > Logon
- After that, double click on the “Turn on convenience PIN Sign-in” option located on the right-side panel.
- Then set its radio button to Enabled. You will see the following description when you do so:
“This policy setting allows you to control whether a domain user can sign in using a convenience PIN. If you enable this policy setting, a domain user can set up and sign in with a convenience PIN. If you disable or don’t configure this policy setting, a domain user can’t set up and use a convenience PIN. Note: The user’s domain password will be cached in the system vault when using this feature. To configure Windows Hello for Business, use the Administrative Template policies under Windows Hello for Business.”
- After setting the radio button to Enabled, it will turn on the Logins in your computer using the PIN.
- Close the Group Policy Editor and restart your computer for the changes to take effect.
Option 4 – Try to reset the ACLs in the Ngc folder
- Type “command prompt” in the Windows Search bar and then right-click on the relevant search result and select “Run as administrator”.
- After opening Command Prompt with admin privileges, execute this command: C:/Windows/Service/Profiles/Local/Service/AppData/Local/MicrosoftNgc /T /Q /C /RESET
- The command you entered will start checking for errors and fix them automatically.
Option 5 – Run the System File Checker scan and the DISM tool
System File Checker:
- Tap Win + R to launch Run.
- Type in cmd in the field and tap Enter.
- After opening Command Prompt, type in sfc /scannow
The command will start a system scan which will take a few whiles before it finishes. Once it’s done, you could get the following results:
- Windows Resource Protection did not find any integrity violations.
- Windows Resource Protection found corrupt files and successfully repaired them.
- Windows Resource Protection found corrupt files but was unable to fix some of them.
- Now restart your computer.
DISM tool:
- Open Command Prompt.
- Then type in the following commands and make sure to hit Enter right after you type each one of them:
- Dism /Online /Cleanup-Image /CheckHealth
- Dism /Online /Cleanup-Image /ScanHealth
- Dism /Online /Cleanup-image /Restorehealth
- After that, wait until the process is finished and do not close the window as the process will probably take a couple of minutes.
- Once it’s done, restart your computer.
Read More
On April 7th Microsoft has released Windows build 21354 for their flagship OS and updates are rolling. Alongside the new update builds Microsoft has decided to create and release Windows 21354 build as an installable ISO image for anyone who wishes to do a clean installation of Windows without the need to update it after the installation.
We have not seen this move by Microsoft in a long time and honestly, we are welcoming it, it is always great to have updated ISO Windows build than to install the old version and sit through an hour or more of updates.
If you are interested in getting this ISO image and you are part of the insider program you can download it from here.
If you would like to read more helpful articles and tips about various software and hardware visit errortools.com daily.
Read More
Copyright © 2023, ErrorTools. All Rights Reserved
Trademark: Microsoft Windows logos are registered trademarks of Microsoft. Disclaimer: ErrorTools.com is not affiliated with Microsoft, nor claims direct affiliation.
The information on this page is provided for information purposes only.
Contents
- What are the common causes of the «BUGCODE_USB_DRIVER» (0x000000FE) error?
- Restore Deleted Files
- Start The Computer in Safe Mode
- Update a Driver With The Device Manager
- Use sfc /scannow To Check All System Files
- Check for Errors The Disk Where Windows Is Installed By Using The Command chkdsk c: /f
- Use The Mode of Compatibility With an Old Version of Windows
- Disable Unnecessary Programs in Windows Startup Menu
- Consult Microsoft Support Service
- Install Latest System Updates
- Scan The System For Viruses
- Test Your RAM
- Make a Clean Installation of Windows
What are the common causes of the «BUGCODE_USB_DRIVER» (0x000000FE) error?
Some common causes of the «BUGCODE_USB_DRIVER» (0x000000FE) error include:
- Outdated or corrupt USB drivers
- Malfunctioning USB devices or ports
- Incompatible or faulty hardware
- Corrupted system files
- Virus or malware infection
- Overheating of the system
- Power supply issues
- Incorrectly configured BIOS settings
- Software conflicts
- Windows updates or patches.
Also:
-
There is not enough free space in the hard disk of your computer/laptop. For Windows 10 to operate correctly you need to have from 2 to 10 Gb of free space in your system disk.
-
An incompatible version of BIOS was installed or the firmware was damaged.
-
Device drivers incompatible with the OS were installed.
-
Windows registry was damaged or deleted, or cleaning operations accidentally deleted system keys.
-
Antivirus software or viruses may block system files or delete important registry keys.
-
An error occurred in the work of backup software.
-
It can also happen as a result of a Windows update.
Read more how to fix 0x000000FE: «BUGCODE_USB_DRIVER» in Windows 11, Windows 10, Windows 8.1, Windows Server 2012, Windows 8, Windows Home Server 2011, Windows 7 (Seven), Windows Small Business Server, Windows Server 2008, Windows Home Server, Windows Vista, Windows XP, Windows 2000, Windows NT.
Here are some ways of eliminating the problem with «BUGCODE_USB_DRIVER»:
Restore Deleted Files
Often BSoD errors cause loss of important files. Files blocked by computer viruses, backup software errors, damaged or overwritten system files, file system errors or bad hard disk sectors – these are only some of the causes that can make your data lost.
Corrections of the corresponding errors will restore the normal operation of your devices, but it does not always restore damaged or lost files. Also, it is not always possible to eliminate an error without formatting the hard disk or clean installation of the operating system, which can also involve loss of files.
Partition Recovery™ 5.0
The tool recovers data from any devices, regardless of the cause of data loss.
Download for free and scan your device with the help of Hetman Partition Recovery. Learn about the program features and step-by-step guide.

Start The Computer in Safe Mode
If the error «BUGCODE_USB_DRIVER» (0x000000FE) occurs when loading Windows and blocks any attempts to work with the system, try loading the computer in Safe Mode. This mode is meant for operating system (OS) diagnostics, but OS functions are very limited in this mode. Safe Mode should only be used if the system is blocked otherwise.

In order to start Safe Mode you should do the following:
-
Go to Start menu and choose Settings.
-
In the settings window that appears go to Update & Security menu and choose the Recovery tab.
-
In the tab Recovery find Advanced startup and click the button Restart now.
-
As your Windows restarts, it will ask you to choose the next step. Choose Troubleshoot.
-
In the Troubleshoot menu click on Advanced Options and then on Startup Settings.
-
Then Windows will inform you that the computer can be restarted with the use of additional settings one of which is Enable Safe Mode. Press Restart.
-
After restarting choose Enable Safe Mode by pressing F4.
Go to view

How to Boot Windows 10 in Safe Mode (All Methods)
Update a Driver With The Device Manager
Have you installed new hardware to your computer? Are you using a new USB device? These can be the causes for the error «BUGCODE_USB_DRIVER». If you installed your device driver from the disk you have found in the device delivery package or if you are using a driver which was downloaded from a place other than Microsoft official website, this can be the core of the problem. You will have to update the device driver to fix it.

You can do it manually in the Windows device manager by taking the following steps:
-
Press Windows button and type device manager on the keyboard.
-
Choose Device Manager from the list.
-
View the list of device categories and click on the arrow nest to the category in which your new device falls. The driver can be marked with a yellow triangle.
-
Right-click on the device name and press Update Driver Software.
-
Then a window of Update Driver Software with two options will appear:
-
Search automatically for updated driver software. Windows will automatically check availability of the best suitable driver for this device.
-
Browse my computer for driver software. Use this option to show the OS where the driver files are kept.
-
Restart the computer after the driver is installed.
Use sfc /scannow To Check All System Files
Damaged or rewritten system files may cause the error «BUGCODE_USB_DRIVER». The command sfc finds damaged Windows system files and replaces them.

-
Press Windows button and enter cmd from the keyboard.
-
Right-click on CMD and launch it as administrator.
-
In the command prompt window, type in sfc /scannow and press Enter.
This process may take several minutes.
Go to view
How to Recover Windows 10, 8, 7 System Files (SFC, DISM)
Check for Errors The Disk Where Windows Is Installed By Using The Command chkdsk c: /f
The blue screen with «BUGCODE_USB_DRIVER» may be caused by a file system error or by bad sectors in your disk. The command CHKDSK will check the disk for file system errors and bad sectors. Using the setting /f will make the program to automatically correct the detected errors, and the setting /r allows finding and fixing problem disk sectors. To launch it, follow these steps:

-
Press Windows, then enter CMD from the keyboard.
-
Right-click on CMD and launch it as administrator.
-
In the command prompt window type chkdsk c: /f and press Enter (use the letter of the drive where your OS is installed).
Wait until the process is over and restart your computer.
Use The Mode of Compatibility With an Old Version of Windows
A error with the code «BUGCODE_USB_DRIVER» may be caused by outdated software. If this error occurs after launching a program, then using Windows compatibility mode can help you get rid of the problem. To fix it, do the following:

-
Find a program executable file (it has .exe extension) and right-click on it.
-
In the quick menu, select Troubleshoot compatibility.
-
At the next stage, you will see the window Program Compatibility Troubleshooter. You will have two troubleshooting options to choose from:
-
Try recommended settings. Select this variant to start a test run of the program using recommended compatibility settings.
-
Troubleshoot program. Select this variant to choose compatibility settings based on what problems you have encountered.
-
-
After testing the program under various versions of Windows and startup settings save the suitable settings for your program.


Go to view
How to Run a Program in Compatibility Mode With Windows 10, 8 and 7
Disable Unnecessary Programs in Windows Startup Menu
The software causing «BUGCODE_USB_DRIVER» (0x000000FE) may be written to Windows Startup list so the error occurs immediately after the system starts without any user activity. You can delete programs from Startup by using Task Manager.

-
Load the computer in Safe Mode.
-
Right-click on Task Bar and then on Task Manager.
-
Go to Startup tab.
-
To delete a program from the startup list select it and disable by clicking Disable in the right lower corner of the window.
Consult Microsoft Support Service
Microsoft offers several solutions to eliminate the blue screen error. «BUGCODE_USB_DRIVER» (0x000000FE) can be fixed with the help of Windows Update or by addressing Windows Support.

-
Go to Microsoft Support Service.
-
Enter your error code and message into the search field and follow the directions.
-
If you don’t find a ready solution as the community where your query can be answered by a certified system administrator.
Install Latest System Updates
Windows provides updates that extend your driver database and correct errors or security vulnerabilities. Download the latest updates to get rid of the error «BUGCODE_USB_DRIVER» (0x000000FE).

You can launch Windows Update like this:
-
Go to Start menu and select Settings.
-
In the Settings window go to Update and Security tab.
-
To install the latest Windows updates click on Check for updates and wait until they are found and installed.

It is recommended to set up automatic download and installation of system updates with the help of Advanced Options.
To enable automatic system update you need to start Windows Update:
-
Go to Start menu and choose Settings.
-
In the Settings window go to the Update and Security menu and select Windows Update. To install the latest Windows updates click on Check for updates and wait until they are found and installed.
-
Go to Advanced Options and choose the mode of update installation — Automatic.
Scan The System For Viruses
The blue screen of death with the error «BUGCODE_USB_DRIVER» 0x000000FE can be caused by computer viruses that infected your system.
To check the computer for viruses launch your antivirus program.
Modern antiviruses allow checking both hard disks and RAM. Run a full system scan.
Test Your RAM
System memory problems may cause errors, loss of data or even make your computer stop working.
Before you start checking RAM, take it out of the slot on the motherboard and then stick it back again. Sometimes the error «BUGCODE_USB_DRIVER» can be caused by the memory stick which was set into the slot incorrectly or not tight enough, and sometimes by the slot contacts covered with dust.
If the above actions did not make things better, you can check your RAM with the means of your operating system – Windows Memory Diagnostic.
JYou can start this tool in two ways:
-
With the help of Control Panel:

Go to Control Panel / System and Security / Administrative Tools. Launch the application Windows Memory Diagnostic.
-
With the use of Run:

Launch the Run tool with the combination of keys Windows + R. Type in mdsched and press Enter. The Windows Diagnostic tool will start.


To start the checking select one of the suggested variants to decide how your RAM will be tested after the computer is restarted.
If the diagnostic tool finds errors that cannot be corrected, such memory should be replaced (that is, you have to replace the memory stick where errors were found).
Make a Clean Installation of Windows
If none of the methods helped you to get rid of «BUGCODE_USB_DRIVER», try reinstalling Windows. In order to make a clean installation of Windows you need to create a setup disk or another media which you are going to use to install the OS.
Start the computer with the setup disk. To do it you may need to change boot priority in BIOS or UEFI for newer computers.
Following the installer menu stages, specify the disk where you want your Windows installed. You will have to format it then. If you are not satisfied with the number or size of the local disks they can be deleted and repartitioned.
Remember that formatting, deleting or partitioning your disks will destroy all files in the hard disk.
After specifying the disk to install Windows to, the process of copying system files and installing the operating system will start. During the installation, no additional action is required. In the process, the screen will go off for a while several times, and the computer will restart on its own to complete certain stages of installation.
Depending on the version of Windows at one of the stages you may have to select or enter basic personalization settings, choose how the computer works with networks and select settings of your account or create a new one.
As the computer loads the desktop, a clean installation of Windows is finished.
Note. Before you start a clean installation of Windows make sure you have drivers for all your hardware and that your files are safe. Download and save drivers to a separate media, and create a backup copy of important data.
Go to view
How to Reset Windows 10 or 8 PC to Factory Default Settings (All Methods)
Go to view
How to Reset Windows 10 or 8 PC If The Operating System Won’t Boot