
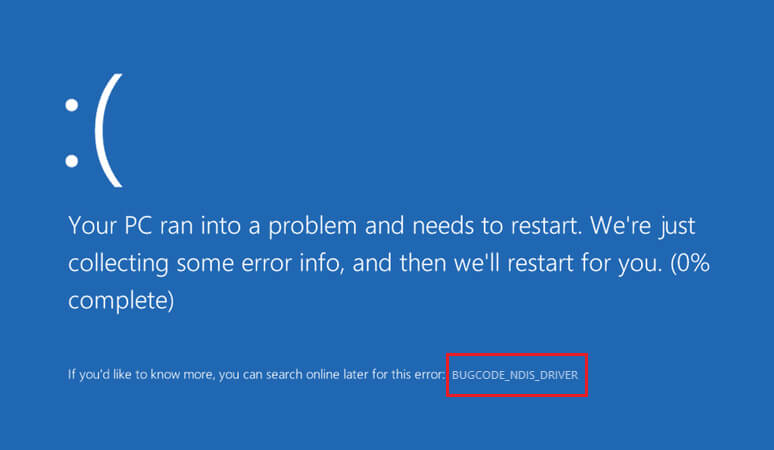
If you have come across a Blue Screen of Death or BSoD on your Windows PC, it might be due to several reasons ranging from software issues to hardware component malfunction. There are various probable reasons for BSoD on a Windows system. One such reason is the BUGCODE_NDIS_DRIVER error identified by the bug check value 0x0000007C. This is basically, an error in the networking driver of your PC.
In this blog, we will learn the most effective methods to counter and eliminate this error causing BSOD and other problems on a Windows machine. You will also find an additional solution to recover any lost data due to the BUGCODE_NDIS_DRIVER error in the latter part of this blog. So, without any further delay, let us begin.
Best Methods to resolve the BUGCODE_NDIS_DRIVER error on Windows 11/10 PC
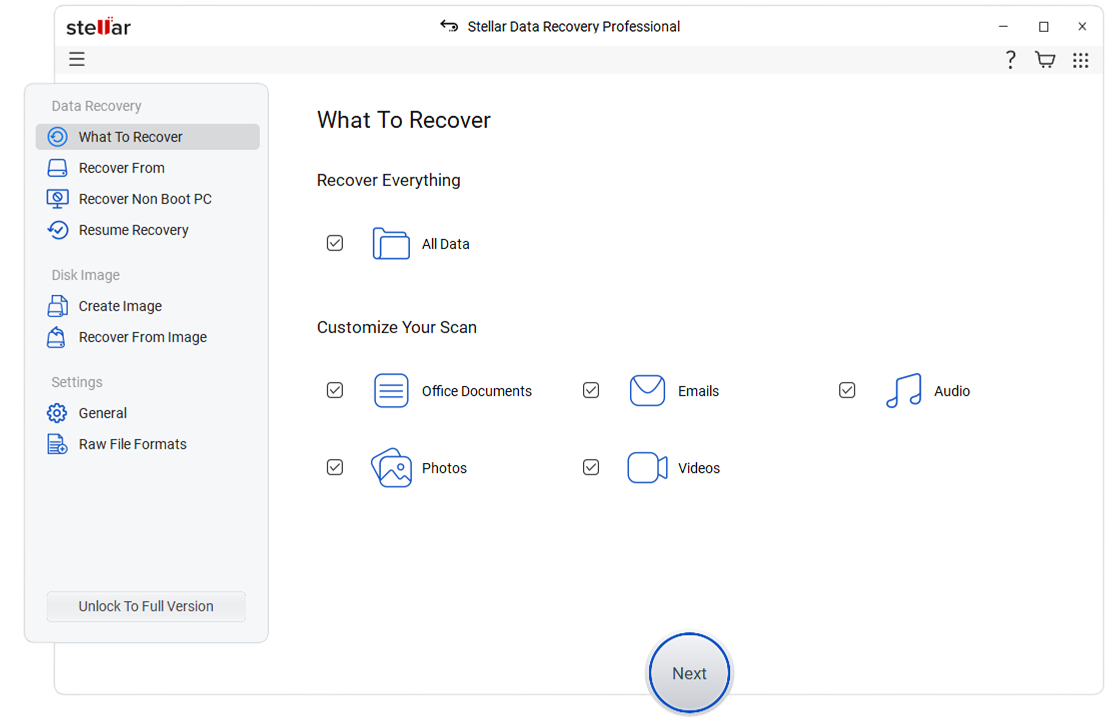
Although you might resolve the bugcode ndis driver error in multiple ways, we have listed the best yet simplest methods to fix the error. As the error causes sudden BSoD, make sure that you have a backup of your data in case of sudden data loss. However, if you don’t have a backup, you should keep Stellar Data Recovery Professional handy for Windows. It will help you securely recover any lost data on Windows 11/10 PC with 100% surety.
Fix 1: Update the system drivers
As discussed above, the core reason for the error in hand is the malfunctioning of a networking driver. Therefore, before proceeding to other solutions, let us address the root cause. To update the system drivers using the Windows Updates, follow the steps below:
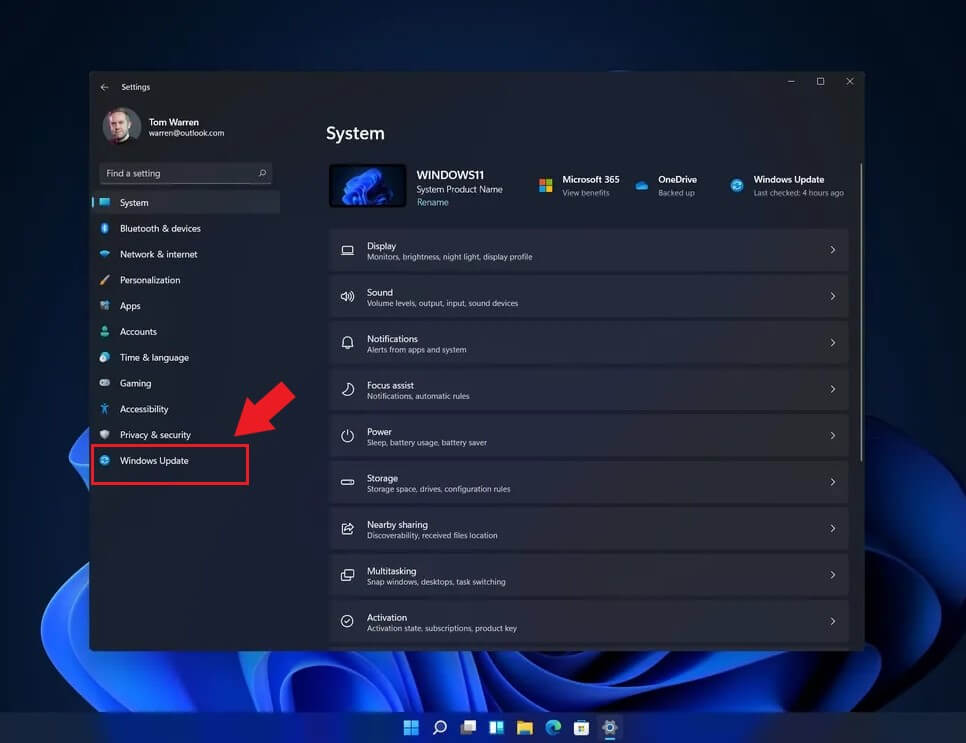
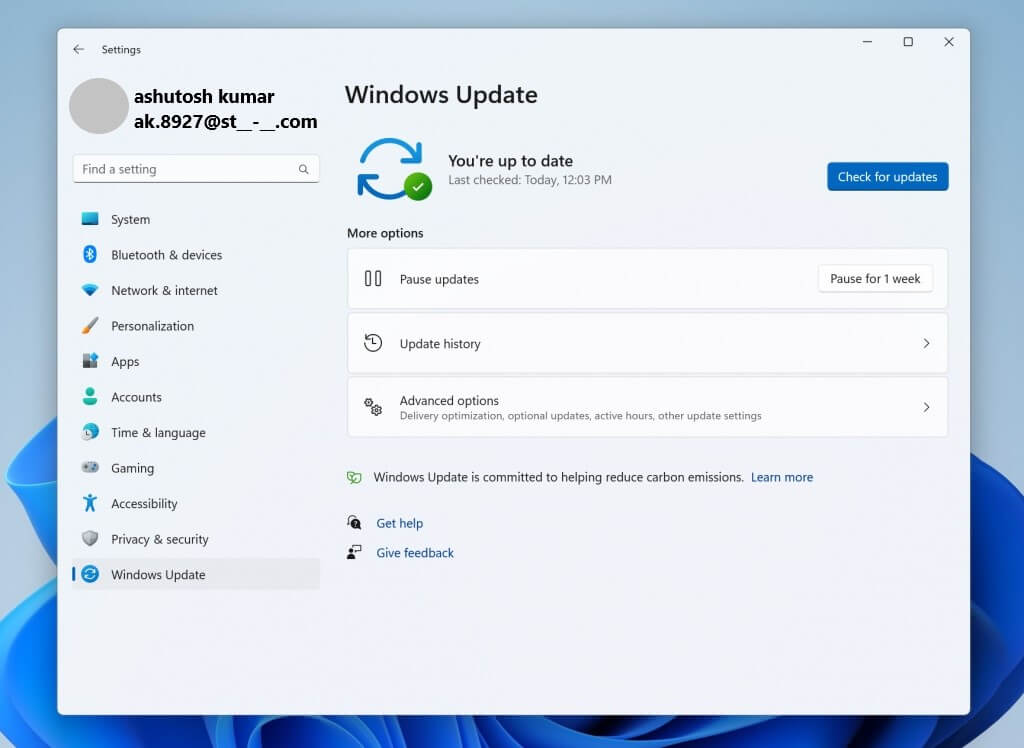
Step 1: Press Win + I to open the Windows Settings and choose Windows Updates from the left pane.
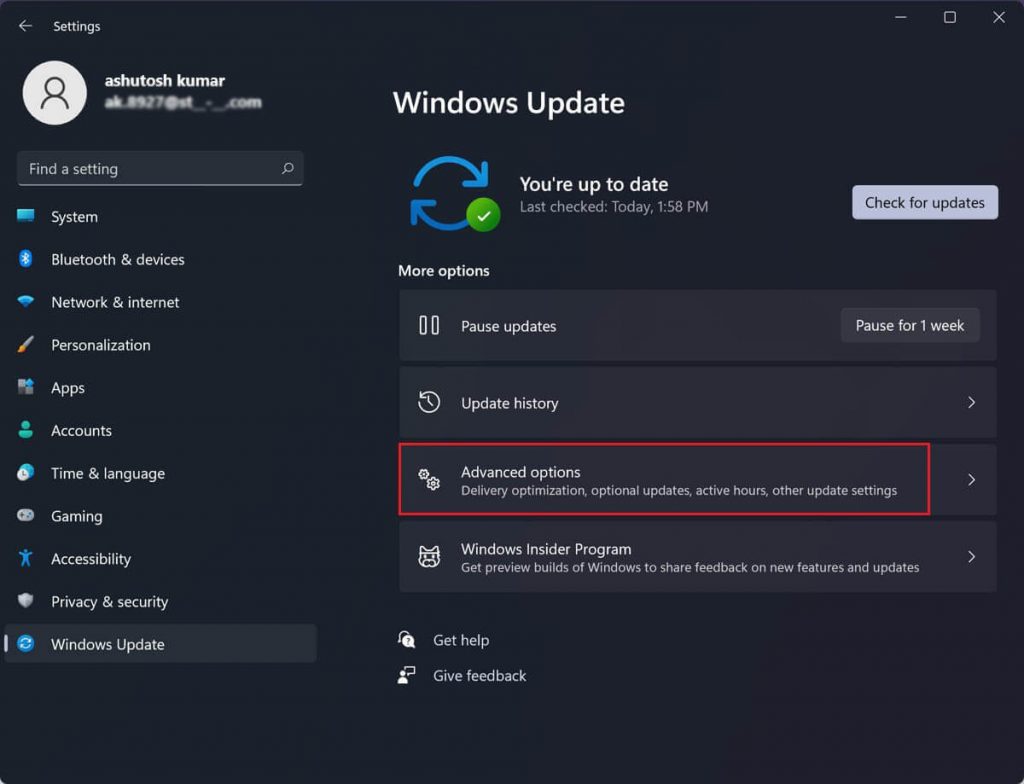
Step 2: Click on Advanced Options.
Step 3: Select the Optional Updates menu under the Additional options tab.
Step 4: Click on the Drivers Update section to expand it and tick the checkbox.
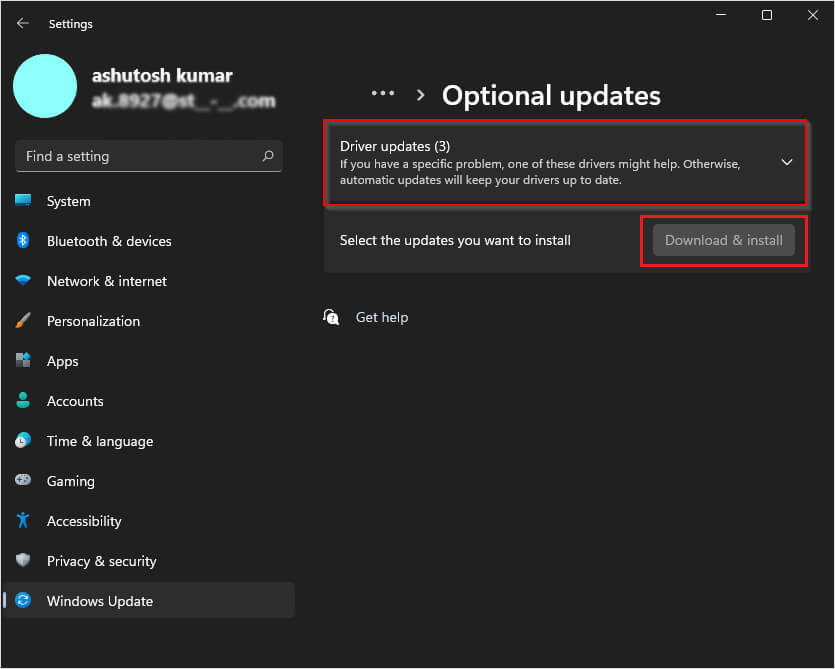
Step 5: Click the Download and Install button.
Your driver’s update will be downloaded and installed automatically. Now, restart your computer and check if the problem is resolved. If not, move ahead to the next fix.
Fix 2: Update your Windows 11/10 OS
There are chances that the drivers are misbehaving due to a pending windows update. The Windows updates are not only meant to improve the performance of your existing OS, but they are also necessary to resolve certain glitches surfacing from time to time on Windows PC. You can update your Windows 11/10 OS by clicking Start > Settings > Windows Update.Then, click Install Updates, and your system will automatically download and install the updates. If you’re facing trouble updating Windows 11, check if you have a good internet connection available on your PC.
Fix 3: Uninstall the Wi-Fi driver
The BUGCODE_NDIS_DRIVER error is also caused due to a faulty Wi-Fi driver. If none of the above methods have worked for you, there might be a problem with your Wi-Fi driver. To resolve the issue, uninstall the Wi-Fi driver by following the steps below.
Step 1: Right-click on the Windows Start menu icon and select Device Manager from the menu.
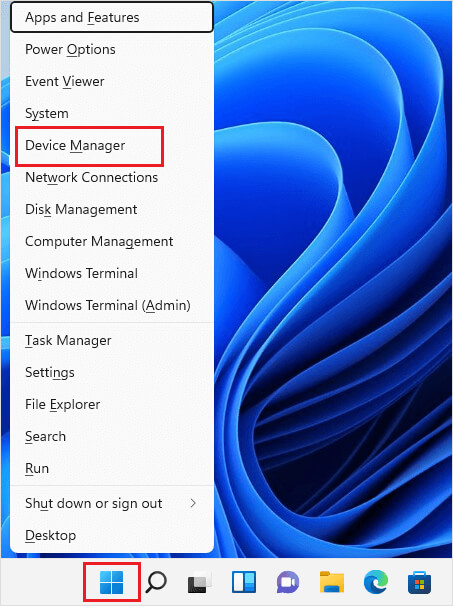
Note: You can also use Control Panel to open the Device Manager.
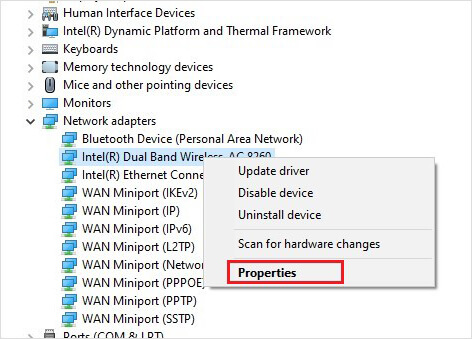
Step 3: Click on Network Adaptor to expand it. You will find a driver with the name Intel(R) Dual Band Wireless – AC followed by a four-digit number like 8260, 8265, 7265, etc.
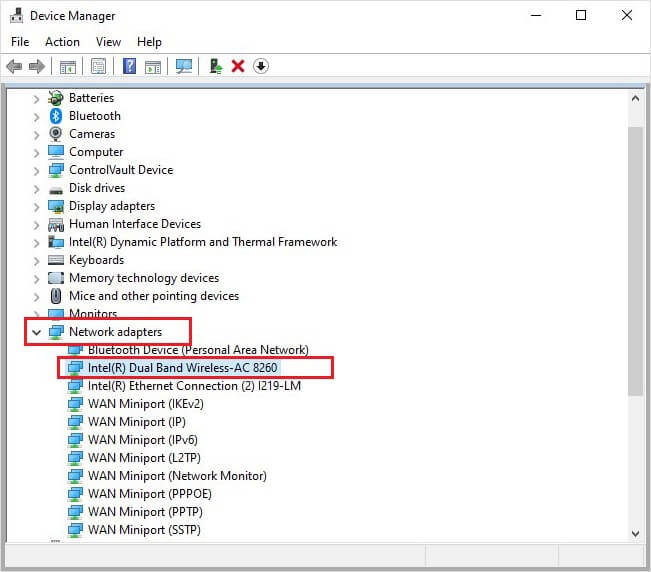
Step 4: Right-click on the driver name and select Uninstall device from the menu.

Step 5: Restart your computer, and the Wi-Fi driver will be re-installed automatically.
Fix 4: Clean boot up your Windows PC
When you boot up your Windows PC normally, it starts by loading up some applications and programs along with the OS. There might be some program causing hindrance in the drivers or is not working properly. To check and rectify this problem, you need to perform a clean boot of your PC.
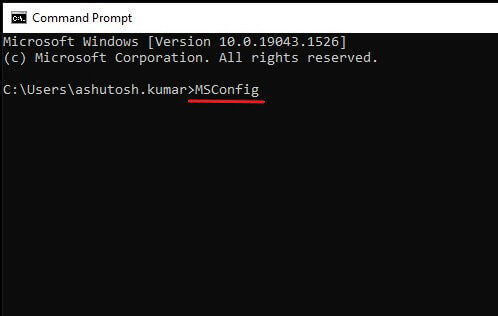
Step 1: Launch Command Prompt and insert the command MSConfig. Now, hit Enter.
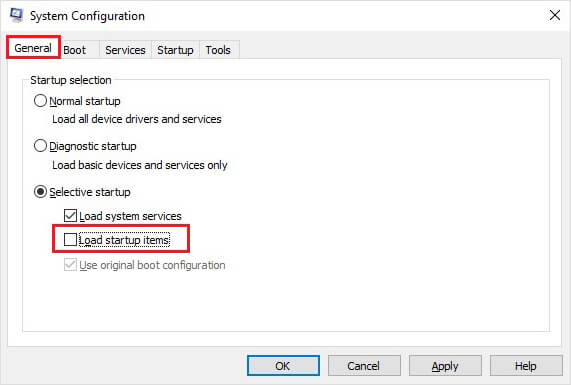
Step 2: Click the General tab in the System Configuration Tool window. Uncheck the Load startup items option.
Step 3: Click the Services tab and check the Hide all Microsoft Services option at the bottom left.
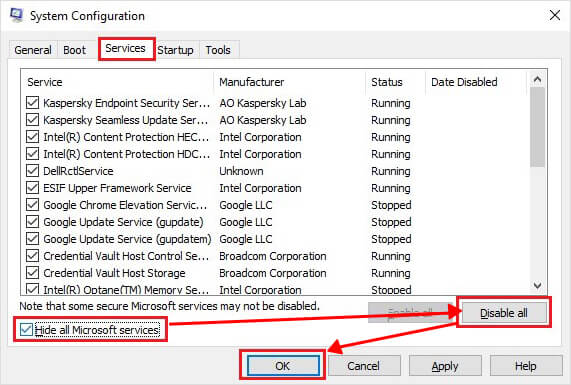
Step 4: Click Disable all tab on the right and click OK.
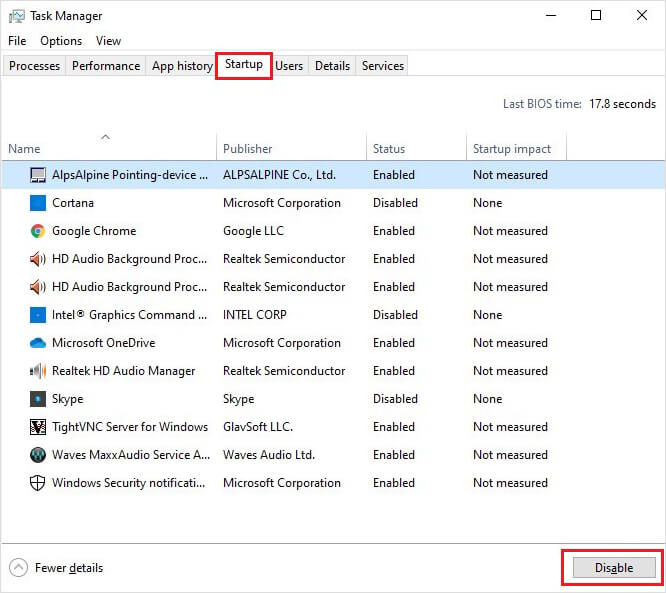
Step 5: Press the Ctrl + Shift + Esc to open the Task Manager.
Step 6: Click the Startup tab and disable all the applications.
Restart your computer for the changes to take effect and clean boot your PC.
Fix 5: Use an older driver version
If nothing from the above methods has worked for you, you should go back to install an older version of the drivers on your Windows PC. Here’s how to do it.
Step 1: Open Control Panel > Device Manager and navigate to the Network Adapters.
Step 2: Expand the Network Adapter option. Right-click on the driver you want to roll back and select Properties.
Step 3: In the Properties window, click the Driver tab, select the Roll Back Driver option, and hit OK.
Can I recover my data lost due to the BSOD issue?
If you have encountered a sudden BSOD due to the BUGCODE_NDIS_DRIVER error on your PC, there are chances that you have lost the unsaved data. It is further possible that the abrupt malfunction of drivers has caused corruption of important data. Well, no need not sweat it. We’ve got your back. Using the Stellar Data Recovery Professional for Windows, you can easily recover any lost, corrupted, or deleted data on your Windows PC.
If you’re wondering how to recover the lost data using professional software, let me tell you that it’s a DIY tool, and you need no technical expertise to use it. The software is capable of recovering any data type, and you can even add the file type you want to recover. So, practically it is suitable for recovering unlimited types of files around the globe. Furthermore, the SMART drive monitoring feature of Stellar Data Recovery Professional keeps a constant check on your system’s temperature, drive health, and performance. This feature helps you avoid any major setback in the PC in advance.
Conclusion
BSOD is a tough situation for any user, and you must address it immediately at the first encounter. Otherwise, it may aggravate the trouble and cause severe data loss. Although, BSOD does not have a single reason, and thus there is no single solution to it. You need to try different solutions to resolve the BSOD on Windows PC. The above methods are, undoubtedly, the most effective ones and one of these will help you get rid of the BUGCODE_NDIS_DRIVER error. Don’t forget to share the technique that helped you.
Was this article helpful?
FAQs
Will BSOD harm my computer?
BSOD occurs only when your OS finds itself in a situation beyond its capability to be resolved normally. So, yes, BSOD is harmful to your PC and the data stored on it. Therefore, you should immediately address the issue causing the BSOD. Moreover, if you have lost data due to deletion or corruption, use Stellar Data Recovery Professional for Windows to recover any lost data on your Windows 11/10/8/7 PC.
Can BSOD occur due to overheating of Windows PC?
Overheating a system can cause a system crash and a blue screen of death apart from other system errors. Therefore, you must ensure that an adequate cooling system is in place to check the overheating of your PC. If you have installed Stellar Data Recovery Professional for Windows, you can get a real-time update of the temperature, drive-health, and performance beforehand with a SMART drive monitor feature.
BUGCODE_NDIS_DRIVER Error ends up with the sudden crash of the Windows, commonly during initialization. This particular error had the bug check of 0x0000007C which signifies issues in a networking driver. Some other general causes can be certain RAM issues, overloaded disc, bugs in an update or even malware or virus attacks.
When the system gets affected with BUGCODE_NDIS_DRIVER, you might come across several complications like auto-shutdown of PC, desktop freezing, irregular flashing and more. Out there are various effective solutions which can help you to disembroil and get rid of this BSOD. So, follow the quick links of the workarounds mentioned below to resolve the problem –
BUGCODE_NDIS_DRIVER Error in Windows 10 Solutions
Here is how to fix BUGCODE_NDIS_DRIVER Error in Windows 10 –
1] Prevent automatic shutdown
Something about blue screen errors that indisputably annoys just every user is the force shut down or crash. Though the PC crashes to ensure the least harm while confronting technical problems, it really can render users helpless. If you too are on the victim list, you can use the below steps to stop your PC from shutting down automatically. Here is what you need to do –
Step-1: If your PC crashed during initialization, restart it and in the desktop, right-click on This PC icon => Properties.
Step-2: When the System window appears on the screen, execute a click on Advanced system settings.
Step-3: Now, the System Properties wizard will come up. Find Startup and recovery in the lower section of this window and hit Settings under this heading.
Step-4: Thereafter, beneath the System Failure, you’ll have to uncheck the box corresponding to Automatically Restart.
Step-5: Finally, click on OK.
With this, any attempts of automatic restart will be blocked. Now, this is not a fix to the blue screen errors, but just for preventing the auto-reboot situation.
2] Fix issues with the hardware accessories
In some cases, certain new hardware components can interrupt the PC’s function due to the lack of compatibility between the two. It could be even due to the specific device driver’s error or obsoleteness. Notice whether you started getting the BUGCODE_NDIS_DRIVER error immediately or shortly after adding or installing new hardware or device on the computer.
- To confirm this, you can simply disconnect or uninstall any recently added device temporarily.
- Keep the hardware elements somewhere safely.
- See whether this bypasses the BSOD. If it does, the hardware component was causing the error.
- If that’s the case, you should update the hardware driver from the respective manufacturer’s site.
3] Boot the device in Safe Mode to resolve BUGCODE_NDIS_DRIVER
You might have seen “working in safe mode” as a workaround to many, many types of errors. The reason is that when you boot your system in this mode, the PC will run only and only the most integral components, programs, and drivers. This means that whatever non-core element had been causing the trouble would no more interrupt and cause the issue. Once in Safe mode, you can easily run the troubleshoot or try other fixes thereby attempting to fix the whole BSOD situation. Below, you can see the steps you need to follow in order to start the safe mode –
- First of all, click on the Start icon and then the Power button.
- Further, choose the Restart option from the menu while simultaneously pressing the Shift key.
- Upon restarting of the Windows, you will be seeing a plain blue or black screen showing a bunch of options. There, you need to hit the Troubleshoot and then Advanced Options.
- The next step is choosing the Startup Settings.
- Now you will find a screen with multiple modes/options of restarting. One of them would be ‘Safe mode’. Also, you will see a Restart icon located at the bottom right corner. Click on the same and let the device to reboot again.
- Thereafter, all you need to do is press F4 to initiate Safe mode. Now that your PC is probably working error-free, go for a full security scan and troubleshooting to fix any discrepancy in the system or its components.
4] Check whether your system drivers are up to date
Device drivers play a critical role in the prompt functioning of the computer and its components. Well, ensuring that they are up to date and well-functioning is important. Besides, as you read in the very beginning, driver related issues are the most common roots of BUGCODE_NDIS_DRIVER. Here is the sequence of steps to check and update device drivers –
- Start by typing devmgmt.msc in the taskbar search box.
- Once you do, you can see the Device Manager option appear in the result. Simply double-click on it to launch the same.
- When you see the console, find out whether any device there has an exclamation mark.
- If there indeed is any, expand it.
- Right-click on the drivers of the devices showing the yellow mark.
- Then, from the menu that flies out, select Update driver option. Afterward, go with the visible instructions available on the screen.
- Once updating completes successfully, simply reboot the system and see whether the BUGCODE NDIS DRIVER error still occurs.
5] Run Blue Screen troubleshooter
Up until recently, Windows just had one generic troubleshooter. However as more and more complaints, reports and user requests for a solution for Blue screen issues came in, Microsoft added a special troubleshooter section particularly to deal with BSOD errors. Introduction of these has been quite helpful to the users, particularly for novice users who are not good with the technical aspects of the operating system. This can be pretty effective in resolving various BSODs including BUGCODE_NDIS_DRIVER.
Blue screen troubleshooter would come handy especially when you have no idea as to what is causing an error. It’s also helpful when other fixes seem to fail. Here is how you can use Windows 10, blue screen troubleshooter –
- Press Windows + I. This is a shortcut that will take you to Settings.
- When in the UI of the Settings, click and navigate to Update & Security.
- Now, in the next screen that follows up in the interface, select Troubleshoot option from the left pane.
- Now, in the adjacent right and click Blue screen from the options in the lower section of the window.
- Finally, select Run the Troubleshooter to trigger the blue-screen troubleshooting process.
6] Get your Windows update to solve BUGCODE_NDIS_DRIVER
As you probably know, the periodic or cumulative updates that Microsoft releases come with certain updated features, fixes for bugs and problems as well as other important changes. These are very critical for a smoothly functioning PC amid the new kind of vulnerabilities, threats, and bugs that pops up now and then.
Usually, users have their PC updated automatically on a monthly or periodic basis every time Microsoft releases an update. However, this would work only if you have the automatic update settings untouched and uninterrupted. If you have disabled the same, you might not receive the latest updates automatically and you might have to do it manually. Also, a network issue while your device was getting updated could cause trouble. It may lead to a faulty update. So, here is how you can personally check and make sure that your PC is up to date. Steps to check for any pending updates –
- Repeat step 1 & 2 from the previous fix. As you go to the Update and security category, you will, by default, be in the Windows update.
- Simply hit Check for updates button and let the system scan for any and all new or pending updates.
- If nothing gets listed, it means no patches are due.
- Now, in case there are any due ones, simply download and let the system install them. You just have to hit the ‘Download’ button and follow any instructions on the screen. PC will ask permission for a restart to complete the procedure.
7] Uninstall faulty Updates
Now, there’s yet another thing. When your system receives a faulty or a buggy update, it too may lead to a blue screen and other kinds of errors like BUGCODE_NDIS_DRIVER. This can’t be true if you started facing the BSOD after installing and update recently. In this part, we will discuss how to uninstall faulty updates and check for new ones as well. Steps to uninstall faulty updates or patches –
- In the Windows Update section, select View Update History=> Uninstall updates.
- A new window will open up showing all the updates that your PC received. Try uninstalling the latest by selecting it and hitting the ‘Uninstall’ button on the top.
- Restart Windows 10 PC and see whether the issue is done with.
8] Avoid having conflicting applications
It is seen quite often that users install multiple application that performs somewhat similar or duplicate functions. While it may not look worse at the time, this thing has a tendency to cause conflicts in the system. For example, if you have a third party antivirus along with Windows Security (the built-in protection app) then there can be conflict. But, all you need to resolve this is by simply uninstalling the problematic applications.
Uninstall the extra apps and see whether this fixes your issue. If it doesn’t, you can sure reinstall if- that is, if you totally need to. It is generally good for the performance of the computer to not have duplicate applications.
9] Run a full scan for security breaches, vulnerabilities and malware attacks
Countless users have their PC in trouble way too often because of malware activities. Windows now come with its own security program, thankfully. You can use the same to check the entire system for any trace of malicious activities.
- You just need to open the Windows Security (the app with Shield icon on the taskbar or simply search it).
- Thereafter, just navigate to the Virus & Threat protection.
- Follow along with the on-screen options to complete the process. Note to select ‘Full scan’ when prompted. Also, the process may take a while. Don’t grow impatient and abandon the process in the middle.
10] Use SFC for any missing file or corrupted component
System File Checker is the function in Windows which, when run, detects an integral system file that is missing and restores it. Further, it looks for any corrupted system components and fixes them as well.
- To use this, all you need to do is open Command Prompt as an administrator.
- Go ahead with the UAC prompt by clicking the Yes button.
- Then, simply type the below command and press Enter.
Sfc /scannow
- After the scan gets over, check for the occurrence of the error code.
11] Free up your memory to avoid BUGCODE_NDIS_DRIVER
Almost all processes that go on in your OS result in a big amount of data being saved and this data is not always valuable. All of these files take up a big chunk of Hard Drive’s memory which can influence your OS’s processing capabilities. You can easily solve BUGCODE_NDIS_DRIVER with the help of Disk Cleanup tool.
- Put in cleanmgr in the search box.
- After Disk Cleanup option pop up in the results, select it.
- You will have to select the exact Disk that you want to delete the junk from. You can do so by choosing it from the newly appearing list and then pressing Enter.
- First, the application will scan Disk to provide you with possible amount of files for cleanup. Then, after it will finish scanning, you will encounter a new window, at the bottom of which you will have to press Clean up system files.
- You will encounter a window where you will have to select a disk you need to clean up. Press OK.
- Another wizard will pop up, and here you will have to select what data you need to clean up. You have to select all of them except for Downloads.
- Look through your Recycle Bin and recover all the important data back to its root.
- To start the cleanup press OK.
- After finishing this process check if the error is still present.
12] Prevent BUGCODE_NDIS_DRIVER by running DISM
Damaged Windows Image can cause a BUGCODE_NDIS_DRIVER to appear, and here is Microsoft’s ultimate tool for this kind of issues. Deployment Image Servicing and Management (DISM) – is an application that can recover images and solve issues that occur as a result of damaged files.
- Simultaneously press Win key and S to get access to a Search Box.
- Put in CMD and press the right mouse button on the appearing Command Prompt.
- From the pop-up menu select Run as Administrator and press Yes when the application will need your approval.
- In the following window type this exact command –
DISM.exe /Online /Cleanup-image /Restorehealth - Click Enter for application to start the recovering process. This procedure can go for as long as 10 minutes, so you will have to be patient.
- After it gets over, reboot the device and look for the presence of BUGCODE_NDIS_DRIVER.
13] Restore all System configurations
There is a pretty big chance that BUGCODE_NDIS_DRIVER can be a product of System’s configurations interference by the way of setting up new applications and/or getting rid of the old ones. You can dismiss all the interfering configurations with a System Restore option.
- Right-click on Windows icon and from the available menu choose Run.
- Put rstrui in the text field and press OK.
- Look through all the available restoration points by unveiling them with Show More Restore points option.
- Select the latest restore point and press Next button.
- On the newly appearing screen press Finish to begin the restoration procedure.
14] Restore Hard Drive’s Bad areas using CHKDSK
Different system’s errors can be caused by various components or configurations, and one of the most common issues for BUGCODE_NDIS_DRIVER error is Hard Drive’s bad areas. Actually you have an implemented tool – CHKDSK to help you solve it. And here is how to access it through the Elevated Command Prompt –
- Use any of the available ways, that are described thoroughly above, to access Elevated Command Prompt.
- In an appearing text bar input the following –
chkdsk [Drive:] [parameters] - Running this command will check Disk Status. But what we need is to find bad sectors and here is the additional syntax to get the desired result –
/f/r/x
f – represents restoring bad sectors that are present in the Hard Drive
r – stands for distinguishing those bad sectors
x – is used to dismiss all the ongoing processes so the application can begin its procedure
To get the result we need we have to use all of the symbols above and to connect them altogether in this form: chkdsk C: /f /r /x
Note – C: is the Hard Drive that we used as an example, so you can do this procedure with any hard drive you need.
- After finishing this procedure, reboot your PC and look for the error.
15] Solve memory issues to get rid of BUGCODE_NDIS_DRIVER
In case you saved some data in a wrong way or your device encountered some sudden power surge etc., as a result, you could experience the BSOD error. Do not worry, there is a way to cope with this issue, and here is how to do it –
- We have to start off from preparation. And the first step will be to finish all active procedures on your PC.
- Access the Search bar and type in Windows Memory.
- Press the “Windows Memory Diagnostic” option when it will be available.
- In the following window, you will have to select “Restart now and check for problems (recommended)“.
- The process will start with scanning that will reveal memory issues. Your device will reboot by itself after finishing this process.
- After booting the device you will find the results in the system tray.
Methods:
1] Prevent automatic shutdown
2] Fix issues with the hardware accessories
3] Boot the device in Safe Mode
4] Check whether your system drivers are up to date
5] Run Blue Screen troubleshooter
6] Get your Windows update to solve BUGCODE_NDIS_DRIVER
7] Uninstall faulty Updates
8] Avoid having conflicting applications
9] Run a full scan for security breaches, vulnerabilities and malware attacks
10] Use SFC for any missing file or corrupted component
11] Free up your memory
12] Prevent BUGCODE_NDIS_DRIVER by running DISM
13] Restore all System configurations
14] Restore Hard Drive’s Bad areas using CHKDSK
15] Solve Memory Issues
That’s all!!
BUGCODE NDIS driver windows 10 fix, You may have come across a computer error where the operating system crashes and displays a Blue Screen of Death and an error. This would be classified as a BUGCODE_NDIS_DRIVER error (BSOD).
Most of the time, it comes during Windows 10 installation when the Wi-Fi option is enabled in the BIOS.
BUGCODE NDIS driver windows 10 fix, You may see a few different results like a computer restart due to this error code being displayed.
The BUGCODE_NDIS_DRIVER error can be caused by faulty driver updates. The error code has been known to have been triggered when it comes to network drivers.
During installation, if Wi-Fi LAN is enabled in your BIOS you may notice that the issue still exists.
At this point it’s important for you to disable all the wireless options in your BIOS so the computer doesn’t attempt to connect intermittently which will trip up Windows Updates and cause a whole host of other issues that are far more severe than just installing some drivers.
Multi-core processors can be a problem. BUGCODE NDIS driver windows 10 fix While you may experience slow performance on Windows computers, you could disable the Wi-Fi adapter options and do a clean install of your software.
If possible, you can re-enable your CPU cores and update your Wi-Fi drivers.

Downloading drivers from the Intel website is a way of making sure that the driver you are using is the latest and most up-to-date version. This can make a difference in terms of performance and reliability.
After installation take a few moments restore your Wi-Fi skills that were put on the backburner.
For many laptops, Wi-Fi network driver is very important . This is because , unlike desktop PCs which have wired connections.
Many times, BUGCODE NDIS driver windows 10 fix you may encounter Windows 10 issues on your ACER computer.
The errors have to do with the drivers and firmware – the source of the error is due to poor installation or incompatible drivers that didn’t get properly installed on the motherboards within your ACER desktop computers.
But with the recent Windows 10 20H1 (also known as 2004 update) edition, it’s more likely that this issue will be fixed. You can subsequently update your Intel drivers by locating them on Windows Update.
BUGCODE_NDIS_DRIVER Error – Common Hardware
“Blue screen of death (also known as 0x0000007C)” error refers to a Windows error.

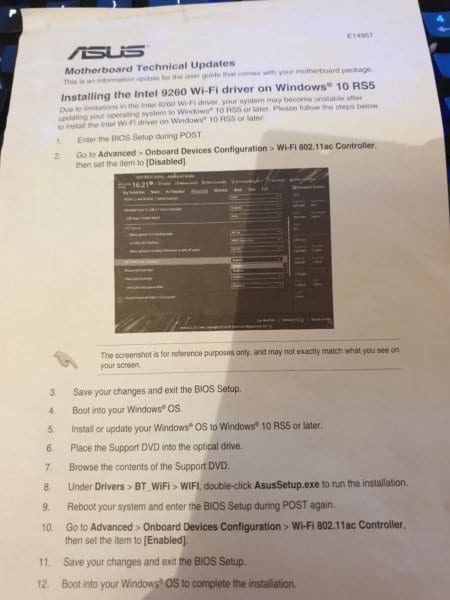
This type of error can occur in different types of Devices manufactured by Asus; it may also be present within some motherboards.
- ASUS ROG Zenith Extreme Alpha X399 HEDT Gaming Motherboard AMD Threadripper 2 (TR4)
- X299 Rampage
- x299 Deluxe II
- Alpha Zenith Extreme Edition
- ryzen 9 3900x
- Asus Prime X299 Deluxe ll
- Tuf x570 (Wifi)
- Dominus Extreme motherboard with an Intel W-3175X CPU
- Gigabyte Aorus B4050I WIFI.
- ASUS X570-Plus (WiFi) motherboard with BIOS version 1407
- ROG Rampage VI Extreme Omega X299-II
- Aspire V5-531
Causes of BUGCODE_NDIS_DRIVER Error
Qualcomm Atheros AR5BWB222 Wireless Network Adapter – A wireless network adapter is a computer hardware device that is installed on an expansion.
BUGCODE NDIS driver windows 10 fix, PCI or mini-PCI slot for the specific purpose of allowing the computer device to connect wirelessly with another device such as a router.
As adding this adapter is not necessary, and in fact can use up some precious PC resources like bandwidth and battery power, you may wish to uninstall this entirely, especially if you do not need or have no use for it at all.
TP-Link adapters are designed to improve or create your internet experience. Their technology helps you bridge the gap between devices that aren’t joined on a network and in some cases of continual problems with these devices.
This prevents access to an adapter’s full functionality. One may remove them from one’s configuration for cleaner operation.
Cisco VPN Client – there are certain pieces of software that may interfere with your process of starting up Windows 10. The easiest thing to do would be to uninstall the Cisco VPN client whenever you experience this BSOD code.
In other words, you can either remove the troublesome software or update it and finally get your version upgraded. Alternatively, you could just find another VPN client for your computer.
BSOD Cause: This problem is observed when the operating system that one is trying to boot into is newly upgraded and the bugs caused by the upgrade are not completely eliminated.
As a consequence, your computer might not start. BUGCODE NDIS driver windows 10 fix There are remedial measures in order to fix this error and one can also try other methods in order to fix or troubleshoot BSOD errors such as BUGCODE_NDIS_DRIVER .
Best Solution
You can disable the on-board Wi-Fi adapter during install. This can be done in your computer’s firmware settings commonly called UEFI setup.
You can enter firmware settings during boot up by pressing required keys for your brand or model of PC.
Generally, it can be found in the network adapters configuration. There, you disable the wireless LAN option. After installation of windows 10, immediately update the latest drivers for your Wi-Fi adapter and then enable it again.
Fix #1: Install an older ISO of Windows 10
The 1503, 1603, or 1709 versions of Windows 10 may not contain the most up-to-date drivers to ensure stable Wi-Fi in your computer.
As a result, there is some chance that connecting to a Wi-Fi access point may become difficult. On the other hand, the 1803 and 1809 versions may give rise to network problems on your PC.
The best option is installing older drivers on your version of Windows 10.
This error is also found in Windows 10 1809 version. Your Wi-Fi module may be the cause of this error. You can use an updated chip driver for Intel 9260 chip.
Fix #2: Update the motherboard’s firmware
When you encounter a BIOS error it is sometimes because the motherboard has failed to update to the latest version of firmware.
When this occurs it’s possible the operating system simply needs to be rolled back and then disabled so that there are no input errors coming from Wi-Fi or an Ethernet cable.
It’s important however that you not let these technical issues distract from what is more important when running a business:
Making sure you’re offering your clients as many services as possible at all times, whether they be online through social media or through traditional means like advertising in newspapers and radio stations.
There are some steps that you have to follow during first time installation. Disconnect the Wi-Fi router from power source and the internet before installing. Afterwards, then can reconnect it again after installation is complete.
You will find yourself in a never-ending cycle of restarting your computer that begins with installation problems.
It’ll seem as though you get past the initial stages, but this is only if you can avoid the intervening blue screen error messages that are STOPCODE BUGCODE NDIS DRIVER.
Fix #3: Simple Hardware during Installation
Since this BUGCODE_NDIS_DRIVER error can occur during installation, you should keep an eye on the number of devices attached to your computer. You can only allow a keyboard and a mouse to be connected, which means you’ll have to do something about these other devices:
- Multiple Display Monitors
- Swap out RAM or DRAM or Memory modules
- Disconnect external Hard-Drives
- Keep only the Primary Hard-Drive where Windows 10 will be installed.
- Disconnect external devices like Network adapters, Wi-Fi extenders etc.
- Reset BIOS defaults
After the initial installation of your operating system, BUGCODE NDIS driver windows 10 fix you can re-connect all your devices and enable the relevant drivers.
If not done during the initial installation process, one’s operating system requires additional components to be installed in order to achieve proper functionality with USB devices such as a printer or a USB thumb drive for example.
Fix #4: Use Windows approved Flash Drive
It’s true, most of the time, BUGCODE NDIS driver windows 10 fix we have to use DVDs or USB flash drive to install Windows 10.
However, there are instances when there are connection issues that you may come across while trying to create your own bootable installation media or it feels like it’s taking too long to do so.
That’s why the Media Creation Tool that comes on the original Microsoft site helps greatly in these situations because it allows users of all skill levels an easy and simple way to create their bootable installation USB/DVD without having to visit another resource for instructions.
We believe that by using this tool a total novice would be able get past any connection issue effortlessly.
Fix #5: Use a normal SSD
BUGCODE NDIS driver windows 10 fix, there are numerous interfaces to connect an SSD with your motherboard.
Some users have reported difficulty with issues in the M.2 interface of the SSD, but it is not an uncommon interface and usually does not take more than a few more seconds to set up correctly.
Also, the BUGCODE_NDIS_DRIVER error can be due to a hardware configuration issue if an SSD is being used.
Hello, My name is Shari & I am a writer for the ‘Outlook AppIns’ blog. I’m a CSIT graduate & I’ve been working in the IT industry for 3 years.
Fix Ndis.sys Failed BSOD Error BUGCODE_NDIS_DRIVER on Windows 11/10 Computer
Blue Screen of Death (BSOD) errors can be a frustrating and confusing experience for many Windows users. One common BSOD error that users may encounter is the BUGCODE_NDIS_DRIVER error, which is related to the Ndis.sys driver on Windows 11/10 computers. In this article, we will discuss what causes this error, how to troubleshoot and fix it, and some preventative measures to avoid encountering it in the future.
What is the Ndis.sys Failed BSOD Error BUGCODE_NDIS_DRIVER?
The Ndis.sys Failed BSOD Error BUGCODE_NDIS_DRIVER is a Blue Screen of Death (BSOD) error that is related to the Ndis.sys driver on Windows 11/10 computers. The Ndis.sys driver is a system file that is responsible for managing network connections on your computer. When this driver encounters an issue or becomes corrupted, it can lead to the BUGCODE_NDIS_DRIVER error, causing your computer to crash and display the blue screen.
This error can be caused by a variety of factors, including outdated or incompatible network drivers, corrupt system files, malware infections, hardware issues, and more. When you encounter this error, your computer may crash and display the following message:
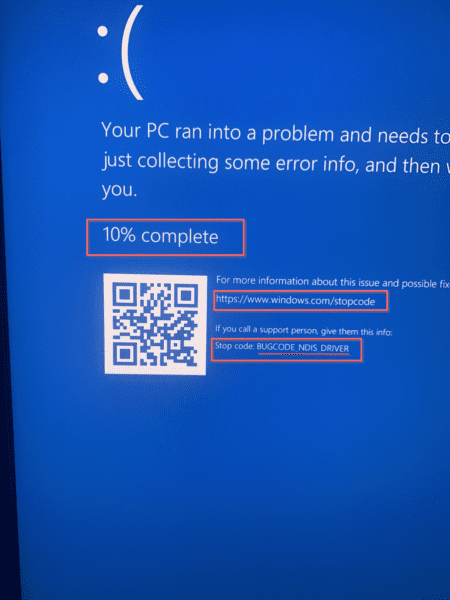
«Your PC ran into a problem and needs to restart. We’re just collecting some error info, and then we’ll restart for you. If you’d like to know more, you can search online later for this error: BUGCODE_NDIS_DRIVER»
If you are experiencing this error on your Windows 11/10 computer, there are several troubleshooting steps you can take to fix it and prevent it from happening again in the future.
How to Fix Ndis.sys Failed BSOD Error BUGCODE_NDIS_DRIVER on Windows 11/10 Computer
- Update Network Drivers
One of the most common causes of the BUGCODE_NDIS_DRIVER error is outdated or incompatible network drivers. To fix this error, you can try updating your network drivers to the latest version. You can do this by visiting the website of your computer’s manufacturer or the website of the network adapter manufacturer and downloading the latest drivers for your specific model.
To update your network drivers, follow these steps:
- Press Windows key + X and select Device Manager from the menu.
- Expand the Network adapters category.
- Right-click on your network adapter and select Update driver.
- Choose Search automatically for updated driver software and follow the on-screen instructions to install the latest drivers.
After updating your network drivers, restart your computer and check if the BUGCODE_NDIS_DRIVER error still persists.
- Run System File Checker
Corrupt system files can also cause the BUGCODE_NDIS_DRIVER error. To fix this issue, you can run the System File Checker tool, which will scan and repair any corrupted system files on your computer. To run the System File Checker tool, follow these steps:
- Press Windows key + X and select Windows Terminal (Admin) from the menu.
- Type sfc /scannow and press Enter.
- Wait for the scan to complete and follow any on-screen instructions to repair corrupted files.
After running the System File Checker tool, restart your computer and check if the error has been resolved.
- Scan for Malware
Malware infections can also cause the BUGCODE_NDIS_DRIVER error on your Windows 11/10 computer. To fix this issue, you can perform a full system scan using your preferred antivirus software. Make sure to update your antivirus definitions before running the scan to ensure that your computer is protected from the latest threats.
To scan for malware, follow these steps:
- Open your antivirus software and initiate a full system scan.
- Wait for the scan to complete and follow any on-screen instructions to remove any detected malware.
After scanning for malware, restart your computer and check if the error has been fixed.
- Check for Hardware Issues
Hardware issues, such as faulty network adapters or RAM modules, can also cause the BUGCODE_NDIS_DRIVER error. To check for hardware issues, you can run hardware diagnostics on your computer to identify any faulty components. You can also try disconnecting and reconnecting your network adapter or replacing it with a new one to see if that resolves the error.
To check for hardware issues, follow these steps:
- Press Windows key + X and select Windows Terminal (Admin) from the menu.
- Type mdsched.exe and press Enter to run Windows Memory Diagnostic.
- Follow the on-screen instructions to test your RAM modules for errors.
If hardware diagnostics identify any faulty components, you may need to replace them to fix the BUGCODE_NDIS_DRIVER error.
Preventative Measures to Avoid the BUGCODE_NDIS_DRIVER Error
To prevent encountering the BUGCODE_NDIS_DRIVER error on your Windows 11/10 computer, you can take some preventative measures to keep your system running smoothly. Here are some tips to avoid this error in the future:
- Regularly update your network drivers to the latest version to ensure compatibility and stability.
- Install and update antivirus software to protect your computer from malware infections.
- Avoid downloading and installing suspicious software or files from untrusted sources.
- Run regular system maintenance tasks, such as disk cleanup and defragmentation, to optimize your system performance.
- Keep your operating system and software up to date with the latest security patches and updates.
By following these preventative measures and troubleshooting steps, you can avoid encountering the Ndis.sys Failed BSOD Error BUGCODE_NDIS_DRIVER on your Windows 11/10 computer and keep your system running smoothly.
Conclusion
The Ndis.sys Failed BSOD Error BUGCODE_NDIS_DRIVER is a common Blue Screen of Death (BSOD) error that can be frustrating and disruptive for Windows 11/10 users. This error is related to the Ndis.sys driver, which manages network connections on your computer. By following the troubleshooting steps outlined in this article, you can fix the BUGCODE_NDIS_DRIVER error and prevent it from happening again in the future.
Remember to regularly update your network drivers, run system file checker, scan for malware, check for hardware issues, and take preventative measures to keep your system running smoothly and avoid encountering the Ndis.sys Failed BSOD Error BUGCODE_NDIS_DRIVER. If you continue to experience this error after trying these troubleshooting steps, you may need to seek further assistance from a professional technician to diagnose and fix the underlying issue.
Windows provide accurate features that users can use to attain the best outcome. There are some instances when Windows encounter an error. It can be inconveniencing to user functionality. BUGCODE_NDIS_DRIVER BSOD error can arise during the installation of windows 10.
When The BUGCODE_NDIS_DRIVER BSOD error occurs, users can be greatly inconvenienced. Such issues are caused by several factors which can be resolved. There are many ways that users can use to resolve the problem. Users need to know more about the issue before taking any precise action.

What BUGCODE_NDIS_DRIVER BSOD error is?
The error usually appears while updating or installing windows 10. It’s safe to ensure that the drivers are correct since the issue can emerge due to data loss and damage. The problems can be caused by incorrect configuration of device drivers. Windows registry can cause a problem when the issue has emerged. Users need to ensure that the RAM is functioning. BSOD errors can be caused by other factors that need to be sorted out before the user makes any necessary changes. Users can use the solutions provided below.
Solution 1: Ensure that Widows 10 is updated
Software and hardware issues are among the most common causes of BSOD error. To fix the errors users can update Windows to the latest version. Auto-update is the most reasonable.
Solution 2: Drivers Update
In some instances when the device drivers are inappropriate the compatibility of the device can be affected. The users need to make an update.
Solution 3: Disable WI-FI Adapter Software
In some instances, users can experience a challenge when the adapter cable has errors. Users can check to ensure that the issue is fully resolved.
Solution 4: Driver settings can be attained by updating the drivers of the device being used:
BUGCODE_NDIS_DRIVER BSOD error is mostly caused by problems with the driver. Users can revert to the version that was previously used. The users can use the steps below to attain the outcome.
Step 1: Press Windows and X key to launch the power user menu.
Step 2: The user can choose the Device Manager and scan for the WI-FI adapter of interest.
Step 3: Navigate through to the Drivers Tab
Step 4: Click on the Roll Back Driver button
Step 5: Restart the computer to apply the changes.
The user can roll back to the previous driver version and also run the computer in safe mode. It ensures that the device is fully functional. The users can turn on the safe mode due to several reasons. In some instances, the safe mode can cause issues in the device. Users need to ensure that the mode is not the cause of the error before troubleshooting. Users can troubleshoot the problem by following the steps below:
Step 1: Press and hold the Shift key and power button
Step 2: Select Troubleshoot
Step 3: Click Advanced options
Step 4: Choose Startup settings
Click on the Restart option. Once the computer restarts successfully the user will be provided several options. Choose Safe mood with networking by simply pressing F5. Revert to the previous version of the wifi adapter driver.
Perform a Clean Boot:
Performing a clean Boot before Updating windows 10 OS version can resolve the BUGCODE_NDIS_DRIVER BOSD error. Clean up provide users with the attainment of the best productivity level of the device. BOSD errors can be resolved by conducting a clean up of the system. The users can use the available methods to clean up:
Step 1: Press the Windows and R keys
Step 2: Search for msconfig and indicate it in the text field that appears.
Step 3: The windows configuration should appear. Choose Selective startup and untick the load startup items.
Step 4: Navigate to the Service Tab.
Step 5: Check the Hide all Microsoft Services option.
Step 6: Hit Apply and restart the computer to make the changes appropriate.
Step 7: Open the Task Manager by pressing the CTRL-Shift and Esc keys.
As soon as the task Manager opens the user can navigate to the Startup tab. Right-click on every entry on the list and click disable. Once it’s done close the task Manager and reboot the computer. The user can check whether the problem has been fully resolved.
Users can Remove Unnecessary Files
There are many instances that users can experience the issue due to corrupt file being in the device. Users can remove unnecessary files. There is much unnecessary information that can accumulate in the process of computer usage. Users can conduct a complete cleanup to sort out the issues from the device. Junk can be an inconvenience hence need to be eradicated.
What causes BSOD errors
There are many reasons why the errors appear. In some instances, the issues emerge from faults in the drivers and windows. Users can use third-party PC Repair tool. With a reliable PC repair tool, the user can scan the system to remove junk.
Final Thoughts
BSOD errors can be inconveniencing to users when they pop up on the screen. There are many causes of the problem. The issue can be caused by faulty issues with the hardware. User needs to ensure that the devices they are using are up to date. Most likely the issues can be caused by drivers being out of date.
Experiencing difficulties with your Device, check out our “How To” page on how to resolve some of these issues.
Aishwarya is a Salesforce Developer. She finds Content writing peaceful. After writing on tech blog for five years, she has become passionate about it. Apart from blogging, she loves listening to Bollywood music.