
Applies ToWindows 7 Enterprise Windows 7 Home Basic Windows 7 Home Premium Windows 7 Professional Windows 7 Ultimate Windows HPC Server 2008 R2 Windows Server 2008 R2 Datacenter Windows Server 2008 R2 Enterprise Windows Server 2008 R2 Standard Windows Server 2008 R2 Web Edition
Не уверены, если это нужное исправление? Этой проблемы мы добавили в наш Диагностический дамп памяти которой можно подтвердить.
Симптомы
Рассмотрим следующую ситуацию. У вас есть компьютер под управлением Windows 7 или Windows Server 2008 R2. Этот компьютер имеет установлены сторонние приложения, использующего драйвер выноска платформы фильтрации Windows (WFP). В этом случае может появиться сообщение об ошибке на синем экране. Это сообщение об ошибке следующего вида:
STOP: 0x00000050 (параметр1, параметр2, параметр3, параметр4)
PAGE_FAULT_IN_NONPAGED_AREA
Примечания
-
Параметры в это сообщение об ошибке могут различаться в зависимости от конфигурации компьютера.
-
Не все сообщения об ошибке «Stop 0x00000050» являются причиной этой проблемы.
-
WFP выноска драйверы обычно используются в независимых производителей антивирусных программ и брандмауэров.
Причина
Эта проблема возникает из-за ошибки в драйвере TCPIP.sys системы. Когда драйвер выноска WFP вызывает функцию FwpsReleaseClassifyHandle0 , чтобы освободить ресурсы системы, возникает неустранимая ошибка.
Решение
Сведения об обновлении
Как получить это обновление
Поддерживаемые обновления от корпорации Майкрософт.
Если обновление доступно для загрузки, имеется раздел «Исправление доступно для загрузки» в верхней части этой статьи базы знаний. Если этот раздел не отображается, обратитесь в службу технической поддержки и поддержки для получения обновления.
Примечание. Если наблюдаются другие проблемы или необходимо устранить неполадки, вам может понадобиться создать отдельный запрос на обслуживание. Затраты на обычные службы поддержки будет применяться к Дополнительные вопросы и проблемы, которые не соответствуют требованиям конкретного обновления. Чтобы получить полный список телефонов поддержки и обслуживания клиентов корпорации Майкрософт или создать отдельный запрос на обслуживание, посетите следующий веб-сайт корпорации Майкрософт:
http://support.microsoft.com/contactus/?ws=supportПримечание. В форме «Исправление доступно для загрузки» отображаются языки, для которых доступно обновление. Если нужный язык не отображается, обновление не для данного языка.
Предварительные условия
Для установки этого обновления необходимо наличие Windows 7 или Windows Server 2008 R2.
Сведения о реестре
Для использования обновления в этом пакете, нет необходимости вносить изменения в реестр.
Необходимость перезагрузки
После установки обновления компьютер необходимо перезагрузить.
Сведения о замене обновлений
Это обновление не заменяет ранее выпущенное обновление.
Сведения о файлах
Глобальная версия этого исправления устанавливает файлы с атрибутами, указанными в приведенных ниже таблицах. Дата и время для файлов указаны в формате UTC. Дата и время для файлов на локальном компьютере отображаются в местном времени с вашим текущим смещением летнего времени (DST). Кроме того, при выполнении определенных операций с файлами, даты и время могут изменяться.
Примечания к сведениям о файлах Windows 7 и Windows Server 2008 R2
Важно. В те же пакеты включены обновления Windows 7 и Windows Server 2008 R2. Однако обновления на странице запрос исправления перечислены под обеими операционными системами. Чтобы запросить пакет обновления, который применяется к одной или обеих операционных систем, установите обновление, описанное в разделе «Windows 7/Windows Server 2008 R2» на странице. Всегда обращайтесь к разделу «Применяется к» в статьях, для определения фактических операционной системы, каждое обновление предназначено для.
-
Файлы, относящиеся к определенному продукту, этапу разработки (RTM, SPn) и направлению поддержки (LDR, GDR) можно определить по номерам версий, как показано в следующей таблице.
Версия
Продукт
Контрольная точка
Направление поддержки
6.1.760 0.16 xxx
Windows 7 и Windows Server 2008 R2
RTM
GDR
6.1.760 0,20 xxx
Windows 7 и Windows Server 2008 R2
RTM
LDR
-
Выпуски обновлений GDR содержат только те исправления, которые выпускаются повсеместно и предназначены для устранения распространенных крайне важных проблем. В обновления LDR входят также специализированные исправления.
-
Файлы MANIFEST (.manifest) и MUM (.mum), устанавливаемые для каждой среды, указаны отдельно в разделе «Сведения о дополнительных файлах для Windows Server 2008 R2 и Windows 7». MUM и файлы МАНИФЕСТА и связанные файлы каталога безопасности (.cat), очень важны для поддержания состояния обновляемого компонента. Файлы каталога безопасности, для которых не перечислены атрибуты, подписаны цифровой подписью корпорации Майкрософт.
Для всех поддерживаемых 86-разрядных версий Windows 7
|
Имя файла |
Версия файла |
Размер файла |
Дата |
Время |
Платформа |
|---|---|---|---|---|---|
|
Fwpkclnt.sys |
6.1.7600.16385 |
187,472 |
14-Jul-2009 |
01:20 |
x86 |
|
Tcpip.sys |
6.1.7600.16512 |
1,288,192 |
27-Jan-2010 |
07:03 |
x86 |
|
Fwpkclnt.sys |
6.1.7600.16385 |
187,472 |
14-Jul-2009 |
01:20 |
x86 |
|
Tcpip.sys |
6.1.7600.20628 |
1,287,048 |
27-Jan-2010 |
06:55 |
x86 |
Для всех поддерживаемых 64-разрядных версий Windows 7 и Windows Server 2008 R2
|
Имя файла |
Версия файла |
Размер файла |
Дата |
Время |
Платформа |
|---|---|---|---|---|---|
|
Fwpkclnt.sys |
6.1.7600.16385 |
288,336 |
14-Jul-2009 |
01:47 |
x64 |
|
Tcpip.sys |
6.1.7600.16512 |
1,898,376 |
27-Jan-2010 |
07:57 |
x64 |
|
Fwpkclnt.sys |
6.1.7600.16385 |
288,336 |
14-Jul-2009 |
01:47 |
x64 |
|
Tcpip.sys |
6.1.7600.20628 |
1,901,568 |
27-Jan-2010 |
07:55 |
x64 |
Для всех поддерживаемых версий Windows Server 2008 R2 для систем на базе процессоров IA-64
|
Имя файла |
Версия файла |
Размер файла |
Дата |
Время |
Платформа |
|---|---|---|---|---|---|
|
Fwpkclnt.sys |
6.1.7600.16385 |
482,896 |
14-Jul-2009 |
01:58 |
IA-64 |
|
Tcpip.sys |
6.1.7600.16512 |
3,774,344 |
27-Jan-2010 |
06:16 |
IA-64 |
|
Fwpkclnt.sys |
6.1.7600.16385 |
482,896 |
14-Jul-2009 |
01:58 |
IA-64 |
|
Tcpip.sys |
6.1.7600.20628 |
3,780,096 |
27-Jan-2010 |
06:12 |
IA-64 |
Статус
Корпорация Майкрософт подтверждает, что это проблема продуктов Майкрософт, перечисленных в разделе «Относится к».
Дополнительные сведения
Для получения дополнительных сведений о Windows Filtering Platform (WFP) и драйверы выноска WFP посетите следующие веб-узлы Microsoft Developer Network (MSDN):
Описание 824684 Стандартные термины, используемые при описании обновлений программных продуктов Майкрософт
Сведения о дополнительных файлах
Сведения о дополнительных файлах для Windows 7 и Windows Server 2008 R2
Дополнительные файлы для всех поддерживаемых 86-разрядных версий Windows 7
|
Имя файла |
Update.mum |
|
Версия файла |
Неприменимо |
|
Размер файла |
1,674 |
|
Дата (UTC) |
28-Jan-2010 |
|
Время (UTC) |
19:12 |
|
Платформа |
Неприменимо |
|
Имя файла |
X86_0c8e4f8ea7b10c6246bad218cf62acb0_31bf3856ad364e35_6.1.7600.20628_none_f9326a31a096c901.manifest |
|
Версия файла |
Неприменимо |
|
Размер файла |
702 |
|
Дата (UTC) |
28-Jan-2010 |
|
Время (UTC) |
19:12 |
|
Платформа |
Неприменимо |
|
Имя файла |
X86_f7f0cf9468d7e4b42d0e8bdfcb39d70f_31bf3856ad364e35_6.1.7600.16512_none_e54464c33cc1e89e.manifest |
|
Версия файла |
Неприменимо |
|
Размер файла |
702 |
|
Дата (UTC) |
28-Jan-2010 |
|
Время (UTC) |
19:12 |
|
Платформа |
Неприменимо |
|
Имя файла |
X86_microsoft-windows-tcpip-binaries_31bf3856ad364e35_6.1.7600.16512_none_b33d1ad7c783c119.manifest |
|
Версия файла |
Неприменимо |
|
Размер файла |
3,780 |
|
Дата (UTC) |
28-Jan-2010 |
|
Время (UTC) |
19:14 |
|
Платформа |
Неприменимо |
|
Имя файла |
X86_microsoft-windows-tcpip-binaries_31bf3856ad364e35_6.1.7600.20628_none_b3c1e972e0a414de.manifest |
|
Версия файла |
Неприменимо |
|
Размер файла |
3,780 |
|
Дата (UTC) |
28-Jan-2010 |
|
Время (UTC) |
19:14 |
|
Платформа |
Неприменимо |
Дополнительные файлы для всех поддерживаемых 64-разрядных версий Windows 7 и Windows Server 2008 R2
|
Имя файла |
Amd64_390de2d435b465019bda5dccfc327efc_31bf3856ad364e35_6.1.7600.16512_none_3a76fb301cdf1d7b.manifest |
|
Версия файла |
Неприменимо |
|
Размер файла |
706 |
|
Дата (UTC) |
28-Jan-2010 |
|
Время (UTC) |
19:12 |
|
Платформа |
Неприменимо |
|
Имя файла |
Amd64_581cea0930f70efb1a58db604d06de66_31bf3856ad364e35_6.1.7600.20628_none_04e71716208179cc.manifest |
|
Версия файла |
Неприменимо |
|
Размер файла |
706 |
|
Дата (UTC) |
28-Jan-2010 |
|
Время (UTC) |
19:12 |
|
Платформа |
Неприменимо |
|
Имя файла |
Amd64_microsoft-windows-tcpip-binaries_31bf3856ad364e35_6.1.7600.16512_none_0f5bb65b7fe1324f.manifest |
|
Версия файла |
Неприменимо |
|
Размер файла |
3,784 |
|
Дата (UTC) |
28-Jan-2010 |
|
Время (UTC) |
19:18 |
|
Платформа |
Неприменимо |
|
Имя файла |
Amd64_microsoft-windows-tcpip-binaries_31bf3856ad364e35_6.1.7600.20628_none_0fe084f699018614.manifest |
|
Версия файла |
Неприменимо |
|
Размер файла |
3,784 |
|
Дата (UTC) |
28-Jan-2010 |
|
Время (UTC) |
19:18 |
|
Платформа |
Неприменимо |
|
Имя файла |
Update.mum |
|
Версия файла |
Неприменимо |
|
Размер файла |
1,906 |
|
Дата (UTC) |
28-Jan-2010 |
|
Время (UTC) |
19:12 |
|
Платформа |
Неприменимо |
Дополнительные файлы для всех поддерживаемых версий Windows Server 2008 R2 с архитектурой IA-64
|
Имя файла |
Ia64_9dd3832faf252545955abe3e97395669_31bf3856ad364e35_6.1.7600.16512_none_b8755b45c2f550a8.manifest |
|
Версия файла |
Неприменимо |
|
Размер файла |
704 |
|
Дата (UTC) |
28-Jan-2010 |
|
Время (UTC) |
19:12 |
|
Платформа |
Неприменимо |
|
Имя файла |
Ia64_b2f5ec7d1dde403f52431d4414c4cae6_31bf3856ad364e35_6.1.7600.20628_none_dfd604ee92e03a88.manifest |
|
Версия файла |
Неприменимо |
|
Размер файла |
704 |
|
Дата (UTC) |
28-Jan-2010 |
|
Время (UTC) |
19:12 |
|
Платформа |
Неприменимо |
|
Имя файла |
Ia64_microsoft-windows-tcpip-binaries_31bf3856ad364e35_6.1.7600.16512_none_b33ebecdc781ca15.manifest |
|
Версия файла |
Неприменимо |
|
Размер файла |
3,782 |
|
Дата (UTC) |
28-Jan-2010 |
|
Время (UTC) |
19:12 |
|
Платформа |
Неприменимо |
|
Имя файла |
Ia64_microsoft-windows-tcpip-binaries_31bf3856ad364e35_6.1.7600.20628_none_b3c38d68e0a21dda.manifest |
|
Версия файла |
Неприменимо |
|
Размер файла |
3,782 |
|
Дата (UTC) |
28-Jan-2010 |
|
Время (UTC) |
19:12 |
|
Платформа |
Неприменимо |
|
Имя файла |
Update.mum |
|
Версия файла |
Неприменимо |
|
Размер файла |
1,684 |
|
Дата (UTC) |
28-Jan-2010 |
|
Время (UTC) |
19:12 |
|
Платформа |
Неприменимо |
Нужна дополнительная помощь?
Нужны дополнительные параметры?
Изучите преимущества подписки, просмотрите учебные курсы, узнайте, как защитить свое устройство и т. д.
If you’re seeing a blue screen of death error with the stop code 0x00000050 on Windows 7, you’re not alone. Many users have reported to have this problem before. It must be so annoying to have a blue screen of death error and not getting anything done from here.
No worries, irritating as it may seem, it’s possible to fix. Here are 3 solutions for you to try. You may not need to try them all, just work your way down until you find the one works for you.
1. Undo recent changes
2. Rum Memory Diagnose and Disk Check
3. Update device drivers
Note: You need to logon to your PC desktop to try the fixes below. If you’re having trouble logging in, feel free to leave us comments and we’ll see what we can do to help.
1. Undo recent changes
Faulty hardware or fail to install hardware right is closely related to the blue screen of death error 0x00000050.
If this is the very first time you had such a problem, and you’ve recently added certain hardware or installed some programs to your computer, they might be the culprit. You may need to remove or uninstall them completely from your PC.
Check if your existing hardware has failed. If you find any not working hardware, remove them as well or replace them with well-functioned ones.
2. Rum Memory Diagnose and Disk Check
If your RAM or hard drive is defective, your PC will shut down to protect you from further damage. You can run a memory check and a disk check to see if you need to replace them with new ones:
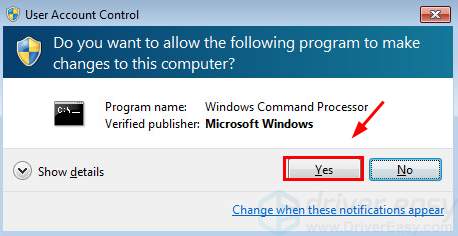
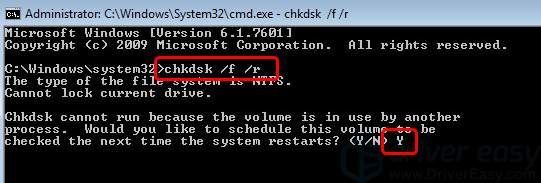
1) On your keyboard, press the Windows logo key and type in cmd. Right-click cmd and click Run as administrator.
2) Click Yes.
3) Type in chkdsk /f /r. Then press Enter. Then press Y so your system will help you scan for hard drive problems the next time you restart your PC.
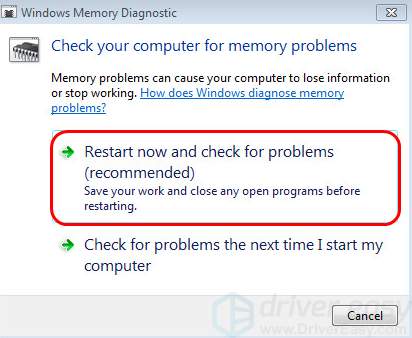
4) On your keyboard, press the Windows logo key and R at the same time. Type in mdsched.exe and press Enter.
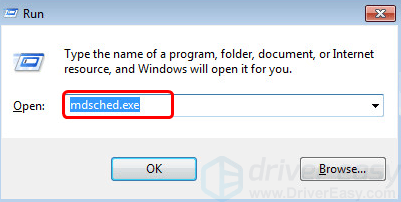
5) Make sure you’ve all important files then click Restart now and check for problems (recommended). Your PC will restart right away.
6) You’ll see the Memory check going. The process could take some time.
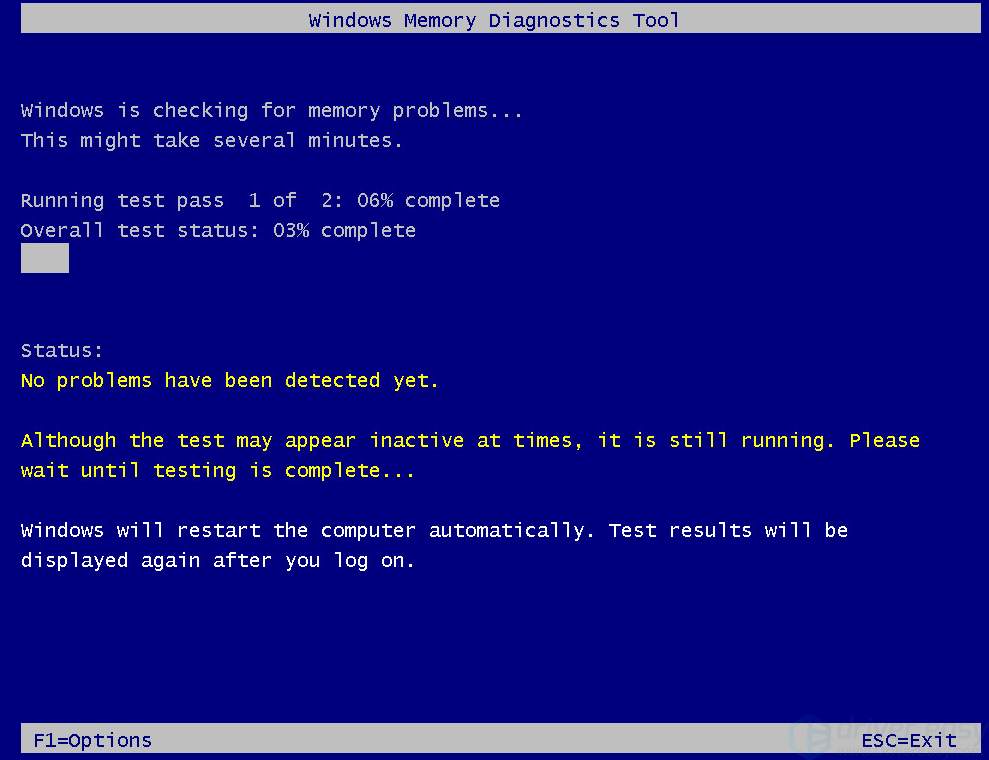
7) When the memory check finishes, your PC will start checking your disks. It’ll take some time to finish.
 If memory check and disk check report problems with your RAM or hard drive, you might need to get your RAM or hard drives replaced.
3. Update device drivers
The installation of a fault driver could also be the cause of 0x00000050 blue screen error. To fix it, you need to update all your device drivers to their best-match versions.
You can go to the support website of your PC manufacturer and search for device driver available for download and update. But that could take quite some time and skills.
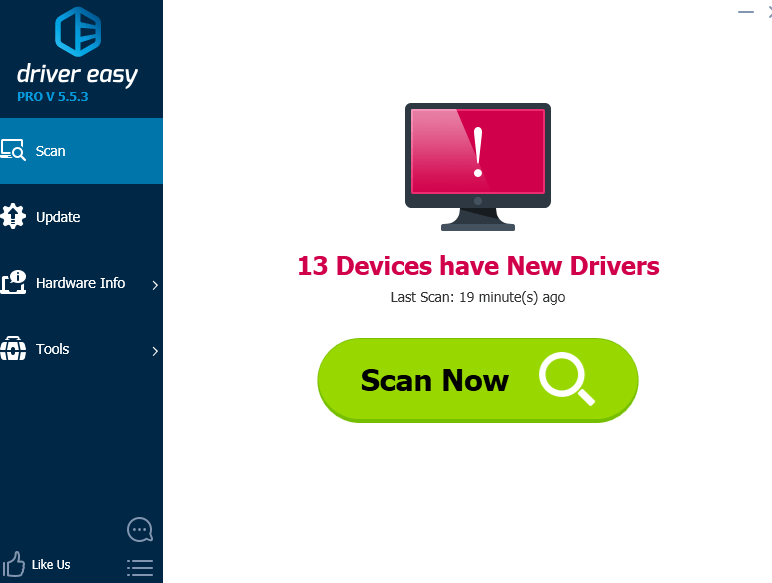
If you don’t have the time, patience or computer skills to update your drivers manually, you can do it automatically with Driver Easy.
Driver Easy will automatically recognize your system and find the correct drivers for it. You don’t need to know exactly what system your computer is running, you don’t need to risk downloading and installing the wrong driver, and you don’t need to worry about making a mistake when installing.
You can update your drivers automatically with either the FREE or the Pro version of Driver Easy. But with the Pro version it takes just 2 clicks (and you get full support and a 30-day money back guarantee):
1) Download and install Driver Easy.
2) Run Driver Easy and click the Scan Now button. Driver Easy will then scan your computer and detect any problem drivers.
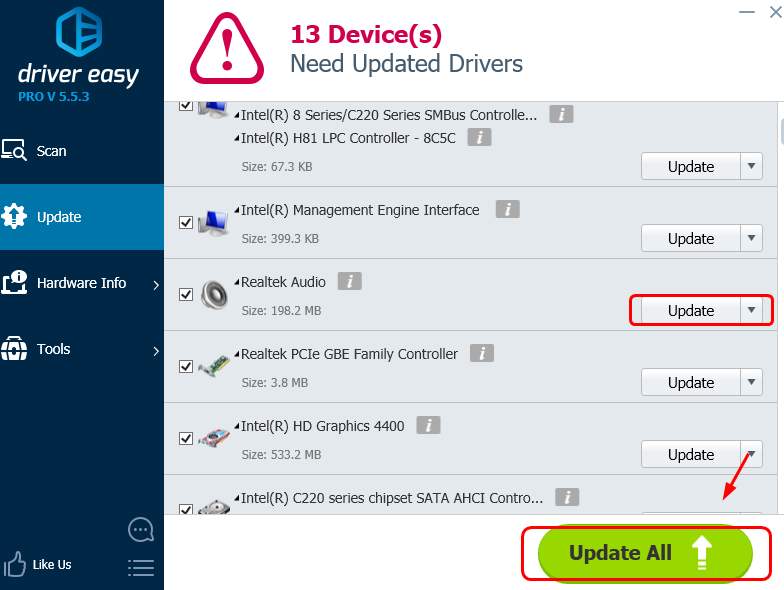
3) Click the Update button next to any flagged driver to automatically download and install the correct version of this driver (you can do this with the FREE version).
Or click Update All to automatically download and install the correct version of all the drivers that are missing or out of date on your system (this requires the Pro version – you’ll be prompted to upgrade when you click Update All).
11
11 people found this helpful
Available in other languages
Bekommen Sie einen Bluescreen mit dem Fehlercode 0x00000050? Keine Sorge. Hier stehen Ihnen 5 Lösungen zur Verfügung.
,
The «PAGE_FAULT_IN_NONPAGED_AREA» BSOD (Blue Screen Of Death) error can happen for several reasons on a Windows computer, e.g. after the installation of an incompatible driver or program (e.g. CPU-Z), corrupted file system, or in laptops that support hybrid video card configuration (dual-graphic card configuration), after the installation of the Platform Update KB2670838 because of a compatibility issue with your currently installed graphic card drivers, etc.. To resolve the PAGE FAULT IN NONPAGED AREA BSOD error, follow the solutions below.

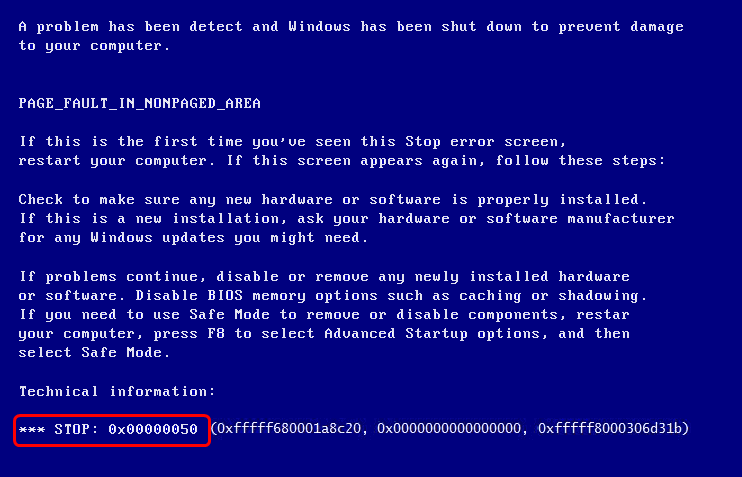
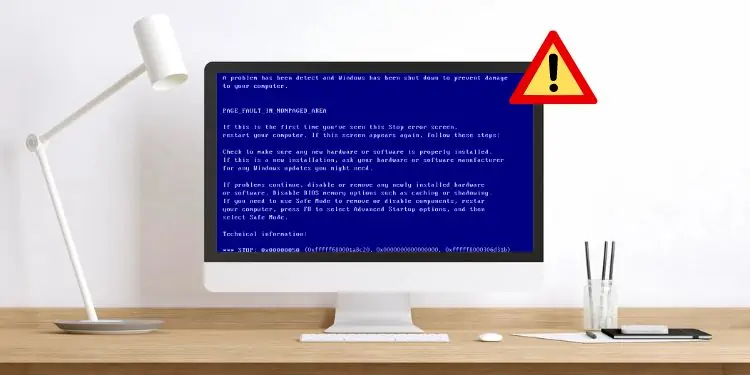
PAGE_FAULT_IN_NONPAGED_AREA
If this is the first time you’ve seen this stop error screen, restart your computer. If this screen appears again, follow these steps:
Check to make sure that any new hardware or software is properly installed.
If this is a new installation, ask your hardware or software manufacturer for any Windows updates you might need.If the problem continues, disable or remove any newly installed hardware or software. Disable BIOS memory options such as caching or shadowing. If you need to use safe mode to remove or disable components, restart your computer, press F8 to select Advanced Startup Options, and then select Safe Mode.
Technical Information:
*** STOP: 0x00000050 (…………………………………)
How to fix the “PAGE_FAULT_IN_NONPAGED_AREA” BSOD – STOP: 0x00000050 error.
In order to resolve the «STOP: 0x00000050 – PAGE_FAULT_IN_NONPAGED_AREA» problem, first:
1. Make sure that your computer is clean from viruses, malware, etc. Detailed instructions on how you can do that you can find in this guide: Quick Malware Scan and Removal Guide.
2. Try to disable your antivirus software and restart your computer.
3. Remove any recently added hardware on your computer and restart your computer to find out if the error recurs.
4. Perform a clean Windows boot to find out if a service or a startup program causes the STOP: 0x00000050 error.
5. Check your hard drive for system errors using Chkdsk /f /r command. Detailed instructions can be found in this tutorial: How to Check and Repair a Hard Disk using Check Disk Tool (Diagnose and Fix File System Errors)
If none of the above suggestions work, then try the following solutions:
Solution 1: Uninstall the latest installed program. (Can be applied to a desktop or a laptop computer)
Solution 2: Uninstall and re-install essential device drivers. (Can be applied to a desktop or a laptop computer)
Solution 3: Uninstall the Update KB2670838. (Only for laptops with dual graphic card support)
Solution 4: Install Update KB2834140. (Only for laptops with dual graphic card support)
Solution 5: Uninstall and re-install the latest Video Card drivers. (Only for laptops with dual graphic card support)
Solution 1: Uninstall the latest installed program.
From Installed Programs, find and uninstall any program that was recently installed on your computer. To do that:
1. Navigate to Windows Control Panel.
2. Double click to open Programs and Features.

3. When the program list is displayed on your screen, sort the programs displayed by Installation date (Installed On) and then find and Remove (Uninstall) any program that was lately installed on your system. (e.g. CPU-Z, iTunes, etc.)

Solution 2: Uninstall and re-install essential device drivers.
Try to uninstall and then re-install some essential device drivers on your system to find out which causes the «PAGE_FAULT_IN_NONPAGED_AREA» problem. To do that, uninstall the following drivers in the following order.*
* Uninstall one driver each time and then restart your computer. If you still receive the «PAGE_FAULT_IN_NONPAGED_AREA» error after the restart, continue to uninstall the next device driver in the list below, until you find which one causes the problem. After finding it, proceed to download and install the latest driver for this device from the manufacturer’s website.
- Display Adapter Driver
- Wireless Adapter Driver
- Ethernet Adapter Driver
– To uninstall and re-install a device driver from your system:
Note: For the NVIDIA or AMD ATI Video cards, you can use the Display Driver Uninstaller utility (DDU) to completely uninstall the graphic drivers. Detailed instructions on how you can use DDU you can find at Step 1 below.
1. Press “Windows” + “R” keys to load the Run dialog box.
2. Type devmgmt.msc and press Enter to open Device Manager.

3. At device manager, expand Display Adapters, right-click on the installed Video adapter (e.g. AMD Radeon) and select Uninstall.

4. When the Uninstall operation is completed, also remove any software related to the uninstalled device from the installed programs (Control Panel > Programs and Features).
5. Restart your computer.
6. Install the latest driver for the uninstalled device(s).
Note: The solutions below are for laptops that support dual-graphic card configuration (e.g. Intel & AMD).
Solution 3: Uninstall the Update KB2670838
1. Navigate to Windows Control Panel.
2. Double click to open Programs and Features.
3. In Programs and Features window, select the “View installed updates” link from the left pane:

4. In the search box (at top right), type “kb2670838”.

5. Now select the “Update for Microsoft Windows (KB2670838)” and click “Uninstall”.

6. Restart your computer and check if the PAGE_FAULT_IN_NONPAGED_AREA BSOD problem is solved.
Solution 4: Install Update KB2834140
1. Navigate to Microsoft’s support site to download and install the appropriate Windows Update KB2834140 package according to your Windows OS version:

2. Follow the instructions to install the update and then check again if the PAGE_FAULT_IN_NONPAGED_AREA BSOD error is solved.
Solution 5: Uninstall and re-Install the latest Video Card drivers.
Step 1: Uninstall the current VGA driver using DDU utility.
Use the Display Driver Uninstaller utility (DDU)* to completely remove the graphics card drivers. To do that:
* Info: Display Driver Uninstaller is a driver removal utility that can help you completely uninstall AMD/NVIDIA graphics card drivers and packages from your system, without leaving leftovers behind (including registry keys, folders and files, driver store).
1. Open your Internet browser & download Display Driver Uninstaller DDU utility from one of these locations:
- Official DDU Download Website: http://www.wagnardmobile.com/DDU/
- Official DDU Guru3D Download Mirror: https://www.guru3d.com/download/display-driver-uninstaller-download/
2. Press the Download button and save the Display Driver Uninstaller utility on your desktop.
![display-driver-uninstaller-utility[3]](https://www.wintips.org/wp-content/uploads/2014/02/display-driver-uninstaller-utility3_thumb.jpg "display-driver-uninstaller-utility[3]")
3. Double-click to run DDU v12.3.exe.
(Choose Run when asked…)

4. Specify a destination folder for the extracted files (e.g “C:\Users\Admin\Desktop\DDUv123”) and then press the “Extract” button.

5. When the extraction is completed, open the destination folder (e.g. “DDUv123” on your Desktop) and double-click at “Display Driver Uninstaller” application.

6. Press OK at the warning message.*
Note: The described procedure below is usually effective and doesn’t cause problems to your computer. But for safety reasons, it’s better to take a backup of your personal files before you use the DDU utility.

7. When the Display Driver Uninstaller main application starts, select (1) your graphic card model (e.g. “NVIDIA”), check (2) the “Remove C:\AMD and or C:\NVIDIA folders” option and then press the “Clean and restart (Highly Recommended)” button.

8. After your computer restarts, proceed to step 2.
Step 2: Download and install latest Graphics Driver.
After the restart, navigate to your graphics card manufacturer website to download and install the corresponding driver for your graphics card:
- NVidia Driver Download
- AMD (ATI) Driver Download
Good luck!
If this article was useful for you, please consider supporting us by making a donation. Even $1 can a make a huge difference for us in our effort to continue to help others while keeping this site free:
- Author
- Recent Posts
Konstantinos is the founder and administrator of Wintips.org. Since 1995 he works and provides IT support as a computer and network expert to individuals and large companies. He is specialized in solving problems related to Windows or other Microsoft products (Windows Server, Office, Microsoft 365, etc.).
Are you annoyed seeing the 0x00000050 BSOD error again and again? Whether you’re receiving this after a recent update or during a Windows backup using third-party software, we’ve got you covered.
Well, you may notice the STOP: 0x00000050 (parameter1, parameter2, parameter3, …) message at the bottom of the blue screen. Here, the parameters vary depending on your computer’s configuration. While some users have reported getting three parameters, others have also come across four.
Generally, this is caused due to the installation of a defective Windows update file or some software and hardware issues. Moreover, logical failures related to page files could also lead to this BSOD error.
Whatever the reason, this article features everything you should know about the 0x00000050 BSOD problem and its possible fixes.
Possible Causes of 0x00000050 BSOD Error
Basically, you get the 0x00000050 BSOD error when there’s an issue with the page file. Windows cannot access the process memory needed to run the system from RAM. This is probably because it’s referring to an invalid memory address.
Well, the major reason behind this problem can vary on different computers. Nonetheless, here are some of the possible causes of the 0x00000050 BSOD error:
- New hardware or software isn’t installed correctly
- Corrupted Windows update
- Enabling caching or shadowing in the BIOS Memory Options
- Problems with your RAM or hard drive
- Corrupted device drivers
- The Win32k.sys driver tries deallocating memory that was never allocated
- Use of third-party software that isn’t compatible with Windows
- Windows is infected with the HaxDoor virus
- Faults within the NTFS
How Do I Fix 0x00000050 BSOD Error on Windows?
When Windows encounters a fatal system error, it immediately shuts down your PC to prevent further damage. Even in this case, you’re directed to the blue screen of death once the 0x00000050 issue is detected.
If this is the first time you see this screen, we recommend first trying out these general fixes that can help resolve memory issues and free up RAM that could be tinkering with Windows:
- Restart your computer
- Update Windows
However, if you’re experiencing this multiple times, you can start following the steps below.
Reinstall or Remove Any New Hardware
The addition of new hardware means the installation of its new device driver. Therefore, if the driver is faulty, there can be a possibility that you’ll encounter the 0x00000050 error.
Thus, we suggest removing any new hardware you recently installed. Next, you can plug back the cable and check if you still receive the PAGE_FAULT_IN_NONPAGED_AREA message.
However, if the situation remains the same, your hardware could have extreme problems. So, we recommend removing it completely and checking if the 0x00000050 BSOD error is now fixed.
Repair or Reinstall Third-Party Applications
Along with hardware, even software can potentially harm your PC. If you recently installed any third-party application before facing the 0x00000050 BSOD error, you can first try repairing it. However, the Repair option is only available on a few programs, and here’s how you can do it:
- Press Windows + I keys to launch the Settings app and choose the Apps menu from the left panel.
- Next, select Apps & Features and search for the recently installed application creating the BSOD error.

- Click on the kebab icon and choose Advanced Options.

- Under Reset, find and press the Repair button.


If the program can’t be repaired, you can uninstall it and install it again:
- Navigate to the Start Menu and open the Control Panel.
- Under the Programs section, click on the Uninstall a program option.

- Next, navigate to the latest program you installed and right-click on it.
- Choose Uninstall and see if this has solved your problem.


Run Antivirus to Remove Potential Viruses
If your Windows PC is affected by a HaxDoor virus, there’s a hidden process that hides your important registry keys and files. This could be why you’re seeing the STOP: 0x00000050 error from time to time.
So, we recommend using one or multiple anti-virus programs to scan and eradicate such viruses. Interestingly, you can even use Windows Security if you do not want to download third-party antivirus software:
- From the search menu, look for Windows Security and launch the application.
- Now, choose Virus & threat protection.

- Find the Quick Scan button and click on it.
- Then, wait until the possible threats are scanned and fixed.


Sometimes, third-party antivirus programs can also bring up the BSOD error. Since Windows defender does an excellent job securing your system against malware, it is advised to uninstall such applications if installed.
Download & Apply Microsoft Hotfix
After several Windows 8 and Windows Server 2012 users frequently faced this issue, Microsoft made a hotfix available for iterations of the OS. So, if you’re one of them, here’s what you can do:
- First, navigate to the Microsoft Update Catalog page and download the applicable hotfix.
- Once the download is complete, run the program and proceed with the on-screen steps.
- Now, restart your PC, and this should fix the 0x00000050 BSOD error.
Update, Rollback, and Reinstall Device Drivers
Well, one of the prime causes for the 0x00000050 BSOD error is driver-related problems, specifically graphics and storage unit drivers. So, updating or reinstalling your PC’s video adapters and storage drivers should do the trick. Also, if a recently installed hardware is causing the issue, you can update the related driver. Follow the below guideline to update, rollback, and reinstall each driver on Windows:
- Open Device Manager from the Start Menu.
- Now, expand one of the adapters, let’s say Display adapters.
- Right-click on the adapter and choose Properties.
- Next, go to the driver tab and click on Update driver.
- Then, select Search automatically for drivers.

- Repeat the process for each video and storage driver on your PC.
- If you get the 0x00000050 error again, navigate back to the adapter properties, and choose Roll Back driver.
- Select a reason why you’re rolling back the driver and hit Yes.
- If you’re still noticing the BSOD error, go back to the adapter properties, and this time, choose Uninstall device.
- Select Uninstall once the warning message appears and your computer gets restarted. Once the PC boots, the necessary driver is reinstalled automatically.

Change Page File Settings
The paging file size is crucial for stabilizing your system and managing the virtual memory space. By default, Windows OS automatically manages paging file sizes for all the drives by creating a dedicated file called Pagefile.sys.
However, if you’re already using an SSD, it performs much better than the HDD, and you can simply set the No paging File option. But, if you’re still using a hard disk drive, we recommend enabling the system-managed size or creating a custom size based on your storage capacity:
- Press Windows + I keys to launch Settings.
- Next, go to System > About.
- Expand the Device Specifications tab and choose Advanced system settings.

- Once the System Properties dialogue box launches, click on the Settings… button under Performance.

- Then, select the Advanced tab, and under Virtual Memory, choose Change…

- Now, uncheck the Automatically manage paging file size for all drives option. When you do this, the System managed size is enabled by default. So, you can press Ok if you’re using an SDD.
- However, if you use an HDD, select the Custom size option. Here, set the Initial file size (MB) and Minimum Size (MB) as per the space available.
- Once done, hit Ok on all the three dialogue boxes.
- Finally, restart your computer, and you should no longer see the 0x00000050 BSOD error.


Disable All Non-Microsoft Programs During Startup
Often, the apps permitted to launch with the Windows startup may also create BSOD issues. In such a case, here’s how you can perform a clean boot:
- Press Windows + R keys to launch the Run dialogue box. Here, type
msconfigand hit enter. - Once the System Configuration window launches, select the Services tab.
- Then, check the Hide all Microsoft services option.
- Ensure that all the services are ticked and press the Disable all button.
- Then, choose either Ok or Apply to save the changes made.

- Next, go to the Startup tab and click on the Open Task Manager link.
- Then, right-click each application one by one and choose Disable.

- Now, restart your computer. If the startup apps were the reasons behind the 0x00000050 BSOD error, you’d no longer get the issue again.
- Now, start enabling each startup app and restart your PC to identify the main culprit.
- Finally, uninstall the program that’s actually causing the problem.


Disable Caching or Shadowing in BIOS
Caching and shadowing are used by most programs to access information directly. Basically, this is a high-speed static RAM, and if any issues are present here, Windows may experience system faults, like BSOD.
Thus, we recommend disabling the option, and this is possible only from your motherboard’s BIOS:
- Use the dedicated key to get into BIOS on Windows 11. Usually, pressing DEL or F2 key should do the job. Or, you can refer to the internet to look for the key that works for you.
- Now, navigate to the Memory settings. If you do not find it, you may need to visit the Advanced settings first.
- Here, find System BIOS Cacheable and C000, 32K Shadow. Disable both these options.


Try Running SFC, DISM, and CHKDSK Commands
SFC scannow is responsible for replacing corrupted files with a cached copy. On the other hand, the DISM command fixes any DLL cache files within your system. Similarly, the CHKDSK command repairs corrupted Windows files on a disk.
Hence, these three commands can help you resolve problems with the Win32k.sys driver and NTFS that’s probably causing the 0x00000050 BSOD error. Here’s how you can run them on Windows:
- From the Start Menu, search for Command Prompt and run it as an administrator.
- Now, copy and paste the following command line to first run the SFC Scannow:
sfc /scannow
- Restart your PC and find out if you’re still getting this error.
- Next, use the following command line to run DISM on Command Prompt:
DISM /online /cleanup-image /restorehealth
- Again, restart your PC and see if the 0x00000050 BSOD error is now fixed.
- Finally, launch the CMD again and use the following command to run the CHKDSK:
chkdsk /r /x
- You are required to restart your PC again and check whether the issue is resolved.


Reseat RAM Stick and GPU
If the techniques mentioned above didn’t work, it’s probably because of physical issues with your RAM. Also, if the port has dust or dirt stuck, the RAM stick or GPU may not work as it should. So, you might need to reseat them or, in the worst case, replace them. Go through the guide below on how to do just that:
- Firstly, ensure that you have turned off your PC and removed the power cord.
- Carefully remove the CPU’s cover plate and locate your RAM stick(s). For laptops, you’ll need to unscrew the bottom base and remove it.
- Generally, your RAM sticks are locked to the slot. So, simply shift the locks upwards or downwards to make them loose.
- Now, gently apply pressure and pull the RAM sticks from each slot.
- Before placing them back, ensure you clean the dust in the RAM slot. Also, you can use 70% isopropyl alcohol to clean your RAM sticks.
- Repeat the same process for your GPU as well.
- Once the RAM sticks and GPU are dried, place them back in their slots and lock them well.
- Then, assemble other parts as well and start your PC.


Try Running Windows Memory Diagnostic
Windows Memory Diagnostic is a built-in tool that lets you diagnose memory errors in your computer applications. Basically, it tests your RAM and sees if anything is causing the 0x00000050 BSOD error on your PC.
Indeed, running the Windows Memory Diagnostic is relatively easy, and these steps will help you do just that:
- On your Windows taskbar, press the Magnifying icon. Here, search and launch the Windows Memory Diagnostic utility.
- Next, choose the Restart now and check for problems (recommended) option.

- Now, your PC restarts and takes you to the Windows Memory Diagnostic Tool window. Here, the test starts automatically, and you’ll be updated with its status under the Status section.
- Wait for several minutes until the diagnosis is completed and your PC restarts.
- Finally, log in to your computer screen, and you’ll receive the test results.


Analyze Mini Dump File
The prime cause of any BSOD error is hard to find. In such a case, you can look through the dump files where the exact cause of the issue is stored. This way, you can analyze and find the faulty driver or application that is responsible for the 0x00000050 BSOD error:
- Firstly, navigate to Microsoft Store and search for the WinDbg Preview application.
- Download and launch the program.
- Now, choose File and select Open dump file.
- Move to the right and click on the Browse button.
- In the address bar, enter
%windir%\Minidump. This takes you toC:\Windows\minidump. - Here, choose the recent dump file created by your OS and click Open.

- Next, use the
!analyze -vcommand and hit enter.
- Now, the exact problem gets listed in the Command section. Use the module name or image name and find the necessary solution on Microsoft’s Forum.


Uninstall Recent Windows Updates
If a recent Windows update isn’t compatible with your computer, you could face the 0x00000050 BSOD error. Luckily, Windows allows viewing all the updated files, and you can uninstall each of them directly:
- Press Windows + I keys to launch the Settings application and navigate to the Windows Update tab.
- Under More options, select Update history.

- Now, navigate to Related settings and click on the Uninstall updates option.
- Here, right-click on each update file and press Uninstall.

- Finally, restart your PC; now, you should no longer see the 0x00000050 BSOD error.


Perform System Restore
Creating a system restore is an excellent option to revert your Windows to its stable version. So, if you’re getting the 0x00000050 BSOD error due to corrupted data or installation failures, here’s how you can perform a system restore on Windows 11:
- Launch Control Panel and go to System and Security.

- Next, select System. This should launch the About Settings.
- Now, expand the Device specifications and click on the Advanced system settings option.
- Once the System Properties launches, navigate to the System Protection tab.
- Under System Restore, click on the System Restore… button.

- When the Restore system files and settings open up, hit Next.
- Then, select an appropriate restore point and click Next.

- Finally, press the Finish button, and your computer restarts and begins to restore Windows to its working condition.
- Proceed with the on-screen steps until your PC boots. Now, you should no longer get the 0x00000050 BSOD error.


