
Если, заглянув в «Просмотр событий» Windows 10 (Win+R — eventvwr.msc) в журнале «Система» вы обнаружили множество ошибок, для которых указано уровень «Критический», источник — Kernel-Power, Код 41, а Категория задачи — 63, то вы не единственный такой пользователь. Обычно, разобравшись в том, о чем говорит эта ошибка и изучив предоставляемый подробности о событии мы можем разобраться в причинах и исправить проблему.
В этой инструкции подробно о том, что чаще всего вызывает ошибку Kernel Power 41 в Windows 10 и о том, какие сведения для диагностики проблемы может предоставить нам информация об ошибке в «Просмотре событий». Примечание: если события с кодом 41 у вас встречаются редко, переживать и что-то предпринимать обычно не стоит, но ознакомиться с теорией может быть полезным.
- Простые причины ошибок Kernel-Power 41
- Диагностика причин ошибки Kernel Power 41 (63)
- Видео
Простые причины ошибок Kernel-Power код события 41
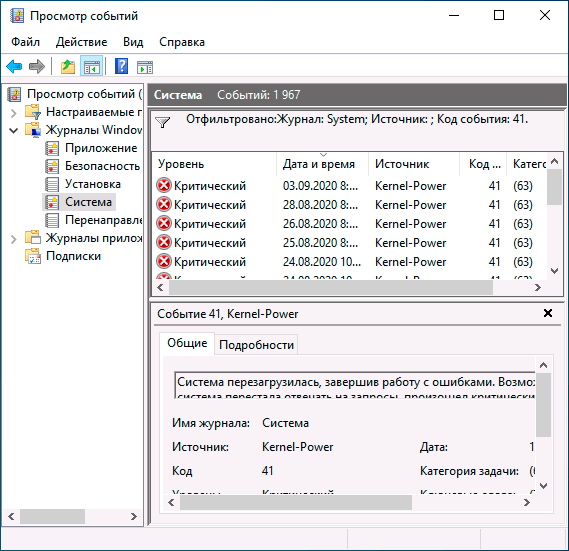
Сообщениях о сбоях Kernel Power 41 (63) регистрируются при тех или иных сбоях, связанных с управлением электропитанием компьютера. При этом пользователь может этого никак не замечать, а может, наоборот, сталкиваться с проблемами: например, полностью зависшим и не отвечающим на команды компьютером.
Начнем с первого варианта, когда с точки зрения пользователя всё работает относительно нормально (или пользователь так считает), но в просмотре событий регистрируются ошибки Kernel Power с кодом события 41. Причинами в данном случае могут быть:
- Выключение компьютера долгим удержанием кнопки питания, выключение кабеля питания из розетки (или внезапное отключение электричества). Для ноутбука — отключение вследствие полного разряда или отключения аккумулятора. В описании ошибки будет почти стандартное: «Система перезагрузилась, завершив работу с ошибками. Возможные причины ошибки: система перестала отвечать на запросы, произошел критический сбой или неожиданно отключилось питание».
- Выключение компьютера или ноутбука, находящегося в режиме сна или гибернации. Очень распространенный вариант в случае с Windows 10 и вот почему: при «Завершении работы» компьютер с Windows 10 по умолчанию не выключается полностью, а переходит в особый режим, схожий с гибернацией. Если его после этого выключить из розетки, может быть зарегистрирована ошибка Kernel Power Если вы намеренно выключаете компьютер из розетки (или иным образом прекращаете подачу электропитания) после каждого завершения работы, отключите функцию Быстрый запуск в Windows 10 — после её отключения «Завершение работы» будет действительно выключать ваш ПК и его можно будет безопасно обесточивать.
- Неправильная работа драйверов, связанных с управлением электропитанием (драйверы чипсета, Intel ME, отдельные драйверы управления электропитанием некоторых ноутбуков), часто в следствие отсутствия оригинальных драйверов (вместо них — те, которые нашла сама Windows 10). Часто при этом наблюдаются странности в цикле завершения работы и включения, например: продолжающие работать вентиляторы после завершения работы, включение компьютера или ноутбука со второго раза или с подобием перезагрузки вначале (еще до входа в систему). Примечание: эти же признаки бывают симптомом неисправности блока питания компьютера, которая в свою очередь, тоже может приводить к ошибкам Kernel Power Для некоторых таких случаев (когда речь именно о драйверах), помимо установки оригинальных драйверов производителя помогает быстрое решение в виде отключения быстрого запуска, как в предыдущем случае, а также отказ от использования режимов сна и гибернации.
Для случаев проблем, связанных с отключением питания в режиме сна или «Connected Standby» (то, что происходит при завершении работы с включенным «Быстрым запуском») вследствие обесточивания или неправильной работы системы управления электропитанием, на вкладке «Подробности» в сведениях об ошибке в разделе EventData параметры SleepInProgress или ConnectedStandbyInProgress будут 1 или true соответственно.
При принудительном отключении кнопкой питания обычно (но не всегда) там же вы увидите параметр LongPowerButtonPressDetected равным true.
Диагностика причин ошибки Kernel Power 41
Всё описанное выше можно отнести к относительно простым случаям появления ошибки Kernel Power 41 с категорией задачи 63. Однако, нередки и более сложные случаи, проявляющиеся в дополнительных (помимо записи в просмотре событий) проблемах и не всегда легко диагностируемые, например:
- Полное зависание компьютера при работе с необходимостью его выключать принудительно.
- Синие экраны с последующей перезагрузкой.
- Внезапные самопроизвольные выключения компьютера (если это происходит под нагрузкой теоретически причиной может быть блок питания или иногда перегрев).

В этих случаях следует попробовать разобраться, а что именно является причиной такого поведения. Если в подробностях об ошибке в разделе EventData параметр BugcheckCode отличается от 0 (ноль), это нам может помочь в диагностике:
- Запустите встроенный калькулятор Windows 10 (можно использовать поиск или нажать клавиши Win+R, ввести calc и нажать Enter). Откройте меню калькулятора и включите режим «Программист».
- Введите число из BugcheckCode а затем переключите представление из десятичной в шестнадцатеричную систему, нажав HEX в калькуляторе.
- Например, самый частый такой код — 159. Если его перевести в HEX, получим 9F. Это будет соответствовать коду ошибки 0x0000009F — мы подставляем полученный на 2-м шаге результат таким образом, чтобы получилось 0x + несколько нулей + наш результат, а общее число знаков после x равно 8. Если выполнить поиск в Интернете по 0x0000009F мы выясним, что этот код соответствует ошибке DRIVER_POWER_STATE_FAILURE и сможем отдельно ознакомиться с причинами и методами исправления этой ошибки.
К сожалению, код не всегда регистрируется, остальные значения в сведениях об ошибке Kernel Power 41 также бывают не определены (равны 0 или false), в этом случае останется лишь наблюдать за закономерностями этой ошибки, а также попробовать следующее:
- Отключить любой разгон памяти, процессора, если они используются.
- Исключить проблемы с блоком питания. Особенно если спонтанные зависания и отключения происходят под нагрузкой. Выходящий из строя блок питания может «продолжать работать», но быть неспособным выдавать необходимую мощность. При этом это не всегда приводит к полному выключению компьютера, например, возможен вариант полной остановки изображения на экране и любой реакции на любые действия.
- Проверить RAM (оперативную память) на ошибки.
- Выполнить проверку системных файлов Windows и жесткого диска на ошибки.
- Иногда причиной может оказаться стороннее ПО, тесно интегрированное с системой, например, сторонние антивирусы.
Видео
Надеюсь, статься помогла разобраться с тем, что вызывает ошибку Kernel Power 41 в вашем случае и предпринять необходимые действия для её устранения.
Если вы столкнулись с аварийной перезагрузкой Windows, то, скорее всего, при следующем запуске ОС увидите отчет об ошибке Kernel-Power 41. Рассказываем, что вызывает данную проблему и как ее решить.
Источник Windows Report / Интерфейс Windows
Когда компьютер или ноутбук неожиданно перезагружается, в журнале событий можно наблюдать критическую ошибку Kernel-Power 41. Она возникает из-за того, что при внезапной перезагрузке Windows 10 программы не успевают корректно закрыться. Все из-за неправильной последовательности завершения работы системы. Сообщение может появиться даже после выхода из спящего режима, иногда сопровождаясь зависанием экрана.
Какие могут быть причины?
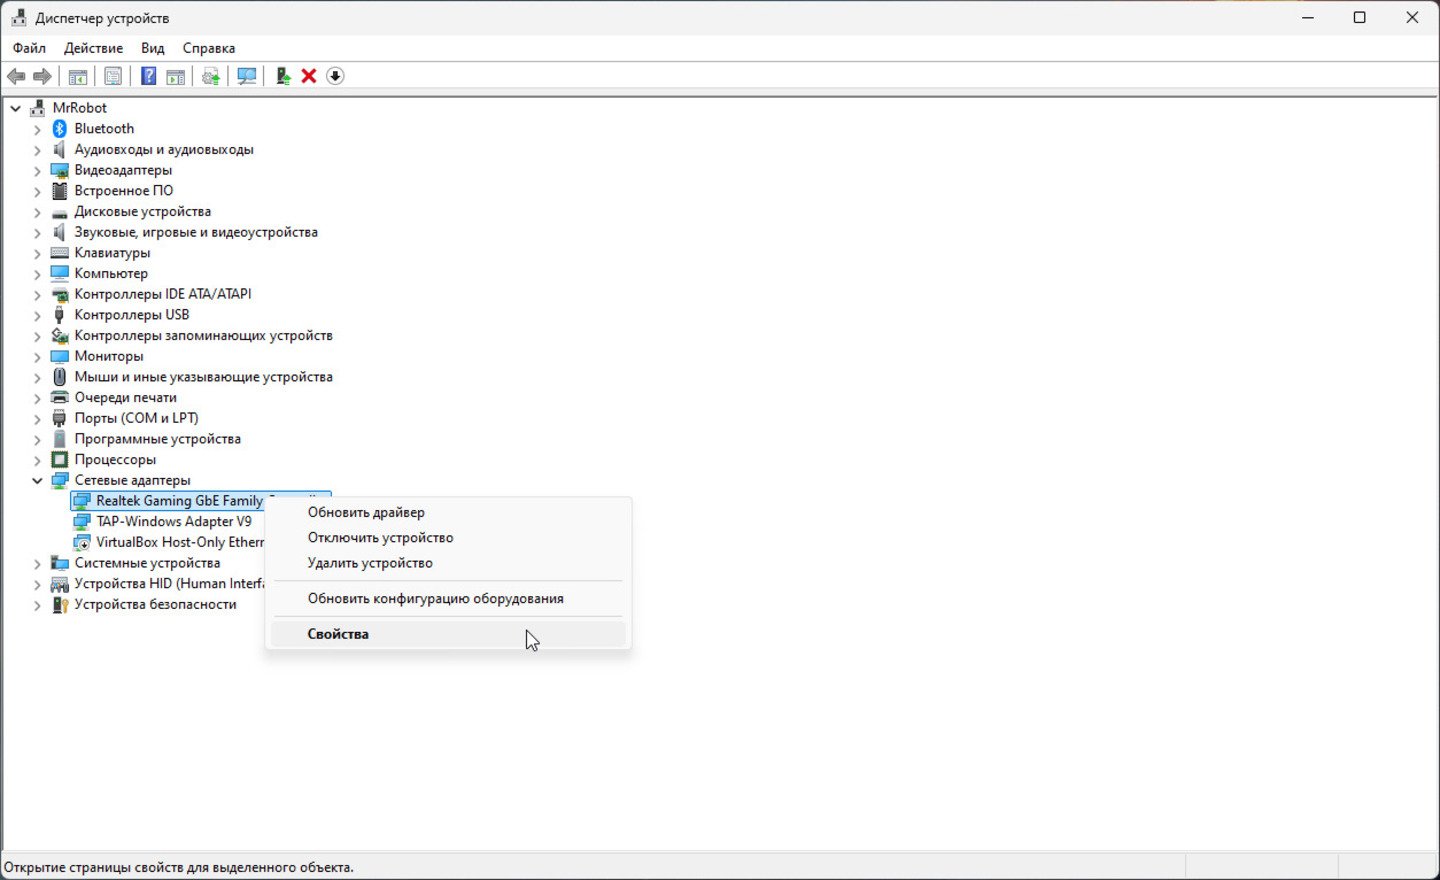
Первая причина — неисправные драйверы
Источник CQ / Windows
Зачастую после установки новой ОС пользователи ставят драйвера с диска, который идет в комплекте с материнской платой. Однако производители материнских плат не всегда способны адаптировать драйвера для будущих обновлений Windows 10. Вторая распространенная проблема — банальная несовместимость софта.
Решение проблемы
- Зайдите в «Диспетчер устройств»;
- Найдите устройства, помеченные желтым треугольным значком;
- Нажмите правую клавишу мыши на нужном устройстве и выбирете «Обновить конфигурацию оборудования».
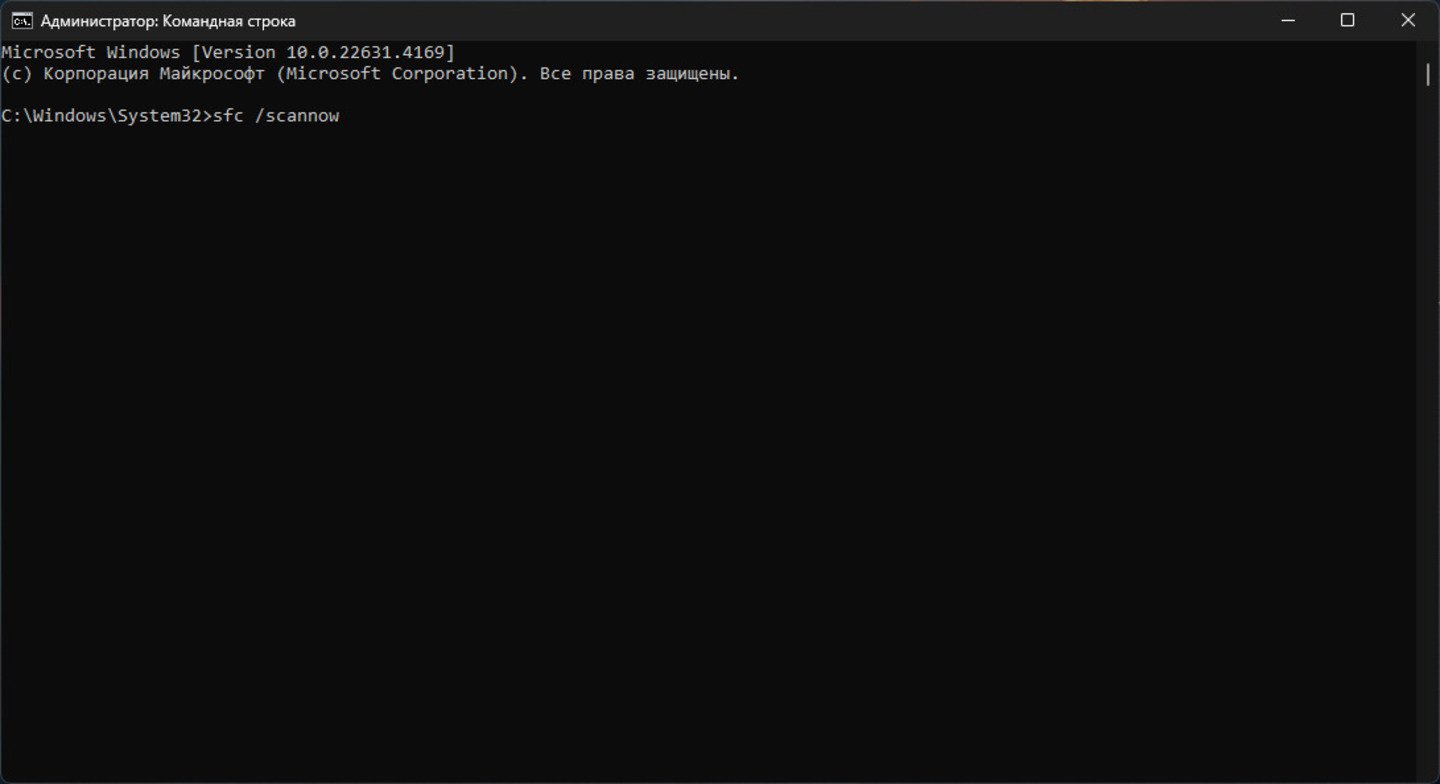
Вторая причина — повреждение системных файлов
Источник CQ / Windows
Если целостность системных файлов нарушена, некоторые функции начинают работать неправильно. В частности, может возникнуть проблема с быстрым запуском, предназначенным для ускорения загрузки после завершения работы устройства. Это также может отразиться на других настройках, связанных с включением системы.
Решение проблемы
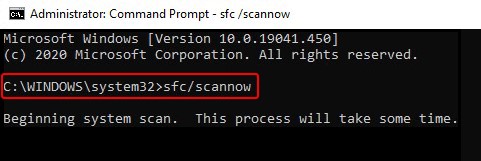
Запустите командную строку от имени администратора с помощью сочетания клавиш «Win+X». В открывшемся окне введите команду:
«sfc /scannow»
После этого система начнет восстановление целостности поврежденных файлов. ОС даст знать, все ли хорошо с Windows. В зависимости от сценария вы увидите на экране одно из двух сообщений.
- «Программа защиты ресурсов Windows обнаружила поврежденные файлы и успешно их восстановила»;
- «Защита ресурсов Windows не обнаружила нарушений целостности».
Третья причина — перегрев или несовместимость комплектующих
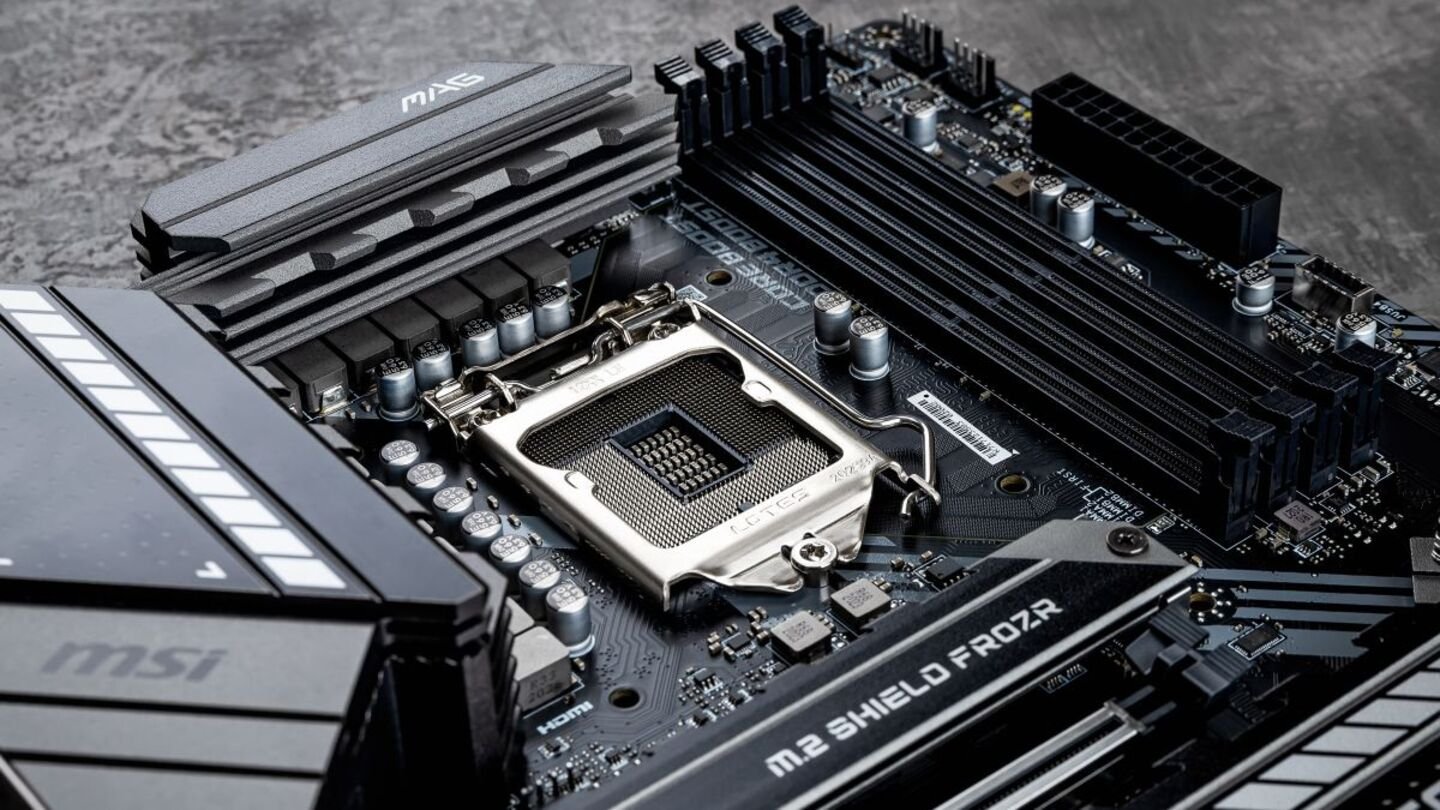
Источник TechRadar / Материнская плата
В частности, проблема может возникать при перегреве материнской платы. Если вы занимались сборкой ПК самостоятельно, не исключена вероятность, что вы просто неправильно подобрали компоненты.
Решение проблемы
Обратитесь в сервисный центр или к специалисту, чтобы он проверил комплектующие на совместимость друг с другом.
Четвертая причина — неправильная работа электропитания
Источник CQ / Windows
Если вы любите баловаться с разгоном видеокарты или процессора, а также если у вас начала сбоить система охлаждения, это может стать причиной появления на экране Kernel-Power 41. Система может просто не выдержать повышенное энергопотребление. Как итог — вынужденная перезагрузка ПК.
Решение проблемы
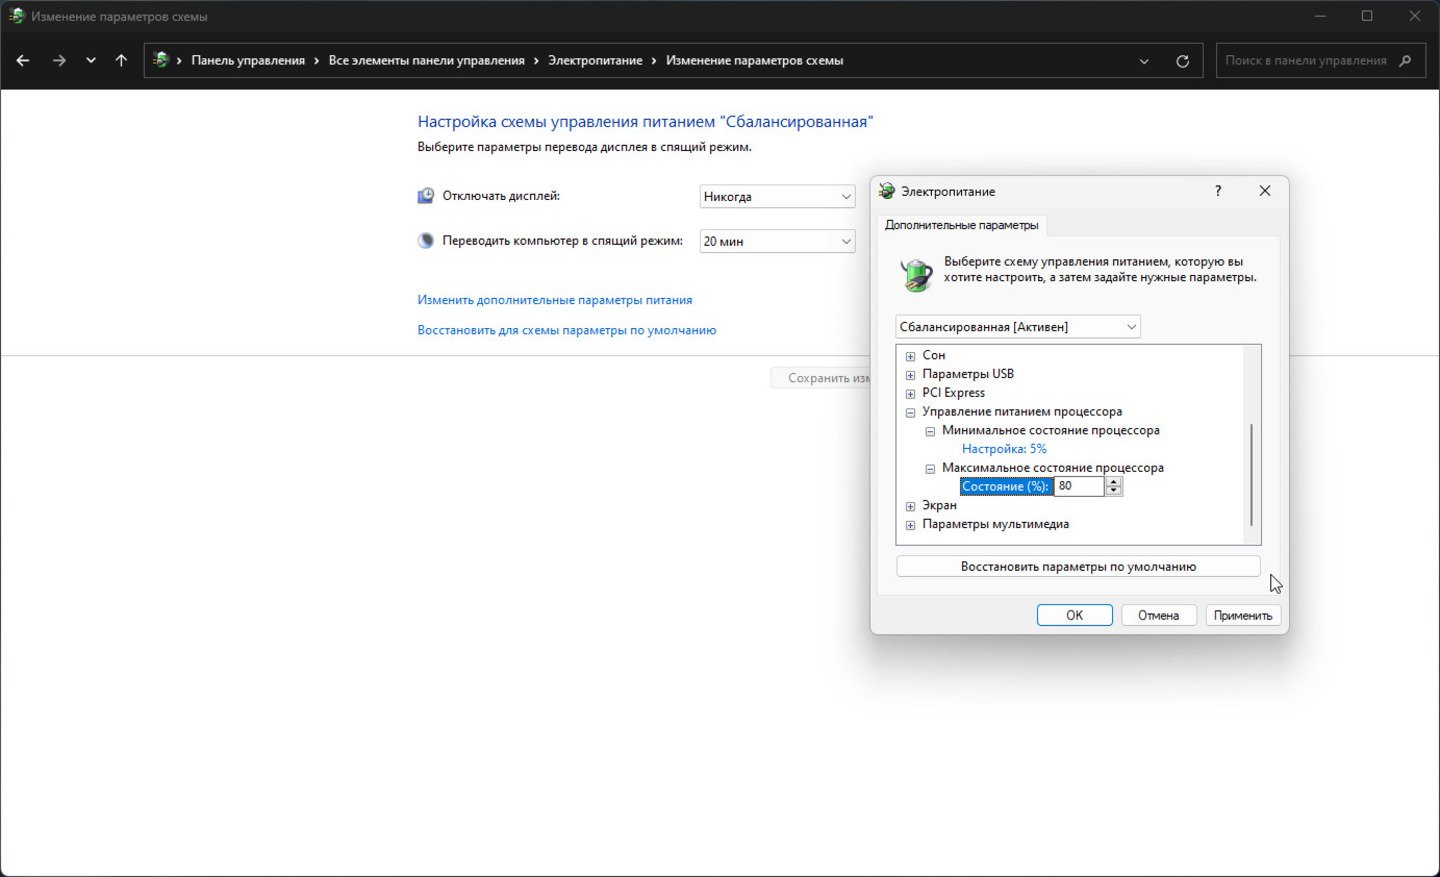
- Нажмите сочетание клавиш «Win+R»;
- Выберете вкладку «Управление питанием процессора»;
- В появившемся поле «Максимальное состояние процессора» оставьте показатель на уровне 90%.
Дополнительные советы
Источник: CQ / Скриншот Windows
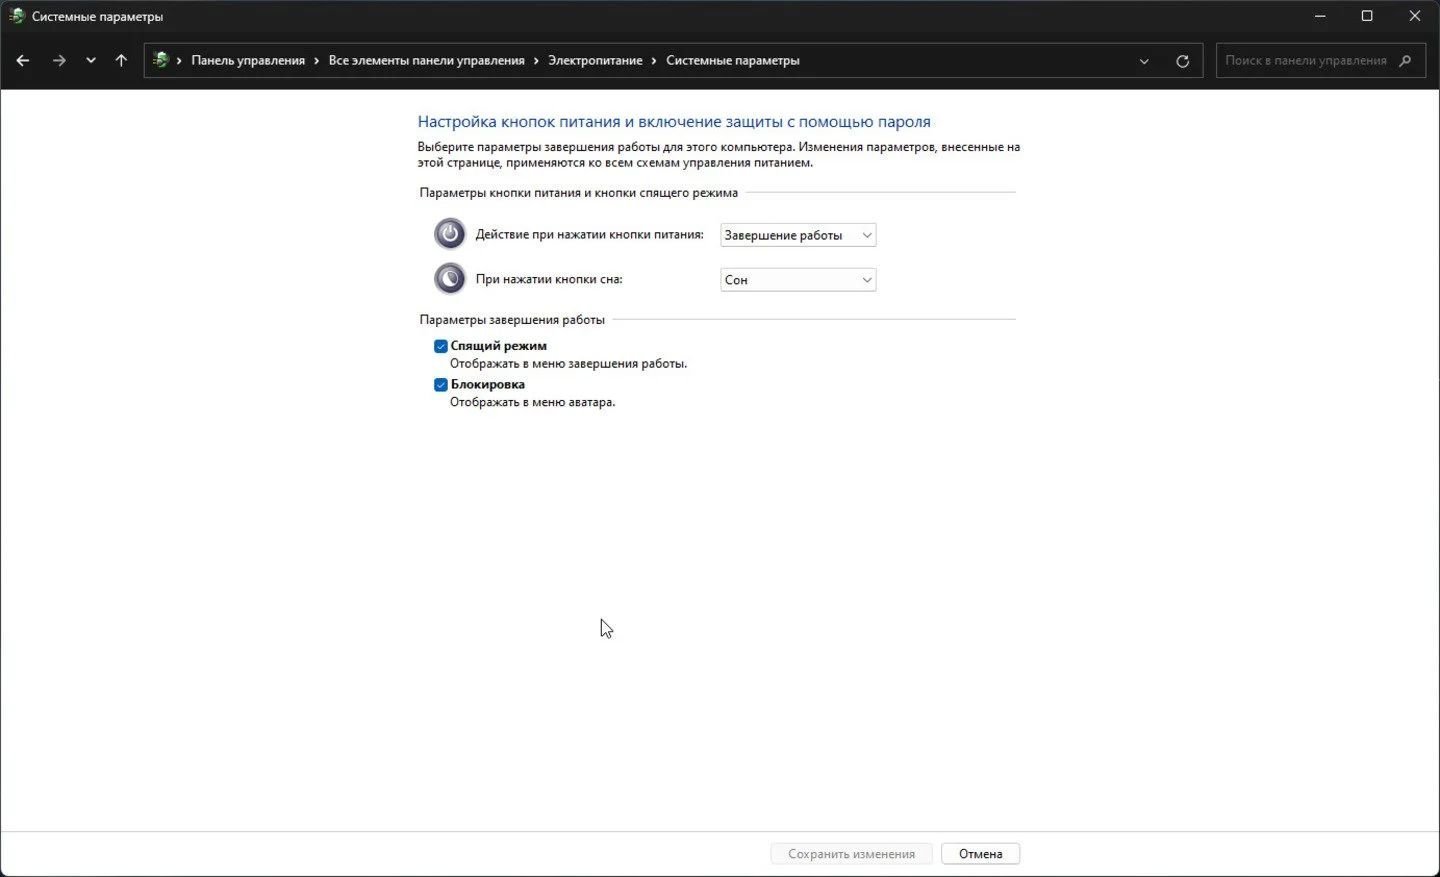
Попробуйте отключить быстрый запуск
- Откройте «Панель управления» и перейдите в раздел «Оборудование и звук»;
- Найдите вкладку «Электропитание», затем «Настройка действий кнопок питания»;
- Уберите галочку с пункта «Включить быстрый запуск».
Поменяйте ОЗУ
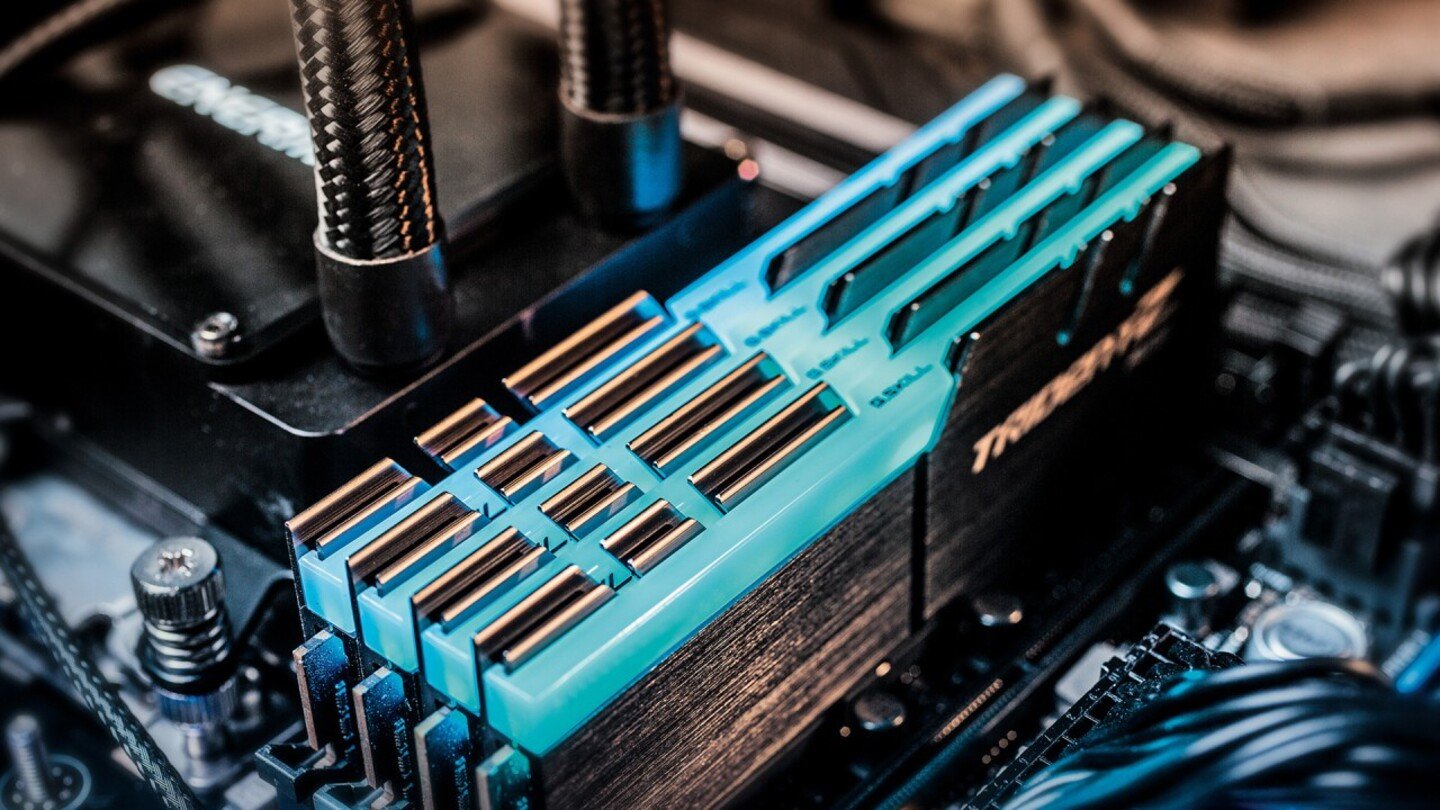
Источник Linkedln / Оперативная память
Если внутри компьютера используется две плашки с оперативной памятью, можно попробовать заменить их на одну. Проблема может быть связана и с количеством компонентов RAM.
Выключите все компоненты из USB-портов
Источник Msadowski / USB-порт
Если в USB-разъемы воткнуты какие-либо устройства, будь то принтер, внешние жесткие диски или флешки, они также могут забирать энергию при перезагрузке операционной системы.
Обновите прошивку BIOS

Источник MakeUsOf / BIOS
В отдельных случаях помогает восстановление или перепрошивка BIOS, поскольку именно с него начинается перезагрузка ПК. Свежая или переустановленная версия BIOS может устранить проблемы с перезапуском.
Ошибка Kernel-Powerявляется трудно выявляемым сбоем, который отображается в журнале событий операционной системы Windows. В описании Windows указывается, что эта ошибка возникает в результате неправильной перезагрузки системы. Также отмечается, что она может быть связана со сбоями системы, потерей питания и другими неожиданными проблемами, возникающими без видимой причины.
Мой ПК не отключался, экран уходил в «черное», загружалась и продолжала работать система бес видимых изменений. Это происходило после пуска ПК.
Я пытался решить проблему всеми возможными способами и советами, которые нашел на просторах интернета. Но ошибка всплывала вновь. Тесты ОССТ ни чего не выявили и другие программы тоже.
Проблема решилась после того, как прочел статью о режимах нагрузки центрального процессора.
Загружен на 100%.
Изменил загрузку ЦП на 90%, не буду утверждать, но проблема ушла, конечно все пока, на уровне тестов.
Снизилась температура в покое до 40 — 44°C, при нагрузке не подымается выше 75°C, при стресс-тесте. Конечно, утверждать что метод работает, не буду. Н�� как говорят, время покажет. Но точно могу сказать — хуже не будет.
Всем удачи, пока.
Привет! Прошло уже 7 дней ошибка Kernel-Power код 41 не всплывала. Так что ограничение нагрузки ЦП до 90% можно считать одним из рабочих вариантов устранения ошибки Kernel-Power код 41.
Всего доброго, пака.
To function properly and as intended, Windows 10 depends on a number of resources and software components. Even with a simple task as powering the machine, there are already several smaller software components supporting it. However, if any of these resources or components experience issues, it will affect the overall function of the computer. One of the errors reported is the Kernel Power Blue Screen error which is triggered by the Windows Kernel that mostly comes with a Windows Kernel Event ID 41 error. This kind of error can turn off and reboot the computer randomly.
Here’s an example of a Bugcheck code entry with the same event:
“EventData
BugcheckCode 159
BugcheckParameter1 0x3
BugcheckParameter2 0xfffffa80029c5060
BugcheckParameter3 0xfffff8000403d518
BugcheckParameter4 0xfffffa800208c010
SleepInProgress false
PowerButtonTimestamp 0Converts to 0x9f (0x3, 0xfffffa80029c5060, 0xfffff8000403d518, 0xfffffa800208c010)”
This kind of BSOD error is caused by an issue with the Power Supply components in both the software and hardware parts of your computer. In such cases, if your computer is stuck in a reboot loop, you need to troubleshoot the problem via Safe Mode or in the Advanced Startup options screen.
Option 1 – Try disabling Overclocking
If you have enabled Overclocking, you might have to disable it as some users reported that the Kernel-Power Blue Screen error started to appear right after overclocking. To disable it, follow the steps below.
- Go to the Start Menu and open Settings.
- Next, select Update and Security and go to the Recover tab.
- From there, click on Restart now in Advanced startup. This will restart your computer.
- Once you’re in the Advanced startup, go to Troubleshoot and then select Advanced Options.
- From there, select the UEFU Firmware Settings.
- Now click on Restart. Once your computer has restarted, it will automatically open BIOS.
- From the BIOS, go to the Advanced tab and navigate to Performance and then look for Overclocking.
- Once you’ve found Overclocking, make sure that it is disabled. If it’s not, then disable it and then save the changes made by tapping the F10 key.
- Start your computer normally and check if the Kernel-Power Blue Screen error is now fixed.
Option 2 – Try to run the Power troubleshooter
The next thing you can do is to run the Power troubleshooter. To do so, follow these steps:
- Go to Settings and navigate to Update & Security > Troubleshoot.
- After that, look for the “Power” option from the given list of built-in troubleshooters and click on it.
- Next, click on the “Run the troubleshooter” button to run the Power troubleshooter.
- Once the troubleshooter is done identifying the problems, follow the next on-screen instructions to resolve the problem.
Note: You could also try to run the Blue Screen troubleshooter to fix the Kernel-Power BSOD error. You can find it under the same page as the Power troubleshooter.
Option 3 – Try to replace the Power Supply Unit
You could also try to consider physically replacing the Power Supply Unit or PSU of your computer and see if that helps or not.
Option 4 – Run the Windows Memory Diagnostic tool
Since this error could be caused by some issues in the memory, you can try running the Windows Memory Diagnostic tool and see if it helps.
- Tap the Win + R keys to open Run and type exe and hit Enter to open the Windows Memory Diagnostic Tool.
- After that, it will give two options such as:
- Restart now and check for problems (Recommended)
- Check for problems the next time I start my computer
- Once your computer has restarted, perform a basic scan or you could also go for the “Advanced” options such as “Test mix” or “Pass count”. Simply tap the F10 key to start the test.
Note: After you select the option, your PC will restart and check for memory-based issues. If it finds any issues, it will automatically fix them and if there’s no issue found, then it’s most likely not a memory-based issue so you should try the other options given below.
Option 5 – Try to check physically check your RAM
In this option, you have to check your RAM physically especially if you tend to use multiple physical RAMs on your computer so it can be quite tricky and technical. You have to check first if they are of the same frequency and then verify if the chip is compatible or not. You also have to check if the sockets are attached using some adapter or non-recommended apparatus as it can cause some problems while giving performance hit to your computer.
Option 6 – Try to update the BIOS
Updating the BIOS can help you fix the Kernel-Power BSOD error but as you know, BIOS is a sensitive part of a computer. Even though it is a software component, the functioning of the hardware depends on it largely. Thus, you must be careful when modifying something in the BIOS. So if you don’t know much about it, it’s best if you skip on this option and try the other ones instead. However, if you are well-versed in navigating the BIOS, then follow the steps below.
- Tap the Win + R keys to open the Run dialog box.
- Next, type “msinfo32” in the field and press Enter to open System Information.
- From there, you should find a search field on the bottom where you have to search for the BIOS version and then press Enter.
- After that, you should see the developer and version of the BIOS installed on your PC.
- Go to your manufacturer’s website and then download the latest version of BIOS on your computer.
- If you are using a laptop, make sure that you keep it plugged in until you have updated the BIOS.
- Now double click on the downloaded file and install the new BIOS version on your computer.
- Now restart your computer to apply the changes made.
Note: If updating the BIOS didn’t help, you might want to consider resetting it instead.
Option 7 – Disable Fast Start-up
If you want your computer to boot faster, then you might have enabled Fast Start-up. This feature is ideal for computers that are using a hard disk drive. However, turning on this feature also means that when the computer boots, it might lag some drivers that are loaded when it initially boots up. Thus, it might be the potential cause of the Kernel-Power BSOD error. Thus, you need to disable Fast Start-up. To do that, follow these steps:
- Boot your PC into Safe Mode.
- Then tap the Win + R keys to open the Run dialog box.
- Next, type in “control” to open Control Panel.
- After that, select Hardware and Sound and click on Power Options.
- Select “Choose what the power buttons do” from the left side menu pane and click on Change settings that are currently unavailable.
- Afterward, uncheck the “Turn on fast startup (Recommended)” entry and click on Save Changes.
- Now restart your PC for the changes to take effect and then check if the problem’s fixed afterward.
Do You Need Help with Your Device?
Our Team of Experts May Help
Troubleshoot.Tech Experts are There for You!
GET HELP
Troubleshoot.Tech experts work with all versions of Microsoft Windows including Windows 11, with Android, Mac, and more.
Share this article:
You might also like
0X0000007B (0xF78d2524) — What is it?
If you are a laptop or a notebook user and you are trying to install Windows XP on it, you might come across 0x0000007B (0xF78524) error message. This error is a popular blue screen of death error and very similar to the error 0x0000007B.
Solution
Error Causes
The common causes of 0x0000007B (0xF78524) error code on your laptop might be:
- File Corruption
- Device Configuration Issues
- Adware/spyware invasion
- Incomplete Installations
- Problem with your computer’s hard drive controller
Further Information and Manual Repair
Many people panic when they experience 0x0000007B (0xF78524) error on their laptops and notebooks simply because it is a blue screen of death error. The BSoD has this whole persona of being deadly computer errors that can almost cripple systems.
If you have also experienced this error on your laptop, remain calm and follow the solutions given below to ensure you fix the error quickly without any hassle.
Here are various ways to fix and resolve the BSOD error code 0x0000007B (0xF78524):
- Whether you have Lenovo IdeaPad Y550 or Dell Latitude E4300 or any other laptop for that matter, if device driver configuration is the cause of the error 0x0000007B (0xF78524), then all you need to do is start up your laptop and press F2 to enter BIOS. Now expand the ‘Drives’ section. After doing so, go to ‘SATA Operation’. SATA is the abbreviation for Serial Advanced Technology Attachment which enables mass storage devices like hard drives and optical drives to communicate with the motherboard by using a high-speed serial cable. For successful communication between devices, you need to configure SATA controller mode. Once you go to the ‘SATA Operation’ mode, change this from RAID AHCI to RAID ATA. Save changes and exit BIOS. This helps resolve the error 0x0000007B (0xF78524) in no time.
- Another way to fix this error is to download and install the 0x0000007B (0xF78524) repair tool. Once this tool is installed on your laptop, click the scan button. Once the scan is complete, you will see a list of errors; click the ‘Repair’ button to fix the errors found and then restart.
- The 0x0000007B (0xF78524) error may also occur due to the boot volume corruption. In such an event, it is advisable to run chkdsk command on the hard drive. This is recovery console command is used to check the hard drive, repair and recover data on the drive successfully.
Read More

Mac OS
A solid reason to switch to Mac from Windows PC is Mac OS. Based on Linux, offers more stability and better security than Windows but you will not be able to find a vast array of applications on it.
Even when Mac OS X (the first big one) was first introduced, it looked and felt like ages beyond Windows (Microsoft just recently made a slick and modern design with Windows 11). Under the hood, it turned out that the operating system itself is stable and incredibly fast & responsive. If you value stability and easiness of use, Mac OS is the Operating system for you.
Apple ecosystem
This one is easy, if you are already invested in apple devices like iPhone and iPad, having an apple computer is one step forward into the apple ecosystem and one more step into easy sharing of documents and data between devices.
Calendars, emails, photos, videos, documents, and many more can easily be shared and synched between devices with a single apple ID making workflows much easier than on other operating systems.
Development
Developers all around the world say that developing on Mac is much better and smoother than on PC, this has probably to do something with OS being based on Linux but whatever the case is, it is much smoother and it just feels better. Apple laptops are often the go-to choice of developers for a reason.
Also if you are in the development business for applications and services aimed at iPhone or iPod then there is no really another way than to be into the apple ecosystem and own apple hardware.
Professional software
A lot of professional-grade software exists for both the Windows platform and Mac OS but there is some software that exists exclusively for Apple hardware like Final Cut Pro or Logic Pro. Both applications are used by professionals and are industry-standard software.
Logic pro is used by industrial audio specialists all around the world and is used in professional studios. Final Cut Pro is also used worldwide by video editors and if you are specializing in any of these two fields Mac seems like a very reasonable platform since the software can not be found on Windows. These two are examples, there are other similar applications that are only available on Mac OS
Longevity
Apple hardware is made of high-quality materials and components and it is proven over time that it lasts longer than usual. There are iPhones out there that have 13 years and they are still working, G3 and G4 Macs that are still functional.
When buying Apple products they will outlive other ones if treated properly so in the end you could be saving money by purchasing them.
Read More
After so many years World of Warcraft is still among the most played MMORPG games in the world. It is still constantly updated with new content and tweak graphically in order to be relevant and fresh. But even the best or most popular ones can still have some minor issues and bugs from time to time. CAS System Was Unable to Initialize is the error that was reported lately by WOW players all around the globe and it happens in multiple Windows systems.
In this guide, we will take with this issue and provide you with solutions on how to fix it so you can get back to enjoying the game itself.
-
-
Repair WOW
In battle.NET launcher select WOW and click on Options
Click on Scan and Repair
Let the process finish and then launch the game again -
Clean Windows registry
Windows cleaning registry operation is a complex task and we will not cover each possible scenario here, instead of trying manually to find issues and clean registry download and install third party registry cleaner software.
-
Run WOW with command line argument
One of the solutions for this particular error is to run WOW with a specific command line switch:
Run battle.NET client as administrator by right-clicking on it and choosing run as administrator
If you are not signed in, sign in now
Click on World of Warcraft to select it
Click on options
Click on Game settings
Check the box associated with Additional command-line arguments
When the box is selected you should’ve able to add inline argument or switch, add -uid wow_engb and confirm
Run World of Warcraft -
Enable Secondary logon service inside Windows
It was reported that enabling this service can fix the issue.
Press ⊞ WINDOWS + R to open the run dialog
Inside run dialog type in services.msc to open services windows
Locate the Secondary Logon service
Right-click on Properties from the context menu
Inside the properties, screen click on the general tab
Change the Startup type to Automatic and hit Apply to save the changes
Run World of Warcraft -
Delete the cache folder
Both indices and cache folder needs to be deleted in order to reset corrupted data. Make sure that both World of Warcraft and battle.NET are fully closed
For this step to work, you will need to go into the folder where you have installed the World of Warcraft game. By default this is in C:/Program Files/World of Warcraft/ but if you have used another folder go there via file explorer.
Once you are inside the folder locate the indices folder and delete it
After that locate and delete the cache folder as well
Restart your computer and start battle.NET -
Remove read-only attribute from WoW folder
Another reason for CAS System Was Unable to Initialize error is because the World of Warcraft folder has been set to read-only and since the client does not have write privileges it will throw this error. To remove the read-only attribute from the folder go to your World of Warcraft installation folder but do not enter it
Right-click on it instead and choose properties
Under properties uncheck the read-only box and confirm.
Run World of Warcraft
-
Read More
Flash.ocx Error — What is it?
To understand this error, first, it is important to understand what Flash.ocx actually is. Flash.ocx is basically a flash plug-in or ActiveX file that is responsible for the adobe flash player to work on the system.
The Flash.ocx error triggers due to issues in the Adobe flash player.
Solution
Error Causes
The error Flash.ocx may occur due to many reasons. These include:
- Flash player corruption
- Corrupted and broken Active X components
To this error code is not fatal but nonetheless it is still advisable to fix it right away to avoid inconvenience when using Flash player.
The inability to run the Flash Player smoothly will hinder you from watching videos on your PC and playing exciting web-based games.
Further Information and Manual Repair
To resolve this error on your system, you don’t have to hire a professional and spend hundreds of dollars. This error code is quite easy to fix. You don’t need to be technically sound to resolve this error code.
Simply follow the methods give below to fix the Flash.ocx error code in a few minutes.
Method 1: Reinstall the Flash Player
If the error occurs due to the corruption of the Flash Player, then it is advisable to reinstall the player on your PC. However, before you do that first remove the previous versions of Adobe Flash Player on your system.
If the previous corrupted version is not removed properly, then you will be unable to re-install it properly on your PC again.
Go to the Add/Remove Programs and find the Flash Player and uninstall it. Make sure the files are also removed from the registry.
Once you have successfully uninstalled the corrupted version, now go to the official website of Adobe Flash Player and download the utility from the website. Install it and run it on your system.
If it works, then this means the error is resolved. However, if the error still persists, then try method 2.
Method 2: Download Restoro to Fix Active X components
Another reason for Flash.ocx error code can be broken or corrupted Active X components.
If this is the issue, then the best way to resolve it is to download Restoro. This is a multi Reimagefunctional and advanced PC Fixer deployed with multiple high-performance scanners including Active X and Class scanner.
The Active X and Class scanner perform an entire PC scans for corrupt and broken Active X entries along with missing software paths and invalid combinations. After the scanning process is complete, it repairs and restores the components back to normal.
Thereby resolving the Flash.ocx error right away and ensuring smooth video browsing over the web.
Restoro is an efficient and a safe program. It has a user-friendly interface and easy navigations. It can be used by all level of users.
Besides the Active X scanner, it includes 5 more value-added utilities like a registry scanner and an antivirus to name a few. It is compatible with all Windows versions
Click here to download Restoro on your PC and resolve Flash.ocx error code now!
Read More
Browsing your files on a computer seamlessly is made possible by the File Explorer in Windows 10 as it provides users with a great sense of customization for both listing and performing operations on a file. You have the option to arrange the folders and files being browsed by their name, type, date, size, and so on. Moreover, files that share a common attribute can be also be grouped accordingly using the grouping feature. However, there are times when instead of helping, it causes some problems for some users. This is why in this post, you will be guided on how you can disable the File Grouping feature in the File Explorer in Windows 10.
There are two methods you need to consider in disabling the File Grouping feature in Windows 10. First, you can disable it for only one folder or you can disable it for all the folders on your computer. For more details, follow the instructions given below.
Option 1 – Disable File Grouping in only one folder
This first option is relatively straightforward and simple which will work if you only want to disable File Grouping in one folder.
- First, open File Explorer, and go to the folder you want to disable File Grouping.
- Next, right-click anywhere on that folder.
- And then select Group by > None. This will disable File Grouping for only that particular folder.
Option 2 – Disable File Grouping in all the folders
If you wish to disable File Grouping in all the folders on your computer, then you need to follow this option. If you have already tried the first one, then continue with the given steps below.
- Tap the Alt + V key combination.
- Then tap the Alt + Y keys and then tap Alt + O keys.
- After that, navigate to the View tab, and under the Folder views section, select Apply to Folders.
- Now click on the Apply and OK buttons to save the changes made. This will disable File Grouping in all the folders listed in the File Explorer.
Read More

Reddit is one of the most popular websites in the world and how Microsoft is opening doors to everyone in its new store Reddit took a logical step and made a Progressive web application and placed it in it.
Being a Progressive web app makes it more familiar and feels like a home experience using it for a lot of Reddit users.
Reddit itself has a large community and active topics discussions all the time about anything. Bringing it to Windows as an application is, in my opinion, a great move since as an application it is independent, more light-weighted, and offering some other advantages specifically tied to being a standalone windows application.
Everyone familiar with and using the Reddit website will feel right at home in this app and you can start using it right away.
Read More
A number of users have recently reported that they were going through an issue with their Bluetooth devices on their Windows 10 computers. This issue involves an error saying,
“Windows cannot verify the digital signature for the drivers required for this device. A recent hardware or software change might have installed a file that is signed incorrectly or damaged, or that might be malicious software from an unknown source. (Code 52).”
If you are one of the users who encountered this kind of error on your Windows 10 computer, read on as this post will guide you on how you can fix this Bluetooth error. According to security experts, the key to fixing this error is to sign the Bluetooth A2DP files with the built-in tool, System File Checker. Apart from that, you could also run the Hardware and Devices troubleshooter or perform System Restore, as well as update or reinstall the concerned drivers. For more details, refer to each one of the options provided below.
Option 1 – Try to check Bluetooth-related services
In Services, there is a Bluetooth-related service that helps users use Bluetooth so if that particular service suddenly malfunctions for some reason, you will most likely get the “Windows was unable to connect with your Bluetooth network device” error message. That’s why you need to check Services and to do that, refer to these steps:
- Tap Win + R keys to open Run prompt and type in “services.msc” then tap Enter to open Services.
- Next, look for the Bluetooth Support Service and double click on it to open Properties.
- From there, verify if the Service status is showing “Running” or “Stopped”. If it’s the latter, you have to click the Start button.
- Lastly, check if the Startup type is set to Manual.
Option 2 – Try running System File Checker or SFC scan
You could also run System File Checker or SFC scan to fix the Bluetooth error. It is a built-in command utility that helps in restoring corrupted files as well as missing files. It replaces bad and corrupted system files with good system files. To run the SFC command, follow the steps given below.
- Tap Win + R to launch Run.
- Type in cmd in the field and tap Enter.
- After opening Command Prompt, type in sfc /scannow
The command will start a system scan which will take a few whiles before it finishes. Once it’s done, you could get the following results:
- Windows Resource Protection did not find any integrity violations.
- Windows Resource Protection found corrupt files and successfully repaired them.
- Windows Resource Protection found corrupt files but was unable to fix some of them.
- Reboot your PC.
Option 3 – Try to perform System Restore
You might also want to perform System Restore as the error might be caused by system modifications. Thus, to undo them, you can use System Restore. Run it using these steps:
- First, tap the Win + R keys to open the Run dialog box.
- After that, type in “sysdm.cpl” in the field and tap Enter.
- Next, go to the System Protection tab then click the System Restore button. This will open a new window where you have to select your preferred System Restore point.
- After that, follow the on-screen instructions to finish the process and then restart your computer and check if the problem is fixed or not.
Option 4 – Try running the Hardware and Devices Troubleshooter
The next thing you can do to fix the problem is to run the Hardware and Devices troubleshooter. Although it won’t make much of a difference, there’s still a possibility that it could automatically fix the Bluetooth error. To use it, refer to these steps:
- The first thing you need to do is click on Start and then on the gear-like icon to pull up the window for Settings.
- After opening Settings, look for the Update and Security option and select it.
- From there, go to the Troubleshoot option located on the left-hand side of the list.
- Next, select Hardware and Devices from the list and open the Troubleshooter and run it. Once it is doing its job, wait for it to complete the process and then restart the system.
- After the system restarts, check if the problem’s now fixed. If not, refer to the next option given below.
Option 5 – Try to reinstall or update the Bluetooth driver
The issue might have something to do with the Bluetooth drivers. It could be that it is outdated and needs to be updated or that you recently updated it and since then you have trouble removing the Bluetooth devices and so to fix the issue, you can update, roll back or uninstall the Bluetooth drivers. How? Follow the steps below.
- Tap the Win + X keys to open the Device Manager.
- Next, look for the Bluetooth device and right-click on it.
- Select the option “Update driver”.
- After that, a new popup window will appear. In there, select the option, “Search automatically for updated driver software”.
Note: Checking the update may take a few minutes so you’ll have to wait until it finishes. If it is able to find an update, you must install it. And if you want to reinstall the Bluetooth driver, just select the “Uninstall driver” option and follow the next on-screen instructions that follow.
Read More
Location services is a built-in tool in Windows 10 is a useful tool that offers users location information even when your laptop or desktop computer does not have a GPS since it uses Wi-Fi positioning as well as your device’s IP address. However, there are instances when you might encounter some problems when using this service. One instance is when you suddenly find the toggle button for Location service greyed out.
This kind of program could be due to some glitch in the system or some third-party application on your computer. Because of this problem, you won’t be able to toggle the Location service on or off and you won’t be able to make any changes in its settings. Worry not, for this post will guide you on what you can do to fix the greyed-out toggle button of Location services in Windows 10.
Before you perform some troubleshooting steps, you might want to restart your computer and see if it fixes the problem. If it didn’t, then this problem is not just some minor glitch. Thus, you have to follow the potential fixes provided below to fix the problem but before you do that, make sure that you create a System Restore point first. After that, follow each one of the following options.
Option 1 – Put your PC in a Clean Boot State
The first thing you can do to resolve the problem is to put your computer in a Clean Boot State. It could be that there is a third-party program that’s preventing the toggle button from functioning. To isolate this possibility, you need to put your computer in a Clean Boot State.
- Log onto your PC as an administrator.
- Type in MSConfig in the Start Search to open the System Configuration utility.
- From there, go to the General tab and click “Selective startup”.
- Clear the “Load Startup items” check box and make sure that the “Load System Services” and “Use Original boot configuration” options are checked.
- Next, click the Services tab and select the “Hide All Microsoft Services” check box.
- Click Disable all.
- Click on Apply/OK and restart your PC. (This will put your PC into a Clean Boot State. And configure Windows to use the usual startup, just simply undo the changes.)
- Now check if you can now use the toggle button of the Location service or not.
Option 2 – Try to use the Registry Editor
If putting your computer in a Clean Boot state didn’t fix the problem, you might want to make some adjustments in the Windows Registry via Registry Editor.
- Tap the Win + R keys to open the Run utility and type “regedit” in the field and then tap Enter to open the Registry Editor.
- After that, navigate to this registry path: HKEY_LOCAL_MACHINESYSTEMCurrentControlSetServiceslfsvcTriggerInfo
- From there, select the Key (folder) named as “3” and right-click on it, and then delete it.
- Once done, exit the Registry Editor and restart your computer.
Option 3 – Try to use the Windows Services Manager
- Tap the Win + R keys to open the Run dialog box and type “services.msc” in the field and hit Enter to open the Services Manager.
- Next, look for the “Geolocation Service” entry from the list of services.
- Once you find it, right-click on it and select Properties. This will open a new mini window.
- From there, make sure that it is “Running” and its Startup Type is set to “Automatic”.
- After that, close the Services Manager and check if the problem is now resolved.
Option 4 – Try to use the Group Policy Editor
- Tap the Win + R keys to launch Run and type “gpedit.msc” in the field and click OK to open the Group Policy Editor.
- After that, navigate to this path: Administrative TemplatesWindows ComponentsLocation and Sensors
- Next, double click on each one of the following settings and select the “Not configured” or “Disabled” option.
- Turn off location scripting
- Turn off location
- Turn off sensors
- Once done, navigate to this path: Administrative TemplatesWindows ComponentsLocation and SensorsWindows Location Provider
- From there, double click on the “Turn off Windows Location Provider” policy setting and set its configuration to either “Disabled” or “Not configured”. You should see the following description of the policy setting in the window:
“This policy setting turns off the Windows Location Provider feature for this computer. If you enable this policy setting, the Windows Location Provider feature will be turned off, and all programs on this computer will not be able to use the Windows Location Provider feature. If you disable or do not configure this policy setting, all programs on this computer can use the Windows Location Provider feature.”
- Now restart your computer.
Read More
If you suddenly receive an error saying, “Error 105 (net:: ERR NAME NOT RESOLVED): Unable to resolve the server’s DNS address” when browsing the web, then this means that the DNS lookup has failed. This kind of error is one of the most commons ones you can encounter while using the Chrome browser. And since it’s a pretty common error, the solutions for this one are pretty easy as well.
Option 1 – Disable both the Antivirus and Firewall temporarily
There are times when antivirus programs and the firewall blocks a website that they consider to be malicious or even because of false-positive effects. Thus, you need to disable these programs temporarily as it might be the reason why you’re getting the “Error 105 (net:: ERR NAME NOT RESOLVED): Unable to resolve the server’s DNS address” error in Chrome.
Option 2 – Check the Network Cables and restart the router then reconnect
Of course, the next thing you have to do is to check if the network cables connected to your computer or router are properly connected. And if your computer is connected via Wi-Fi, you need to make sure to restart your router once. In addition, you can also forget the Wi-Fi your computer is currently connected to and then try reconnecting again to see if it would work.
Option 3 – Try running the Chrome Cleanup tool
You might want to run Google Chrome’s built-in Malware Scanner & Cleanup tool as it could also help in getting rid of any unwanted ads, pop-ups, and even malware, as well as unusual startup pages, toolbars, and anything else that might overtake the network and could affect the performance of the browser.
Option 4 – Try removing the Proxy
Removing the Proxy might also help you in fixing the ERR_NAME_NOT_RESOLVED error in Chrome. Here’s how you can do it:
- Tap the Win + R keys to open the Run dialog box.
- Then type “inetcpl.cpl” in the field and hit Enter to pull up the Internet Properties.
- After that, go to the Connections tab and select the LAN settings.
- From there. Uncheck the “Use a Proxy Server” option for your LAN and then make sure that the “Automatically detect settings” option is checked.
- Now click the OK and the Apply buttons.
- Restart your PC.
Note: If you are using a third-party proxy service, you have to disable it.
Option 5 – Disable Prefetch in Chrome
In case you don’t know, Google makes use of a prediction service that helps users in completing searches and typing URLs in the address bar. This prediction service uses the already resolve IP address to connect to the website you’ve already visited. Thus, it would be better if you disable it in cases like this one.
- Open Chrome’s Settings.
- Next, go to Privacy and Security then look for “Prefetch”.
- After finding Prefetch, toggle off the “Use a prediction service to help complete searches and URLs typed in the address bar” setting and then restart Chrome.
Option 6 – Flush the DNS, reset Winsock and then reset TCP/IP
- Click the Start button and type in “command prompt” in the field.
- From the search results that appear, right-click on Command Prompt and select the “Run as administrator” option.
- After opening Command Prompt, you have to type each one of the commands listed below. Just make sure that after you type each command, you hit Enter
- ipconfig /release
- ipconfig /all
- ipconfig /flushdns
- ipconfig /renew
- netsh int ip set dns
- netsh winsock reset
After you key in the commands listed above, the DNS cache will be flushed and the Winsock, as well as the TCP/IP, will reset.
Option 7 – Try using the Google Public DNS
- The first thing you have to do is right-click on the network icon in the Taskbar and select Network and Sharing Center.
- Next, click on the “Change Adapter Settings” option.
- After that, search for the network connection that you are using to connect to the internet. Note that the option might be “Wireless Connection” or “Local Area Connection”.
- Right-click on your network connection and click on Properties.
- Then select the new window to choose the “Internet Protocol 4 (TCP/IPv4)” option.
- After that, click on the Properties button and click the checkbox in the new window for the option “Use the following DNS server addresses”.
- Type in “8.8.8” and “8.8.4.4” and click OK and exit.
Option 8 – Reset Chrome
Resetting Chrome can also help you fix the error. Resetting Chrome means restoring its default settings, disabling all the extensions, add-ons, and themes. Aside from that, the content settings will be reset as well and the cookies, cache, and site data will also be deleted. To reset Chrome, here’s what you have to do:
- Open Google Chrome, then tap the Alt + F keys.
- After that, click on Settings.
- Next, scroll down until you see the Advanced option, once you see it, click on it.
- After clicking the Advanced option, go to the “Restore and clean up the option and click on the “Restore settings to their original defaults” option to reset Google Chrome.
- Now restart Google Chrome.
Read More
Error Code 0x80240001- What is it?
Error Code 0x80240001 usually occurs in Windows 10 and is specific to the process of updating your system. It is similar to an error code found in previous versions of the software during the update process. There are a number of steps that can be taken to solve this error code, most of which are fairly easy for the average user to undertake.
Common symptoms for this particular error code include:
- Inability to complete the updating process of your Windows 10 system
- A notice that the Windows Update Agent is not able to provide appropriate services through the update module.
While it can be frustrating to have this message appear during the update process, users can resolve the error in a number of ways. However, if you are not confident in your ability to follow the steps below or if the methods listed fail to resolve the problem, contact a certified Windows 10 repair technician to assist you in the process.
Solution
Error Causes
Error Code 0x80240001 occurs when the Windows Update tool is unable to complete its service successfully. This error occurs most often when users attempt to update to Windows 10 from older versions of the software, including Windows 7, 8, or 8.1.
This particular error code can also occur when your system has not been updated in a regular fashion. Stacked updates make it more likely for Error Code 0x80240001 to occur.
In most cases, when Error Code 0x80240001 appears on your screen, the update process will be halted. Sometimes, the screen may display a single color background, removing the appearance of all other windows and applications.
Fortunately, there are several methods that you can use to attempt to circumvent the problem and see the update process through to completion.
Further Information and Manual Repair
While it can be frustrating to deal with an error when you attempt to update your Windows software, there are several ways that you can seek to resolve the issue that causes Error Code 0x80240001. These steps are relatively simple to complete and do not require advanced techniques to be used. However, if you are not confident in your ability to complete the steps listed below, enlist the aid of a qualified Windows technician to help you.
Here are the most common ways that Error Code 0x80240001 can be resolved for Windows 10:
Method One: Download and Use the Windows Repair Tool
From the Windows website, you can download the Windows Repair tool, if it is not already installed on your computer. While there are other tools available through outside sites that claim that they can resolve this error, in many cases, they can be a carrier for viruses and other kinds of malware, so it is inadvisable to use non-Windows tools to fix this particular error code.
Once you have successfully added the Windows Repair tool to your computer, open it up and look for the option to run “Repair Windows Update.” Using this process, your system can search for and resolve the error, allowing you to successfully run the update tool through to completion.
Method Two: Uninstall Recently Added Software
In some cases, software that has been recently added to a non-updated computer can cause the update process to experience issues. If you believe that this may have occurred in your case, simply uninstall the software in question, then attempt to run the Windows 10 Update process again.
The best way to prevent this error from reoccurring when you seek to update your Windows 10 system is to apply updates within a short period of time from their release date. It is recommended that users update regularly, which can allow them to avoid a number of issues that are common to the update process.
If you have any difficulty in resolving Error Code 0x80240001 after you have attempted these steps, you may need to enlist the help of a qualified technician who is familiar with the specific errors related to the Windows 10 Update process. This can especially be helpful if you have recently installed a number of new kinds of software and are unsure of whether or not any specific one may be causing your issues. If you wish to always have at your disposal a utility tool to fix these Windows 10 and other related issues when they do arise, download and install a powerful automated tool.
Read More
Copyright © 2023, ErrorTools. All Rights Reserved
Trademark: Microsoft Windows logos are registered trademarks of Microsoft. Disclaimer: ErrorTools.com is not affiliated with Microsoft, nor claims direct affiliation.
The information on this page is provided for information purposes only.
Suppose, you’re working on an important project, to be submitted in a few days, and suddenly your system shuts down without showing any warning. You tried to turn it on several times, but it keeps crashing every time or showing a blue screen with a stop code – Kernel-Power Error 41. Now, you’re wondering.
“What is Kernel-Power error 41?”
“Why did it occur in the first place?”
“How can I fix it?”
Well, to get answers for all such queries, let’s start with the basics.
Kernel-Power Error 41: An Overview
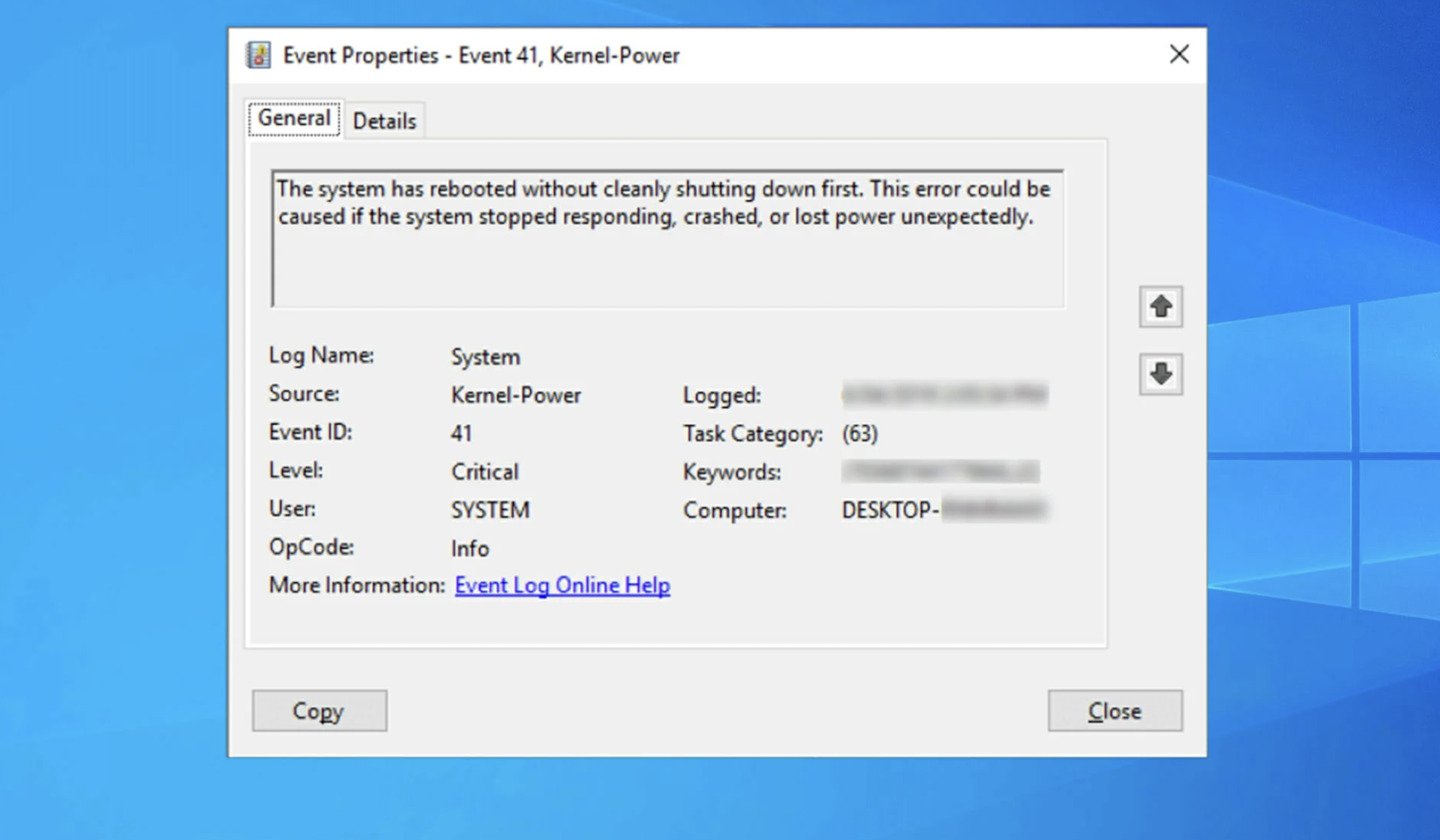
When your system shuts down unexpectedly, you may encounter Windows logs event ID 41 on your system the next time you try to restart it. The complete error message may appear as:
Event ID: 41
Description: The system has rebooted without cleanly shutting down first.
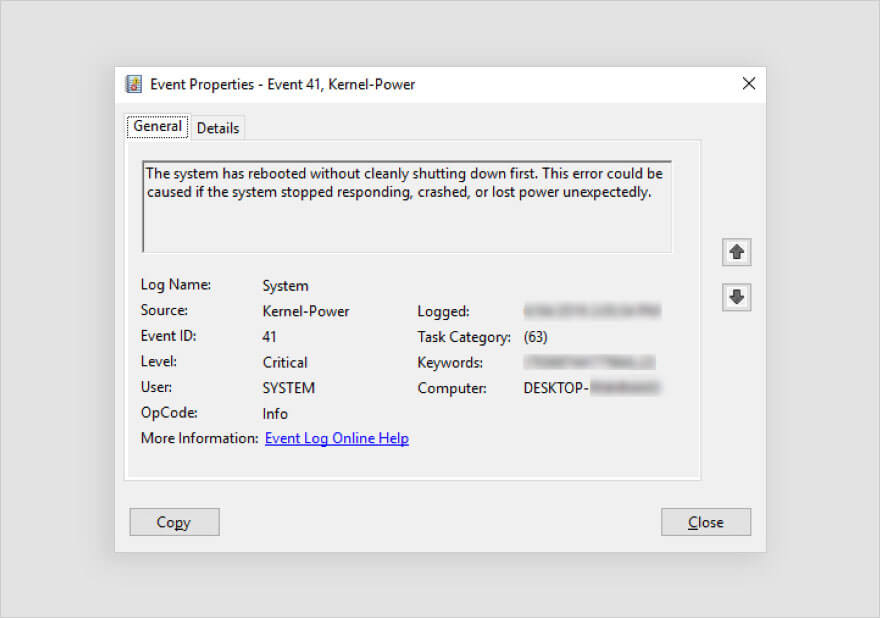
It may occur when some program or spontaneous activity causes a problem for Windows in shutting down correctly. When you reboot your system, Windows may show the stop codes in Event ID 41, including:
- BugcheckCode 159
- SleepInProgress false
- BugcheckParameter1 0x3
- BugcheckParameter3 0xfffff8000403d518
- BugcheckParameter2 0xfffffa80029c5060
- BugcheckParameter4 0xfffffa800208c010
- PowerButtonTimestamp 0Converts to 0x9f (0x3, 0xfffffa80029c5060, 0xfffff8000403d518, 0xfffffa800208c010)
Other than the above, you may also encounter the stop code as “Kernel Power Event ID 41 (63).”
Why does Kernel-Power Error 41 Occur?
There could be several reasons behind this error, including:
- Lack of sufficient power supply
- Hardware failure
- System overclocking
- Memory errors
- Outdated BIOS
- Third-party software
- File corruption
- Driver incompatibility
Scenarios in which Kernel-Power 41 Error May Occur
- Scenario 1: The system gets rebooted automatically due to a Stop error and Event ID 41 consists of a Stop error (bug check) code.
- Scenario 2: The system becomes unresponsive, freezes, or reboots randomly, and Event ID 41 entry lists the error code values of zero or the Event ID 41 is not logged in.
- Scenario 3: The system shuts down automatically when playing graphic-intensive games. The system first restarts and then crashes every time.
- Scenario 4: The system reboots as you press or hold on to the power key.
- Scenario 5: After upgrading Windows from a lower version to the latest version.
Several Windows users have reported that Kernel-Power Error 41 appears with a blue screen and repeatedly crashes the system. Refer to the below query:

In such a condition, the system and its data are at great risk. So, let’s walk you through the best possible methods to troubleshoot this error without further ado.
Recover Data before Fixing the Error
As your system is frequently crashing, there are high chances that you might lose your system data. It is suggested to immediately recover the data from the system. You can use a professional data recovery software, such as Stellar Data Recovery Professional to retrieve the data. The software provides a ‘Create a recovery drive’ feature that allows you to create bootable recovery media for recovering data from crashed or unbootable Windows systems.
Read more: How to recover data from an Unbootable system/ Crashed OS?
How to Fix-Kernel Power Error 41?
Below, we’ve discussed several workarounds that can help you fix this error.
#1. Replace the Faulty Hardware
Usually, a hardware problem is related to the Kernel Power Error 41. Check if you hear any tingling or hindering noise coming from your system. The system’s hard drive may be faulty or damaged or RAM may be defective, due to which you’re facing such an issue. Replace the problematic hardware. Then, try rebooting your system and see if the error has been fixed.
#2. Check the Power Supply
The Kernel Power Error 41 may occur due to an underpowered or faulty power supply problem. You need to make sure that your system has sufficient wattage to handle the installed devices appropriately. Additionally, consider acquiring a UPS (Uninterruptible Power Supply) such as a battery backup power supply.
#3. Disable Overclocking in BIOS
Overclocking is a technique that speeds up the performance of your system’s graphic card, CPU, etc. However, it is not recommended by manufacturers, yet several Windows users do it. You can check if your system has overclocking enabled as it may cause Kernel-Power error 41 (63). To disable overclocking, follow the given steps:
- Reboot your Windows system and when it starts showing you the Windows logo on the screen, turn it off again using the Power key.
- Repeat the same steps thrice, after which you will be able to enter the Automatic Repair environment.
- Once you’re in the Automatic Repair environment, follow Advanced options > Troubleshoot > Advanced options.
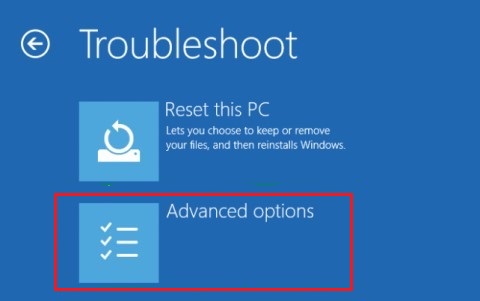
- Next, click UEFI Firmware Settings > Restart.
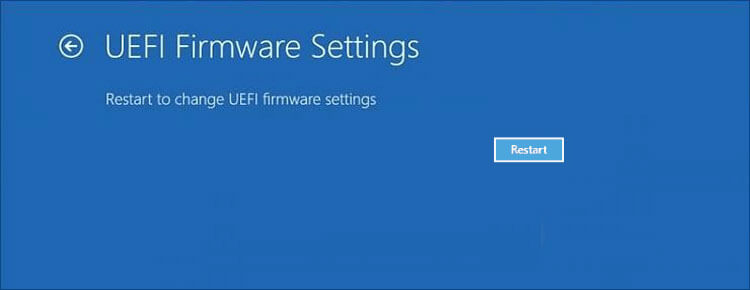
- When the system reboots, it should automatically boot in BIOS mode.
- In BIOS settings, go to Advanced > Performance > Overclocking.
- Disable overclocking, save changes to BIOS, and reboot your system.
- Now, check if the error has been fixed.
If still the error occurs, you might have problem in booting your PC normally. Hence, we’d advise you to boot your PC in safe mode. This will help you perform the troubleshooting methods without any interruption. Read more to learn how to start PC in Safe Mode in Windows 10?
If you’re able to boot PC in Safe Mode, perform the below-discussed methods to fix this BSOD error.
#4. Run Memory Diagnostic Tool
Faulty RAM or memory error may also cause Kernel-Power Error 41 BSOD. Some users have reported that the issue was caused due to a faulty RAM. You can run the Memory Diagnostic Tool to check problems with it.
- Type mdsched.exe in the Run dialog box to open Windows Memory Diagnostic Tool.
- Next, click ‘Restart now and cart now and check for problems (recommended).’
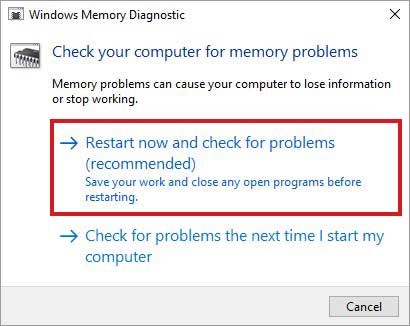
- The system will reboot and a test will begin to check the RAM.
- Wait until the test completes. Once done, see if there is any instructions given to follow.
- Finally, reboot your system and check if the problem persists.
#5. Update BIOS
If an outdated BIOS version is installed on your system, it may cause Kernel-Power 41 Blue Screen error. You can update BIOS to the latest version with the help of the given steps.
Note: Take precautions while updating the BIOS version as sudden power loss or interruption in the process may corrupt the BIOS firmware and may cause more damage to your system.
- To update BIOS, check the make and model of your motherboard. Then, refer to your user manual of the main board.
- Now, type ‘System Information’ in Windows Search Box.
- Next, locate the System Summary. There, you can see the BIOS version. Note it down.
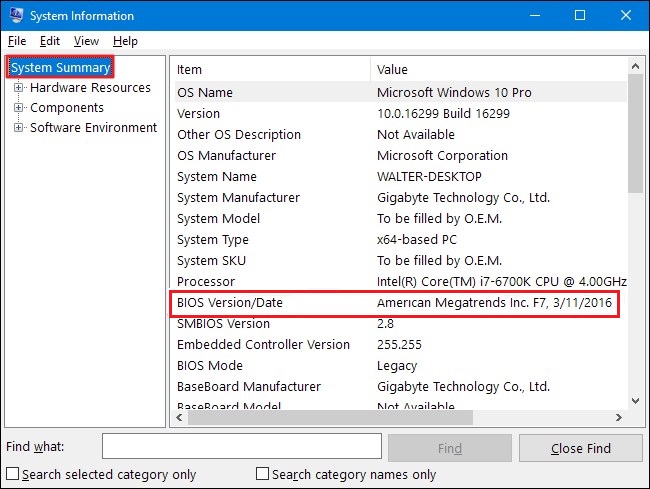
- Different motherboards use different utilities as well as the process. You must visit the manufacturer’s official site of your system’s motherboard and follow the instructions to update BIOS.
#6. Uninstall Faulty Third-Party Software
A corrupted or outdated third-party software installed on your system may be the cause behind this blue screen error. If you find any such software, application, or program on your system, uninstall it to get rid of the problem. Follow these steps to install a program:
- Boot into safe mode. After that, open System Settings and locate Apps.
- Next, navigate to Apps & features.
- There, select the application which is no longer required or malfunctioning while accessing it, and click Uninstall.
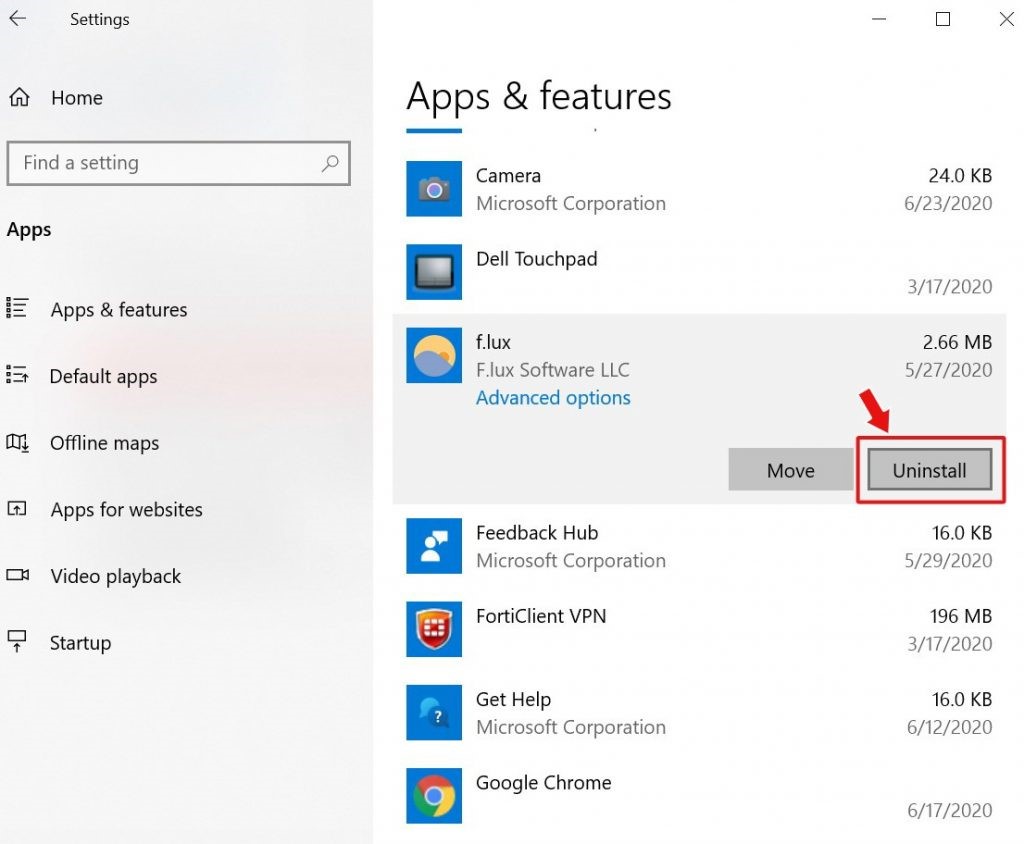
- Now reboot your system and see if the problem is fixed now.
#7. Run DISM Tool and SFC Scan
Corrupt or damaged system files may also be the reason behind Kernel-Power Error 41 63. You can try running DISM and then SFC scan to fix the problem. Follow the below steps:
- Open Command Prompt, run it as administrator, and type the following command:
DISM.exe /Online /Cleanup-image /Restorehealth
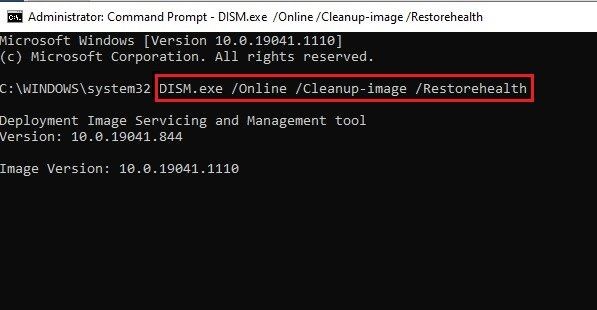
- Let the process run and wait for some time. Finally, it will show the files that need to be repaired.
- Afterward, type SFC/Scannow and hit Enter.
- It may take a while. Once done, close the window and reboot your system to see if the problem is fixed.
Read More: How to Run System File Checker (SFC) Scan in Windows 10
#8. Uninstall Device Driver
Outdated or incompatible device drivers may also cause a blue screen of death error on your Windows 10. If you have recently made any changes related to device drivers, consider uninstalling them and install the compatible one. Follow the below steps:
- Go to Device Manager, expand the device for which you recently installed any driver.
- Right-click the driver and click Uninstall device.
- Now, confirm the action by selecting ‘Delete the driver software for this device’ and click Uninstall.
- Close the window, restart your system, and check if the error persists.
Conclusion
If you’re not able to boot your PC or it keeps crashing, we’d suggest you try recovering essential data using professional data recovery software i.e. Stellar Data Recovery Professional. The software allows you to create bootable media with which you can boot into a crashed or non-bootable Windows PC and retrieve the data. Once done with recovering data, you can perform the methods mentioned in this post.
Majorly, the Kernel Power Error 41 error occurs due to hardware problem or insufficient power supply. However, the reasons could be different as discussed above. Hence, first make sure that your system is in good state. If everything is fine, yet the error occurs, try other troubleshooting methods shared in this blog.
Also Read: How to Fix Windows 10 ‘Kernel Data Inpage Error’ Blue Screen
Was this article helpful?
YES6
NO