
mod_auth_gssapi
Intro
This module has been built as a replacement for the aging mod_auth_kerb.
Its aim is to use only GSSAPI calls and be as much as possible agnostic
of the actual mechanism used.
Negotiate, Client Specific Behavior, and External Clients
The mod_auth_gssapi httpd plugin relies on Microsoft’s IANA registered
www-authenticate: Negotiate
auth scheme to provide Kerberos and NTLM authentication to web browsers.
The negotiation process is client driven and the default process is to
attempt Kerberos first, then fall back onto NTLM.
If NTLM is not desired it must be disabled client-side. Many browsers
such as recent versions of Firefox default to disabling NTLM and require
opt-in (regardless of OS). However. many browsers behave differently on
Windows, defer to the Windows Authentication subsystem, and therefore still
use an NTLM fallback per the original Microsoft specification in
RFC4559 by default. Browsers which
default to NTLM fallback on Windows include chromium based browsers such as
Chrome and Edge as well as older browsers such as IE.
If NTLM is enabled client side and Kerberos auth fails then the browser will
prompt the user with a username and password dialog that looks similar to an
HTTP Basic auth form, regardless of whether the server is configured to handle
NTLM. This often confuses and frustrates users and admins. It may be
possible to disable NTLM fallback if an admin has control of every user OS and
user browser, but in that scenario (corporate network/intranet) the admin has
presumably correctly configured Kerberos so fallback is unlikely to occur. The
larger issue is if you have an external facing auth server and therefore no
control over all clients some of whom may be on Windows using a browser that
delegates to the Windows Authentication subsystem. Neither Kerberos nor NTLM
are designed to work in a public Internet scenario and therefore using IP-based
request filtering on the auth server to conditionally prompt only internal
managed Kerberos clients (corporate intranet) users with
www-authenticate: Negotiate is a reasonable solution.
Dependencies
A modern version of MIT’s Krb5 distribution or any GSSAPI implementation
that supports the credential store
extension
is necessary to achieve full functionality. Reduced functionality is
provided without these extensions.
MIT krb5 (>=1.11)
Apache httpd (>=2.4.11)
Tests
To run tests, you also need:
- The Kerberos 5 Key-Distribution-Center (
krb5-kdcpackage on Debian,
krb5-serveron Fedora) - Packages
mod_session,krb5-workstation,python3-requests-gssapi,
andpython3-gssapion Fedora - Some tests require
krb5-pkinitpackage on fedora and krb5 >= 1.15. - nss_wrapper, packaged in Fedora
- socket_wrapper, packaged in Fedora
Installation
autoreconf -fi
./configure
make
make install
Configuration
Apache authentication modules are usually configured per location, see the
mod_authn_core
documentation for the common directives
Basic configuration
The simplest configuration scheme specifies just one directive, which is the
location of the keytab.
Example
<Location /private>
    AuthType GSSAPI
    AuthName "GSSAPI Single Sign On Login"
    GssapiCredStore keytab:/etc/httpd.keytab
    Require valid-user
</Location>
Your Apache server need read access to the keytab configured.
If your Kerberos implementation does not support the credential store
extensions you can also simply set the KRB5_KTNAME environment variable in the
Apache init script and skip the GssapiCredStore option completely.
Environment Variables
(Note: these are not process environment variables, but rather Apache
environment variables, as described
in the apache docs.)
gssapi-no-negotiate
This environment variable is used to suppress setting Negotiate headers. Not
sending these headers is useful to work around browsers that do not handle
them properly (and incorrectly show authentication popups to users).
Example
For instance, to suppress negotiation on Windows browsers, one could set:
BrowserMatch Windows gssapi-no-negotiate
Configuration Directives
Alphabetic List of Directives
GssapiAcceptorName
GssapiAllowedMech
GssapiBasicAuth
GssapiBasicAuthMech
GssapiBasicTicketTimeout
GssapiConnectionBound
GssapiCredStore
GssapiDelegCcacheDir
GssapiDelegCcacheEnvVar
GssapiDelegCcachePerms
GssapiDelegCcacheUnique
GssapiImpersonate
GssapiLocalName
GssapiNameAttributes
GssapiNegotiateOnce
GssapiPublishErrors
GssapiPublishMech
GssapiRequiredNameAttributes
GssapiSessionKey
GssapiSignalPersistentAuth
GssapiSSLonly
GssapiUseS4U2Proxy
GssapiUseSessions
GssapiSSLonly
Forces the authentication attempt to fail if the connection is not being
established over TLS. The default is «Off», which could be helpful in a
local development environment, but we do not recommend for production
deployments. A passive adversary could listen to the plaintext HTTP connection
to observe any private information in the client’s request or server’s
response (for example: the full HTTP response body, or any web application
session cookies, etc). You should only use mod_auth_gssapi with HTTPS in
production, so we recommend that you enable this setting in production for
added protection.
- Enable with: GssapiSSLonly On
- Default: GssapiSSLonly Off
GssapiLocalName
Tries to map the client principal to a local name using the gss_localname()
call. This requires configuration in the /etc/krb5.conf file in order to allow
proper mapping for principals not in the default realm (for example a user
coming from a trusted realm).
See the ‘auth_to_local’ option in the [realms] section of krb5.conf(5)
When GssapiLocalName is set to on, mod_auth_gssapi will set the
REMOTE_USER variable to the resolved user name. mod_auth_gssapi will also
set the GSS_NAME variable to the complete client principal name.
- Enable with: GssapiLocalName On
- Default: GssapiLocalName Off
GssapiConnectionBound
This option is not needed for krb5 or basic auth in almost all cases. It
incurs overhead, so leaving it off is recommended.
For NTLMSSP (and any other GSS mechanisms that require more than one
round-trip to complete authentication), it is necessary to bind to the
authentication to the connection in order to keep the state between
round-trips. With this option, incomplete context are stored in the
connection and retrieved on the next request for continuation.
- Enable with: GssapiConnectionBound On
- Default: GssapiConnectionBound Off
GssapiSignalPersistentAuth
For clients that make use of Persistent-Auth header, send the header according
to GssapiConnectionBound setting.
- Enable with: GssapiSignalPersistentAuth On
- Default: GssapiSignalPersistentAuth Off
GssapiUseSessions
In order to avoid constant and costly re-authentication attempts for every
request, mod_auth_gssapi offers a cookie based session method to maintain
authentication across multiple requests. GSSAPI uses the mod_sessions module
to handle cookies so that module needs to be activated and configured.
GSSAPI uses a secured (encrypted + MAC-ed) payload to maintain state in the
session cookie. The session cookie lifetime depends on the lifetime of the
GSSAPI session established at authentication.
NOTE: It is important to correctly set the SessionCookieName option.
See the
mod_sessions
documentation for more information.
- Enable with: GssapiUseSessions On
- Default: GssapiUseSessions Off
Example
GssapiUseSessions On
Session On
SessionCookieName gssapi_session path=/private;httponly;secure;
GssapiSessionKey
When GssapiUseSessions is enabled a key use to encrypt and MAC the session
data will be automatically generated at startup, this means session data will
become unreadable if the server is restarted or multiple servers are used and
the client is load balanced from one to another. To obviate this problem the
admin can choose to install a permanent key in the configuration so that
session data remain accessible after a restart or by multiple servers
sharing the same key.
Two schemes to read persistent keys are provided, ‘key’ and ‘file’.
-
‘key’
A key is read from the configuration directive.
The key must be a base64 encoded raw key of 32 bytes of length. -
‘file’
A file on the file system is used to store the key. If the file does not
exists one is created with a randomly generated key during the first
execution.
Examples
GssapiSessionKey key:VGhpcyBpcyBhIDMyIGJ5dGUgbG9uZyBzZWNyZXQhISE=
GssapiSessionKey file:/var/lib/httpd/secrets/session.key
GssapiCredStore
The GssapiCredStore option allows to specify multiple credential related
options like keytab location, client_keytab location, ccache location etc.
Example
GssapiCredStore keytab:/etc/httpd.keytab
GssapiCredStore ccache:FILE:/var/run/httpd/krb5ccache
GssapiDelegCcacheDir
If delegation of credentials is desired credentials can be exported in a
private directory accessible by the Apache process.
The delegated credentials will be stored in a file named after the client
principal and a request environment variable (KRB5CCNAME by default) will be
set to point to that file.
Example
GssapiDelegCcacheDir /var/run/httpd/clientcaches
A user foo@EXAMPLE.COM delegating its credentials would cause the server to
create a ccache file named /var/run/httpd/clientcaches/foo@EXAMPLE.COM
GssapiDelegCcacheUnique
Enables using unique ccache names for delegation. ccache files will be placed
in GssapiDelegCcacheDir and named using the principal and a six-digit unique
suffix.
Note: Consuming application must delete the ccache otherwise it will
litter the filesystem if sessions are used. An example sweeper can be found
in the contrib directory. If using with gssproxy, see note at the top of that
file.
- Enable with: GssapiDelegCcacheUnique On
- Default: GssapiDelegCcacheUnique Off
GssapiDelegCcacheEnvVar
Set the name of the request environment variable that will receive the
credential cache name. If unspecified, defaults to KRB5CCNAME.
Example
GssapiDelegCcacheEnvVar AJP_KRB5CCNAME
GssapiUseS4U2Proxy
Enables the use of the s4u2Proxy Kerberos extension also known as
constrained delegation
This option allows an application running within Apache to operate on
behalf of the user against other servers by using the provided ticket
(subject to KDC authorization).
This options requires GssapiDelegCcacheDir to be set. The ccache will be
populated with the user’s provided ticket which is later used as evidence
ticket by the application.
Note: This flag has no effect when Basic-Auth is used since user’s
credentials are delegated anyway when GssapiDelegCcacheDir is set.
Example
GssapiUseS4U2Proxy On
GssapiCredStore keytab:/etc/httpd.keytab
GssapiCredStore client_keytab:/etc/httpd.keytab
GssapiCredStore ccache:FILE:/var/run/httpd/krb5ccache
GssapiDelegCcacheDir /var/run/httpd/clientcaches
NOTE: The client keytab is necessary to allow GSSAPI to initiate via keytab
on its own. If not present an external mechanism needs to kinit with the
keytab and store a ccache in the configured ccache file.
GssapiBasicAuth
Allows the use of Basic Auth in conjunction with Negotiate.
If the browser fails to use Negotiate it will instead fallback to Basic and
the username and password will be used to try to acquire credentials in the
module via GSSAPI. If credentials are acquired successfully then they are
validated against the server’s keytab.
- Enable with: GssapiBasicAuth On
- Default: GssapiBasicAuth Off
Example
<Location /gssapi>
  AuthType GSSAPI
  AuthName "Login"
  GssapiBasicAuth On
  GssapiCredStore keytab:/etc/httpd/http.keytab
  Require valid-user
</Location>
GssapiAllowedMech
List of allowed mechanisms. This is useful to restrict the mechanism that
can be used when credentials for multiple mechanisms are available.
By default no mechanism is set, this means all locally available mechanisms
are allowed. The recognized mechanism names are: krb5, iakerb, ntlmssp
Example
GssapiAllowedMech krb5
GssapiAllowedMech ntlmssp
GssapiBasicAuthMech
List of mechanisms against which Basic Auth is attempted. This is useful to
restrict the mechanisms that can be used to attempt password auth.
By default no mechanism is set, this means all locally available mechanisms
are allowed, unless GssapiAllowedMech is set, in which case those are used.
GssapiBasicAuthMech always takes precedence over GssapiAllowedMech.
The recognized mechanism names are: krb5, iakerb, ntlmssp
Example
GssapiNameAttributes
Enables the module to source Name Attributes from the client name
(authorization data associated with the established context) and exposes them
as environment variables.
Value format: ENV_VAR_NAME ATTRIBUTE_NAME
This option can be specified multiple times, once for each attribute to expose.
The Special value «json» is used to expose all attributes in a json formatted
string via the special environment variable GSS_NAME_ATTRS_JSON
The environment variable GSS_NAME_ATTR_ERROR is set with the Gssapi returned
error string in case the inquire name function fails to retrieve attributes,
and with the string «0 attributes found», if no attributes are set.
Note: These variables are NOT saved in the session data stored in the
cookie so they are available only on the first authenticated request when
GssapiUseSessions is used.
Note: It is recommended but not required to use only capital letters and
underscores for environment variable names.
Example
GssapiNameAttributes json
GssapiNameAttributes RADIUS_NAME urn:ietf:params:gss:radius-attribute_1
GssapiRequiredNameAttributes
This option allows specifying one or more Name Attributes that the client must
possess in order to be authorized to access the location. The required Name
Attributes are specified by name=value pairs (name being the ATTRIBUTE_NAME as
mentioned above, and value being a Null-terminated string. Alternately, if a
Name Attribute produces binary values or is expected to contain a space
character, the desired value can be specified by a ‘:=’ and a base64-encoded
string).
A combination of Name Attributes (including multiple values from a single Name
Attribute type) can be specified with an expression that separates each
name=value pair with the «and» or «or» logical operators. Operator precedence
can be influenced by parenthesized statements.
foo=bar
foo:=YmFy
foo=bar or foo=baz
foo=bar and foo=baz and bar=baz
(foo=bar and foo=baz) or bar:=YmFy
If the Name Attributes associated with the client do not satisfy the given
expression, or no Name Attributes are present, a 403 response is returned.
Example
GssapiRequiredNameAttributes "auth-indicators=high"
GssapiRequiredNameAttributes "auth-indicators=high or other-attr=foo"
GssapiRequiredNameAttributes "((auth-indicators=low and auth-indicators=med) or auth-indicators=high)"
GssapiNegotiateOnce
When this option is enabled the Negotiate header will not be resent if
Negotiation has already been attempted but failed.
Normally when a client fails to use Negotiate authentication, a HTTP 401
response is returned with a WWW-Authenticate: Negotiate header, implying that
the client can retry to use Negotiate with different credentials or a
different mechanism.
Consider enabling GssapiNegotiateOnce when only one single sign on mechanism
is allowed, or when GssapiBasicAuth is enabled.
NOTE: if the initial Negotiate attempt fails, some browsers will fallback
to other Negotiate mechanisms, prompting the user for login credentials and
reattempting negotiation. This situation can mislead users — for example if
krb5 authentication failed and no other mechanisms are allowed, a user could
be prompted for login information even though any login information provided
cannot succeed. When this occurs, some browsers will not fall back to a Basic
Auth mechanism. Enable GssapiNegotiateOnce to avoid this situation.
- Enable with: GssapiNegotiateOnce On
- Default: GssapiNegotiateOnce Off
GssapiImpersonate
This option can be used even if AuthType GSSAPI is not used for given
Location or LocationMatch, to obtain service ticket for a user that was
already authenticated by different module. (This is also known as s4u2self,
or protocol transition.)
The principal of the user is retrieved from the internal r->user
identifier which typically holds the username from the authentication
results.
Optionally, this user principal can later be used for s4u2proxy (constrained
delegation). To do this, ensure the server principal is permitted to acquire
forwardable tickets to itself from arbitrary users (i.e., with the option
+ok_to_auth_as_delegate).
- Enable with: GssapiImpersonate On
- Default: GssapiImpersonate Off
GssapiDelegCcachePerms
This option is used to set alternative ownership and permission for delegated
ccache files stored in the GssapiDelegCcacheDir location. It is a multivalue
configuration directive that can accept the following three settings:
- mode
- uid
- gid
If a setting is not present the relative file property will not be modified and
the default owners and/or mode will be retained.
mode
This option allows to set the file mode, the format used is a numeric mode
with the same semantics of the chmod unix command for mapping numbers to
permissions.
uid
A user id number or name, an attempt to change the user owner of the file
to the uid number specified will be made. If a user name has been
specified, it will be resolved at startup time and the user's id number
stored internally for all subsequent operations.
gid
A group id number or name, an attempt to change the group owner of the
file to the gid number specified will be made. If a group name has been
specified, it will be resolved at startup time and the group's id number
stored internally for all subsequent operations.
Example
GssapiDelegCcachePerms mode:0660 gid:webuiworkers
GssapiPublishErrors
This option is used to publish errors as Environment Variables for use by
httpd processes.
A general error type is provided in the MAG_ERROR variable, and can have the
following values: «GSS ERROR», «INTERNAL ERROR», «AUTH NOT ALLOWED»
Additionally, in the variable named MAG_ERROR_TEXT there may be a free form
error message.
When the error type is «GSS ERROR» the variables GSS_ERROR_MAJ and
GSS_ERROR_MIN contain the numeric errors returned by GSSAPI, and the
MAG_ERROR_TEXT will contain a GSS Error message, possibly prepended by
an additional message that provides more context.
- Enable with: GssapiPublishErrors On
- Default: GssapiPublishErrors Off
GssapiAcceptorName
This option is used to force the server to accept only for a specific name.
This allows, for example to select to use a specific credential when multiple
keys are provided in a keytab.
A special value of {HOSTNAME} will make the code use the name apache sees in
the httpd request to select the correct name to use. This may be useful to
allow multiple names and multiple keys to be used on the same apache instance.
Note: By default no name is set and any name in a keytab or mechanism specific
acceptor credential will be allowed.
Note: Global gssapi options set in krb5.conf like ‘ignore_acceptor_hostname’
may affect the ability to restrict names.
Note: The GSS_C_NT_HOSTBASED_SERVICE format is used for names (see example).
Example
GssapiAcceptorName HTTP@www.example.com
GssapiBasicTicketTimeout
This option controls the ticket validity time requested for the user TGT by the
Basic Auth method.
Normally basic auth is repeated by the browser on each request so a short
validity period is used to reduce the scope of the ticket as it will be
replaced quickly.
However in cases where the authentication page is separate and the session
is used by other pages the validity can be changed to arbitrary duration.
Note: the validity of a ticket is still capped by KDC configuration.
Note: the value is specified in seconds.
- Default: GssapiBasicTicketTimeout 300
Example
GssapiBasicTicketTimeout 36000
Sets ticket/session validity to 10 hours.
GssapiPublishMech
This option is used to publish the mech used for authentication as an
Environment variable named GSS_MECH.
It will return a string of the form ‘Authtype/Mechname’.
Authtype represents the type of auth performed by the module. Possible values
are ‘Basic’, ‘Negotiate’, ‘NTLM’, ‘Impersonate’.
Mechname is the name of the mechanism as reported by GSSAPI or the OID of the
mechanism if a name is not available. In case of errors the ‘Unavailable’
string may also be returned for either Authtype or Mechname.
- Enable with: GssapiPublishMech On
- Default: GssapiPublishMech Off
Guide To Setup Kerberos Single Sign-On (SSO)
Overview
Kerberos is a cryptography-based authentication protocol that guards access to applications. This protocol is designed to provide secure authentication over an insecure network. The key idea behind Kerberos is to authenticate users while preventing passwords from being sent over the internet.
Effortless LDAP/Active Directory Integration for WordPress Video.
Kerberos terms:
Kerberos: Kerberos is an authentication protocol that supports the concept of Single Sign-On (SSO). In the case of HTTP, support for Kerberos is usually provided using the term «SPNEGO» authentication mechanism.
Kerberos Realm: An administrative domain for authentication is denoted by the term realm. Its goal is to define the restrictions on when an authentication server can authenticate a user, host, or service. This does not imply that a user and a service must be members of the same realm in order for authentication to occur: if the two objects are connected through a trust connection despite belonging to different realms, authentication can still occur.
Principal: In a Kerberos system, a Kerberos Principal represents a distinct identity to whom Kerberos can issue tickets for access to Kerberos-aware services. The «/» separator is used to separate the various components that make up principal names. The «@» character can be used to identify a realm as the name’s final element. If no realm is specified, it is presumed that the Principal belongs to the default realm set in the krb5.conf file.
Clients/Users: A process that accesses a service on the behalf of a user. There can be multiple clients or users within a realm.
Service: Something the user wants to gain access to.
SSO: Single Sign-On is a procedure that enables a user to log in just once and access numerous services after completing user authentication. After logging into a primary service, this entails authentication into every service the user has granted authorization to. SSO has a number of advantages, one of which is the avoidance of the tiresome process of repeatedly validating identity using passwords or other authentication systems.
GSSAPI: Programs can access security services through the Generic Security Service Application Program Interface(GSSAPI), which is an application programming interface (API). An IETF standard is GSSAPI. It doesn’t offer any security on its own. Instead, GSSAPI implementations are offered by security-service providers. The exchange of opaque messages (tokens), which conceals the implementation detail from the higher-level application, is the distinguishing characteristic of GSSAPI applications.
SPNEGO: Client-server software uses the Simple and Protected GSSAPI Negotiation Mechanism, frequently called «spen-go,» to negotiate the selection of security technology. When a client application has to log in to a remote server but neither end is certain which authentication protocols the other supports, SPNEGO is employed. The pseudo-mechanism uses a protocol to identify the available common GSSAPI mechanisms, chooses one, and then assigns all subsequent security actions to that chosen mechanism.
KDC: A Key Distribution Center is a network service that supplies tickets and temporary sessions keys; or an instance of that service or the host on which it runs. The KDC services both initial ticket and ticket-granting requests. The initial ticket portion is sometimes referred to as the Authentication Server (or service). The ticket-granting ticket portion is sometimes referred to as the ticket-granting server (or service).
NTLM Authentication Protocol:
A client’s access to a resource on an Active Directory domain can be authenticated using the challenge-response authentication protocol known as Windows NT LAN Manager (NTLM). When a client requests access to a domain-related service, the service sends a challenge to the client, instructing it to use its authentication token to perform a mathematical operation, and then provide the outcome to the service. The result may be verified by the service or verified by the Domain Controller (DC). The service grants access to the client if the DC or service verifies that the client’s response is accurate.
Because it allows the user to enter the underlying authentication factor only once, during login, NTLM is a sort of single sign-on (SSO).

- The NEGOTIATE_MESSAGE defines an NTLM Negotiate message that is sent from the client to the server. This message allows the client to specify its supported NTLM options to the server.
- The CHALLENGE_MESSAGE defines an NTLM challenge message that is sent from the server to the client and it is used by the server to challenge the client to prove its identity.
- The AUTHENTICATE_MESSAGE defines an NTLM authentication message that is sent from the client to the server after the CHALLENGE_MESSAGE is processed by the client.
Note: Windows authentication uses either Kerberos authentication protocol or NTLM authentication protocol, depending on the client and server configurations.
Kerberos Authentication Protocol:
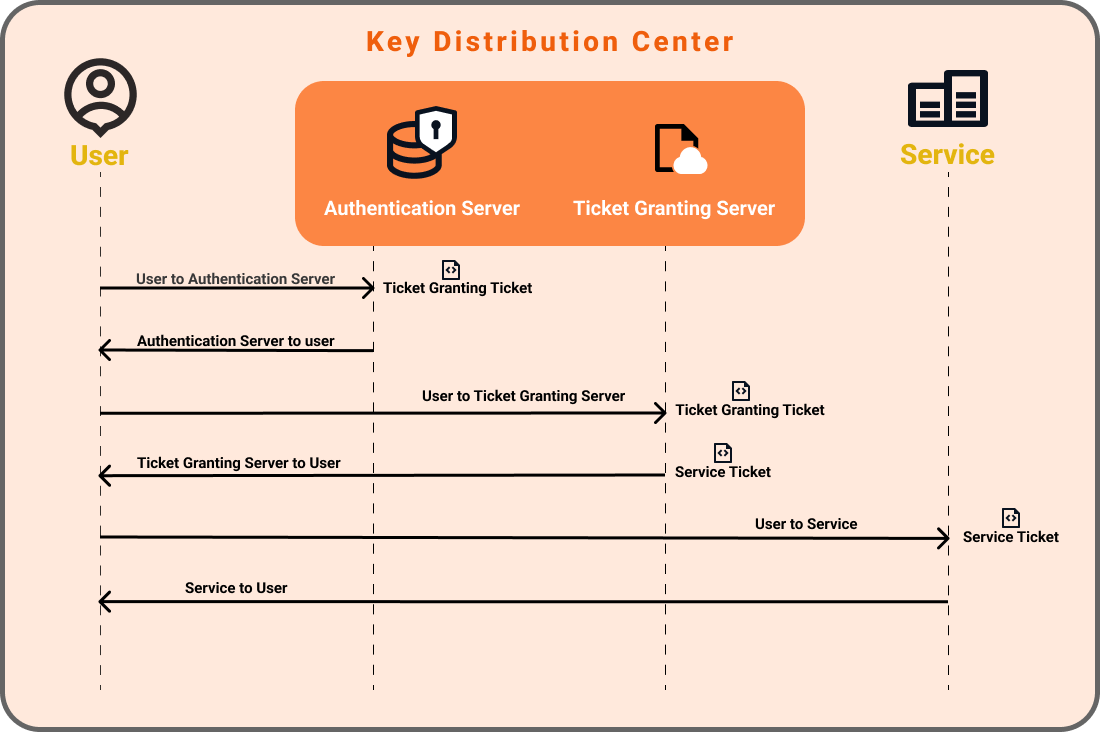
- Message A: Client/TGS Session Key encrypted using the secret key of the client/user.
- Message B: Ticket-Granting-Ticket encrypted using the secret key of the TGS.
- Message C: Composed of the TGT from message B and the ID of the requested service.
- Message D: Authenticator encrypted using the Client/TGS Session Key.
- Message E: Client-to-server ticket encrypted using the service’s secret key.
- Message F: Client/Server Session Key encrypted with the Client/TGS Session Key.
- Message G: A new Authenticator, which includes the client ID, timestamp and is encrypted using Client/Server Session Key.
- Message H: The timestamp found in the client’s Authenticator encrypted using the Client/Server Session Key.
Kerberos SSO On Ubuntu/Debian:
Prerequisites:
- A Service account / User account in the Active Directory.
- The account password should have a password set to Not Expired.
Step 1: Create Keytab file on the AD Domain Controller:
- On the AD Domain Controller open the command prompt in the administrator mode and execute the following command to create the Keytab file.
ktpass -princ HTTP/<Server Host Name>@EXAMPLE.COM -mapuser <username@EXAMPLE.COM>
 -pass password -ptype KRB5_NT_PRINCIPAL -out <PATH>\spn.keytab -crypto ALL
Note: Ensure EXAMPLE.COM should be in uppercase. If the user with SPN is already exist, use that user insted creating a new one. The Kerberos principle is case-sensitive. Please check for differences in upper/lower-case writing before running the keytab command.
- The following are the components of the command.
| Server Host Name: | It is the host name of the site hosted on the Server. |
| EXAMPLE.COM: | It is the Active Directory Domain Name. |
| Username: | It is a service account in Active Directory. |
| Password: | It is the password of the service account used above. |
| Path: | Path to a local location which will store the keytab file. (C:\Temp\spn.keytab) |
Note: The above command creates a keytab file. It needs to be placed on the client server where your WordPress site is hosted. The user running Apache should have full access to this file. The user should have permission to the keytab file.
- Open Active Directory Users and Computers and from the top menu select View >> Advanced features.
- Open the service account and go to the attribute editor tab, browse to the servicePrincipalName to verify the SPN entry.
- Navigate to the Delegation tab.
- Select Trust this user for delegation to any service (Kerberos only).
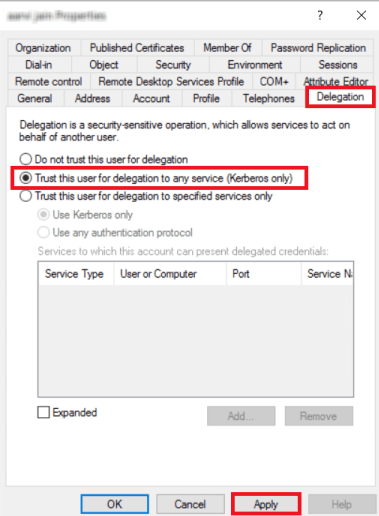
- Click Apply.
- Copy the Keytab file from AD Domain Controller to the web server hosted on Apache.
- Provide permission to kerberos keytab file:
chmod 644 etc/apache2/spn.keytab
Step 2: Install kerberos client libraries on the web server:
- Use the following command on your terminal to install the Kerberos client libraries.
sudo apt-get install krb5-user
Step 3: Install modules for Apache:
Note: In the most recent releases of Ubuntu/Debian, the mod_auth_kerb has been deprecated and replaced with the mod_auth_gssapi.
- There are two apache modules, but only one of them is needed to be installed:
1. mod-auth-gssapi module for apache.
2. mod_auth_kerb module for apache. (deprecated)
1. Install the mod-auth-gssapi module for apache:
- Use the following command to install the libapache2-mod-auth-gssapi module for Apache on debian-based systems:
sudo apt-get -y install libapache2-mod-auth-gssapi
OR
2. Install the mod_auth_kerb module for apache (deprecated):
- Use the following command to install the auth_kerb module for Apache on debian-based systems:
sudo apt-get install libapache2-mod-auth-kerb
- Once the auth_kerb module is installed, it needs to be enabled through the following command.
a2enmod auth_kerb
- After enabling, Restart Apache to take effect.
Step 4: Configure the Active Directory domain in the Kerberos Configuration file:
- Open and edit the krb5.conf file.
The path to the krb5.conf file for linux is C:/etc/krb5.conf and for other UNIX-based system is c:/etc/krb5/krb5.conf - Add the following configuration snippet to the krb5.conf file under the mentioned section:
 [libdefaults]

        default_realm = EXAMPLE.COM

        # ...

        # ...


                                 [realms]

        EXAMPLE.COM  = {

            kdc =  <DNS entries pointing to your primary domain controller>: Port

            admin_server =  <DNS entries pointing to your primary domain controller>: Port

        }

        [domain_realm]

        .example.com = EXAMPLE.COM

        example.com = EXAMPLE.COM
Note: Replace the AD DOMAIN CONTROLLER IP/DNS with your IP/DNS address. Ensure EXAMPLE.COM should be in upper case.
Replace the EXAMPLE.COM with the Active Directory domain name and ensure that the port 88 on the AD Domain Controller is accessible from this server.
- Save the file.
Step 5: Configure Kerberos SSO for the site directory:
- Edit the imposed virtual host configuration file which is stored under /etc/apache2/sites-enabled directory or the default virtual host file named 000-default.conf
Note: Add the following section in the directory according to the apache module used. Eg: «mod_auth_kerb» or «mod_auth_gssapi».
- 1. Add the following section in the directory of the site for mod_auth_gssapi.
        <IfModule !mod_auth_gssapi.c>

            LoadModule auth_gssapi_module /usr/lib64/httpd/modules/mod_auth_gssapi.so

        </IfModule>

        <Directory "/placeholder">

            AuthType GSSAPI

            AuthName "Kerberos auth"

            GssapiAllowedMech krb5

            GssapiBasicAuth On

            GssapiCredStore keytab:<PATH TO KEYTAB>

            GssapiLocalName On

            BrowserMatch Windows gssapi-no-negotiate

            Require valid-user

        </Directory>
OR
- 2. Add the following section in the directory of the site for mod_auth_kerb (deprecated).
<Directory "/placeholder">

            AuthType Kerberos

            KrbAuthRealms EXAMPLE.COM

            KrbServiceName HTTP/<Server Host Name>

            Krb5Keytab <PATH TO KEYTAB>

            KrbMethodNegotiate on

            KrbMethodK5Passwd on

            require valid-user

        </Directory>
Note: Ensure EXAMPLE.COM should be in upper case.
The following are the components of the above configuration:
| EXAMPLE.COM: | This is the Active Directory domain as configured in krb5.conf. |
| PATH TO KEYTAB: | Accessible path to the keytab on this server. (etc/spn.keytab) |
- After this configuration, Apache needs to be restarted for the changes to take effect.
Note: Once you have finished configuring settings, click here to configure browsers for Kerberos SSO.
To test your Kerberos/NTLM SSO configuration, click here.
To troubleshoot any error, please click here.
Setup Kerberos On RHEL/CentOS:
Step 1: Create Keytab file on the AD Domain Controller:
- On the AD Domain Controller open the command prompt in administrator mode and execute the following command to create the Keytab file.
ktpass -princ HTTP/<Server Host Name>@EXAMPLE.COM -mapuser <username@EXAMPLE.COM>
 -pass password -ptype KRB5_NT_PRINCIPAL -out <PATH>\spn.keytab -crypto ALL
Note: Ensure EXAMPLE.COM should be in uppercase. The Kerberos principle is case-sensitive. Please check for differences in upper/lower-case writing before running the keytab command.
- The following are the components of the command.
| Server Host Name: | It is the host name of the site hosted on the Server. |
| EXAMPLE.COM: | It is the Active Directory Domain Name. |
| Username: | It is a service account in Active Directory. |
| Password: | It is the password of the service account used above. |
| Path: | Path to a local location which will store the keytab file. (C:\Temp\spn.keytab) |
Note: The above command creates a keytab file. It needs to be placed on the client server where your WordPress site is hosted. The user running Apache should have full access to this file.The user should have permission to the keytab file.
- Copy the Keytab file from AD Domain Controller to the web server hosted on Apache.
- Provide permission to kerberos keytab file:
chmod 644 etc/httpd/spn.keytab
Step 2: Install kerberos client libraries on the web server:
- Use the following command on your terminal to install the Kerberos client libraries.
yum install -y krb5-workstation krb5-devel krb5-libs mod_auth_gssapi mod_session
Note: In the most recent releases of CentOS, the mod_auth_kerb has been deprecated and replaced with the mod_auth_gssapi.
Step 3: Install modules for Apache:
Note: In the most recent releases of Ubuntu/Debian, the mod_auth_kerb has been deprecated and replaced with the mod_auth_gssapi.
- There are two apache modules, but only one of them is needed to be installed:
1. mod-auth-gssapi module for apache.
2. mod_auth_kerb module for apache (deprecated).
1. Install the mod-auth-gssapi module for apache:
- Use the following command to install the libapache2-mod-auth-gssapi module for Apache on debian-based systems:
sudo apt-get -y install libapache2-mod-auth-gssapi
OR
2. Install the mod_auth_kerb module for apache (deprecated):
- Use the following command to install the auth_kerb module for Apache on Red Hat-based systems. (For latest releases of RHEL use mod-auth-gssapi module)
yum install mod_auth_kerb
Step 4: Configure the Active Directory domain in the Kerberos Configuration file:
- Open and edit the krb5.conf file.
The path to the krb5.conf file for RHEL is C:/etc/krb5.conf - Add the following configuration snippet to the krb5.conf file under the mentioned section:
- Navigate to the [libdefaults] section and add the following :
        default_realm = EXAMPLE.COM

        dns_lookup_realm = true

        dns_lookup_kdc = true
- Navigate to the [realms] section and add the following:
        EXAMPLE.COM  = {

            kdc =  <DNS entries pointing to your primary domain controller>: Port

            admin_server =  <DNS entries pointing to your primary domain controller>: Port

        }
- Navigate to the [domain_realm] section and add the following:
        .example.com = EXAMPLE.COM

        example.com = EXAMPLE.COM
Note: Replace the AD DOMAIN CONTROLLER IP/DNS with your IP/DNS address. Ensure EXAMPLE.COM should be in upper case.
Replace the EXAMPLE.COM with the Active Directory domain name and ensure that the port 88 on the AD Domain Controller is accessible from this server.
- Save the file.
Step 5: Configure the Active Directory domain in the Kerberos Configuration file:
- Edit the imposed host configuration file /etc/httpd/conf/httpd.conf
- Add the following section in the directory of the site for mod_auth_gssapi
        LoadModule auth_gssapi_module modules/mod_auth_gssapi.so


        <Directory "/placeholder">

            AuthType GSSAPI

            AuthName "Kerberos auth"

            GssapiBasicAuth On

            GssapiCredStore keytab:<PATH TO KEYTAB>

            GssapiLocalName On

            Require valid-user

        </Directory>
OR
- Add the following section in the directory of the site for mod_auth_kerb (deprecated).
        <Directory "/placeholder">

            AuthType Kerberos

            KrbAuthRealms EXAMPLE.COM

            KrbServiceName HTTP/<Server Host Name>

            Krb5Keytab <PATH TO KEYTAB>

            KrbMethodNegotiate on

            KrbMethodK5Passwd on

            require valid-user

        </Directory>
- The following are the components of the above configuration:
| PATH TO KEYTAB | Accessible path to the keytab on this server. (etc/apache2/spn.keytab) |
| «/placeholder» | Path to the document root |
- After this configuration, Apache needs to be restarted for the changes to take effect.
Note: Once you have finished configuring settings, click here to configure browsers for Kerberos SSO.
To test your Kerberos/NTLM SSO configuration, click here.
To troubleshoot any error, please click here.
SSO with Windows Authentication On IIS Server:
- Open Command prompt in Administrator mode.
- Execute the following command to add Service Principal Name (SPN) for the service account.
Note: Suppose, that the website has to respond at http://machinename and http://machinename.domain.com. We have to specify these addresses in the SPN attribute of the service account.
Setspn -S http/<computer-name>.<domain-name> <domain-user-account>
Example: C:\Users\Administrator> setspn -S HTTP/machinename.domain.com service_account
Note: «machinename.domain.com» here is computer-name. Make sure it’s resolvable on the Windows server running AD service.
- Verify whether this has been properly set by running the following command:
setspn -l domain or service_account
Example: C:\Users\Administrator> setspn -l service_account or C:\Users\Administrator> setspn -l domain_name
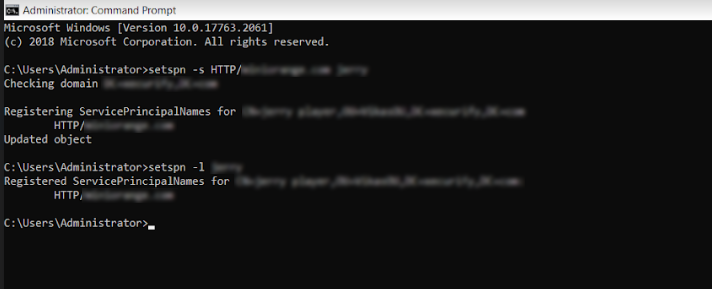
- The result should list http/machinename.domain.com
- Open Active Directory Users and Computers and from the top menu select View >> Advanced features.
- Open the service account and go to the attribute editor tab, browse to the servicePrincipalName to verify the SPN entry.
- Navigate to the Delegation tab.
- Select Trust this user for delegation to any service (Kerberos only).
- Click Apply.
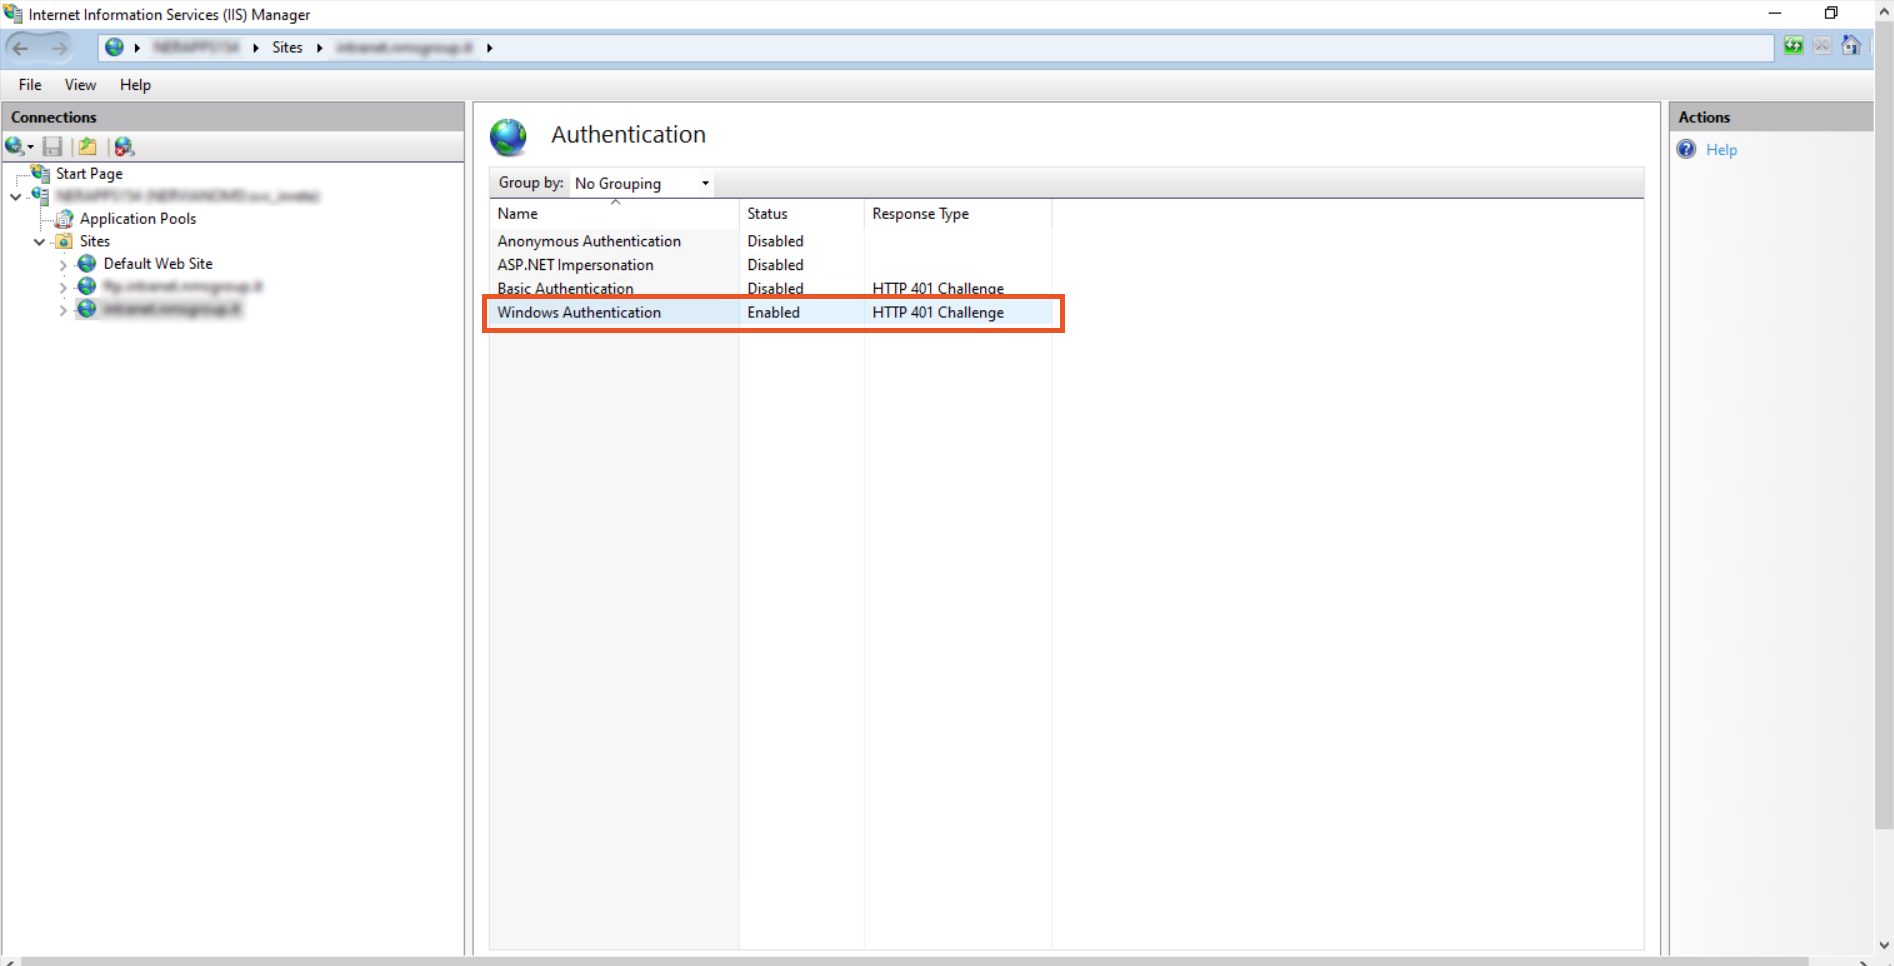
- Open the IIS Manager and click on the website for which you want to enable the windows authentication.
- Double click on Authentication.
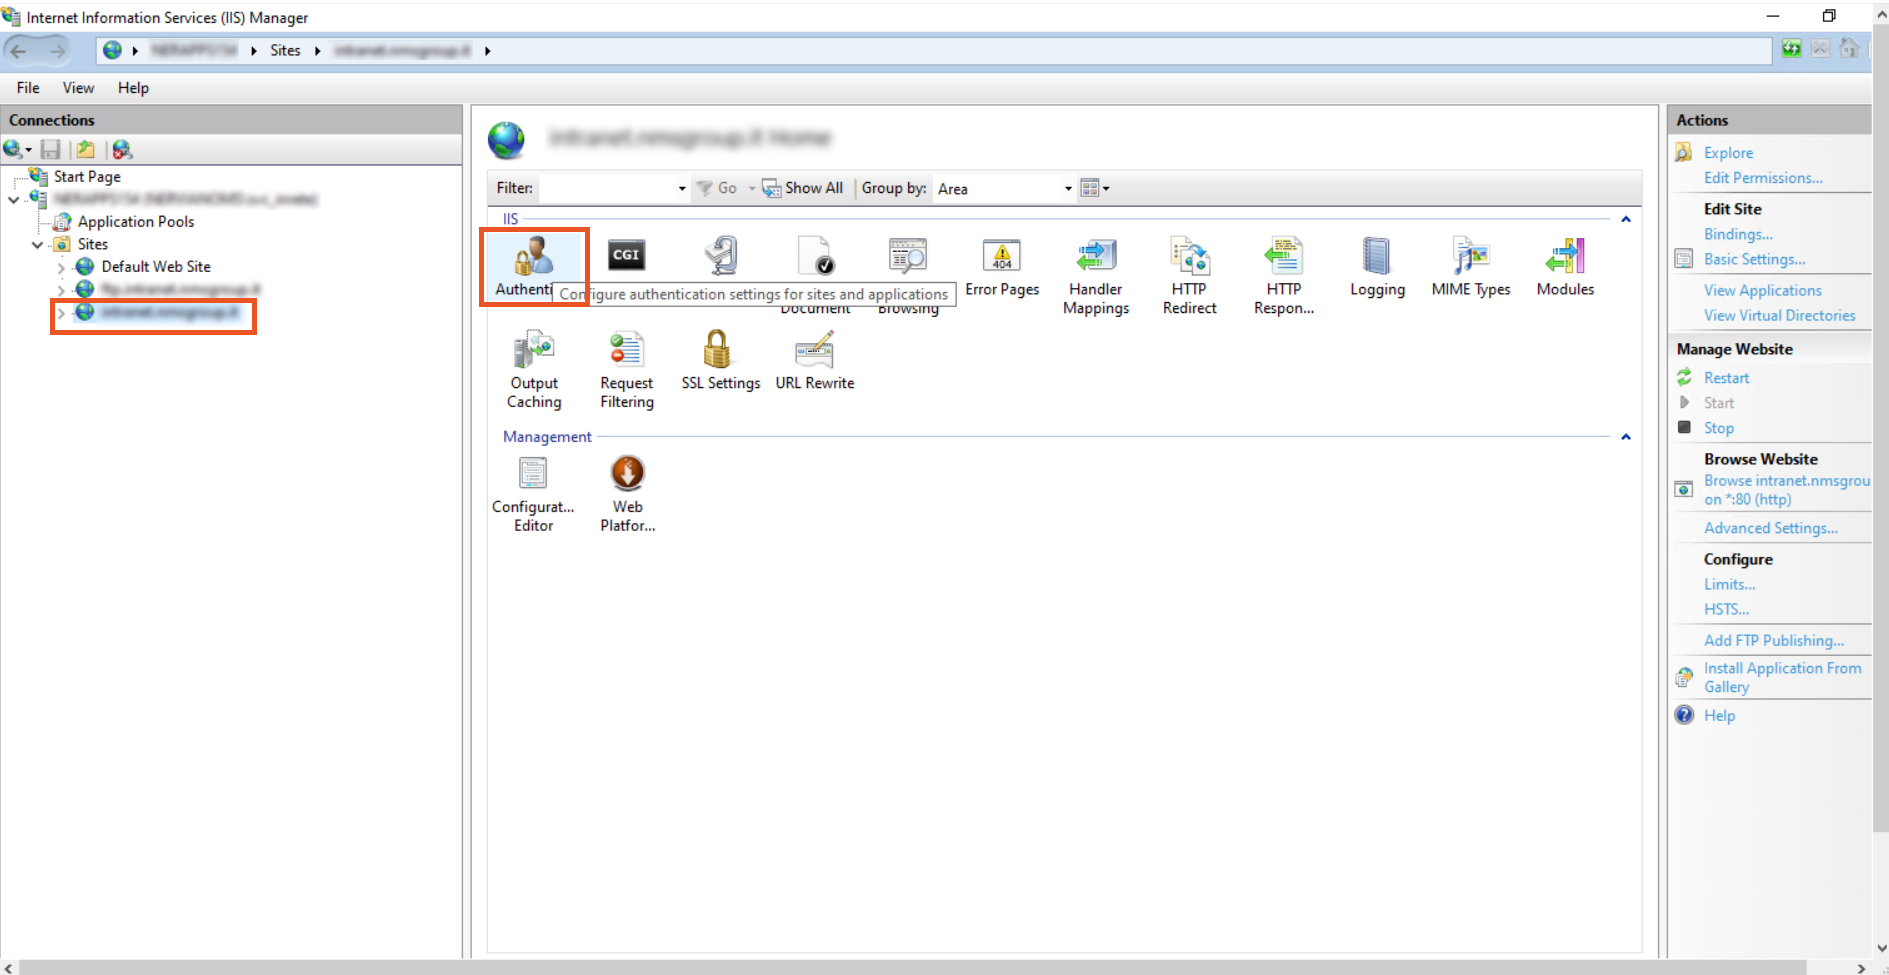
- In the Authentication section, you can see only Anonymous Authentication is enabled by default. IIS always tries to perform anonymous authentication, So Disable Anonymous Authentication and Enable Windows Authentication.
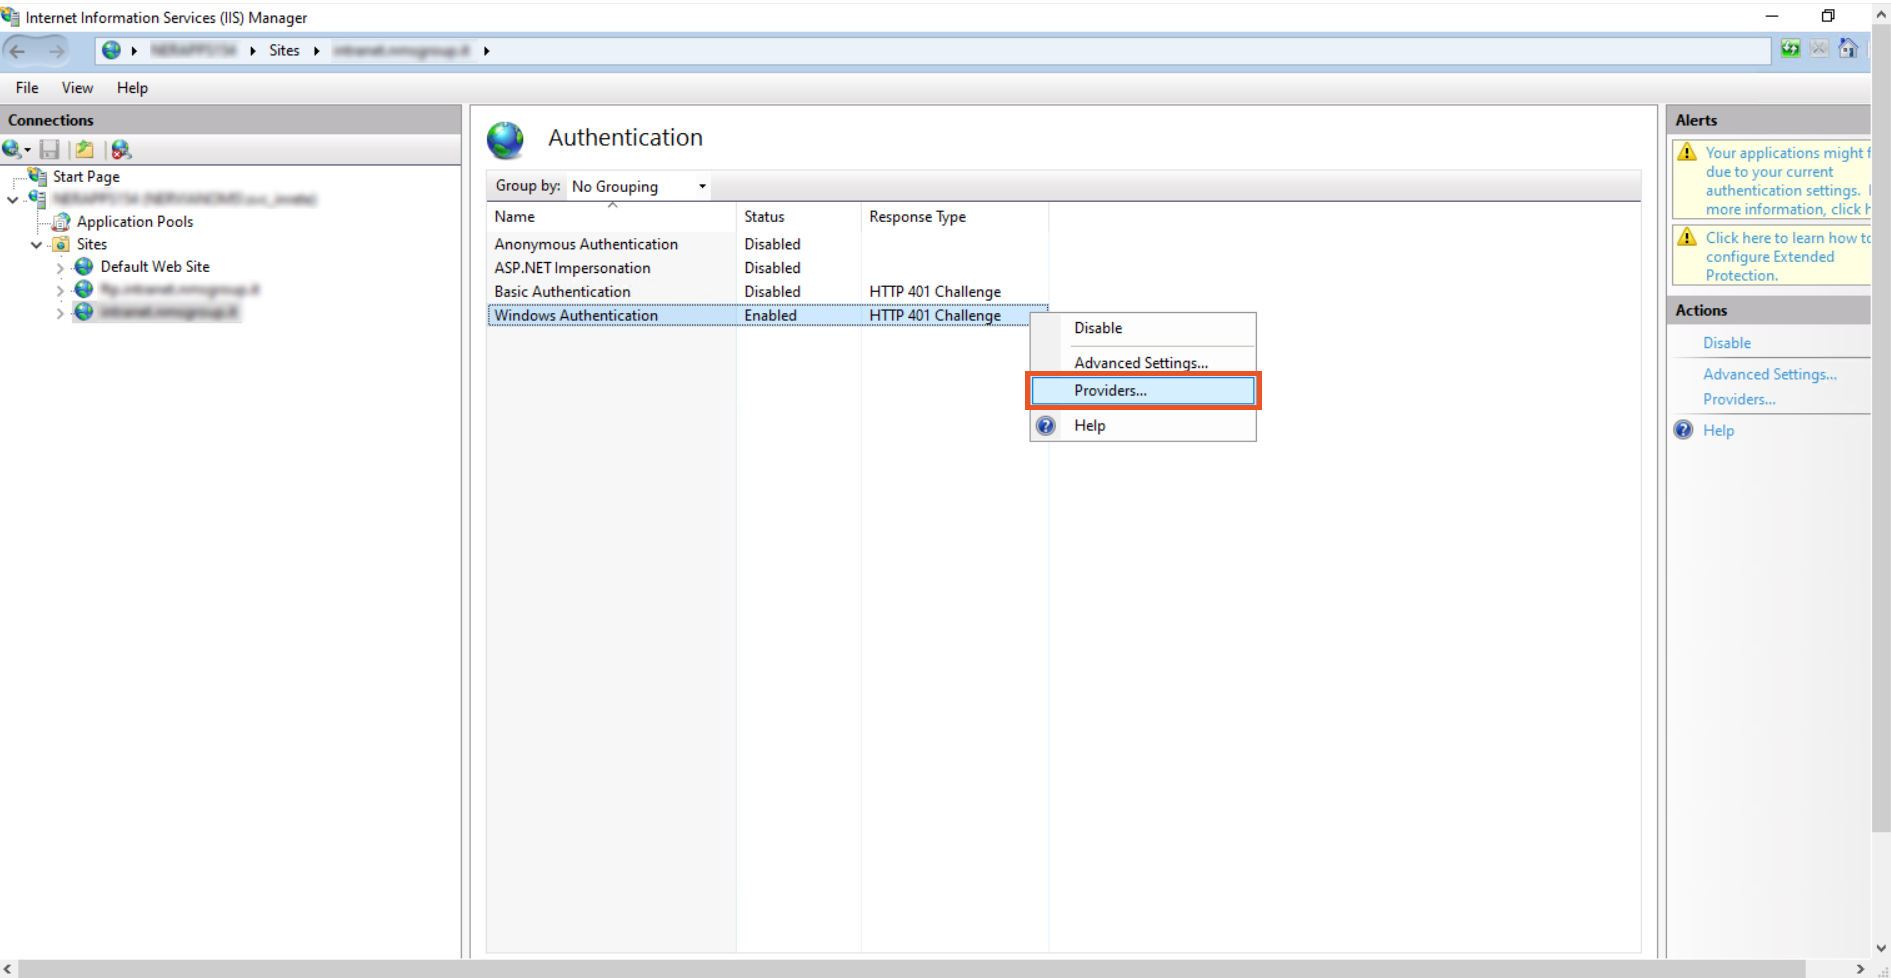
- Right click on the Windows Authentication and click on the Providers.
- The following window will appear. Make sure «Negotiate» is at the top of the list in the providers list.
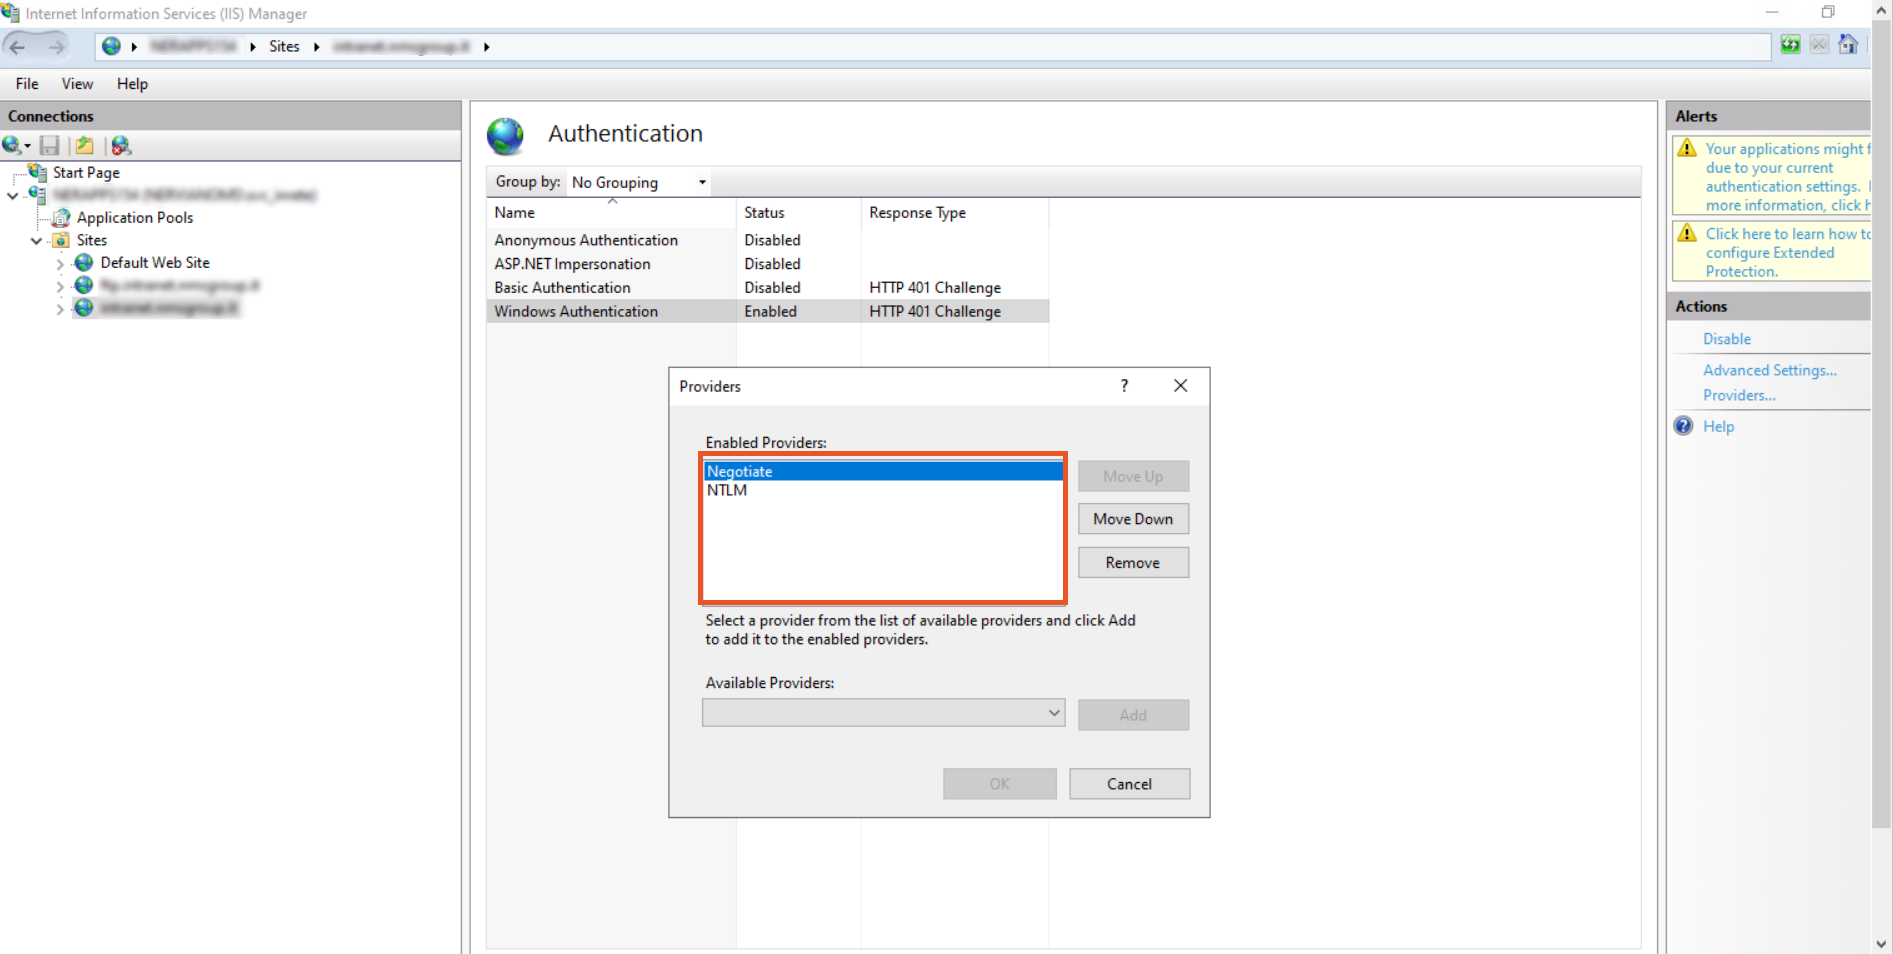
Note: By default there are two providers available, Negotiate and NTLM. Negotiate is a container that uses kerberos as the first authentication method, and if the authentication fails, NTLM is used. So it is required that Negotiate comes first in the list of providers.
- Click on Ok to close the window.
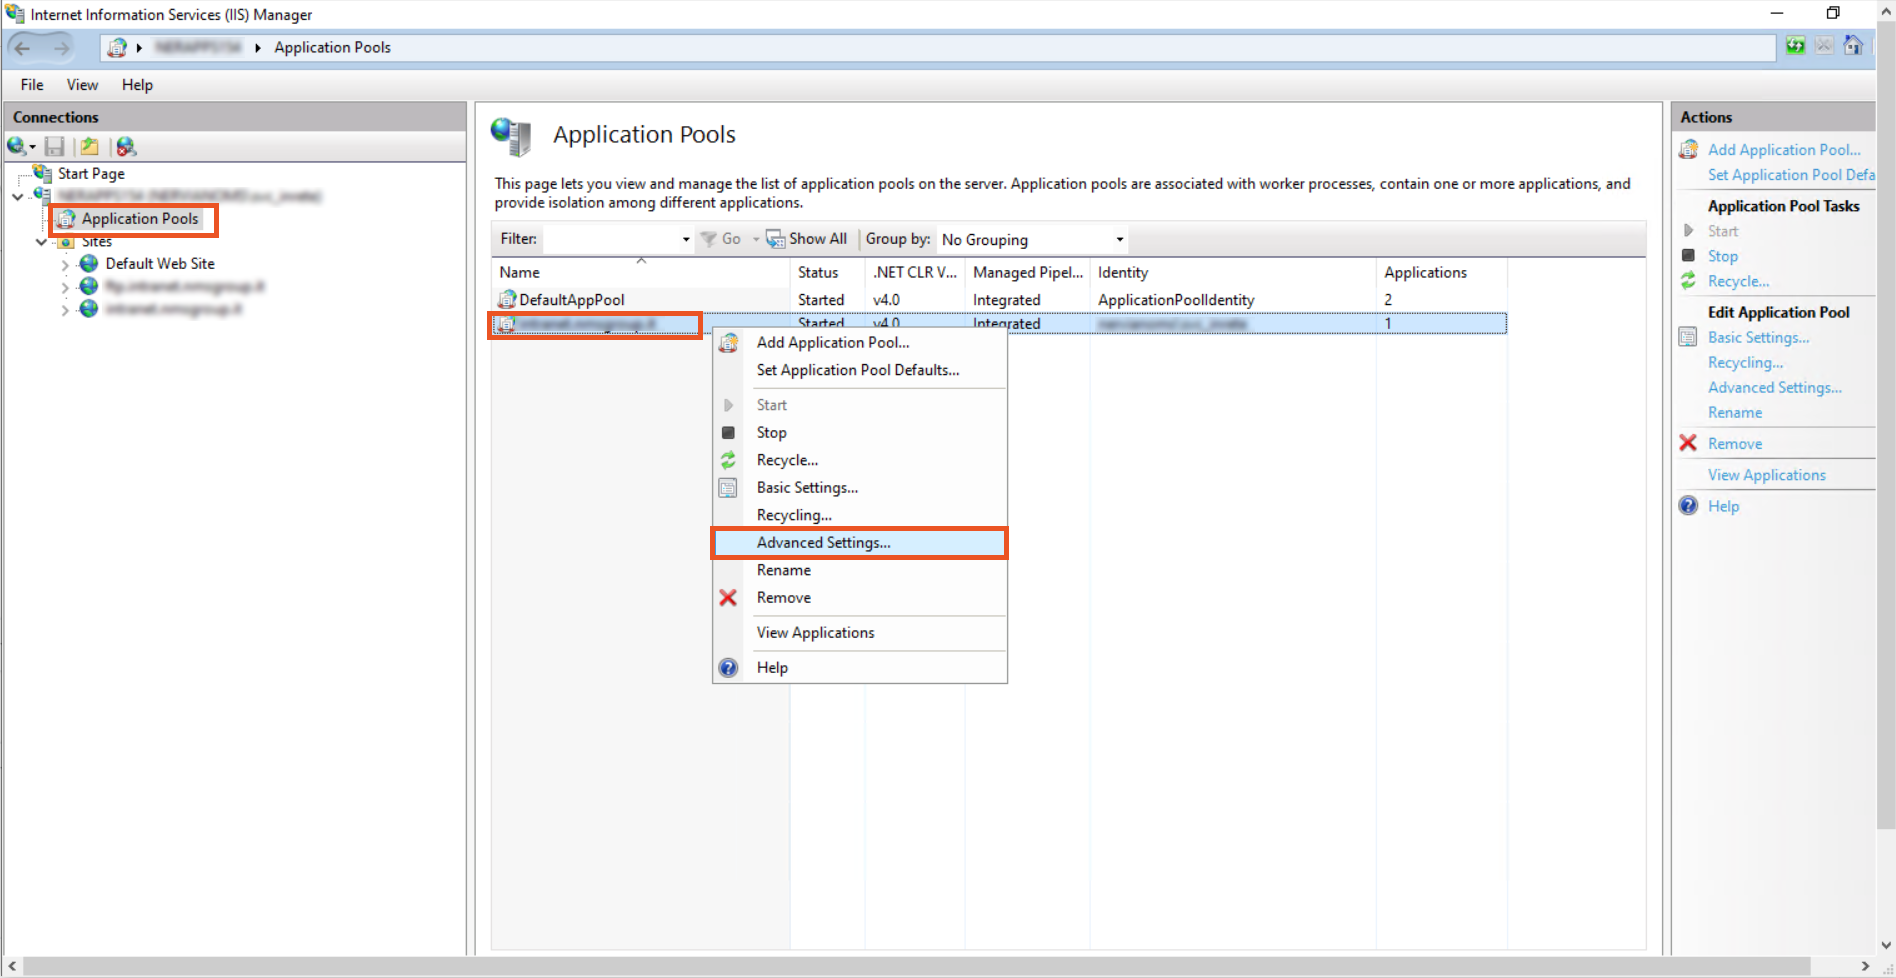
- To Configure the IIS Application Pool to launch it from the SPN account created, Click on the Application Pools to open the Application Pools window.
- Right click on the domain and from the list click on the Advanced Settings.
- In the Advanced Settings window under Process Model click on the Identity.
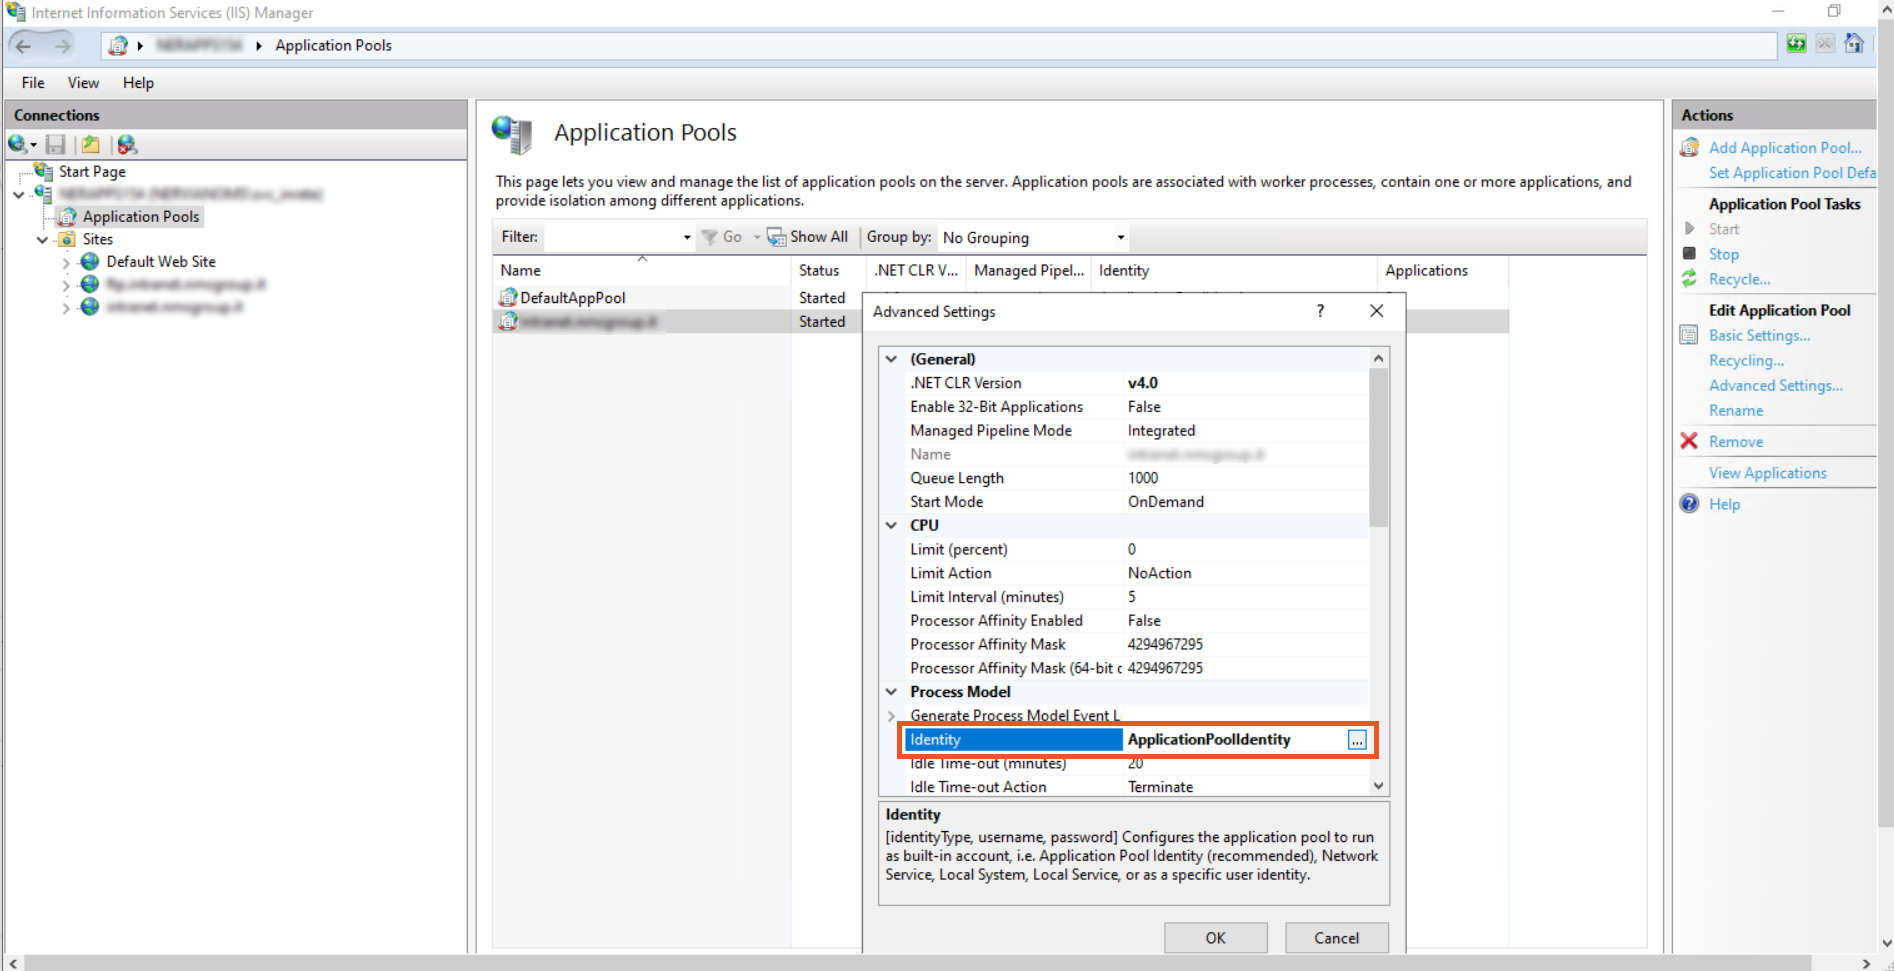
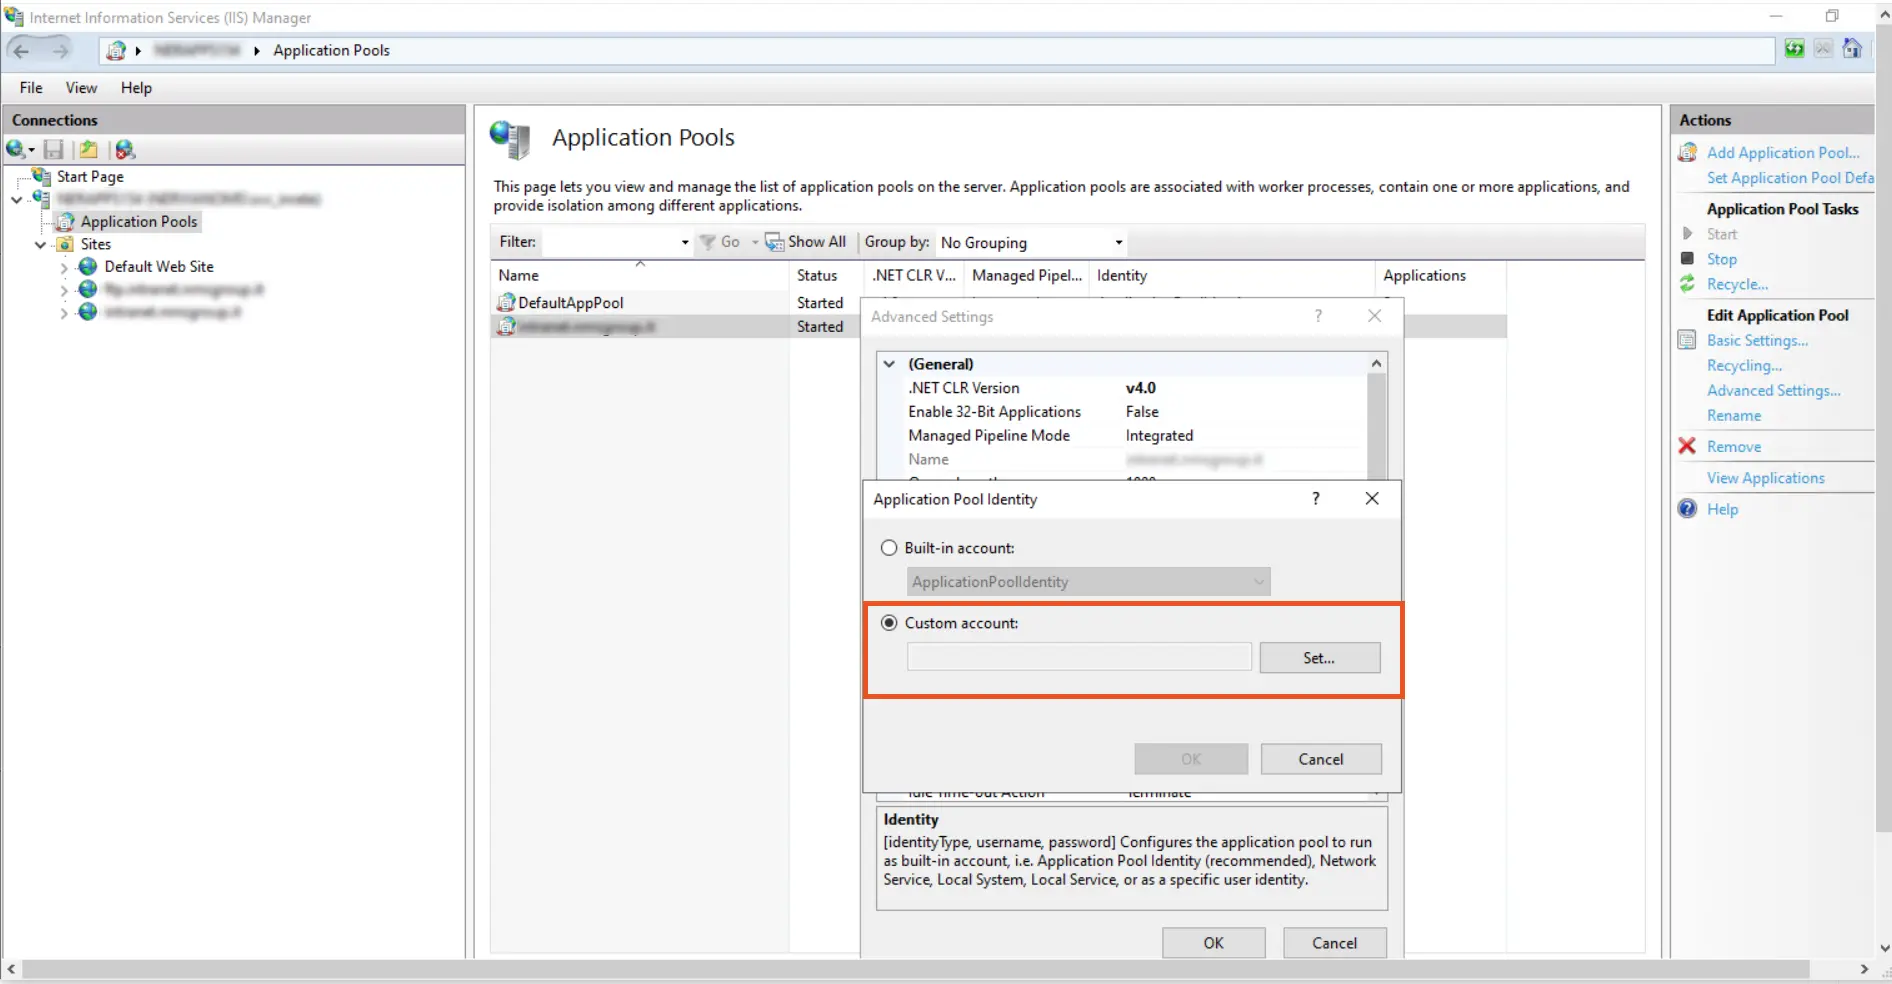
- In the Application Pool Identity, select Custom Account and click on the set button to set the Identity.
- Change it from ApplicationPoolIdentity to <domain_name>\<username>.
Example: domain.com\service_account
- Go to the Configuration Editor.
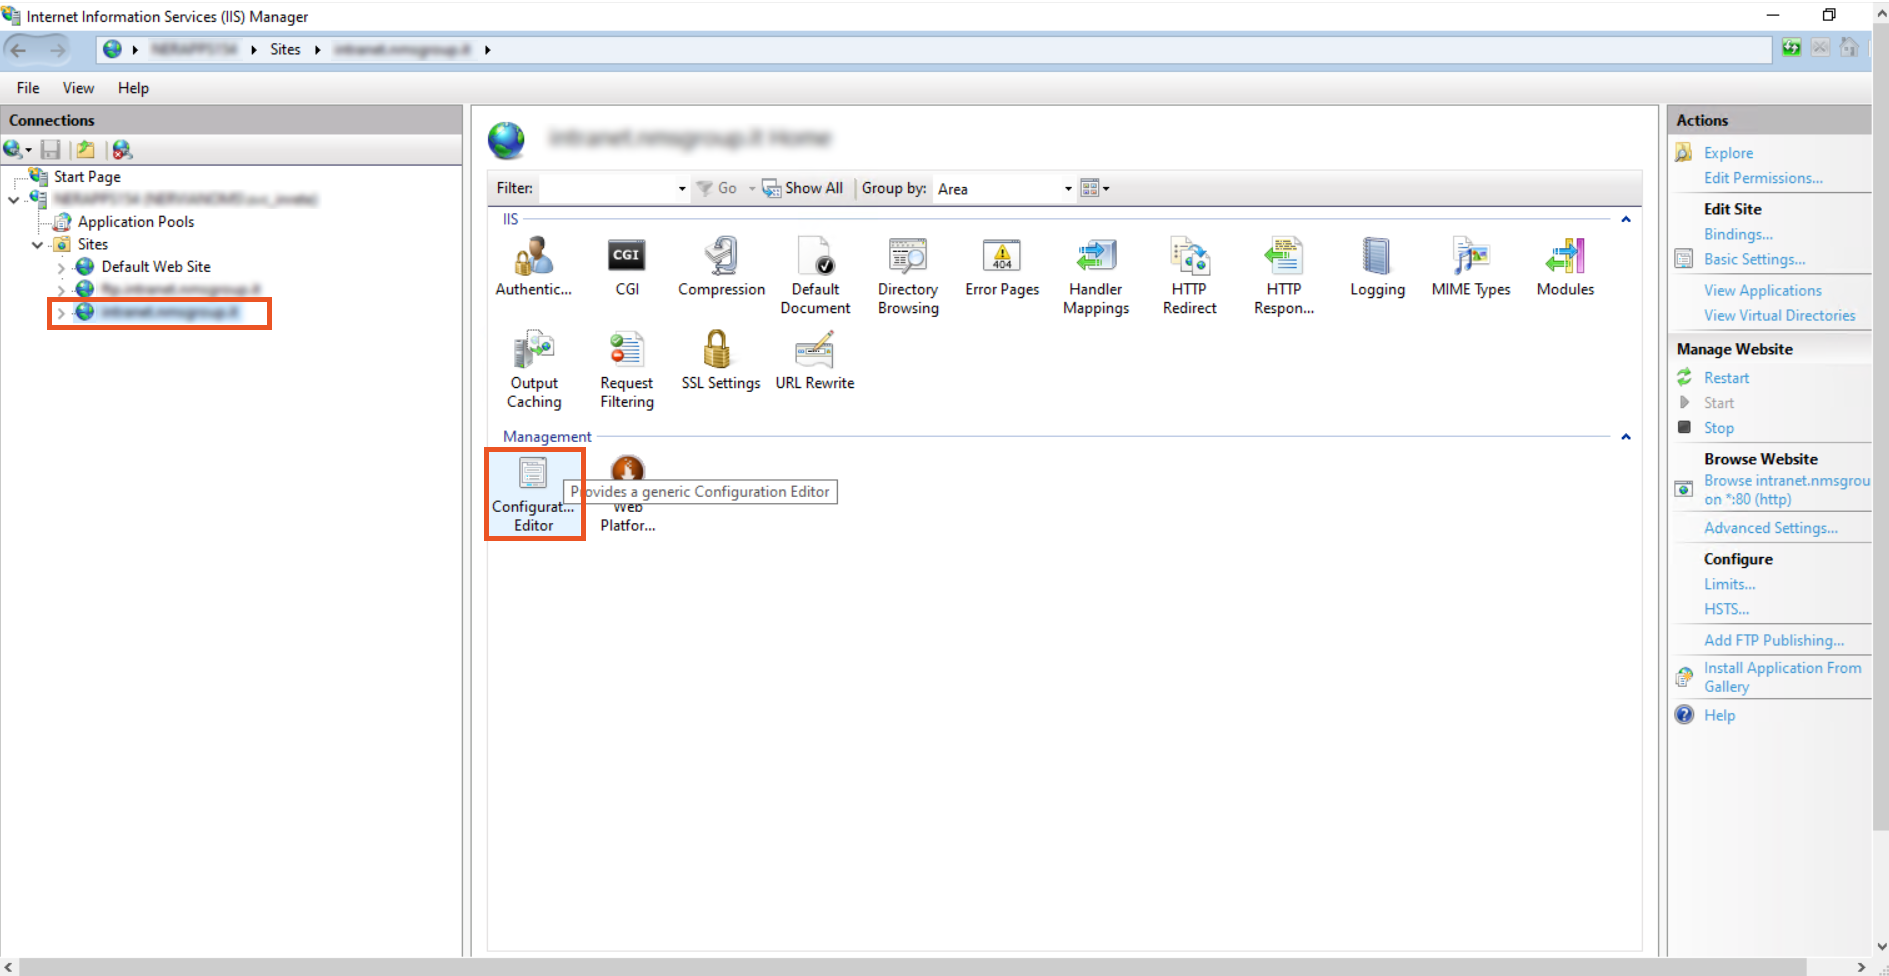
- From the dropdown, select system.webServer > security > authentication > windowsAuthentication.
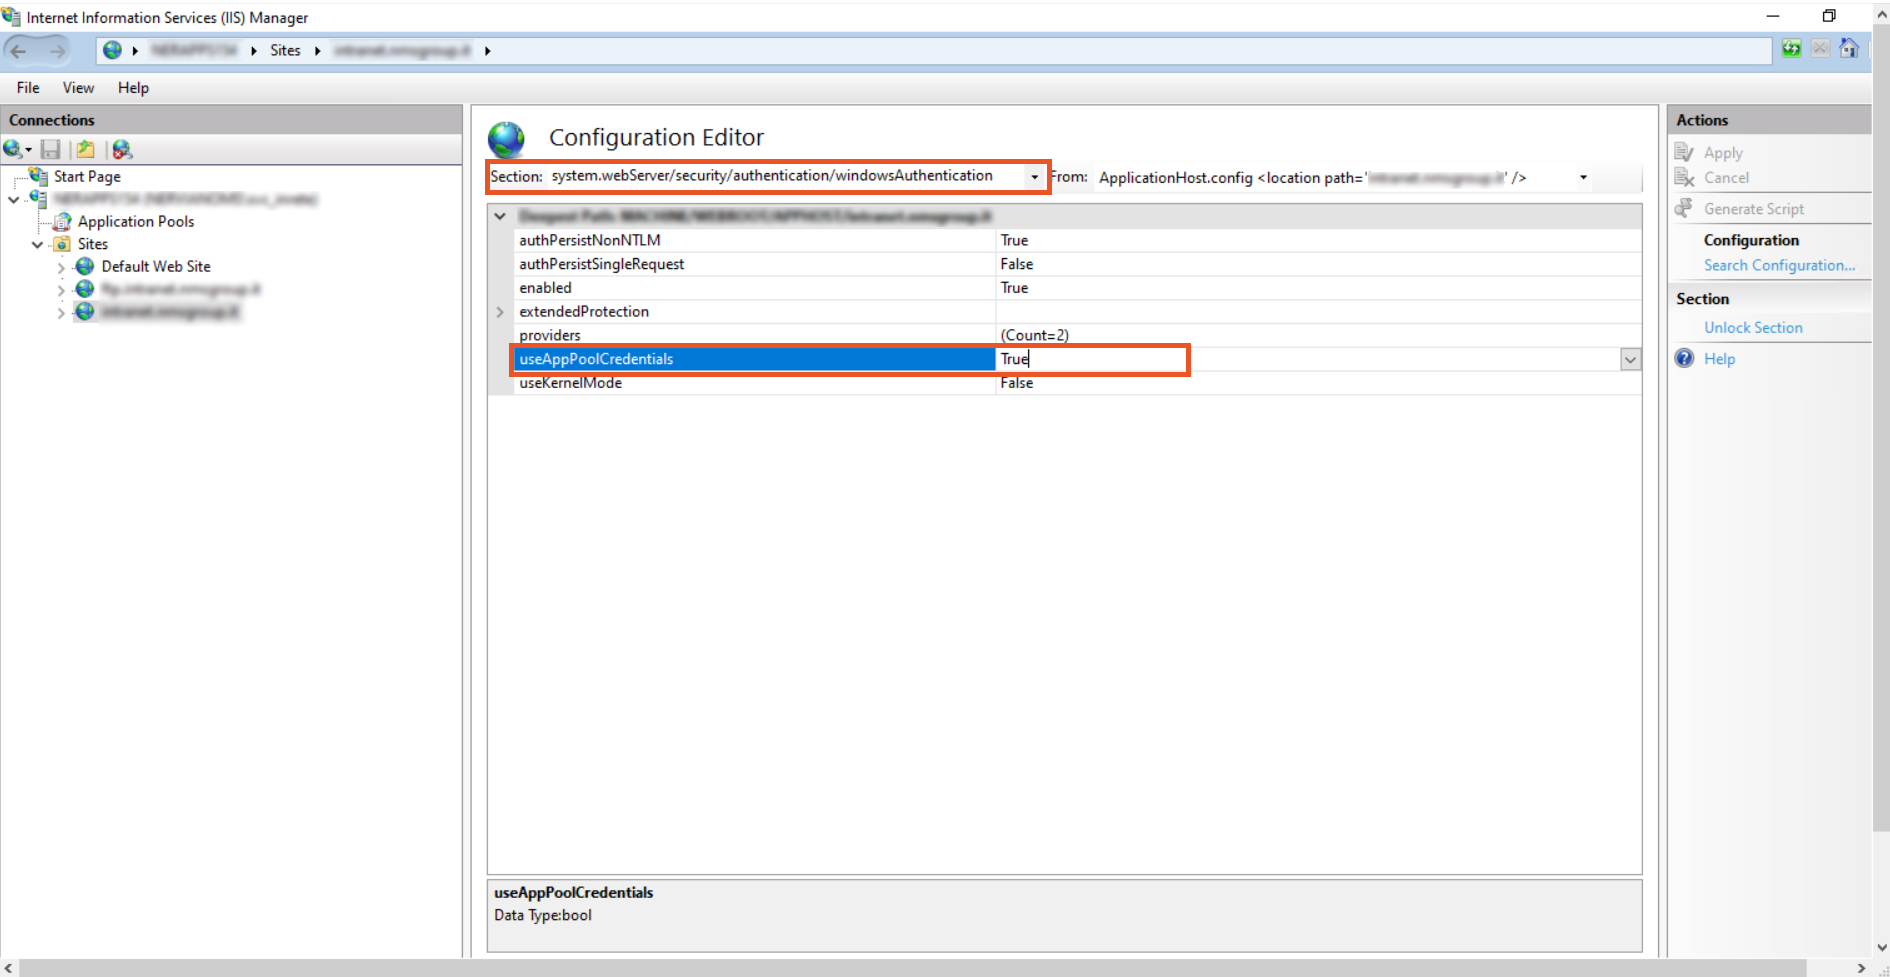
- Change useAppPoolCredentials to True. and useKernelMode to False.
Note: Setting useAppPoolCredentials to True means that we allow IIS to use the domain account to Decrypt Kerberos ticket from the clients.
- Click Apply.
- Restart IIS server.
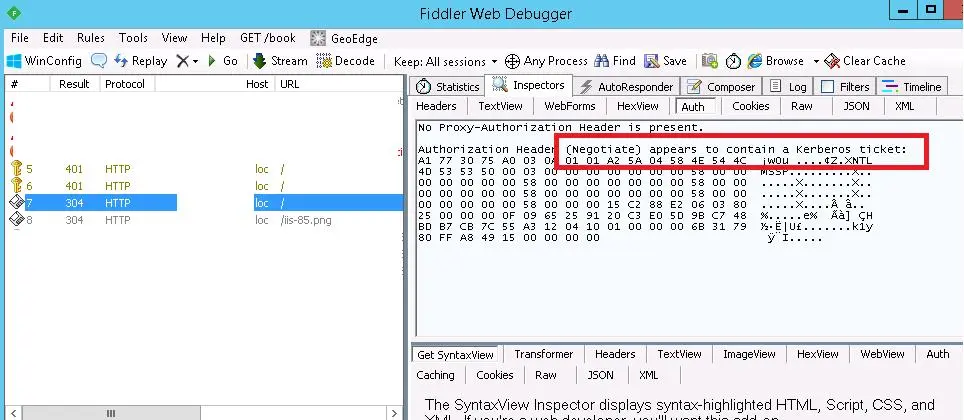
- You can check that kerberos authentication is being used on the website by monitoring HTTP traffic using Fiddler.
Launch the fiddler and launch the browser to the desired website. Locate the line of website access in the window’s left side. Select the Inspect tab from the window’s right side. It is evident that Kerberos has been used to authenticate on the IIS website from the line «Authorization Header (Negotiate) appears to contain a Kerberos ticket.»
Note: Once you have finished configuring settings, click here to configure browsers for Kerberos SSO.
To test your Kerberos/NTLM SSO configuration, click here.
To troubleshoot any error, please click here.
SSO with Apache on Windows Xampp Server:
- Open Command prompt in Administrator mode.
- Execute the following command to add Service Principal Name (SPN) for the service account.
Setspn -s http/<computer-name>.<domain-name> <domain-user-account>
Example: C:\Users\Administrator> setspn -S HTTP/machinename.domain.com service_account
Note:«machinename.domain.com» here is computer-name. Make sure it’s resolvable on the Windows server running AD service.
- Verify whether this has been properly set by running the following command:
setspn -l domain\service_account
- The result should list http/machinename.domain.com
- Open Active Directory Users and Computers and from the top menu select View >> Advanced features.
- Open the service account and go to the attribute editor tab, browse to the servicePrincipalName to verify the SPN entry.
- Navigate to the Delegation tab.
- Select Trust this user for delegation to any service (Kerberos only).
- Click Apply.
- Click Here to download the apache module.
- Copy the mod_authnz_sspi.so from Apache24 > modules folder and place it in the modules (C:\xampp\apache\modules) directory.
- Copy the sspipkgs.exe file from Apache24 -> bin folder and place it in the bin folder of your Xampp apache folder (…..\xampp\apache\bin) on your webserver.
- Open httpd.conf (…..\xampp\apache\conf) and place the below line of code in the LoadModule section.
LoadModule authnz_sspi_module modules/mod_authnz_sspi.so
- Make sure that the following modules are uncommented:
LoadModule authn_core_module modules/mod_authn_core.so
LoadModule authz_core_module modules/mod_authz_core.so
- Also, make sure to enable ldap extension.
- Open the httpd.conf file from (…..\xampp\apache\conf\httpd.conf).
Go to and paste the below lines after #Require all grants.
        <Directory "...../xampp/htdocs">

            ......

            ......

            #Require all granted

            AllowOverride None Options None

            AuthType SSPI

            SSPIAuth On

            SSPIAuthoritative On

            Require valid-user

        </Directory>
- Restart your Apache Server.
Note: Once you have finished configuring settings, click here to configure browsers for Kerberos SSO.
To test your Kerberos/NTLM SSO configuration, click here.
To troubleshoot any error, please click here.
Configure browsers for Kerberos SSO:
Note: The client-side configuration enables the respective browser to use SPNEGO to negotiate Kerberos authentication for the browser. You must make sure that the browser on an end user’s system is configured to support Kerberos authentication.
General Kerberos SSO Configuration for all Browsers:
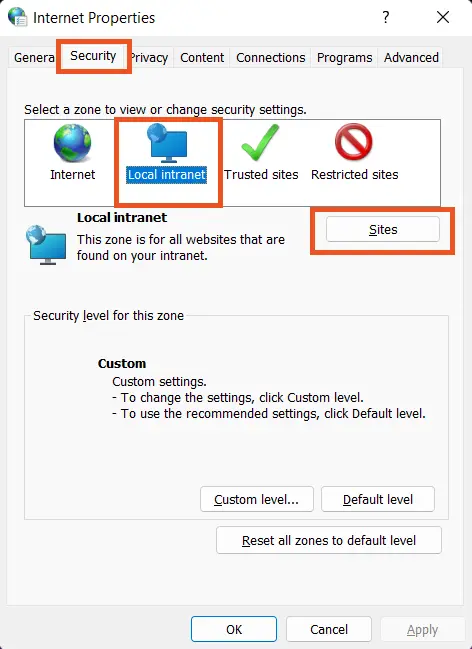
- Go to Control Panel and click on Network and Internet >> Internet Options.
- This will open a Internet Properties window. Click on Security >> Local Intranet >> Sites.
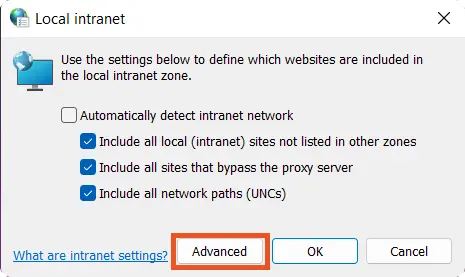
- After that, click on the Advanced button.
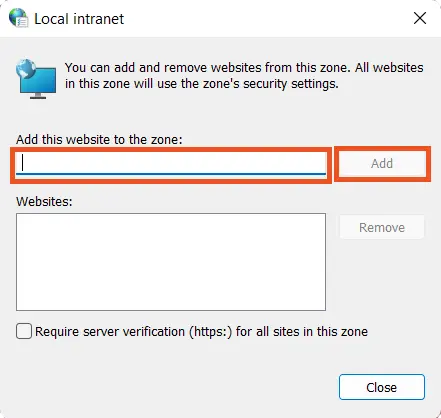
- In the Add this website to the zone section add the website URL that you wish to login with SSO.
- Click Tools > Internet Options > Security > Local intranet > Custom Level.
- Scroll down to the User Authentication options and select Automatic logon only in the Intranet zone.
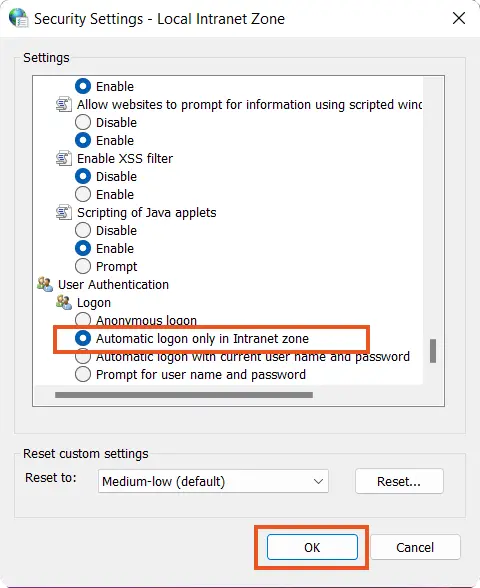
- Click on Ok button and then restart your browser.
Once done with the above settings, you need not to configure the browser settings for internet explorer, Google Chrome and Apple Safari.
- Internet Explorer
- Google Chrome
- Mozilla Firefox
- Apple Safari
Internet Explorer:
By default the general browser configuration settings will be applicable, no more additional settings are required for Internet Explorer.
Google Chrome:
By default the general browser configuration settings will be applicable, no more additional settings are required for Google Chrome.
Mozilla Firefox:
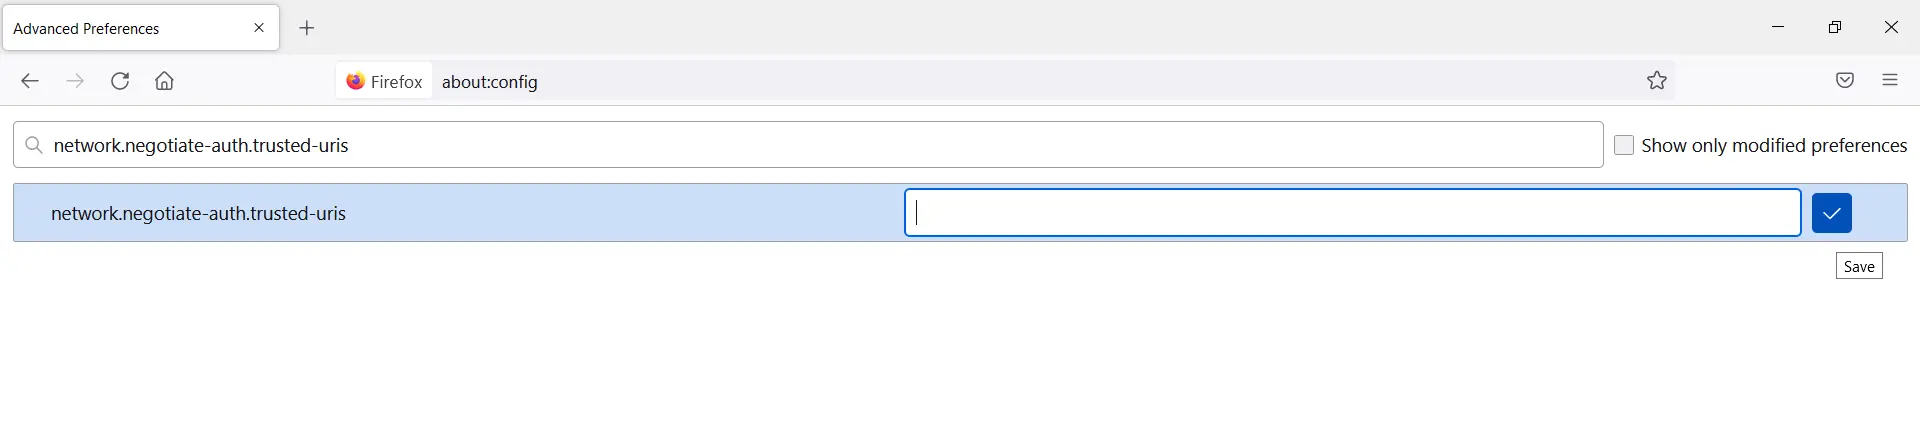
- Open Mozilla Firefox browser and enter about:config in the address bar.
- Search for network.negotiate-auth.trusted-uris Preference Name, and click on Edit. enter the hostname or the domain of the web server that is protected by Kerberos HTTP SPNEGO. Specify multiple domains and hostnames separated with a comma.
- Search for network.automatic-ntlm-auth.trusted-uris Preference Name, and click on Edit. enter the hostname or the domain of the web server that is protected by Kerberos HTTP SPNEGO. Specify multiple domains and hostnames separated with a comma.

- Click OK and then restart your browser.
Apple Safari:
Safari on windows supports SPNEGO with no furthere configuration. It supports both kerberos and NTLM as sub mechanism of SPENGO.
Test your Kerberos/NTLM SSO Configuration:
Time Synchronization:
The Kerberos protocol requires the time of the client and server to match: if the system clock of the client does not match that of the server, authentication will fail. The simplest way to synchronize the system clocks is to use a Network Time Protocol (NTP) server.
Verify With Commands:
To verify your keytab and kerberos configuration, you can run the following commands:
- Klist: The klist command displays the contents of a Kerberos credentials cache or key table. With this command you can check if you got a valid ticket or not.
- klist -t -k etc/apache2/spn.keytab: To list all of the entries in the etc/apache2/spn.keytab key table with timestamps.
- klist -ek /etc/apache2/spn.keytab: Displays the encryption type for the session key and the ticket and lists the entries in a key table.
- kinit -V -kt /etc/apache2/spn.keytab -p HTTPS/ webserver.yourdomain.com @YOURDOMAIN.COM: Verify Kerberos Authentication with keytab file.
- kdestroy -A: You can use the this command on Linux to reset any Kerberos token on your local machine. The command destroy your previous Kerberos ticket.
- klist purge: You can use the this command on Windows to reset any Kerberos token on your local machine. The command destroy your previous Kerberos ticket.
- KRB5_TRACE=/dev/stdout kinit -kt /etc/krb5.keytab HTTP/≶Server Host Name>: You can use this command in your linux web server to get Kerberos ticket using the keytab file and get detailed information for debugging of Kerberos Authentication process by enabling Kerberos tracing.
- To test the SSO configuration create a test.php file in your WordPress root directory.
- Enter the below line:
<?php

        var_dump($_SERVER);

        ?>
- Save the file and access it in the web browser. You will see the $_SERVER content.
- Search for «REMOTE_USER» and it should contain the currently logged in username.
Note: Please remove the test.php file after verifying your configuration. As it contains some valuable information.
Kerberos Authentication Across Multiple Domains:
- Create separate Keytabs on each domain and merge them with the ktutil tool:
ktutil

        ktutil: read_kt <keytab_filename_1>

        ktutil: read_kt <keytab_filename_2>

        ktutil: read_kt <keytab_filename_3>

        ktutil: write_kt spn.keytab

        ktutil: quit
- Verify the merge with the below command:
klist -k spn.keytab
- Configure krb5.conf:
The krb5.conf file contains Kerberos configuration information which includes KDC & admin servers for one or more Kerberos realms, default values for the current realm and mappings of hostnames onto Kerberos realms. In case of multiple domains the krb5.conf file should be updated with information about various domains/domain realms for authentication to work.
Troubleshooting:
The following are the most common error messages:
-
kinit: Pre-authentication failed: Invalid argument while getting initial credentials
or

                GSS ERROR gss_accept_sec_context(): [Unspecified GSS failure.  Minor code may provide more information (Request ticket server HTTP/<Server Host Name>@EXAMPLE.COM kvno x enctype rc4-hmac found in keytab but cannot decrypt ticket)]
The rc4 encryption type which is still heavily used in AD environments but already disabled by default in RHEL-8.3. You can refer to the example below to add encryption type to your keytab file.
Example:
                ktutil

                addent -password -p HTTP/<Server Host Name>@EXAMPLE.COM -k 1 -e aes256-cts-hmac-sha1-96

                wkt spn.keytab.
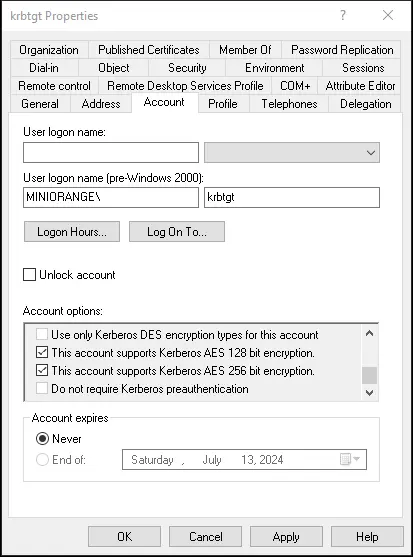
Make sure Kerberos AES 256 bit encryption is supported in the user «Account» settings.

-
Unspecified GSS failure. Minor code may provide more information (Clock skew too great)

                or

                kinit: krb5_get_init_creds: Too large time skew
Kerberos is very time sensitive. Verify that the clocks on the hosts for Active Directory and the web server are identical. Set up one of your domain controllers to serve as the NTP server for your client computers. -
gss_acquire_cred() failed: Unspecified GSS failure. Minor code may provide more information (, Permission denied)
Wrong file system permissions for /etc/apache2/spn.keytab, i.e. not readable for the webserver’s Linux user.
To change file system permissions use chmod 644 /etc/apache2/spn.keytab -
gss_acquire_cred() failed: Unspecified GSS failure. Minor code may provide more information (, Key table entry not found).
Missing service principal (possibly HTTP/ webserver.yourdomain.com @YOURDOMAIN.COM) in /etc/apache2/spn.keytab. -
Warning: received token seems to be NTLM, which isn't supported by the Kerberos module. Check your IE configuration.
gss_accept_sec_context() failed: An unsupported mechanism was requested (, Unknown error)
The website is not in the zone «Local Intranet» in IE or IE is configured incorrectly, see Authentication Uses NTLM instead of Kerberos. -
gss_accept_sec_context() failed: Unspecified GSS failure. Minor code may provide more information (, ).
Wrong kvno or machine password in etc/apache2/spn.keytab. Recreate the keytab using the correct information.
Problem with local Kerberos ticket cache on your workstation, use Kerbtray.exe to purge the ticket cache and open the website in IE again. -
kinit: KDC has no support for encryption type while getting initial credentials
Change the default encryption type in the libdefaults section of the /etc/apache2/krb5.conf file. Add the default_tgs_enctypes and default_tkt_enctypes to your config. -
                [libdefaults]

                default_tgs_enctypes = arcfour-hmac-md5 des-cbc-crc des-cbc-md5

                default_tkt_enctypes = arcfour-hmac-md5 des-cbc-crc des-cbc-md5
kinit: krb5_get_init_creds: Error from KDC: CLIENT EXPIRED

                or

                kinit: Client's entry in database has expired while getting initial credentials
Your Kerberos account is no longer active. The account credentials need to be renewed. -
kinit: krb5_cc_get_principal: No credentials cache file found

                or

                kinit: krb5_get_init_creds: Error from KDC: CLIENT_NOT_FOUND
The wrong domain was targeted when running the kinit command. Verify the domain name, it should be in capital letters EXAMPLE.COM -
kinit : Cannot find KDC for requested realm while getting initial credentials
/etc/apache2/krb5.conf file does not contain the active directory domain name (.EXAMPLE.COM). -
kinit: Preauthentication failed while getting initial credentials
Caused by mistakenly typing the kerberos password. Please try again. Or due to your system’s clock. Make sure that the date command returns a time correct to within 5 minutes. -
kinit: Client not found in Kerberos database while getting initial credentials
Your kerberos principal may differ from your username on your local system. -
kinit: Client's entry in database has expired
You must change your kerberos password.
Can I use an existing LDAP user as a Kerberos Service principal?
Yes, you can use an existing LDAP user as a Kerberos service principal. However, this user must have a password set to never expire. Kindly make sure this account is not used by any user as the application uses this account as the Kerberos service principal and the corresponding keytab to obtain a kerberos ticket.
What is a «Kerberos client», «Kerberos server», and «application server»?
All authentication in Kerberos occurs between clients and servers. Therefore, any entity that receives a service ticket for a Kerberos service is referred to as a «Kerberos client» in Kerberos terminology. Users are often considered clients, but any principal might be one.
The Key Distribution Center, or KDC for short, is typically referred to as a «Kerberos server». Both the Authentication Service (AS) and the Ticket Granting Service (TGS) are implemented by the KDC. Every password connected to every principal is stored in the KDC. Because of this, it is essential that the KDC be as safe as feasible.
The phrase «application server» often refers to Kerberized software that clients use to interact while authenticating using Kerberos tickets. An example of an application server is the Kerberos telnet daemon.
Why am I getting a prompt to enter my credentials?
This happens when the NTLM protocol is used for Authentication instead of Kerberos.
This may occur due to multiple reasons:
- Check if you are using a domain joined machine to access the website.
- Make sure the time is synchronized between the LDAP server and webserver.
- Confirm if your browser settings and Internet options are configured for Kerberos SSO.
- If you are still facing this issue, feel free to contact us.
Related Articles
Fixing the annoying popup in FreeIPA
I love FreeIPA except for one thing: That annoying popup when using Chrome:
This popup confuses the hell out of my users when they can’t log in. So what is it? One nice feature of FreeIPA is it’s ability to do Single Sign on via Kerberos. The problem is that not all browsers support this and the configuration of this feature for users has a high bar of entry — I’m not even sure you can get it working in Chrome. So when a user goes to the FreeIPA page which supports Kerberos logins and sees this popup they (understandably) think they need to log in. Since the browser is not configured for Kerberos, this inevitably fails. But what is worse, is that unauthenticated users are prompted to log in twice. So pretty quickly this can turn into a service call or ticket when a user «can’t login.» The workaround is to click cancel twice to be taken to the forms based login. But instead, why don’t we just suppress this popup?
Since the FreeIPA documentation is notoriously abysmal, I’ll provide my solution to the problem here. Simply do the following:
Log in to your host
edit /etc/httpd/conf.d/ipa-rewrite.conf
Add to the end of this file:
#The following disables the annoying kerberos popup for Chrome
RewriteCond %{HTTP_COOKIE} !ipa_session
RewriteCond %{HTTP_REFERER} ^(.+)/ipa/ui/$
RewriteRule ^/ipa/session/json$ — [R=401,L]
RedirectMatch 401 ^/ipa/session/login_kerberos
And that’s it! Restart your web server and this popup should go away! So what does it do?
The first three lines set very specific conditions for triggering a 401 response for the page /ipa/session/json. The web client uses JSON to communicate with the IPA server, so we only want to send the 401 response if there is no ipa_session cookie (set on login) and the user is coming from the ui page and not, say, making their own JSON call from the command line. Otherwise we risk inadvertently breaking something.
It is worth noting that in older versions of FreeIPA, this path was /ipa/session/xml, but it was renamed. If you are on an old version of IPA either upgrade or adjust your configuration appropriately.
The second thing this does is returns a 401 when someone tries to access the kerberos login page. It is these two pages that generate the http basic authentication login and by immediately returning a 401 instead of allowing these pages to try to authenticate with kerberos, we are ultimately able to resolve this issue.
RHEL Engineering is moving the tracking of its product development work on RHEL 6 through RHEL 9 to Red Hat Jira (
issues.redhat.com
). If you’re a Red Hat customer, please continue to file support cases via the
Red Hat customer portal
. If you’re not, please head to the «
RHEL project
» in Red Hat Jira and file new tickets here. Individual Bugzilla bugs in the statuses «NEW«, «ASSIGNED«, and «POST» are being migrated throughout September 2023. Bugs of Red Hat partners with an assigned Engineering Partner Manager (EPM) are migrated in late September as per pre-agreed dates. Bugs against components «kernel«, «kernel-rt«, and «kpatch» are only migrated if still in «NEW» or «ASSIGNED«. If you cannot log in to RH Jira, please consult
article #7032570
. That failing, please send an e-mail to the RH Jira admins at rh-issues@redhat.com to troubleshoot your issue as a user management inquiry. The email creates a ServiceNow ticket with Red Hat. Individual Bugzilla bugs that are migrated will be moved to status «CLOSED«, resolution «MIGRATED«, and set with «MigratedToJIRA» in «Keywords«. The link to the successor Jira issue will be found under «Links«, have a little «two-footprint» icon next to it, and direct you to the «
RHEL project
» in Red Hat Jira (issue links are of type «https://issues.redhat.com/browse/RHEL-XXXX«, where «X» is a digit). This same link will be available in a blue banner at the top of the page informing you that that bug has been migrated.
Just FYI, I have looked at the code again and compared to what mod_auth_kerb did and I am not sure we have a way to handle this w/o disabling SSO completely.
mod_auth_gssapi 1.3.2 is now pushed to F23 stable, it includes a new setting that may alleviate these issues.
After further testing I’m able to confirm that Chrome on Windows and Edge always show a username/password pop-up for a 401 response with «WWW-Authenticate: Negotiate» header. The Python script «negotiate_srv.py» is a minimal reproducer for the issue.
I haven’t found a way to suppress the login window.
Metadata Update from @rcritten:
— Issue assigned to someone
— Issue set to the milestone: FreeIPA 4.5 backlog
8 years ago
Fixed upstream in mod_auth_gssapi.
Metadata Update from @rcritten:
— Issue close_status updated to: fixed
— Issue status updated to: Closed (was: Open)
6 years ago
As far as I understand upstream added the GssapiNegotiateOnce option. Shouldn’t it be enabled by default in FreeIPA?
I suppose we could add the workaround to /etc/httpd/conf.d/ipa.conf ala:
...
<Location "/ipa">
  AuthType GSSAPI
  AuthName "Kerberos Login"
  BrowserMatch MSIE gssapi-no-negotiate
...
Metadata Update from @rcritten:
— Issue status updated to: Open (was: Closed)
6 years ago
Adding the GssapiNegotiateOnce option to the httpd conf works perfectly since quite a while for us.
Log in
to comment on this ticket.