
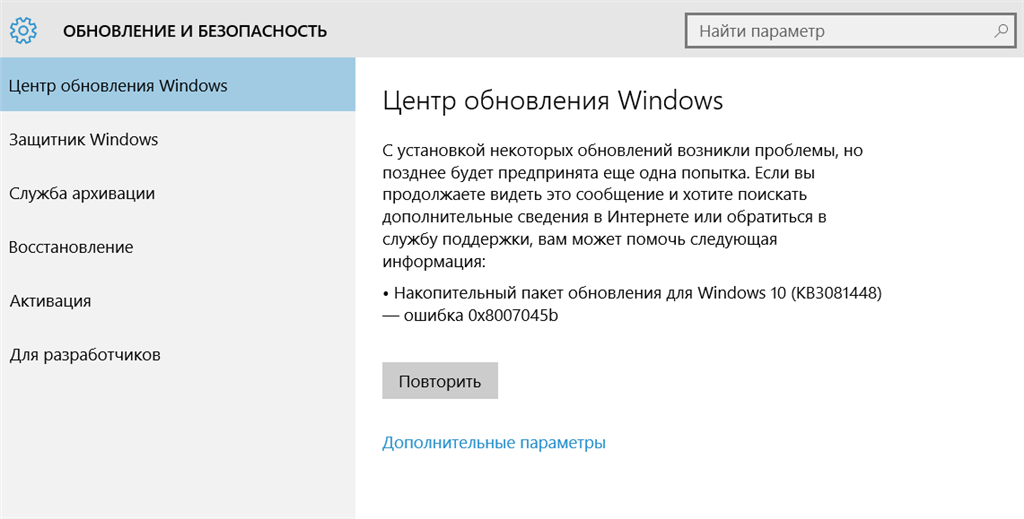
Уведомление об ошибке 0x8007045b не позволяет Windows 10 обновиться. Вызывается конфликтами архитектуры обновлений и системными файлами, повреждениями компонентами ОС.
Как исправить проблему?
В первую очередь выполните следующее:
- убедитесь, что Windows не заражена вирусами, для большей уверенности примените несколько антивирусных продуктов для проверки;
- обновите ОС при подключении к иной сети, чем в первый раз;
- отключите брандмауэр, сторонний файрвол и подобные приложения, которые способны блокировать сетевые подключения.
Если проблема не пропадет, то пробуйте следующие способы.
№1: DISM
В запущенной под правами администратора командной строке введите две команды:
- DISM.exe /Online /Cleanup-image /Scanhealth
- DISM.exe /Online /Cleanup-image /Restorehealth
Они найдут и восстановят файлы, которые неисправны. Команда обратится к Центру обновления для загрузки оригинальных файлов, но это может быть безуспешным. В этом случае используйте альтернативный источник: сетевую папку Windows на другом компьютере, образ ОС на флешке или DVD. Это задается за счет добавления ко второй команде /Source:ххх, где ххх — альтернативный источник нормальных системных файлов.
№2: сброс Windows
Перейдите по пути «Параметры» => «Обновление и безопасность» => «Вернуть компьютер в исходное состояние» => «Начать». Если на ПК нет важных личных файлов, то в появившемся окне предпочтительней выбрать «Удалить все», но если они есть, то остановитесь на «Сохранить мои файлы». Это вернет все настройки системы на стандартные и ошибка 0x8007045b не станет больше досаждать.
Applies ToWindows 7 Enterprise Windows 7 Home Premium Windows 7 Professional Windows 7 Ultimate Windows 7 Home Basic
Проблемы
При попытке запустить брандмауэр Windows, если служба брандмауэра отключена, или ваш компьютер заражен вредоносной программой, появляется следующее сообщение об ошибке:
0x8007042c
Решение
Чтобы устранить эту проблему, проверьте компьютер на наличие вредоносных программ и удалите их, выполнив инструкции в способе 1.
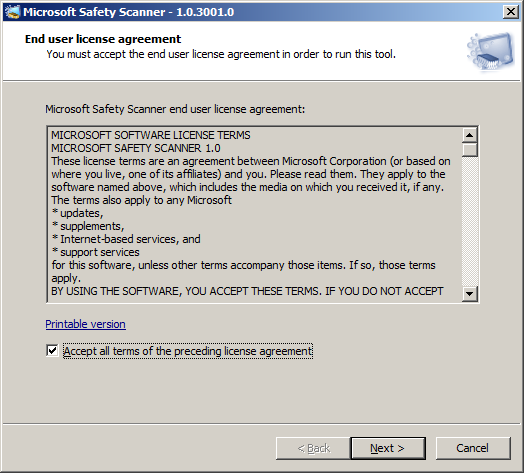
Если в последнее время вы не проверяли компьютер на наличие вирусов или вредоносных программ, настоятельно рекомендуется это сделать. Для удаления вредоносных программ можно использовать Microsoft Safety Scanner. Для этого выполните следующие действия.
-
Перейдите на следующий веб-сайт корпорации Майкрософт: Средство проверки безопасности (Майкрософт)
-
Нажмите кнопку Скачать сейчас. Следуйте инструкциям по загрузке и установке Microsoft Safety Scanner. Сохраните файл на рабочий стол при появлении соответствующего запроса.
-
По завершении установки перейдите на рабочий стол и дважды щелкните значок Microsoft Safety Scanner. Он может отображаться как msert.
-
Установите флажок Принять все условия лицензионного соглашения и нажмите кнопку Далее два раза.

-
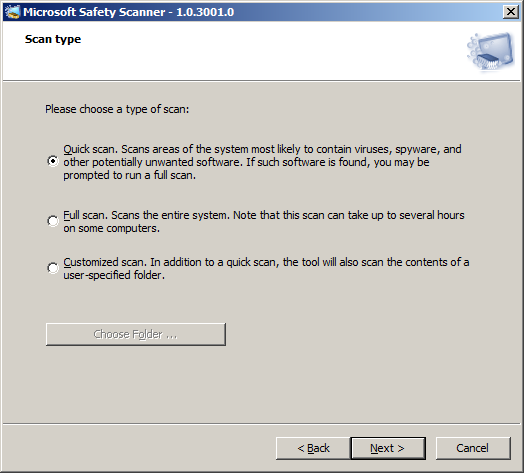
Выберите Быстрая проверка, а затем нажмите кнопку Далее.
-
Средство проверки безопасности (Майкрософт) проверит ваш компьютер и удалит все вредоносные программы.
-
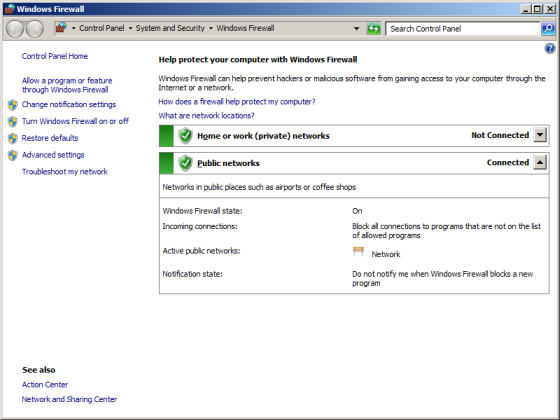
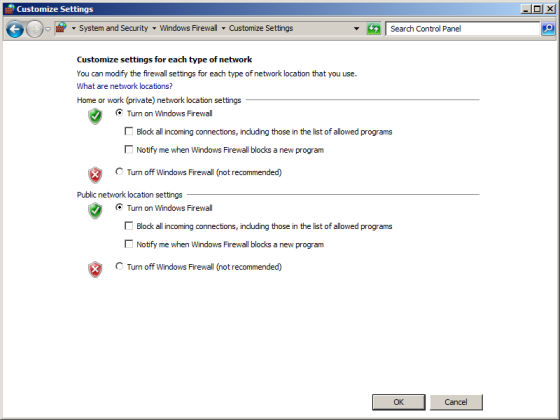
Нажмите кнопку Пуск и введите Брандмауэр Windows в поле Найти программы и файлы (Windows 7) или в поле Начать поиск (Windows Vista).
-
Выберите пункт Брандмауэр Windows.
-
В области навигации (слева) панели управления выберите пункт Включение и отключение брандмауэра Windows.

-
Выберите Включить брандмауэр Windows для каждой сетевой папки, затем нажмите кнопку ОК.
Если при попытке включить брандмауэр по-прежнему возникает ошибка с кодом 0x8007042c, перейдите к способу 2.
Вы можете запустить службы брандмауэра Windows, а затем сделать так, чтобы в будущем они запускались автоматически. Для этого выполните следующие действия.
-
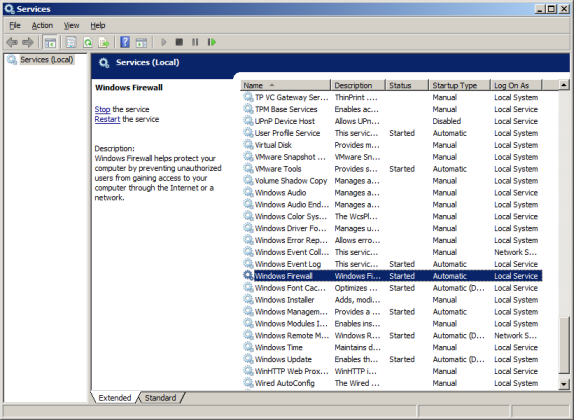
Нажмите кнопку Пуск и в поле Поиск введите Службы.
-
Щелкните правой кнопкой мыши пункт Службы и выберите команду Запуск от имени администратора. Если потребуется, введите имя пользователя и пароль администратора, а затем нажмите клавишу ВВОД.
-
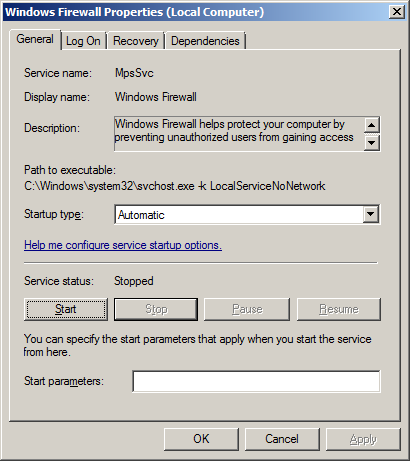
Прокрутите содержимое окна вниз, пока не увидите элемент Брандмауэр Windows, затем дважды щелкните строку Брандмауэр Windows.

-
Щелкните поле Тип запуска, а затем выберите пункт Автоматически.

-
Если для параметра Состояние службы указано значение Остановлена, нажмите кнопку Запустить.
-
Нажмите кнопку Применить, а затем — ОК.
-
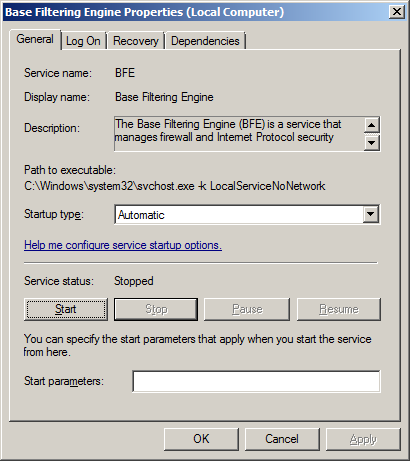
Прокрутите содержимое окна вниз, пока не увидите элемент Базовый модуль фильтрации, затем дважды щелкните строку Базовый модуль фильтрации.
-
Если для параметра Состояние службы указано значение Остановлена, нажмите кнопку Запустить.
-
Нажмите кнопку Применить, а затем — ОК.
-
Перезапустите Windows и проверьте, включен ли брандмауэр Windows.
Если при попытке включить брандмауэр по-прежнему возникает ошибка с кодом 0x8007042c, перейдите к способу 3.
Чтобы остановить и повторно запустить эти службы с помощью пакетного файла, выполните указанные ниже действия.
-
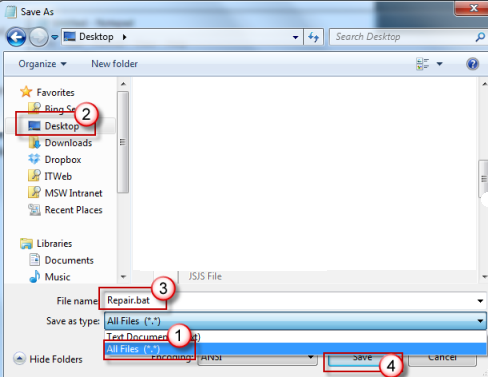
Нажмите кнопку Пуск, в поле Поиск введите Блокнот и выберите пункт Блокнот в списке программ.
-
Выделите приведенный ниже текст, щелкните его правой кнопкой мыши и выберите команду Копировать. Щелкните правой кнопкой мыши в окне Блокнота и выберите команду Вставить.
sc config MpsSvc start= auto
sc config KeyIso start= auto
sc config BFE start= auto
sc config FwcAgent start= auto
net stop MpsSvc
net start MpsSvc
net stop KeyIso
net start KeyIso
net start Wlansvc
net start dot3svc
net start EapHostnet
net stop BFE
net start BFE
net start PolicyAgent
net start MpsSvc
net start IKEEXT
net start DcaSvcnet
net stop FwcAgent
net start FwcAgent
-
В Блокноте в меню Файл выберите команду Сохранить как, а затем в поле Имя файла введите Repair.bat.
-
Щелкните поле Тип файла и выберите вариант Все файлы (*.*).
-
На панели слева щелкните элемент Рабочий стол и нажмите кнопку Сохранить.

-
В меню Файл выберите пункт Выход.
-
На рабочем столе щелкните правой кнопкой мыши файл Repair.bat, который вы сохранили на шаге 5, и выберите пункт Запуск от имени администратора.
Внимание! Если потребуется подтвердить остановку службы, нажмите клавишу Y на клавиатуре, а затем клавишу ВВОД.
-
Попробуйте снова запустить брандмауэр Windows. Если брандмауэр Windows запускается, удалите файл Repair.bat. Для этого щелкните файл Repair.bat правой кнопкой мыши, выберите команду Удалить, а затем нажмите кнопку Да.
Если при попытке запустить брандмауэр Windows по-прежнему появляется сообщение об ошибке с кодом 0x8007042c, обратитесь в Центр справки и поддержки пользователей Майкрософт по вопросам безопасности. Для этого перейдите на веб-сайт по адресу https://technet.microsoft.com/ru-ru/security/cc165610.aspx.
Дополнительная информация
Нужна дополнительная помощь?
Нужны дополнительные параметры?
Изучите преимущества подписки, просмотрите учебные курсы, узнайте, как защитить свое устройство и т. д.
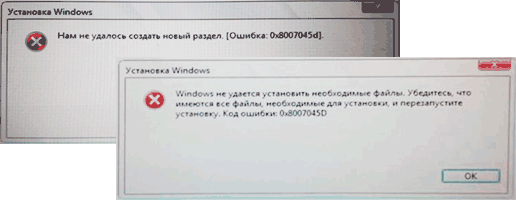
При чистой установке Windows 10, 8.1 или Windows 7 вы можете столкнуться с ошибкой с кодом 0x8007045D, причем появиться она может на двух этапах: после выбора раздела для установки, при этом сообщение будет «Нам не удалось создать новый раздел», либо уже после начала копирования файлов установки с сообщением «Windows не удается установить необходимые файлы. Убедитесь, что имеются все файлы, необходимые для установки и перезапустите установку».
Сам по себе код 0x8007045d сообщает ошибке ввода-вывода: либо не удается прочитать данные с установочного накопителя, либо не удается произвести запись на жесткий диск или SSD, на который производится установка Windows. Эту же ошибку можно встретить и при простой работе в системе, об этом отдельная инструкция — Как исправить ошибку ввода-вывода 0x8007045d и 0x800703ee при копировании файлов на флешку или карту памяти.
Как исправить ошибку 0x8007045D при установке Windows
Далее — по порядку некоторые действия, которые следует предпринять в первую очередь, если вы столкнулись с рассматриваемой ошибкой.
- Если ошибка возникает на сразу после выбора раздела для установки Windows 10, 8.1 или Windows 7 и вы видите сообщение «Нам не удалось создать новый раздел (Ошибка: 0x8007045d)», при этом вы выбираете большое незанятое пространство на диске, попробуйте вручную создать раздел на этом пространстве: нажать «Создать» в программе установки и указать более скромный размер — 50-100 Гб, учитывая, что размеры указываются в мегабайтах (ошибка часто появляется на дисках размером от терабайта). Также разделы можно создать в Diskpart в командной строке, которая открывается в программе установки по нажатию Shift+F10, либо Shift+Fn+F10 на некоторых ноутбуках. Как именно создавать разделы в DISKPART — опишу далее.
- Если ошибка появилась после подключения новых дисков к компьютеру, попробуйте отключить все диски и накопители (в том числе приводы компакт-дисков, необязательные на этом этапе USB-устройства), оставив только диск, на который производится установка.
- Выполните проверку диска (раздела), на который производится установка, на ошибки с помощью командной строки: опять же, открыть ее можно с помощью Shift+F10 или Shift+Fn+F10 прямо в программе установки, затем использовать команду chkdsk C: /f /r (где C: — буква проверяемого диска). Учитывайте, что буквы дисков в программе установки могут отличаться от тех, что были в системе. Чтобы посмотреть актуальные буквы можно использовать по порядку команды
diskpart
list volume
exit
- Если ошибка с кодом 0x8007045d возникает при копировании файлов установки и сообщает, что Windows не удается установить необходимые файлы, попробуйте следующие варианты: подключить флешку к другому разъему, желательно не через USB-хаб, а в случае ПК — на задней панели компьютера. Также может иметь смысл попробовать записать другой образ на другой накопитель. Одновременно, эта же ошибка может говорить и о проблемах с жестким диском или SSD, а в некоторых случаях — и с оперативной памятью. Рекомендую в случае именно такого сообщения проделать все действия из отдельной инструкции Ошибка 0x8007025D Windows 10 при установке — причины идентичны.
Теперь про создание разделов в командной строке с помощью DISKPART, если создать их в программе установки не получается и при условии, что диск полностью чистый (т.е. содержит только одно «незанятое пространство»). Если на диске есть важные данные, то выполняйте описанные команды только при условии, что знаете и понимаете, что именно делаете.
Учитывайте, что при установке Windows в режиме UEFI на GPT диск системе также потребуется раздел для загрузчика с файловой системой FAT32: она попробует создать его сама после созданных вами разделов, но вы можете сделать это и сами, создав первым раздел размером 100 Мб и отформатировав его в FAT32 командной format fs=fat32 quick (вводится сразу после выполнения create partition primary).
Используйте по порядку следующие команды:
- diskpart
- list disk (в результате выполнения этой команды вы получите список подключенных дисков, вам нужен номер диска, на котором будем создавать разделы, далее — N)
- select disk N
- create partition primary size=РАЗМЕР_В_МЕГАБАЙТАХ (рекомендую установить в районе 40-50 Гб или, соответственно, 40960-51200 Мб).
- Вы можете повторить команду, чтобы создать следующие разделы на этом же диске. Форматировать их не обязательно, программа установки это должна сделать сама.
- После создания разделов, введите команду exit и закройте командную строку, обновите список разделов в программе установки. Выберите раздел для установки и нажмите «Далее», чтобы проверить, сохранится ли ошибка.
Дополнительная команда, которая может пригодиться в процессе — assign letter=БУКВА (выполняем после создания раздела), присваивающая букву только что созданному разделу, что дает нам возможность выполнить его проверку на ошибки с помощью chkdsk.
Error 0x8007045d is a common issue encountered by Windows 10 and 11 users that can cause irritation and hinder the operating system’s smooth performance. This issue frequently happens while performing various tasks such as installing or updating apps, copying files, or backing up data. When confronted with this error 0x8007045d, users may have difficulty completing critical tasks, perhaps resulting in data loss or system instability.
Fortunately, seven efficient techniques exist for resolving the error code 0x8007045d on Windows 10 and 11. And this post will go through seven effective methods for troubleshooting and fixing this error, allowing you to recover control of your system’s functioning. Whether you are an expert or inexperienced user, these strategies are intended to provide simple to comprehend and implement solutions.
Part 1: What Causes the Error 0x8007045d on Windows 10/11?
Various factors can cause the error 0x8007045d on Windows 10/11. Once you understand the possible causes, you can effectively troubleshoot and resolve the issue. Here are some common causes of this error:
- Hardware Issues: The error 0x8007045d can be caused by faulty or malfunctioning hardware components, such as a damaged hard drive, faulty RAM, or faulty data cables. Hardware problems can impede read or write processes, resulting in errors.
- Corrupted System Files: System files are required for the operating system to function correctly. Many issues might occur if files get corrupted or damaged, including the 0x8007045d error. Malware infestations, faulty shutdowns, or system crashes can all cause this error code 0x8007045d.
- Incompatible or Outdated Drivers: Outdated or incompatible drivers can cause conflicts with the system and generate errors. When the drivers responsible for managing storage devices are not up to date or inconsistent with the operating system, it can trigger the error 0x8007045d.
- Problematic Software: Certain software applications or programs installed on your Windows 10/11 system may conflict with the operating system or other applications. These conflicts can result in errors, including the 0x8007045d error.
- Storage Device Issues: The error 0x8007045d could happen if there are problems with the storage devices attached to your system, such as external hard drives, USB drives, or SD cards. Faulty sectors, poor formatting, or physical damage can cause this error code 0x8007045d.
Part 2: How to Fix the Error 0x8007045d on Windows 10/11?
Fix 1: Restart Your PC
One of the simplest yet often effective methods to resolve the error 0x8007045d on Windows 10/11 is to restart your computer. Restarting the system can help clear temporary files, reset specific settings, and fix minor software glitches that may be causing the error. Follow these steps to restart your PC:
- Save your work and close all open applications.
- Click on the Start button at your screen’s bottom left corner.
- From the Start menu, click on the Power icon.
- Select «Restart» from the options presented.
Fix 2: Reconnect the USB Drive
If you get the error 0x8007045d while using a USB drive, the connection between the USB drive and your computer may need to be correctly developed. Reconnecting the USB drive can help resolve the 0x8007045d USB issue in such circumstances. To reattach the USB drive, follow these steps:
- Remove the USB drive from your computer safely. Right-click the USB drive icon in the system tray and choose «Eject» or «Safely Remove Hardware and Eject Media.» Please wait for the notification that it is safe to remove the device before unplugging it.
- Reconnect your USB again and allow your computer to recognize and detect the USB device. Once the drive has been identified, check if the 0x8007045d error has been addressed.
Fix 3: Try another USB Port
If reconnecting the USB drive didn’t resolve the error 0x8007045d, you can try connecting it to another available USB port on your computer. Follow the below steps to act:
- Safely remove the USB drive from your computer.
- Insert the USB drive into the new USB port. Ensure a proper and secure connection.
- Check if the error 0x8007045d is resolved. If the error persists, proceed to the next fix for further troubleshooting.
Fix 4: Re-download the Files
If you receive the 0x8007045d error while attempting to copy or install files, they may be corrupted or incomplete. In such circumstances, re-downloading the data may assist in resolving the problem. Identify the precise files or applications that caused the problem for this reason. Take down their names and locations.
Return to the official website or reputable source from whence you downloaded the files. To begin the download, click on the corresponding link. After successfully downloading the files, try to copy or install them again. Check to see if the error 0x8007045d has been addressed.
Fix 5: Update the Drivers
Your drivers must be updated if the error 0x8007045d keeps popping up, which is another cause. Follow the below steps:
-
Press the Windows+R at the same time. Then type “devmgmt.msc” and hit the ‘Enter’ button.
-
The “Driver Manager” will appear, and you must monitor your “Display adapters,” and the graphics card will be right under it. Select ‘Properties’ from the context menu.
-
It’s time to click on the “Driver” tab and select «Update Driver.»
-
You will now be directed to Update Driver Software, where you can look for the ‘Search automatically for updated driver software’ option. The process will begin once you click on it. And you will successfully update your drivers after performing a few simple instructions.
Fix 6: Run the Hardware and Devices Troubleshooter
Windows has a troubleshooting program that detects and repair various Windows issues. If you obtain error code 0x8007045d, run Troubleshooter to resolve it.
-
Choose Settings > Update & Security > Troubleshoot to discover it. After you’ve found it, please enable it by selecting the Run the troubleshooter option.
- Following that, the program will search your computer for problems and attempt to resolve them automatically.
Fix 7: Format Your USB Drive (Last Option)
If you continue encountering the 0x8007045d error when using a specific USB drive, formatting the drive can help resolve any underlying issues with its file system. Follow these steps to format your USB drive:
- Connect the USB flash drive to the USB Flash port.
-
Now navigate to your ‘This PC’ section of the computer. The Flash Drive symbol can be found there. If you named it, this is indicated with a name. Otherwise, it is denoted by a (E:). And you need to right-click on it and select ‘Format.’
-
Check the «Quick Format» option to expedite the formatting process. Then click on the «Start» button to begin the formatting process.
- You will receive a notification once the formatting is finished indicating the successful completion.
Part 3: How to Recover Lost Data from Your Formatted USB Drive?
Formatting a USB drive will generally result in the loss of all data stored on the drive. If you have not backed up your data before you format the USB drive, don’t worry! You may be able to recover some or all of your data using data recovery software. We recommend you use 4DDiG Windows Data Recovery, which is an influential and trustworthy data recovery tool that can help you recover lost, erased, or formatted files from various devices. It has an easy-to-use interface and powerful recovery algorithms, making it an excellent choice for beginner and experienced users.
Whether you accidentally lost data, formatted a storage device, experienced a system crash, or other data loss scenarios, 4DDiG Windows Data Recovery offers complete data recovery skills to help you recover your valuable data.
Follow the below steps to recover the lost data from external hard drives.
-
First, download and install Tenorshare 4DDiG Windows Data Recovery. After opening the application, connect your lost data external hard drive to your PC, and then choose the external hard disk to start scanning.

-
4DDiG searches the external hard drive for missing data immediately, and you can halt or terminate the search at any time if you’ve discovered the files you wish to recover.
-
After locating the target files, you can preview and recover them to a safe location. Please do not save to the same partition where you lost your data in the event of disk overwriting and permanent data loss.

Conclusion
In a nutshell, encountering the error 0x8007045d on Windows 10/11 can be irritating, but with the proper methods and tools, you can fix the problem and restore control of your system’s functioning. We investigated numerous practical ways for troubleshooting and resolving this error, such as restarting your PC, reconnecting the USB drive, re-downloading files, formatting the USB drive, and more.
Additionally, we introduced 4DDiG Windows Data Recovery as a reliable and recommended solution for recovering data from a formatted USB drive. Its powerful features, such as file recovery, partition recovery, and deep scanning, make it an ideal choice for retrieving lost files. The user-friendly interface and selective recovery option enhance the overall experience and ensure a smooth recovery process.
Thus by utilizing the methods and tools mentioned in this article, you can effectively overcome the error code 0x8007045d and restore the smooth functioning of your Windows 10/11 system.
William Bollson (senior editor)
William Bollson, the editor-in-chief of 4DDiG, devotes to providing the best solutions for Windows and Mac related issues, including data recovery, repair, error fixes.
Error Code 0x8007045D is basically an I/O bug that appears during a new app installation or while updating Windows. When this occurs, users can’t even perform a basic operation like – transferring files from one location to another inside Windows OS, or opening system apps.
If you encounter this error code, it implies that your device has got some severe issues and requires an immediate fix. Don’t ignore this issue as it may corrupt the entire operating system if not looked upon. Since there are numerous reasons that may trigger this error code, you need to perform all the solutions one after another. Know the most probable reasons behind it and if you do find any matching issue, apply that fix first. Else, try all the solutions discussed in this article sequentially.

What does Error Code 0x8007045d mean?
The error 0x8007045d occurs when the following conditions are met on your computer –
- Windows can’t process required files: This error may appear during installing a new application or updating Windows, however, the system is unable to process the required files.
- I/O Device Error: You are using a corrupted input/output device attached to your computer. Get rid of the corrupted one and this error immediately settles.
When this occurs, you may receive a pop-up error message that reads the following –
Windows cannot install required files. The files may be corrupted or missing.
Make sure all files required for installation are available and restart the installation.
Error code: 0x8007045D
What causes Error Code 0x8007045d?
As stated above, this error appears when your device faces difficulty accessing the required files. This might happen because of the following reasons –
- Corrupted Windows Registry
- Missing or damaged system files/folders
- After installing buggy software or applying a faulty update
- Storage Spaces Issues in HDD
To solve Error Code 0x8007045D in Windows 11 or 10 PC, attempt the following fixes –
1] Boot into the Safe Mode
This error might occur because of third-party apps interacting with system apps and services. All third-party apps and services remain disabled in the Safe mode, thus stopping their interactions. Boot into the Safe Mode first and check if the error code 0x8007045D occurs in this mode as well. To do so, use these steps –
- Press Win + S, and type System Configuration in the text field.
- Go to the Boot tab, and check the Safe boot checkbox under Boot options.
- The minimal checkbox would be selected by default.
- Click Apply then OK.
- Your device will restart and boot into the Safe Mode.
When you are inside the Safe boot, try performing the same operations for which you were getting an error code. If it works quite easily here, one or more third-party apps must have become corrupted. You may enter Control Panel while remaining in this mode, and uninstall the recently installed applications.
However, if you receive the same error code here as well, the problem must lie elsewhere. So, you need to work upon that. Worry not, as we have several other fixes to check upon.
Note: In case you are using a third-party antivirus program, make sure to disable it as well. Many a time, the problem may occur because of it interacting with system applications. You may use Windows Defender as a substitute as this works quite fine in Windows 11 or 10 PC.
2] Disable Startup items
The basic operations in Windows may fail if you have unintentionally enabled too many startup programs on your PC. We say unintentionally because you might not have any idea of granting third-party apps being started whenever the system reboots. Go and disable all such programs and check if it resolves the issue that you were struggling with –
- Launch Windows Search by pressing Win + Q together.
- Type System and select System Configuration from the list.
- On the General tab, select Selective Startup and uncheck both the checkboxes –
- Load system services
- Load startup items

- Now, visit the Services tab and check the box Hide all Microsoft services.
- Tap Disable all and hit the Apply button.
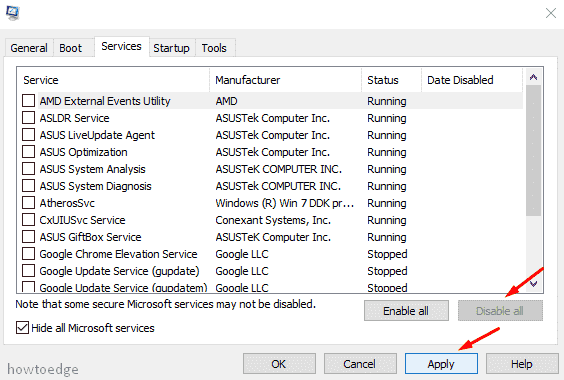
- Go to the Startup tab next and hit the link – Open Task Manager.
- Right-click on each one of the apps/services and hit disable.
- Repeat the above steps unless you disable all programs (that you rarely use).
- Click Apply and then OK to save the current configuration.
Restart your PC and check if you can now install new apps or update Windows.
3] Using the Disk Check Utility to fix Error Code 0x8007045D
At times, this issue may occur because of corrupted sectors on the hard disk. Go and inspect your HDD and if any issues are found, resolve them by following these easy steps –
- Launch CMD as administrator.
- When UAC prompts, hit Yes to approve accessing Command Prompt as admin.
- On the upcoming console, execute this code –
chkdsk C: /f /r /x
- The scan won’t start as the root drive is already in use. However, the console will ask – “if you would like to begin this scan when the PC restarts?”.
- Type “Y“, and press Enter. Restart your PC next to begin the CHKDSK scan.
4] Updating Device Drivers
If the above solutions don’t address the error code 0x8007045D, the problem may lie within running device drivers. Go and check if you can find any driver updates under Windows Update. To do so, reach out to the below path, and hit Check for updates –
Settings (Win + I) > Windows Update > Check for updates
- If this search reveals an optional updates link, click over that.
- Select all the checkboxes and hit “Download and Install”.
- Wait while the system is updating all selected device adapters on your PC.
5] Reset your PC
If none of the above methods help to resolve this error, then reset your PC as the last workaround. However, keep in mind that you should have a backup of all your important data, files, and folders. Now, simply follow the given steps and get the Error Code 0x8007045d fixed.
On Windows 10:
- Press Win + I to launch Windows Settings.
- Click Update & Security.
- Select the Recovery option on the left pane.
- Go to the right side and hit Get started under Reset this PC.

- Choose to Keep my files option and follow the on-screen instructions.
On Windows 11:
Reset this PC functions as it does on Windows 10. The only difference you find on this OS is its location. Navigate to the below path and do as guided above –
Settings (Win + I) > System > Recovery (right-pane)
- When Recovery expands, click Reset PC under Recovery options.

We hope the strategies (mentioned above), would help to address the Error Code 0x8007045D on Windows 11 or 10 PC. Let’s know which solution works on your device.