
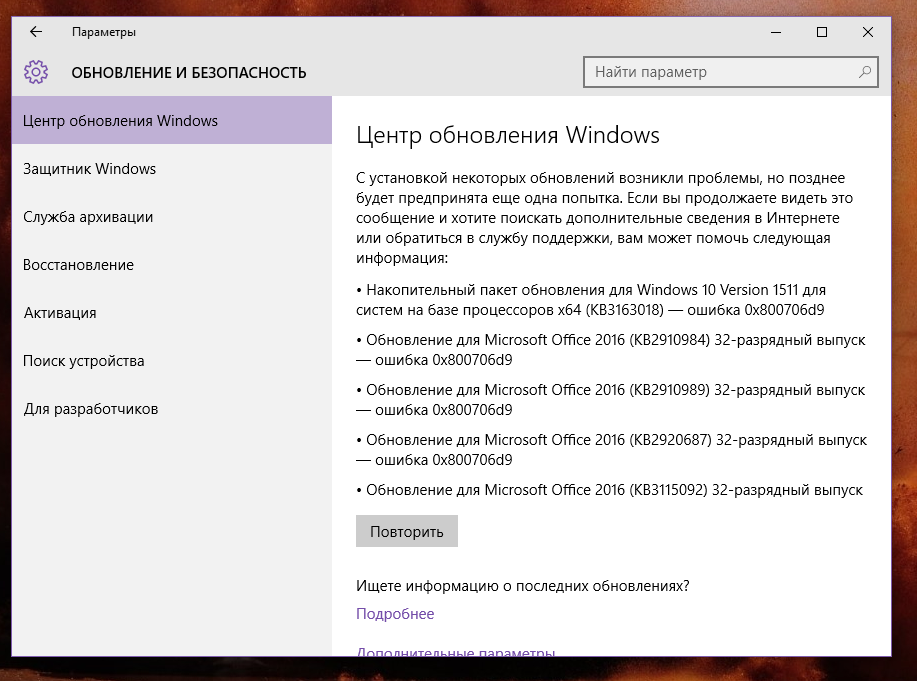
При обновлении и скачивании приложений или других действиях в Microsoft Store Windows 11/10 пользователи могут столкнуться с ошибкой с кодом 0x800706d9 с сообщением «Что-то пошло не так» или другим текстом.
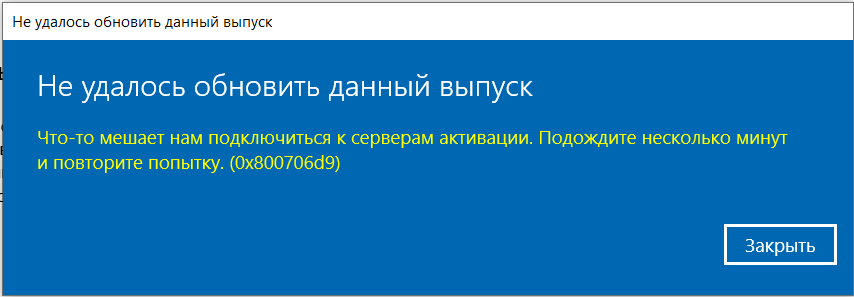
В этой инструкции подробно о том, чем может быть вызвана ошибка и варианты решения проблемы.
Необходимые службы

Наиболее частая причина того, что при действиях в магазине приложений Microsoft Store вы видите сообщения о том, что «возникла внутренняя проблема» или «произошла ошибка» и код 0x800706d9 в информации об ошибке — отключение необходимых для правильной работы служб Windows. Прежде всего следует проверить и исправить тип запуска служб, для этого:
- Нажмите клавиши Win+R на клавиатуре, либо нажмите правой кнопкой мыши по кнопке «Пуск» и выберите пункт «Выполнить», введите services.msc и нажмите Enter.
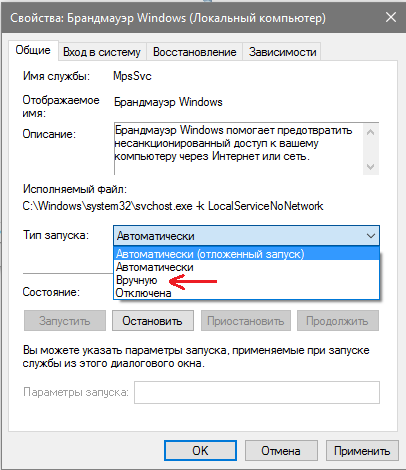
- В списке служб найдите «Брандмауэр Защитника Windows» и дважды нажмите по ней. Если тип запуска отличается от «Автоматически», измените тип запуска на «Автоматически», примените настройки, затем запустите службу. Если поля для изменения настроек не активны — далее в инструкции будет предложено решение.
- Аналогичным образом для службы с именами «Служба Windows License Manager» установите тип запуска «Вручную», а для «Служба хранилища» — «Автоматически (Отложенный запуск)», последнюю стоит запустить вручную после применения настроек.

- Если вы каким-либо образом отключали службу «Центр обновления Windows» — это также может вызывать ошибки в работе Microsoft Store. Включите её (лучше — тем же способом или с помощью той же утилиты, которой выполнялось отключение). Также может помочь сброс компонентов Windows Update.
- Перезапустите Microsoft Store и проверьте, была ли решена проблема.

Настройки некоторых служб Windows могут быть недоступны в оснастке «Службы», если вы с этим столкнулись, варианты действий:
- В случае, если для отключения служб использовалось какое-либо стороннее ПО для «оптимизации» Windows обычно можно использовать его же для повторного их включения. После этого желательно перезагрузить компьютер.
- Тип запуска служб можно менять в реестре Windows, подробно об этом в соответствующем разделе отдельной инструкции по изменению типа запуска служб.
Возможно, ошибки не будут исправлены сразу после внесения изменений. В этом случае попробуйте перезагрузить компьютер.
Исправление ошибок приложения Microsoft Store
Причиной также могут оказаться внутренние ошибки самого Microsoft Store. Для их исправления можно использовать следующие варианты:
- Запустить командную строку от имени администратора, ввести команду wsreset и нажать Enter.
- Открыть параметры приложения Microsoft Store (в Параметрах или через контекстное меню по правому клику на значке приложения в меню «Пуск») и использовать кнопки «Исправить» и, если не поможет, — «Сброс».

- Запустить Windows PowerShell или Терминал Windows от имени администратора (доступно в контекстном меню кнопки «Пуск» или по клавишам Win+X) и использовать команду
Get-AppxPackage *windowsstore* -AllUsers | Foreach {Add-AppxPackage -DisableDevelopmentMode -Register "$($_.InstallLocation)\AppxManifest.xml"}

В случае если первый раздел инструкции не помог, возможно, один из этих вариантов сработает.
В завершении несколько дополнительных возможных причин ошибки 0x800706d9 в Microsoft Store и способов её исправления:
- Сторонние антивирусы, файрволлы или средства, модифицирующие поведения сетевого подключения — проверьте, решается ли проблема при их отключении или удалении.
- Повреждение системных файлов Windows 11/10, попробуйте выполнить их восстановление, либо используйте точки восстановления системы на дату, когда проблема не наблюдалась.
- Дополнительно можно попробовать следующие подходы: сброс параметров сети, чистая загрузка Windows и, в крайнем случае — обновление на месте.
Надеюсь, один из предложенных вариантов поможет решить проблему. Если же нет — детально опишите ситуацию, наблюдения и уже выполненные действия в комментариях ниже. Возможно, решение найдётся и для вашего случая.
Did you recently encounter Error Code 0x800706d9 while opening a Store app, launching Sandbox, or updating Windows 10? Well, in this guide, we explore the reasons that lead to this bug in the first place along with some working ways to resolve the issue.
The error 0x800706d9 may occur due to corrupt system files, missing Windows components, fail to start certain services, storage-related issues, etc. In general, we can categorize them into four different types and each one has its own set of solutions. If you do know why you are receiving this error, reach out to the specific section below –
- Update Error 0x800706D9
- Sandbox Error 0x800706D9
- Microsoft Store Error 0x800706D9
- Windows Defender Error 0x800706D9
To solve the Update error 0x800706D9, try the below workarounds –
1. Run System File Checker
The update error 0x800706D9 occurs mainly due to corrupt or missing system files. SFC is a great utility program designed to scan and repair damaged system files. Here’s how to use this tool –
- First of all, open Command Prompt with Admin rights.
- Copy/paste
sfc/ scannowon the elevated console and press the Enter key.

- This usually takes 15-20 minutes to locate and repair corrupt system files. In certain cases, this might even take more time, so wait accordingly.
- Once over, Restart Windows so that changes made come into effect.
2. Manually Install Cumulative Update
If the error persists, one should manually download and install the recent standalone package on the computer. Here’s how to perform this task –
- First of all, visit the Windows 10 Update History page.
- On the left column, select the Windows 10 version that you are having on the computer.
- Scroll down to “In this release“.
- Note down the KB number and reach out to the Microsoft Update Catalog site.
- Paste the KB number noted down earlier and hit Enter. A list of matching results will pop-up.
- Look for the system architecture
- Here, hit the Download button next to the system architecture that you are currently having
- On the subsequent screen, click the top link to download the .msu file.
After the file gets downloaded, browse to the Download folder and double-click the setup to install this.
3. Purge Windows Update Folder
Usually, manually installing the recent cumulative update will resolve any update-related issues on Windows 10. If the 0x800706D9 bug persists even after this, purge the update folder and reinstall the setup file (downloaded above). Here’s how to purge Windows update folder –
- Type “regedit” on the search bar and click the top result.
- When the UAC window prompts, hit Yes.
- On the registry window, navigate to –
HKEY_LOCAL_MACHINE\SOFTWARE\Policies\Microsoft\Windows\WindowsUpdate
Note: If you don’t find the WindowsUpdate folder at the above location, use either system backup or clean install Windows 10, May 2020 Update.
- Head over to the right pane and search for
WUServerandWIStatusServerfolders. - Right-click on each one of them and select “delete“.
- Restart Windows to save the recent changes.
Sign back into Windows 10 and re-follow the method-2.
Fix: Windows Sandbox Error 0x800706d9
The Sandbox error 0x800706D9 may occur due to some corruption inside the system files, certain services not working properly, or installing an incorrect feature update. To correct this, attempt to disable then re-enable Hyper-V services.
Note: Make sure to enable the virtualization settings inside the computer BIOS or Firmware menu before proceeding to the solutions.
Here’s how to fix disable then re-enable Hyper-V related services –
1. Check the status of Hyper-V Related Services
- Press Win+S to invoke the Search UI.
- Type “services” in the text field and click the top result.

- Now, check each one of the services below.
- If you find any one of them as “stopped”, hit “Start” to restart them.
Network Virtualization Service
Virtual Disk
Hyper-V Virtual Machine Manager
Hyper-V Host Compute Service
Container Manager Services
Application Guard Container Service
Remote Procedure Call (RDC)
2. Disable and Enable Hyper-V
First of all, disable the following services –
- Windows Defender Random Folder Protection
- Tamper Protection Service
- Container Manager service
- Windows Sandbox
Next, browse to the below paths –
C:\ProgramData\Microsoft\Windows\Containters\Sandboxes
C:\ProgramData\Microsoft\Windows\Containters\Zygotes
Here, search for VHDX files and delete them. However, make sure not to delete these files from the recycle bin. Now, re-enable the services that you have stopped earlier following the exact reverse order i.e. –
- Windows Sandbox
- Container Manager service
- Tamper Protection Service
- Windows Defender Random Folder Protection
Do Restart Windows to incorporate the above changes. From the next logon, Windows Sandbox will start normally.
Fix: Microsoft Store Error 0x800706D9
This error may also occur while opening Microsoft Store or any of its applications. To solve this, try the following suggestions –
1. Run Store App Troubleshooter
Windows 10 includes a troubleshooter for each one of its services and components. Store App Troubleshooter is one such tool that can locate and repair any bugs related to Windows Store. In case this doesn’t solve the issue, it suggests mending ways to address the issue at hand. Here’s how to use this tool –
- Press Win+I shortcut to start Windows Settings UI.
- Click Update & Security thereafter Troubleshoot on the left overlay.
- Move to the right side and click the “Additional troubleshooter” link.
- Scroll down to Windows Store apps and click to extend its pane.
- Hit Run the troubleshooter.

- The tool immediately starts detecting and fixing any errors (if it finds any).
2. Enable Storage Services
At times, the 0x800706D9 error occurs due to Storage services becoming troublesome. Users often disable storage services so as to avoid Windows writing hidden files on USB devices. The 0x6D9 error might occur due to such restrictions on Windows 10. To get rid of this bug, you need to re-enable the services manually following these easy steps –
- Right-click on the Windows icon and choose Run.
- Type “services.msc” without quotes and hit the OK button.
- Locate Storage Service on the succeeding window.
- Double-click the same to launch its Properties window.
- If the Service status displays “stopped”, click the start button.

- Click Apply then OK to confirm these changes.
- Restart Windows so that changes made come into effect from the next logon.
3. Re-register All Store apps
If you are still getting the 0x800706D9 bug, you must re-register each one of the Store apps using PowerShell command. Here are the essential steps to work upon –
- Right-click on the Start button and choose “Windows PowerShell (Admin)“.
- When the UAC window comes into view, tap Yes.
- On the elevated console, copy/paste the below code and hit Enter –
Get-AppXPackage -AllUsers | Foreach {Add-AppxPackage -DisableDevelopmentMode -Register "$($_.InstallLocation)\AppXManifest.xml"}

- After this code runs successfully, reboot PC to implement the recent changes.
Fix: Windows Defender Firewall Error 0x800706d9
If you are getting the error code 0x800706d9 while opening Windows Defender, try these solutions –
Tip: Make sure to uninstall or remove any third-party antivirus program as well to avoid this error.
1. Disable Microsoft Defender
- Go and click the “up arrow” available near the notification area and hit the “Shield” icon.
- Doing so will launch the Microsoft Defender application.
- Head over to the right pane and click Virus & threat protection.
- On the succeeding page, tap Manage settings link.

- Next, turn off the Real-time protection toggle switch.
- When a confirmation window appears, hit the Yes button.
You may now check whether the error 0x800706d9 is still appearing or has disappeared.
2. Set Windows Firewall to Automatic
As per certain user’s POV, disabling the Firewall/ICS service directly may fix this issue on Windows 10. However, doing so you might not even launch the Windows Firewall wizard. Here’s how to fix this –
- Make a right-click on the Windows icon and select Run.
- Type “devmgmt.msc” and press Enter to launch the Device Manager.
- This time, right-click on the Windows firewall and set it to Automatic.
That’s it, I hope the above tutorial does help to address the error code 0x800706d9 on Windows 10.
Download Windows Speedup Tool to fix errors and make PC run faster
Error code 0x800706d9 is one of the many Windows update error code you might encounter when trying to install certain updates on your Windows 11/10 device. In this post, we will identify the possible causes as well as provide the appropriate solutions you can try to remediate the issue.

Error 0x800706d9 occurred while downloading update
This Windows Update error 0x800706d9 is caused mainly due to Windows Firewall configuration or if it is turned off. Some users prefer to use other antivirus products rather than the security programs that come with the Windows operating system, and in the process automatically disable the firewall and Windows Defender. These users are the ones most likely to run into the above problem. Windows Firewall monitors the flow of data into and out of your computer. In Windows 11/10, most programs cannot install as long as the Windows Firewall is turned off. Windows updates will most definitely not install when the firewall is turned off.
If you’re faced with this Windows Update error 0x800706d9 issue, you can try our recommended solutions presented below in no particular order to resolve the issue.
- Run Windows Update Troubleshooter
- Turn on Windows Firewall & make sure Windows Firewall Service is running
- Reset Firewall to default
- Disable/Uninstall 3rd party security software
- Rename/Clear the Windows Update cache
Let’s take a look at the description of the process involved concerning each of the listed solutions.
1] Run Windows Update Troubleshooter
This solution requires you to run the inbuilt Windows Update Troubleshooter and see if that helps to resolve the Windows Update error 0x800706d9 issue.
2] Turn on Windows Firewall & make sure Windows Firewall Service is running
This solution requires you to turn on the Windows Defender Firewall and also ensure that the Windows Firewall service is running.
Read: Windows could not start the Windows Update service on Local Computer
3] Reset Firewall to default
Reset the Firewall to default settings and then try.
Read: Fix 0x800706D9 Microsoft Store Error
4] Disable/Uninstall 3rd party security software
Firewall and antivirus are important for your system safety, but sometimes these programs can interfere with Windows 10 and cause this error to appear.
Third-party AV suites are all known to cause this particular issue. In this case, to fix this issue, you’ll have to remove all third-party antivirus programs from your PC using the dedicated removal tool to remove all files associated with your antivirus program. The reason is, it’s much more efficient and invasive to use the custom uninstall tools for the AV program from the manufacturer, if available, whenever uninstalling antivirus software, as there are registries and dependencies, installed deep within the OS which the traditional Control Panel uninstaller (appwiz.cpl) might miss in most cases.
If removing the antivirus fixes this error, you can now install the same antivirus again, or you can switch to an alternative software or better still stick to Windows 10 native AV program – Windows Defender.
5] Rename/Clear the Windows Update cache
The Software Distribution folder in Windows operating system is a folder located in the Windows directory and used to temporarily store files that may be required to install Windows Update on your computer. This solution requires you clear the contents of the Software Distribution folder and then retry the update process again.
PS: More tips here to Troubleshoot Windows Updates Errors in Windows 11/10.
Similar error codes:
- Microsoft Account Error 0x800706d9
- Windows Sandbox Error 0x800706d9.
Obinna has completed B.Tech in Information & Communication Technology. He has worked as a System Support Engineer, primarily on User Endpoint Administration, as well as a Technical Analyst, primarily on Server/System Administration. He also has experience as a Network and Communications Officer. He has been a Windows Insider MVP (2020) and currently owns and runs a Computer Clinic.
Во время обновления ПК на базе Windows 10 некоторые пользователи могут сталкиваться с ошибкой 0x800706d9. Самая частая причина за этой неполадок — деактивированный брандмауэр Windows. Впрочем, иногда она может возникать из-за проблем с компонентами Центра обновления.
Как исправить ошибку 0x800706d9?
Прежде всего, создайте точку восстановления на вашем компьютере. Она поможет вам в случае того, если что-то пойдет не так. Нажмите Win+S и пропишите в поисковую строку запрос «Создание точки восстановления». В появившемся окошке выполните все необходимые действия и создайте точку на одном из разделов диска. Как только закончите, переходите к методам ниже.
Метод №1 Включение брандмауэра Windows
Ошибка 0x800706d9 может возникать в процессе обновления Windows, если в вашей системе отключен брандмауэр. Чтобы включить его, сделайте следующее:
- нажмите Win+S для вызова поисковой строки;
- пропишите запрос «Брандмауэр Защитника Windows»;
- кликните на ссылку «Включение и выключение брандмауэра Защитника Windows» в левой части окошка;
- выберите опции по включению брандмауэра и сохраните внесенные изменения;
- перезагрузите компьютер и попробуйте запустить апдейт ОС Windows еще раз.
Метод №2 Проверка параметров служб брандмауэра и Центра обновления
Возможно, параметры служб брандмауэра и Центра обновления были изменены, вследствие чего те перестали нормально функционировать. Вот что вам нужно сделать:
- нажмите комбинацию Win+R;
- пропишите в пустой строчке services.msc и нажмите Enter;
- найдите в списке службу «Центр обновления Windows» и дважды кликните на нее ЛКМ;
- выставьте в типе запуске значение «Автоматически»;
- сохраните выставленные настройки и закройте окно свойств службы;
- сделайте все вышеописанное для службы «Брандмауэр Защитника Windows»;
- перезагрузите компьютер и проверьте наличие ошибки 0x800706d9.
Метод №3 Запуск средства устранения неполадок Центра обновления
В некоторых случаях приходится положиться на системное средство устранения неполадок. Оно не всегда помогает, но попробовать все же стоит. Сделать это можно вот так:
- нажмите Win+S;
- пропишите «Устранение общих проблем» и выберите результат;
- выберите пункт «Центр обновления Windows» и нажмите на кнопку «Запустить средство устранения неполадок»;
- следуйте инструкциям, которые предлагает вам средство;
- перезагрузите компьютер, если в этом будет необходимость.
Как только зайдете в Windows, запустите процесс обновления и проверьте, была ли решена ошибка 0x800706d9.
Метод №4 Сброс компонентов Центра обновления
Если ничего из вышеуказанного не помогло, предлагаем вам заняться сбросом компонентом Центра обновления. Да, звучит сложно, но на деле процедура крайне простая. Вот что вам нужно сделать:
- нажмите Win+R;
- напишите notepad.exe и нажмите Enter;
- вставьте в окно Блокнота следующие команды:
:: Run the reset Windows Update components.
:: void components();
:: /*************************************************************************************/
:components
:: —— Stopping the Windows Update services ——
call :print Stopping the Windows Update services.
net stop bitscall :print Stopping the Windows Update services.
net stop wuauservcall :print Stopping the Windows Update services.
net stop appidsvccall :print Stopping the Windows Update services.
net stop cryptsvccall :print Canceling the Windows Update process.
taskkill /im wuauclt.exe /f
:: —— Checking the services status ——
call :print Checking the services status.sc query bits | findstr /I /C:»STOPPED»
if %errorlevel% NEQ 0 (
echo. Failed to stop the BITS service.
echo.
echo.Press any key to continue . . .
pause>nul
goto :eof
)call :print Checking the services status.sc query wuauserv | findstr /I /C:»STOPPED»
if %errorlevel% NEQ 0 (
echo. Failed to stop the Windows Update service.
echo.
echo.Press any key to continue . . .
pause>nul
goto :eof
)call :print Checking the services status.
sc query appidsvc | findstr /I /C:»STOPPED»
if %errorlevel% NEQ 0 (
sc query appidsvc | findstr /I /C:»OpenService FAILED 1060″
if %errorlevel% NEQ 0 (
echo. Failed to stop the Application Identity service.
echo.
echo.Press any key to continue . . .
pause>nul
if %family% NEQ 6 goto :eof
)
)call :print Checking the services status.
sc query cryptsvc | findstr /I /C:»STOPPED»
if %errorlevel% NEQ 0 (
echo. Failed to stop the Cryptographic Services service.
echo.
echo.Press any key to continue . . .
pause>nul
goto :eof
):: —— Delete the qmgr*.dat files ——
call :print Deleting the qmgr*.dat files.del /s /q /f «%ALLUSERSPROFILE%\Application Data\Microsoft\Network\Downloader\qmgr*.dat»
del /s /q /f «%ALLUSERSPROFILE%\Microsoft\Network\Downloader\qmgr*.dat»:: —— Renaming the softare distribution folders backup copies ——
call :print Deleting the old software distribution backup copies.cd /d %SYSTEMROOT%
if exist «%SYSTEMROOT%\winsxs\pending.xml.bak» (
del /s /q /f «%SYSTEMROOT%\winsxs\pending.xml.bak»
)
if exist «%SYSTEMROOT%\SoftwareDistribution.bak» (
rmdir /s /q «%SYSTEMROOT%\SoftwareDistribution.bak»
)
if exist «%SYSTEMROOT%\system32\Catroot2.bak» (
rmdir /s /q «%SYSTEMROOT%\system32\Catroot2.bak»
)
if exist «%SYSTEMROOT%\WindowsUpdate.log.bak» (
del /s /q /f «%SYSTEMROOT%\WindowsUpdate.log.bak»
)call :print Renaming the software distribution folders.
if exist «%SYSTEMROOT%\winsxs\pending.xml» (
takeown /f «%SYSTEMROOT%\winsxs\pending.xml»
attrib -r -s -h /s /d «%SYSTEMROOT%\winsxs\pending.xml»
ren «%SYSTEMROOT%\winsxs\pending.xml» pending.xml.bak
)
if exist «%SYSTEMROOT%\SoftwareDistribution» (
attrib -r -s -h /s /d «%SYSTEMROOT%\SoftwareDistribution»
ren «%SYSTEMROOT%\SoftwareDistribution» SoftwareDistribution.bak
if exist «%SYSTEMROOT%\SoftwareDistribution» (
echo.
echo. Failed to rename the SoftwareDistribution folder.
echo.
echo.Press any key to continue . . .
pause>nul
goto :eof
)
)
if exist «%SYSTEMROOT%\system32\Catroot2» (
attrib -r -s -h /s /d «%SYSTEMROOT%\system32\Catroot2»
ren «%SYSTEMROOT%\system32\Catroot2» Catroot2.bak
)
if exist «%SYSTEMROOT%\WindowsUpdate.log» (
attrib -r -s -h /s /d «%SYSTEMROOT%\WindowsUpdate.log»
ren «%SYSTEMROOT%\WindowsUpdate.log» WindowsUpdate.log.bak
):: —— Reset the BITS service and the Windows Update service to the default security descriptor ——
call :print Reset the BITS service and the Windows Update service to the default security descriptor.sc.exe sdset wuauserv D:(A;;CCLCSWLOCRRC;;;AU)(A;;CCDCLCSWRPWPDTLOCRSDRCWDWO;;;BA)(A;;CCDCLCSWRPWPDTLCRSDRCWDWO;;;SO)(A;;CCLCSWRPWPDTLOCRRC;;;SY)S:(AU;FA;CCDCLCSWRPWPDTLOCRSDRCWDWO;;WD)
sc.exe sdset bits D:(A;;CCLCSWLOCRRC;;;AU)(A;;CCDCLCSWRPWPDTLOCRSDRCWDWO;;;BA)(A;;CCDCLCSWRPWPDTLCRSDRCWDWO;;;SO)(A;;CCLCSWRPWPDTLOCRRC;;;SY)S:(AU;FA;CCDCLCSWRPWPDTLOCRSDRCWDWO;;WD)
sc.exe sdset cryptsvc D:(A;;CCLCSWLOCRRC;;;AU)(A;;CCDCLCSWRPWPDTLOCRSDRCWDWO;;;BA)(A;;CCDCLCSWRPWPDTLCRSDRCWDWO;;;SO)(A;;CCLCSWRPWPDTLOCRRC;;;SY)S:(AU;FA;CCDCLCSWRPWPDTLOCRSDRCWDWO;;WD)
sc.exe sdset trustedinstaller D:(A;;CCLCSWLOCRRC;;;AU)(A;;CCDCLCSWRPWPDTLOCRSDRCWDWO;;;BA)(A;;CCDCLCSWRPWPDTLCRSDRCWDWO;;;SO)(A;;CCLCSWRPWPDTLOCRRC;;;SY)S:(AU;FA;CCDCLCSWRPWPDTLOCRSDRCWDWO;;WD):: —— Reregister the BITS files and the Windows Update files ——
call :print Reregister the BITS files and the Windows Update files.cd /d %SYSTEMROOT%\system32
regsvr32.exe /s atl.dll
regsvr32.exe /s urlmon.dll
regsvr32.exe /s mshtml.dll
regsvr32.exe /s shdocvw.dll
regsvr32.exe /s browseui.dll
regsvr32.exe /s jscript.dll
regsvr32.exe /s vbscript.dll
regsvr32.exe /s scrrun.dll
regsvr32.exe /s msxml.dll
regsvr32.exe /s msxml3.dll
regsvr32.exe /s msxml6.dll
regsvr32.exe /s actxprxy.dll
regsvr32.exe /s softpub.dll
regsvr32.exe /s wintrust.dll
regsvr32.exe /s dssenh.dll
regsvr32.exe /s rsaenh.dll
regsvr32.exe /s gpkcsp.dll
regsvr32.exe /s sccbase.dll
regsvr32.exe /s slbcsp.dll
regsvr32.exe /s cryptdlg.dll
regsvr32.exe /s oleaut32.dll
regsvr32.exe /s ole32.dll
regsvr32.exe /s shell32.dll
regsvr32.exe /s initpki.dll
regsvr32.exe /s wuapi.dll
regsvr32.exe /s wuaueng.dll
regsvr32.exe /s wuaueng1.dll
regsvr32.exe /s wucltui.dll
regsvr32.exe /s wups.dll
regsvr32.exe /s wups2.dll
regsvr32.exe /s wuweb.dll
regsvr32.exe /s qmgr.dll
regsvr32.exe /s qmgrprxy.dll
regsvr32.exe /s wucltux.dll
regsvr32.exe /s muweb.dll
regsvr32.exe /s wuwebv.dll:: —— Resetting Winsock ——
call :print Resetting Winsock.
netsh winsock reset:: —— Resetting WinHTTP Proxy ——
call :print Resetting WinHTTP Proxy.if %family% EQU 5 (
proxycfg.exe -d
) else (
netsh winhttp reset proxy
):: —— Set the startup type as automatic ——
call :print Resetting the services as automatics.
sc.exe config wuauserv start= auto
sc.exe config bits start= delayed-auto
sc.exe config cryptsvc start= auto
sc.exe config TrustedInstaller start= demand
sc.exe config DcomLaunch start= auto:: —— Starting the Windows Update services ——
call :print Starting the Windows Update services.
net start bitscall :print Starting the Windows Update services.
net start wuauservcall :print Starting the Windows Update services.
net start appidsvccall :print Starting the Windows Update services.
net start cryptsvccall :print Starting the Windows Update services.
net start DcomLaunch:: —— End process ——
call :print The operation completed successfully.echo.Press any key to continue . . .
pause>nul
goto :eof
:: /*************************************************************************************/
- нажмите на пункт «Файл» в строке меню и выберите «Сохранить как…»;
- задайте файлу имя «WinUpdReset.cmd» (обязательно укажите расширение CMD в конце!) и сохраните его в удобное для вас место;
- дважды кликните ЛКМ на созданный WinUpdReset.cmd и следуйте инструкциям в окошке Командной строки;
- перезагрузите компьютер по окончанию сброса компонентов Центра обновления.
После выполнения этого процесса ошибка 0x800706d9 не должна вас больше донимать.
Если у Вас при попытке загрузки или установке обновлений в системе, или при активации (либо обновлении системы с «Домашней» версии до Pro) возникает ошибка с кодом — 0x800706d9. Есть несколько вариантов как это исправить.
1) Заходим в меню «Службы», сделать это можно путем вызова горячих клавиш Win + R => В поле ввода введите services.msc => Находите в списке окна «Службы» пункт «Брандмауэр Защитника Windows» => Щелкаем на него дважды и переводим в ручной режим. Далее применить. Помимо всего, рекомендуем отключить антивирус на время обновления, или активации, если он у Вас установлен. Т.к антивирус может блокировать исходящие и входящие соединения с серверами Microsoft.
Теперь можете повторить активацию системы, либо ее обновление.
2) Если Вам нужна активации системы, либо к примеру обновление Windows 10 Домашняя до Windows 10 Pro, при наличии у Вас ключа активации Windows 10 Pro. То Вы можете попробовать активировать альтернативным способом через терминал, по следующей инструкциии.
3) Помимо всего мы рекомендуем использовать только оригинальные дистрибутивы Windows 10. Скачать их можете с сайта Microsoft по инструкции, либо из нашего каталога.
Лицензионный ключ активации Windows 10 от