
Все способы:
- Почему компьютер не может обнаружить систему
- Вариант 1: Исправление ошибок файловой системы
- Вариант 2: Восстановление загрузчика
- Вариант 3: Ручное пересоздание BCD
- Вариант 4: Переустановка Windows
- Вопросы и ответы: 3
Почему компьютер не может обнаружить систему
Для исправления связанных с запуском системы неисправностей в Windows предусмотрена специальная служебная утилита «Bootrec». Она входит в состав среды WinPE и используется для восстановления загрузчика, а также данных конфигурации загрузки системы. Это мощный инструмент, но и он может выдавать ошибки: например, при выполнении сканирования диска на предмет имеющихся на нем операционных систем командой bootrec /scanos утилита может вернуть ошибку «Общее количество обнаруженных систем Windows: 0».
С этой ошибкой пользователь может столкнуться и при выполнении похожей команды — bootrec /rebuildbcd, позволяющей не только обнаруживать на диске совместимые с Windows системы, но и добавлять выбранные из них в хранилище конфигураций загрузки. Существует три основных причины появления указанной ошибки: повреждение целостности файловой системы, повреждение конфигурационного файла BCD и повреждение содержимого системного каталога «System32».
Вариант 1: Исправление ошибок файловой системы
Для начала следует исключить повреждения файловой системы, но, поскольку в рассматриваемом случае система, скорее всего, не загрузится, вам нужно будет воспользоваться установочным диском с Windows.
Читайте также: Как создать загрузочную флешку с Windows 11 / Windows 10 / Windows 8 / Windows 7 Windows XP
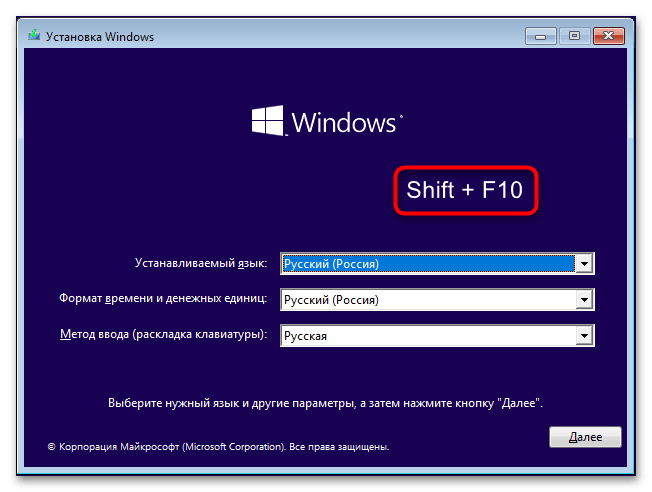
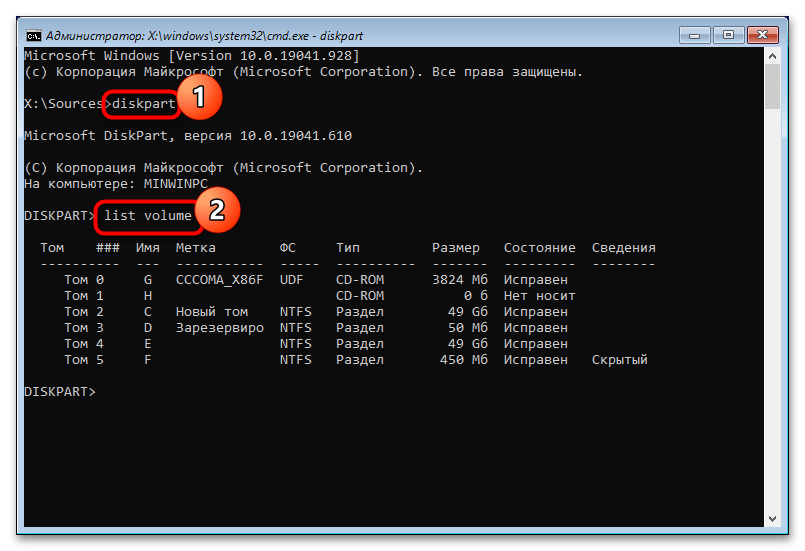
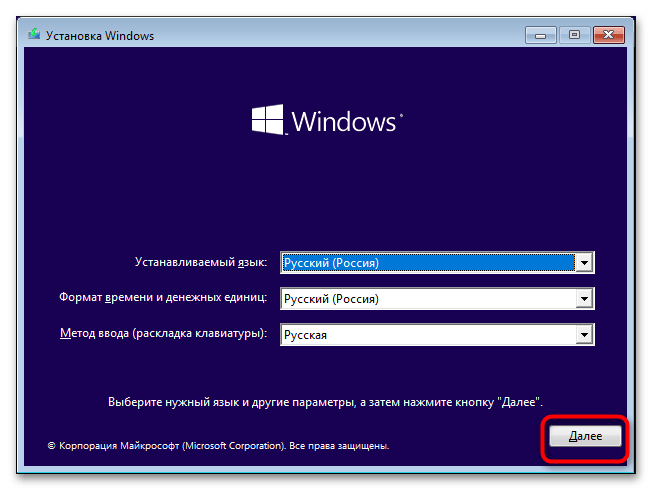
- Загрузите компьютер с флешки или DVD-диска с дистрибутивом Windows, а когда на экране появится окно мастера-установщика, нажмите Shift + F10.
- В открывшейся командной строке определите буквы разделов на жестком диске, для чего последовательно выполните команды
diskpartиlist volume. - Выйдите из утилиты «Diskpart» командой
exit, а затем выполните командуchkdsk /f /r D:, где D — буква проверяемого раздела. - Проверьте все системные разделы, подставляя в команду их букву.
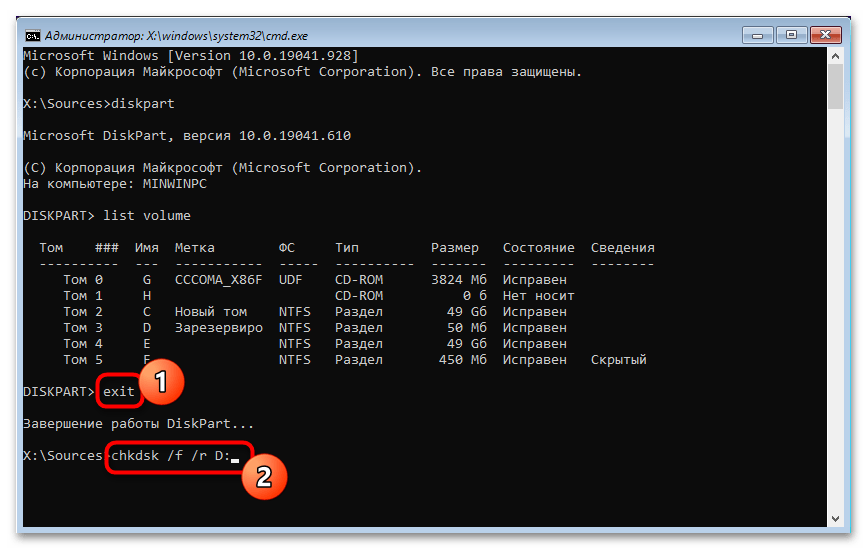
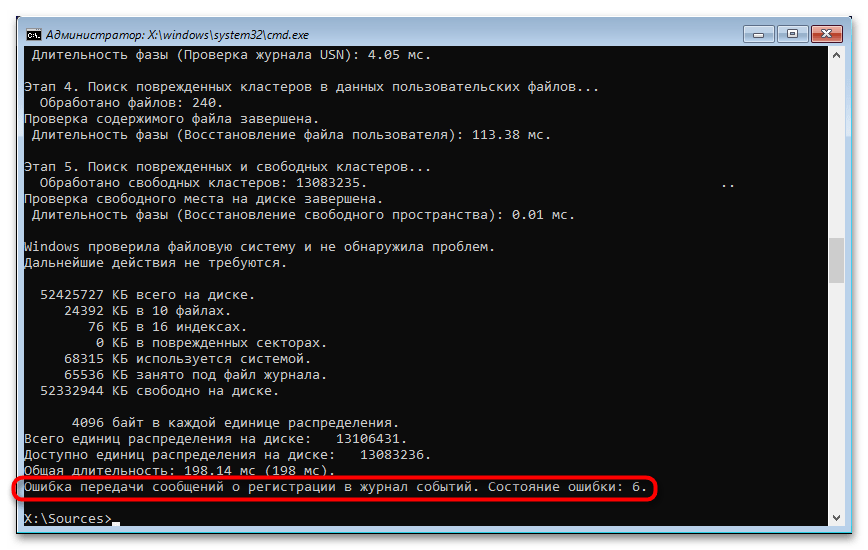
Если в процессе сканирования будут обнаружены ошибки файловой системы, утилита «chkdsk» исправит их. Не обращайте внимания на ошибку передачи сообщений о регистрации в журнал событий — это нормально, поскольку в неработающей Windows последний недоступен.
Вариант 2: Восстановление загрузчика
В состав загрузочной среды Windows входит инструмент, позволяющий устранять типовые проблемы с загрузкой операционной системы, — воспользуйтесь им.
- Загрузите компьютер с установочного диска и нажмите в окне мастера установщика «Далее».
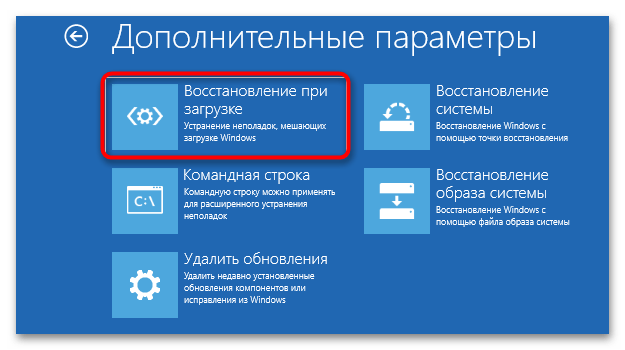
- В следующем окне нажмите «Восстановление системы».
- Выберите в меню действий «Поиск и исправление неисправностей» → «Восстановление при загрузке».
- Дождитесь результата.

Вариант 3: Ручное пересоздание BCD
Если «chkdsk» не выявила ошибок или исправление найденных ошибок не дало результатов, вероятно, дело в повреждении загрузочного файла BCD. В этом случае его нужно пересоздать.
- Загрузите компьютер с установочного диска и откройте «Командную строку» нажатием Shift + F10.
- Определите букву системного служебного тома средствами утилиты «DiskPart» как было показано выше. Вам нужен том с файлом BCD.
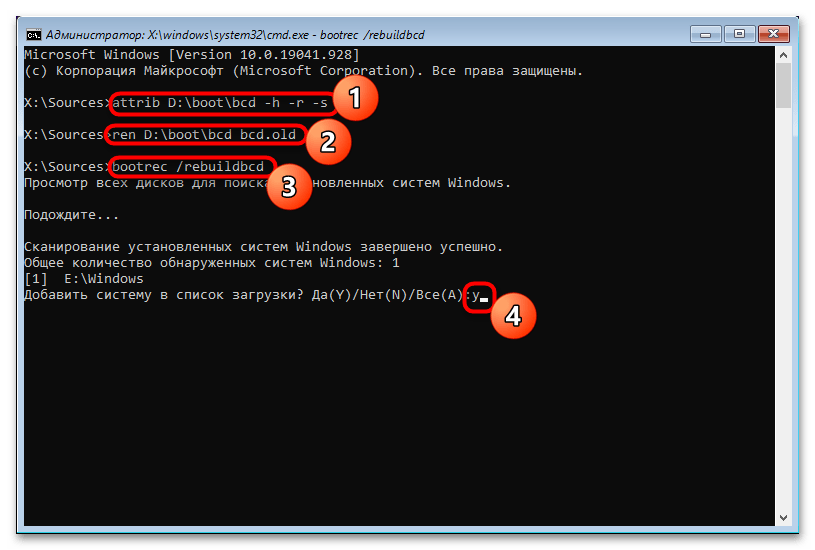
- Выполните последовательно следующие команды:
- В случае успеха вам будет предложено добавить систему в список загрузки — подтвердите действие вводом Y и нажатием клавиши Enter.
- Попробуйте загрузиться в обычном режиме.
attrib D:\boot\bcd -h -r -s

ren D:\boot\bcd bcd.old

bootrec /rebuildbcd
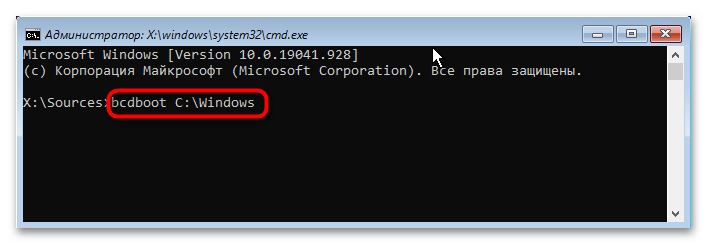
Если при включении компьютера вы получите ошибку загрузки с кодом 0xc000000f и указанием на файл BCD, вернитесь к предыдущему шагу и выполните команду восстановления файлов загрузки bcdboot C:\windows.
Вариант 4: Переустановка Windows
Когда перечисленные выше меры не дали положительного результата, причина ошибки может заключаться в повреждении самой Windows. Если у вас имеется полная резервная копия системы, выполните восстановление из нее, если же бэкап отсутствует, Виндовс придется переустановить. В крайнем случае ОС придется откатить к заводскому состоянию.
Подробнее: Возвращаем Windows 10 к заводскому состоянию
Наша группа в TelegramПолезные советы и помощь
Fix: bootrec /rebuildbcd fails the requested system device cannot be found Windows 10, 8, 7
Hello every readers! Thank you for visiting our blog! Just before we uploaded this bootrec /rebuildbcd post, we had a laptop that is displaying a blue screen error of :\BCD ERROR 0XC0000098. It has Windows 10. As we tried to resolve the problem, we tried to use these bootrec commands in Windows Command Prompt. The bootrec /fixMBR, and bootrect /fixboot commands were successful, but for some reason, when we tried the bootrec /rebuildbcd command, it was unsuccessful. It keep failed with an error message of the requested system device cannot be found. This is probably what you are having right now. Thankfully, we did Google search and found out the solution on other website. Here is the solution for it. Let’s fix the computer!
How to fix bootrec /rebuildbcd fails the requested system device cannot be found Windows 10, 8, 7
First of all, you need to be in Advanced option to open Windows Command Prompt. If you need Windows 10 & 8 installation disk, here is how to create Windows installation disk on a DVD or USB: https://www.pntbrother.com/how-to-download-windows-10-8-iso-from-microsoft-for-free/ After creating an installation disk, boot from the installation disk, and by clicking repair you computer button during the installation process, you will be able to access the advanced option. After opening CMD, type the following command
diskpart
Enter diskpart to use the disk utility to see the existing hard drive partitions and to find out the current EFI partition. It is important that your EFI partition is formatted as FAT32 type. Type list vol to list all the partitions and volumes like the example below:
DISKPART> list vol

  Volume ###  Ltr  Label        Fs     Type        Size     Status     Info
  ----------  ---  -----------  -----  ----------  -------  ---------  --------
  Volume 0     E                       DVD-ROM         0 B  No Media
  Volume 1     C                NTFS   Partition    195 GB  Healthy    Boot
  Volume 2         WINRE        NTFS   Partition    400 MB  Healthy    Hidden
  Volume 3                      FAT32  Partition    260 MB  Healthy    System
It is time to assign a drive letter for EFI partition. In this case, it is the Volume 3 which is formatted in FAT32 type. Type the following command to assign a letter to it. In this example, we are assigning a letter B. you can assign any letters. It is totally up to you. 😀
DISKPART> sel vol 3

Volume 3 is the selected volume.

DISKPART> assign letter=b:

DiskPart successfully assigned the drive letter or mount point.
Type exit to quit disk utility and type the following commands.
cd /d b:\EFI\Microsoft\Boot\

bootrec /fixboot
Now, you can delete BDC file or change the name of it like below. The command below is showing how to change it from BCD to BCD.bak file.
ren BCD BCD.bak
Time to recreate BCD. Type the following command:
bcdboot c:\Windows /l en-us /s b: /f ALL
After it, try to restart the computer, and see if it works. We hope your computer is back to life! Thank you for the great solution (original link: http://www.screwloose.com.au/windows-10-bootrec-the-requested-system-device-cannot-be-found) Thank you everyone! Have a great day!! 😀 😀 😀
Иногда при восстановлении загрузчика операционной системы и применении известных команд bootrec /scanos В или bootrec /rebuildbcd компьютер не находит Windows. Рассмотрим, что делать в таких случаях.
В
Такая проблема обычно возникает, когда не удается провести автоматическое восстановление системы, и дальнейшие действия производятся с установочного диска. Порядок такого восстановления хорошо описан.
В
Сначала в командной строке набирается команда bootrec / fixmbr, с помощью которой записывается mbr без перезаписи разделов диска. Затем в системный раздел записывается новый загрузочный сектор командой bootrec / fixboot.
В
Читайте также: Bootrec/fixboot отказано в доступе
В
После этого производится сканирование операционных систем, которые можно добавить в bcd. Это делается командой bootrec / scanos. И затем, с помощью команды bootrec /rebuildbcd можно выбрать конкретную ОС, которая добавляется в bcd.
В
При этом, в принципе, командуВ bootrec / scanos вообще можно пропустить, сразу переходя к выбору операционной системы через команду bootrec /rebuildbcd. Однако именно в этот момент и возникает сообщение В«An operating system was not foundВ», что операционная система Window не найдена.
Это, конечно, может быть связано с повреждением диска. Поэтому не мешает проверить состояние диска надежной командой chkdsk. Это, во всяком случае, позволит устранить сомнения в целостности информации на диске.

bootrec rebuildbcd не находит Windows
В
Если все в порядке, нужно проверить главную причину того, что bootrec /scanos В или bootrec /rebuildbcd не находит Windows – состояние раздела диска. Для этого:
- запустить diskpart при загрузке;
- выбрать partition (нужный раздел восстановления);
- установить состояние active для этого раздела, если он был неактивен.
Как правило, это устраняет ошибку, загрузчик успешно находит Windows и дальнейшая загрузка идет нормально.
В
Если же проблема осталась, нужно попробовать переименовать или удалить и вновь записать файл boot bcd (не забудьте предварительно сделать копию файла).
В
Просим пройти опрос ниже статьи по методу устранения ошибки.
Для восстановления «слетевшего» загрузчика в Windows применяется специальная команда bootrec с параметрами /FixMbr, если диск имеет разметку MBR и /FixBoot. Команда bootrec с первым параметром создает основную загрузочную запись, та же команда со вторым параметром записывает в системный раздел новый загрузочный сектор. Но не всегда выполнение этих команд бывает корректным. В некоторых случаях при выполнении команды bootrec /fixboot вы можете получить ошибку «Элемент не найден».

Ошибка может оказаться серьезной, поскольку без перезаписи boot-сектора Windows не загрузится. Что же может препятствовать выполнению команды? Причин ее появления не так уже и много, сообщение «Элемент не найден» вы наверняка получите при деактивации системного раздела, отсутствии буквы для раздела EFI и повреждении самих файлов BCD или MBR. Рассмотрим все три сценария чуть более подробно.
Активируйте системный раздел
На дисках MBR загрузчик лежит в специальном разделе «Зарезервировано системой», который является активным. Если он по какой-то причине станет неактивным, при загрузке Windows вы получите ошибку BOOT FAILURE. Попытка восстановить загрузчик командой fixboot ни к чему не приведет, так как наличие флага «Активный» для раздела является обязательным условием.
Сделать том «Зарезервировано системой» активным проще всего с помощью загрузочных LiveCD с менеджерами дисков, но сгодится и обычный установочный диск с Windows. Загрузив с него компьютер и открыв нажатием Shift + F10 командную строку, последовательно выполните в ней указанные на скриншоте команды:

Первая команда запускает Diskpart, вторая предоставляет список подключенных носителей, третья выбирает диск с системой, четвертая выводит список томов, пятая устанавливает фокус на разделе «Зарезервировано системой», шестая делает его активным. Exit служит для выхода из Diskpart. Активировав раздел, выполните команду bootrec /fixboot.
Присвойте букву разделу EFI
С ошибкой «Элемент не найден» при восстановлении загрузки нередко сталкиваются пользователи, конвертировавшие MBR в GPT. Чаще ее причиной становиться отсутствие буквы для EFI-раздела, на котором сохраняются загрузочные файлы. Фиксим неполадку, присваивая EFI-разделу букву с помощью той же Diskpart. Загружаем ПК с установочного диска, запускаем описанным выше способом консоль и Diskpart, и выполняем такие команды:
Первая команда выдает перечень всех разделов на физических дисках, второй командой выбирается EFI-раздел (он имеет файловую систему FAT32), третья команда присваивает ему букву X, exit завершает работу Diskpart, пятой командой выполняется переход в EFI-раздел с загрузочными файлами, шестая команда записывает новый загрузочный сектор.
Примечание: в некоторых случаях каталог с загрузочными файлами может иметь расположение cd /d Буква:Boot либо же cd /d Буква:ESDWindowsEFIMicrosoft/Boot.
Восстановление BCD
Наконец, ошибка может быть вызвана повреждением конфигурационных файлов BCD. Чтобы их восстановить, загрузите ПК с установочного диска, откройте нажатием Shift + F10 командную строку и выполните такие команды:

Обратите внимание на используемые буквы. Буква F в данном примере присвоена загрузочному диску с дистрибутивом Windows, D — это буква системного раздела с файлами операционной системы. В проводнике он обычно имеет букву C, но в загрузочной среде буква может отличаться. Если вы не знаете, какие буквы присваиваются в загрузочной среде, откроете командой notepadБлокнот и выберите Файл -> Сохранить как -> Этот компьютер.
Информация к новости
- Просмотров: 229 505
- Автор: admin
- Дата: 25-03-2015
25-03-2015
Категория: Windows 8.1 / Восстановление Windows
Здравствуйте, очень надеюсь на вашу компетентную помощь, проблема такая, изначально была установлена Windows 8.1, затем я решил установить на второй раздел жёсткого диска Windows XP, после установки стала загружаться одна XP. Чтобы загружались обе винды пришлось скачать и установить менеджер загрузки операционных систем EasyBCD 2.0.2, но видимо я что-то неправильно в нём настроил и при загрузке стала выходить ошибка An operating system was not found (Операционная система не найдена).Бог с ней с XP, попытался восстановить загрузчик Windows 8.1 с помощью установочного диска и всем известных команд:но проблему это почему-то не решило, ошибка как выходила, так и выходит.Может есть какие-то хитрые способы восстановить загрузку Windows 8.1?
Восстановление загрузчика Windows 8.1 или что делать при ошибке An operating system was not found (Операционная система не найдена)

Привет друзья! В этой статье я приведу три эффективных способа восстановления загрузчика Windows 8.1 на диске MBR (обычный БИОС). Начну с простых ситуаций и закончу более сложными.
- Примечание: если у вас новый ноутбук с такой проблемой, то обратите внимание на нашу статью Восстановление загрузчика Windows 8.1 на ноутбуке с БИОСом UEFI
- Также в конце статьи приведён способ создания резервной копии хранилища загрузки BCD и восстановление из этой копии.
Данная ошибка: “An operating system was not found (Операционная система не найдена)” обозначает не что иное, как повреждение или полное отсутствие загрузчика “Windows 8.1, к которому несомненно относятся файлы находящиеся в скрытом разделе System Reserved (Зарезервировано системой).Прежде чем исправлять эти файлы, давайте на них посмотрим. Идём в Управление дисками.Присвойте букву скрытому разделу System Reserved (Зарезервировано системой, объём 350 МБ).

и включите в системе отображение скрытых защищённых системных файлов, и вы увидите папку Boot, и менеджер загрузки файл bootmgr.

Файл bootmgr является загрузчиком операционной системы или простыми словами – диспетчером более сложного инструмента под названием: “Хранилище конфигурации загрузки BCD”, данный механизм представляет из себя обычный файл под названием BCDи находится он в папке Boot.

Загрузка Windows 8.1 происходит в такой последовательности, загрузчик bootmgr обрабатывает имеющуюся информацию в хранилище загрузки (файле BCD), а это – меню, время отображения, список операционных систем (если их несколько) и так далее, еcли данные корректные, то следует загрузка операционной системы. Но! Если хоть один из упомянутых мной файлов (bootmgr или BCD) окажется некорректным или вовсе будет отсутствовать, то проблемы при загрузке системы нам обеспечены.Обычно восстановление производят так, загружают компьютер или ноутбук с установочного диска или флешки Windows 8.1 и в начальном окне установки системы открывают командную строку клавиатурным сочетанием Shift+F10

и вводят последовательно команды:bootrec /FixMbr – создание новой загрузочной записи на системном разделе.bootrec /FixBoot – создание нового загрузочного сектора.bootrec /ScanOS – поиск на всех дисках установленных систем Windows.bootrec /RebuildBcd – находит все установленные операционные системы Windows на вашем компьютере и предложит внести о них информацию в хранилище загрузки BCD, нам всего лишь нужно будет согласиться и нажать на клавиатуре Y.

Перезагрузка и Windows 8.1 загружается.
В каких случаях могут помочь вышеперечисленные команды. Например, вы не стали соблюдать всем известное правило устанавливать первым делом старшую систему (Windows XP), а затем уже младшую (Windows 8.1) и сделали наоборот, сначала установили на ваш компьютер Windows 8.1, а затем Windows XP или Linux, следовательно после установки будет загружатьсятолько Linux или XP, так как они переписали загрузочные файлы на себя, создали новую загрузочную запись и новый загрузочный сектор. В этом случае ввод вышеупомянутых команд исправит загрузку Windows 8.1.Обратите внимание на скришнот. После установки Windows XP второй системой на компьютер с Windows 8.1 в скрытом разделе System Reserved (Зарезервировано системой), принадлежащем восьмёрке, прописались загрузочные файлы XP: boot.ini, ntldr, ntdetect.com, которые сейчас и рулят загрузкой.

В более сложных ситуациях данные команды: bootrec /FixMbr, bootrec /FixBoot могут не помочь и действовать придётся по другому. К примеру, возьмём ошибку нашего читателя:“An operating system was not found” (Операционная система не найдена)или есть ещё одна нехорошая ошибка:Windows failed to start. A recent hardware or software chnge mightbe the cause.If you do not have this disc, contact your system administratoror computer manufacturer for assistance.file: bootBCDstatus: 0xc000000f
Обе этих ошибки говорят о том, что файла хранилища загрузки BCD нет вообще или он абсолютно некорректен, бывает это из-за деструктивных действий вируса, ошибок файловой системы, присутствия на жёстком диске сбойных секторов, установки неоригинальных кривых сборок Windows и т.д. Если загрузить такой компьютер или ноутбук с аварийного диска Microsoft DaRT, то можно увидеть, что в корне скрытого раздела System Reserved (Зарезервировано системой) нет файла bootmgr и папки Boot содержащей хранилище загрузки (файл BCD) или папка Boot есть, а файла BCD в ней нет.

</span>Способ №1 Восстанавливаем заново файлы хранилища загрузки BCDЗагружаем компьютер или ноутбук с установочной флешки или диска с Windows 8.1, открываем командную строку клавиатурным сочетанием Shift+F10.
В среде восстановления Windows 8.1 сначала определим букву диска с операционной системой.Вводим команду:diskpartдалееlist volumeМожно увидеть, что DVD-рому присвоена буква (G:), а скрытому разделу Зарезервировано системой, объём 350 МБ, присвоена буква (C:). Значит файлы операционной системы с папками Windows и Program Files находятся на следующем разделе (E:), также можете сориентироваться по объёму диска.Выходим из diskpart, вводим exitВодим следующую командуbcdboot.exe E:Windows (где E: раздел с установленной Windows 8.1)Данная команда заново воссоздаст загрузчик Windows 8.1, а именно файл bootmgr и файлы конфигурации хранилища загрузки (BCD), то есть всё содержимое папки Boot!

После этого ваша Windows 8.1 обязательно загрузится

Способ №2Форматируем скрытый раздел System Reserved (Зарезервировано системой, объём 350 МБ) и создаём его заново.
Похожая ситуация друзья, имеем компьютер с Windows 8.1 (обычный БИОС).
Операционная система установлена на твердотельный накопитель SSD и не загружается.

Загружаемся в среду восстановления и вводим команды:
diskpart
lis vol (выводим все разделы накопителей подключенных к компьютеру в список).
sel vol 1 (Том 1, это и есть наш скрытый раздел System Reserved, выбираем его этой командой).
format fs=NTFS (форматируем его в файловую систему NTFS).
exit
bcdboot D:Windows (создаём заново файлы загрузки на скрытом разделе System Reserved для Windows 8.1, так как буква диска операционной системы в среде восстановления (D:)).
Файлы загрузки успешно созданы.

Способ №3Удаляем скрытый раздел System Reserved (Зарезервировано системой, объём 350 МБ) и создаём его заново.В некоторых случаях форматирование скрытого раздела System Reserved с файлами загрузки системы не поможет, тогда его нужно удалить и создать заново.Загружаемся в среду восстановления и вводим команды:
diskpart
lis vol (выводим все разделы накопителей подключенных к компьютеру в список).
sel vol 1 (Том 1, это и есть наш скрытый раздел System Reserved, выбираем его этой командой).
del vol (удаляем его образуя нераспределённое пространство на жёстком диске)
lis dis (выводим список дисков подключенных к компьютеру)
sel dis 0 (выбираем единственный Диск 0)
create par primary size=350 (создаём заново скрытый раздел System Reserved).
format fs=NTFS (форматируем его в файловую систему NTFS).
activ (делаем активным).
assign (присваиваем букву).
lis vol (выводим все разделы накопителей подключенных к компьютеру в список).
exit
bcdboot D:Windows (создаём заново файлы загрузки на скрытом разделе System Reserved для Windows 8.1, так как буква диска операционной системы в среде восстановления (D:)).
Файлы загрузки успешно созданы
Создание резервной копии хранилища загрузки BCD
В конце статьи приведу очень простой способ создания резервной копии хранилища загрузки BCD. Если ваша Windows 8.1 перестанет загружаться по вине неисправного или отсутствующего загрузчика, то такую резервную копию вы сможете развернуть даже в случае, если операционная система откажется загружаться.
Во первых, создаём папку в корне диска (C:) и называем её bacup. Открываем командную строку от имени администратора и вводим команду:
bcdedit /export C:bacupbcd

в папке bacup создаётся бэкап хранилища загрузки BCD.

Теперь представим, что с нашей Windows 8.1 проблемы и она не загружается.
Чтобы восстановить хранилище загрузки нам нужно загрузиться с установочного диска или флешки Windows 8.1. В начальном окне установки открываем командную строку клавиатурным сочетанием Shift+F10.
Во первых определяем букву диска с операционной системой.
Вводим команду:
diskpart
далее
list volume
DVD-рому присвоена буква (G:), скрытому разделу Зарезервировано системой присвоена буква (C:). Значит файлы Win 8.1 находится на (E:).
Выходим из diskpart
exit
Водим следующую команду
bcdedit /import E:bacupbcd

Резервная копия заменяет имеющийся файл BCD или создаёт его заново. Загрузчик Windows 8.1 восстановлен.
Статьи, которая вам точно пригодятся – Используемые источники:
- https://godnyesovety.ru/1045-bootrec-scanos-ili-bootrec-rebuildbcd-ne-nahodit-windows-chto-delat.html
- https://www.white-windows.ru/kak-ispravit-oshibku-element-ne-najden-pri-vosstanovlenii-zagruzchika-utilitoj-bootrec/
- https://remontcompa.ru/windows/windows-81/710-vosstanovlenie-zagruzchika-windows-81-ili-chto-delat-pri-oshibke-an-operating-system-was-not-found-operacionnaya-sistema-ne-naydena.html
Have you ever come across the “total identified Windows installations 0” error in CMD? What does it mean and how to fix it? Don’t worry. This article will tell you all the information about the error total identified Windows installations 0 Windows 10/8/7.
When your PC ran into problem and was unable to boot into Windows, you might try various solutions to fix it. And one is to rebuild BCD with a few commands. You may input the following commands to rebuild BCD in CMD with a bootable USB drive.
- bootrec /fixmbr
- bootrec /fixboot
- bootrec /scanos
- bootrec /rebuildbcd
However, some users get into trouble during the process. When they type the command bootrec /scanos or bootrec /rebuildbcd and hit Enter key, the “total identified Windows installations 0” error message emerges unexpectedly. What happened? You might be confused.
If you have no idea about how to fix this issue, you may read this article.
What does the Windows 10 total identified Windows installations 0 message mean? Actually this error message is to tell you that bootrec couldn’t find any additional installations of Windows on your computer to add to the BCD. How to fix it? Don’t worry. You will just need to run a few more commands to repair the BCD.
Solution 1. Repair BCD
If you receive the “Total identified Windows installations: 0” message instead of “Total identified Windows installations: 1” message, you need to run a few more commands to fix this issue and continue to rebuild BCD.
Step 1. Create a Windows 10 bootable USB drive with Windows Media Creation Tool. If you have one, just ignore this step.
Step 2. Change BIOS boot order to boot from the USB flash drive.
Step 3. On the Windows setup page, choose your language preference, and then click Next to continue.
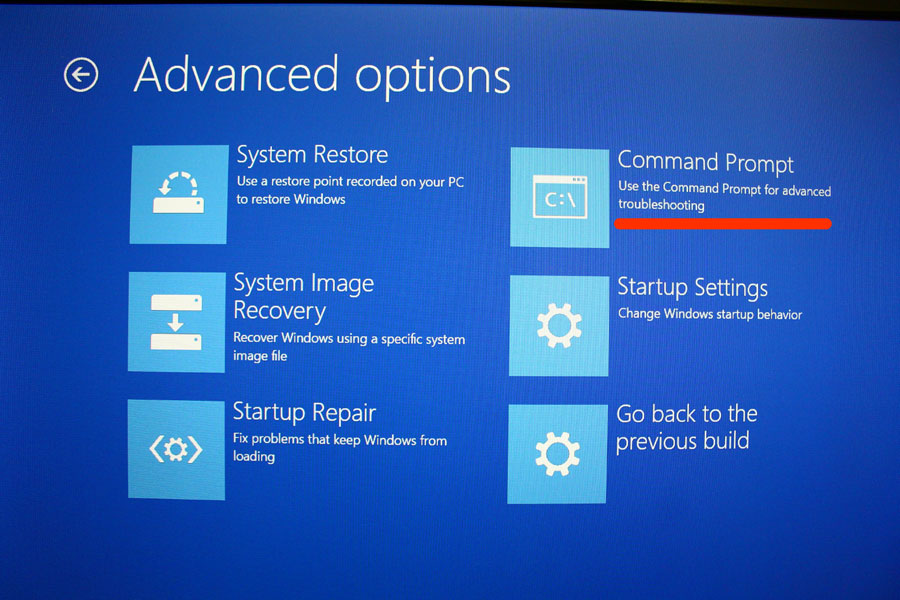
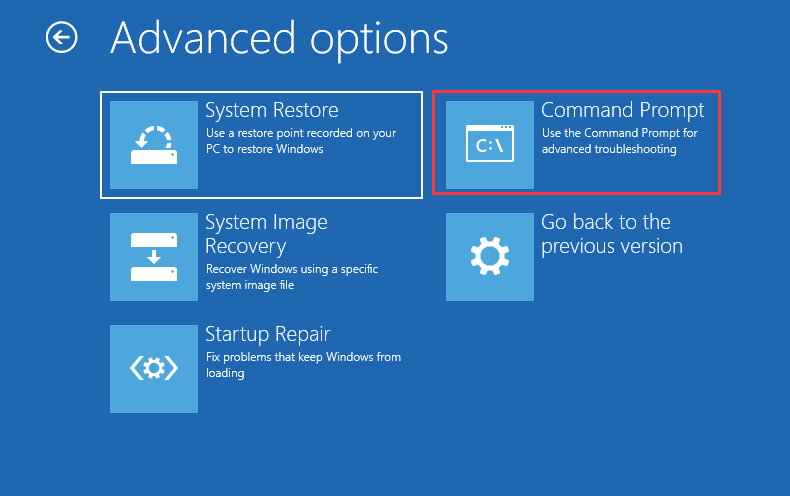
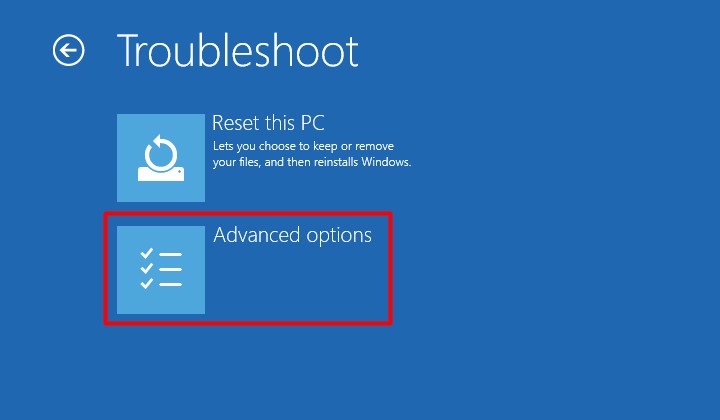
Step 4. Go to Repair your computer -> Advanced Options -> Troubleshoot -> Command Prompt.
Step 5. Input the following command and hit Enter. After inputting this command, you may encounter the total identified Windows installations: 0 error. Just follow the step-by-step guide to continue.
bootrec /rebuildbcd
Step 6. Type the following commands and hit Enter after each one
- bcdedit /export c:bcdbackup (This step is to created a backup of the previous BCD store.)
- attrib c:bootbcd -h -r -s (This step is to remove the hidden, read-only, and system attributes from the file BCD.)
- ren c:bootbcd bcd.old (This is to rename the BCD store)
- bootrec /rebuildbcd
Then following contents will appear:
Successfully scanned Windows installations.
Total identified Windows installations: 1
[1] C:Windows
Add installation to boot list? Yes<Y>/No<N>/All<A>:
Press Y to add the installation to boot list and hit Enter. Then you will see the “The operation completed successfully” message, which indicates that the BCD rebuild is finished completely.
Step 7. The error has been removed now. Then you can restart your computer and check to see if you are able to boot normally. Windows should start as expected.
If this method does not work, you may try the next solution to fix error total identified Windows installations 0 Windows 7/8/10.
Solution 2. Perform System Restore
The Windows built-in feature System Restore enables you to restore your computer to an early state by using the system restore points created in previous days. So System Restore is a quick fix for you to repair system issues. If you encounter bootrec rebuildbcd total identified Windows installations 0 issue, just try System Restore to restore your PC.
Tip: System Restore can only be used to recover Windows system files, programs, and registry settings installed on your system. It does not affect your personal files and cannot help you to restore your personal files like e-mail, documents, and so on.
Here is the tutorial.
Step 1. Boot from the bootable USB flash drive you made before.
Step 2. Go to Repair your computer -> Advanced Options -> Troubleshoot get into the Advanced options page.
Step 3. On this page, click System Restore and follow the prompts to revert system to a normal state with system restore points.

System Restore can help you remove the error total identified Windows installations 0 and fix Windows startup issue in one step, which is very convenient and effective.
However, if you do not have created a system restore point before, you are unable to perform a system restore. And if other fixes cannot help you, you may need to reinstall Windows 10.
Solution 3. Reinstall Windows 10
If the above fixes cannot help you or you’ve tried many fixes on the Internet but just don’t work, you can reinstall Windows 10 to resolve this issue.
Step 1. Create a Windows 10 bootable USB drive with Windows Media Creation Tool. If you have one, just ignore this step.
Step 2. Change BIOS boot order to boot from the USB drive.
Step 3. On the Windows setup page, choose your language preference, and then click Next to continue.
Step 4. Click Install Now.
Step 5. Enter the license key. You can also click I don’t have a product key to skip it, but you will be required to enter the license key later.
Step 6. Choose the operating system you want to install and click Next.
Step 7. Read and accept the license terms and click Next.
Step 8. Here choose one method to reinstall your operating system.
If you choose to perform a clean install (install Windows only), you need to backup important files in advance, as this option will wipe your hard drive and make a fresh start.
- [Upgrade: Install Windows and keep files, settings, and applications]: This will keep all your files, settings and applications saved in the system partition. However, it is only available when a supported version of Windows is already running on the computer.
- [Custom: Install Windows only (advanced)]: This will remove all your personal files, settings and applications and give you a clean install of Windows 10. You can make changes to partitions and drives. It is recommend to backup your files before you continue.
Step 7. Follow the on-screen instructions to complete the system installation. The installation process will start and your PC will reboot. When it’s finished, you just need to log in with your account.
Recover Data from PC with Total Identified Windows Installations 0 Error
If you come across any data loss, you may use MiniTool Partition Wizard Pro Ultimate to help you make data recovery. MiniTool Partition Wizard Pro Ultimate is a piece of professional hard drive recovery software. It can help you recover many types of file including documents, photos, audio, music, videos, emails, archives and so on.
If you want to recover data from the PC with total identified Windows installations 0 error directly, you can just follow the steps below.
Now I will show you the detailed steps to recover data from the unbootable computer.
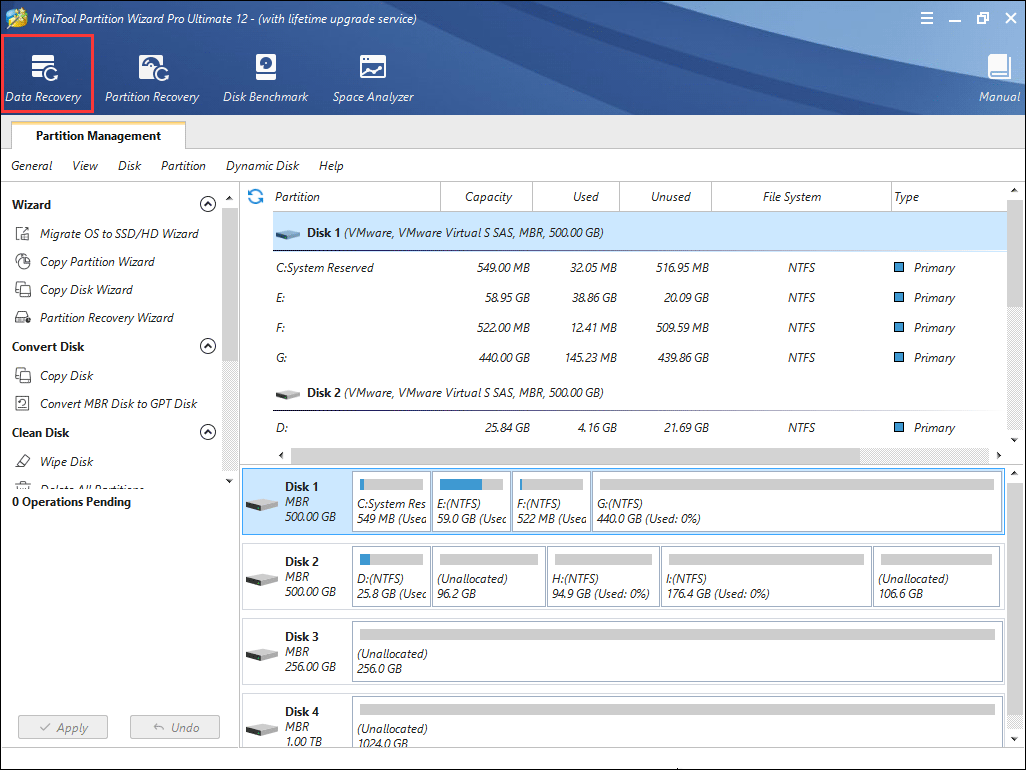
Step 1. Get MiniTool Partition Wizard Pro Ultimate by click the following button. Install it on a normal PC that can boot into Windows and launch it to get the main interface.
Step 2. Click the Bootable Media on the main interface and follow the prompts to create a bootable USB drive. If your PC can boot into Windows, you can use the software on your PC to perform data recovery directly.
Step 3. Boot from the USB drive and you will see the MiniTool Partition Wizard Bootable Edition.
Step 4. On the interface of MiniTool Partition Wizard Bootable Edition, you can click Data Recovery button on the top toolbar to launch it.
Tip: you can also right-click a partition and choose Data Recovery to scan the partition directly.
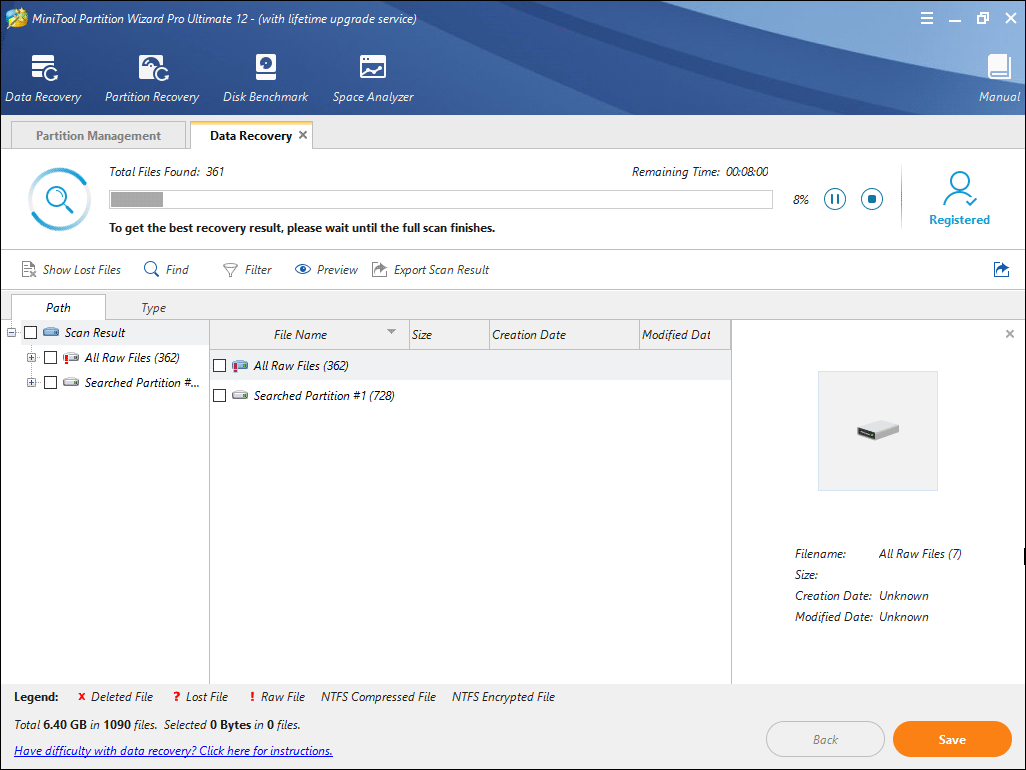
Step 5. On the Data Recovery interface, choose a partition and click Scan button on the lower right corner.
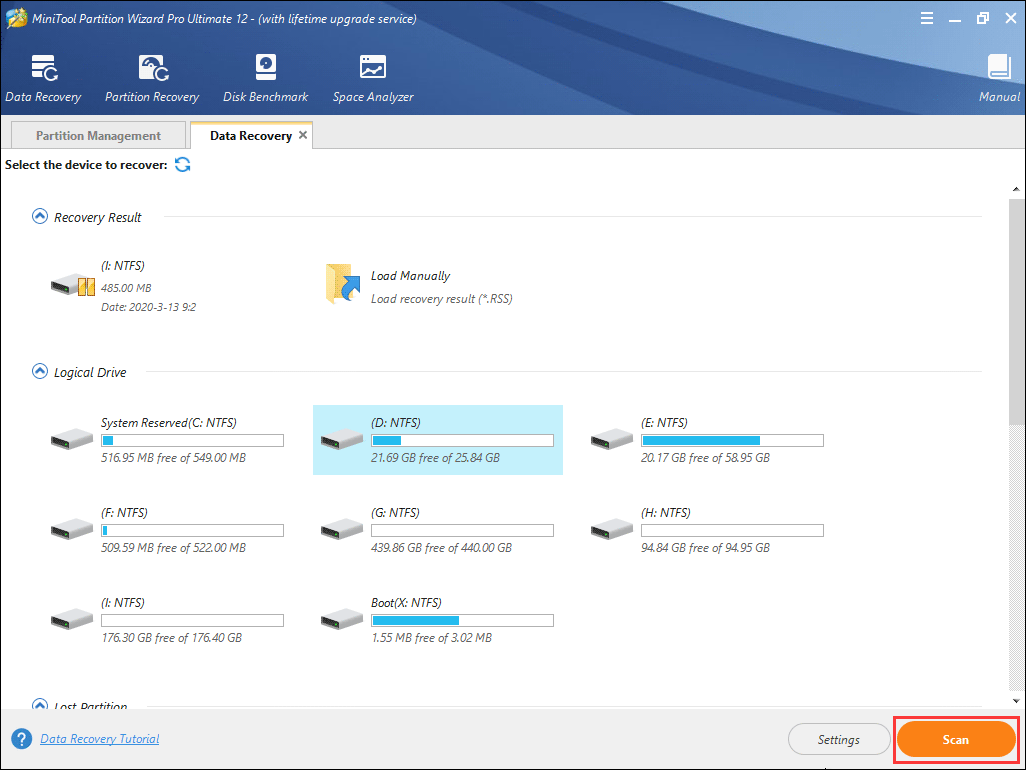
There are five parts listed on the interface, namely Recovery Result, Logical Drive, Lost Partition, Unallocated Space, Hard Disk.
- Recovery Result will recover the last scanning result and you can load .rss file manually to get result recovery you’ve scanned.
- Logical Drive will list all existing partitions on your PC.
- Hard Disk will show you all disks connected on your PC including SSD, HDD, USB flash drives, SD cards as so on.
- Lost Partition or Unallocated Space part will only appear when there is lost partitions or unallocated spaces on your PC hard drive.
Step 6. You see, the software is scanning your drive right now. When it is finished, you can check out the recovery result. During the process, you can pause or stop the scanning any time you want. Just click the Pause or Stop button near the progress bar.
Step 7. When it is finished, you can check the items you want to recover and click Save button.
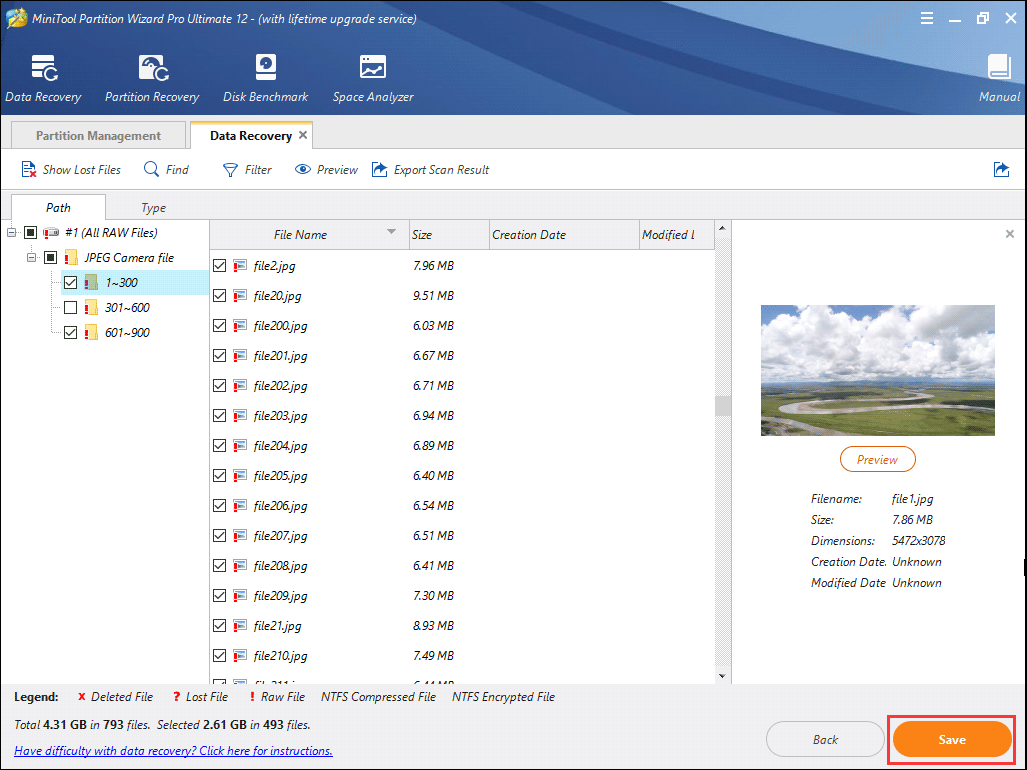
These features on the top tool bar can help you find needed files quickly.
- Show Lost Files: Click this button to check out lost files only.
- Find: Click this button to find a file by its file name exactly with its Match Case and Match Word option.
- Filter: Click this button to find needed files by filename/extension, file size, file creation or modification date
- Preview: Click this button to preview a file before recovery. The supported preview file types reach to 70 in 14 categories.
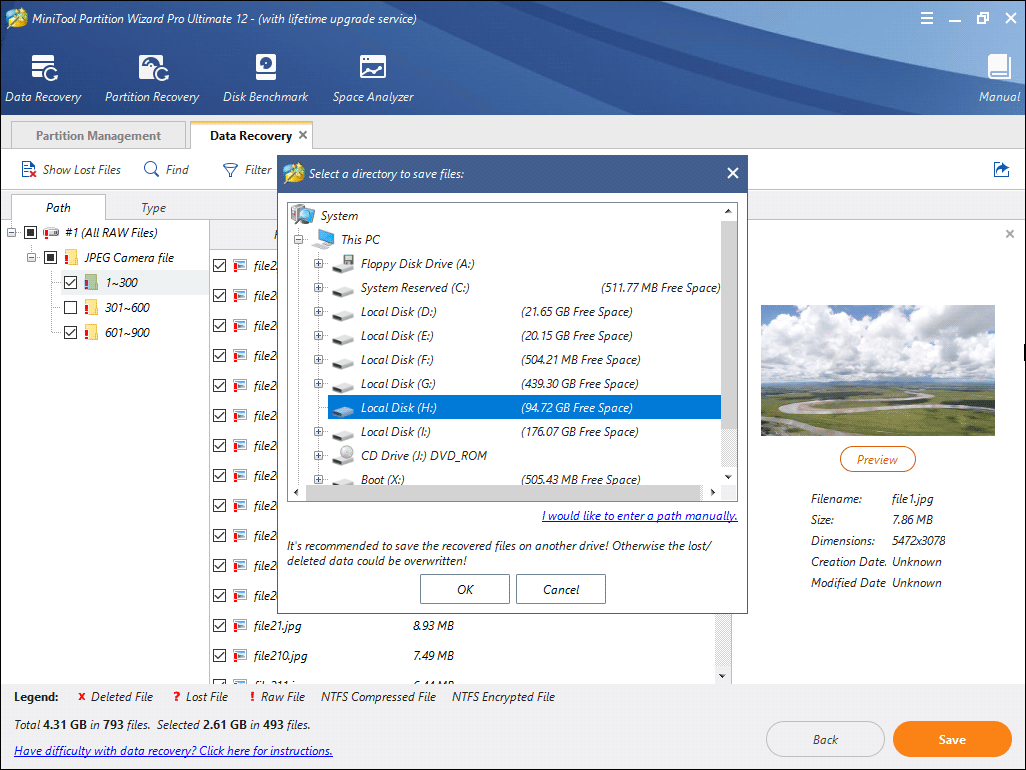
Step 8. Choose a directory to save the needed files immediately. It is recommended to save the recovered files on another drive. Otherwise, the lost/deleted data could be overwritten.
If you find any data loss on your PC, you can utilize MiniTool Partition Wizard Pro Ultimate to recover the data immediately. And keep in mind that do not save new files to the hard drive that encounter data loss, or the lost data will be overwritten.
I have very important files stored on my PC. But my PC got into trouble with total identified Windows installations 0 error message. Luckily, with MiniTool Partition Wizard, I successfully recovered data from my drive.Click to tweet
Bottom Line
This article has shown you how to remove the error total identified Windows installations 0 when you rebuild BCD in CMD. The above three methods are proven to be effective. If you come across the error total identified Windows installations: 0 when running bootrec /scanos OR bootrec /rebuildbcd, you might as well try the fixes shown in this article.
If you have any question about how to fix the error total identified Windows installations 0 Windows 7/8/10 or recover data from the computer, you may post your comment in the following comment zone. And we will reply as soon as possible. If you need any help when using MiniTool software, you can contact us via [email protected].
You are probably furious right now, and it might be due to several reasons that triggered your current anger state. However, one might be the interruption of your activities caused by an error with your personal computer while using it. It gets worse when you realize it’s not one of the usual errors you get that requires quick fixes. The Bootrec Rebuildbcd error falls into the category of errors that can trigger your fury, especially when on a deadline.
The Bootrec Rebuildbcd error you encounter is partially severe since it requires immediate attention without hardware changes. Reasons you encounter this error could be due to a partition issue, OS installation problem, or others relating to booting. One or more of these issues makes you experience the error pop-up on your screen while starting your personal computer. The good news is that there are solutions that you can implement to rid yourself of this problem when encountered.
So, let’s find out the exact causes of the problem before checking out the remedies you should implement for them.
What Causes This Startup Issue
The error occurs due to some specific factors making it similar to other possible errors you might have encountered before. These factors vary depending on the status of your personal computer and customizations that you have done on it. However, the issue also has solutions you can implement to resolve, just like other issues you have encountered. So here are the possible reasons you are facing the device not found pop-up relating to Bootrec and Rebuildbcd:
Incorrect USB Input
Implementing the USB bootable option is common but needs unified support from your BIOS and environment repair. You will experience the error if even one of the two sectors doesn’t support your chosen booting option.
Missing or Broken Volume
Another cause of this error occurs when there are damages to the partition that contains your booting registry. It is also something you will experience if the registry does not exist on the partition or the entire device.
Conflict in Firmware Settings
The installation of your windows and the drive you use to boot up must be set on the same mode. Selecting different modes on these two sectors creates a mismatch leading to your encounter with this issue at specific intervals.
Interface Load Troubles
Upgrades exist to improve performance and stability, but not all devices meet up to those upgrades early. If you use an advance 3.0 over the acceptable 2.0 drive support, you will also encounter this error.
Problems After Disk Format Change
Conversions relating to disk partitions also affect the booting experience and can lead to the error you encounter. It results from your booting mode existing on different partitions and with varying styles of implementation involving the start-up.
What You Can Do To Solve It
You now know why the boot error is popping up on your screen, and it’s time to learn some remedies. Several remedies exist for this particular problem, and the remedies that will work also vary depending on the situation. The reason is that these remedies target specific issues and conditions, so you might need to try multiple remedies. Implementing more than one remedy works to tackle the problem if the previous ones don’t work for the issue. So, below are some of the remedies that you should try out when you encounter this issue on your PC:
- Use a repair disc
- Try expert tools for MBR repairs
- Pick the required partition
1. Boot From Recovery Media
The first thing you should consider when you can’t boot your personal computer with your pen drive is repairing it. You can create media for installation using a disc and boot your personal computer. The media will work to boot your personal computer in place of your inaccessible USB-Drive to continue your work. Follow these steps below to create a media for your installation to replace your bootable pen drive for your PC:
Step 1: Make a media for installation.
Step 2: Begin your boot with the disk and tap the advance options
Step 3: Follow the prompt and click enter after the following commands
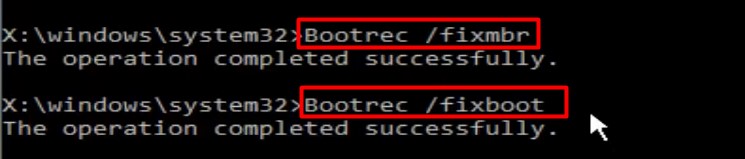
Bootrec /fixmbr
Bootrec /fixboot
Bootrec /Rebuildbcd
Step 4: Restart your personal computer and check the fixes
2. Use Partition Repair Utilities
Another remedy you can implement In cases where the first remedy doesn’t work is to try using expert repair tools. Several repair tools exist to help you fix issues with your personal computer; one is the partition assistant. Uses the steps below as a guide to repair your MBR and improve the booting issue with your personal computer:
Step 1: Install a partition assistant and make a detectable drive
Step 2: Pick the Create a bootable media and select the drive of your choice
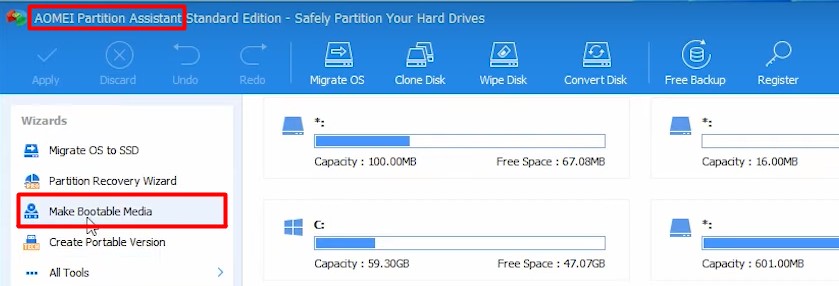
Step 3: Plug in the Drive and pick it as the Boot priority
Step 4: Right-select the affected disk and tap Rebuild MBR
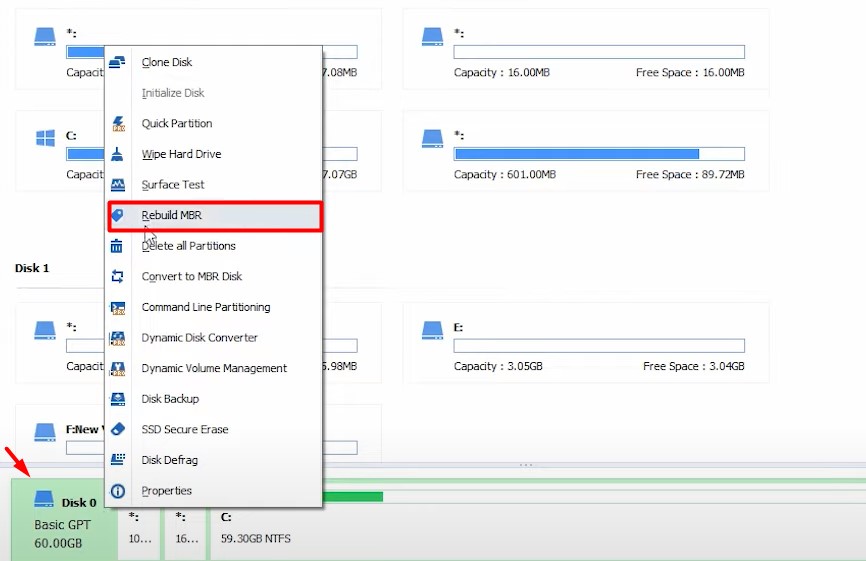
Step 5: Pick the MBR type that you use
Step 6: Apply the changes and tap Proceed to begin
Step 7: Unplug the drive and reboot
3. Set Correct Volume as Active
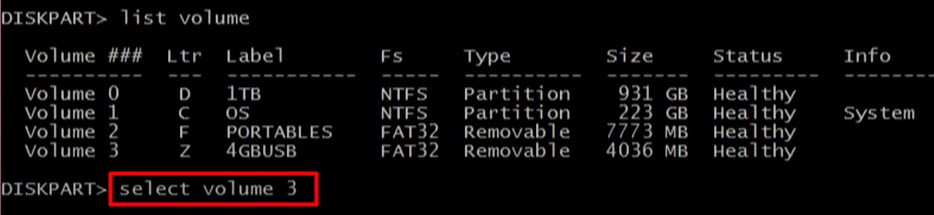
Your error might result from partition mismatch when trying to locate the boot registry or file during start-up. The best choice you can make is to pick the partition that is required to complete the booting process. Finding the appropriate partition for your booting process helps rid you of the error you are experiencing, aiding smooth booting. Implement the steps below as a guide to picking the one that you need for your booting process:
Step 1: Boot your system from UEFI Win10 disk
Step 2: Pick Cmd prompt in the Advanced Options
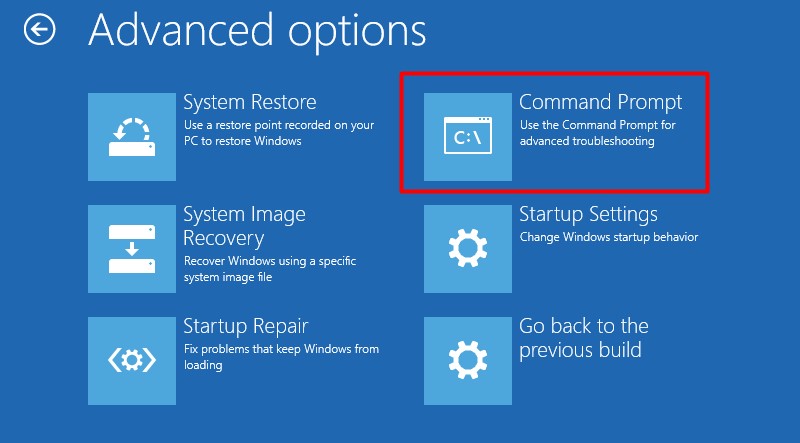
Step 3: List all the available EFI (FAT32) partitions by inputting diskpart and clicking Enter
Step 4: Tap enter after inputting the Select volume 3 command
Step 5: Assign a letter to the partition by inserting the letter=m command
Step 6: Leave the diskpart by inserting Exit and clicking Enter

Step 7: Click enter after inserting the following commands

cd / d m: EFIMicrosoftboot
bootrec /fixboot
Step 8: Rename the filename by inserting ren BCD BCD.bak
Step 9: Remake the file by inserting bcdboot c:Windows /I en-us / s m: /f All
Step 10: Restart after leaving the console
Summary Advice
The current booting error you encounter might throw you off, unlike other errors you have experienced. However, there is always a solution, and you have it with the above steps. Try them out by following the guide to help resolve each issue and check the results.
Common Questions
Will I be able to lead my desktop screen after encountering this error?
“No, you will not be able to start up your personal computer without a complete booting process.”
Should I prioritize getting an expert to resolve the issue?
“You should consider that if you are not good with troubleshooting your device personally.”