
Do you know how to fix Bootrec/fix boot element not found Error in Windows? The following four methods will help you fix this problem:
| Workable Solutions | Step-by-step Troubleshooting |
|---|---|
| Method 1. Activate System Partition | Create Windows bootable USB drive, and insert the USB drive into the PC to boot from it…Full steps |
| Method 2. Assign Drive Letter to EFI Partition | You can resolve the Bootrec/fixboot element not found error by assigning a drive letter to the…Full steps |
| Method 3. Repair Boot Configuration Data | If the BCD (Boot configuration data) file is damaged or corrupted, you might face…Full steps |
| Method 4. Restore Windows to Troubleshoot | Navigate to the Windows Advanced Startup Options menu by hitting F11…Full steps |
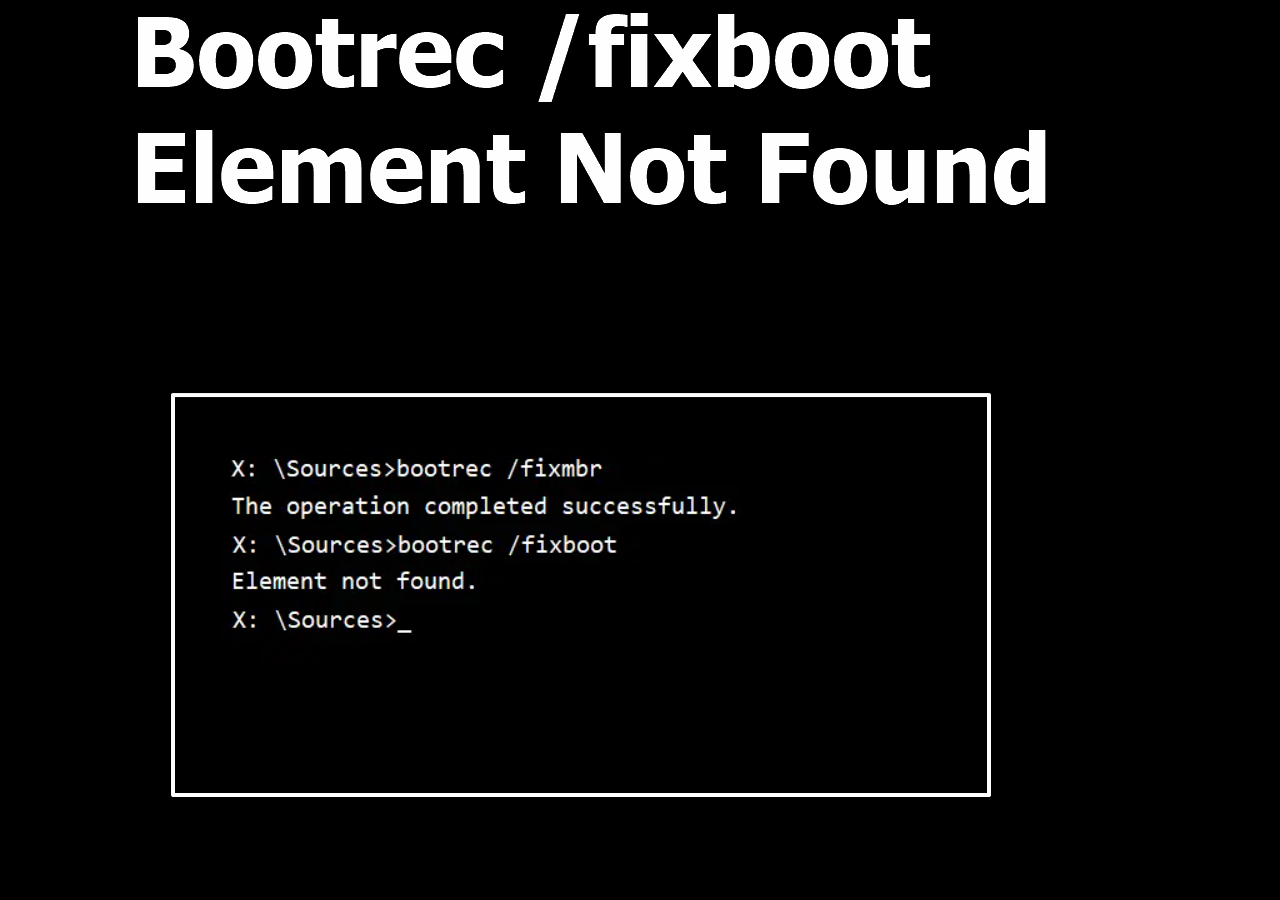
Bootrec /fixboot Element Not Found Error
Are you facing the Bootrec/fix boot element not found Error? If you are searching for solutions, you are at the right place; we are here to resolve this issue. Before getting into the solutions part, it’s essential to understand this Error and its cause. So let’s get started.
The question is, what causes Bootrec/fixboot element not to be found? Here I have summarized a few main reasons which usually lead to this issue on Windows PC.
- ❌The Boot drive or system partition is not marked as active. If the boot drive or system partition is inactive, you may face this Error. In such a case, you must set the system partition active using a bootable USB drive.
- 💽There is no drive letter for the EFI partition. Whenever you convert MBR to GPT, files are stored on the EFI partition. In such a case, if the partition is not assigned with a drive letter, it shows the Bootrec fixboot element not found Error.
- 🛠️The BCD(boost Configuration Data) files are damaged. If the BCD files are damaged, the user may face this issue as Windows will not be able to find from where it should boot.
- 👩🔧The MBR(Master Boot Record) of the disk is corrupted. Due to MBR of the disk corruption, you might face the Bootrec/fixboot element not found Error.
Hopefully, you understand the cause behind this Error; in the next part, we will know how to fix this error successfully, so read the post till the end.
How to Fix Bootrec Element Not Found in Windows Without Losing Data
Here we will provide a video that will give you a clear idea of how to fix Bootrec elements not found on Windows in detail.
- 00:30 Difference between MBR and GPT
- 01:15 Identifying MBR disk
- 01:39 Identifying system volume
- 01:54 Identifying System Partition
Recover Data from Unbootable Windows PC/Laptop
It’s crucial to recover lost data before fixing any error in your PC. When you try for any solution to resolve your PC error, there might be a chance of data loss due to PC error, so we recommend using a reliable and trusted bootable data recovery software to secure your essential data before fixing the Error.
Here we will suggest you use EaseUS Data Recovery Wizard for users. This powerful and advanced data recovery tool comes with unique features. This is a tool having a high data recovery success rate. Its robust data recovery feature can quickly recover lost data from damaged hard drives, SD cards, USB drive pen drives, and HDDs.
How to get files off a laptop that won’t turn on with EaseUS Data Recovery Wizard? The following tutorial will help you learn more details:
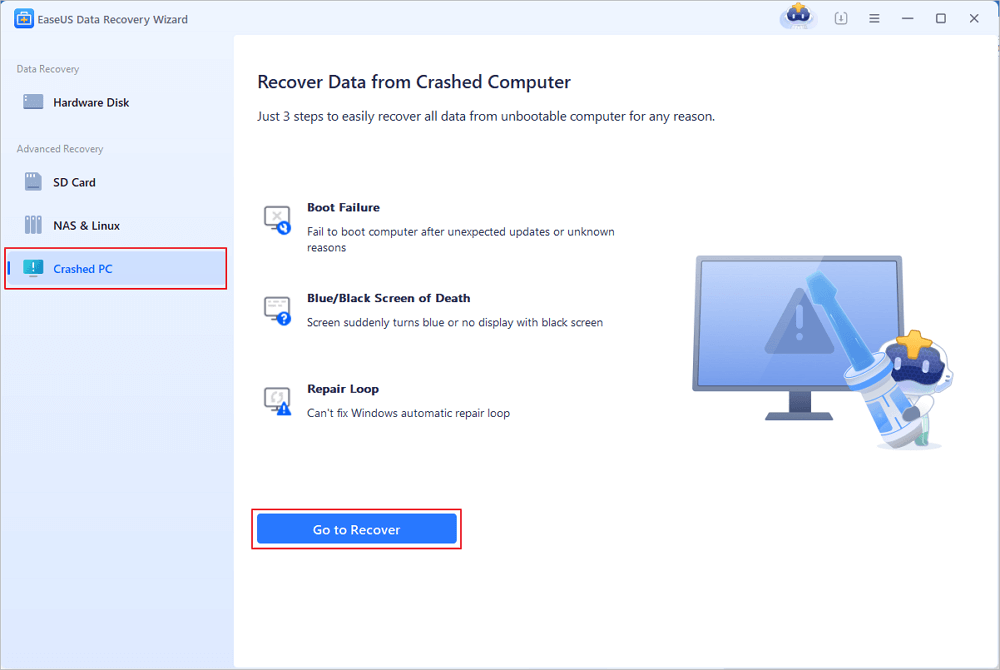
Step 1. Create a bootable disk
Launch EaseUS Data Recovery Wizard, choose «Crashed PC» and click «Go to Recover».
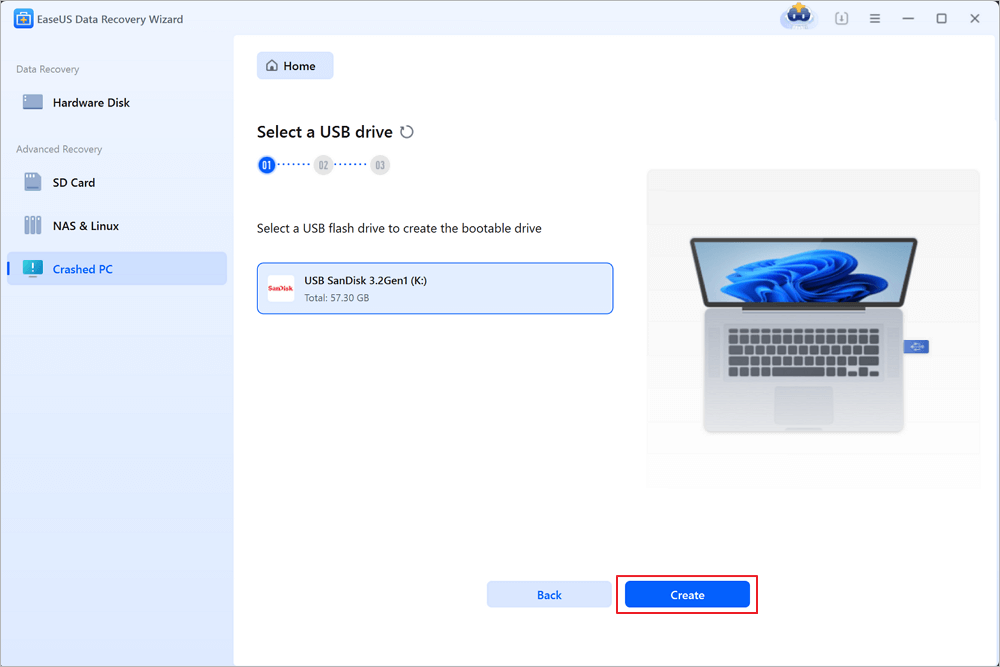
Select an empty USB to create the bootable drive and click «Create».
⚠️Warning: When you create a bootable disk, EaseUS Data Recovery Wizard will erase all data saved in the USB drive. Back up important data beforehand.
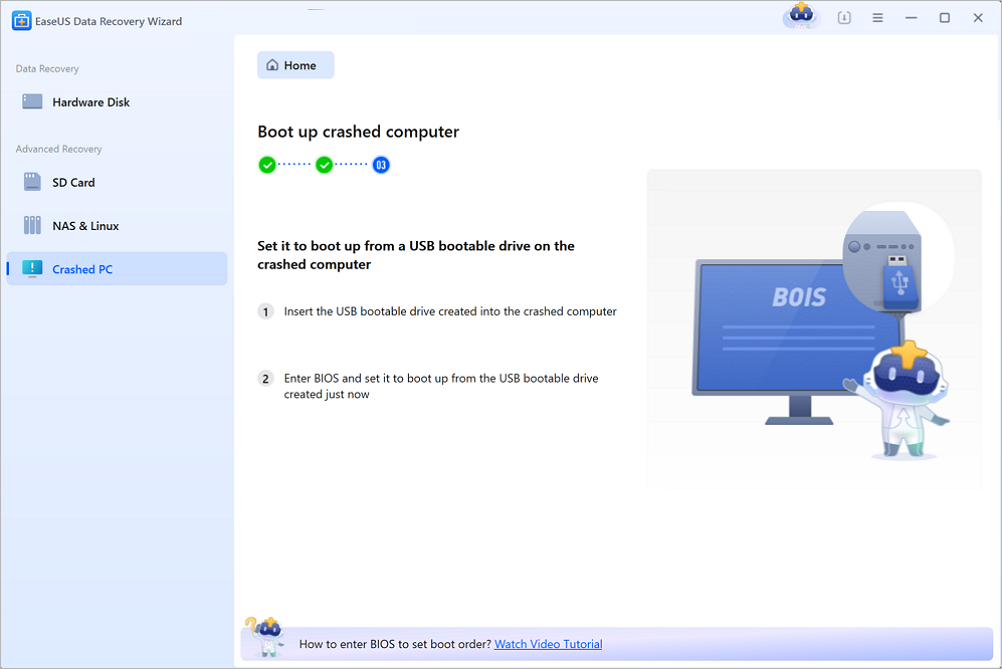
Step 2. Boot your computer from the bootable USB
Connect the bootable disk to the PC that won’t boot and change your computer boot sequence in BIOS. For most users, it works well when they restart their computer and press F2 simultaneously to enter BIOS.
Set to boot the PC from «Removable Devices» (bootable USB disk) beyond Hard Drive. Press «F10» to save and exit.
Step 3. Recover data from a crashed system/PC
After booting from EaseUS Data Recovery Wizard bootable disk, select the drive you want to scan to find all your lost files. Preview and recover the files you need to a safe location.
💡Tip: You can restore data on the local disks, external hard drives, and also the cloud storage.

Method 1. Activate System Partition
The most common reason for the Bootrec/fixboot element not to be found Error is an inactive system partition. In such cases, you must access the Diskpart utility in the Windows Recovery Environment and activate the system partition. Follow the below steps to activate the system partition properly.
Step 1. Create Windows bootable USB drive, and insert the USB drive into the PC to boot from it.
Step 2. Choose your preferred language on the Windows setup page, and click Next to continue.
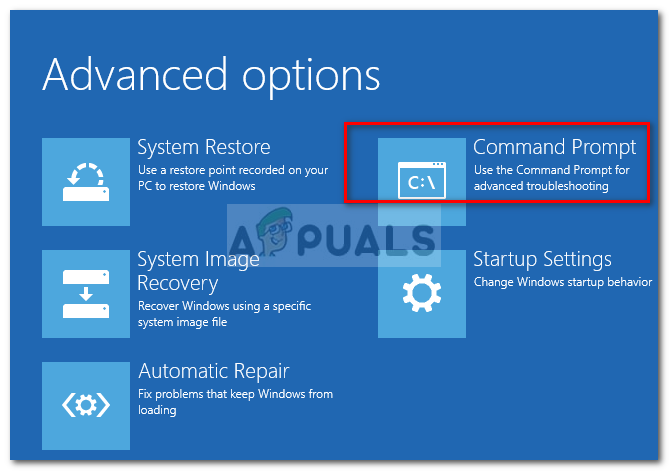
Step 3. On the first screen of the Windows Setup page, look for the option to repair your computer in the lower left. Click to get into the Advanced Options page.
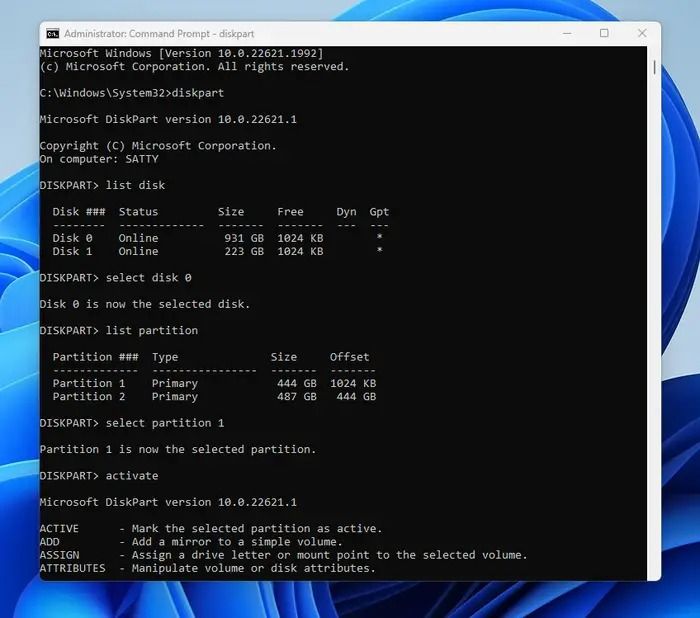
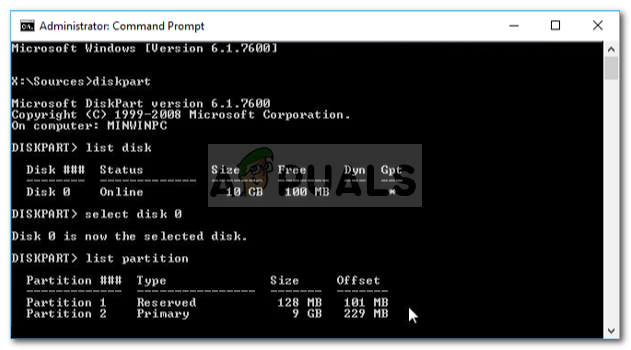
Step 4. Please type the following on the command prompt, and execute them one after the other. You can also use the diskpart command when the disk is write protected.
diskpart
list disk
select disk # (# represents the disk you face the Error)
list partition
select partition#(# represents the system partition)
activate
Now restart your PC and check the issue should be fixed, if you have fixed the issue, please share this page to let more users know this method!
Method 2. Assign Drive Letter to EFI Partition
You can resolve the Bootrec/fixboot element not found error by assigning a drive letter to the EFI partition. Follow the below steps to complete this process successfully.
Step 1. Create Windows bootable USB drive and plug the USB drive into your PC, and boot from it.
Step 2. Choose your preferred language on the Windows setup page, and click Next to continue.
Step 3. On the setup screen, choose the Repair your Computer link in the lower left corner. It will open the Advanced recovery, where you need to click on Troubleshoot to get into the Advanced Options page.
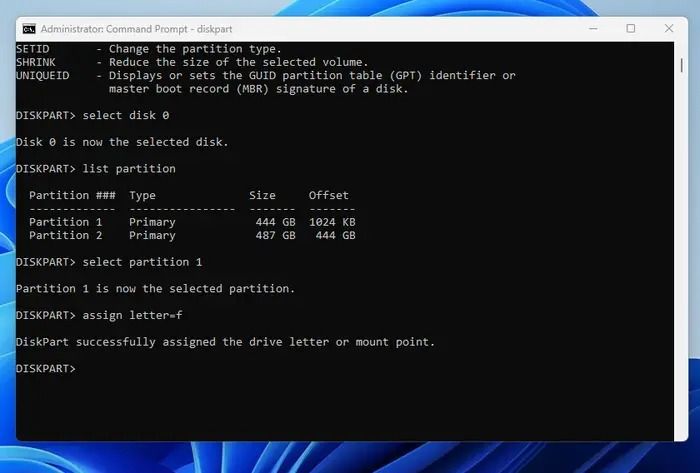
Step 4. Open Command Prompt and execute the below-listed commands.
diskpart
list disk
select disk #(# represents for the disk that you facing the error)
list partition
select partition#(# respresnets the EFI partition)
assign letter=#(#represents the letter you want to assign)
Method 3. Repair Boot Configuration Data
If the BCD (Boot configuration data) file is damaged or corrupted, you might face the Bootrec/fix bot element not found Error; in such conditions, you must fix the BCD file. Follow the below steps to repair BCD effectively.
Step 1. Boot the PC into Advanced recovery using a bootable USB drive.
Step 2. The Click Repair your computer option, offered during the start of the Windows installation screen, lets you boot into the Advanced Options page.
Step 3. Execute the following on the command prompt:
cd/d x:EFIMicrosoft(x stands for the letter of the boot drive)
bootrec/fixboot
renBCD BCD.bak
bcdboot c:Windows/l en-us/ s b:/f ALL
Now reboot the PC and check if the Error has been resolved. You may also be interested in the boot configuration data missing issue:
[SOLVED] The Boot Configuration Data for Your PC Is Missing
Don’t worry if you have to face the error — boot configuration data for your pc is missing. This article covers the best fixes for the error. Read more >>
Method 4. Restore Windows to Troubleshoot
Restore Windows to Troubleshoot can fix the Bootrec/fix bot element not found error easily. Follow the steps below to perform this process.
Step 1. Navigate to the Windows Advanced Startup Options menu by hitting F11 (ASSIGNED KEY) as soon as you power your PC, boot off an install disk, and press the Next option.
Step 2. Then Repair offers a secondary option after your PC has booted, select Troubleshoot from there and click on Advanced options.
Step 3. Now, reboot your computer from the System Restore option from the advanced options.
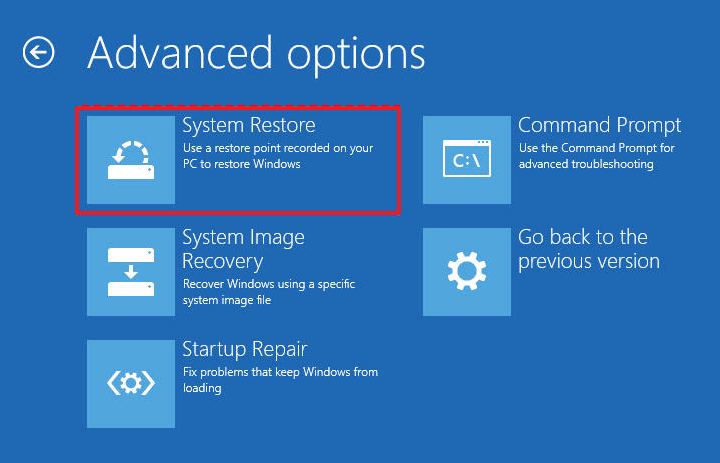
Step 4. Now select your username, and enter the password. Now select a restore point from the menu and follow the on-screen prompts. If there is no System Restore points in Windows 11, read the following passage to fix the problem.
No System Restore Points Windows 11? How to Enable System Restore
Are you wondering how to Enable system restore points on Windows 11? This article will help you with the system restore points disappear issue. Read more >>
To Wrap Up
If you are still following this post, you must understand all four methods to resolve the Bootrec/fix bot element not found Error in Windows PC. We suggest you try all these methods and experience which is easy and works better for you. Remember always to recover your important data before trying any of these methods with the help of the EaseUS Data Recovery Wizard tool, and make sure to download this tool only from its official website for security purposes.
Bootrec /fixboot Element Not Found FAQs
In this part, we will answer some of the key Frequently asked questions to help you clear your doubts, so read this section carefully.
1. Why did I encounter the bootrec /fixboot element not found?
If you encounter the bootrec/fixboot element not found on your Windows PC, it might be because of the following reasons.
- The Boot drive or system partition is not marked as active.
- EFI partition has no drive letter.
- The BCD(boost Configuration Data) files are damaged.
- Corrupt MBR(Master Boot Record).
2. How to solve bootrec /fixboot element not found on Windows 7?
To solve the bootrec/fixboot element not found on Windows 7, follow the below steps.
Step 1. Create Windows bootable USB drive plugin for the PC and Boot it. Choose your preferred language on the Windows setup page, and click Next to continue.
Step 2. Choose Repair your computer from the setup screen, and go to Troubleshoot to get into the Advanced Options page.
Step 3. Execute the commands on the CMD screen.
- cd/d x:EFIMicrosoft(x stands for the letter of the boot drive)
- bootrec/fixboot
- renBCD BCD.bak
- bcdboot c:Windows/l en-us/ s b:/f ALL
3. How to fix bootrec /fixboot access denied?
To fix bootrec/fixboot access is denied error, you can restore Windows Troubleshoot. Follow the below steps to complete this process.
Step 1. Navigate to the Windows Advanced Startup Options menu by hitting F11 as soon as you power on your PC. Select Troubleshoot from there and click on Advanced options.
Step 2. Now, reboot your computer from the System Restore option from the advanced options.
Step 3. Now select your username, and enter the password. Now select a restore point from the menu and follow the on-screen prompts.
4. Can I rescue data from an unbootable computer?
Yes, you can quickly rescue data from an unbootable computer with the help of an advanced Recovery tool. We recommend using EaseUS Data Recovery Wizard, which has an extremely high recovery success rate.
The error ‘Element not found’ is often caused by inactive system partition or if the EFI partition is not assigned a letter. This error occurs when users use the ‘bootrec /fixboot’ command in the command prompt. This command is used to repair Windows boot up whenever it is not functioning properly. This issue can turn out be quite critical as you won’t be able to use your computer unless you fix the system’s boot up which can be done using the bootrec command.
However, you do not have to freak out as this issue has a few solutions that will resolve it easily. If you have been facing this issue for quite a while, this article will help you in solving the issue permanently. But before we get into that, let us have a look at the causes of the error.
What causes the ‘Element Not Found’ Error on Windows 10?
As we have mentioned above, this error occurs when you try to repair Windows boot up. It is often due to the following factors —
- Inactive system partition. If your system partition is not set to active, it can cause the issue to occur.
- No drive letter assigned to EFI partition. When you convert MBR to GPT, the boot files are stored on EFI partition. However, if the EFI partition is not assigned a drive letter, it will cause the error.
- Damaged BCD or MBR. The error will also occur if the BCD or MBR files are damaged or corrupted.
Now, to get rid of the error, you can follow the solutions down below. Please remember that these solutions will require a Windows bootable USB/DVD or CD drive, therefore, make sure you have that covered.
Solution 1: Set the System Partition to Active
Most commonly, the reason for the error popup is an inactive system partition. In such a case, you will have to access DiskPart utility in the Windows Recovery Environment and activate the system partition. Here’s how to do it:
- Insert your Windows bootable drive and boot from it.
- When the Windows Setup window appears, select ‘Repair your computer’.
- Select ‘Troubleshoot’ and then go to Advanced Options.
- There, select ‘Command Prompt’.

Opening Command Prompt - Once the command prompt loads, type in ‘diskpart’ and then press enter.
- Afterward, enter the following command one-by-one:
- First of all, type in ‘list disk’.
- Then, type in ‘Select DISK X’ where X is the disk with boot issues.
- Type in ‘list partition’.

Listing Partitions - Now, you have to select the system partition which is usually around 100 MB in size, to do this type ‘select partition x’ where X is the letter of the system partition.
- Finally, type in ‘active’ to activate the partition.
- Exit the diskpart utility by typing in ‘exit’.
Once you have activated the system partition, try running the bootrec commands again. If it tells you that you don’t have a Windows installation, just exit the command prompt and run Startup Repair.
Solution 2: Assigning Drive letter to EFI Partition
If you have converted MBR to GPT, the boot files are automatically stored in EFI partition. Now, if the EFI partition is not assigned a drive letter, it will cause the ‘Element not found’ error. To fix this, you will have to assign a drive letter to the EFI partition. Use this solution only if you have a GPT disk. Here’s how to do it:
- Open up the Diskpart utility as shown in solution 1.
- Once you have loaded the diskpart utility, type in ‘list volume’.

Listing Volume - Then, select the EFI partition using the ‘select volume X’ command where X represents the EFI partition which is formatted with FAT32 not NTFS.
- Now, you have to assign it a letter. Type ‘assign letter=B’ where B is the letter assigned to EFI partition.
- Exit the diskpart utility by typing ‘exit’ and then restart your system.

Solution 3: Repair BCD
The last solution that you can apply to fix your error would be to repair the Boot Configuration Data (BCD) file. Make sure you have a Windows bootable drive. Here’s how to do it:
- Access the command prompt as shown in solution 1.
- Once the command prompt opens, type in ‘cd /d b:\EFI\Microsoft\’ where b: is the drive letter of the bootable drive (change it if it is different).
- Type in ‘bootrec /fixboot’ and press Enter.
- Afterward, type ‘ren BCD BCD.bak’ and hit Enter to rename the BCD file.
- Finally, type in ‘bcdboot c:\Windows /l en-us /s b: /f ALL’. Replace the letter b: here as well according to your bootable drive letter.

Repairing BCD - Reboot your system.

Kevin Arrows
Kevin Arrows is a highly experienced and knowledgeable technology specialist with over a decade of industry experience. He holds a Microsoft Certified Technology Specialist (MCTS) certification and has a deep passion for staying up-to-date on the latest tech developments. Kevin has written extensively on a wide range of tech-related topics, showcasing his expertise and knowledge in areas such as software development, cybersecurity, and cloud computing. His contributions to the tech field have been widely recognized and respected by his peers, and he is highly regarded for his ability to explain complex technical concepts in a clear and concise manner.
While using the Windows computer, you may see the system running into an error
preventing you from performing the key operations on the Windows. Performing
the bootrec fixboot element in the command prompt to fix Windows-related
problems is common.
Unfortunately, many people complain about encountering the »
Bootrec fix boot element not found
» issue while running the bootrec fixboot command. In addition to revealing
the potential reasons behind this issue, we’ll introduce the best ways to fix
the «bootrec Fixboot element not found Win10» issue.
Part 1: Overview of Bootrec Fixboot Element Error
The »Bootrec fixboot element not found» error occurs when you’re invited to
fix the boot issues through running the bootrec/fixboot command. The following
reasons could be instrumental factors behind this annoying issue.
-
An inactive system partition.
-
Didn’t assign the drive letter to the EFi partition.
-
Damaged BCD or MBR.
Part 2: Ensure You Don’t Lose Data While Fixing the «bootrec fixboot element
not found» Error.
Struggling with the »bootrec fixboot element not found» issue can sometimes
cause data loss.
Thus, it makes sense to look at a third-party data recovery tool like
4DDiG Data Recovery
, which has a reputation for quickly recovering 2000+ types of data. With its
fast scanning speed and ability to preview data, 4DDiG Data Recovery makes it
effortless to retrieve lost data.
-
Retrieve the data lost due to the bootrec fixboot element not found.
-
Restore data from deleted or lost partition, formatted, corrupted, or
crashed PC, etc. -
Preview the data before getting it back.
-
Prompts the highest recovery rate.
How to recover data through 4DDiG Data Recovery?
-
Install 4DDiG Data Recovery and starting the tool afterwards. Next, you
must enter the folder from which you’ve lost data. -
In this phase, you’ll need to, as 4DDiG Data offers a fast scanning speed,
provided you’ve got a fast internet connection. start scanning for lost
data -
After scanning the data, you’ll need to review its credentials and then
hit the Recover button to get back the data on the computer.
Part 3: How to Fix Bootrec Fixboot Element Not Found?
Apart from revealing the potential reasons behind this issue, we’ll introduce
the best ways to fix the »bootrec Fixboot element not found Win10» issue.
Method 1. Make System Partition Active
Activating the system partition will be instrumental in fixing issues like
»bootrec/fixboot element not found».
-
Insert the USB flash drive once you’re done creating the Windows bootable
USB drive. The next step is to select the appropriate language and click
the Next button. -
Locate the Repair your computer option and press the Advanced options
icon. Now, you’ll need to enter the following command, and you can
implement these commands one by one to fix the issue you’re having.diskpart
list disk
select disk # (# is disk you’re facing the
Error with)
list partition
select partition#(# represents the
system partition)
activate -
After running the commands, you must start the computer again to see how
it goes.
Method 2. Rebuild MBR
Rebuilding the MBR is another useful way to tackle the »
bootrec fixboot element not found
» issue. You can rebuild the MBR by following the guide given below.
-
First, you’ll need to boot from the original installation DVD or recovery
USB. Tap on the Repair your computer after navigating to the Install
screen. -
After going into the options screen, you must select the Command prompt
after choosing the Troubleshoot and advanced icons. -
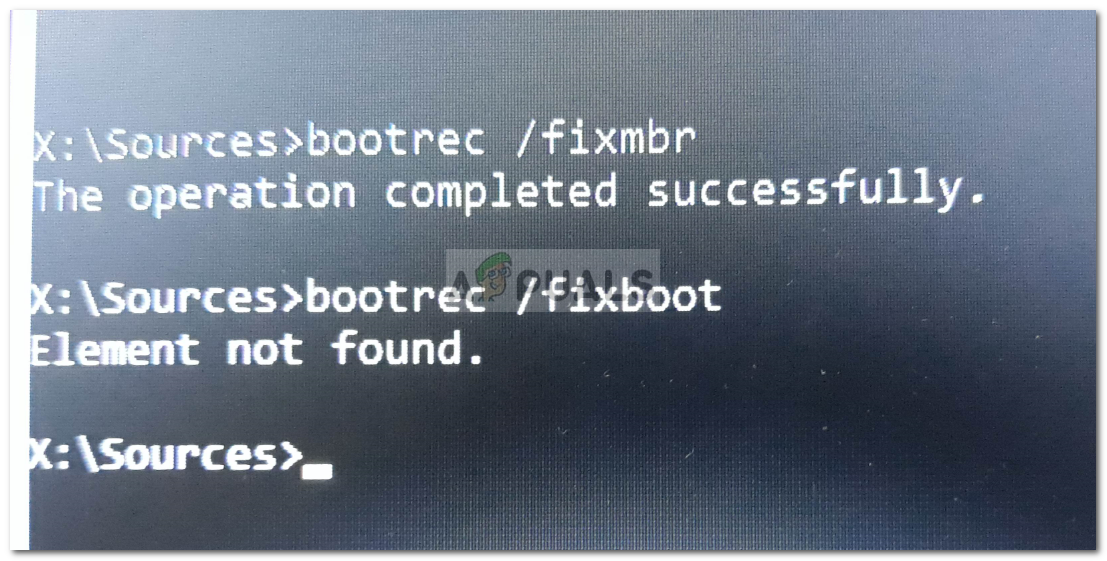
Press the Enter icon after entering the following commands.
bootrec /fixmbr
bootrec /fixboot
bootrec /scanos
bootrec
/rebuildbcd -
Next, you’ll need to remove the USB from the computer and restart the
computer.
Method 3. Assigning a Drive Letter to the EFI Partition
Assigning the drive letter to the EFI partition is another efficient way to
eliminate the » bootrec.exe fix boot element not found» issue.
-
Plug the USB flash drive into the PC after establishing the Windows
bootable USB drive before booting for it. Next, you must select the
language and hit the Next icon. -
After selecting the Repair your computer button, enter into the Advanced
recovery option. Upon clicking the Troubleshoot, you’ll move past the
Advanced options. You’ll need to execute the following commands frequently
after launching the Command prompt.diskpart
list disk
select disk #(# is disk you’re facing the
Error with )
list partition
select partition# (# represents the
EFI partition)
assign letter=#(# is name of letter)
Method 4. Repair the Corrupted BCD
Despite trying various options, if you still can’t fix the »bootrec fixboot
element not found Win10» issue, rebuilding or repairing the BCD might help.
-
Enter the Windows Recovery Environment after clicking the F8 key upon
restarting your computer or startup. -
Visit the troubleshooting page and hit the »Advanced Options» afterward.
You can access the CMD by hitting the command prompt. Click on the Enter
button after typing the bootrec/rebuildbcd. Press the Enter button again
before typing the bootrec/fixmbr. Hit the Enter icon after typing the
bootrec/fixboot.
Method 5. Try the Bootrec Commands by CMD
You can also run the bootrec commands through CMD to fix the boot issues, as
the possibility of fixing the boot issues is immense through the command
prompt.
-
press and hold the F8 key several times upon restarting the PC three times
or upon startup. Tap on the Advanced options icon afterward to proceed
ahead. -
Click the Troubleshoot icon, then select Advanced. Click the command
prompt to open it, then click the CMD. Hit the Enter button after typing
the CHKDSK C:/r. Wait for a few moments before getting the computer
started again.
In Conclusion
While fixing the boot issues, encountering the » bootrec fixboot element
not found» message isn’t unpleasant. The good news is that we’ve discussed
the potential reasons behind this erroneous message and also revealed
several majestic ways to dismantle the «bootrec fixboot element not found»
issue.
Aiming at the
4DDiG Data Recovery
is the best way to recover data lost due to the »bootrec.exe fix boot
element not found» issue, as it offers the highest recovery rate and
effortless user interface.
William Bollson (senior editor)
William Bollson, the editor-in-chief of 4DDiG, devotes to providing the best solutions for Windows and Mac related issues, including data recovery, repair, error fixes.
One of the most useful utilities for advanced users in Windows is the Windows command line or Command Prompt. It is efficient in fixing system files, checking the disk for errors as well as other intensive tasks that are made convenient using this.
One of the tasks you can carry out using Command Prompt is repairing the Windows bootup process if it encounters any issues. However, if you tried running the “bootrec/fixboot” command and you receive an error message saying, “Element not found”, read on as this post will guide you in fixing this error. This kind of error in the command line could be due to a damaged BCD or MBE, inactive system partition, or it could also be that there is no drive letter being assigned to the EFI partition. Whichever the case is, here are some possible fixes that should help you resolve the problem.
Option 1 – Try to repair BCD
As mentioned the error could be caused by a damaged BCD and so to fix the problem, you need to repair BCD by following these steps:
- First, make sure that you have a bootable Windows 10 USB drive with you and use it to boot your computer.
- Once you’re on the Welcome Screen, click on Next.
- After that, click on Repair your computer located at the bottom-left portion of the window.
- Then select Troubleshoot > Advanced Options > Command Prompt.
- After you open the Command Prompt window, execute the following command:
bootrec /fixboot
- Afterward, enter the next command below to rename the BCD file:
ren BCD BCD.bak
- Next, type the following command and make sure to replace “b:” with the letter of your bootable drive attached to your computer.
bcdboot c:Windows /l en-us /s b: /f ALL
- Now, wait until the process is completed and restart your computer to successfully apply the changes made.
Option 2 – Try assigning the drive letter to the EFI partition
- Tap the Win + X keys or right-click on the Start button and click on Command Prompt (Admin) to open Command Prompt with admin privileges.
- Then type the following command to start the Diskpart utility:
diskpart
- After that, if you receive a UAC prompt, just click on Yes to proceed.
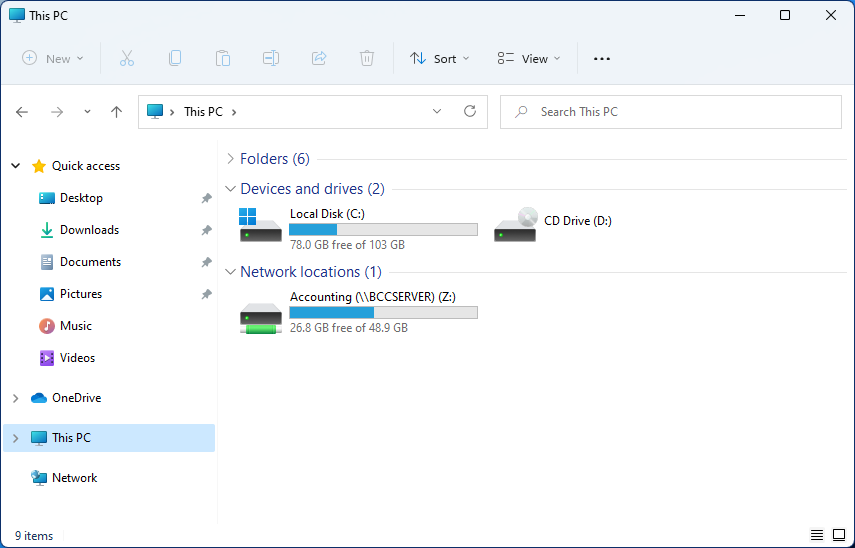
- Next, type the following command to list all the volumes created on your PC including both types of partitions that are visible to a normal user in the File Explorer as well as the ones created by Windows 10 by default which helps it in storing the boot files and other important system files:
list volume
- Now type the following command to select the desired volume:
select volume number
- Then type the following command to assign a letter to the selected volume:
assign letter=<LETTER>
Note: Make sure to replace “<LETTER>” with the letter you want to allocate to that partition. Afterward, it will assign a letter to the selected volume.
- Reboot your PC to apply the changes made.
Option 3 – Try setting the System Partition to Active
Like the first given option, you also have to make sure that you have a bootable Windows 10 USB drive before you proceed to set the System Partition to Active. Once you have it covered, refer to these steps:
- Boot your computer using the bootable Windows 10 USB drive.
- Next, click Next when you get to the Welcome Screen.
- Then click on Repair your computer located at the bottom left part of the window and select Troubleshoot > Advanced Options > Command Prompt.
- After opening Command Prompt, type the following command and hit Enter to start the Diskpart utility. It is a command line-based utility just like Command Prompt but has a UAC prompt once you provoke it. So if you encounter a UAC prompt, just click on Yes to proceed.
diskpart
- Now type the following command:
list disk
- From there, select your primary disk by typing the following command:
select disk number
- After that, list all the partitions on the selected disk by entering the following command:
list partition
- The command you just entered will list all the partitions created on your PC including both types of partitions that are visible to a normal user in the File Explorer as well as the ones created by Windows 10 by default which helps it in storing the boot files and other important system files.
- Now type the following command to select the partition that is usually around 100 MB in size:
select partition number
- Finally, type the following command to mark the partition active:
active
- Then type the “exit” command to exit the disk part utility.
Do You Need Help with Your Device?
Our Team of Experts May Help
Troubleshoot.Tech Experts are There for You!
GET HELP
Troubleshoot.Tech experts work with all versions of Microsoft Windows including Windows 11, with Android, Mac, and more.
Share this article:
You might also like
Error Code 0xc00007b – What is it?
Error code 0xc00007b usually manifests itself via the inability to start an application properly. It can occur when users attempt to run a game or other programs on their computer. In such a case, the application will not start and a message box will pop up stating that error code 0xc00007b has occurred. The error code is likely to occur when users attempt to run a program in the incorrect or inappropriate bit. For instance, if you try to load a 32bit location with a 64bit location.
Solution
Error Causes
Error code 0xc00007b affects various versions of the Windows operating system, including Windows 7, 8, 8.1, and Windows 10. In the case of error code 0xc00007b for Windows 10, the error may be caused by issues related to software you’ve installed on your machine. This may cause software conflict resulting in the need to install programs like DirectX. Left unchecked, error code 0xc00007b could incite other error codes in Windows 10, such as error code 0xc004f034.
Further Information and Manual Repair
To repair error code 0xc00007b for Windows 10 devices, users will need to implement at least one manual repair procedure. Manual repair methods are effective in combating these issues as they can address the issues causing the error in the first place, thus fixing the problem.
The manual repair procedures for fixing error code 0xc00007b are very straightforward and can be implemented with little technical knowledge. However, you may need to contact a Windows repair technician if you have difficulty fixing the error code after completing the manual repair methods listed below.
Method One: Install Microsoft DirectX
Microsoft DirectX is an application usually included in the Microsoft operating system. It enables users to access high-speed gaming and multimedia on their PC. The latest version of this Windows technology is available on Microsoft’s official site.
Visit the Microsoft website and search for DirectX End-User Runtime Web Installer. Once you have located the latest version of the program, select the preferred language you would like DirectX to run in, and then click download. Run the program, then be sure to reboot your computer.
Note that this solution should only be applied if you are having issues running or displaying a gaming or multimedia application. Once you’ve correctly installed the latest version of DirectX, it should be able to fix underlying issues that may be causing error code 0xc00007b to occur. If you are still unable to run applications after completing this manual repair procedure, however, you will need to apply another method to fix error code 0xc00007b for Windows 10.
Method Two: Install Latest Version of .NET Framework
.NET Framework, a framework developed by Microsoft, provides solutions for users who may be having problems with applications. To download the latest version of the .NET framework, follow the steps listed below.
- Step one: Open your favorite web browser
- Step two: Enter www.microsoft.com/net
- Step three: Click Downloads
- Step four: Select the latest version of the .NET Framework by clicking the framework at the top of the list. (Currently, the latest version is .NET Framework 4.6.2.)
- Step five: Select preferred language, then download
- Step six: Run software.
To ensure you successfully download the latest version of the .NET Framework, verify your computer is properly connected to the Internet while downloading the software. Also, follow the instructions provided on the Microsoft website.
After completing the download process, reboot your computer then check if you have successfully resolved error code 0xc00007b for Windows 10. If this manual repair method is successful, you will be able to access your gaming and multimedia programs. Otherwise, the error code message box will reoccur, stating that the application error code is present on your device. Apply the next manual repair procedure to correct the error code if this reoccurs.
Method Three: Install Windows Updates
In certain instances, application error codes like error code 0xc00007b affect PC users who fail to install the most current Windows updates on their device. That is why it’s important to check your system and ensure you have installed all the latest updates.
The updates, if any are available, will automatically be installed on your PC once you access Windows Update in Settings. Reboot your computer then check if you are able to run programs that previously would not open due to error code 0xc00007b. If problems persist resulting in the reoccurrence of the error code, reinstall the applications you are unable to open or get help from a Windows repair technician.
Method Four: Download an Automated Tool
If you wish to always have at your disposal a utility tool to fix these Windows 8 and other related issues when they do arise, download and install a powerful automated tool.
Read More
Rundll Error — What is it?
Rundll Error, DLL is also known as Dynamic Link Library is a Window library that basically consists of instructions and codes used and shared by multiple programs installed on your system. It helps programs load and run smoothly.
Rundll error is generated when the system fails to access DLL files thereby hampering your ability to successfully run your desired program.
Solution
Error Causes
The rundll error code is triggered due to multiple reasons such as:
- DLL file affected by virus and malware
- Poor program installation
- Invalid Windows registry entries
It is advisable to fix the run.dll error immediately without any delay because this error exposes your PC to serious threats such as system crash, freeze, failure, data loss, and even privacy threats like cybercrime, data breaches, and identity thefts.
Further Information and Manual Repair
To resolve the rundll error on your system, here are some solutions that you can try:
Solution 1: Reboot your System
Sometimes rebooting your system can also resolve the issue. However, if it doesn’t then you need to try some other solution to fix it.
Solution 2: Identify the Program Triggering the Error
To fix rundll error, the first thing that you need to do is to identify the program generating this error and check it for validity. For this, simply analyze the rundll error dialog box. Let’s say you get the following run.dll error on your system Error loading
C:\WINDOWS\system32\usvdgpo.dll.
This error message indicates that the program ‘usvdgpo’ is causing the run.dll error on the system.
Once the program is identified, the next step is to stop it manually. For this, you go to the start menu and click run, now type ‘services.msc’ in the dialog box, and press ‘Enter’.
After that right-click the related process to your rundll error and then click the ‘Stop’ button to stop the program. Now close the window.
Though this action will stop the process it will not remove the reference to the bogus items. To remove that you will have to remove the program from the Windows Registry. This can be done by typing ‘Regedit’ in the Run dialog box.
This will open the registry editor. From the keys listed in the left panel, navigate to the following key: HKEY_LOCAL_MACHINE/Software/Microsoft/Windows/CurrentVersion/Run.
Now right-click on this key and click delete and then simply close the windows registry and reboot your system.
After this, you will then have to uninstall the program to completely eradicate the rundll error. To do this, go to the control panel, Add/remove programs, and right-click to uninstall the program causing the run.dll error on your system. Click yes to confirm your decision.
Once the program is uninstalled, reinstall the program using the program CD to get yourself an error-free program.
This procedure is tricky, time-consuming, and maybe slightly challenging for you especially if you are not a computer programmer.
Solution 3: Run an Antivirus
If the cause of the run.dll error is a malware attack then you need to download an antivirus and run it on your system. However, this may impact the speed of your PC.
Antivirus is notorious for slowing down PC speed.
Solution 4: Download Restoro.
If you are not a computer programmer, then running Restoro is possibly the easiest way for you to resolve rundll errors on your system in seconds. Restoro is an innovative, cutting edge, and multi-functional feature-filled PC repair tool that can be used to repair all kinds of system-related errors including rundll errors.
The registry cleaner utility cleans up the RAM by removing unnecessary and obsolete files like junk files, invalid registry entries, and files from the uninstalled programs. It resolves disk fragmentation issues, repairs dll files, and the registry.
In just a few clicks you can easily repair the registry and remove malware thereby resolving rundll errors on your system. Operating Total System Care is quite simple. It has a user-friendly interface and easy navigation.
It is safe, efficient, bug-free, and compatible with all Windows versions
Click here to download Restoro and resolve ‘rundll errors’ and access/run programs on your system smoothly.
Read More
In case you don’t know, a teletype network, also known as Telnet, is a protocol that is meant for internet or LAN communication which is used primarily to control other computers effortlessly. And it is available as a command-line utility in Windows and helps users in opening a command-line interface for the remote computer. However, a lot of users have reported an error that states, “Telnet is not recognized as an internal or external command, operable program, or batch file” when you try to use it. If you are one of these users, then you’ve come to the right place as this post will guide you on how to fix this error in Windows 10.
This kind of error means that the Telnet utility is not installed on your computer but Telnet is a default feature in Windows 10 so the protocol mainly is not enabled yet. The Telnet client is disabled by default in Windows 10 and to fix this error, you can try to enable the Telnet Client via Programs and Features or try to install Telnet using an elevated Command Prompt.
Option 1 – Try to enable the Telnet Client via Programs and Features
The first thing you can do is to enable the Telnet client using Programs and Features since it is disabled by default. To do that, follow the steps below.
- Tap the Win + R keys to open the Run dialog box and type “appwiz.cpl” in the field and hit Enter to open the Programs and Features window.
- Next, select the “Turn Windows features on or off” from the options given on the left-hand side.
- After that, look for the Telnet client from the list and check the checkbox next to it and then click on OK to save the changes made.
- Now restart your computer.
Option 2 – Try to install Telnet via an elevated Command Prompt
If enabling the Telnet client using Programs and Features didn’t work, then you can try to do it using Command Prompt instead. To get started, follow the steps given below.
- In the Windows Search bar, type “command prompt” in the field and right-click on Command Prompt from the search results, and select the “Run as administrator” option.
- Next, execute this command to enable the Telnet client: dism /online /Enable-Feature /FeatureName:TelnetClient
- Once the command has been executed, close the Command Prompt and restart your computer.
Read More
Mapping network drive has many benefits in terms of speed and ease of access of files via network. It lets you access the hard drive over the whole network like it was the hard drive inside your PC case. In order to easily and quickly map a folder as a network drive follow the guide below.
- Open File Explorer
- Click on the three dots icon in the Toolbar
- Select Map Network Drive
- Click the Drive drop-down menu
- Select a driver letter that you wish to assign as a network drive
- In the folder field enter network device and share name (click on browse to see all devices on local network)
- Check the box beside Reconnect at sign-in if you wish to automatically connect to a network drive on Windows startup
- Check Connect Using Different Credentials if you wish to connect to a network drive using different credentials that one used to login into Windows.
- Click Finish
After finishing setting Windows 11 will try to connect to the network drive and if successful drive icon will appear inside File Explorer and the drive will open up to see its content.
If for any reason it cannot connect try checking user credentials, cables, network adapters, etc.
Read More
It is no secret that a few days ago Facebook has been breach and tons of user accounts have been compromised. These kinds of things are very unpleasant experiences for both users and the company itself. User trust lowers significantly in the company and it can greatly increase the chances of users migrating to another platform.
This just shows how much a hacker or security breach can produce damage to the business.
Sadly we can not offer you guidance or assistance in recovering your stolen data nor can we provide you with removing your data from the hands of the attacker. What we can do is to provide you with information has your data been stolen.
Threat actor released the personal information for 533,313,128 Facebook users on a hacking forum, including mobile numbers, name, gender, location, relationship status, occupation, date of birth, and email addresses. This data was originally sold in private sales after being collected in 2019 using a bug in the ‘Add Friend’ feature on Facebook.
Facebook had closed this vulnerability soon after it was discovered, but threat actors continued to circulate the data until it was finally released practically for free. Since then, Troy Hunt has added the leaked data to his Have I Been Pwned data breach notification service to help users determine if a Facebook member’s data was exposed in the leak.
Go to the site and enter your email address to check and see if your data has been compromised.
Read More
This post will show you how to fix the Windows update error 0xca00a000 which you can encounter during the installation of Windows updates. Here’s the full error message of this Windows Update error:
“Updates failed
There were problems installing some updates, but we’ll try again later. If you keep seeing this and want to search the web or contact support for information, this may help:
2018-07 Cumulative Update for Windows 10 Version 1803 for x64-based Systems (KB4345421) – Error 0xca00a000”
This kind of Windows Update error pops up when Windows has missed installing one of the cumulative updates needed or when there is some problem with the driver that won’t let the installation of the updates push through. There are also instances when the system files are modified with incorrect permission that may result in the Windows update error 0xca00a000. Thus, you need to fix the trusted installer permission as well as resolve the issue with the driver. To do these things, you need to follow the options laid out below.
Option 1 – Run the Windows Module Installer
The Windows Module Installer is a built-in service in the Windows operating system that could help you resolve the Windows update error 0xca00a000. You need to make sure that this service is Started and that its Startup type is set to Automatic – you can do this via Services Manager or by executing the command given below in an elevated Command Prompt.
- Tap the Win + R keys to open the Run dialog box.
- Then type “command prompt” in the field and hit Enter to open Command Prompt.
- And in the elevated Command Prompt type in the following command and hit Enter:
SC config trustedinstaller start=auto
- After executing the command successfully, you should see the “[SC] ChangeServiceConfig SUCCESS” message on the Command Prompt window.
Option 2 – Try manually installing the updates
As mentioned, the error might be because Windows missed installing a particular update which is why you are not able to proceed with the current update. So to resolve the issue, you need to install the update that wasn’t installed by downloading it from the Microsoft Update Catalog website. You also have to make sure that you didn’t turn off the Windows update or have it delayed.
Option 3 – Delete the files from the Software Distribution folder
The Software Distribution folder in the Windows operating system is a folder that can be found in the Windows directory and is used to store files temporarily which might be required to install the Windows Update on your PC. Thus, it is required by the Windows Update and maintained by WUAgent. A lot of users tried deleting the files in this folder to fix the problem and so far it has worked. Like them, you can try clearing the Windows Update cache by simply deleting the contents of the folder named “SoftwareDistribution” since Windows apparently can’t clear and re-download the update contents once they are corrupted. Thus, deleting the contents of this folder will make Windows download the contents again which will fix the problem. To do that, follow the steps below.
- Open the WinX Menu.
- From there, open Command Prompt as admin.
- Then type in the following command – don’t forget to hit Enter right after typing each one of them.
net stop wuauserv
net stop bits
- After entering these commands, it will stop the Windows Update Service and the Background Intelligent Transfer Service.
- Next, go to the C:/Windows/SoftwareDistribution folder and get rid of all the folders and files thereby tapping the Ctrl + A keys to select them all and then click on Delete. Note that if the files are in use, you won’t be able to delete them.
- Once all the contents in the Software Distribution folder are deleted, restart your PC and then go back to Command Prompt and input the following commands again.
net start wuauserv
net start bits
Since the folder has already been flushed, it will be populated afresh the instant your restart your computer and open Windows Update.
- Now Open Settings and check for Windows Updates. Windows 10 should begin the download right away.
Option 4 – Install the updates in a Clean Boot State
You might want to try putting your computer in a Clean Boot state and then install Windows Updates again without any trouble. During this state, you can start the system with a minimum number of drivers and startup programs that will surely help you in isolating the root cause of the issue.
- Log onto your PC as an administrator.
- Type in MSConfig in the Start Search to open the System Configuration utility.
- From there, go to the General tab and click “Selective startup”.
- Clear the “Load Startup items” checkbox and make sure that the “Load System Services” and “Use Original boot configuration” options are checked.
- Next, click the Services tab and select the “Hide All Microsoft Services” checkbox.
- Click Disable all.
- Click on Apply/OK and restart your PC. (This will put your PC into a Clean Boot State. And configure Windows to use the usual startup, just simply undo the changes.)
- After that, try to install the Windows Updates or upgrade again.
Option 5 – Run the Windows Update Troubleshooter
Running the built-in Windows Update troubleshooter could also help you resolve the Windows update error 0xca00a000. To run it, go to Settings and then select Troubleshoot from the options. From there, click on Windows Update and then click the “Run the troubleshooter” button. After that, follow the next on-screen instructions and you should be good to go.
Option 6 – Run Microsoft’s online troubleshooter
Running Microsoft’s online troubleshooter might also help you fix the Windows update error 0xca00a000. This online troubleshooter is known to help in fixing Windows Update errors, it scans your computer for issues that might be causing the problem and then fixes them automatically.
Read More
In previous versions of Windows changing the system, the font was a pretty straightforward process, but it seems Microsoft did not want this feature to keep for whatever reason and there is no option as of the time of the writing of this article to do it in standard options in Windows 10.
But do not worry, you are still able to customize your Windows and choose which font would you like to see inside it in all of its dialogs. You can choose whichever font you desire, the only prerequisite is it to be installed on your system.
This guide will require you to change values in the registry of Windows itself so please follow step-by-step instructions and always make a backup of the registry before changing it in order to prevent some permanent Windows issues.
All of that being said, let’s start.
Setting new font
First thing is to open notepad, in the notepad paste the next block of code:
Windows Registry Editor Version 5.00
[HKEY_LOCAL_MACHINE\SOFTWARE\Microsoft\Windows NT\CurrentVersion\Fonts]
«Segoe UI (TrueType)»=»»
«Segoe UI Bold (TrueType)»=»»
«Segoe UI Bold Italic (TrueType)»=»»
«Segoe UI Italic (TrueType)»=»»
«Segoe UI Light (TrueType)»=»»
«Segoe UI Semibold (TrueType)»=»»
«Segoe UI Symbol (TrueType)»=»»
[HKEY_LOCAL_MACHINE\SOFTWARE\Microsoft\Windows NT\CurrentVersion\FontSubstitutes]
«Segoe UI»=»NEW_FONT»
Where in «Segoe UI»=»NEW_FONT» instead of NEW_FONT you need to write the exact name of the font that you wish to use as a system font.
Once you have replaced the default system font with your desired one, go to File and save as, from file type drop-down menu, choose all files and save this file as .REG type giving it whatever name you wish.
When the file is saved, close notepad, right-click on the saved file and choose the merge option. Confirm with YES and click on OK. Reboot your system and your Windows will now use the font of your choice as its default system font.
Restoring default font
If you wish to return the old default system font as it was, follow the same steps but in your notepad paste this code:
Windows Registry Editor Version 5.00
[HKEY_LOCAL_MACHINE\SOFTWARE\Microsoft\Windows NT\CurrentVersion\Fonts]
«Segoe UI (TrueType)»=»segoeui.ttf»
«Segoe UI Black (TrueType)»=»seguibl.ttf»
«Segoe UI Black Italic (TrueType)»=»seguibli.ttf»
«Segoe UI Bold (TrueType)»=»segoeuib.ttf»
«Segoe UI Bold Italic (TrueType)»=»segoeuiz.ttf»
«Segoe UI Emoji (TrueType)»=»seguiemj.ttf»
«Segoe UI Historic (TrueType)»=»seguihis.ttf»
«Segoe UI Italic (TrueType)»=»segoeuii.ttf»
«Segoe UI Light (TrueType)»=»segoeuil.ttf»
«Segoe UI Light Italic (TrueType)»=»seguili.ttf»
«Segoe UI Semibold (TrueType)»=»seguisb.ttf»
«Segoe UI Semibold Italic (TrueType)»=»seguisbi.ttf»
«Segoe UI Semilight (TrueType)»=»segoeuisl.ttf»
«Segoe UI Semilight Italic (TrueType)»=»seguisli.ttf»
«Segoe UI Symbol (TrueType)»=»seguisym.ttf»
«Segoe MDL2 Assets (TrueType)»=»segmdl2.ttf»
«Segoe Print (TrueType)»=»segoepr.ttf»
«Segoe Print Bold (TrueType)»=»segoeprb.ttf»
«Segoe Script (TrueType)»=»segoesc.ttf»
«Segoe Script Bold (TrueType)»=»segoescb.ttf»
[HKEY_LOCAL_MACHINE\SOFTWARE\Microsoft\Windows NT\CurrentVersion\FontSubstitutes]
«Segoe UI»=-
Reboot your system and your Windows will now revert the font of your choice as its default system font.
Read More
CLR20R3 error is received when you are launching an application in Windows 10. It can happen because of two reasons, a corrupted application file or missing system components. Keep on reading in order to find solutions to fix this error.
-
Run the program in compatibility mode
Locate problematic application executable file
Right-click on executable
Click on properties
Go to the compatibility tab and try running the application in the previous version of Windows or as an administrator. -
Reset Windows media component
Right-click on Start, then left-click on command prompt (admin)
In command prompt type next command and after each line of command press ENTER
regsvr32 atl.dll
cd C:\WINDOWS\eHome
ehSched /unregServer
ehSched /service
ehRecvr /unregServer
ehRecvr /service
ehRec.exe /unregServer
ehRec.exe /regserver
ehmsas.exe /unregServer
ehmsas.exe /regserver -
Reinstall Windows media player
Go to control panel
Click on Program and Features > Turn Windows feature on or off.
Expand Media Features, uncheck Windows Media Player, and click Ok.
Restart your PC, go through the same steps, tick Windows Media Player, and restart your computer once again. -
Reinstall .NET framework
Go to control panel
Click on Program and Features > Turn Windows feature on or off.
Uncheck “.NET Framework 3.5” and “.NET Framework 4.8”, and click Ok.
Restart your computer, go through the same steps, check “.NET Framework 3.5” and “.NET Framework 4.8”, and restart your computer once again. -
Update Windows
Go to settings and check for updates
Read More
A black screen error inside Windows 11 is a typical screen turning to solid black without any error message. This can be very annoying since it can randomly appear out of nowhere and it will appear while you are using the computer. Worry not, this is not a serious error and we have several solutions for it, so please keep reading and try them as presented in order.
Restart graphic driver
This is the first thing to check if the issue is due to software or driver malfunctioning, there is a shortcut for rebooting graphic driver inside Windows 11. Press WINDOWS + CTRL + SHIFT + B to reboot the graphic driver and see if this fixes the issue. A beep sound should be heard during this process and the screen should turn back to normal.
Check connections
Sometimes the screen can go black due to a faulty connection or cable. If you have it at your hand try a different cable or slightly and gently nudge the existing one to see will screen flicker. If you are on a laptop try gently moving the lid from back to front and pay attention to the screen. If screen flickers or picture returns with this method, cable or connector needs to be replaced.
Clean your computer
The black screen can be because the computer is overheating. If this is the case either fan inside is not working properly or there is a lot of dirt and dust that needs to be removed so airflow can be established again for proper cooling. We have an article on errortools.com on how to properly clean your PC but if you are not technical enough maybe the best solution would be to call someone who is or to take the PC to service for cleaning.
Change The Projection Settings
Press WINDOWS + P to open projection settings, check to see if PC is set to PC screen only. If any other option is selected change it to PC screen only since this can cause random black screen issues.
Uninstall latest updates
If this problem has started to manifest itself during the latest update, go to setting and roll back from the latest update to fix this issue.
Scan system for malware
The black screen can also be caused by various viruses and malware. IF you have anti-virus software, run a full system scan to check it for malware. If you do not have one, download a free one and run a system scan, we recommend Bitdefender.
Read More
As you know, every Windows Update is essential for every Windows operating system. They have to be regularly installed, especially since they include various security updates that are important to the system. However, there are times when Windows Update fails to execute properly and you get errors like the error code 0x80070BC9. When you encounter this particular Windows Update error, you will get the following error message on your screen:
“0x80070BC9 – ERROR_FAIL_REBOOT_REQUIRED. The requested operation failed. A system reboot is required to roll back changes made.”
This kind of Windows Update error is most likely caused by a newly installed problematic software, corrupted Windows Update files, or policies that restrict the behavior of the Windows Module Installer. The Windows Module Installer, also known as “WMIW” or “TiWorker.exe”, is the one that checks for new updates from the Windows server and installs them on your computer. This is why you need to make sure that you do not have any policies that control the start behavior of the Windows Module Installer since this service must not be hardened to any start value and should be managed by the operating system.
To resolve the Windows Update error code 0x80070BC9, you can check out the options provided below.
Option 1 – Try checking the status of the Windows Modules Installer Worker Service
Since the Windows Update error code 0x80070BC9 has something to do with the Windows Module Installer Worker service, you need to check its status in the Service Manager. Refer to the following steps to do so.
- In the Cortana search box, type “services” and click on the Services icon to open the Services Manager. Alternatively, you can also tap the Win + R keys to launch the Run prompt and then type “MSC” in the field and hit Enter to open the Services Manager.
- After opening the Services Manager, look for the Windows Modules Installer Worker Service.
- Once you found it, check its status and make sure that its Startup type is set to Manual.
- Now click on the Start button and see if it fixes the Windows Update error.
Option 2 – Run the Windows Update Troubleshooter
You might want to run a built-in Windows Update troubleshooter to resolve the Windows Update error. It is one of the things you can check out as it is known to automatically resolve any Windows Update errors like error code 0x80072EE2. To run this troubleshooter, go to Settings and then select Troubleshoot from the options. From there, click on Windows Update and then click the “Run the troubleshooter” button. After that, follow the next on-screen instructions and you should be good to go.
Option 3 – Try contacting the IT administrator to modify the group policies
You could also try to contact the IT administrator to have the group policies modified. This option is applicable for company-managed systems. As mentioned, one of the possible causes of the Windows Update error 0x80072EE2 is the policies that control the start behavior of the Windows Module Installer. Thus, you need to have them removed so that the Windows Module Installer Worker service is managed by the operating system itself. And since there could be many policies, it is highly advised that you contact your company’s IT administrator to get the job done for you.
Option 4 – Try to install the Windows Updates in a Clean Boot State
There are some instances that some conflicting programs installed in your computer might be the one that’s causing Windows Update error code 0x80070BC9. To identify which program is causing the problem, you need to put your computer in a Clean Boot State. To do so, follow the steps below.
- Log onto your PC as an administrator.
- Type in MSConfig in the Start Search to open the System Configuration utility.
- From there, go to the General tab and click “Selective startup”.
- Clear the “Load Startup items” check box and make sure that the “Load System Services” and “Use Original boot configuration” options are checked.
- Next, click the Services tab and select the “Hide All Microsoft Services” check box.
- Click Disable all.
- Click on Apply/OK and restart your PC. (This will put your PC into a Clean Boot State. And configure Windows to use the usual startup, just simply undo the changes.)
- From there, start to isolate the problem by checking which one of the programs you installed recently is the root cause of the problem.
Read More
Copyright © 2023, ErrorTools. All Rights Reserved
Trademark: Microsoft Windows logos are registered trademarks of Microsoft. Disclaimer: ErrorTools.com is not affiliated with Microsoft, nor claims direct affiliation.
The information on this page is provided for information purposes only.