
Не паникуйте, обнаружив при загрузке операционной системы (ОС) эту ошибку. Ее относительно несложно исправить. Достаточно разобраться в причинах, а потом правильно действовать.
Причины ошибок
BOOTMGR — загрузчик ОС Windows, начиная с версии Vista. Он загружает ядро Виндовс в операционную память, подготавливает оборудование к работе, определяет какие ОС установлены на компьютере. То есть, он ответственный за начало работы системы, поэтому при его сбоях невозможно использовать компьютер. Коварство неполадки заключается в том, что ОС не будет грузиться ни в обычном, ни в безопасном режиме. Еще эта ошибка может предшествовать скорому выходу из строя накопителя.
BOOTMGR is compressed
Означает, что файл был сжат, а поэтому не может нормально определяться BIOS-UEFI-прошивкой материнской платы, которая стартует еще до запуска Windows. В подавляющем большинстве случаев такой сбой вызван активированной опцией сжатия системного диска для экономии свободного пространства. То есть, специальная утилита взяла и заархивировала BOOTMGR, а в таком виде он не может нормально функционировать. Также в некоторых ситуациях ошибка может означать, что файл повредился.
BOOTMGR is missing
Означает, что файл невозможно найти на жестком диске. Это не обязательно означает, что он был стерт или перемещен. Для таких манипуляций все равно нужны специальные права допуска и неплохие познания в компьютерах. Порой сбой возникает из-за неправильного приоритета загрузки — БИОС выбирает не тот накопитель для запуска ОС.
BOOTMGR is is corrupt
Означает, что файл поврежден и невозможно выполнить его полное чтение с диска. Наиболее редкий вариант ошибки, но и последствия у него самые печальные. Чаще всего это происходит при существенной деградации поверхности магнитных пластин на жестком диске (HDD) или исчерпании ресурса циклов записи данных в ячейку памяти в твердотельном диске (SSD).
Способы исправления
Обобщено для устранения сбоя с BOOTMGR is compressed нужно сделать одно из следующих действий:
- устранить фактор, вызывающий невозможность работы загрузчика;
- восстановить или заменить загрузчик.
Способ 1. Неувязка появилась из-за некорректных опций в BIOS.
Это типично для компьютеров с несколькими подключенными накопителями. К примеру, на SSD может быть ОС, а на HDD — основные пользовательские файлы. В BIOS может заглючить опция приоритетности загрузки и тогда ее следует возвратить к изначальному значению.
Меняем настройки БИОСа
Для этого выполняйте следующее:
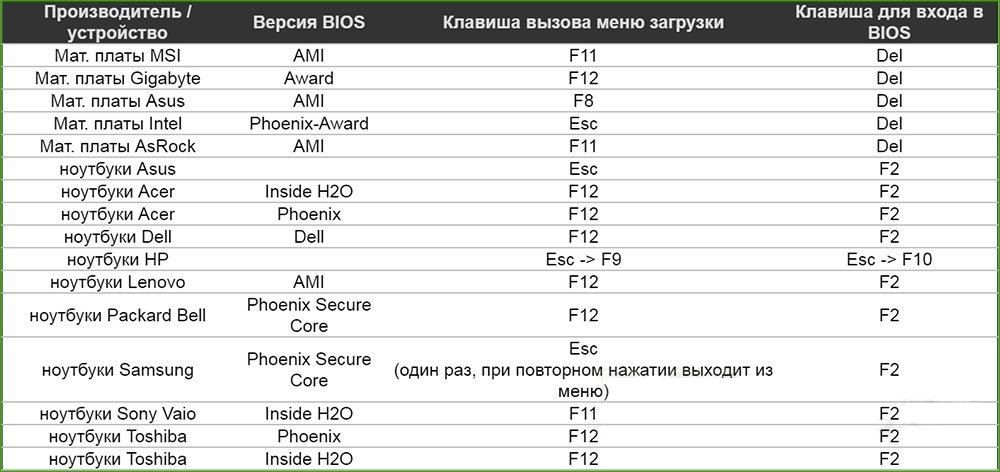
- Зайдите в BIOS. Для этого перед возникновением ошибки жмите на Del, F2, F12, F10 или другую кнопку, которая будет указана на экране для запуска БИОСа. Не торопитесь, оповещение о требуемой клавише однозначно появится, нужно только быть внимательным, там не так много строчек, чтобы не заметить.
- Перейдите во вкладку «Boot» («Boot Settings»). Она может называться по-разному в зависимости от версии прошивки материнки. Ищите на этой вкладке строчки «Boot Devices Priority» и «Hard Disc Drives». Опять же, названия могут отличаться в вашем случае, но не существенно.
- Убедитесь, что в настройках «Hard Disc Drives» на первом месте стоит накопитель, на котором установлена ОС. В «Boot Devices Priority» проверьте, что первым грузится информация с жесткого диска, а не оптического дисковода. Везде должны быть корректные установки, при иных обстоятельствах измените их.
- Сохраните изменения. Это можно делать нажатием на F10 и подтверждением операции Yes (Y, OK). Возможно, в вашем БИОСе нужно будет просто перейти в опцию «Save Changes & Exit».
После этих манипуляций BIOS-UEFI будет искать загрузчик ОС на подходящем накопителе.
Сброс настроек к заводским
Действовать можно двумя путями:
- Вынимать батарейку CMOS памяти. Подойдет для настольных компьютеров, которые можно разбирать. Снимите боковую крышку, найдите на материнке батарейку-таблетку и вытяните ее на 10-15 секунд. После этого произойдет перезапуск всех настроек к стандартным.
- Программно сбросить установки. Для этого зайдите в БИОС и активируйте опцию «Load Defaults BIOS» («Load BIOS Setup Defaults», «Load Safe-Fail Defaults»).
Способ 2. Неувязка появилась из-за программного сбоя
На черном фоне отображается BOOTMGR is compressed, что делать? В большинстве случаев проблема в системном файле, который по неизвестным причинам потерял изначальную форму.
Откат системы
Проще всего воспользоваться встроенными инструментами ОС для замещения сбойного файла на нормальный. Для этого потребуется установочный диск или флешка.
Подготовка диска или флешки с установочными файлами Windows
Требуется записать образ той версии Windows, которая сейчас установлена на компьютере. Нет принципиальной разницы между оптическим диском или USB-флешкой. В каждом случае важно лишь корректно установить подходящий приоритет загрузки в BIOS-UEFI. Сама процедура записи происходит по стандартной схеме, в результате на руках должен быть загрузочный носитель с которого можно проинсталлировать Windows.
Установка для Windows 7
Выполняйте следующие действия:
- На начальном окне установки ОС в левом нижнем углу нажмите на «Восстановление системы».
- Отобразится окно «Параметры восстановления Windows», в котором клик на ту ОС, которая не хочет грузиться на вашем компьютере.
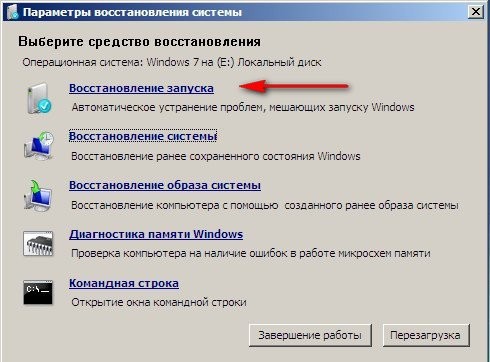
- В следующем окошке сначала жмите на «Восстановление запуска». После начнется процедура проверки, которая может длиться достаточно долго. Если по ее окончании сбой не пройдет, то возвратитесь снова к этому окошку и кликните внизу на строчку «Командная строка».
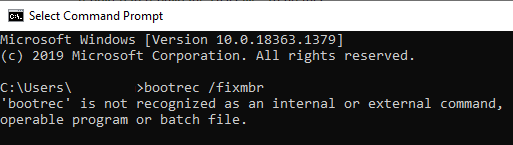
- В возникшее черное окно копируйте команду bootrec /fixmbr и запустите ее нажатием на Enter. Далее проделайте аналогичную операцию с bootrec /fixboot.
- Закройте утилиту восстановления, перегрузите систему, вновь поставьте первую загрузку с накопителя, где установлена Windows. Ошибка должна исчезнуть, так как вы создали новый нормальный файл BOOTMGR и указали ОС, что она должна грузиться с его помощью.
Установка для Windows 8 и 8.1
Действуйте по следующему алгоритму:
- На начальном окне установки ОС следуйте по пути: «Восстановление системы» => «Windows 8» => «Диагностика» => «Дополнительные параметры» => «Автоматическое восстановление».
- Сначала кликните на «Восстановление системы». После начнется процедура проверки, которая может длиться достаточно долго. Если по ее окончании сбой снова появится, то возвратитесь к этому окошку и жмите на «Командная строка».
- В возникшее черное окно копируйте команду bootrec.exe /FixMbr и запустите ее нажатием на Enter. Далее проделайте аналогичную операцию с bootrec.exe /FixBoot. После закройте окно и перезагрузите компьютер. Если проблема не исчезла, то возвратитесь снова к этому окошку.
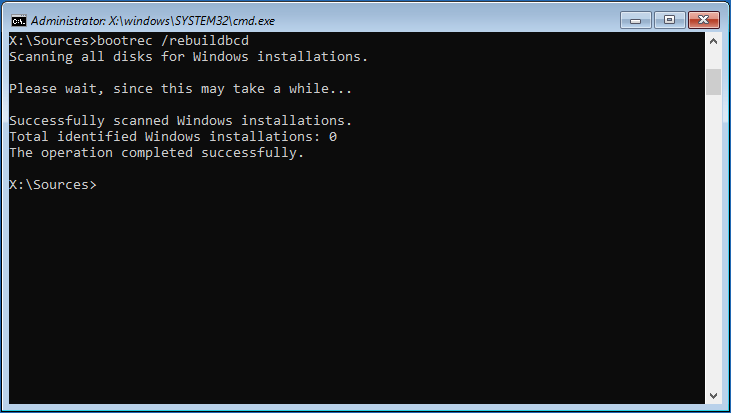
- Запустите команду bootrec.exe /RebuildBcd. Она просмотрит все накопители на наличие ОС, а при нахождение таковой сделает у вас запрос, что ОС будет включена в список загрузки. Нужно подтвердить эту манипуляции вводом Y и нажатием на кнопку Enter.
Установка для Windows 10
Выполняйте те же действия, что и в предыдущем блоке, но запускайте другую команду в Командной строке — bcdboot Х:\Windows /s Y:\, где:
- Х:\Windows — папка с Виндовс на диске, в вашем случае, скорее всего, это будет C:\Windows;
- Y — обозначение флешки или оптического диска, с которого восстанавливается система;
- чтобы точно узнать буквы дисков, вводите команды diskpart и list volume.
Это заменит поврежденный загрузчик BOOTMGR на нормальный, который скопируется с загрузочной флешки или диска.
Способ 3. Решение проблемы с помощью программ
Ошибка с загрузчиком предполагает полную невозможность запуска ОС, поэтому однозначно нужно и можно загружаться только с флешки или LiveCD. После этого вы получите доступ к основному накопителю и вопрос будет стоять в выборе подходящей утилиты для восстановления BOOTMGR. Таких много, но рассмотрим MbrFix. Для одного жесткого диска в системе с одним локальным диском на котором установлена седьмая версия Виндовс, вам нужно лишь запустить команду MbrFix.exe /drive 0 fixmbr /win7. Для других ОС и конфигураций стоит обращаться к детальным инструкциям, их несложно найти в сети.
Как предотвратить ошибку в будущем
Во избежание ошибки выполняйте следующие действия:
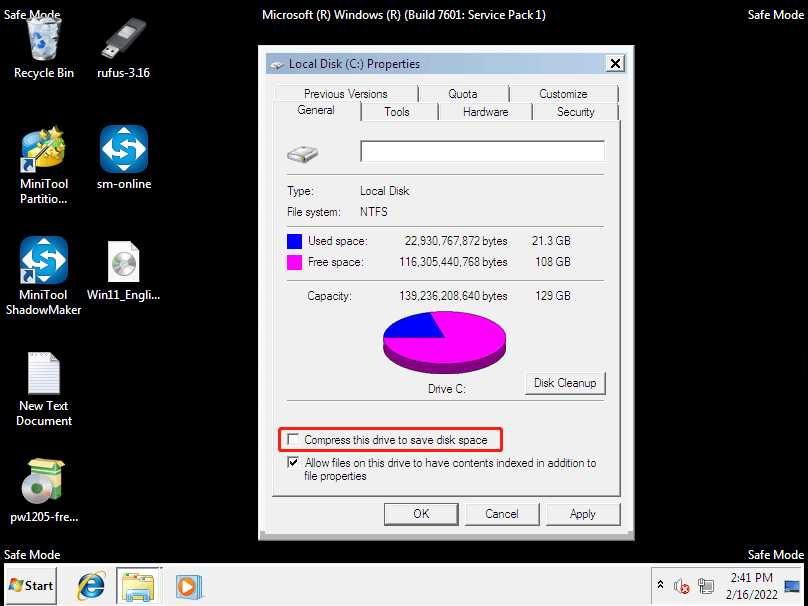
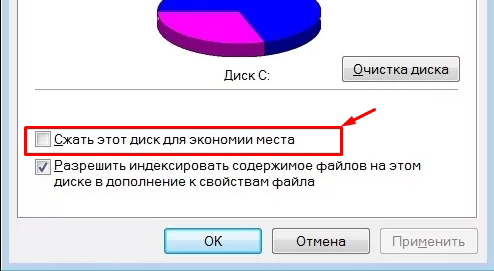
- Отключите сжатие данных на локальном диске, где стоит Windows. Для этого зайдите в «Мой (Этот) Компьютер», клик правой кнопкой мышки на первом диске => «Свойства» => «Общие». Снимите отметку со строчки «Сжать этот диск».
- Следите за состоянием накопителя. Если у вас SSD, то используйте утилиту мониторинга от производителя, она есть для продукции любого известного бренда. Если у вас HDD, то проводите мониторинг параметров S.M.A.R.T. Для этого есть множество приложений, среди бесплатных рекомендуем CrystalDiskInfo.
Заключение
- Сбой вызван невозможностью запуска загрузчика ОС.
- Для его устранения проще всего воспользоваться средствами восстановления Виндовс.
- Иногда проблема только предвещает серьезную поломку накопителя.
“BOOTMGR is compressed” is a common system error when starting your Windows 10/8/7 PC to the desktop. How can you fix this issue to use your computer as normal? Don’t panic and you come to the right place. MiniTool will help you easily get rid of this startup error. As well, some suggestions are given to you.
BOOTMGR Is Compressed Press Ctrl+Alt+Del to Restart
What is BOOTMGR? It is Windows Boot Manager that was first introduced in Windows Vista to replace NTLDR boot manager in previous versions of Windows. It is necessary for Windows to work properly. If it goes wrong, Windows will fail to load to enter the desktop.
BOOTMGR missing is a common error when loading up the operating system. If you encounter it, you can go to find troubleshooting tips from the related article – 11 Solutions to “BOOTMGR Is Missing” Error in Windows 10/8/7.
Besides, there is another error – BOOTMGR is compressed. If you press Ctrl+Alt+Del to restart the PC, the error still appears on the screen. File compression is an excellent feature to help PC users reduce the size of files, folders, and programs to save disk space. But since the system boot sector code cannot decompress files by itself, the BOOTMGR file shouldn’t be compressed. Or else, you see the error on the screen.
Well then, how can you remove the compressed BOOTMGR error from your PC? Go on reading to find some useful fixes.
How to Fix BOOTMGR Is Compressed Windows 10/8/7
Further Reading: How to Enter WinRE
Since Windows fails to load when getting the error “BOOTMGR is compressed press Ctrl+Alt+Del to restart”, you cannot perform fixes on the desktop. An installation disc or USB drive is required to boot the PC to enter the Windows Recovery Environment (WinRE) for troubleshooting.
In Windows 10/8/7, you need to go to download an ISO file of Windows and burn it to a CD/DVD/USB. Or, create a recovery drive on another computer and use the drive to boot your PC.
Some of you may be interested in BOOTMGR is compressed fix without CD or USB. If there is no disc or USB, you can also enter the recovery mode.
In Windows 10, you can repeat the process of turning the PC on and off three times when seeing the Windows logo and the PC will automatically boot to the Automatic Repair interface the fourth time. Then, click Advanced options to enter WinRE.
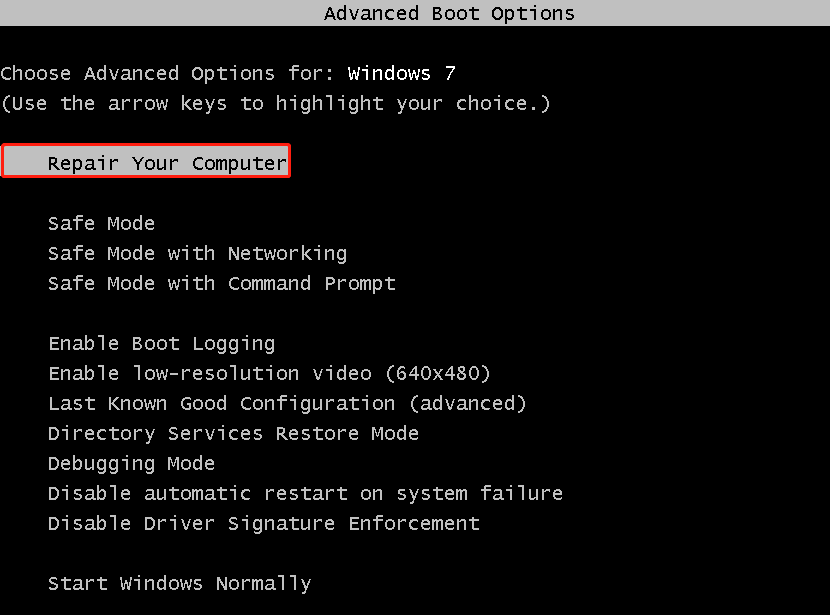
In Windows 7, press F8 before the Windows logo appears during the reboot process to access Advanced Boot Options and then click Repair Your Computer to start System Recovery Options.
In the following fixes, the steps are based on installation disc or USB.
Run Startup Repair to Repair BOOTMGR
Startup Repair is a good way to scan the Windows operating system for damaged or missing system files in Windows 10, 8, 7, and Vista. If the BOOTMGR file is corrupt, missing, or compressed, you can also run this to replace that file to remove the error from the PC.
Step 1: Connect the installation medium to your Windows 10/8/7 PC, enter BIOS by pressing F2, Del, etc. and change the boot order to run the computer from the disc or USB drive.
Step 2: Choose a language and keyboard options, and click the Repair your computer button to enter WinRE or access System Recovery Options.
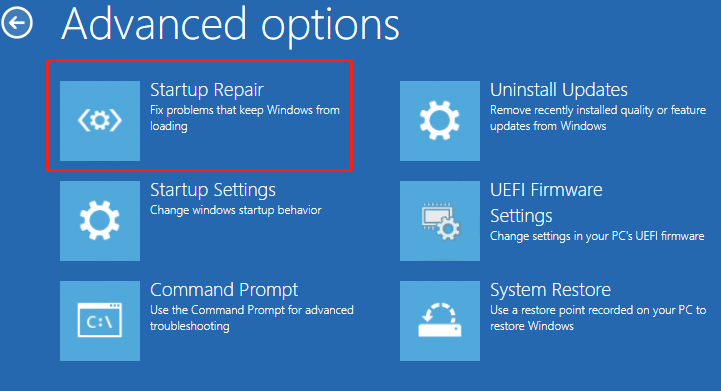
Step 3: In Windows 10/8, go to Choose an option > Troubleshoot > Advanced options. Then, click Startup Repair or Automatic Repair to start to fix problems that keep Windows from loading.
In Windows 7, check the box of the first recovery option to use recovery tools to fix problems starting Windows, select Windows 7 to repair, and click Next. Then, you can see multiple recovery tools, as shown below. Just click Startup Repair to continue.
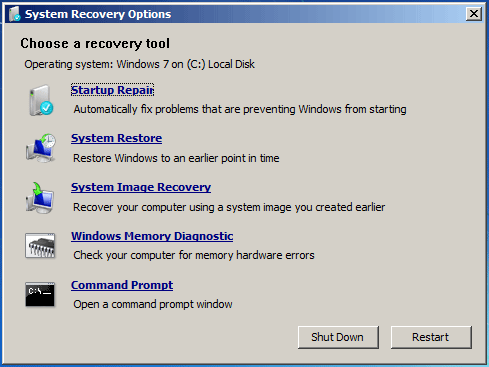
Then, the Startup Repair tool starts scanning the system for known issues and try a repair if possible. If this cannot fix BOOTMGR is compressed, continue the fix in other ways below.
Rebuild Boot Configuration Data (BCD) File
BCD includes boot configuration parameters that are used to boot Windows. If the BCD file is corrupted or damaged, rebuilding it is necessary since the system always cannot boot up. When getting the error message “BOOTMGR is compressed press Ctrl+Alt+Del to restart”, you can also try to rebuild BCD by following the instructions below.
Step 1: In Windows 10/8, enter WinRE by following the steps above and go to Troubleshoot > Advanced options > Command Prompt. In Windows 7, go to click Command Prompt in the System Recovery Options window.
Step 2: Type in these commands in turn and press Enter after each command:
bootrec /fixmbr
bootrec /fixboot
bootrec /rebuildbcd
Related Article: What Is Bootrec.exe? Bootrec Commands and How to Access
Update BOOTMGR Manually
The BOOTMGR error can be caused by a compressed BOOTMGR file. To fix it, you can update BOOTMGR to replace the file with the correct one. Here is what you should do:
Step 1: Boot the PC from the installation disc or USB drive and click Repair your computer to enter Windows recovery mode.
Step 2: Open Command Prompt (CMD) in Windows 10/8/7.
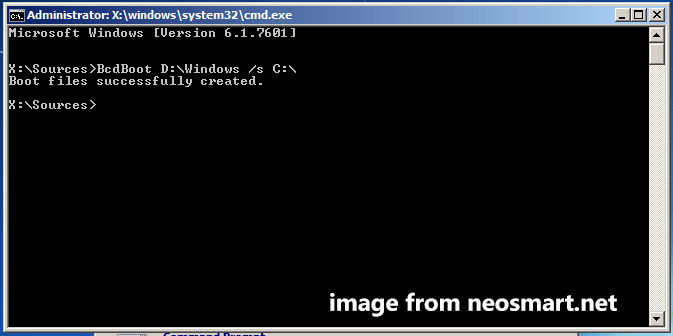
Step 3: Type in bcdboot C:\Windows /s D:\ to the CMD window and press Enter to execute this command.
Tip: Windows installation drive is usually C drive. If you install Windows on another drive, replace C:\ here with the correct one. Besides, D:\ refers to an active boot partition. If it is not D on your PC, replace it, too. See the following example screenshot to know the details.
Uncheck Compress This Drive
Sometimes “BOOTMGR is compressed” error is triggered by a compressed hard drive and uncompressing the drive is a good solution to fix the issue in Windows 10/8/7.
Step 1: Boot the PC from the installation drive or disc and open Command Prompt.
Step 2: Type in one of the following commands based on which Safe Mode you want and press Enter. After that, exit CMD and restart the PC to Safe Mode.
- Safe Mode: bcdedit /set {default} safeboot minimal
- Safe Mode with Networking: bcdedit /set {default} safeboot network
- Safe Mode with Command Prompt: bcdedit /set {default} safebootalternateshell yes
Tip: In Windows 7, you can press F8 during the startup process and choose a Safe Mode option under the Advanced Boot Options window. In Windows 10/8, you can enter WinRE, go to Troubleshoot > Advanced options >Startup Settings > Restart, and press a function key to enter Safe Mode.
Step 3: Go to Windows Explorer, right-click on the system drive like C and choose Properties.
Step 4: In the General tab, uncheck the option – Compress this drive to save disk space.
Step 5: Click Apply and OK to save the change.
After trying these ways, the error message “BOOTMGR is compressed press Ctrl+Alt+Del” should be removed and you can run Windows normally. You can share these solutions on Twitter to let more people know so that they can easily get rid of the trouble when encountering it.
Click to Tweet
Suggestion: Back up Windows
Windows system issues always happen unexpectedly and even sometimes Windows cannot load properly. Once the system goes wrong, you need to take some time to find solutions, which is troublesome and annoying. If you don’t have some computer skills, fixing the issues is difficult.
There is a suggestion to give you: back up the operating system. Once Windows fails to boot or system issues happen, you can restore the PC to a previous state from the system image file. How to do this work? Use a professional backup software!
On the market, PC backup software brands are various and which one should you choose? Here we strongly recommended MiniTool ShadowMaker. It is compatible with Windows 11/10/8/7 and can help you back up your hard drive, USB flash drive, SD card, and more.
Multiple backups are supported, including files, folders, disks, partitions, and system backup. MiniTool ShadowMaker can help you back up data automatically in a time point that you have configured and it supports only backing up new or added data – incremental or differential backup. File sync and disk cloning can also be done by this software.
Just click the following button to download this software and install it on your PC. Then, start a backup.
MiniTool ShadowMaker TrialClick to Download100%Clean & Safe
Step 1: Double-click the icon of MiniTool ShadowMaker to launch it and click Keep Trial.
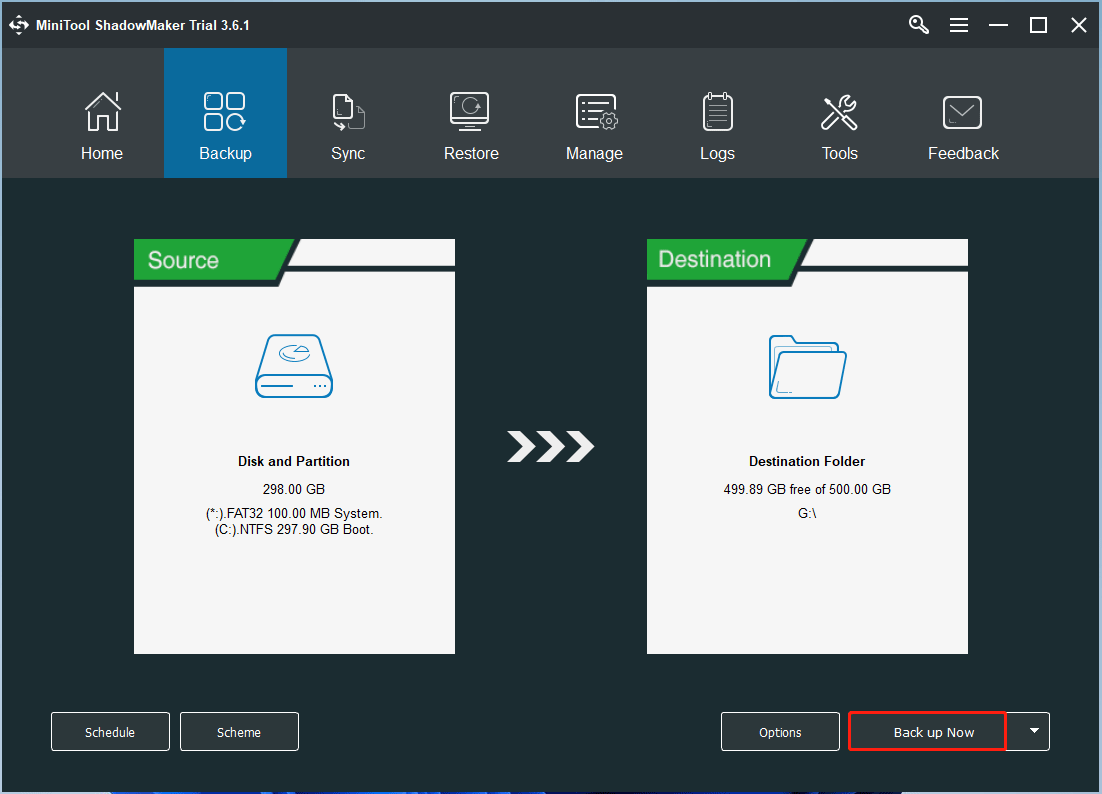
Step 2: Choose system partitions as the backup source. By default, this program has selected these partitions and you can see it under Backup. You need to specify a path to save the system image file by clicking Destination.
Tip: If you want to back up files, go to Source > Folders and Files, check items you want to back up, and click OK.
Step 3: Click Back up Now to execute the system backup.
After finishing the system image backup, you should create a bootable USB drive or CD/DVD by clicking Media Builder under the Tools page. Once Windows fails to load to the desktop with an error like BOOTMR is missing, you can run your PC from the bootable drive or disc and enter the bootable edition of MiniTool ShadowMaker, then perform a system image recovery to restore the PC to a normal state.
Recover Data from Your PC
If the error – BOOTMRG is compressed cannot be fixed after you try the methods above, what should you do to keep the data safe? You can recover data from the bootable PC. To do this work, a professional data recovery software for Windows 11/10/8/7 is recommended.
MiniTool Power Data Recovery can be your good assistant. It allows you to easily recover files from multiple devices like an SSD, HDD, external hard drive, USB drive, SD card, and more. Multiple situations are supported, for example, recover files from formatted/damaged/deleted/RAW partitions, retrieve data from an unbootable PC, etc.
Since the PC fails to boot with the compressed BOOTMGR error, you need to get its full edition from MiniTool Store and create a bootable USB drive or CD/DVD by clicking the disc icon. Then, boot the PC to BIOS, and then change the boot sequence to start it from the drive to enter the bootable edition of MiniTool Power Data Recovery.
Step 1: In the main interface of this software, go to Devices, choose the system disk and click the Scan button to begin scanning the hard drive.
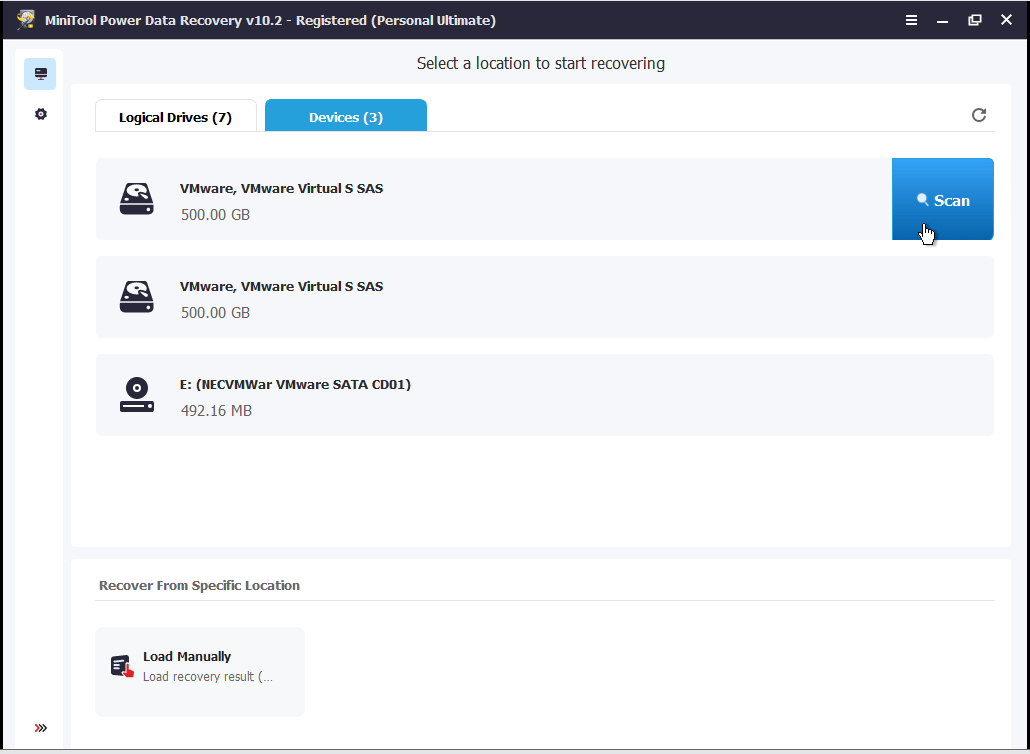
Step 2: The scanning process will take some time and you should wait patiently. After that, locate files you want to recover and click Save to restore data to a safe location. Here, we recommend using another hard drive or USB drive.
Bottom Line
Get the error message “BOOTMGR is compressed press Ctrl+Alt+Del to restart” in Windows 10/8/7 when starting up your PC? How can you remove this issue? This post gives you some useful solutions and you can follow the detailed instructions to perform the fix depending on your system.
To quickly perform a disaster recovery, you had better back up your system beforehand with MiniTool ShadowMaker. If you cannot fix your issue, you can use MiniTool Power Data Recovery to recover data from your PC.
If you have any other troubleshooting tips to fix compressed BOOTMGR or you encounter issues when using MiniTool Software, leave a comment below.
Если при очередном включении компьютера, вместо загрузки Windows 7 на черном экране вы увидели белую надпись «BOOTMGR is compressed. Press Ctrl+Alt+Del to restart» и не знаете, что делать то, прежде всего: ничего страшного в этом нет, исправить это можно в течение нескольких минут, также как и ошибку BOOTMGR is missing
Очень хорошо, если у вас имеется загрузочный диск или флешка с Windows 7. Если загрузочных накопителей нет в наличии, то, по возможности, сделайте на другом компьютере. Кстати, подойдет также и диск восстановления, созданный после установки ОС ее встроенными средствами, но мало кто их делает: если у вас есть другой компьютер с аналогичной ОС, вы можете создать диск восстановления там и использовать его.
Исправить ошибку Bootmgr is compressed можно и с помощью дополнительных программ, которые опять же должны будут располагаться на загрузочном LiveCD или флешке. Таким образом сразу отвечаю на частый вопрос: можно ли убрать bootmgr is compressed без диска и флешки? — можно, но только отключив жесткий диск и подключив его к другому компьютеру.
Исправление ошибки Bootmgr is compressed в Windows 7
В BIOS компьютера установите загрузку с диска или загрузочной флешки, на которых находятся либо файлы установки Windows 7, либо это диск восстановления.

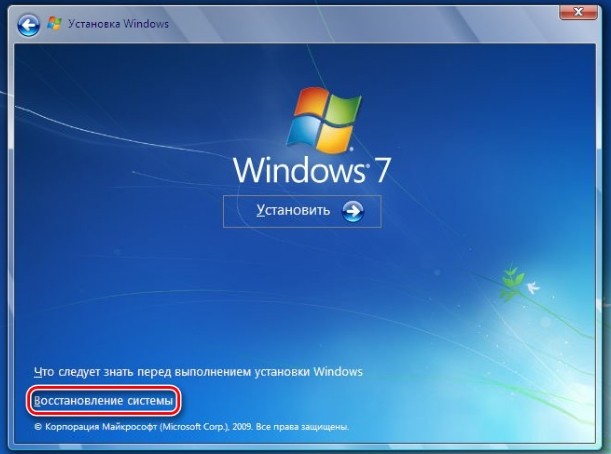
Если вы используете установочный накопитель Windows, то после выбора языка, на экране с кнопкой «Установить» нажмите ссылку «Восстановление системы».
А затем, указав, какую ОС нужно восстанавливать, выберите запустите командную строку. Если же используется диск восстановления, то просто выберите командную строку в списке средств восстановления (предварительно вас попросят выбрать установленную копию Windows 7).

Следующие действия очень просты. В командной строке введите команду:
bootrec /fixmbr
Данная команда перезапишет MBR на системном разделе жесткого диска. После ее успешного выполнения введите еще одну команду:
bootrec /fixboot

Этим вы завершите процесс восстановления загрузчика Windows 7.
После этого просто выйдите из восстановления Windows 7, при перезагрузке компьютера выньте диск или флешку, установите в BIOS загрузку с жесткого диска, и в этот раз система должна загрузиться без появления ошибки «Bootmgr is compressed».
Have you come across the error message “BOOTMGR is compressed Press Ctrl+Alt+Del to restart” while booting up your computer? This is a common error on Windows 7, 8, and 10 systems. When encountering this error, you’ll be presented with a black screen and the mentioned message, with limited options available, prompting a reboot of your computer.
BOOTMGR is short for Boot Manager, an important system file of Windows. It replaced Ntldr, which used to be the boot loader in Windows XP.
Once it is compressed, the file can’t be used and Windows won’t start or boot up. The BOOTMGR must therefore be uncompressed first for your Windows PC to be able to boot up properly.
File compression used to be a great method to save on hard drive storage, back in the days when hard disks were only around 20 GB in size. Unfortunately, modern drives now offer hundreds or thousands of GB storage so there is no longer any need to compress files.
This BOOTMGR error can be caused by several factors and not just when the file BOOTMGR is compressed. It can also be triggered by a corrupted or missing MBR, Boot Sector, or BCD.
If you get the ‘BOOTMGR is compressed’ error message, you do not need to worry. There are two easy solutions to fix the error.
What Is BOOTMGR is compressed Error on Windows 10/11?
BOOTMGR is a Windows utility designed to manage boot sequence order. When accessed, it displays the OS selection options after loading the boot configuration data. The configuration data for BOOTMGR is usually located in the Boot Configuration Data or BCD store.
We have discussed earlier that file compression allows PC users to minimize the size of files, folders, and programs. This is often done to reduce disk space usage. But since the system boot sector code does not have the ability to decompress files by itself, the BOOTMGR file, an important part of the booting process, should never be compressed. Otherwise, you’ll encounter this “BOOTMGR is compressed Press Ctrl+Alt+Del to restart” error on Windows 10/11 startup.
It is also possible that due to a bug in Microsoft’s filesystem compression code, you might encounter this compression error with a different filename. Here are some examples.
- QXHDK is compressed. Press CTRL+ALT+DEL to restart.
- PJBIH is compressed. Press CTRL+ALT+DEL to restart.
- DFJEU is compressed. Press CTRL+ALT+DEL to restart.
- VUFEI is compressed. Press CTRL+ALT+DEL to restart.
- DGKAR is compressed. Press CTRL+ALT+DEL to restart.
This is basically the same error and the circumstances surrounding them are the same. It only means that the compressed file is something else. But you can use the same troubleshooting steps to fix this type of errors.
What Causes BOOTMGR is compressed Error on Windows 10/11?
File compression is a great feature with which users can decrease the size of any data and reduce the amount of storage space they consume on hard drives. Unfortunately, the system boot sector code does not have the ability to unpack files on its own. On newer OS, the boot sector code loads the BOOTMGR file.
This BOOTMGR file is used to launch the operating system kernel and start Windows. It is located in the main partition’s root directory found on the first boot disk. So when the boot sector finds that the BOOTMGR file is compressed, the boot process is halted and the error “BOOTMGR is compressed Press Ctrl Alt Del to Restart” pops up on the monitor screen.
There are two reasons why the BOOTMGR file may have been compressed. The first culprit is the speed booster or system optimizer that you might have installed recently. This type of program often triggers this problem because it compresses the entire system partition, usually the C: drive, to save storage. One of the files included in the compression is the crucial BOOTMGR file.
File compression, even when it is done correctly, might slow down system performance. So if your system optimizer is doing this, it’s not really helping at all.
Another reason why compression happens is when you manually compressed the entirety of the system partition via the drive’s Properties window.
Whatever the cause is, resolving this error should be your priority because you won’t be able to boot normally otherwise. Follow our guide below to find out various methods to deal with the BOOTMGR is compressed error on your PC. You can also apply the solutions if you get the BOOTMGR is missing error.
What To Do About BOOTMGR is compressed Error on Windows 10/11
If you encounter this error, this means that you have limited startup options. You need to resolve it quickly to be able to boot normally. You can follow the instructions below to guide you in troubleshooting this issue.
Fix #1. Use System Repair.
Your first option is to use your Windows Installation Disc or bootable media. You can use the system recovery options to fix the “BOOTMGR is Compressed” error. To do this:
- Insert your Windows Installation DVD or bootable media and boot from it.
- Set CD/DVD-ROM/USB bootable media as the first boot device if not set already.
- Click Repair My Computer.
- Choose the OS installation.
- Click the Load Drivers button to bring up a drive browser.
- Right-click on your system drive, and uncheck Compress This Drive if selected. This is often the reason why the “BOOTMGR is Compressed” error has occurred.
- Click Apply in the dialog box, then choose Apply to Subfolders/files.
- Reboot your computer.
- The “BOOTMGR is Compressed” error should now be fixed.
Startup Repair is one of the most effective methods to fix the “bootmgr is compressed” problem. But if you can’t load the Automatic Repair or you could not resolve the problem this way, then try the next solution.
Fix #2. Disable Compress this drive Option.
Another option is to simply deactivate the disk compression option and then try rebooting your computer. Since you can’t boot the system normally, you will need your installation disc.
So, once you have booted from the installation DVD, click Repair My Computer, then choose your operating system.
Now, click on Load Disks and navigate to your boot disk. By default, this is drive C. Select it and choose Properties. Go to the Advanced tab and uncheck the option Compress This Drive. Restart your computer and you should be good to go. If not, try the next solution.
Fix #3. Rebuild the BCD.
The BCD or Boot Configuration Data is your computer’s firmware-independent database file that contains the boot-time configuration data. It is needed by the Windows Boot Manager and replaces the boot.ini which was used by NTLDR earlier. If boot problems occur, you might be required to rebuild the BCD file. To do this:
- Boot your computer using Advanced Recovery Mode.
- Open a Command Prompt window under Advanced Options.
- Type in bootrec /fixmbr, then press Enter.
- Type in bootrec /fixboot, then press Enter.
- To rebuild the BCD file, type in the following command – bootrec /rebuildbcd. Then press Enter.
- After executing this command, your computer will scan for other operating systems and allow you to select the operating systems you want to add to BCD. If this does not work, you can choose to manually set the boot path. However, only do so if you know what you’re doing because it could create further issues.
- Next, type in the following command and hit Enter: bcdboot c:\windows /s c:
The BCDboot tool is a built-in command-line utility that allows you to manage system partition files. If any of the system partitions has been corrupted, you can use the BCDboot tool to replace the damaged system partition files with new copies from the Windows partition.
Fix #4: Manually Update the BOOTMGR File.
Since this particular boot error is usually caused by a compressed BOOTMGR file, replacing it is a good and effective solution.
To manually update the BOOTMGR file, do the following:
- Interrupt your Windows 10/11 boot three times. Male sure to press and hold the power button to force a shutdown as soon as you see the Windows logo. Repeat this at least three times to force Windows to launch the Advanced Startup Options menu.
- Alternatively, if you have the Windows 10/11 installation media, you can boot into it to open the Advanced Startup Options menu.
- At the Advanced Startup Options windows, choose Advanced Options.
- Click Troubleshoot.
- Under the Advanced options window, click Command Prompt.
- Type in cd\ and hit Enter.
- Type in C: and hit Enter.
- Type in the command below and hit Enter: bcdboot C:\Windows /s D:\
Once the command has been executed, restart your PC and see if it can now successfully boot without the issue. Otherwise, try the next fix.
Fix #5. Manually Decompress the File.
If nothing works, this fix should be able to resolve the problem. You can decompress all files on the system partition manually using commands. To do this:
- Log into the System Recovery Options and choose Command Prompt.
- Type in the following command and press Enter: compact /u /a c:\*.*
What does the compact command do? This decompresses (/u) all files (*.*) found on the c:\ drive, including hidden and system files (/a).
The command might take a few hours to complete if you have a very large drive. Just let it finish. Once the system has finished decompressing all files, type in Exit and press Enter to restart your computer.
The error message should no longer appear and Windows should be able to start up normally.
Summary
Fixing the BOOTMGR is compressed error on Windows 10/11 might seem like a complicated process, but as long as you follow the instructions above, you should be able to resolve it in no time.
Give us some love and rate our post!
Всем привет! Сегодня включаю я компьютер с Windows 7, а на экране красуется ошибка с текстом: «Bootmgr is compressed. Press Ctrl+Alt+Del to restart». Надпись может начинаться и по-другому: «Loadmgr is compressed». Понятно дело, если нажать на кнопки, то комп просто перезагрузится, а ошибка останется. Из текста видно, что есть проблема с файлом Bootmgr – он отвечает за загрузку системы. Также в тексте сказано, что он сжат.
Такое может происходить, в первую очередь, когда пользователь в свойствах системного диска «С» ставит галочку напротив функции сжатия, которая нужна для экономии места.
Проблема в том, что Windows 7 не идеальна, и она сжимает все, в том числе системные утилиты. Может проблема появилась из-за вируса, или проблем с жестким носителем. Наша задача восстановить этот файл в естественный вид. Далее я расскажу, что делать и как исправить эту проблему. Если у вас возникнут какие-то сложности, то пишите в комментариях.
Содержание
- Способ 1: через устранение неполадок
- Способ 2: Через загрузочную флешку или диск
- Не забудьте!
- Задать вопрос автору статьи
Способ 1: через устранение неполадок
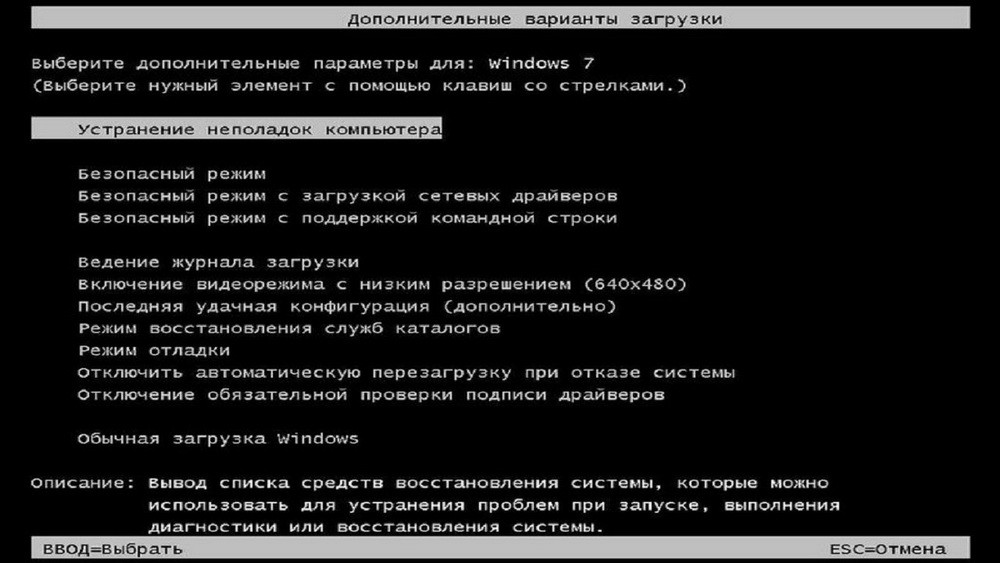
Перезагружаем компьютер и включаем режим, где вы увидите дополнительные варианты загрузки – для этого при включении компьютера зажмите кнопку F8 (находится в верхнем ряду клавиатуры). Должно отобразиться вот такое окошко, где нужно будет выбрать самый первый пункт, как на картинке ниже. Если это не поможет, то идем дальше.
Способ 2: Через загрузочную флешку или диск
Нам нужно скопировать работающий файл «BOOTMGR» для этого нам понадобится установочный диск или флешка с Windows 7.
- Вставляем флешку или диск в компьютер. Если у вас его нет, то вы можете посмотреть инструкцию по созданию тут.
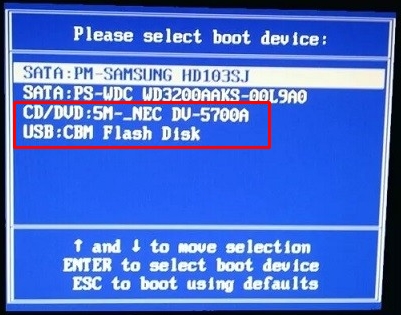
- При перезагрузке вам нужно вызвать «Boot menu» вашего BIOS – для этого нужно нажать на соответствующую клавишу: F11, F12, F9, Esc (смотрите на подсказку на загрузочном экране BIOS). Далее выбираем «USB» или «CD/DVD» устройство из списка.
- Вы также можете зайти в сам BIOS и выполнить запуск с диска или флешки оттуда. Там также нужно найти «Boot Menu» и для загрузки первичного девайса выбрать вашего устройство.
- Как только начнется загрузка с девайса, вы должны увидеть надпись как на картинке ниже – нажмите на любую клавишу, чтобы начать загрузку.

- Далее вы увидите меню установки, но нас это не интересует – нажимаем ниже по надписи: «Восстановление системы».
- Система может сразу понять, что что-то не так, и вы увидите окошко параметров – нажимаем «Исправить и перезагрузить». Проверяем загрузку вашей ОС.

- Если проблема осталась, то опять делаем все то же самое, но, если опять вылезет, то же самое окошко, выбираем «Нет». Далее из списка выбираем нашу систему и кликаем по кнопке «Далее».
- Теперь нажимаем по ссылке «Восстановление запуска».
- Комп перезагрузится еще раз, опять проверяем загрузку ОС. Если ошибка «Bootmgr is compressed» осталась, то опять идем туда же, но теперь выбираем «Командная строка» и прописываем две команды:
bootrec /fixmbr
bootrec /fixboot
- Далее сломанный файл автоматом должен переписаться на носитель. Если и этом не поможет, то можно попробовать скопировать файл с загрузочного носителя вручную. Опять теми же действиями запускаем командную строку.
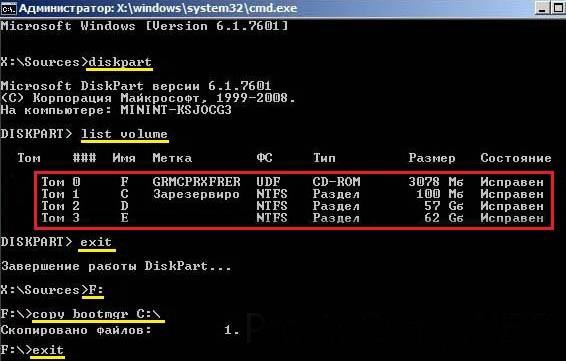
- Сначала нам нужно имя раздела, который имеет 100 Мб – именно там и хранится наш файлик. Прописываем:
diskpart
- В моем случае это диск «С». Сначала прописываем:
exit (Чтобы выйти из Diskpart)
- Нужно перейти в раздел установочного носителя, откуда мы будем копировать файл – смотрите по размеру. В моем случае это диск «F» – прописываем:
F: (У вас может быть другой диск)
- Теперь выполняем копирование нашего главного файла:
ПРИМЕЧАНИЕ! Если в списке нет раздела 100 Мб, то скопируйте файл во все существующие разделы.
copy bootmgr C:\
- После этого перезагружаем комп. Если это не поможет, то пробуем другую команду:
bootsect /nt60 All
Не забудьте!
Если проблема решилась, не забудьте зайти в «Свойства» системного диска и проверить, чтобы у вас не стояла галочка напротив сжатия раздела. Уберите её, если он там стоит и нажмите на кнопку «Применить».