
How to dual-boot Linux and Windows on the same hard disk? Typically a computer will have a single operating system installed on them, for those that want to dual-boot multiple OS such as a combination of Windows and Linux, you will need to make some changes and enable the option to choose which OS to boot from during startup.
Continue ➤ 3 Free Boot Camp Alternatives – Run Windows Applications And Games On macOS
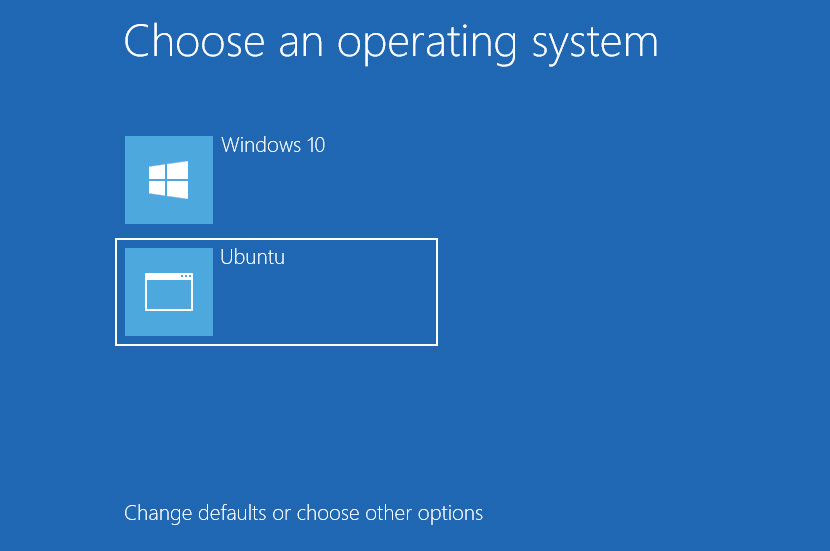
You can install 2 operating systems provided that you partition your SSD or Hard Disk into 2 drives. When you install a Linux distribution, it typically installs the Grub boot loader. Grub loads instead of the Windows boot loader at boot time if Windows was already installed, allowing you to choose the operating system you want to boot by modifying the Boot Configuration Data.
1. Grub2Win

Grub2Win supports 64 and 32 bit EFI and BIOS on Windows. Safely dual boot Windows and Linux from GPT or MBR disks. Grub2Win boots native GNU Grub version 2 code. Everything is contained in a single 20 MB directory on your Windows C: drive. On EFI systems a few small modules are installed to your EFI partition.
Using the simple Windows GUI and instructions you can install Grub2Win quickly and safely. Select from many OS choices. Supports Antergos, Android, Ubuntu, Debian, Suse, Fedora, Mint, Clover and Windows. Also boots ISO files. You can enter your own custom commands for each menu entry.
- Supports 64 and 32 bit EFI as well as BIOS firmware.
- Requires just one directory on the Windows C: drive, about 20 MB disk space.
- Simple Windows GUI easily sets up Grub2Win in seconds.
- Lets you set your EFI firmware boot order from within Windows.
- Preview and customize the 9 included graphic background themes.
- Works with all filesystems including Mac hfs and Btrfs.
- Can search for and boot a partition by its label. Supports advanced scripting.
- Works with both GPT and MBR disks – up to 128 primary partitions per drive.
- Supports extremely large (over 40 TB) disks and partitions.
- Safely multiboot Windows, Antergos, Android, Ubuntu, Debian, Suse, Fedora, Mint, Clover and more.
- Grub customization is done from Windows – Configuration in Linux is not required.
2. EasyBCD
Free for personal, non-commercial use
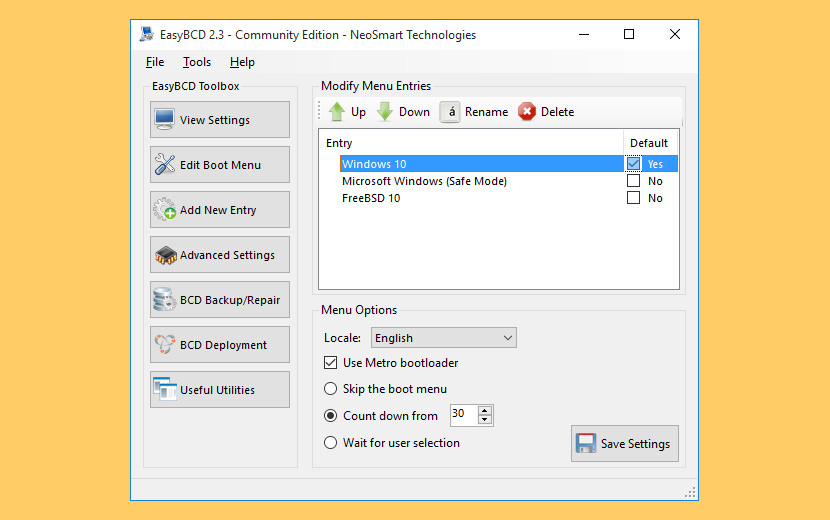
Take control of your boot loader, EasyBCD supercharges your Windows PC, allowing you to dual-boot to your heart’s content. Also boot into legacy systems Microsoft doesn’t support: MS-DOS, Windows 9x, Windows ME, and Windows 2000!
EasyBCD is geared for users of all kinds. Whether you just want to add an entry to your old XP partition or want to create a duplicate for testing purposes; if you’re interested in debugging the Windows Kernel or septuple-booting your seven test operating systems, EasyBCD is the key.
- Boot anything – Windows, Linux, macOS, & BSD! Boot both from and into USB drives, ISO images, virtual disks, and more.
- Boot anywhere – Create bootable USB sticks with repair utilities that you can take with you anywhere.
- Protect against disaster – Create entries to boot into recovery utilities or safe mode to prepare for a rainy day.
- Painless editing – Add, rename, remove, configure, and reorder entries at whim.
- Solve difficult problems – Use EasyBCD to troubleshoot Windows, back up and repair the bootloader, and more.
- Powerful scripting with NeoGrub – You’ll have the power to hide partitions, change active flags, and create complex boot scenarios.
3. rEFInd Boot Manager
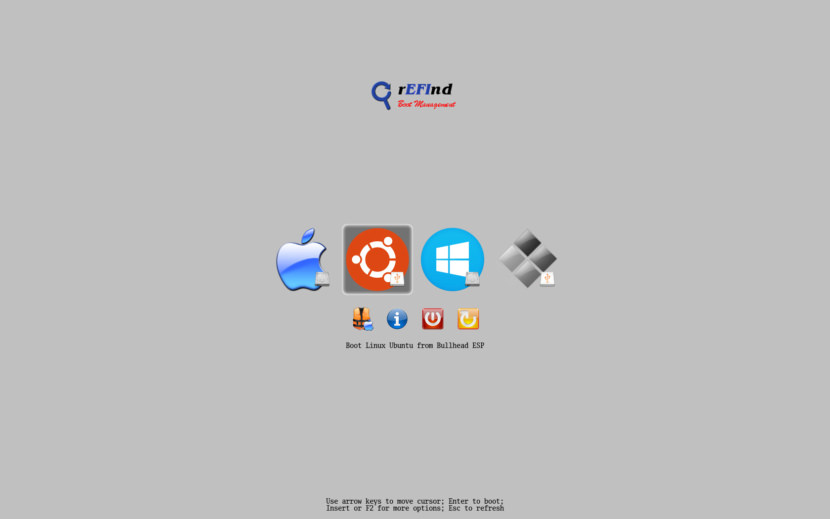
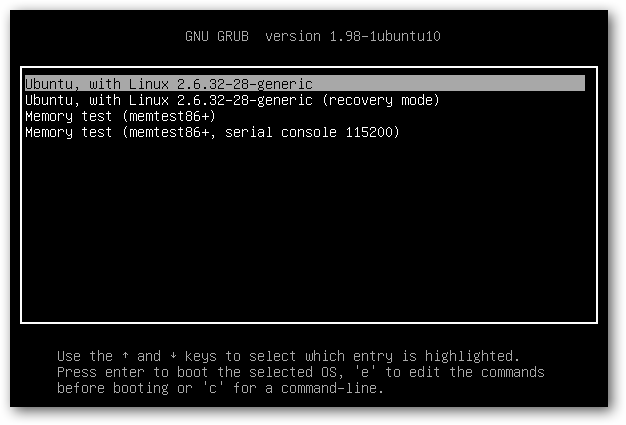
rEFInd is a fork of the Small rEFIt boot manager for computers based on the Extensible Firmware Interface (EFI) and Unified EFI (UEFI). Like rEFIt, rEFInd is a boot manager, meaning that it presents a menu of options to the user when the computer first starts up, as shown below. rEFInd is not a boot loader, which is a program that loads an OS kernel and hands off control to it.
4. Clover EFI bootloader
This is an EFI-based bootloader for BIOS-based computers created as a replacement to the EDK2/Duet bootloader. Clover is an operating system boot loader for computers already equipped with an UEFI firmware and for those equipped with legacy BIOS firmware. An operating system (OS) may support (U)EFI (macOS, Windows, Linux) or not (Windows XP). Legacy boot is used for the last one, that is, the old BIOS system is used to handle boot sectors.
- Boot macOS, Windows, and Linux in UEFI or legacy mode on Mac or PC with UEFI or BIOS firmware
- Boot using UEFI firmware directly or CloverEFI UEFI firmware emulation
- Customizable GUI including themes, icons, fonts, background images, animations, and mouse pointers.
- Ability to boot previously selected boot entry after default timeout
- Boot entries menu scrolls if screen resolution is too low for menu
- Create custom boot entries for personalizing boot entries and add support for other operating systems
- Create Clover boot entry in NVRAM with tool from GUI
5. Grub

GNU GRUB is a Multiboot boot loader. It was derived from GRUB, the GRand Unified Bootloader, which was originally designed and implemented by Erich Stefan Boleyn.
Briefly, a boot loader is the first software program that runs when a computer starts. It is responsible for loading and transferring control to the operating system kernel software (such as the Hurd or Linux). The kernel, in turn, initializes the rest of the operating system (e.g. GNU).
6. Super Grub2 Disk

Super GRUB2 Disk helps you to boot into most any Operating System (OS) even if you cannot boot into it by normal means. Super Grub2 Disk is a live CD that helps the user to boot into almost any operating system even if the system cannot boot into it by normal means. This allows a user to boot into an installed operating system if their GRUB installation has been overwritten, erased or otherwise corrupted.
Super Grub2 Disk can detect installed operating systems and provide a boot menu which allows the user to boot into their desired operating system. Super Grub2 Disk is not an operating system itself, but a live boot loader which can be run from a CD or USB thumb drive. Everything option to detect most Operating Systems.
- grub.cfg – (GRUB2 configuration files)
- menu.lst – (GRUB legacy configuration files)
- core.img – (GRUB2 installation (even if mbr is overwritten))
- Bootable ISOs (in /boot-isos or /boot/boot-isos)
- Enable GRUB2’s LVM support
- Enable GRUB2’s RAID support
- Enable GRUB2’s PATA support (to work around BIOS bugs/limitation)
- Mount encrypted volumes (LUKS and geli)
- Enable serial terminal
7. Ventoy
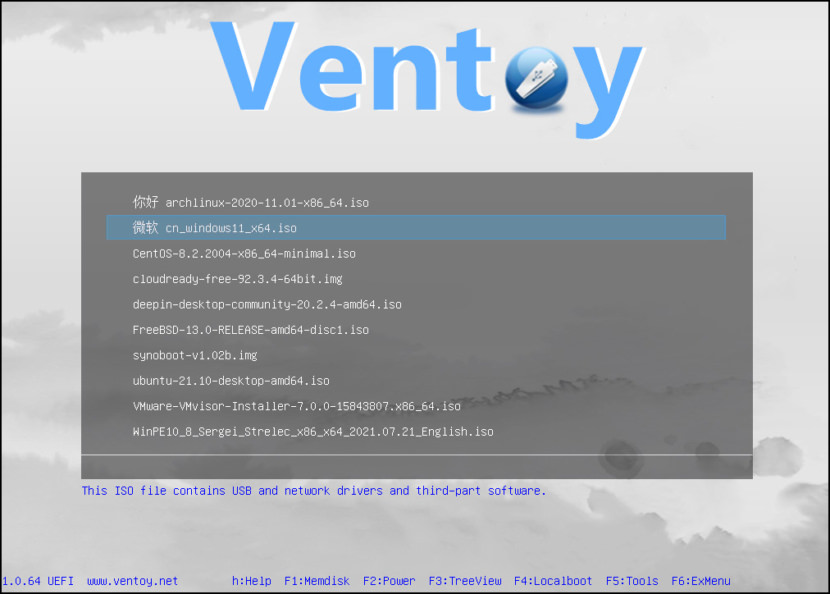
Ventoy is an open source tool to create bootable USB drives for ISO/WIM/IMG/VHD(x)/EFI files. With ventoy, you don’t need to format the disk over and over, you just need to copy the ISO/WIM/IMG/VHD(x)/EFI files to the USB drive and boot them directly.
MBR and GPT partition styles, x86 Legacy BIOS and various UEFI boot methods (including persistence) are supported. ISO files larger than 4 GB can be used. Ventoy supports various operating system boot and installation ISO files including Windows and above, Debian, Ubuntu, CentOS, RHEL, Deepin, Fedora and more than a hundred other Linux distributions; various UNIX releases, VMware, Citrix XenServer, etc. have also been tested.
- x86 Legacy BIOS, IA32 UEFI, x86_64 UEFI, ARM64 UEFI, MIPS64EL UEFI supported
- IA32/x86_64 UEFI Secure Boot supported Notes
- Linux Persistence supported Notes
- Windows auto installation supported Notes
- Linux auto installation supported Notes
- Variables Expansion supported for Windows/Linux auto installation script Notes
- FAT32/exFAT/NTFS/UDF/XFS/Ext2(3)(4) supported for main partition
- ISO files larger than 4GB supported
Время на прочтение5 мин
Количество просмотров151K
Привет, Хабр! Сегодня мы рассмотрим ситуацию, когда при двойной установке Linux & Windows загрузчик GRUB не стартует, давая возможность выбрать ОС, а автоматически загружается Windows. Немного теории:
GRUB (GRand Unified Bootloader) — программа-загрузчик операционных систем.
GRUB может загрузить любую совместимую с ней операционную систему. Среди них: Linux, FreeBSD, Solaris и многие другие. Кроме того, GRUB умеет по цепочке передавать управление другому загрузчику, что позволяет ему загружать Windows (через загрузчик NTLDR), MS-DOS, OS/2 и другие системы.
Значит с теорией мы немного разобрались (думаю этого будет достаточно), теперь же рассмотрим, какие бывают подводные камни, при установке Dual Boot Windows и Linux на одном компьютере.
Эксперимент производился на рабочей станции со следующими характеристиками:
Base Board Information
- Manufacturer: Acer
- Product Name: Aspire XC600
Memory Device
- Size: 4096 MB
- Type: DDR3
- Speed: 1333 MHz
- Manufacturer: Kingston
- Rank: 2
HDD
- product: ST500DM002-1BD14
- vendor: Seagate
- physical id: 0.0.0
- bus info: scsi@0:0.0.0
- logical name: /dev/sda
- size: 465GiB (500GB)
- capabilities: gpt-1.00 partitioned partitioned:gpt
Доказано, что проблем с установкой Debian 8.6 Jessie совместно с Windows 10 не обнаружено. Debian корректно прописывается в автозагрузке, GRUB запускается без ошибок и две ОС также работают нормально.
Но, как показала практика, не со всеми дистрибутивами такое происходит. При установке Ubuntu 16.04.1 вместо Debian на ту же рабочую станцию вылез первый подводный камень — GRUB не стартовал, и Windows 10 автоматом шла на загрузку.
Решение проблемы было найдено спустя недели три-четыре (тогда уже надоело считать, сколько времени убито на решение проблемы). Оно оказалось неожиданным, но в тоже время вся система заработала. Значит, если вы столкнулись с такой же проблемой, приведенная ниже инструкция может вам пригодится и сэкономить кучу времени.
Важно! До начала выполнения инструкции нужно подготовить LiveCD с дистрибутивом Linux Mint — все операции мы будем выполнять на нем (я выбрал этот дистрибутив из-за того, что на него спокойно можно установить Midnight Commander, что сложно сделать на LiveCD с Ubuntu, так мы получаем больше пространства для маневров). Также стоит заметить, что команда из под консоли update-grub вам не поможет, так как она рассчитана на случай, когда GRUB запускается, но не видит другие ОС кроме Линукса. Также рекомендую создавать резервные копии файлов/каталогов, над которыми вы осуществляете хоть малейшие изменения.
- Через терминал, с правами root смонтировать раздел с EFI в папку /mnt. В моем случае, это была команда mount /dev/sda2 /mnt.
- Введите команду sudo -s и подтвердите пароль (он пустой по умолчанию) для последующих операций (многие советуют не делать этого, а вводить sudo и команду для выполнения — я поддерживаю это мнение, но инструкция рассчитана на опытных пользователей системы Linux, которые понимаю, что делают все на свой страх и риск).
- Запустить Midnight Commander командой mc.
- Найти в файловой системе следующий каталог: EFI в папке /mnt.
- Переименовать каталог Microsoft во что-нибудь другое, например в Microsoft2.
- Создаем новый каталог с именем Microsoft.
- Заходим в только что созданный каталог Microsoft и частично создаем внутри его иерархию папок аналогичную старому Microsoft (тому, что переименовали). В моем случае он имел такую структуру папок: /boot/, затем куча папок и файл bootmgfw.efi рядом с ними. Нужно воссоздать структуру папок ровно до этого файла. Т.е. всё, что лежит рядом с ним — не нужно, а всё, что идет до него (т.е. родительские папки, соседние с ними тоже не нужны) воссоздаем в нашей новой папке Microsoft. В моем случае понадобилось создать только папку /boot, итоговый путь до нового каталога вышел таким: /EFI/Microsoft/boot. Можно просто скопировать все папки и файлы — проверено, это работает и можно не создавать все вручную.
- Находим в каталоге из шага 6 папку с именем нашего дистрибутива Линукса, в нашем случае это Ubuntu. Копируем (оригиналы файлов и папку ubuntu на всякий случай оставляем, не помешают) все файлы из данной в папки в итоговый каталог, созданный на предыдущем шаге: /EFI/Microsoft/boot.
- В получившейся файловой системе находим файл grubx.efi или grubx64.efi (будет только один из них: в зависимости от разрядности установленного Линукса). Переименовываем его в bootmgfw.efi.
- Находим файл /boot/grub/grub.cfg в файловой системе установленного Линукса. Открываем его для редактирования. Внутри него находим слово «Microsoft» в контексте строки, начинающейся с «chainloader» и заменяем это слово (должно быть только одно вхождение и именно в строке с «chainloader», так что не ошибетесь) на название каталога, в который мы переименовали Microsoft (т.е. на Microsoft2 в нашем примере). Сохраняем изменения в файле.
Также, в этом файле вы можете поменять названия в списке, который выводит GRUB. Например, вместо
openSUSE Leap 42.2 27.01
в части кода:
menuentry 'openSUSE Leap 42.2 27.01'  --class opensuse --class gnu-linux --class gnu --class os $menuentry_id_option 'gnulinux-simple-996b3ed5-150f-4de3-a40c-6d385e27d6de' {
	load_video
	set gfxpayload=keep
	insmod gzio
	insmod part_gpt
	insmod ext2
	set root='hd0,gpt6'
	if [ x$feature_platform_search_hint = xy ]; then
	  search --no-floppy --fs-uuid --set=root --hint-bios=hd0,gpt6 --hint-efi=hd0,gpt6 --hint-baremetal=ahci0,gpt6  996b3ed5-150f-4de3-a40c-6d385e27d6de
	else
	  search --no-floppy --fs-uuid --set=root 996b3ed5-150f-4de3-a40c-6d385e27d6de
	fi
	echo	'Загружается Linux 4.4.36-8-default …'
	linuxefi /boot/vmlinuz-4.4.36-8-default root=UUID=996b3ed5-150f-4de3-a40c-6d385e27d6de ro  resume=/dev/sda7 splash=silent quiet showopts
	echo	'Загружается начальный виртуальный диск …'
	initrdefi /boot/initrd-4.4.36-8-default
}
Написать
openSUSE The best choice!:)
:
menuentry 'openSUSE The best choice!:)'  --class opensuse --class gnu-linux --class gnu --class os $menuentry_id_option 'gnulinux-simple-996b3ed5-150f-4de3-a40c-6d385e27d6de' {
	load_video
	set gfxpayload=keep
	insmod gzio
	insmod part_gpt
	insmod ext2
	set root='hd0,gpt6'
	if [ x$feature_platform_search_hint = xy ]; then
	  search --no-floppy --fs-uuid --set=root --hint-bios=hd0,gpt6 --hint-efi=hd0,gpt6 --hint-baremetal=ahci0,gpt6  996b3ed5-150f-4de3-a40c-6d385e27d6de
	else
	  search --no-floppy --fs-uuid --set=root 996b3ed5-150f-4de3-a40c-6d385e27d6de
	fi
	echo	'Загружается Linux 4.4.36-8-default …'
	linuxefi /boot/vmlinuz-4.4.36-8-default root=UUID=996b3ed5-150f-4de3-a40c-6d385e27d6de ro  resume=/dev/sda7 splash=silent quiet showopts
	echo	'Загружается начальный виртуальный диск …'
	initrdefi /boot/initrd-4.4.36-8-default
}
Хоть мелочь, а приятно! Остальное в коде советую не трогать.
Если трудно разобраться с управлением Midnight Commander (в этом нет ничего страшного, у меня тоже в первый раз были проблемы с этой программой), все операции можно выполнить в файловом менеджере Nautilus (или в другом, не суть важно), но изначально запустив его под правами пользователя root.
После этого идем на перезагрузку и радуемся результату. Но, как оказывается, такая проблема есть и у дистрибутива OpenSUSE Leap 42.2. Как показала практика, если на компьютере установлен дистрибутив OpenSUSE с Windows 10, то приведенная выше инструкция не поможет. Точнее, она поможет, но только ее нужно дополнить. После выполнения основной части выполняем следующие шаги:
- После выполнения всех операций заходим в папку /EFI/opensuse/x86_64-efi/ (название итоговой папки x86_64-efi может быть другим в зависимости от архитектуры ПК)
- Копируем файл grub.efi (если у вас включена опция Secure Boot, там будет еще файл shim.efi, тогда советую скопировать их вместе)
- Заходим в папку /EFI/Boot и удаляем все файлы, которые там есть (при обновлении загрузчика они снова появятся, но в этом нет ничего страшного)
- Вставляем файл (или файлы), которые мы скопировали и спокойно идем на перезагрузку.
Вот и вся инструкция. Думаю, кому-то пригодится…
P.S. Если же у вас все хорошо, GRUB с OpenSUSE запускается, но не видит Windows, радуйтесь — проблема решается всего одной командной: grub2-mkconfig -o /boot/grub2/grub.cfg, а если у вас стоит Ubuntu, нужно выполнить просто update-grub.
Для тех же, кого заинтересовала данная тема, рекомендую прочитать статью: «Начальный загрузчик GRUB 2 — полное руководство».
This guide provides a step-by-step process for installing and dual booting Arch Linux alongside Windows 10 or Windows 11.
Table of Contents
- Preparation
- Installation Process
- Fixing Windows Boot Menu Entry
- Additional Resources
- Author
Preparation:
I. Download Files:
- Download the latest Arch Linux ISO file from the official website.
- Download a tool like Rufus to create a bootable USB drive.
II. Create a Bootable USB Drive:
- Insert a USB drive with at least 8GB of space.
- Open Rufus and select the downloaded Arch Linux ISO file.
- Partition scheme:
- UEFI System: Select GPT partition scheme.
- Legacy System: Select MBR partition scheme.
- Leave the rest of the settings as default and click on «Start».
III. Prepare Windows Partition:
- Right-click on the Start menu and select «Disk Management».
- Locate your main Windows partition (usually the largest disk).
- Right-click on the partition and select «Shrink Volume».
- Allocate at least 40GB of free space for Arch Linux.
Installation Process:
I. Boot into Arch Linux:
- Restart your system and press the key to enter the boot menu (usually F12 or Escape).
- Select your USB drive to boot into Arch Linux.
- Disable Secure Boot (if applicable):
- If your system has Secure Boot enabled, you’ll need to disable it from the BIOS settings to boot Arch Linux successfully.
II. Connect to Wi-Fi (if applicable):
- Use the
iwctlcommand to list available Wi-Fi networks and connect to your desired network.
iwctl
# Scan for networks:
iwctl scan
# Connect to a network:
iwctl station <interface_name> connect <network_name>
# Enter password:
iwctl station <interface_name> set-key <password>
# Verify connection:
ping -c 2 google.com
III. Partitioning the Disk:
- List your disk partitions using:
lsblk- Identify your main disk (e.g.,
/dev/sda).
- Identify your main disk (e.g.,
- Use cfdisk to create partitions:
sudo cfdisk /dev/<your_main_disk_number> - Create the following partitions:
- EFI Partition (UEFI only): Size: 300MB, Type: EFI System
- Swap Partition: Size: Equal to your RAM size, Type: Linux swap
- Root Partition: Remaining free space, Type: Linux file system
- Write the changes made to the partitions.
IV. Formatting Partitions:
- Format the EFI partition (UEFI only):
mkfs.fat -F32 /dev/<efi_partition_name> - Format the root partition:
mkfs.ext4 /dev/<root_partition_name> - Format the swap partition:
mkswap /dev/<swap_partition_name>
V. Mounting Partitions:
- Mount the root partition:
mount /dev/<root_partition_name> /mnt - Mount the EFI partition (UEFI only):
mount /dev/<efi_partition_name> /boot/efi
VI. Installing Base System Packages:
- Install essential packages:
pacman -S base base-devel linux linux-headers linux-firmware nano networkmanager networkmanager-applet wireless-tools bluez bluez-utils git
VII. Generating fstab File:
- Generate the fstab file:
genfstab /mnt >> /mnt/etc/fstab
VIII. Entering the Installed System:
- Enter the installed system:
arch-chroot /mnt
IX. Configuring Time Zone and Locale:
- Set the time zone:
ln -sf /usr/share/zoneinfo/<your_region>/<your_city> /etc/localtime
- Synchronize system time:
hwclock --systohc - Configure locale:
- Uncomment your desired language in
/etc/locale.gen. - Generate the locale file:
locale-gen - Set hostname:
echo "<your_hostname>" > /etc/hostname - Edit the
/etc/hostsfile usingnano.
- Uncomment your desired language in
X. Creating Username and Password:
- Set root password:
passwd - Add a new user:
useradd -m <username> - Set password for the new user:
passwd <username> - Add the user to the wheel group for administrative privileges:
usermod -aG wheel <username>
XI. Enabling sudo Privileges:
- Edit the
/etc/sudoersfile using nano and uncomment the line:wheel ALL=(ALL) ALL
XII. Installing Bootloader:
- Install bootloader and additional packages:
pacman -S grub os-prober ntfs-3g - Identify your main disk number using
lsblk. - Install grub on a UEFI system:
- If you encounter an error, install
efibootmgrusingpacman -S efibootmgrand rerun the previous command.
- If you encounter an error, install
grub-install --target=x86_64-efi --efi-directory=/boot --bootloader-id=grub
- Install grub on a legacy system:
grub-install --target=i386-pc /dev/<your_main_disk_number>
XIII. Generating Grub Configuration File:
- Generate the grub configuration file:
grub-mkconfig -o /boot/grub/grub.cfg
XIV. Installing Display and Audio Drivers:
- Install video and audio drivers:
pacman -S xfce4 xfce4-goodies - For Nvidia graphics cards, additionally install:
pacman -S nvidia nvidia-utils nvidia-settings
XV. Enabling Services at Startup:
- Enable network manager and bluetooth services:
systemctl enable networkmanager bluetooth
XVI. Installing Desktop Environment:
- Choose and install your preferred desktop environment:
- Gnome:
pacman -S gnome - KDE:
pacman -S plasma kde-applications - XFCE:
pacman -S xfce4 xfce4-goodies
- Gnome:
XVII. Enabling Display Manager:
- Enable the display manager corresponding to your desktop environment:
- Gnome:
systemctl enable gdm - KDE:
systemctl enable sddm - XFCE:
systemctl enable lightdm- If lightdm is not installed, install it using:
pacman -S lightdm lightdm-gtk-greeter - Enable it:
systemctl enable lightdm
- If lightdm is not installed, install it using:
- Gnome:
XVIII. Exiting and Rebooting:
- Exit the chroot environment:
exit - Reboot the system:
reboot
Fixing Windows Boot Menu Entry (if not appearing):
I. Boot into Arch Linux.
II. Identify Windows Partition: lsblk
III. Mount Windows Partition:
mount /dev/<windows_partition_name> /mnt/windows
IV. Edit /etc/default/grub:
- Edit the file using nano.
- Uncomment the line:
GRUB_DISABLE_OS_PROBER
V. Regenerate Grub Configuration:
grub-mkconfig -o /boot/grub/grub.cfg
VI. Reboot the system.
Additional Resources
Official Arch Linux Resources:
-
Arch Linux Wiki: The official Arch Linux Wiki is an incredibly comprehensive resource for all things Arch, including detailed installation guides, troubleshooting tips, and configuration options: wiki.archlinux.org.
-
Arch Linux Forums: The Arch Linux forums are a vibrant community where you can ask questions, get help from experienced users, and stay updated on the latest developments: bbs.archlinux.org.
Additional Tutorials and Guides:
- Video Tutorials: Many excellent video tutorials exist online that provide visual guidance through the installation process. Search for «Arch Linux dual boot Windows 10/11» on platforms like YouTube to find helpful resources.
- I recommend this awesome video by Sandip Sky.
Troubleshooting and Support:
-
Reddit Community: The r/archlinux subreddit is a great place to find answers to common problems, share experiences, and connect with other Arch Linux users: reddit.com/r/archlinux.
-
Comments in this Gist: Feel free to leave comments directly in this Gist if you have any questions or encounter specific difficulties.
-
Contact Me: Feel free to contact me directly through X.
Author
Yousef Saeed:
GitHub
LinkedIn
X
Table of Contents
- 1 Introduction
- 2 Prerequisites
- 3 Step 1: Prepare Your PC
- 3.1 Backup Your Data
- 3.2 Create Free Space on Your Hard Drive
- 4 Step 2: Create a Bootable USB Drive
- 4.1 Download the Linux ISO
- 4.2 Use a Tool to Create a Bootable USB
- 5 Step 3: Install Linux
- 5.1 Boot from the USB Drive
- 5.2 Start the Linux Installation
- 5.3 Partition Your Hard Drive
- 5.4 Complete the Installation
- 6 Step 4: Configure the Dual Boot
- 6.1 GRUB Bootloader
- 7 FAQs
- 7.1 Can I Install Any Linux Distribution Alongside Windows?
- 7.2 What If I Don’t See the GRUB Menu?
- 7.3 How Do I Remove Linux and Restore the Windows Bootloader?
- 7.4 Is Dual Booting Safe?
- 8 Conclusion
Introduction
Dual Boot Linux OS and Windows allows you to enjoy the benefits of both operating systems on a single machine. This tutorial will guide you through the entire process of setting up a dual-boot system, from preparing your PC to installing and configuring both operating systems. By the end of this guide, you’ll be able to switch between Linux and Windows seamlessly, leveraging the strengths of each OS for different tasks.
Prerequisites
Before you start, make sure you have the following:
- A PC with Windows already installed
- A Linux distribution ISO file (e.g., Ubuntu, Fedora)
- A USB drive (at least 8GB)
- Backup of your important data
- Free disk space for the Linux installation
Step 1: Prepare Your PC
Backup Your Data
Before making any changes to your system, it’s crucial to back up all your important data. This ensures you don’t lose any important files in case something goes wrong during the installation process.
Create Free Space on Your Hard Drive
You’ll need free space on your hard drive to install Linux. If your entire disk is allocated to Windows, you’ll need to shrink the Windows partition:
- Open Disk Management: Press
Win + R, typediskmgmt.msc, and press Enter. - Shrink Volume: Right-click on your Windows partition and select “Shrink Volume.” Specify the amount of space to shrink (at least 20GB recommended).
Step 2: Create a Bootable USB Drive
Download the Linux ISO
Download the ISO file for your chosen Linux distribution from its official website.
Use a Tool to Create a Bootable USB
There are several tools you can use to create a bootable USB drive. One popular option is Rufus:
- Download and Install Rufus: Get Rufus from here.
- Create Bootable USB: Insert your USB drive, open Rufus, select the Linux ISO file, and click “Start.” Follow the prompts to create the bootable USB.
Step 3: Install Linux
Boot from the USB Drive
- Restart Your PC: Insert the bootable USB drive and restart your PC.
- Enter BIOS/UEFI: Press the appropriate key (usually
F2,F12,DEL, orESC) to enter the BIOS/UEFI settings. - Change Boot Order: Set the USB drive as the primary boot device and save the changes.
Start the Linux Installation
- Boot from USB: Your PC should now boot from the USB drive and display the Linux installation menu.
- Start Installation: Select “Install” and follow the on-screen instructions.
Partition Your Hard Drive
When prompted to partition your hard drive, select the option to install Linux alongside Windows:
- Automatic Partitioning: Most Linux installers will automatically partition the free space for you.
- Manual Partitioning: If you prefer, you can manually create partitions. Create at least two partitions: one for the Linux filesystem (ext4) and one for swap space.
Complete the Installation
Follow the remaining installation steps, including setting up your user account and password. Once the installation is complete, restart your PC.
Step 4: Configure the Dual Boot
GRUB Bootloader
After installing Linux, the GRUB bootloader will manage the dual boot process:
- GRUB Menu: On startup, you should see the GRUB menu with options to boot into either Linux or Windows.
- Default OS: You can configure GRUB to set a default OS and adjust the timeout duration.
FAQs
Can I Install Any Linux Distribution Alongside Windows?
Yes, you can install any Linux distribution alongside Windows. Popular choices include Ubuntu, Fedora, and Debian.
If you don’t see the GRUB menu, you may need to configure your BIOS/UEFI settings to prioritize the Linux bootloader. Check your BIOS/UEFI settings and ensure the correct boot order.
How Do I Remove Linux and Restore the Windows Bootloader?
If you decide to remove Linux, you’ll need to restore the Windows bootloader:
- Boot into Windows: Open Command Prompt as an administrator.
- Run Bootrec: Type
bootrec /fixmbrand press Enter. - Remove Linux Partitions: Use Disk Management to delete the Linux partitions and expand your Windows partition.
Is Dual Booting Safe?
Yes, dual booting is generally safe if you follow the instructions carefully. Always back up your data before making changes to your system.
Conclusion
Setting up a dual-boot system with Linux and Windows allows you to leverage the strengths of both operating systems. By following this complete tutorial, you can seamlessly switch between Linux and Windows, maximizing your productivity and flexibility. Remember to back up your data, follow each step carefully, and enjoy the best of both worlds on your PC. Thank you for reading my website linuxoperatingsystem
linux

Gone are the days when Linux and Windows were like two opposing forces. Microsoft has embraced the open-source community quite cordially in recent years, and as a result we have things like Windows Subsystem for Linux baked right into our Windows installations.
That doesn’t mean that we no longer need a full blown Linux installation. In fact, machines with both Windows and Linux running side by side are quite common.
But do you know what’s more common than machines running both operating systems? Machine owners who have tried to dual boot their machines and ended up losing a lot of data in the process.
So if you’re one of the victims or one of those who are trying to avoid possible disasters in their upcoming dual booting adventure, this article is for you. Here you’ll learn about:
- How to install any Linux distribution alongside Windows
- How to get rid of Linux without messing up Windows if necessary
- Common problems, misconceptions, and their solutions, and
- Some generally geeky stuff to impress you peers
Without any further ado, let’s grab a mug of coffee or tea or at least water and jump right into the process.
Some Assumptions I’m Making
Before I jump into the core of the tutorial, I want to clarify a few things. To make this entire article approachable, I’m making following assumptions about your system:
- Your computer is using UEFI and not BIOS
- You already have Windows installed on your machine
- You have a USB drive large enough (4GB) to boot Linux from
- You have enough space (25GB) to install Linux on your HDD or SSD
That’s pretty much it. If you have all of the above ready, you’re good to go.
How to Create a Bootable Linux USB Drive
There are multiple tools that can help you to create a bootable Linux USB drive. Among all these tools, my favorites are:
- balenaEtcher
- Fedora Media Writer
Both of these tools are open-source, free to use, and available on pretty much all major platforms. For this article, I’ll go with Fedora Media Writer simply because there are not a lot of tutorials talking about it and because I use it personally.
Like the name suggests, Fedora Media Writer is a tool created by Red Hat for making bootable Linux USBs. Once you’ve downloaded the program, install it on your system and fire it up.
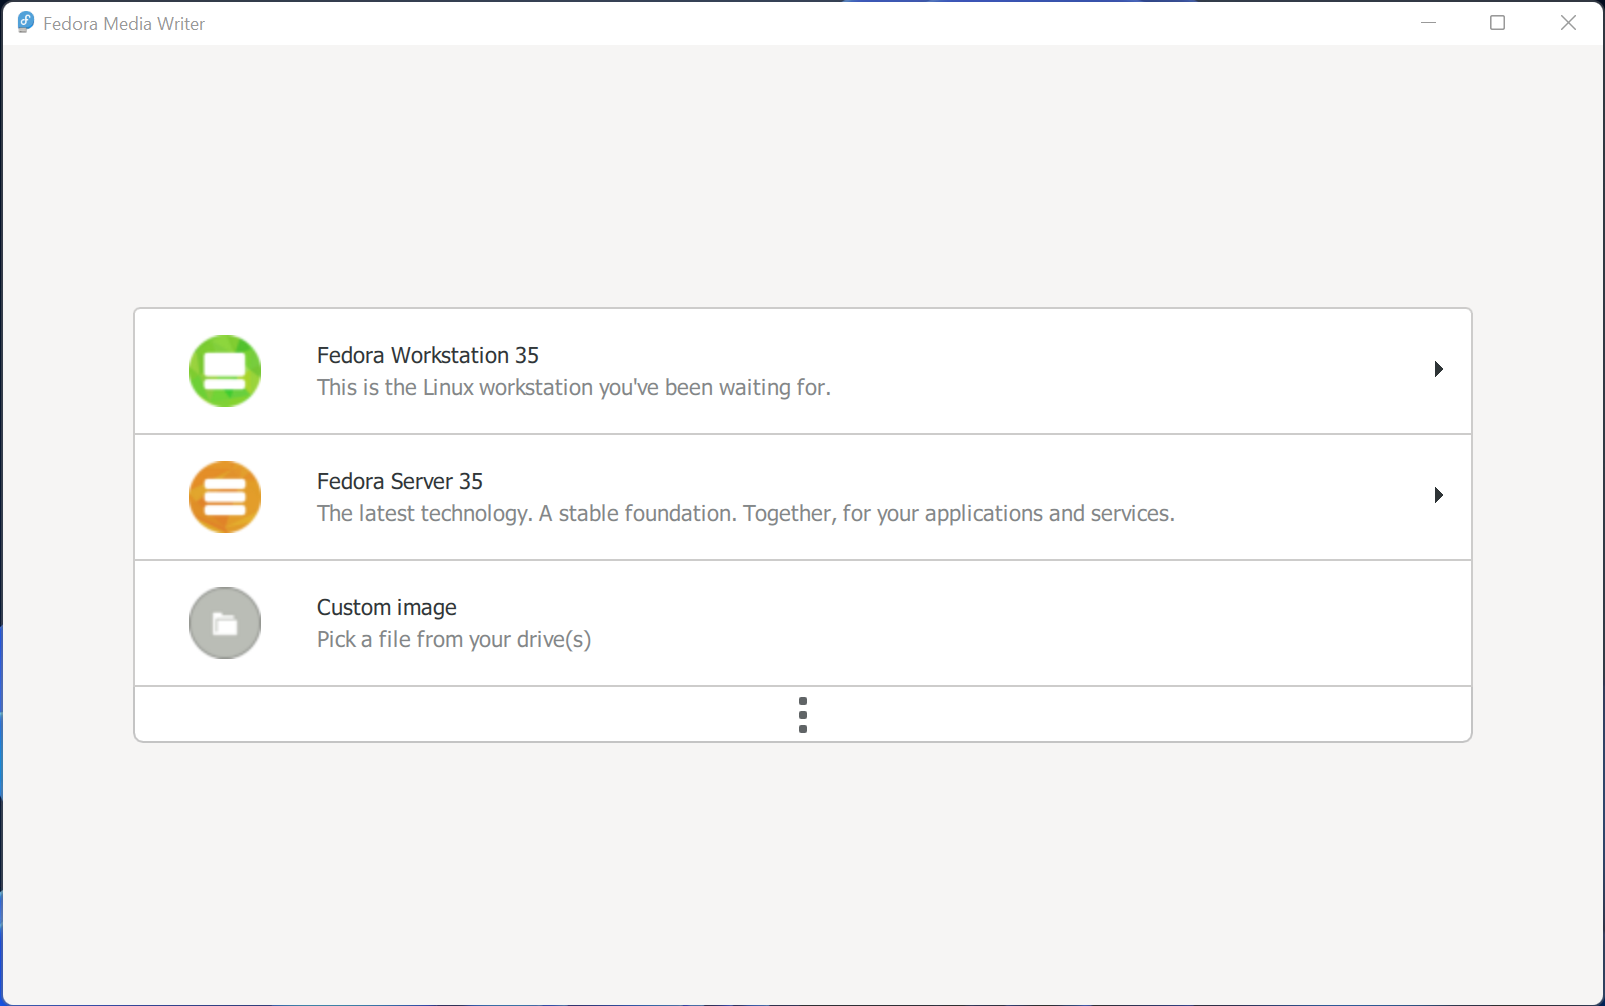
This is how it looks. As you can see, you’ve got the option to download the latest Fedora ISOs as well as an option to pick a custom image file from your drives.
Unless you’re planning on installing Fedora (spoiler! it’s my favorite) on your machine, you’ll have to go ahead and download your desired ISO file.
In this article, I’ll use Ubuntu because it’s more popular among newcomers. But the things you’ll learn here can be applied to any other Linux distribution.
Go ahead and download the ISO for Ubuntu from their download page. Ubuntu 20.04 LTS (the latest long term release at the time of writing) is around 2.67GB in size. Once you’ve finished downloading the file, go back to Fedora Media Writer, click on «Custom Image», and select the ISO file you’ve just downloaded.
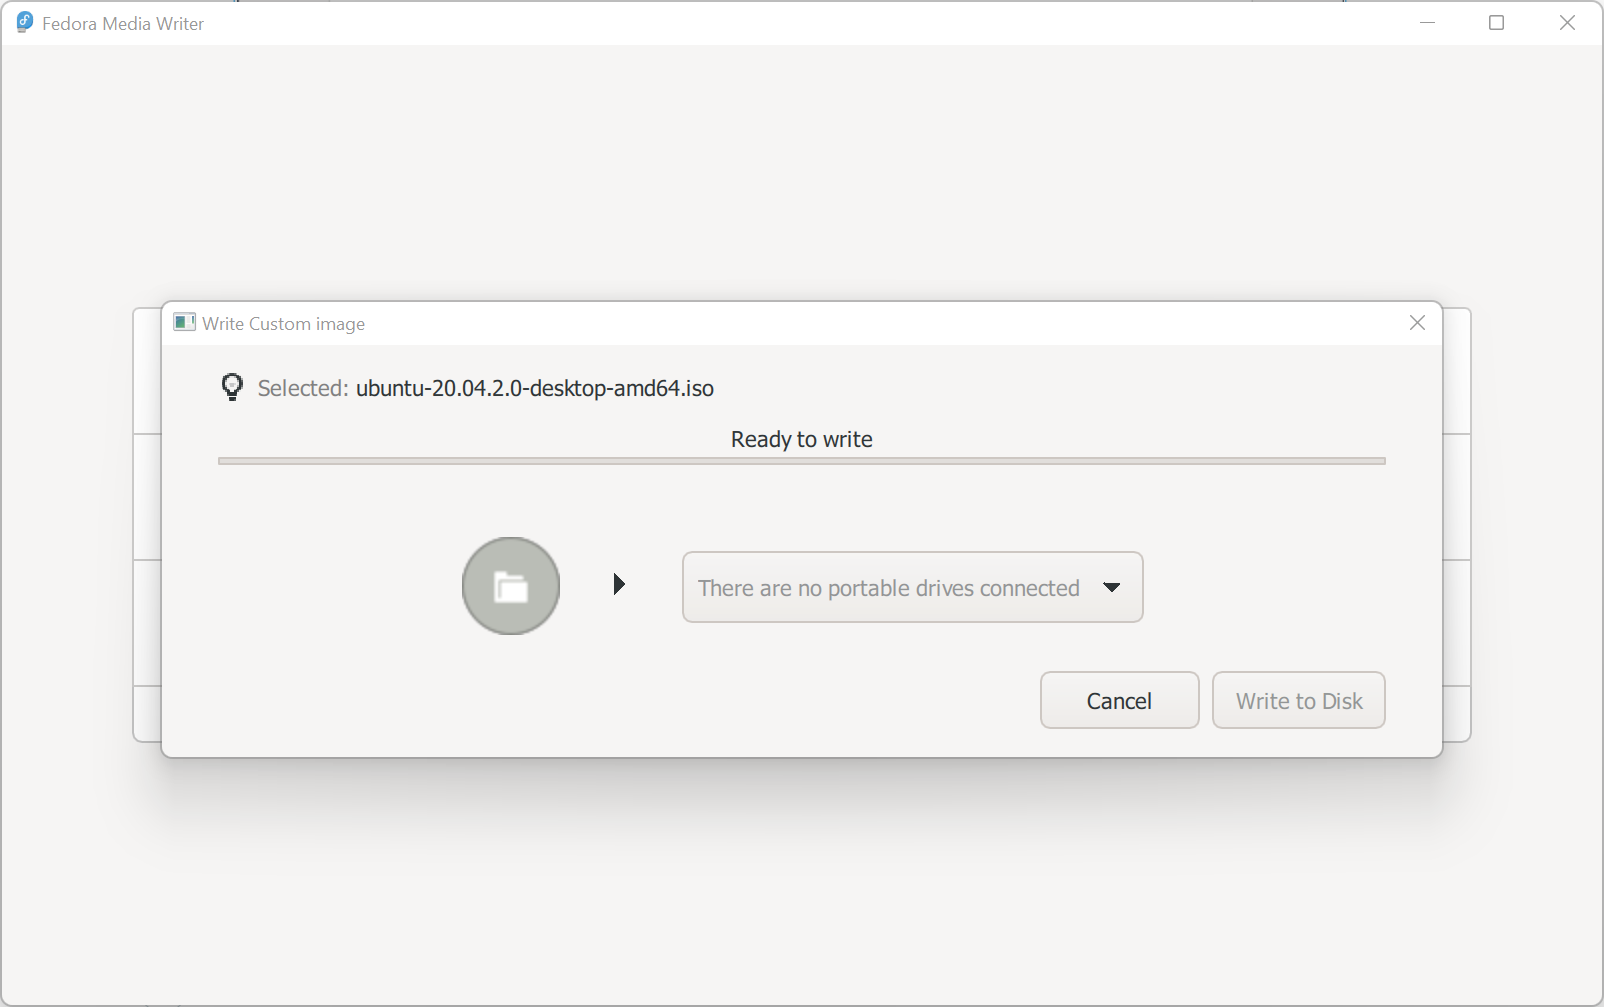
The «Write to Disk» button is grayed out because there are no USB drives attached to the computer. Connect your USB drive and the button should turn bright red.
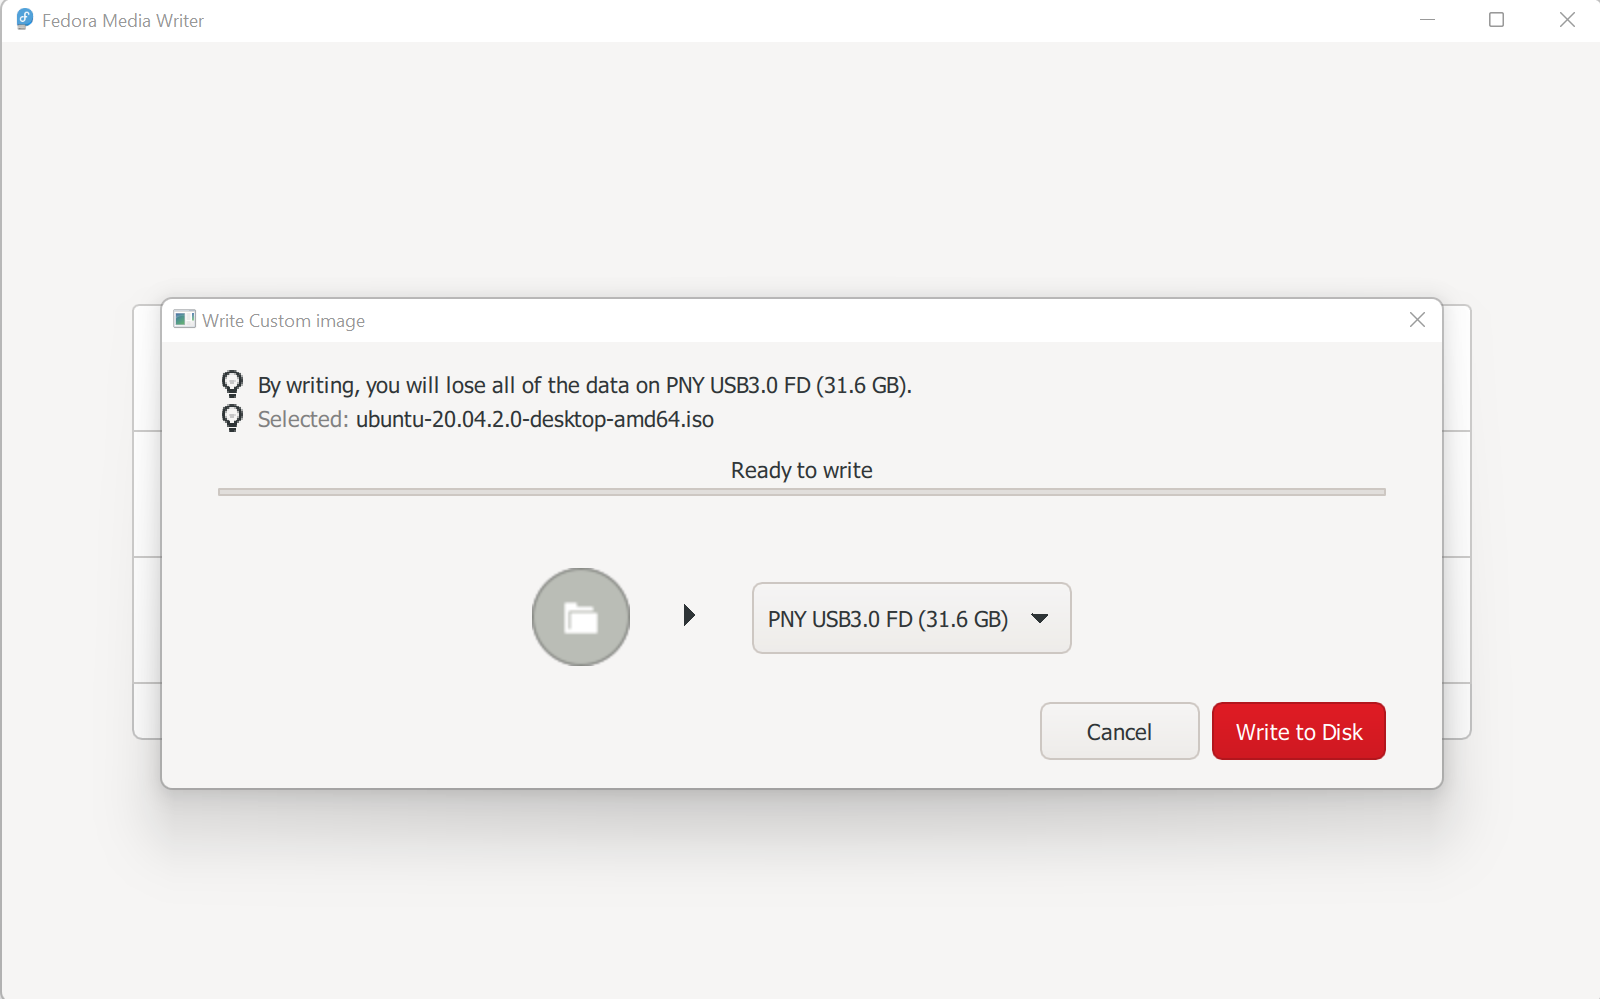
Recheck that the correct USB drive is selected in the dropdown and hit the «Write to Disk» button. Depending on your machine’s transfer rate, this process may take a few minutes. Once it’s done, disconnect the USB drive and set it aside. You’ll need it soon.
How to Prepare Your Computer for Installing Linux
Again, it’s not uncommon to find people who have failed to boot from a Linux USB drive. This can happen if you haven’t configured your computer properly.
To do so, go to your Control Panel. Not the new Settings application, but the OG Control Panel.
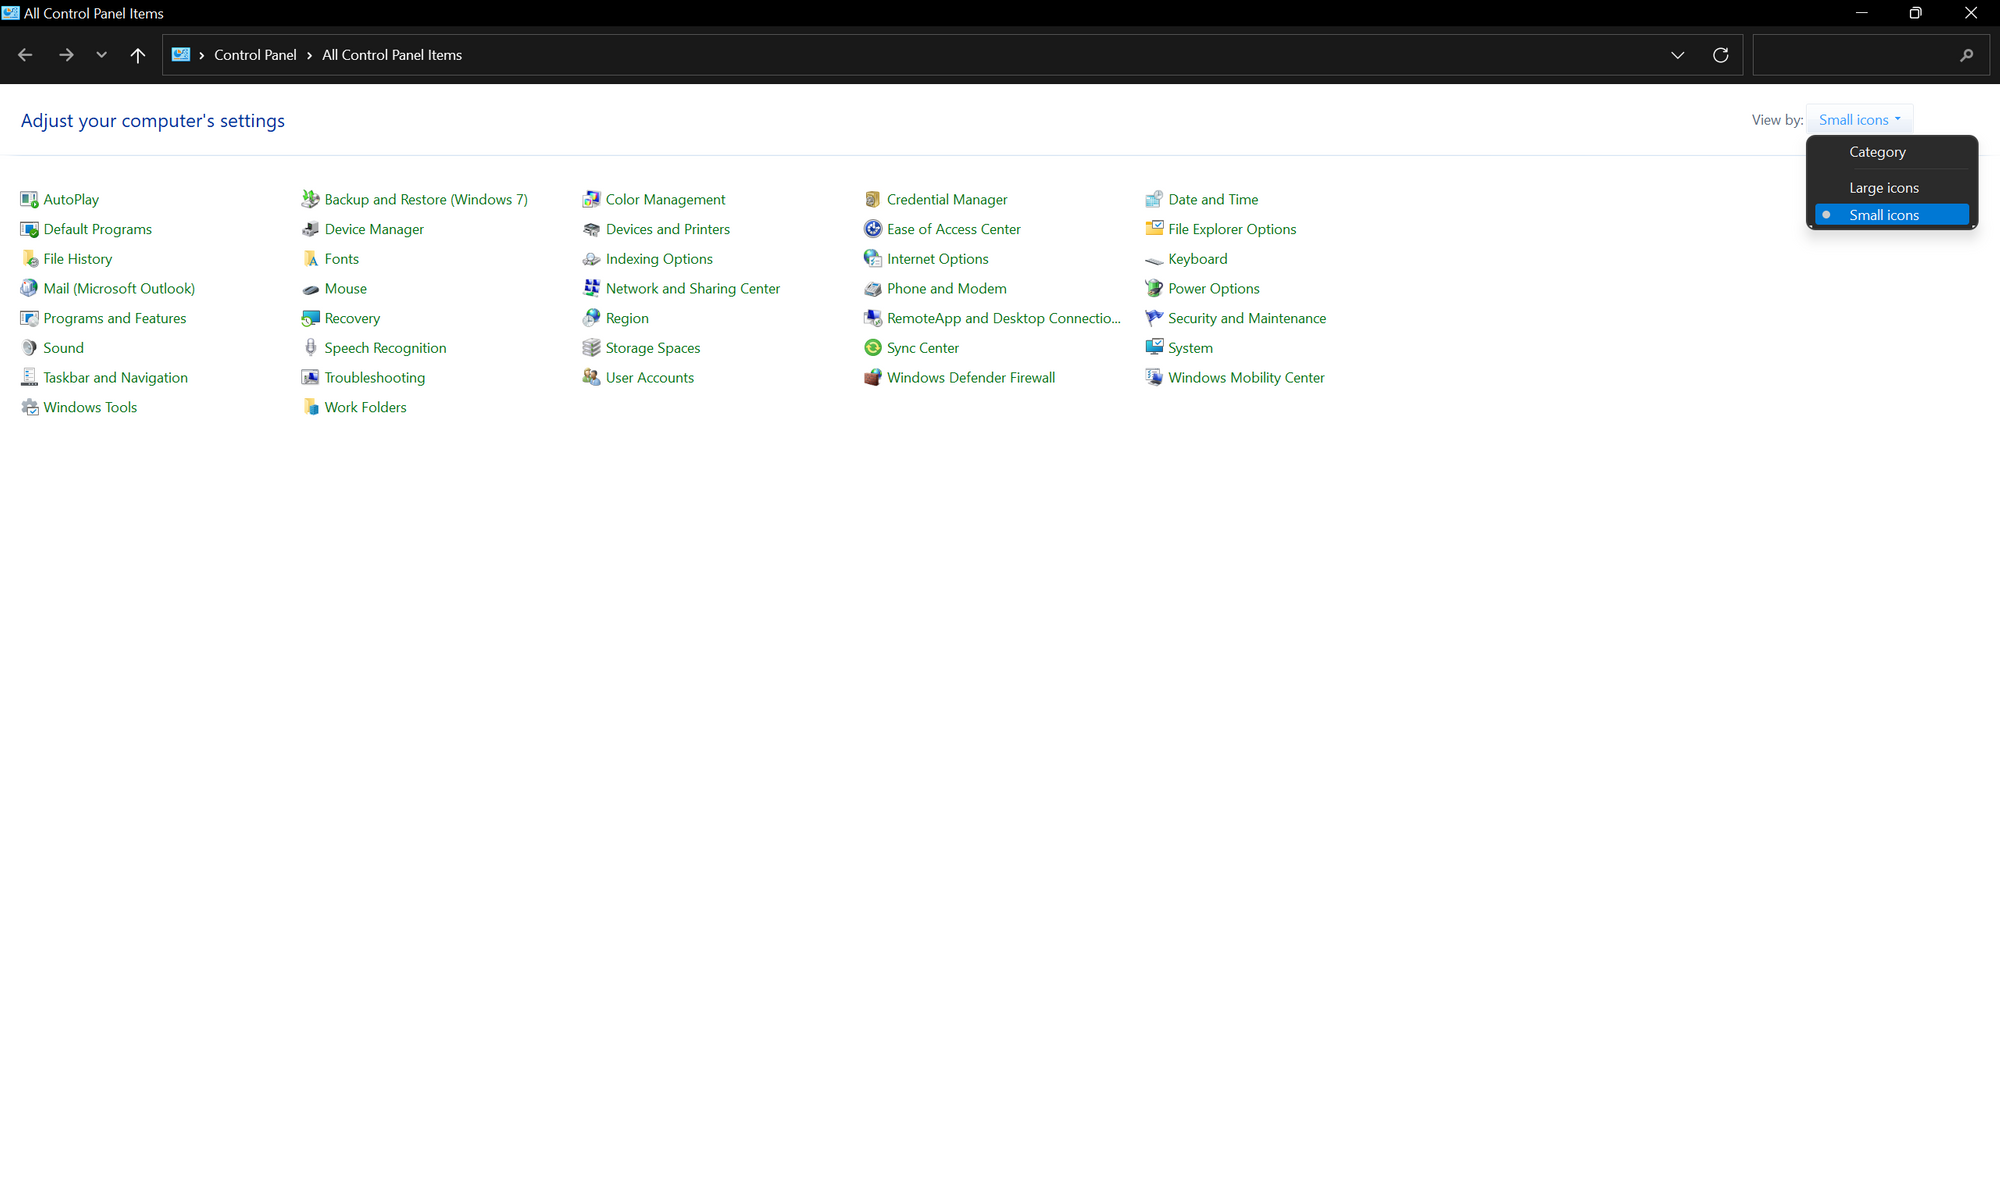
Make sure Control Panel is either on «Small icons» or «Large icons» mode and not on the «Category mode». Now go to «Power Options» and from the left side-bar, click on «Choose what the power buttons do».
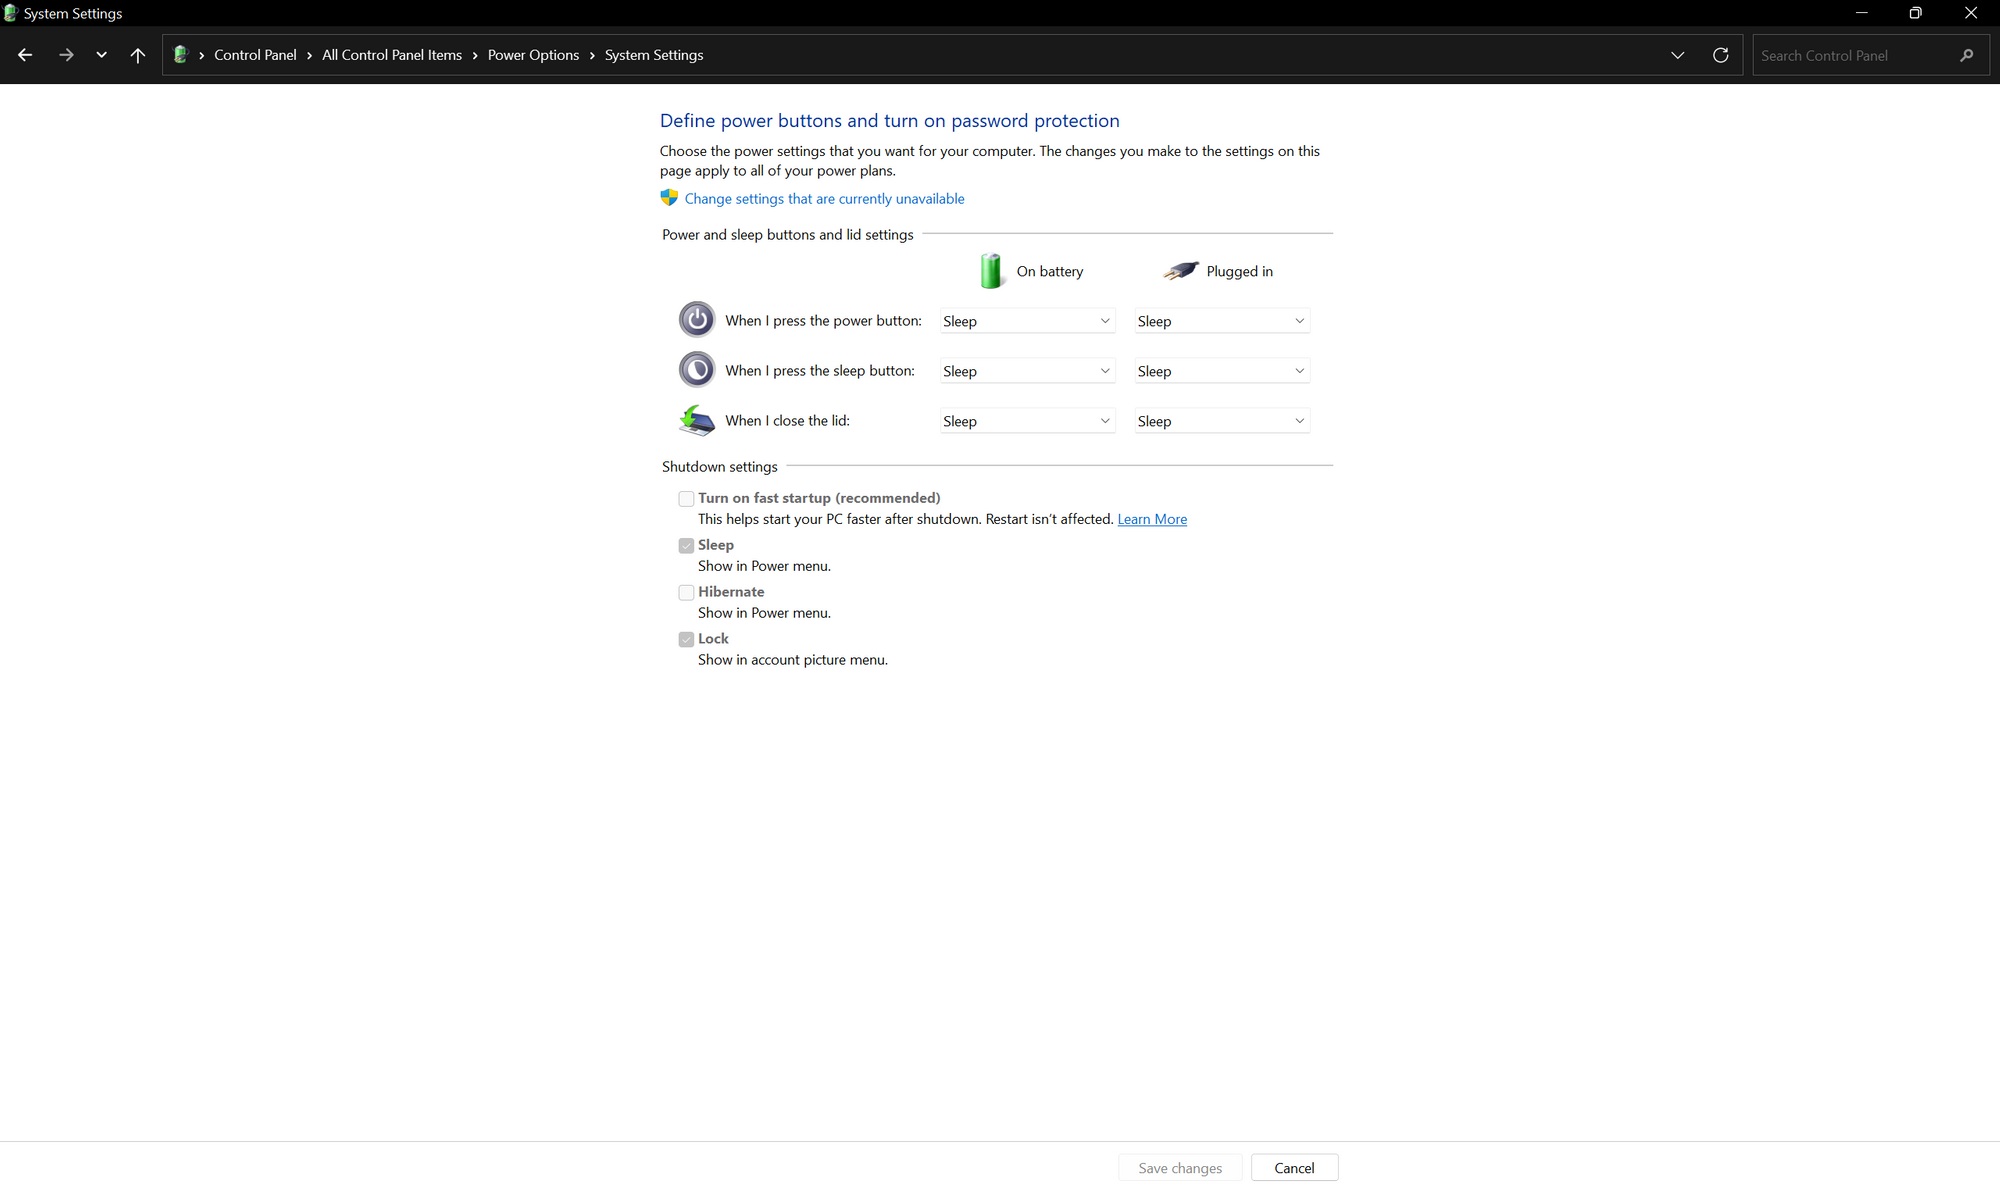
Click on the Change settings that are currently unavailable link and uncheck the «Turn on fast startup (recommended)» option and hit «Save changes».
According to Walter Glenn’s article,
Fast Startup combines elements of a cold shutdown and the hibernate feature. When you shut down your computer with Fast Startup enabled, Windows closes all applications and logs off all users, just as in a normal cold shutdown.
At this point, Windows is in a state very similar to when it’s freshly booted up: No users have logged in and started programs, but the Windows kernel is loaded and the system session is running.
Windows then alerts device drivers that support it to prepare for hibernation, saves the current system state to the hibernation file, and turns off the computer.
When you start the computer again, Windows does not have to reload the kernel, drivers, and system state individually. Instead, it just refreshes your RAM with the loaded image from the hibernation file and delivers you to the login screen. This technique can shave considerable time off your start up.
I know this sounds like a nice to have feature, but the problem is, if you keep fast startup enabled in a dual boot system, Linux will be unable to use any of the drives shared between the two operating systems because they’re hibernated and held by Windows.
Next, boot into your motherboard’s UEFI configuration screen. Depending on your motherboard or laptop brand, the key can change but in most cases pressing the «Del» key should get you in.
Once you’re there, you’ll have to change one setting in particular:
- Turn off secure boot – this is one of the features of UEFI that helps prevent attacks and malware during boot. Disabling it is not strictly necessary but depending on the distribution you’ve chosen you may or may not face issues during installation. Disable it to be safe.
Save the updated settings and boot back to Windows. Now it’s time to prepare some disk space for Linux to fit into.
How to Create Additional Partitions for Installing Linux
Now it’s time to make some room for the new OS. Based on the state of your HDD or SSD, it can either be very straightforward or quite tricky.
Let me explain what we’re going to do. There is a utility built into Windows called «Disk Management» that’s useful when you want to mess around with your partitions.
You can use this to squeeze out some space out of your existing partitions. To do so, open Disk Management by searching for it in the start menu.
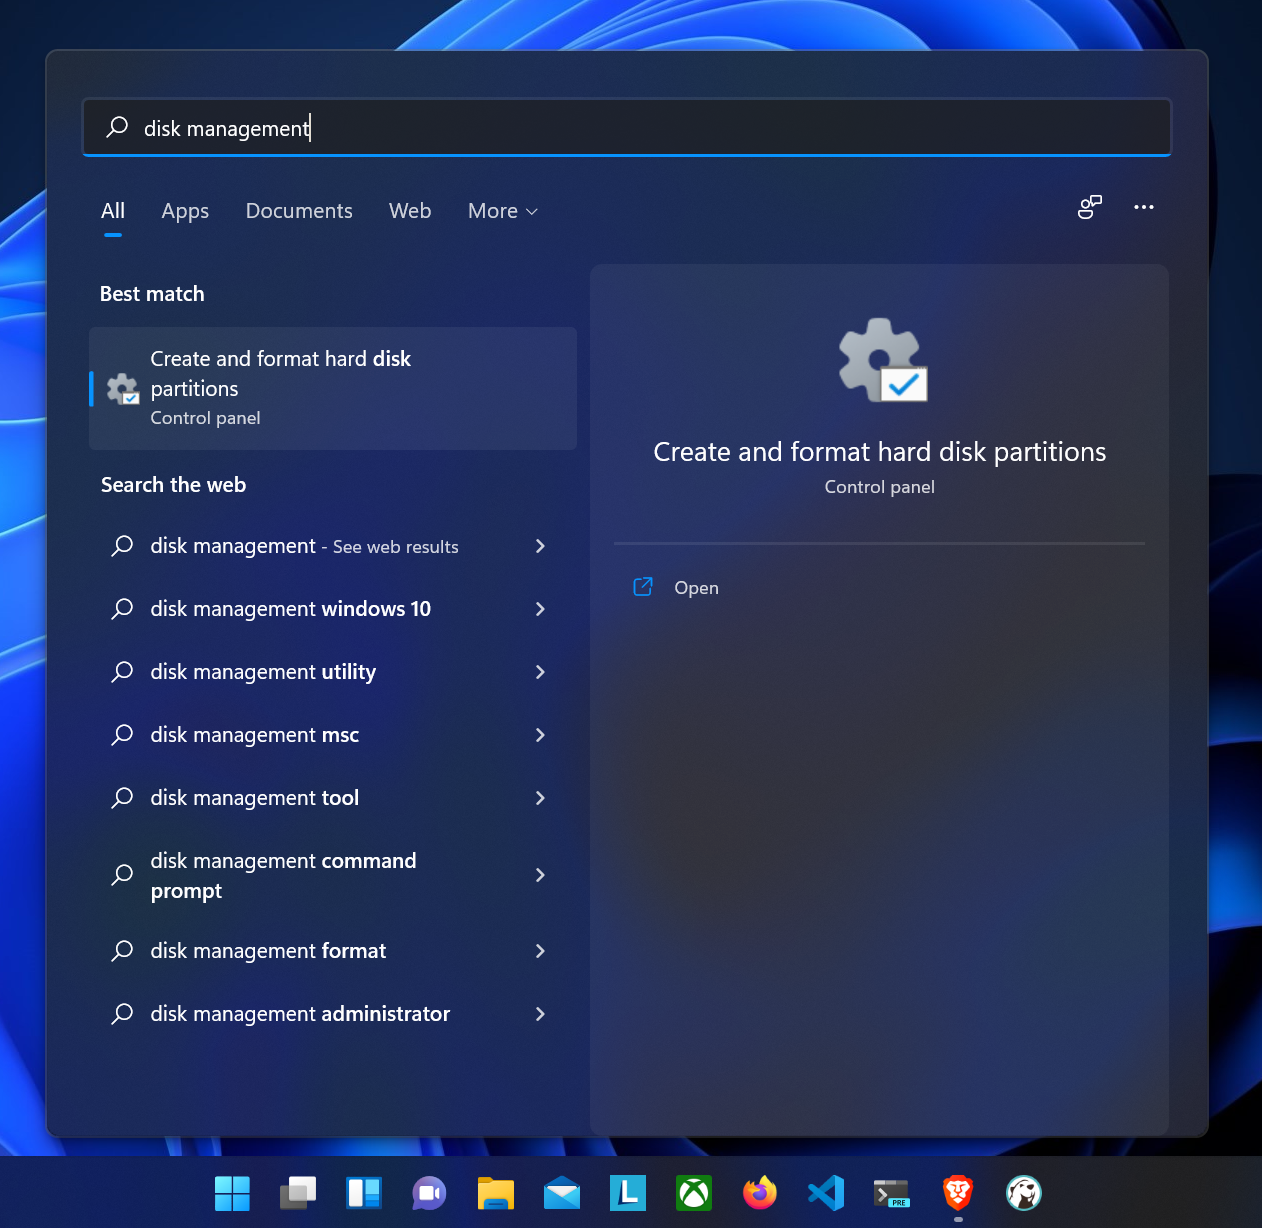
Keep in mind that it may pop up as «Create and format hard disk partitions» instead of Disk Management. Fire it up and have a good look at its user interface:
This screenshot is from one of my machines that doesn’t have Linux installed. I’ll use this device as the guinea pig for this article. It has a 512GB NVME SSD and 8GB of RAM.
The user interface is divided into two parts. The top one is a list of all your partitions and the bottom part has all the physical disks connected to your computer listed vertically.
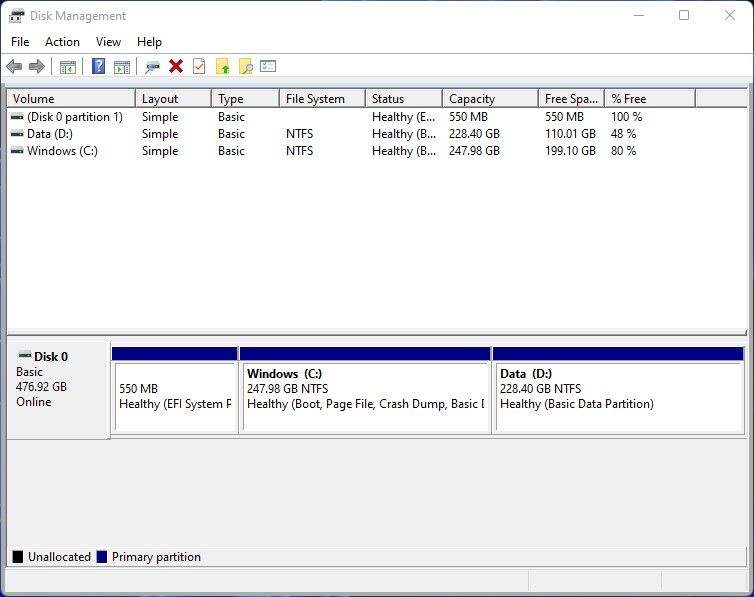
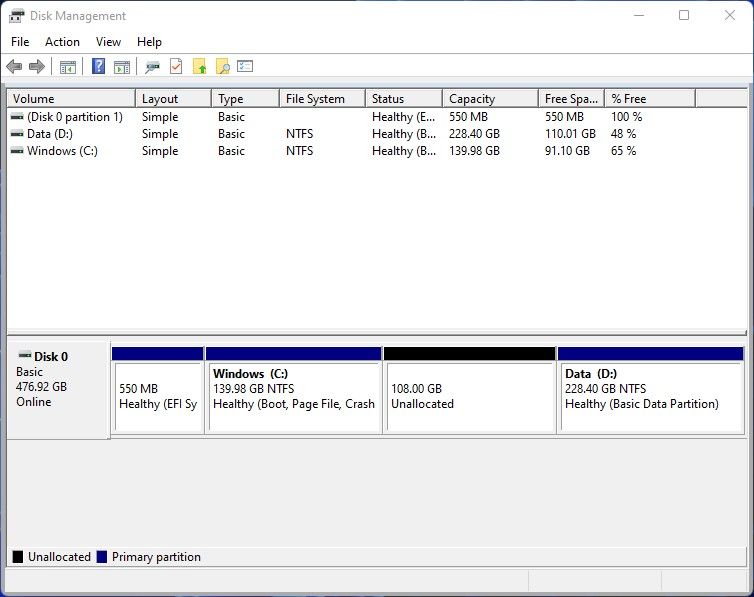
The below screenshot is from my desktop workstation that has a 250GB NVME SSD and a 1TB HDD. I have both Windows and Linux installed on the second disk. So if you have multiple disks on your machine as well, I would suggest you install the OS on the disk that contains the EFI partition.

If you look at the beginning of Disk 1, that 550MB FAT32 partition is the EFI. On your machine, it may be much smaller.
Let’s get back to our guinea pig device. As you can see from the screenshot, the Windows (C:) partition is almost 250GB. I’ll cut off 108GB from this partition.
- 100GB for root
- 8GB for swap
In Linux, the root directory contains all other directories and files on the system. When your RAM gets full, Linux moves the inactive pages from memory to the swap space. Having a swap space is not mandatory but it’s good to have.
There is no hard and fast rule for determining the swap space. The recommended size for swap when you have a 4GB-8GB RAM is 2 times that size, and for 8GB-16GB is 1.5 times that size. Considering I don’t do any memory intensive tasks on this laptop, I will break the rule here.
To cut off some space from your desired partition, right click on it from the bottom part and click on «Shrink». Once you do that, Disk Management will start calculating the amount available for shrinking.
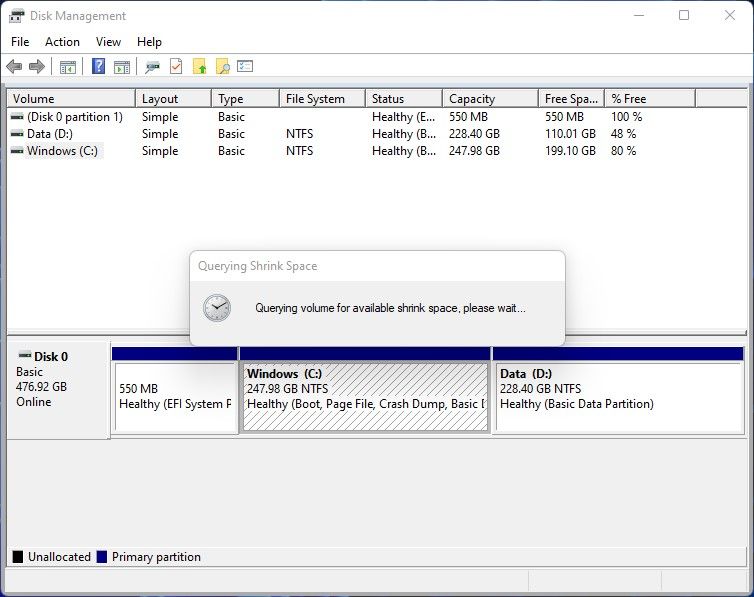
You may think that the entire free space of a partition should be shrinkable, but that’s not true. Sometimes there are unmovable files scattered around your partition that may prevent you from using the full free space. In those cases, use a tool like Defraggler to optimize your drive.
After Disk Management has finished querying the partition, you’ll see the following window:

As you can see, I have 160311MB of space available to shrink. Dividing the value by 1024 will give you the size in gigabytes which in my case is around 156GB.
But I want to shrink my partition by 108GB. Multiplying this value by 1024 gives the value in megabytes of 110592MB.
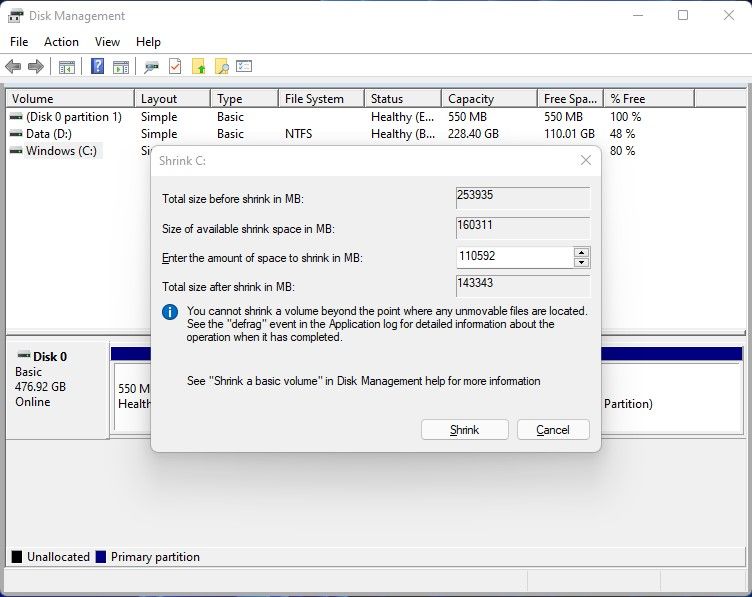
Once you have your desired size calculated, hit the «Shrink» button. The shrinking process doesn’t take that long. Once the process is done the bottom part of the user interface will update.
As you can see, I now have 108GB of unallocated space. To be honest, this is enough for proceeding to the next step. But to make your life easier, I would suggest that you create two RAW partitions before going forward.
To do so, right click on the unallocated space and click on the «New Simple Volume» option. A new wizard window will show up. Press the «Next» button and on the next step, the wizard will ask about the new partition’s size:
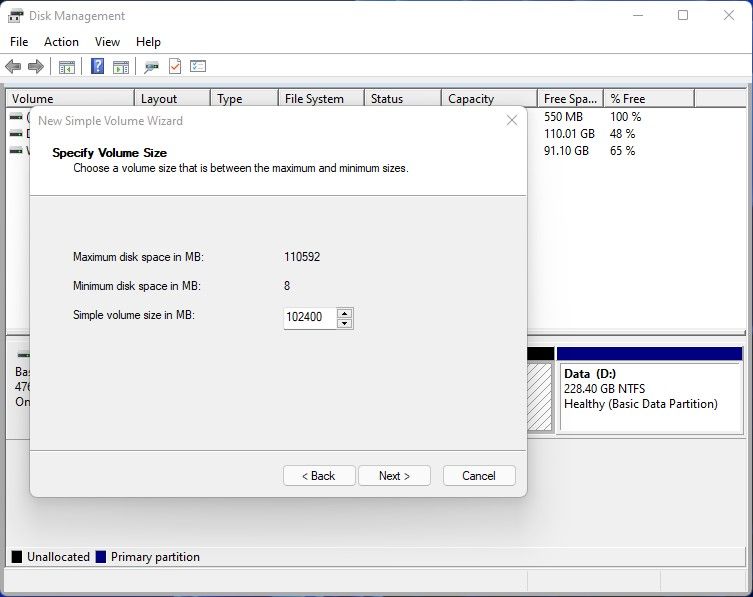
I want to create the 100GB root partition. Multiplying that value by 1024 gives the value in megabytes which is 102400MB. Once you have the size calculated, hit «Next».
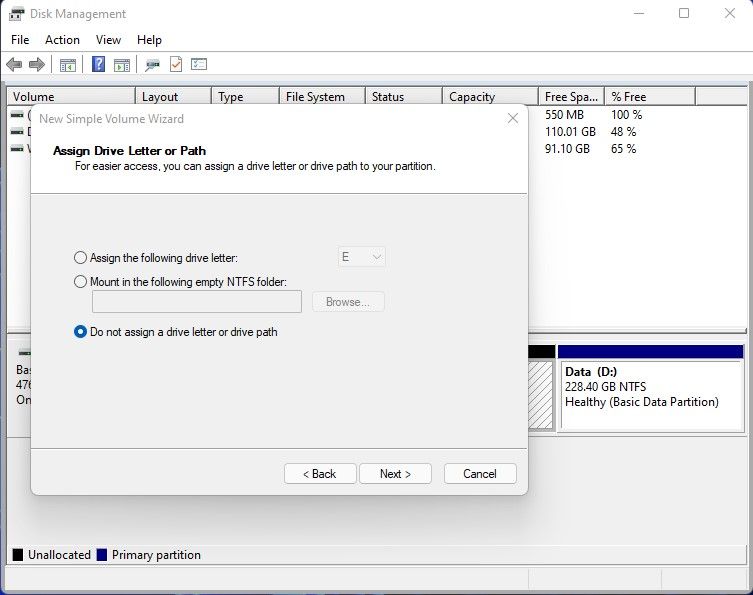
In the next step, the wizard will ask you about the drive letter. Choose «Do not assign a drive letter or drive path» and hit «Next».
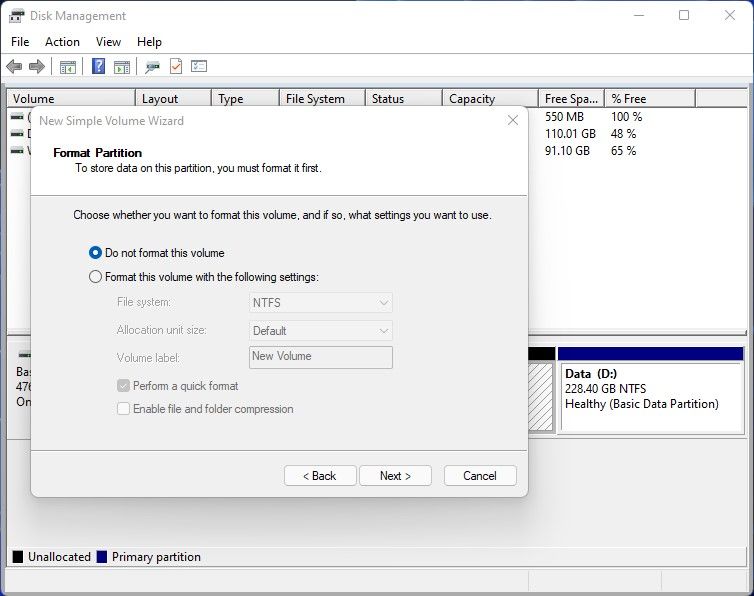
In this step, select the «Do not format this volume» option and hit «Next». Finally hit finish on the last step. Follow the same process for creating your swap partition.

I now have a 100GB RAW partition for the Linux root and a 8GB RAW partition for swap. Close the disk management tool and grab another mug of coffee or tea or at least water because we’re going deeper into the rabbit hole.
How to Install Linux Alongside Windows
Okay everyone, it’s getting real now. We’re going to do it. But first, you’ll have to figure out which key to use to get into your boot menu.
On the device I’m using, pressing the F2 button takes me to the UEFI configuration screen. From there, pressing F8 takes me to the boot menu. So make sure you’ve done the research for your device.
Some tutorials may instruct you to change the boot order from your UEFI configuration screen, but I don’t recommend doing that. The SSD or HDD that contains your bootloader should always be on the top.
Now connect the bootable USB device that you set aside on the first section and reboot your computer into the boot menu. From the boot menu, select the bootable USB drive and hit enter.
The GNU GRUB menu will appear. Pick the first one that says «Ubuntu». Wait until the file integrity check finishes or you can just skip it by hitting «Ctrl + C» on your keyboard.
You’ll hear a beautiful chime and with that, the majestic Ubuntu installer will show up:
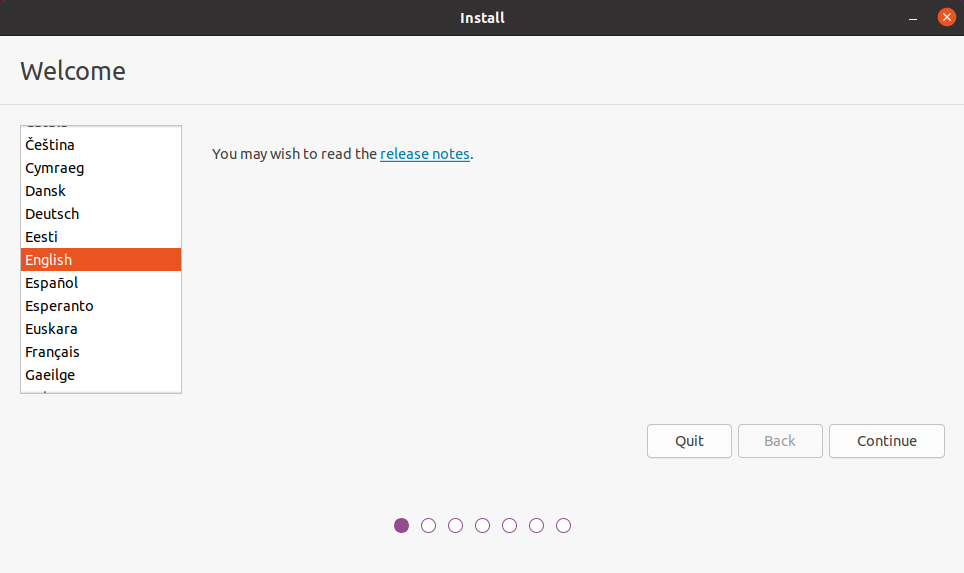
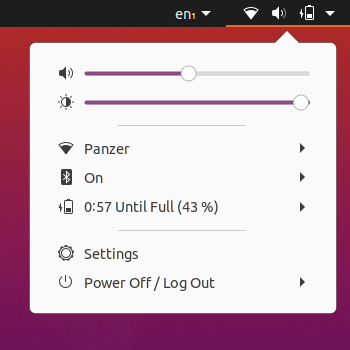
Before you hit the «Continue» button, I would suggest that you get connected to the internet. If you’re using an ethernet cable then you should be connected already. But if you’re using wireless, then check the top right corner of your screen for the Wifi icon:
Once you’re connected, hit the «Continue» button on the installer:
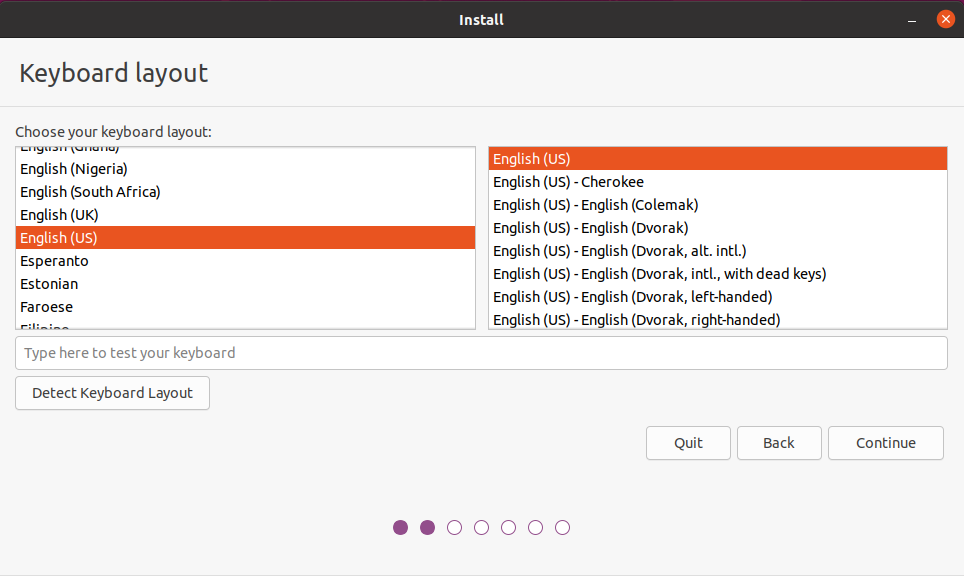
Pick the correct keyboard layout for yourself and hit «Continue».
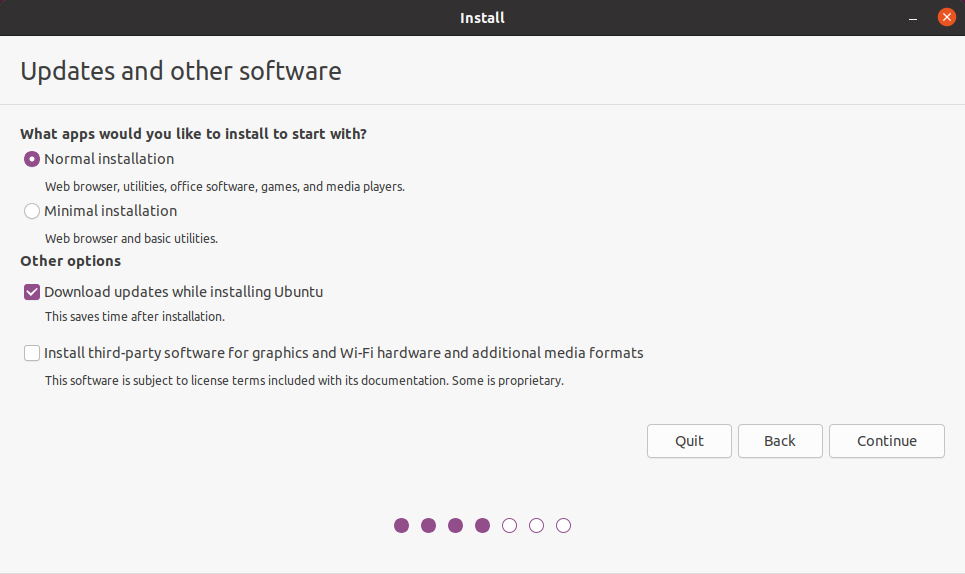
The «Normal installation» will give you a bunch of useful software and games from the get go, whereas the «Minimal installation» will give you the essentials only.
Keep the «Download updates while installing Ubuntu» option checked. This will download updated package files from the internet during installation.
The third option needs some explanation. Assume that you’re using an NVIDIA GPU. When Ubuntu detects that GPU, Ubuntu will load the open-source drivers for NVIDIA GPUs known as «nouveau».
If you check the «Install third-party software for graphics and Wi-Fi hardware and additional media formats» option, NVIDIA will attempt to install proprietary drivers provided by NVIDIA itself. It’ll also install codecs for proprietary media formats such as MPEG.
This device I’m using has an AMD GPU and uses the open-source «amdgpu» driver. I’ll leave this unchecked considering I can install the codecs as necessary by myself. Do what you prefer and hit the «Continue» button.
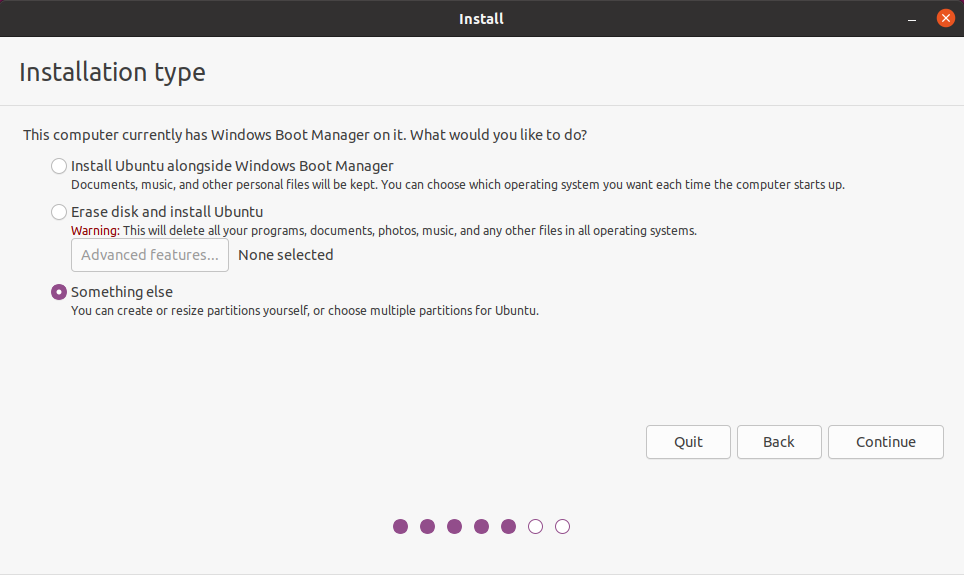
Okay this step needs attention. The Ubuntu installer is smart enough to detect whether you have other OSes installed on your machine or not. If yes, the installer will offer you the option to install Ubuntu alongside them. Don’t pick that option. I repeat, don’t pick that option.
Choose «Something else» and hit the «Continue» button.
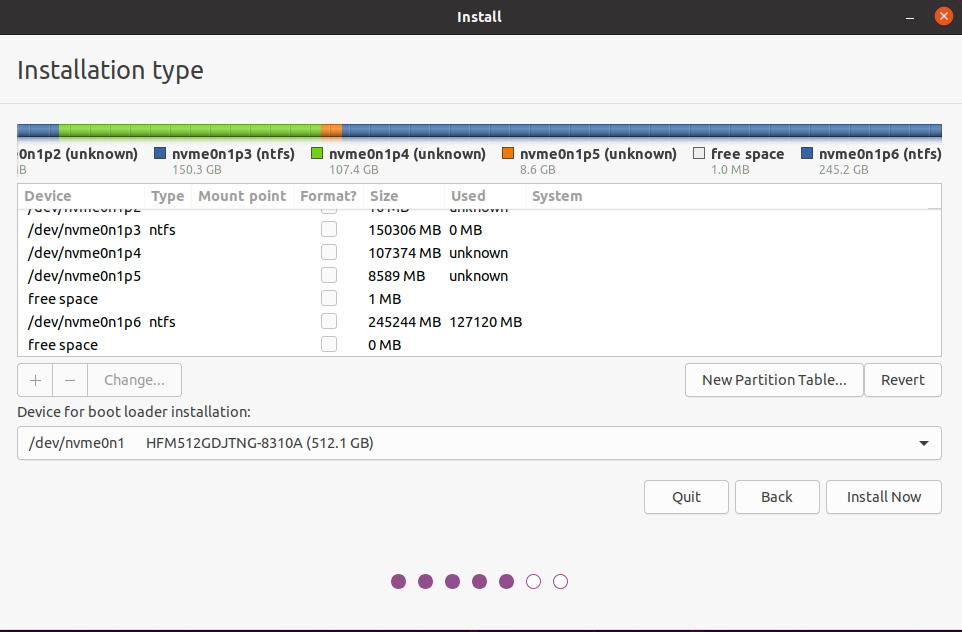
This part can be a bit tricky. This is why I instructed you to create the partition from Windows instead of leaving the space unallocated. If you had left it unallocated, figuring out which part of the disk you should use would have become much more difficult.
At the top you can see a multi-colored line along with legends for which color represents which partition. Find out the two partitions you created from Windows.
In my machine, «nvme0n1p4» and «nvme0n1p5» are the ones. Now from the list, find the one you created for the root (nvme0n1p4 in my case) and double click on it:
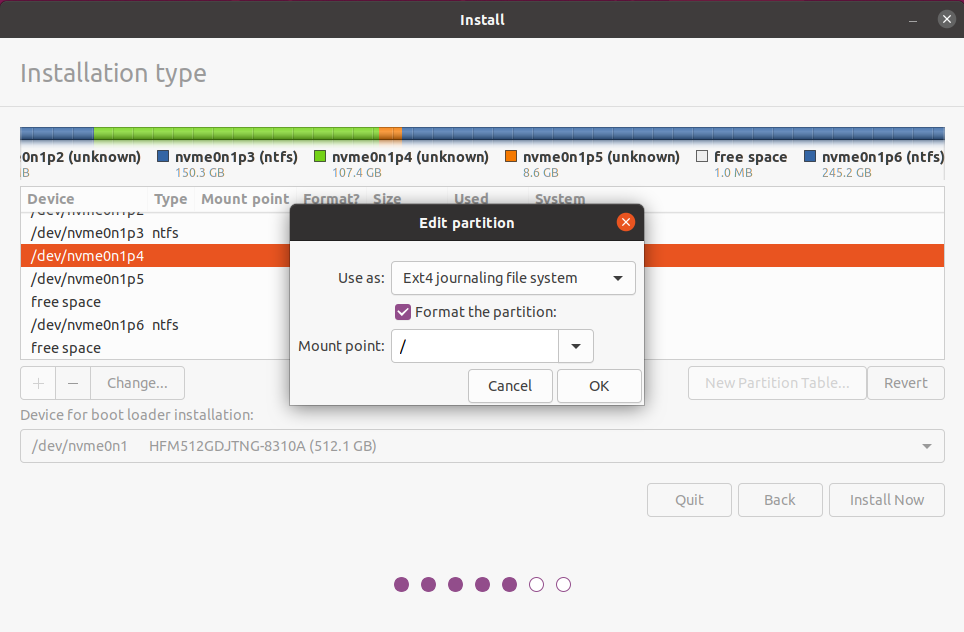
Choose «Ext4 journaling file system» from the «Use as» dropdown and «/» as the «Mount point» dropdown. According to the The Linux Information Project:
A mount point is a directory (typically an empty one) in the currently accessible filesystem on which an additional filesystem is mounted (i.e., logically attached).
Hit the «OK» button. Next double click on the partition you created for the swap space:
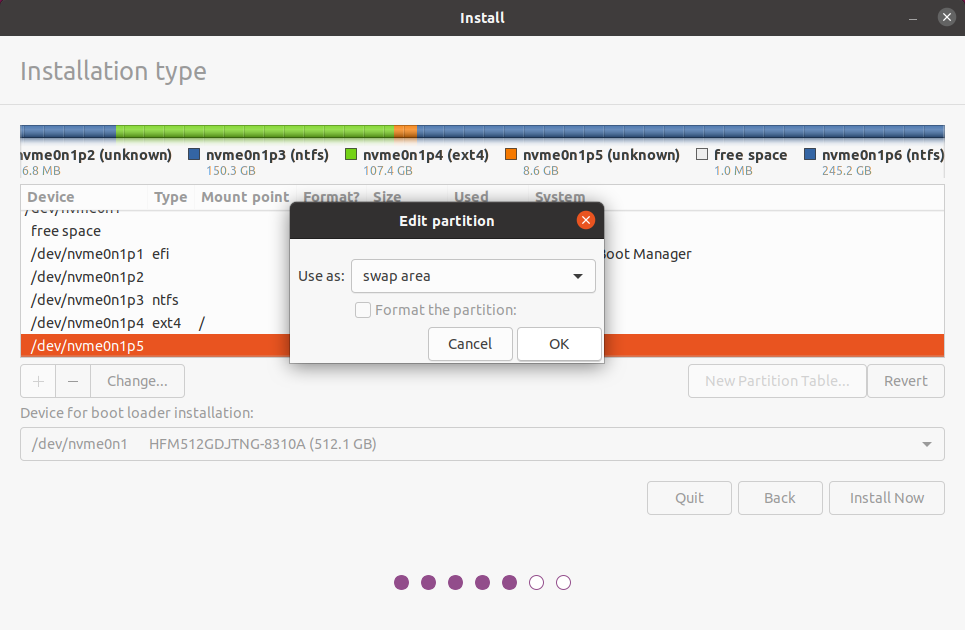
Choose «swap area» from the «Use as» dropdown menu and hit the «OK» button. There is one more partition to configure. That is the EFI partition. Scroll through the list and find the FAT32 partition.
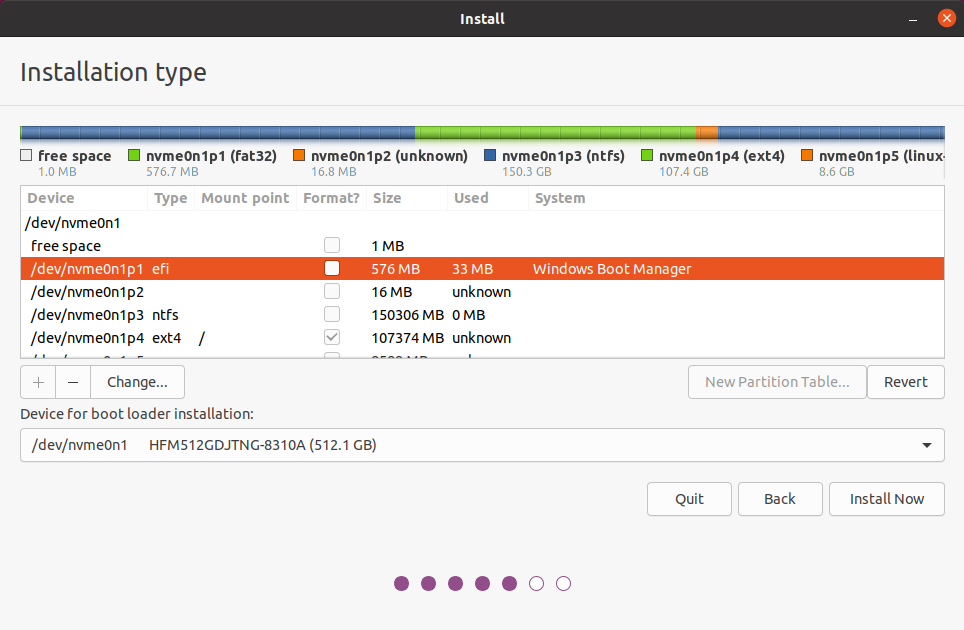
On my machine, the «nvme0n1p1» is the EFI partition. Double click on it:
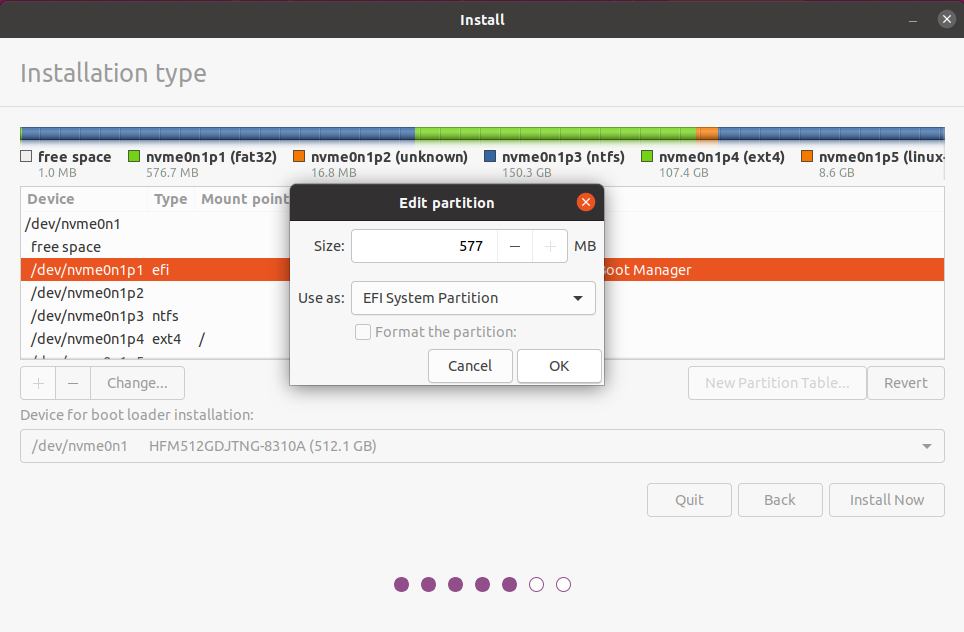
Make sure «EFI System Partition» is selected from the «Use as» dropdown menu. This is the partition that’ll contain your bootloader. Make sure you’re not formatting this partition. Hit the «OK» button.
Also, the default mount point for the EFI partition is «/boot/efi». Some distributions like Fedora will require you to write this mount point manually. So make sure you’re putting the correct mount point.
Recheck the partition configuration once again and if everything looks fine, hit the «Install Now» button.

The installer will ask you about your time zone. I live in Dhaka, Bangladesh so that’s what I’ve chosen. Hit the «Continue» button.
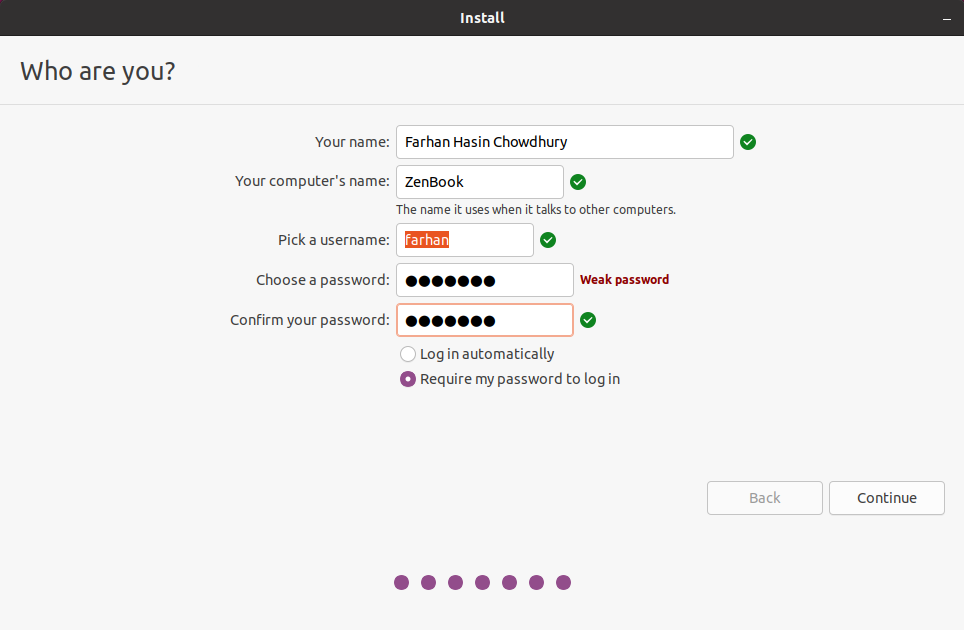
Fill out all the information as you see fit and hit the «Continue» button.
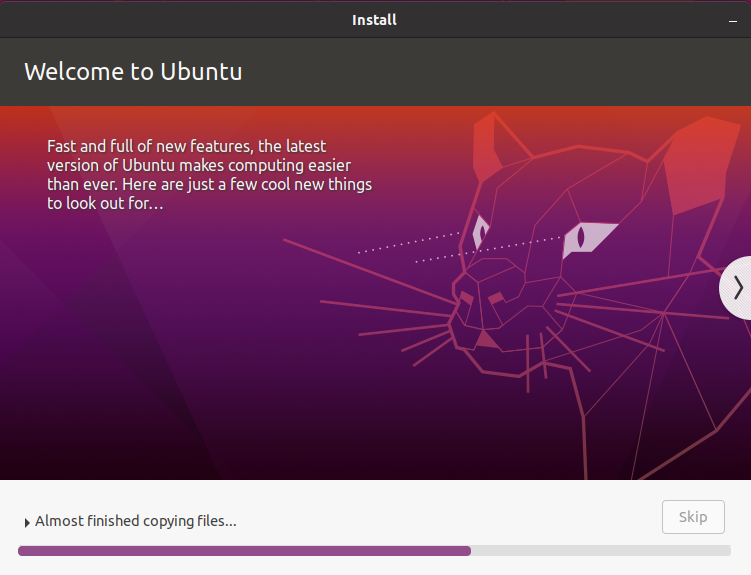
The installation process shouldn’t take long. Back when I was a kid, I loved looking at this slideshow.
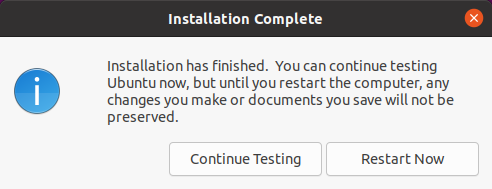
Once the installation is done you can either continue testing or restart. If you choose to restart, Ubuntu will instruct you to disconnect the USB drive and hit Enter.
The machine will reboot and the GRUB menu will show up again. Take a look at the list, and you’ll see both Ubuntu and Windows Boot Manager on the menu. Boot into Ubuntu because you have one last thing to do.
How to Sync the Time Between Windows and Linux
This is one of the common problems that people with a dual boot system face. When you boot into Windows and then boot into Linux, you’ll find Linux’s clock all messed up. The same thing will happen if you first boot into Linux and then boot into Windows.
Let me explain why this happens. Your computer (or rather every computer in the world) has two clocks. One is the system clock that lives within the OS, and the other is the hardware clock that lives in your motherboard and keeps track of time even when your computer is not running.
The problem is that Windows assumes that your hardware clock is running in your local time and Linux assumes that your hardware clock is running in UTC time and applies an offset according to your location.
The easiest way to fix this issue is to make your Linux distribution use local time like Windows does. To do so, execute the following command in the Linux terminal:
timedatectl set-local-rtc 1 --adjust-system-clock
Now restart your computer into Windows, sync the system clock and go back to Linux. The time should not be messed up now.
How to Remove Linux From a Dual Boot System
Say for some reason you didn’t like your time with Linux and want to get rid of it. This would be sad, but life is hard, ain’t it?
Removing Linux from a dual boot system is a two step process:
- Getting rid of the GRUB bootloader
- Getting rid of the Linux partitions
To get rid of the GRUB bootloader you’ll have to remove the corresponding files from the EFI partition. The problem is that the partition is hidden by default.
To make if accessible you’ll have to use the diskpart program. It’s a disk management utility like the Disk Management tool but it’s a command line interface.
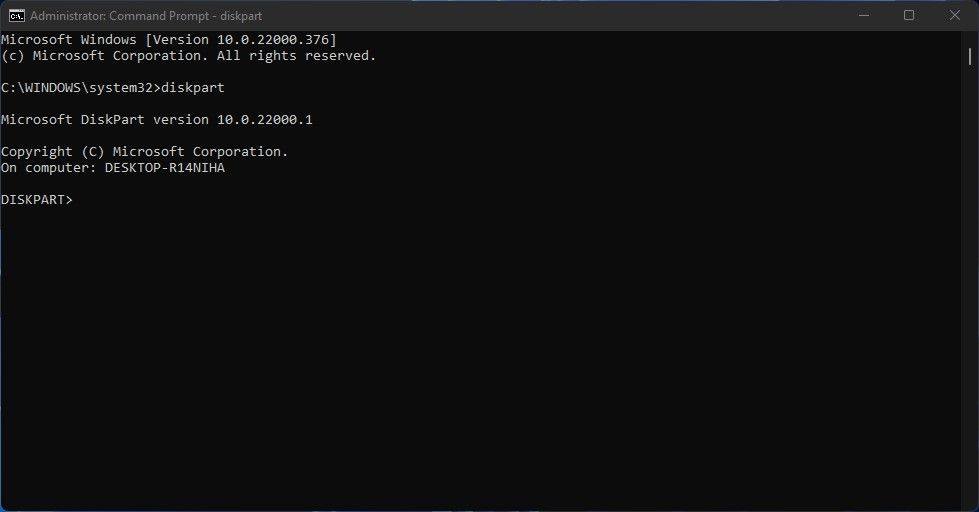
Boot into Windows. From the start menu, open Command Prompt as an administrator. To do so, just search for «cmd» in your start menu and when the Command Prompt shows up, press the «Ctrl + Shift + Enter» key combination.
Now write diskpart in the command prompt window and hit enter to start the program.
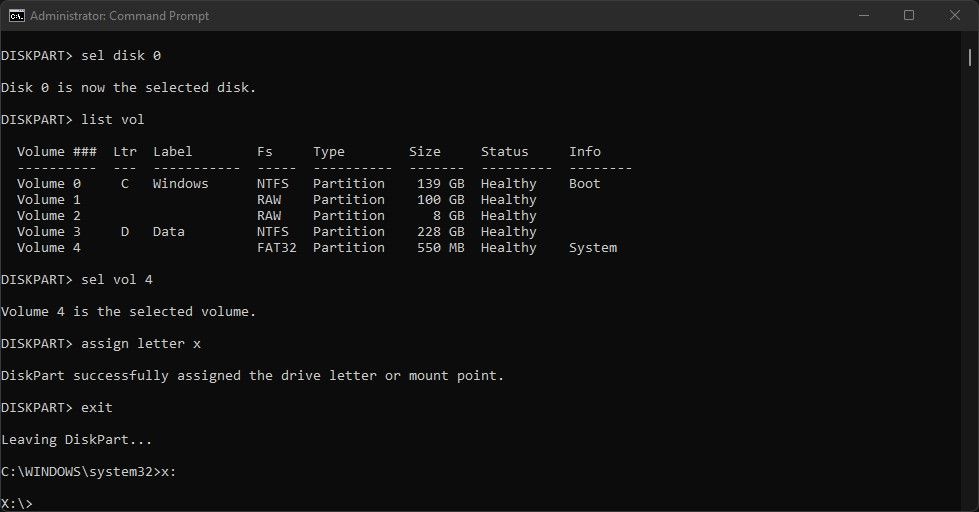
Next, write list disk and hit enter to get a list of all the connected disks:
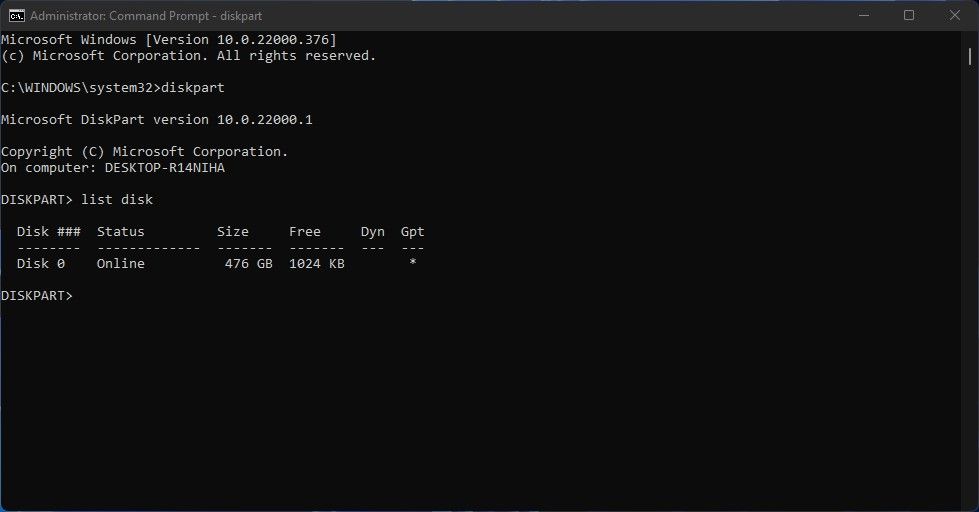
This device has only one physical disk but you may have multiple. Write sel disk <disk number> to select the desired disk.
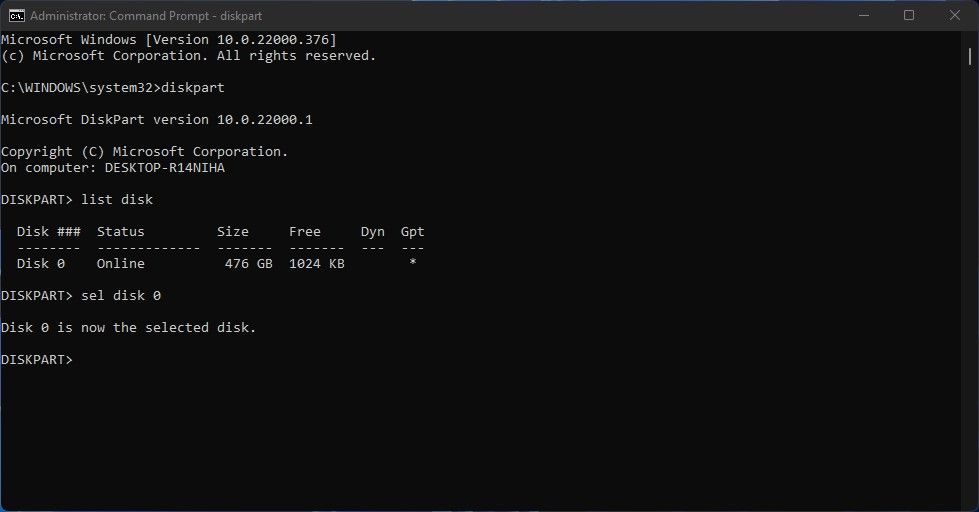
Then write list vol and press enter to list out all the partitions in this disk.
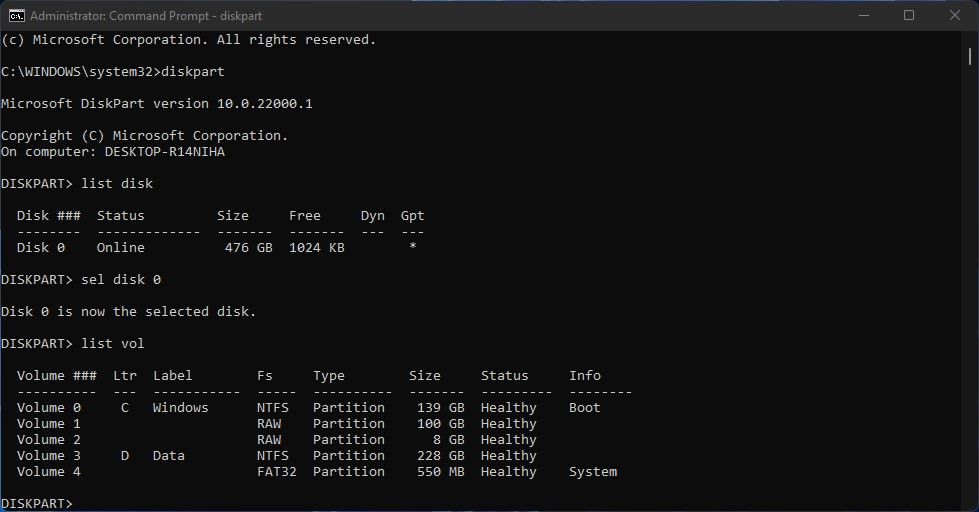
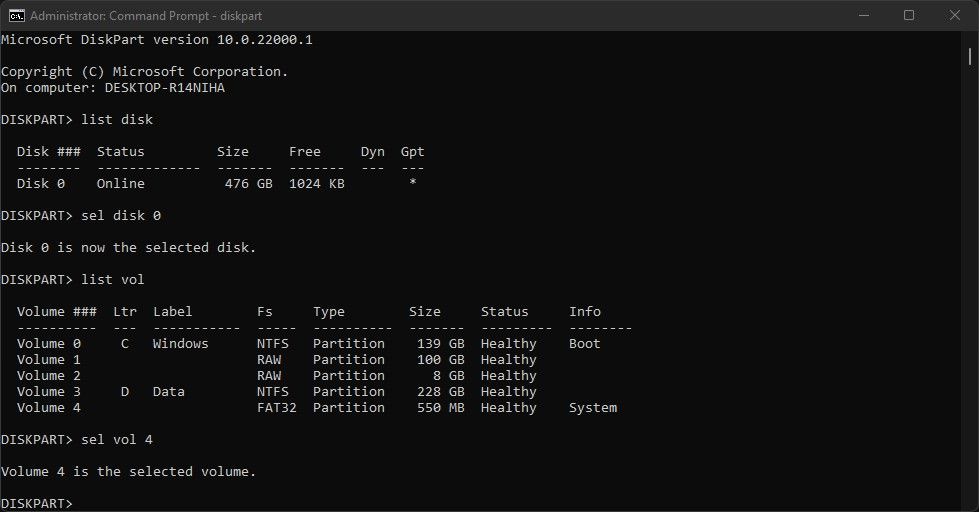
Judging by the size and format, I can say that Volume 4 is the EFI partition. Keep in mind this can be much smaller on your system but it will be always a FAT32 partition. Write sel vol <volume number> to select the desired volume.
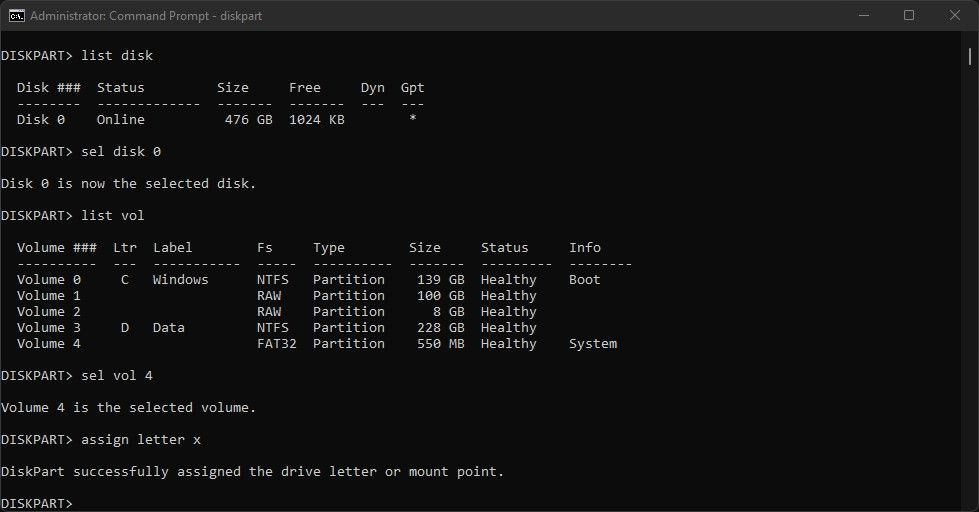
Finally write assign letter x and hit enter to assign the letter x to this partition.
Exit diskpart by writing exit and hitting enter:
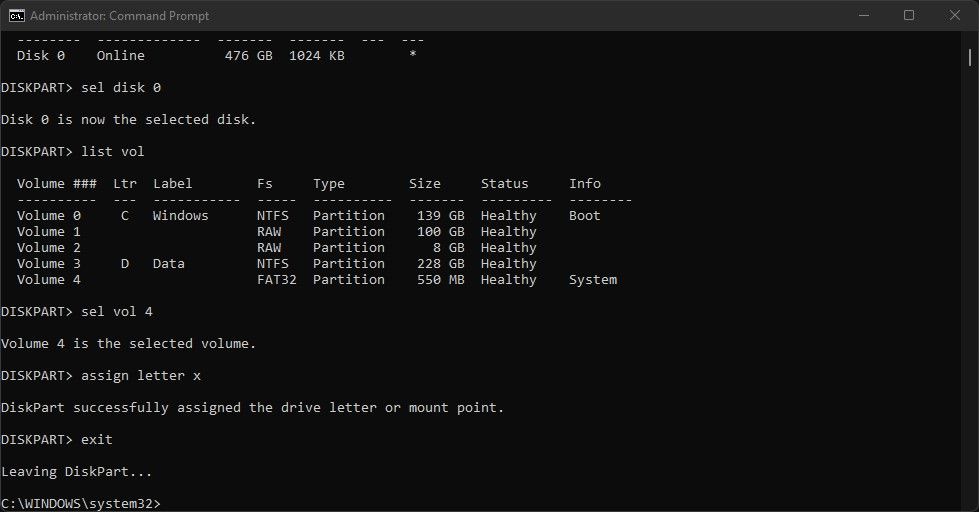
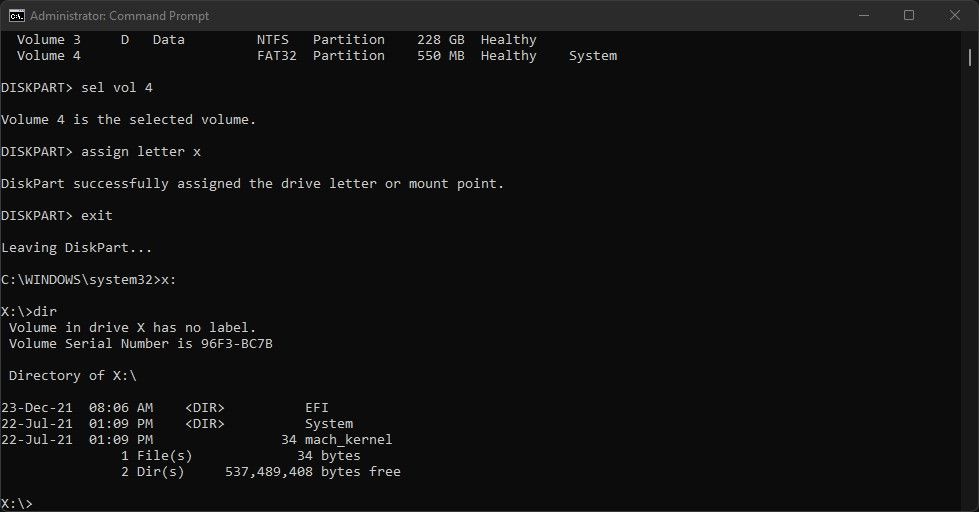
Now the partition has become accessible. From the same command prompt window, go inside the EFI partition by writing x: and hitting enter.
To get a list of all the folders in there, write dir and hit enter.
Now write cd EFI to go inside that EFI folder and write dir once again to list out the contents.
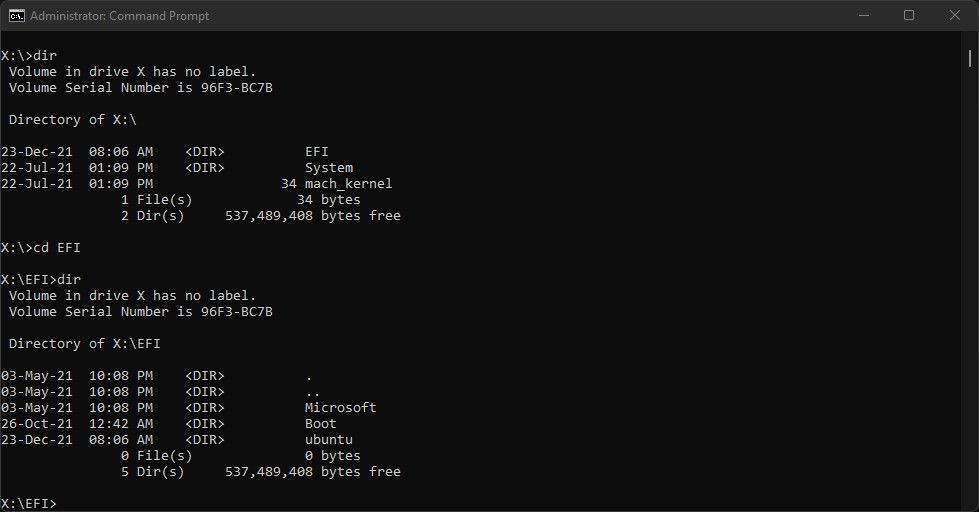
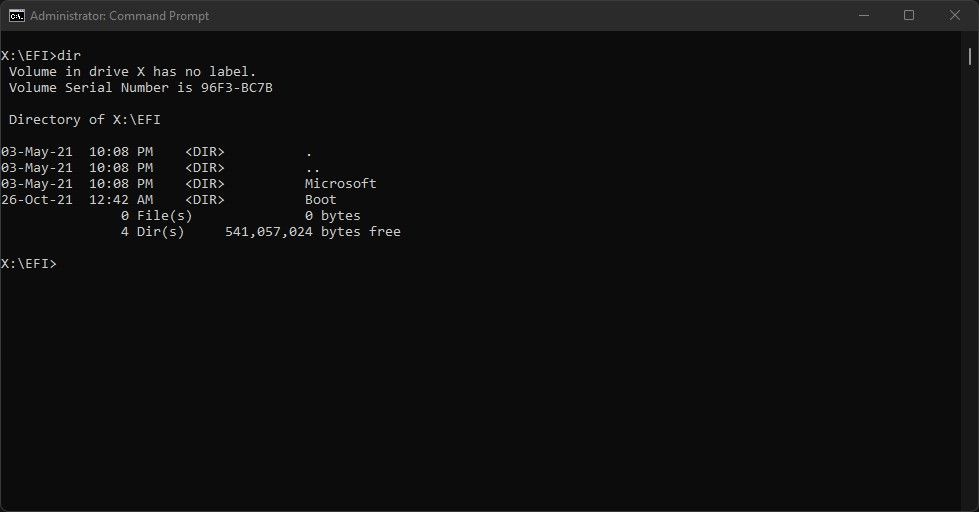
You’ll have to get rid of that ubuntu folder. To do so, write rmdir /s ubuntu and hit enter. Command prompt will ask you whether you’re sure or not. Write Y and hit enter to confirm. Then use dir one last time to make sure it’s gone.
That’s it. Next, open Disk Management once again like you did before and from the bottom part, right click on the Linux oriented partitions and choose «Delete Volume» from the list.
After deleting the partitions, you can either create a new one using the unallocated space or extend the partition on the left of it to dissolve the unallocated space.
Finally reboot your computer and check whether the Ubuntu has gone away from your machine or not.
What About Other Linux Distributions?
The techniques learned in this article is relevant for any Linux distributions out there.
So, whenever you’re dual booting a system, make sure that
- Secure Boot is disabled
- Fast Startup is disabled
And during the installation
- Do not choose any guided/automatic installation type
- Make sure to not format the EFI/ESP partition
- Make sure to mount your partitions properly
As long as you’re sticking to these few rules, you should be good to go.
Just keep in mind that there are some rare cases when a distribution may not use GRUB as a bootloader.
Take the very popular «Pop!_OS» for example. It uses «systemd-boot» as its default bootloader. As a result you’ll have to keep pressing the Space button (or maybe any button on the keyboard) during startup, otherwise the boot menu won’t show up and you’ll boot into Pop!_OS directly.
Another thing that I’ve seen: some motherboards such as my MSI B450 Tomahawk Max, chooses the Windows Boot Manager by default even though I have a working Linux installation. If you see something like this, go into your UEFI configuration screen and look for relevant options.
Conclusion
I would like to thank you from the bottom of my heart for the time you’ve spent reading this article.
I also have a personal blog where I write about random tech stuff, so if you’re interested in something like that, checkout https://farhan.dev. If you have any questions or are confused about anything – or just want to get in touch – I’m available on Twitter and LinkedIn.
Learn to code for free. freeCodeCamp’s open source curriculum has helped more than 40,000 people get jobs as developers. Get started